


 Download code from GitHub
I/O and GUI
In this chapter, we will cover the following recipes:
- Reading images from file
- Simple image transformations—resizing and flipping
- Saving images using lossy and lossless compression
- Showing images in an OpenCV window
- Working with UI elements, such as buttons and trackbars, in an OpenCV window
- Drawing 2D primitives—markers, lines, ellipses, rectangles, and text
- Handling user input from a keyboard
- Making your app interactive through handling user input from a mouse
- Capturing and showing frames from a camera
- Playing frame stream from video
- Obtaining a frame stream properties
- Writing a frame stream into video
- Jumping between frames in video files
Introduction
Computer vision algorithms consume and produce data—they usually take images as an input and generate features of the input, such as contours, points or regions of interest, bounding boxes for objects, or another images. So dealing with the input and output of graphical information is an essential part of any computer vision algorithm. This means not only reading and saving images, but also displaying them with additional information about their features.
In this chapter, we will cover basic OpenCV functionality related to I/O functions. From the recipes, you will learn how to obtain images from different sources (either filesystem or camera), display them, and save images and videos. Also, the chapter covers the topic of working with the OpenCV UI system; for instance, in creating windows and trackbars.
Reading images from files
In this recipe, we will learn how to read images from files. OpenCV supports reading images in different formats, such as PNG, JPEG, and TIFF. Let's write a program that takes the path to an image as its first parameter, reads the image, and prints its shape and size.
Getting ready
You need to have OpenCV 3.x installed with Python API support.
How to do it...
For this recipe, you need to perform the following steps:
- You can easily read an image with the cv2.imread function, which takes path to image and optional flags:
import argparse
import cv2
parser = argparse.ArgumentParser()
parser.add_argument('--path', default='../data/Lena.png', help='Image path.')
params = parser.parse_args()
img = cv2.imread(params.path)
- Sometimes it's useful to check whether the image was successfully loaded or not:
assert img is not None  # check if the image was successfully loaded
print('read {}'.format(params.path))
print('shape:', img.shape)
print('dtype:', img.dtype)
- Load the image and convert it to grayscale, even if it had many color channels originally:
img = cv2.imread(params.path, cv2.IMREAD_GRAYSCALE)
assert img is not None
print('read {} as grayscale'.format(params.path))
print('shape:', img.shape)
print('dtype:', img.dtype)
How it works...
The loaded image is represented as a NumPy array. The same representation is used in OpenCV for matrices. NumPy arrays have such properties as shape, which is an image's size and number of color channels, and dtype, which is the underlying data type (for example, uint8 or float32). Note that OpenCV loads images in BGR, not RGB, format.
The shape tuple in this case should be interpreted as follows: image height, image width, color channels count.
The cv.imread function also supports optional flags, where users can specify whether conversion to uint8 type should be performed, and whether the image is grayscale or color.
Having run the code with the default parameters, you should see the following output:
read ../data/Lena.png
shape: (512, 512, 3)
dtype: uint8

read ../data/Lena.png as grayscale
shape: (512, 512)
dtype: uint8
Simple image transformations—resizing and flipping
Now we're able to load an image, it's time to do some simple image processing. The operations we're going to review—resize and flip—are basic and usually used as preliminary steps of complex computer vision algorithms.
Getting ready
You need to have OpenCV 3.x installed with Python API support.
How to do it...
For this recipe, we need the following steps to be executed:
- Load an image and print its original size:
img = cv2.imread('../data/Lena.png')
print('original image shape:', img.shape)
- OpenCV offers several ways of using the cv2.resize function. We can set the target size (width, height) in pixels as the second parameter:
width, height = 128, 256
resized_img = cv2.resize(img, (width, height))
print('resized to 128x256 image shape:', resized_img.shape)
- Resize by setting multipliers of the image's original width and height:
w_mult, h_mult = 0.25, 0.5
resized_img = cv2.resize(img, (0, 0), resized_img, w_mult, h_mult)
print('image shape:', resized_img.shape)
- Resize using nearest-neighbor interpolation instead of the default one:
w_mult, h_mult = 2, 4
resized_img = cv2.resize(img, (0, 0), resized_img, w_mult, h_mult, cv2.INTER_NEAREST)
print('half sized image shape:', resized_img.shape)
- Reflect the image along its horizontal x-axis. To do this, we should pass 0 as the last argument of the cv2.flip function:
img_flip_along_x = cv2.flip(img, 0)
- Of course, it's possible to flip the image along its vertical y-axis—just pass any value greater than 0:
img_flip_along_y = cv2.flip(img, 1)
- We can flip both x and y simultaneously by passing any negative value to the function:
img_flipped_xy = cv2.flip(img, -1)
How it works...
We can play with interpolation mode in cv2.resize—it defines how values between pixels are computed. There are quite a few types of interpolation, each with a different outcome. This argument can be passed as the last one and doesn't influence the result's size—only the quality and smoothness of the output.
By default, bilinear interpolation (cv2.INTER_LINEAR) is used. But in some situations, it may be necessary to apply other, more complicated options.
The cv2.flip function is used for mirroring images. It doesn't change the size of an image, but rather swaps the pixels.
Saving images using lossy and lossless compression
This recipe will teach you how to save images. Sometimes you want to get feedback from your computer vision algorithm. One way to do so is to store results on a disk. The feedback could be final images, pictures with additional information such as contours, metrics, values and so on, or results of individual steps from a complicated pipeline.
Getting ready
You need to have OpenCV 3.x installed with Python API support.
How to do it...
Here are the steps for this recipe:
- First, read the image:
img = cv2.imread('../data/Lena.png')
- Save the image in PNG format without losing quality, then read it again to check whether all the information has been preserved during writing onto the disk:
# save image with lower compression—bigger file size but faster decoding
cv2.imwrite('../data/Lena_compressed.png', img, [cv2.IMWRITE_PNG_COMPRESSION, 0])

# check that image saved and loaded again image is the same as original one
saved_img = cv2.imread(params.out_png)
assert saved_img.all() == img.all()
- Save the image in the JPEG format:
# save image with lower quality—smaller file size
cv2.imwrite('../data/Lena_compressed.jpg', img, [cv2.IMWRITE_JPEG_QUALITY, 0])
How it works...
To save an image, you should use the cv2.imwrite function. The file's format is determined by this function, as can be seen in the filename (JPEG, PNG, and some others are supported). There are two main options for saving images: whether to lose some information while saving, or not.
The cv2.imwrite function takes three arguments: the path of output file, the image itself, and the parameters of saving. When saving an image to PNG format, we can specify the compression level. The value of IMWRITE_PNG_COMPRESSION must be in the (0, 9) interval—the bigger the number, the smaller the file on the disk, but the slower the decoding process.
When saving to JPEG format, we can manage the compression process by setting the value of IMWRITE_JPEG_QUALITY. We can set this as any value from 0 to 100. But here, we have a situation where bigger is better. Larger values lead to higher result quality and a lower amount of JPEG artifacts.
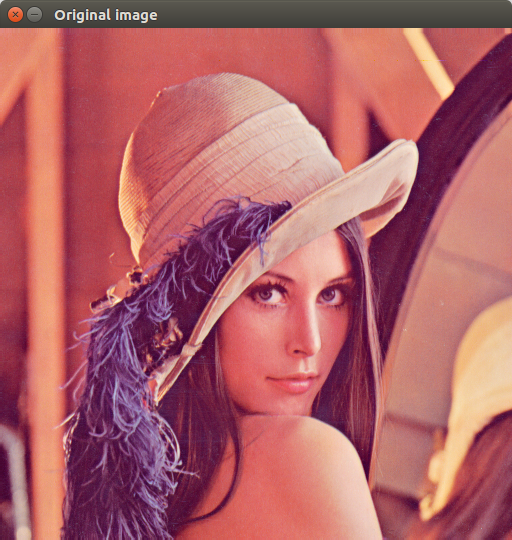
Showing images in an OpenCV window
One of the many brilliant features of OpenCV is that you can visualize images with very little effort. Here we will learn all about showing images in OpenCV.
Getting ready
You need to have OpenCV 3.x installed with Python API support.
How to do it...
The steps are as follows:
- Load an image to have something to work with and get its size:
orig = cv2.imread('../data/Lena.png')
orig_size = orig.shape[0:2]
- Now let's display our image. To do so, we need to call the cv2.imshow and cv2.waitKey functions:
cv2.imshow("Original image", orig)
cv2.waitKey(2000)
How it works...
Now, let's shed some light on the functions. The cv2.imshow function is needed to show the image—its first parameter is the name of the window (see the header of the window in the following screenshot), the second parameter is the image we want to display. The cv2.waitKey function is necessary for controlling the display time of the window.
Note that the display time must be explicitly controlled, otherwise you won't see any windows. The function takes the duration of the window display time in milliseconds. But if you press any key on the keyboard, the window will disappear earlier than the specified time. We will review this functionality in one of the following recipes.
The code above results in the following:
Working with UI elements, such as buttons and trackbars, in an OpenCV window
In this recipe, we will learn how to add UI elements, such as buttons and trackbars, into OpenCV windows and work with them. Trackbars are useful UI elements that:
- Show the value of an integer variable, assuming the value is within a predefined range
- Allow us to change the value interactively through changing the trackbar position
Let's create a program that allows users to specify the fill color for an image by interactively changing each Red, Green, Blue (RGB) channel value.
Getting ready
You need to have OpenCV 3.x installed with Python API support.
How to do it...
To complete this recipe, the steps are as follows:
- First create an OpenCV window named window:
import cv2, numpy as np

cv2.namedWindow('window')
- Create a variable that will contain the fill color value for the image. The variable is a NumPy array with three values that will be interpreted as blue, green, and red color components (in that order) from the [0, 255] range:
fill_val = np.array([255, 255, 255], np.uint8)
- Add an auxiliary function to call from each trackbar_callback function. The function takes the color component index and new value as settings:
def trackbar_callback(idx, value):
    fill_val[idx] = value
- Add three trackbars into window and bind each trackbar callback to a specific color component using the Python lambda function:
cv2.createTrackbar('R', 'window', 255, 255, lambda v: trackbar_callback(2, v))
cv2.createTrackbar('G', 'window', 255, 255, lambda v: trackbar_callback(1, v))
cv2.createTrackbar('B', 'window', 255, 255, lambda v: trackbar_callback(0, v))
- In a loop, show the image in a window with three trackbars and process keyboard input as well:
while True:
    image = np.full((500, 500, 3), fill_val)
    cv2.imshow('window', image)
    key = cv2.waitKey(3)
    if key == 27:
        break
cv2.destroyAllWindows()
How it works...
A window like the one following is expected to be shown, though it might vary slightly depending on the version of OpenCV and how it was built:

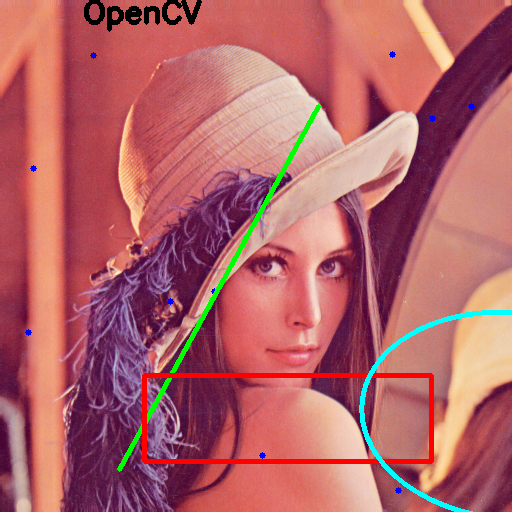
Drawing 2D primitives—markers, lines, ellipses, rectangles, and text
Just after you implement your first computer vision algorithm, you will want to see its results. OpenCV has a considerable number of drawing functions to let you highlight any feature in an image.
Getting ready
You need to have OpenCV 3.x installed with Python API support.
How to do it...
- Open an image and get its width and height. Also, define a simple function that returns a random point inside our image:
import cv2, random

image = cv2.imread('../data/Lena.png')
w, h = image.shape[1], image.shape[0]


def rand_pt(mult=1.):
    return (random.randrange(int(w*mult)),
            random.randrange(int(h*mult)))
- Let's draw something! Let's go for circles:
cv2.circle(image, rand_pt(), 40, (255, 0, 0))
cv2.circle(image, rand_pt(), 5, (255, 0, 0), cv2.FILLED)
cv2.circle(image, rand_pt(), 40, (255, 85, 85), 2)
cv2.circle(image, rand_pt(), 40, (255, 170, 170), 2, cv2.LINE_AA)
- Now let's try to draw lines:
cv2.line(image, rand_pt(), rand_pt(), (0, 255, 0))
cv2.line(image, rand_pt(), rand_pt(), (85, 255, 85), 3)
cv2.line(image, rand_pt(), rand_pt(), (170, 255, 170), 3, cv2.LINE_AA)
- If you want to draw an arrow, use the arrowedLine() function:
cv2.arrowedLine(image, rand_pt(), rand_pt(), (0, 0, 255), 3, cv2.LINE_AA)
- To draw rectangles, OpenCV has the rectangle() function:
cv2.rectangle(image, rand_pt(), rand_pt(), (255, 255, 0), 3)
- Also, OpenCV includes a function to draw ellipses. Let's draw them:
cv2.ellipse(image, rand_pt(), rand_pt(0.3), random.randrange(360), 0, 360, (255, 255, 255), 3)
- Our final drawing-related function is for placing text on the image:
cv2.putText(image, 'OpenCV', rand_pt(), cv2.FONT_HERSHEY_SIMPLEX, 1, (0, 0, 0), 3)
How it works...
First, cv2.circle gives the thinnest and darkest blue primitive. The second invocation draws a dark blue point. The third call produces a lighter blue circle with sharp edges. The last call, cv2.circle, reveals the lightest blue circle with smooth borders.
The cv2.circle function takes the image as first parameter, and the position of center in (x, y) format, radius of the circle, and the color as mandatory arguments. Also you can specify line thickness (the FILLED value gives a filled circle) and line type (LINE_AA gives aliasing-free borders).
The cv2.line function takes an image, start and end points, and color of the image (as in first call). Optionally you can pass line thickness and line type (again, to suppress aliasing).
We will get something like this (positions may vary due to randomness):
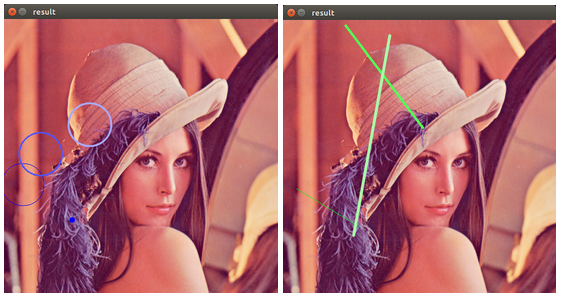
The parameters of the cv2.arrowedLine function are the same as those for cv2.line.
The parameters that cv2.rectangle takes are the image that is to be drawn upon, the upper-left corner, bottom-right corner, and the color. Also, it's possible to specify thickness (or make the rectangle filled with the FILLED value).
cv2.ellipse takes the image, the position of the center in (x, y) format, half axis lengths in (a, b) format, the rotation angle, the start angle of drawing, the end angle of drawing, and color and thickness of line (you can also draw a filled ellipse) as parameters.
Arguments of the cv2.putText function are the image, the text being placed, the position of the bottom-left corner of the text, the name of the font face, the scale of symbols, and color and thickness.
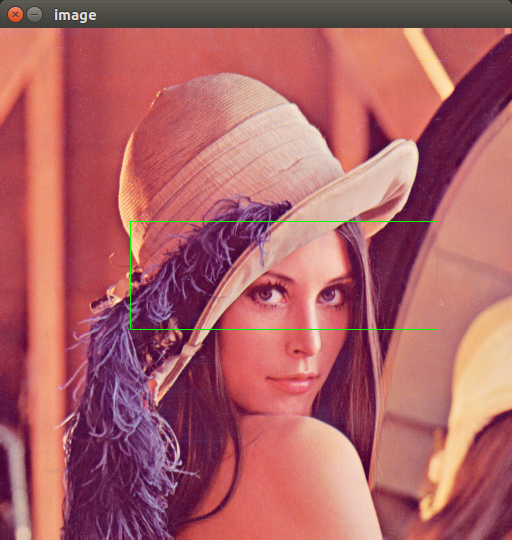
Handling user input from a keyboard
OpenCV has simple and clear way to handle input from a keyboard. This functionality is organically built into the cv2.waitKey function. Let's see how we can use it.
Getting ready
You need to have OpenCV 3.x installed with Python API support.
How to do it...
You will need to perform the following steps for this recipe:
- As done previously, open an image and get its width and height. Also, make a copy of the original image and define a simple function that returns a random point with coordinates inside our image:
import cv2, numpy as np, random

image = cv2.imread('../data/Lena.png')
w, h = image.shape[1], image.shape[0]
image_to_show = np.copy(image)

def rand_pt():
 return (random.randrange(w),
 random.randrange(h))
- Now when the user presses P, L, R, E, or T draw points, lines, rectangles, ellipses, or text, respectively. Also, we will clear an image when the user hits C and closes the application when the Esc key is pushed:
finish = False
while not finish:
    cv2.imshow("result", image_to_show)
    key = cv2.waitKey(0)
    if key == ord('p'):
        for pt in [rand_pt() for _ in range(10)]:
            cv2.circle(image_to_show, pt, 3, (255, 0, 0), -1)
    elif key == ord('l'):
        cv2.line(image_to_show, rand_pt(), rand_pt(), (0, 255, 0), 3)
    elif key == ord('r'):
        cv2.rectangle(image_to_show, rand_pt(), rand_pt(), (0, 0, 255), 3)
    elif key == ord('e'):
        cv2.ellipse(image_to_show, rand_pt(), rand_pt(), random.randrange(360), 0, 360, (255, 255, 0), 3)
    elif key == ord('t'):
        cv2.putText(image_to_show, 'OpenCV', rand_pt(), cv2.FONT_HERSHEY_SIMPLEX, 1, (0, 0, 0), 3)
    elif key == ord('c'):
        image_to_show = np.copy(image)
    elif key == 27:
        finish = True
How it works...
As you can see, we just analyze the waitKey() return value. If we set a duration and no key is pressed, waitKey() would return -1.
After launching the code and pressing the P, L, R, E, and T keys a few times, you will get an image close to the following:
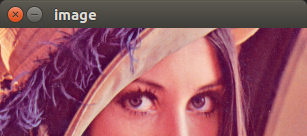
Making your app interactive through handling user input from a mouse
In this recipe, we will learn how to enable the handling of mouse input in your OpenCV application. An instance that gets events from a mouse is the window, so we need to use cv2.imshow. But we also need to add our handlers for mouse events. Let's see, in detail, how to do it by implementing crop functionality through selecting image regions by mouse.
Getting ready
You need to have OpenCV 3.x installed with Python API support.
How to do it...
The steps for this recipe are as follows:
- First, load an image and make its copy:
import cv2, numpy as np

image = cv2.imread('../data/Lena.png')
image_to_show = np.copy(image)
- Now, define some variables to store the mouse state:
mouse_pressed = False
s_x = s_y = e_x = e_y = -1
- Let's implement a handler for mouse events. This should be a function that takes four arguments, as follows:
def mouse_callback(event, x, y, flags, param):
    global image_to_show, s_x, s_y, e_x, e_y, mouse_pressed

    if event == cv2.EVENT_LBUTTONDOWN:
        mouse_pressed = True
        s_x, s_y = x, y
        image_to_show = np.copy(image)

    elif event == cv2.EVENT_MOUSEMOVE:
        if mouse_pressed:
            image_to_show = np.copy(image)
            cv2.rectangle(image_to_show, (s_x, s_y),
                          (x, y), (0, 255, 0), 1)

    elif event == cv2.EVENT_LBUTTONUP:
        mouse_pressed = False
        e_x, e_y = x, y
- Let's create the window instance that will be capturing mouse events and translating them into the handler function we defined earlier:
cv2.namedWindow('image')
cv2.setMouseCallback('image', mouse_callback)
- Now, let's implement the remaining part of our application, which should be reacting to buttons pushes and cropping the original image:
while True:
    cv2.imshow('image', image_to_show)
    k = cv2.waitKey(1)

    if k == ord('c'):
        if s_y > e_y:
            s_y, e_y = e_y, s_y
        if s_x > e_x:
            s_x, e_x = e_x, s_x

        if e_y - s_y > 1 and e_x - s_x > 0:
            image = image[s_y:e_y, s_x:e_x]
            image_to_show = np.copy(image)
    elif k == 27:
        break

cv2.destroyAllWindows()
How it works...
In cv2.setMouseCallback , we assigned our mouse events handler, mouse_callback , to the window named image.
After launching, we will be able to select a region by pushing the left mouse button somewhere in the image, dragging the mouse to the end point, and releasing the mouse button to confirm that our selection is finished. We can repeat the process by clicking in a new place—the previous selection disappears:
By hitting the C button on the keyboard, we can cut an area inside the selected region, as follows:
Capturing and showing frames from a camera
In this recipe, you will learn how to connect to a USB camera and capture frames from it live using OpenCV.
Getting ready
You need to have OpenCV 3.x installed with Python API support.
How to do it...
For this recipe, the steps are as follows:
- Create a VideoCapture object:
import cv2

capture = cv2.VideoCapture(0)
- Read the frames from the camera using the capture.read method, which returns a pair: a read success flag and the frame itself:
while True:
    has_frame, frame = capture.read()
    if not has_frame:
        print('Can\'t get frame')
        break

    cv2.imshow('frame', frame)
    key = cv2.waitKey(3)
    if key == 27:
        print('Pressed Esc')
        break
- It's generally recommended that you release the video device (a camera, in our case) and destroy all the windows created:
capture.release()
cv2.destroyAllWindows()
How it works...
Working with cameras in OpenCV is done through the cv2.VideoCapture class. In fact it provides support when working with both cameras and video files. To instantiate an object representing a frame stream coming from a camera, you should just specify its number (zero-based device index). If OpenCV doesn't support your camera out of the box, you can try recompiling OpenCV, turning on optional support of other industrial camera types.
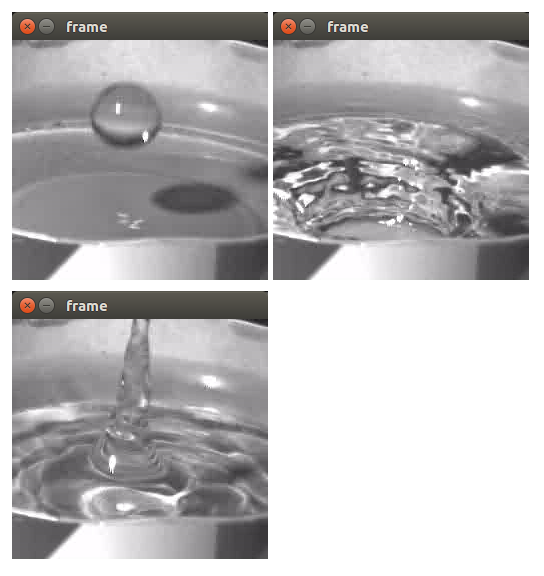
Playing frame stream from video
In this recipe, you will learn how to open an existing video file using OpenCV. You will also learn how to replay frames from the opened video.
Getting ready
You need to have OpenCV 3.x installed with Python API support.
How to do it...
The following are the steps for this recipe:
- Create a VideoCapture object for video file:
import cv2

capture = cv2.VideoCapture('../data/drop.avi')
- Replay all the frames in the video:
while True:
    has_frame, frame = capture.read()
    if not has_frame:
        print('Reached the end of the video')
        break

    cv2.imshow('frame', frame)
    key = cv2.waitKey(50)
    if key == 27:
        print('Pressed Esc')
        break

cv2.destroyAllWindows()
How it works...
Working with video files is virtually the same as working with cameras—it's done through the same cv2.VideoCapture class. This time, however, instead of the camera device index, you should specify the path to the video file you want to open. Depending on the OS and video codecs available, OpenCV might not support some of the video formats.
After the video file is opened in a infinite while loop, we acquire frames using the capture.read method. The function returns a pair: a Boolean frame read success flag, and the frame itself. Note that frames are read at the maximum possible rate, meaning if you want to replay video at a certain FPS, you should implement it on your own. In the preceding code, after we call the cv2.imshow function, we wait for 50 milliseconds in the cv2.waitKey function. Assuming the time spent on showing the image and decoding the video is negligible, the video will be replayed at a rate no greater than 20 FPS.
The following frames are expected to be seen:
Obtaining a frame stream properties
In this recipe, you will learn how to get such VideoCapture properties as frame height and width, frame count for video files, and camera frame rate.
Getting ready
You need to have OpenCV 3.x installed with Python API support.
How to do it...
Execute the following steps:
- Let's create an auxiliary function that will take the VideoCapture ID (either what the camera device is or the path to the video), create a VideoCapture object, and request the frame height and width, count, and rate:
import numpy
import cv2

def print_capture_properties(*args):
    capture = cv2.VideoCapture(*args)
    print('Created capture:', ' '.join(map(str, args)))
    print('Frame count:', int(capture.get(cv2.CAP_PROP_FRAME_COUNT)))
    print('Frame width:', int(capture.get(cv2.CAP_PROP_FRAME_WIDTH)))
    print('Frame height:', int(capture.get(cv2.CAP_PROP_FRAME_HEIGHT)))
    print('Frame rate:', capture.get(cv2.CAP_PROP_FPS))
- Let's call this function for a video file:
print_capture_properties('../data/drop.avi')
- Now let's request properties for the camera capture object:
print_capture_properties(0)
How it works...
As in the earlier recipes, working with cameras and video frame streams is done through the cv2.VideoCapture class. You can get properties using the capture.get function, which takes the property ID and returns its value as a floating-point value.
Note that, depending on the OS and video backend used, not all of the properties being requested can be accessed.
The following output is expected (it might vary depending on the OS and the video backend that OpenCV was compiled with):
Created capture: ../data/drop.avi
Frame count: 182
Frame width: 256
Frame height: 240
Frame rate: 30.0

Created capture: 0
Frame count: -1
Frame width: 640
Frame height: 480
Frame rate: 30.0
Writing a frame stream into video
In this recipe, you will learn how to capture frames from a USB camera live and simultaneously write frames into a video file using a specified video codec.
Getting ready
You need to have OpenCV 3.x installed with Python API support.
How to do it...
Here are the steps we need to execute in order to complete this recipe:
- First, we create a camera capture object, as in the previous recipes, and get the frame height and width:
import cv2
capture = cv2.VideoCapture(0)
frame_width = int(capture.get(cv2.CAP_PROP_FRAME_WIDTH))
frame_height = int(capture.get(cv2.CAP_PROP_FRAME_HEIGHT))
print('Frame width:', frame_width)
print('Frame height:', frame_height)
- Create a video writer:
video = cv2.VideoWriter('../data/captured_video.avi', cv2.VideoWriter_fourcc(*'X264'),
                        25, (frame_width, frame_height))
- Then, in an infinite while loop, capture frames and write them using the video.write method:
while True:
    has_frame, frame = capture.read()
    if not has_frame:
        print('Can\'t get frame')
        break

    video.write(frame)

    cv2.imshow('frame', frame)
    key = cv2.waitKey(3)
    if key == 27:
        print('Pressed Esc')
        break
- Release all created VideoCapture and VideoWriter objects, and destroy the windows:
capture.release()
writer.release()
cv2.destroyAllWindows()
How it works...
Writing video is performed using the cv2.VideoWriter class. The constructor takes the output video path, four characted code (FOURCC) specifying video code, desired frame rate and frame size. Examples of codec codes include P, I, M, and 1 for MPEG-1; M, J, P, and G for motion-JPEG; X, V, I, and D for XVID MPEG-4; and H, 2, 6, and 4 for H.264.
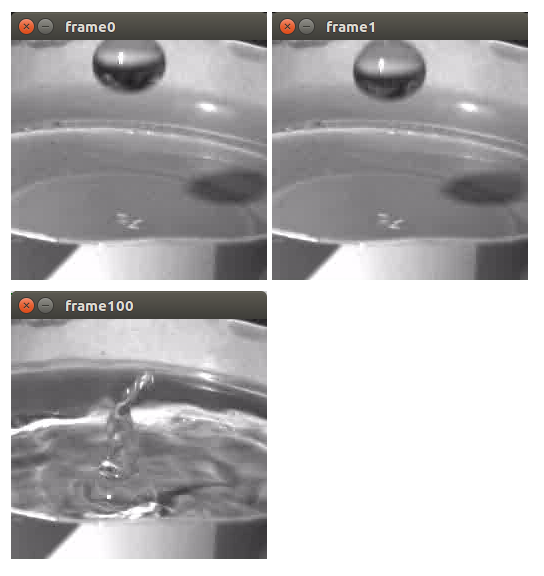
Jumping between frames in video files
In this recipe, you will learn how to position VideoCapture objects at different frame positions.
Getting ready
You need to have OpenCV 3.x installed with Python API support.
How to do it...
The steps for this recipe are:
- First, let's create a VideoCapture object and obtain the total number of frames:
import cv2
capture = cv2.VideoCapture('../data/drop.avi')
frame_count = int(capture.get(cv2.CAP_PROP_FRAME_COUNT))
print('Frame count:', frame_count)
- Get the total number of frames:
print('Position:', int(capture.get(cv2.CAP_PROP_POS_FRAMES)))
_, frame = capture.read()
cv2.imshow('frame0', frame)
- Note that the capture.read method advances the current video position one frame forward. Get the next frame:
print('Position:', capture.get(cv2.CAP_PROP_POS_FRAMES))
_, frame = capture.read()
cv2.imshow('frame1', frame)
- Let's jump to frame position 100:
capture.set(cv2.CAP_PROP_POS_FRAMES, 100)
print('Position:', int(capture.get(cv2.CAP_PROP_POS_FRAMES)))
_, frame = capture.read()
cv2.imshow('frame100', frame)

cv2.waitKey()
cv2.destroyAllWindows()
How it works...
Obtaining the video position and setting it is done using the cv2.CAP_PROP_POS_FRAMES property. Depending on the way a video is encoded, setting the property might not result in setting the exact frame index requested. The value to set must be within a valid range.
You should see the following output after running the program:
Frame count: 182
Position: 0
Position: 1
Position: 100
The following frames should be displayed: