Download code from GitHub
Chapter 1: Quick Start Using the Developer Mode
Odoo provides a rapid application development framework that is particularly suited to building applications for business. Business applications usually focus on keeping business records and workflows. Odoo makes it easy to build this type of application and provides rich components to create compelling user interfaces (UIs), such as a kanban view, as well as calendar and graph views.
In this chapter, we will jump straight into the action and start coding by exploring the Odoo internals directly from the web UI – even before we have to set up a local development environment. This will give you a hands-on understanding of the components involved in an Odoo app. At the same time, you will learn some essential tools for inspecting existing apps and building quick prototypes.
The topics discussed in this chapter are as follows:
- Introducing the to-do list project
- Understanding basic Odoo concepts
- Using an Odoo SaaS trial database
- Installing Odoo in your workstation
- Enabling the developer tools
- Adding a custom field to a model
- Creating a new model
- Creating menu items and actions
- Configuring access control security
- Creating views
By the end of this chapter, you will be familiar with the main components for Odoo customization and development.
Technical requirements
The minimum requirement for this chapter is to have a modern web browser, such as Mozilla Firefox or Google Chrome. With a browser and an internet connection, you can follow the chapter using an Odoo SaaS trial database, and no local installation is needed.
Of course, you can use a locally installed instance of Odoo if you want. In this case, you can follow the instructions in the Installing Odoo in your workstation section, which describes prepackaged installations for Windows, Ubuntu, and Red Hat Enterprise Linux (RHEL). Alternatively, you can use Docker.
Introducing the to-do list project
Throughout this chapter, we will use an example project to illustrate the concepts being presented. The project will be to build a simple to-do list Odoo app.
We want the app to allow us to add new to-do items to a list and then mark them as completed. For example, we want to be able to add a Buy eggs to-do item to the list and then check an Is done? checkbox once the task is completed. Additionally, the to-do items should be private to each user – in other words, the current user should be able to access only their own to-do items. To make the project more interesting, we will introduce an additional complication – our to-do items should be able to include a list of the people involved in the task: the work team.
It is useful to think about our application by considering the tiers involved:
- Data tier: This tier is implemented through models.
- Business Logic tier: This tier is implemented through Python automation code.
- Presentation tier: This tier is implemented through views.
For the Data tier, we will create a To-do Item model. For the work team feature, we will make use of the built-in Contact model (also known as the Partner model). And we must not forget to configure the access control security for our new model.
The Business Logic tier will allow the basic create, read, update, and delete (CRUD) operations handled by the framework. In this case, we don't have additional automation requirements to support. We need to use Python code in developer modules to access the full power of the framework. We won't be doing that for developer modules yet, but the Technical menu provides access to the Automated Actions tool to implement business logic from the UI. We will look at an example of how to use this tool later in the chapter.
Finally, for the Presentation tier, we will add the menu option for our application and the views for the To-do Item model. The essential views for a business application are the list view (to browse the existing records) and the form view (to zoom in to a record and see all of its details). For user convenience, we can also add predefined filters to the list view's search box. The search box options are configured through a search view component.
We will follow these steps to build the to-do list app:
- Create the new model for the to-do items.
- Create the menu items to make them available to users.
- Configure the access control security.
- Create the list and form views for the to-do items.
The new To-do Item model should have these fields:
- A
Descriptioncharacter field - An
Is Done?flag, which is a Boolean field
Our specification for the app includes a work team feature: that is, the ability to select a list of people that will be working on the task. So, we need a model to represent people. Odoo includes the Contact model (with the technical name of res.partner) to use for individual people, companies, and addresses.
The To-do Item model should include a work team field, which will allow us to select a list of people. We want to limit the people that can be selected to be part of work teams. For this, we will modify the Contact model to add a field for this: a Is Work Team? flag. Only people with this flag enabled can be added to a work team.
For the work team feature, we need to add a field to the Contact model and the form view.
Before we go into the actual implementation, we will first discuss a few basic concepts relating to the Odoo framework, and then learn how to prepare an environment to work with.
Understanding basic Odoo concepts
There are a few concepts that might not be obvious to people first learning about Odoo. Let's try to understand these before moving on.
About Odoo and the Odoo community
Odoo is a software product published by Odoo SA, a software company based in Belgium founded by Fabien Pinckaers. The Odoo software is company-driven, meaning that its roadmap and development are both tightly controlled by Odoo SA. However, it still follows open source principles, and community contributions to the code are welcome.
The Odoo software follows the open core business model, meaning that some parts of the software are open source and some parts are proprietary. As a result of this model, Odoo publishes two editions:
The Community Edition (CE) is publicly available, open source, and licensed under LGPL.
The Enterprise Edition (EE) is available only to official partners and customers and has a proprietary license requiring non-disclosure of the code.
The Odoo EE works as a layer of additional modules on top of the Odoo CE core, offering premium features that are expected to provide enough value to motivate users to upgrade. The revenue from the Odoo EE funds the development for both the Odoo CE and EE. The Odoo founder and CEO Fabien Pinckaers has repeatedly pledged a commitment to keeping 80% of the code as open source in the Odoo CE and 20% in the proprietary Odoo EE.
The biggest strength of any open source project is the community around it. Odoo has an active community of contributors. For the Odoo product, the community contributes with feature feedback, translations, security issue reports, bug fixes, and occasionally some technical improvements to the core product. The Odoo CE is developed at https://github.com/odoo/odoo.
Beyond the Odoo core product, the community publishes additional Odoo modules that add features. Many individuals and companies in the Odoo community make their Git repositories publicly available under open source licenses. They also publish them in Odoo Apps – which is the official Odoo app store: apps.odoo.com. The app store allows for both free and paid modules.
The Odoo core project does not offer a space to host these community module efforts, so they are developed in a dispersed way, with no common standards and quality controls. The Odoo Community Association (OCA) was created to address this issue. It provides the space to host community-contributed modules, along with common coding standards, guidelines, quality controls, and the tools for these workflows. The OCA code repositories can be found at https://github.com/oca, and the published modules can also be browsed at https://odoo-community.org/shop.
Odoo product versions
At the time of writing, Odoo's latest stable version is version 15, marked on GitHub as branch 15.0. This is the version we will work with throughout this book. Major stable versions of Odoo are released on a yearly basis at the annual Odoo Experience conference every October.
The last three stable versions are officially supported. With the release of version 15, versions 14 and 13 are still supported, but versions up to 12 have no official support. This means that they don't receive bug and security fixes anymore.
Odoo databases are incompatible between its major versions. If you run an Odoo 15 server against a database created for a previous major version of Odoo, it won't work. Non-trivial migration work is needed before a database can be used with a later version of Odoo.
The same is true for addon modules. As a general rule, an addon module developed for a major Odoo version will not work on other versions. When downloading a community module from the web, make sure it targets the Odoo version you are using.
Major releases – such as 15.0 – are expected to receive frequent updates, but these should be mostly bug fixes and not new features. They are guaranteed to be API-stable, meaning that model data structures and view element identifiers will remain stable. This is important because it means there will be no risk of custom modules breaking due to incompatible changes in the upstream core modules.
The Odoo Online SaaS edition may use intermediary versions, which are sometimes called the SaaS versions. These are also officially supported. The current list of supported versions can be checked at https://www.odoo.com/documentation/user, in the Practical Information section of the Support page.
The version in the master branch version will result in the next major stable version, but until then, it's not API-stable and you should not use it to build custom modules. Doing so is like moving on quicksand – you can't be sure when changes will be introduced and they could break your custom module. You have been warned.
The Odoo architecture
It's useful to understand the layers involved in the Odoo architecture and the role of each type of component we will use. So, we will now take a look at the Odoo application architecture and focus on how we can help application development by decomposing work into several component layers.
Odoo applications can be decomposed into three tiers: the Data, Logic, and Presentation tiers:

Figure 1.1 – The Odoo application layers
The Data tier is the lowest-level layer and is responsible for data storage and persistence. Odoo relies on a PostgreSQL server for this. PostgreSQL is the only supported database server in Odoo, and this is a design choice. Binary files – such as the attachments of documents or images – are stored in the filesystem in a directory referred to as filestore.
Note
This means that a full backup of an Odoo instance needs both a database dump and a copy of filestore.
We will rarely use SQL to interact directly with the database engine; however, this is possible and might be needed in particular cases.
Odoo relies on its Object Relational Mapping (ORM) engine as the interface between the apps and the database. The ORM provides the application programming interface (API) used by the addon modules to interact with the data. We implement the Data tier using ORM models. For example, the Partner data entity, which is used for data records such as customers or suppliers, is represented by a model.
As a general rule, the low-level database should only be accessed by this layer because it ensures secure access control and data consistency. ORM models are based on a Python object class that supports several interaction methods, such as the CRUD basic operations. In particular, these CRUD operations are implemented by the create(), search(), write(), and unlink() model methods.
The Logic tier is responsible for all of the interactions with the Data tier and is handled by the Odoo server. The basic CRUD operations can be extended to implement specific business logic. For example, the create() and write() methods might implement default values or some other automation. Other code methods can be added to enforce validation rules or automatically compute field values.
The Presentation tier is responsible for presenting data and interacting with the user. It is implemented by the client part of the software, which is responsible for end user interaction. The client software uses remote procedure calls (RPCs) to the Odoo service, running the ORM engine and the business logic. The ORM API calls are sent to the Odoo server for processing to read, write, verify, or perform any other action. Then, the results are sent back to the client for further handling.
Odoo provides a web client out of the box. The web client supports all of the features needed by a business application, such as login sessions, navigation menus, data lists, and forms.
A website framework is also available to use as a public frontend for external users. It provides CMS features, allowing us to create both static and dynamic web pages. The website framework uses controller components for the code implementing the presentation-specific logic, keeping it separate from the model's intrinsic logic. The page rendering uses QWeb as the templating engine. These are XML documents that contain HTML markup plus specific XML QWeb tags for operations such as loops, conditions, or calls to include other templates.
The Odoo server API is open, and all server functions are available through it. The server API used by the official web client is the same as the one available to any other application. So, other client implementations are possible and could be built in almost any platform or programming language. Desktop and smartphone applications can be built to provide specific user interfaces, leveraging the Odoo Data and Logic tiers for business logic and data persistence.
Using an Odoo SaaS trial database
The simplest way to get started with Odoo is to use an Odoo software as a service (SaaS) trial database. In this case, we don't need to install anything – just go to https://odoo.com/ and click Try it free button.
You will be asked to select the first app to install in the new database. For the purpose of following this chapter, any choice will work for us, so feel free to choose any of the proposed apps. If you're unsure, the CRM app is a good choice.

Figure 1.2 – The Odoo SaaS trial database initial app choice
New SaaS databases use the latest Odoo SaaS version – which is always based on the last stable Odoo EE version – but also have their own minor releases. So, it will not match the last stable Odoo EE version exactly.
The free trial will be valid for a period of 15 days. At the time of writing, the Odoo SaaS edition offers a free plan that allows you to keep this database running after this period (as long as you have more than one app installed).
Installing Odoo in your workstation
Using an Odoo SaaS trial database will be the default choice for this chapter. For the rest of the book, we will use a local Odoo installation, and in Chapter 2, Preparing the Development Environment, we will guide you through this process.
It is still worth noting that there are a few prepackaged installation alternatives for Odoo. We will briefly guide you through the available options in case you want to try any of them:
- Install Odoo with a prepackaged installer for your operating system: This is a good option if you're new to Odoo and want to quickly have a local environment running. Prepackaged installers are available for the following: Windows (EXE installer); Debian/Ubuntu (DEB package), and CentOS/RHEL (RPM package).
- Install Odoo using a Docker container: This could be a good option if you have experience with Docker and already have it installed on your system. If you're not confident with Docker, you might want to try another option so that learning Docker doesn't distract you from your current goal (learning Odoo development).
Odoo packages can be downloaded from https://download.odoo.com. They are available for all stable Odoo versions, as well as for the master branch corresponding to the latest development version. We will explain each of these options in the following sections.
For additional information on installing Odoo, you can refer to the official documentation at https://www.odoo.com/documentation/15.0/setup/install.html.
Installing on Windows using the all-in-one installer
Odoo provides an all-in-one installer for Windows, providing everything needed to run Odoo: a Python 3 runtime environment, a PostgreSQL database server, and the Odoo server with the required dependencies.
The installer can be downloaded from https://download.odoo.com. Select the desired version from the home page: 15 (stable) - Community Edition. The daily builds should be in 15.0/nightly/windows, and the latest build should be at the bottom of the list.
The installer is straightforward to follow. Odoo will be automatically started at the end of the installation.
It will also create a Windows service to automatically start the Odoo and PostgreSQL services when the machine starts. Remember this when you try other installation options such as the source code installation – port 8069 will already be used by the Windows installation, and this will prevent other installations from using the same port.
Installing on Linux using a pre-packaged installer
The Odoo download site (https://download.odoo.com) provides repositories with official packages for the Debian family (including Ubuntu) and for RHEL/CentOS.
Installation instructions for using the system-packed installers (apt or yum) are provided on the home page. Make sure that you replace the Odoo version used in the command line examples with your target one – for example, 15.0.
Before installing Odoo 15 on our Linux system, you should install the PostgreSQL database. This way, Odoo will be able to create and configure its user.
Installing Odoo using Docker containers
Docker provides a convenient multi-platform solution to run applications. It can be used to run applications on Windows, Linux, and macOS. The container technology is simple to use and resource-efficient when compared to classic virtual machines.
You must first have Docker installed on your system. Docker Desktop is the community edition and is free to use. It can be downloaded from https://www.docker.com. It is worth referring to the Docker website for the latest installation details. Docker relies on virtualization hardware features, so make sure that your basic input/output system (BIOS) has these features enabled.
General guidance on how to install and run Docker can be found at https://docs.docker.com/engine/install.
For example, for Ubuntu systems, the detailed installation instructions point to https://docs.docker.com/engine/install/ubuntu/.
Important post-installation steps – such as running Docker with a non-root user – can be found at https://docs.docker.com/engine/install/linux-postinstall/.
Docker Desktop for Windows requires Hyper-V, which is only available in Windows 10 Enterprise or Education releases. Up-to-date details should be available at https://docs.docker.com/desktop/windows/install/.
Docker Desktop for Mac requires macOS 10.14 or later. Up-to-date details should be available at https://docs.docker.com/desktop/mac/install/.
Note
Docker Toolbox used to be available as an alternative for other Windows and macOS versions, but this distribution is now deprecated. Docker Toolbox bundles VirtualBox and provides a preconfigured shell that should be used as the command-line environment to operate Docker containers. See https://docs.docker.com/toolbox/ for more details.
The Odoo Docker official images are available on Docker Hub at https://hub.docker.com/_/odoo. There, we can also find basic instructions to get started with the Odoo Docker images. To run Odoo, two Docker containers will be created: one for the PostgreSQL database and the other for the Odoo server.
The installation and operation are done from the command line. To install the PostgreSQL Docker container, run the following:
$ docker run -d -e POSTGRES_USER=odoo -e POSTGRES_PASSWORD=odoo -e POSTGRES_DB=postgres --name db postgres:13
This will download the latest PostgreSQL image from the internet and start a container for it to run as a background job.
Next, install and run the Odoo server container, linking it to the PostgreSQL container we just started, and exposing it on port 8069:
$ docker run -t -p 8069:8069 --name odoo --link db:db odoo:15.0 -d odoo15
With this, you will see the live Odoo server log in your terminal window, and you will be able to access the Odoo instance by opening http://localhost:8069 with your chosen web browser.
Note
The Odoo server can fail to start if port 8069 is already in use. For instance, it could be in use by an already running Odoo server. In this case, you could look for and stop the running service (for example, by looking at the list of running services) or try to start this Odoo server on a different port by changing the -p option. For example, to use port 8070, use -p 8070. In that case, you can also use -d <dbname> to set the database name that this instance should use.
There are a few basic commands you should know to help manage these Docker containers:
docker stop <name>: Stops a containerdocker start <name>: Starts a containerdocker start -a <name>: Starts a container and attaches the output – such as the server log – to the terminal windowdocker attach <name>: Reattaches a container's output to the current terminal windowdocker ps: Lists the current Docker containers
These are the basic commands needed to operate our Docker containers.
In case you get into trouble running the containers, here is a recipe to start over:
$ docker container stop db
$ docker container rm db
$ docker container stop odoo
$ docker container rm odoo
The Docker technology has more potential, and it might be interesting to learn more about it. The Docker website has good documentation to learn from, and a good place to get started is https://www.docker.com/get-started.
Enabling the developer tools
The Odoo developer tools are needed for us to implement our project. They are made available by enabling the developer mode.
The developer mode is useful for inspecting and modifying the current Odoo configurations. It allows us to customize Odoo apps directly from the UI and is a quick way to make changes and add features. It can be used for making small modifications, such as adding a custom field, or it can be used for larger customizations, such as creating an application with its own menus, views, and underlying data model.
Caution
The developer mode exposes internal configurations for Odoo apps and allows them to be changed. With great power comes great responsibility, so be careful with the changes made. Always try these changes on a copy database before making them in a live system. If things go wrong, there is a chance that an upgrade of the affected app – or the base module – can resolve the issues, but this is not guaranteed.
Making customizations through the developer tools has some limitations compared to the programming tools covered throughout the rest of the book. For example, the developer tools can't add or extend the default ORM methods.
The customizations made with the developer mode (and with the Odoo Studio app, for that matter) can't be easily integrated into a structured development workflow with version control, automated tests, and QA/staging/production code promotion workflows.
The developer mode features will be used in this chapter as a way to introduce how the application configuration data is organized in the Odoo framework and how the developer mode can be leveraged for simple customizations or prototyping solutions.
Enabling the developer mode
For Odoo 13 and later, the developer mode is enabled on the Settings | General Settings page. Near the bottom, you will find a Developer Tools section. There, you will find the Activate the developer mode link. Clicking on this enables the developer mode features for the current browser window, as shown in the following screenshot:
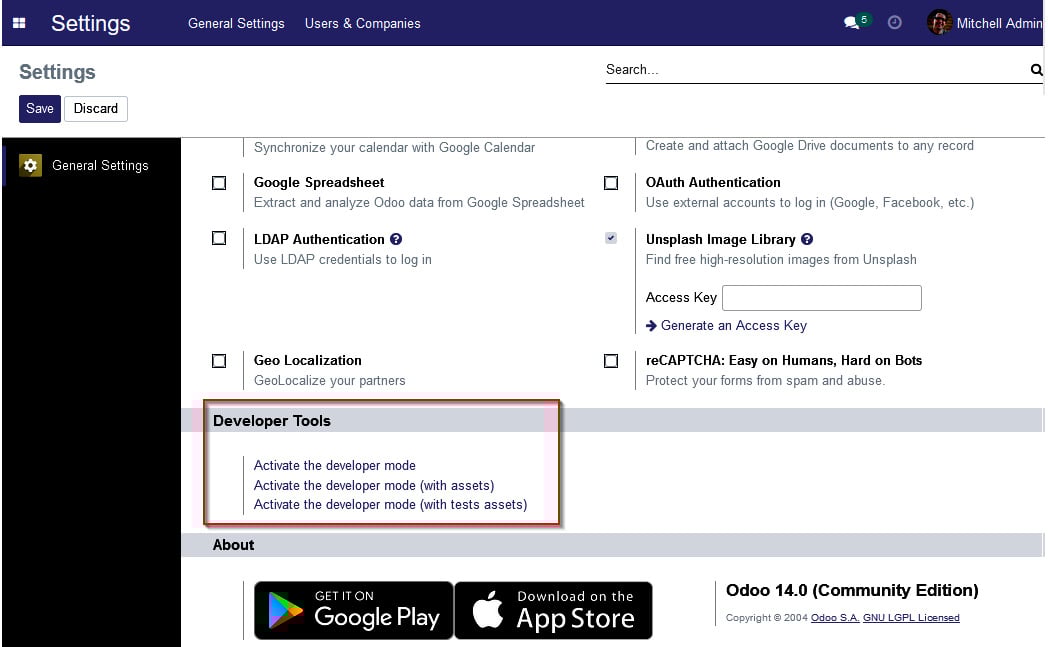
Figure 1.3 – The Developer Tools options section on the Settings page
Note that the General Settings menu option is only visible if there is at least one app installed. If it is not available, install an app such as Contacts or CRM (or any other of your choice).
Changes in Odoo 13
In Odoo versions 10 to 12, the developer mode is enabled on the Settings | Dashboard page in the lower-right corner. For Odoo 9 and before, the developer mode is activated in the About dialog window, which is available from the User menu in the upper-right corner of the web client.
Once the developer mode is enabled, we will see the following menus made available:
- On the top menu bar, the developer tools bug icon will be on the right-hand side next to the Conversations and Activities icons.
- On the Settings app, the Technical and Translations menu items will be visible on the top bar.
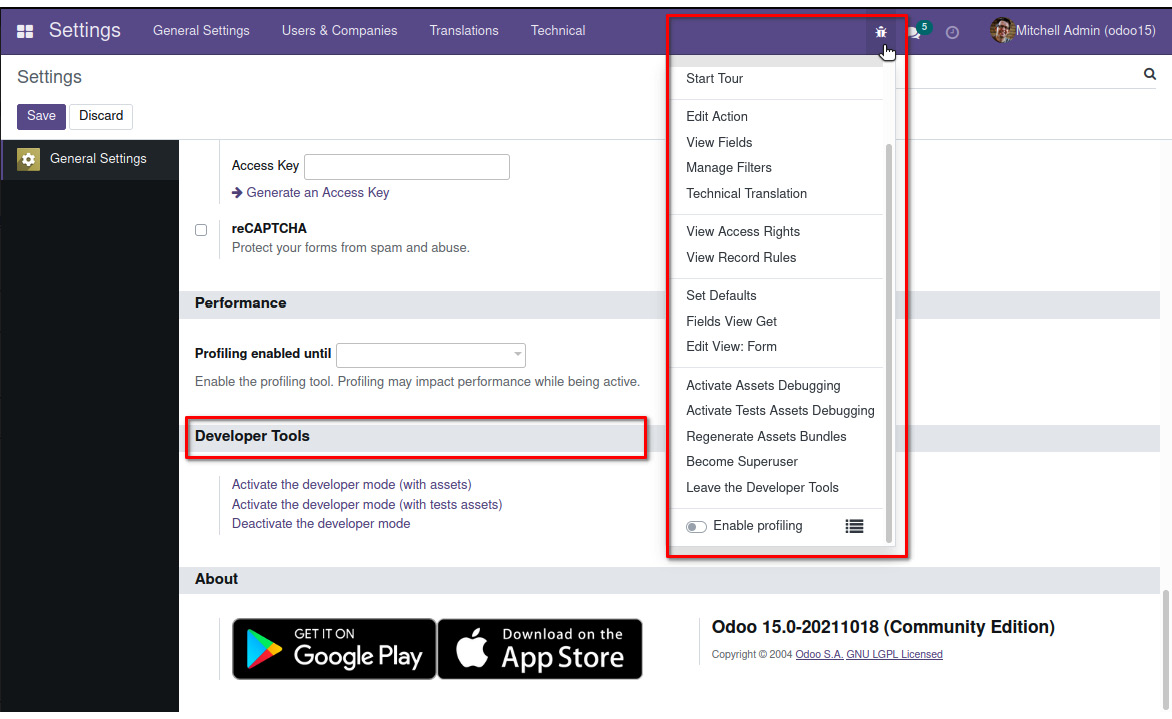
Figure 1.4 – The Settings page with the developer mode enabled
The developer mode also enables additional information on the web client views – when hovering the mouse pointer over a field, a tooltip will display technical information relating to it.
Note
The developer mode can also be enabled by directly editing the current URL without having to leave the current page to open the settings. Edit the URL to change the .../web#... part to insert .../web?debug=1#... in its place. For example, http://localhost:8069/web#home would become http://localhost_8069/web?debug=1#home.
Using the developer mode with assets
For faster load times, the web client minifies the JavaScript and CSS assets into compact files. Unfortunately, that makes web client debugging nearly impossible.
The Activate the developer mode (with assets) option prevents this minification and loads the web assets in individual, non-minified files. This is useful to debug the web client itself, but it comes at the expense of making the web client navigation slower.
Tip
Both Firefox and Chrome browsers have extensions available providing a button to conveniently enable and disable the developer mode in Odoo. Search for Odoo Debug in their extension stores.
About Odoo Studio
It is also worth noting that both the Odoo EE and the Odoo SaaS edition offer the Odoo Studio app – an interactive application builder. We won't be using it because it's not available for the Odoo CE that is used as the example edition in this book.
Odoo Studio provides a user-friendly UI for the same interactive development features introduced in this chapter – along with a few extra features, such as the ability to export our customizations to a file.
Here, we will be using the developer mode (sometimes referred to as the debug mode) and the Technical menu, which are both available in all Odoo editions. Most of what can be built using Odoo Studio can also be built with these tools – albeit in a more technical way that is not as easy for non-developers.
Adding a custom field to a model
Adding a custom field to an existing form is a common customization, and it can be done from the UI without the need to create a custom module.
For our to-do list app, we want to select a group of people that will be able to collaborate on to-do items. We will identify them by setting a flag on their partner form. To do that, we will add an Is Work Team? flag to the Contact model.
The Contact model is part of the Odoo core and is available even if you haven't installed any apps yet. However, you may not have a menu option available to visit it.
If the Contacts app is not available in the main menu, you should install it now. To do this, open the Apps item in the top menu, look up this application, and install it.
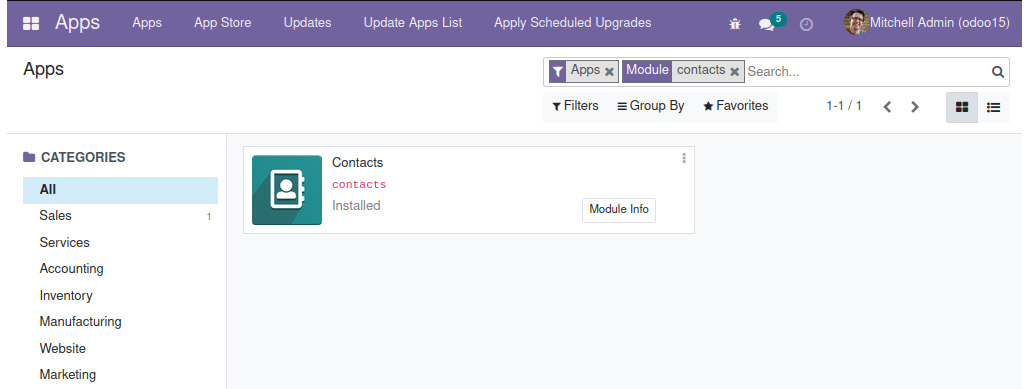
Figure 1.5 – The Contacts app listed in the Apps menu
Once the app is installed, the Contacts application top menu option will be available.
Adding a field to a model
We will start by adding a custom field to the data model.
To do this, click the Contacts app menu item to see the Contacts main view. Click the developer tools bug icon and select the View Fields option.
Changes in Odoo 12
The View Fields option in the developer menu was added in Odoo 12. For earlier versions, fields can be added and edited in the Settings | Technical | Database Structure menu. You can either use the Models or the Fields option.
Now, you will see a list with all the existing fields for the current model: Contact. Click the Create button in the top left and fill in the details for this new field:
- Field Name:
x_is_work_team - Field Label:
Is Work Team? - Field Type: boolean
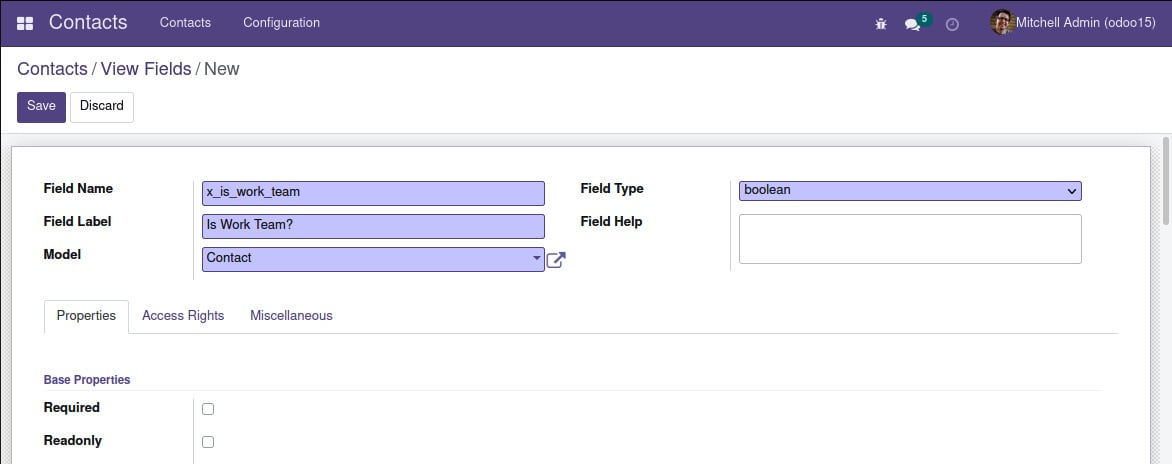
Figure 1.6 – Creating the Is Work Team? field
The Field Name field entry must start with the x_ prefix. This is mandatory for models and fields created from the developer tools. Customizations made through addon modules don't have this limitation.
Click Save, and our new field should have been added to the fields list. By default, the list view is limited to 80 records, so you will need to use the right arrow in the upper-left corner to navigate to the next page to see the new field, or you can edit the number of records to present next to the page navigation arrows.
Adding a field to a form view
Our new field is now available in the Contact model (as noted previously, this is also known as the Partner model). But it is not visible in the UI. It now needs to be given a view. We will add it to the contact's form view.
Go back to the Contacts list and open the form view, either by selecting one of the existing contacts or by clicking on the Create button.
We should now decide where in the form we want to add the field. For example, we could add it after the Tags field. This will be the extension point to use.
Hovering the mouse pointer over the field shows us useful technical details for it, as shown in the following screenshot:
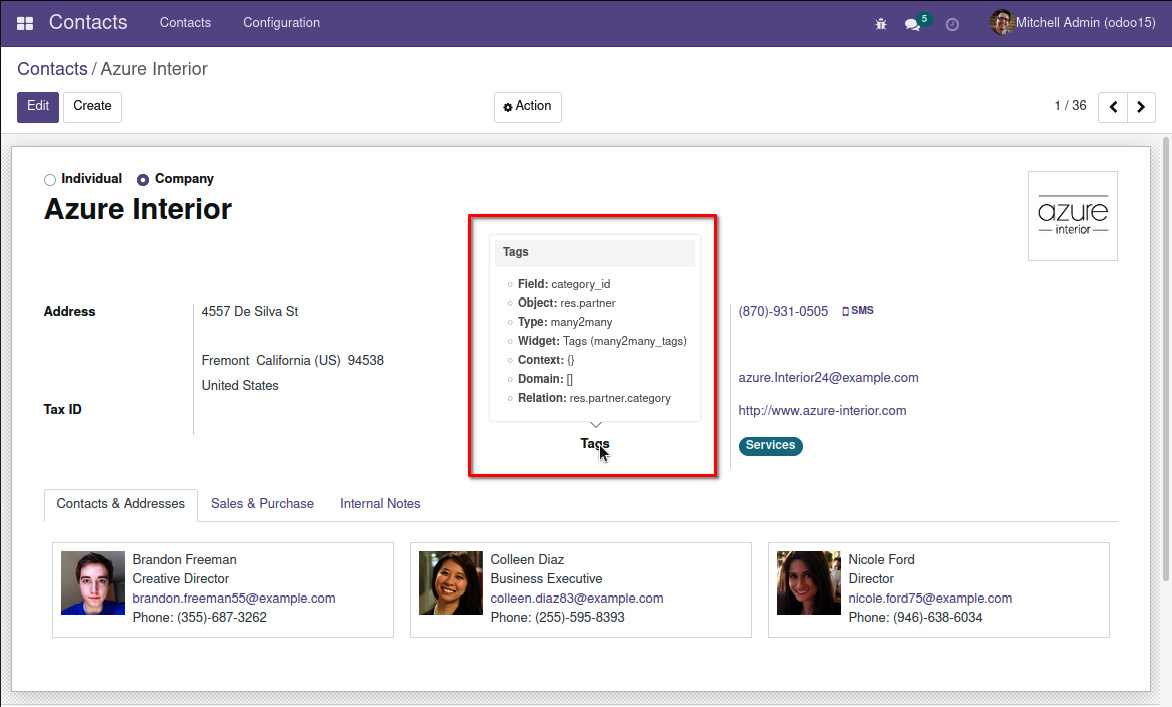
Figure 1.7 – The Tags field tooltip with technical details
Next, we need to find out the technical name of that field. We can find this by hovering the mouse pointer over the field's label. By doing so, we can see that the field name is category_id.
We can now extend the form view to add that field. Click the developer tools bug icon and select the Edit View: Form option. This will open a window with the form's definition.
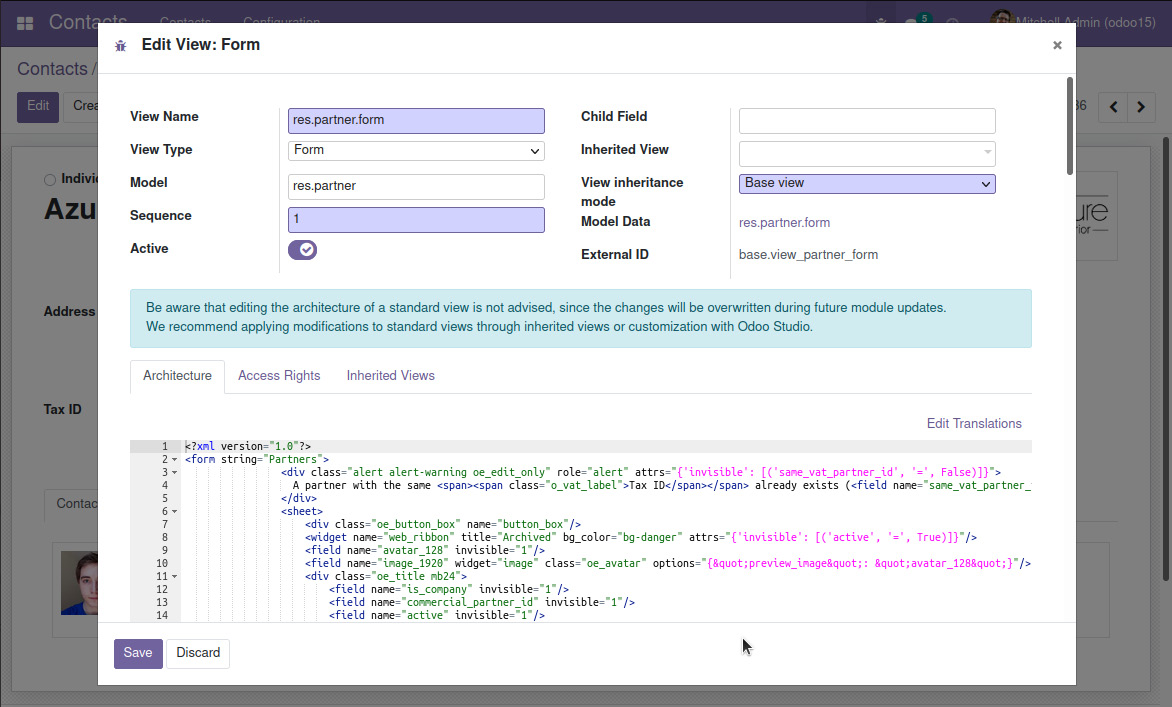
Figure 1.8 – The Edit View: Form window
In the Architecture tab, we can see the XML for the base view. We could edit this directly, but this is not a good idea because those changes will be lost in the case that the module adding it is upgraded. The correct way to edit it is by creating an extension view.
When additional modules are installed, they can add more fields and visual elements to the base view. This is done using extension views, and we can see them in the Inherited Views tab. This is where we will be adding our own extension to the contacts form view.
On the Inherited Views list, click Add a line at the bottom and create the extension view using these values:
- View Name: Add some short description such as
Contacts Form extensions for To-do App. - Architecture: This requires an XML fragment specifying an extension point and the content to add. Use
<field name="category_id" position="after"><field name="x_is_work_team"/></field>.
The extension view should look like the following figure:
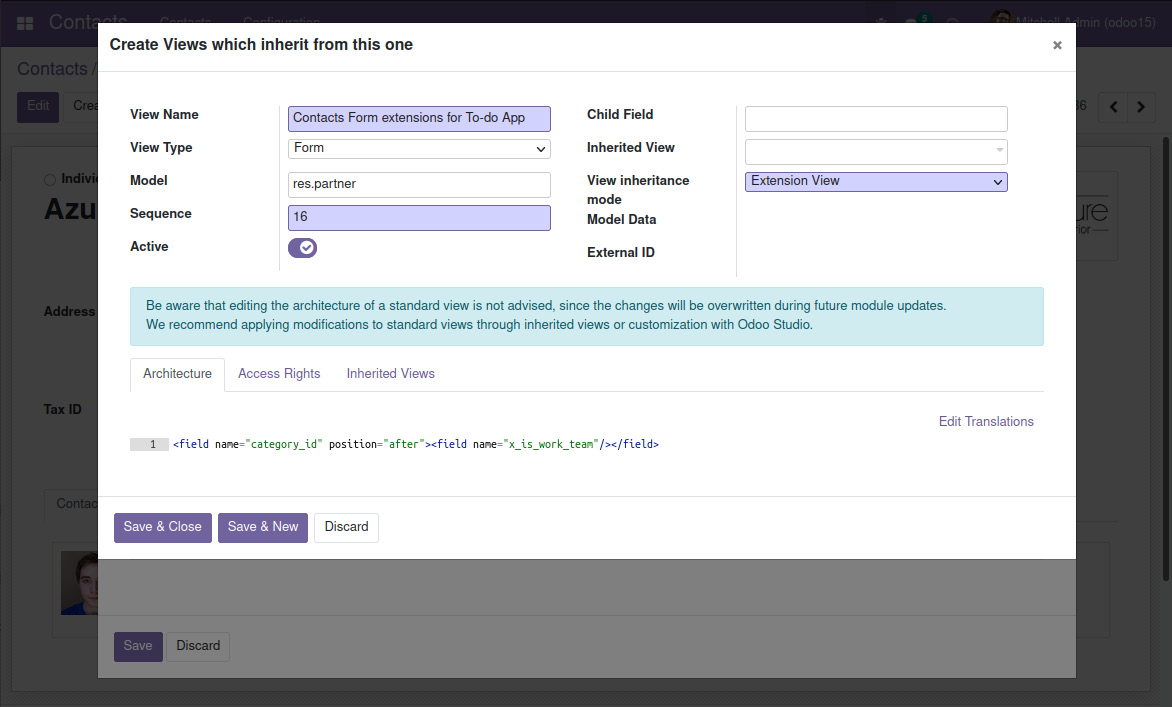
Figure 1.9 – Creating an extension view to add the category_id field
Now, click Save & Close – if your XML is correct, you get back to the Inherited Views list, where our extension will also be included. Click Save to finalize the form changes, and close the Edit Form: View window by clicking the x button in the top right.
The change is made, but the form needs to be reloaded for us to see it. Reload the page, and the Is Work Team? field should now be visible below the Tags field, as shown in the following figure:
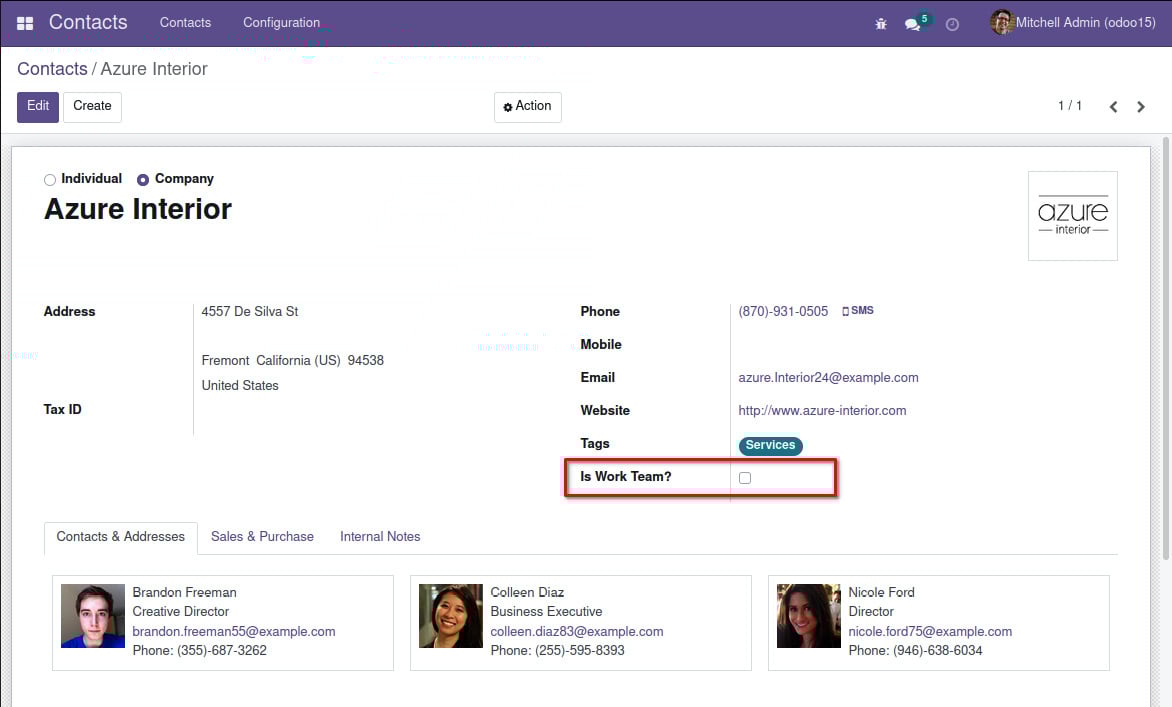
Figure 1.10 – The Contacts form view with the Is Work Team? field visible
This completes the steps needed to add a custom field to a form view. Forms are one of the view types available. The following section discusses view types in more detail.
Understanding view types
We just interacted with a particular view type, the form view. But the user interface also uses other view types.
The initial view type for Contacts is a kanban view, showing the records in data cards. Kanban views can also group the cards in columns. For example, the CRM app uses this in the initial view, the Pipeline view. In a kanban view, the developer menu will show an Edit View: Kanban option.
The list view (sometimes referred to as the tree view) displays the records as a list. In a list view, the developer menu will show an Edit View: List option.
Finally, the search view controls the behavior of the search box on the top-right of the kanban and list views, as well as the buttons under it: Filters and Group By. When a search box is visible, the developer menu will show an Edit View: ControlPanelView option.
The view types available are not limited to these; there are others available that will be explored in Chapter 10, Backend Views – Designing the User Interface.
We can see all the view definitions via the Settings | Technical | User Interface | Views menu option.
A more focused alternative is to use Settings | Technical | Database Structure | Models to find the model we want (in this case, res.partner, alternatively known as Contact), and open the Views tab.
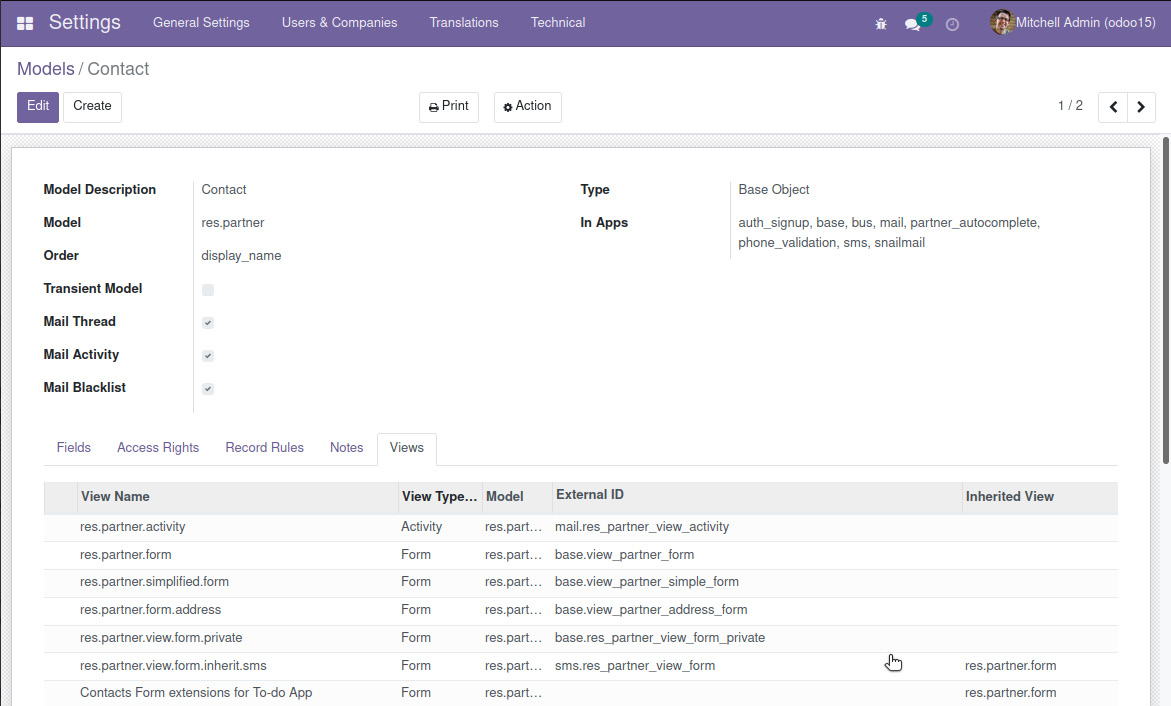
Figure 1.11 – The database structure for the Contact model
Here, we can see all the view definitions for the selected model. We can see records for the different view types – identified by the View Type column – and for base views and their extensions. Changing or adding view records is immediately effective, and the changes will be visible the next time the view is reloaded.
Sorting the list by view type is helpful to see all the extensions related to the same view type together.
The base view is the one with an empty Inherited View field. A view type is not limited to a single base view. For example, the Contact model (res.partner) has multiple base views available for the form view, such as base.view_partner_form and base.view_partner_simple_form.
Views also have a Sequence field. The base view with the lowest Sequence number is the one displayed by default. When visiting the form for the view definition, we will see a field with this Sequence value. Window actions, which are used in menu items, can specify a particular base view to use. As mentioned, if no specific view is defined, the one with the lowest sequence will be used.
Creating a new model
Models are the basic components for building applications and provide the data structures and storage to be used. Next, we will create the model for our to-do list app with three fields:
- Description text
- The
Is Done?flag - Work team (that is, a list of people collaborating in this item)
Model names should use the singular form, so the new model should be named To-do Item. The model technical name must be a valid database object identifier, so we should use letters and underscores and avoid other symbols. Since the models created through the Technical menu must have an x_ prefix, the technical name for the new model will be x_todo_item.
Model definitions are accessed in the Settings app in the Technical | Database Structure | Models menu.
To create a new model, click the Create button on the Models list:
- Fill in the basic definition values for it – enter
To-do Itemin the Model Description field andx_todo_itemfor the Model field. - By default, the model will include in the fields list the
x_namefield. This is a title that represents the record in lists or when it is referenced in other records. It can be used for the To-do Item title, so edit it to change the Field Label column accordingly. - Next, add the
Is Done?field. This should be straightforward. On the Fields list, click Add a line at the bottom of the list to open the new field form, and then, enter these values:- Field Name:
x_is_done - Field Label:
Is Done? - Field Type: boolean
Then, click the Save & Close button and click Save on the model form.

Figure 1.12 – The Create Fields form
- Field Name:
- Now, adding the Work Team field should be a little more challenging. Not only is this a relation field that refers to records in the Contact (
res.partner) model, but it is also a multiple-value selection field.Fortunately, Odoo supports many-to-many relations. This is the case here since a to-do item can be related to many contacts, and each contact can be related to many to-do items.
To add the Work Team field on the Fields list, click again on the form Edit button, then click Add a line to open the new field form. Then, enter these values:
- Field Name:
x_work_team_ids - Field Label:
Work Team - Field Type:
many2many - Related Model:
res.partner - Domain:
[('x_is_work_team', '=', True)]
Many-to-many fields have a few specific base properties: Relation Table, Column 1, and Column 2. These are automatically filled out for you, and the defaults work for most cases. These properties are discussed in more detail in Chapter 6, Models – Structuring the Application Data.
The
Domainattribute is optional and defines a filter for the records to be presented. We are using it to limit the selectable contacts to the ones that have theIs Work Team?flag checked on them. Otherwise, all contacts would be available for selection.The domain expression to use follows an Odoo-specific syntax – it is a list of triplets, where each triplet is a filter condition, indicating the field name to filter, the filter operator to use, and the value to filter against. A detailed explanation of domain expressions is given in Chapter 7, Recordsets – Working with Model Data.
Tip
Odoo has an interactive domain filter wizard that can be used as a helper to generate domain expressions. To use it, select the Settings | Technical | User Interface | User-defined Filters menu option. Once a target model is selected in the form, the Domain field will display an + Add filter button to add filter conditions. When doing so, the textbox below it will dynamically show the corresponding domain expression code.
- Field Name:
- When we are done, click the model form Save button. When the new model is created, a few fields are automatically added. The ORM engine includes them in all models, and they can be useful for audit purposes:
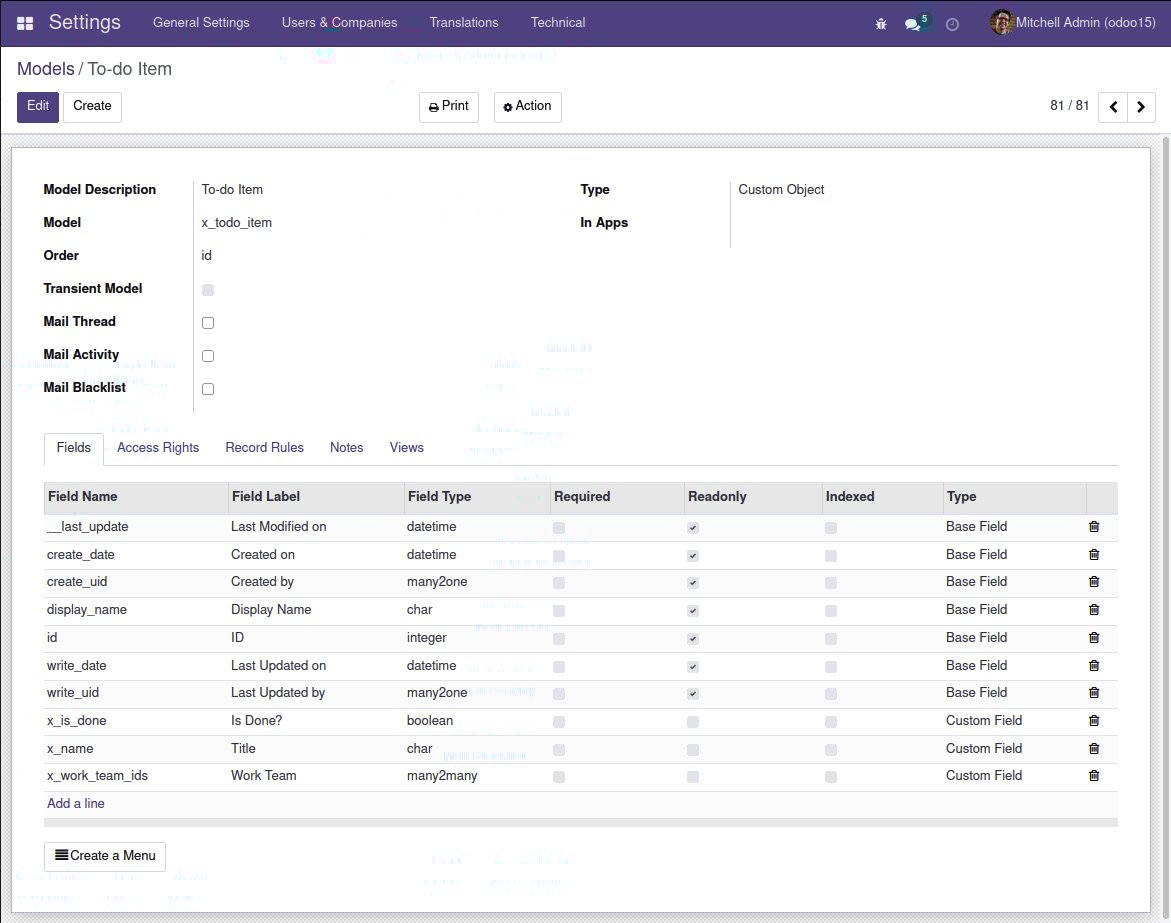
Figure 1.13 – The database structure for the To-do Item model
We now have the underlying model for the to-do list app, but it is still not accessible by users. For that, access security needs to be configured. So, let's look at that in the next section.
Creating menu items and actions
We now have a model to store the to-do items and want to have it available in the UI. This is done by adding menu items to the UI.
We will create a top-level menu item that directly opens the to-do list. Some apps (such as Contacts) work like this, while others have submenu items shown in the top bar.
Menu definitions can be found in the Settings app in the Technical | User Interface | Menu Items option:
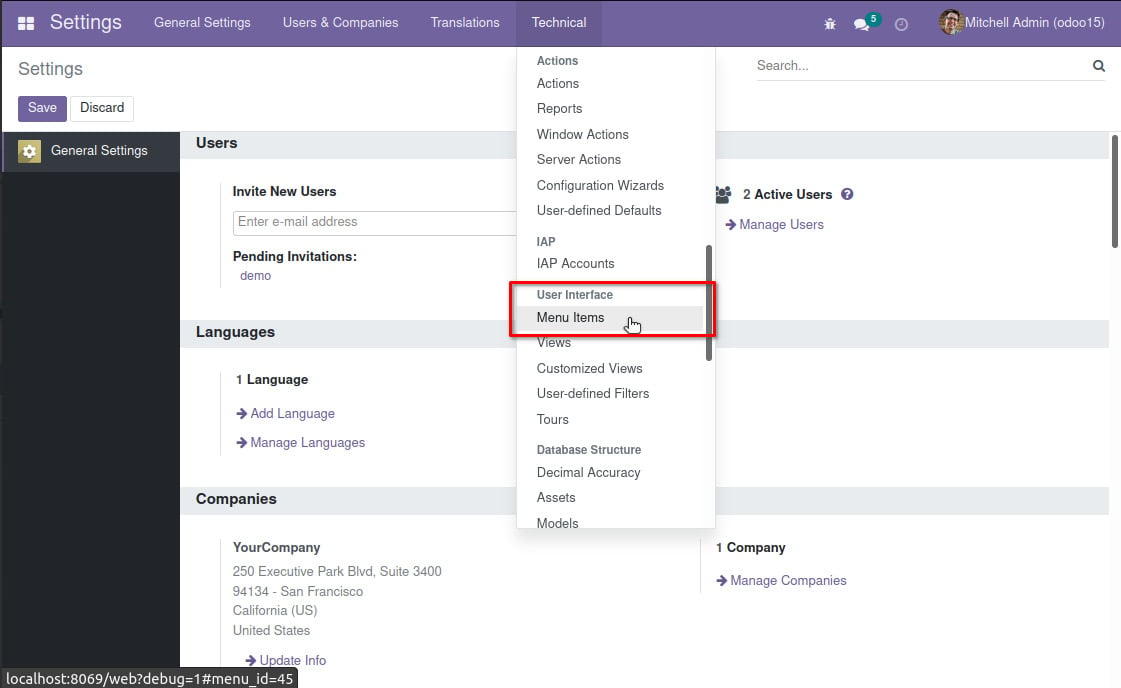
Figure 1.14 – The Technical menu Menu Items option
We'll perform the following steps to create menu items:
- Navigate there, click on Create, and enter the following values:
- Menu:
To-do. - Parent Menu: [leave empty].
- Action: Select the ir.actions.act_window option.
- In the selection box next to the Action field, type
To-do Items, and in the drop-down list, select Create and Edit.... This will open a Create: Action form.
- Menu:
- In the Create: Action form, set the following values:
- Action Name:
To-do Items - External ID Object:
x_todo_item(the technical name of the target model). - At this point, the action definition should look like this:
- Action Name:
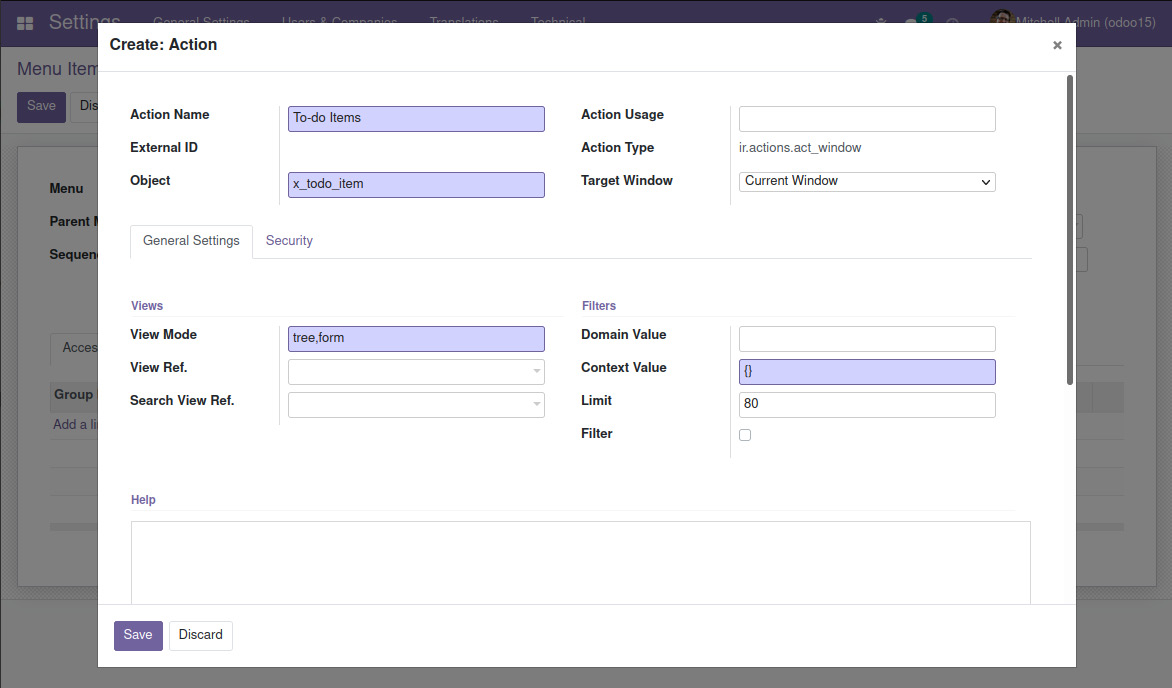
Figure 1.15 – The Create: Action form
- Click Save in the Create: Action form. Then, click Save in the Menu Items form, and the menu item for the to-do list application should be almost ready to use.
Changes to menus require a full browser page reload to be visible. In most browsers, the F5 key can be used for this. But if we try that now, we won't be able to see the To-do menu option yet. Why? The reason we won't be able to see the menu yet is that our user wasn't given access to it.
Access security needs to be configured before the menu item can be presented to the users. We will take care of that in this chapter, but before that, it is worth discussing a few more details about window actions.
Understanding window actions
In our case, an action was added directly to a top-level menu item with no child menu items. But menus can be a tree of menu items with parent/child relations. The leaf menu items have a related action that defines what happens when it is selected. This action name is what will be used as the title of the presented view.
There are several action types available, and the most important ones are window, report, and server actions. Window actions are the most frequent ones and are used to present views in the web client. Report actions are used to run reports and server actions are used to define automated tasks.
At this point, we are concerned with window actions that are used to display views. The menu item we just created for the to-do item uses a window action that was created directly from the Menu Item form. We can also view and edit this window action from the Settings | Technical | Actions menu options. In this particular case, we are interested in the window actions menu option.
Tip
In many cases, it is more convenient to use the Edit Action option in the Developer Tools menu, providing a convenient shortcut to edit the window action that was used to access the current view.
Configuring access control security
Odoo includes built-in access control mechanisms. A user will only be able to use the features they were granted access to. This means that the To-do Item model we created is not accessible by the users.
Changes in Odoo 12
The admin user is now subject to access control like any other user. In previous Odoo versions, the admin user was special and bypassed security rules. This is no longer true, and admin must be granted access privileges to be able to access model data.
Access security is defined using user groups. Groups, which are sometimes called access control lists (ACLs), define the access permissions for models. Users belong to groups. So, each user's access depends on the group they belong to.
For our project, we will create a to-do group to be assigned to the users that should have access to this feature.
Furthermore, we can also define record rules (sometimes called row-level security), restricting the records each user can access.
For our project, we want the to-do items to be private for each user, so users should only be able to access the records they created.
Security groups
Access control is based on groups. A security group is given access privileges on models, and this will determine the menu items available to the users belonging to that group. For more fine-grained control, we can also give access to specific menu items, views, fields, and even data records by using record rules, which we will explain in the next section.
Security groups are also organized around apps, and typically, each app provides at least two groups: User, with permissions for performing daily tasks, and Manager, with permissions for performing all configurations for that app.
We will now create a new security group for the to-do list app.
In the Settings top menu, navigate to Users & Companies | Groups and create a new record using the following values:
- Application: [leave empty] .
- Name:
To-Do User. - Inherited tab: Add a line and select User types / Internal User.
This is how it should look:
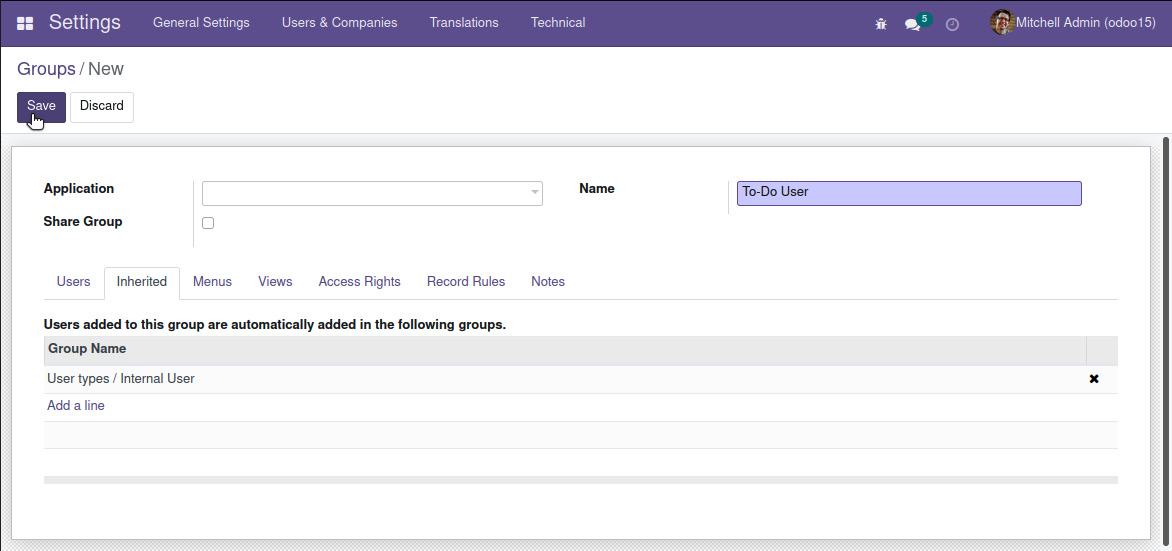
Figure 1.16 – The To-Do User security group
Our security group inherits the Internal User group. Group inheritance means that members of this group will also be members of the inherited groups and will accumulate the permissions granted to all of them. The Internal User group is the basic access group, and app security groups usually inherit it.
Changes in Odoo 12
Before Odoo 12, the Internal User group was called Employee. This was just a cosmetic change, and the technical identifier (that is, the XML ID) is still the same as in previous versions: base.group_user.
Security access control lists
Now, we can grant the group/to-do user access to specific models.
The simplest way to do this is to use the Access Rights tab in the Groups form. Add a line there using these values:
- Name:
To-do Item User Access. - Object: Select To-do Item from the list.
- Read Access, Write Access, Create Access, and Delete Access: Check all of these checkboxes to grant the respective privileges.
It is useful to know that these model ACLs can also be managed from the Technical | Security | Access Rights menu item.
Notice that we don't need to specifically add access to the Contact model since we are inheriting the Internal User group that already grants access to it.
Assigning security groups to users
Now, we can try these new security settings by adding the admin user to this new security group:
- Select the Users & Companies | Users menu item, open the Mitchell Admin user form, and click Edit.
- In the Other section in the Access Rights tab, we will see a To-do User checkbox to enable the security group for this user. Select it and save the form.
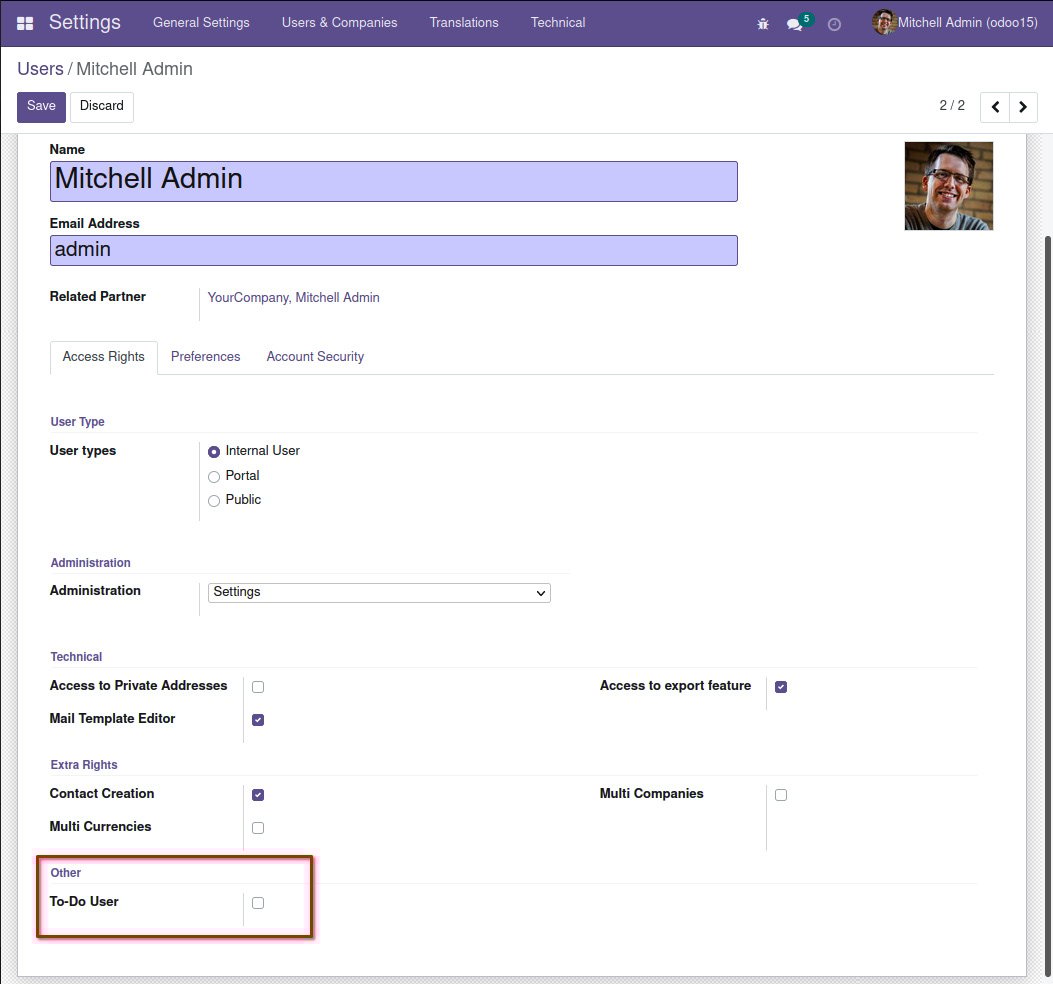
Figure 1.17 – The Mitchel Admin user form
If everything went as expected, you should be able to see the To-do app top menu. A browser page reload should be needed to force a refresh of the menu items.
We haven't created any views for it yet, but the Odoo framework is nice enough to automatically generate some basic views for us:
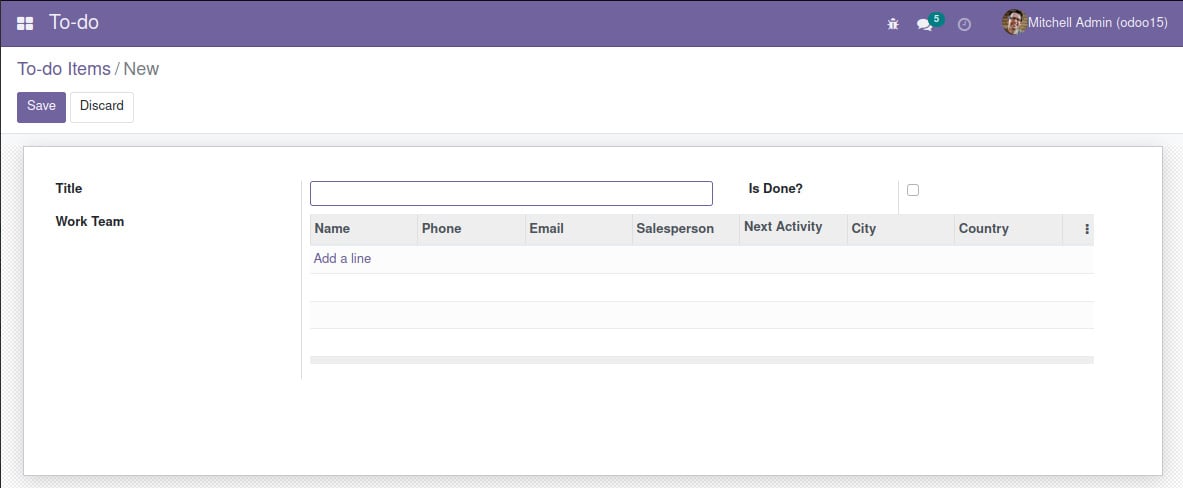
Figure 1.18 – The To-do Items default form view
Security record rules
When given access to a model, users will be able to access all of its records by default. But in some cases, we need to restrict what records each user can access. This can be done using record rules.
Record rules set domain filters on models that will be enforced when read or write operations are made on them.
For example, in our to-do list app, the to-do items are expected to be private to each user, so we want each user to only see their own items. So, we should create a record rule with a filter to show only the records created by the current user, taking the following into consideration:
- Records have a
create_uidfield – which is automatically added by the framework – that stores the user that created the record. So, we can use it to know who owns each record. - The domain evaluation context includes a
uservariable that contains a browser record for the current user. So, we can use dot notation on it to access its attributes, such as theuser.idvalue.
We can use this in a domain expression to achieve our goal:
[('create_uid', '=', user.id)]
Record rules are available in the Settings | Technical | Security | Record Rules menu, or in the View Record Rules option in the developer menu. Navigate there and create a new record rule with the following values:
- Name: Enter a descriptive title such as
To-do User Own Items. - Model: Select the model from the drop-down list (in our case, To-do Item).
- Access Rights: These checkboxes control the actions where the rule will be applied. Keep all of them checked.
- Rule Definition (Domain Filter): Enter
[('create_uid', '=', user.id)]. - Groups: This section contains the security groups the rule will apply to. Click Add a line and select the To-do User group option.
Now, this is what the record rules definition will look like:
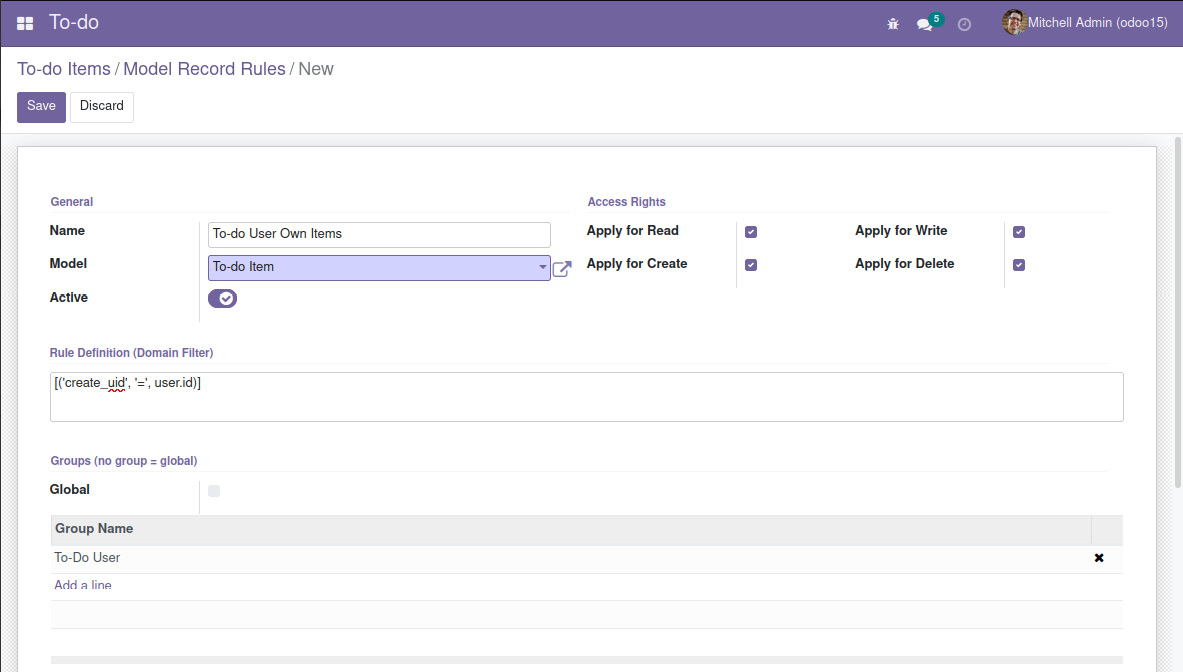
Figure 1.19 – The To-do User Own Items record rule
And we're done. You can now try this new rule by creating a couple of to-do items with both the Admin and Demo users. Each should be able to see only their own items.
Understanding the superuser account
Odoo includes an internal root-like superuser that has special privileges and bypasses security controls. It is used for internal operations or actions that need to ignore security controls. This superuser is named OdooBot – it is automatically created upon database creation and has the database ID 1.
Changes in Odoo 12
Before Odoo 12, the default admin user used for system setups was also the superuser. So, the admin user bypassed access controls by default. This is no longer the case since Odoo 12. Now, the default admin user is a regular user, but it is set as the manager on all Odoo apps by default.
The superuser has no login password, but it is possible to enable one. When logged in as a user with the Admin \ Setting group, the Become Superuser option is then available in the developer menu.
It is also possible to go directly into superuser mode from the login screen. For this, you need to enable the developer mode by editing the URL to add ?debug=1 (for example, http://localhost:8069/web/login?debug=1). Then, the Login as superuser option will be available below the Login button.
When the superuser is enabled, in the upper-right corner, the current user is shown as OdooBot, and the colors in the upper-right area change to yellow and black stripes to make it clear the superuser is enabled.
Caution
Using the superuser should be done only if absolutely necessary. The fact that the superuser bypasses access security can lead to data inconsistencies – for example, in a multi-company context – and should be avoided.
Creating views
We created the To-do Item model and made it available in the UI with a menu item. Next, we will be creating the two essential views for it: the list and form views.
The list view is the most basic way for users to browse the existing records. In some cases, records can be edited directly in the list view, but the most common case is to navigate to a form view when clicking on a record to edit the record data.
Creating a list view
We can manage views in Settings | Technical | User Interface | Views. There, click the Create button and enter the following values:
- View Name:
To-do List View. - View Type: Tree.
- Model:
x_todo_item. - Architecture: This tab should contain the XML for the view structure. Use the following XML code:
<tree>
  <field name="x_name" />
  <field name="x_is_done" />
</tree>
This is what the view definition is expected to look like:
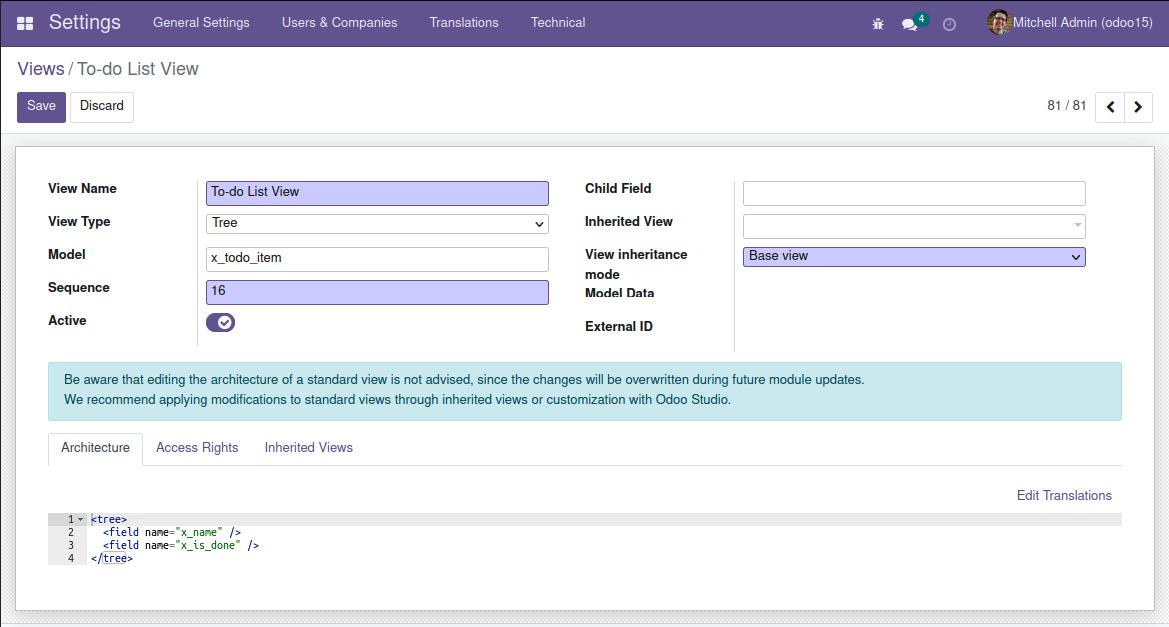
Figure 1.20 – The To-do List View definition
The basic structure of a list view is quite simple – it contains a <tree> element containing one or more <field> elements for each of the columns to display in the list view.
We can do a few more interesting things with list views, and we will explore them in more detail in Chapter 10, Backend Views – Designing the User Interface.
Creating a form view
Form views can also be created in Settings | Technical | User Interface | Views. Create another view record by clicking the Create button and enter the following values:
- View Name:
To-do Form View. - View Type: Form.
- Model:
x_todo_item. - Architecture: In this tab, add the following XML code:
<form>
  <group>
    <field name="x_name" />
    <field name="x_is_done" />
    <field name="x_work_team_ids"
           widget="many2many_tags"
           context="{'default_x_is_work_team': True}" />
  </group>
</form>
Note
If we don't specify the view type, it will be auto-detected from the view definition.
The form view structure has a root <form> element, which contains elements such as <field> among others. We will learn about these other elements in Chapter 10, Backend Views – Designing the User Interface. For the x_work_team_ids work team field, we chose to use a specific widget – many2many_tags – that presents the related records as button-line tags instead of the usual list.
You can also see that a context attribute is being used in the x_work_team_ids work team field. By default, relational fields allow us to directly create a new record to be used in the relation. So, users can create a new Partner record directly from the Work Team field. Since only partners with the Is Work Team? flag set are selectable, we want any created partners to have this flag enabled by default. This is what the default_x_is_work_team context key is doing – setting a default value for the records created from this field.
And with that, we have our new form view. If we now try the To-Do menu option and create a new item or open an existing one from the list, we will see the form view we just added.
Creating search views
We can find a search box in the top left of the Odoo views screen. The search box allows us to search in particular fields. The Filters and Group By buttons are available under the search box and offer some predefined options.
The Search view is the UI element controlling these behaviors. It defines the searches made when typing in the search box and the options available in the Filters and Group By buttons.
Views can be edited either in the Settings | Technical | User Interface menu or from the Edit ControlPanelView option in the developer tools menu in Odoo 13, or Edit Search View in previous Odoo versions.
The To-do Item model has no search view yet, so we should create a new one. We will add an option to filter the outstanding to-do items to the filters menu.
Fill in the following values in the new View form and click Save:
- View Name:
To-do Search View. - View Type: Search.
- Model:
x_todo_item. - Architecture: In this tab, add this XML code:
<search>
 <filter name="item_not_done"
         string="Not Done"
         domain="[('x_is_done', '=', False)]" />
</search>
After this, and when reopening or reloading the to-do list view, the Not Done option should be available in the Filters option list.
Enabling default filters on views
It would be nice to have this filter enabled by default and remove it when needed.
When we click the To-do menu option, it runs a window action to open the To-do list view. The window action context object can be used to set default filters in a similar way to how default values can be set on fields.
Let's try this:
- Open the To-do menu option to navigate to the To-do list view.
- Open the developer tools menu and select the Edit Action option. This will open a form with the window action used to open the current views. In the General Settings tab, in the Filters section, we have the Context Value field, along with a Domain Value field.
- In the Context Value field, enter the following:
{'search_default_item_not_done': True}
The search_default_ prefix instructs a particular filter – item_not_done in this case – to be selected by default. Now, if we click on the To-do menu option, we should see the Not Done filter enabled by default on the search box, and the user is free to disable it.
The Domain Value field can also be used to set a filter on the records to present, but it will be a fixed filter that can't be removed by the user.
Summary
In this chapter, we presented an overview of Odoo's components, and we also made use of the developer mode to dive into Odoo's internals and understand how the components work together to create applications.
We used these tools to build a simple application with models, views, and the corresponding menu. We also learned how to use the developer tools to inspect existing applications or make quick customizations directly from the UI.
In the next chapter, we will learn how to install Odoo from source and to prepare the development environment to be used for Odoo module development.