Download code from GitHub
Odoo provides a rapid application development framework that's particularly suited to building business applications. This type of application is usually concerned with keeping business records, centered around create, read, update, and delete (CRUD) operations. Not only does Odoo makes it easy to build this type of application, it also provides rich components to create compelling user interfaces, such as Kanban and Calendar views.
This book is organized into five parts. We start by providing an overview of the Odoo framework, setting up a development environment, and building our first Odoo app. Being generally familiar with the main Odoo components, we will dive, in more detail, into each of the three main application layers: models, business logic, and views. Once we have built our app, it needs to be tested, deployed to a production environment, and maintained. The final part of the book will cover these topics.
In this chapter, we will quickly get into the action, exploring the Odoo internals directly from the web user interface, even before having set up our local development environment.
We will learn about the Odoo architecture, to understand where each of the components fit. Then we will use the Developer mode to create a simple Library app, learning how to add fields to existing Models, add new Models, create our custom Views for them, and make them available to users through Menu Items.
We will next provide a high-level overview of the Odoo architecture, before we perform a hands-on customization using the Developer mode.
Odoo follows a multi-tier architecture, and we can identify three main tiers: Data, Logic, and Presentation:

The Data tier is the lowest-level layer, and is responsible for data storage and persistence. Odoo relies on a PostgreSQL server for this. PostgreSQL is the only supported RDBMS, and this is a design choice. So, other databases such as MySQL are not supported. Binary files, such as attachments of documents or images, are usually stored in a filesystem.
The Logic tier is responsible for all the interactions with the data layer, and is handled by the Odoo server. As a general rule, the low-level database should only be accessed by this layer, since it is the only way to ensure security access control and data consistency. At the core of the Odoo server, we have the Object-Relational Mapping (ORM) engine for this interface. The ORM provides the application programming interface (API) used by the addon modules to interact with the data.
For example, the Partner data entity, such as a Customer or a Supplier, is represented in the ORM by a model. This model is a Python object class supporting several interaction methods, such as create() to create new Partner records, or read() to query existing records and their data. These generic methods can implement specific business logic in particular Models. For example, the create() method might implement default values or enforce validation rules; the read() method might support some automatically computed fields, or enforce access controls depending on the user performing that action.
The Presentation tier is responsible for presenting data and interacting with the user. It is implemented by a client responsible for all the user experience. The client interacts with the ORM API to read, write, verify, or perform any other action, calling ORM API methods through remote procedure calls (RPCs). These are sent to the Odoo server for processing, and then the results are sent back to the client for further handling.
For the Presentation tier, Odoo provides a full-featured web client out of the box. The web client supports all the features needed by a business application: login sessions, navigation menus, data lists, forms, and so on. The global look and feel are not as customizable as a frontend developer might expect, but it makes it easy to create a functional and consistent user experience.
A complementary presentation layer is the included website framework. It gives full flexibility to create web pages as the exact user interface intended, like in other CMS frameworks, at the expense of some additional effort and web expertise. The website framework supports web controllers to implement code for presenting specific logic, keeping it separate from the model intrinsic logic. Frontend developers will probably feel very much at home in this space.
Due to the openness of the Odoo server API, other client implementations are possible, and could be built in almost any platform or programming language. Desktop and smartphone apps can be built to provide specific user interfaces, leveraging the Odoo Data and Logic tiers for business logic and data persistence.
A particular example of a third-party Odoo client is ERPpeek. It is a command- line client, allowing you to connect and interact with remote Odoo servers. It can be useful for developers or system administrators with Odoo technical knowledge, to inspect data on the server, script advanced operations, or perform maintenance operations. We will present an overview of ERPpeek in Chapter 8, External API – Integrating with Other Systems.
Many Odoo customizations can be made directly from the user interface.
This has the advantage of being a rather quick way to make changes to applications. It can be used from small modifications, such as adding a field, to larger customizations, such as creating an app with several models, views, and menu items.
These customizations done directly from the user interface have some limitations, when compared to customizations done with programming tools, covered throughout the rest of this book. For example, you can't add or extend ORM methods (although Automated Actions can be used as a close alternative to that). They also can't be easily integrated into a structured development workflow, such as running automated tests and deploying into several environments (for example, quality assurance, pre-production, and production).
Odoo 10.0 introduced Odoo Studio, an app designer to create customizations from the user interface. We won't discuss Odoo Studio here, but it ends up being a user-friendly frontend for the developer tools we introduce throughout this chapter, so the limitations on customizations possible are about the same. Odoo Studio does include an important additional feature, that is, the ability to export the customizations done in a convenient module package. It can be very helpful to allow power users to create customizations in a SaaS instance or simpler self-hosted technical environments.
The remainder of this book explains how to develop for Odoo in a structured way, creating addon modules with your code editor.
But in this chapter, we will be using the Developer mode features to perform customizations directly from the web client user interface, since it is important for an Odoo developer to have a good understanding of these tools and what can be achieved with them.
But more importantly, the goal for this exercise is to gain a good understanding of the several layers involved in an Odoo application, and how their components are organized.
Enough talk; let's get busy trying out these tools.
To explain the developer tools, we will use a simple project: we will create a very simple Library app. Our Library aims to keep a record of our Books and their Authors. It should keep a list of the Authors and the Books authored by each Author.
Our Library app needs two Models: Authors and Books. These two Models have a many-to-many relationship between them: each Author can have many Books, and each Book can have many Authors.
Odoo already provides the built-in Partner Model, with the res.partner technical name, to represent people, organizations, and addresses. For example, customers, suppliers, contact people, and application users are all Partners.
We will make our life simpler if we reuse it for the Authors of our Library app. We will be adding an Is Book Author? flag to this Model, and a menu item showing only the Author Partners.
The book we will create has a completely new Model, the corresponding form, and list views, and a menu item to access them.
We will be needing an Odoo test database to work with.
In Chapter 2, Installing and Organizing the Development Environment, we will explain how to install Odoo from source and set up our development environment. But we want to skip that for now, and start working directly from the user interface of some existing Odoo server.
If by chance you have a self-hosted Odoo installation working, that's perfect; we can use it to go through the rest of this chapter. At the login screen, access the Manage Databases menu option and create a new database to play with.
If you don't have an Odoo installation available, you can instead create a test database at Odoo.com to follow this chapter. The user interface there will be from the Odoo Enterprise Edition, so it will be a little different from the screenshots you will find here, but that should not be a problem. To create a new database, you will probably be asked to select a starting app. No specific app is required to follow this chapter, but if you're unsure on what to pick, CRM would be fine.
Note
Odoo follows an "open core" business model, where the product is published in two editions, Community and Enterprise. The Enterprise edition is built on top of the Community edition, adding some premium features to it, including an improved user interface. At Odoo.com, you will be using the Enterprise edition, and in the public GitHub repository, you will find the Community edition. While the user interface looks different in both editions, they are just cosmetic changes; the user interface features are the same in both editions.
Now, access the Odoo database with your browser and log in. For Odoo online, the address should be something like https://<mydbname>.odoo.com. For a self-hosted instance, it should be something like http://<server-address>:8069. The 8069 port is the Odoo default. If your installation uses a different port, you should change it accordingly.
We will be using the Contacts Directory app, so the first thing to do is to install it. Open the Apps top menu, look up this app, and install it, if you have not already done so:

Now that we have an Odoo instance to work with, the next step is to enable the developer tools, that give us the access to the Odoo internals.
In Settings | Dashboard, at the bottom right, you can find the Activate the developer mode link. Clicking on it enables the Developer mode features for this browser window.
Note
For Odoo 9.0 and before, the Developer mode is activated in the About dialog window, available from the User menu, at the top-right corner of the web client.
We also have available an Activate the developer mode (with assets) option. What it does is to prevent web client asset minification. It is useful to debug the web client itself, at the expense of making the navigation a little slower.
For faster load times, the web client minifies the Javascript and CSS assets into compact files. Unfortunately, that makes web client debugging nearly impossible. The Activate the developer mode (with assets) option prevents this minification and loads the web assets in individual, non-minified files.
Note
You can enable the Developer mode without having to leave your current screen to open settings. Just edit the current URL to insert ?debug, or ?debug=assets, just after the /web part.
For example, http://myserver/web#home would be changed tohttp://myserver/web?debug#home.
Although there is no link to enable it, the frontend framework also supports the debug flag. To disable asset minification in a frontend web page, add ?debug=assets to the corresponding URL. Take note that the option will probably not persist when navigating through links to other frontend pages.
Once the Developer mode is enabled, we will see two additional menus available:
- The Debug menu, the bug icon at the right-hand side of the top menu bar, just before the username and avatar
- The
Technicalmenu item, in theSettingsapp:

Note
The Developer mode also enables additional information on form fields: when pausing the mouse pointer over a field, a tooltip will display technical information on it.
We will be explaining and making use of these Developer mode features in the next sections of this chapter.
Adding a custom field to an existing form is a common customization, and it can be done from the user interface, without the need to create a custom module.
For our Library app, we want to add the Is Book Author? flag to the Partner model, to make it easier to list everyone who is a book author.
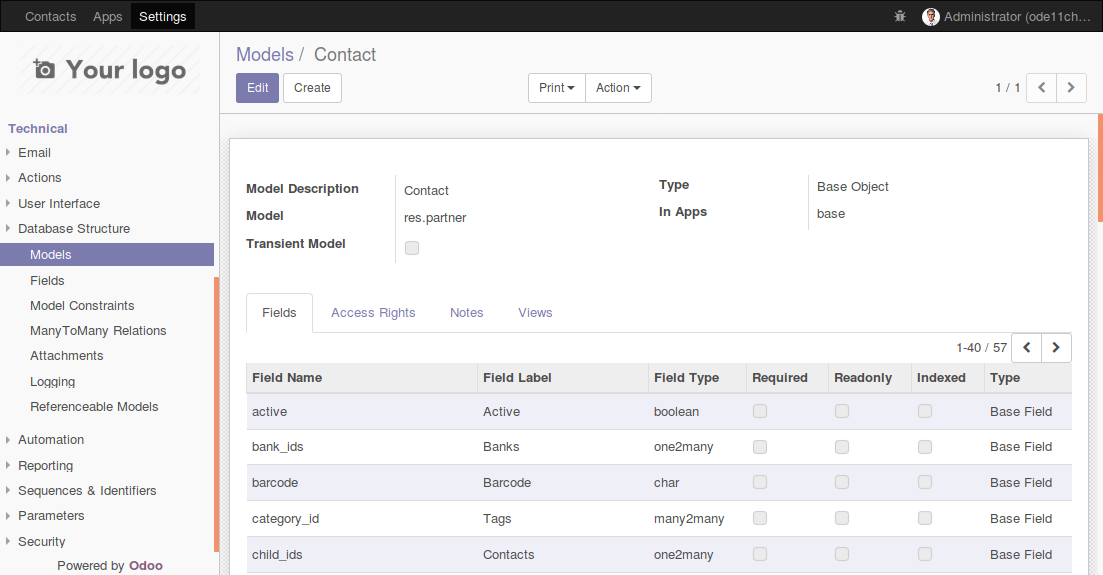
To do this, in the Settings app, go to the Technical | Database Structure | Models menu item, and look up the res.partner model, with Contacts for Model Description. Click on it to open the corresponding form view, and you will see all the specific details about the Partner model, including the field list:
Now, Edit the form and click on Add an item at the bottom of the Fields list. A pop-up window will be presented for the new field creation.
Let's fill in the configuration:
- Field Name:
x_is_book_author - Field Label:
Is Book Author? - Field Type:
boolean
The Field Name must start with x_. This is mandatory for Models and Fields created directly through the user interface. Customizations made through addon modules don't have this limitation.
That's it. Click Save & Close and our new field should have been added to the Fields list. Chances are that this model has more than 80 fields, and so you might need to navigate to the next page of the Fields list to see it. To do so, use the right arrow at the top left of the Fields list.
Now, click on the top-left Save button to make this change permanent.
Our new field is now available in the Partners model, but it is not yet visible to users. For that, we need to add it to the Views.
Still, on the Partner/Contact Model form, click on the Views tab, and we will be able to see all the View definitions for the res.partner model. As you can see, each View is a record in the database. Changing or adding View records is immediately effective, and will be visible the next time that View is reloaded.
There are a couple of important things to notice in the Views list.
We can see that there are several View Type, such as Form, Tree, Search, or Kanban. The Search views are actually definitions on the filters available in the top-right search box. The other view types are the different ways the data can be displayed. The basic ones are Tree, for list views, and Form, for the detailed form view.
Note
Both Tree and List can be used to refer to the same view type. They are in fact lists, and the Tree name exists for historical reasons: in the past list views used to have a "tree" hierarchical mode.
If you sort the list by View Type, you will notice that the same view type can have multiple definitions. In fact, we can have several Base view definitions, the ones with an empty Inherited View field. And we can have several Extension view definitions, also called Inherited Views, adding incremental changes to a base view, for example, to add a field to an existing form.
Note
Extension views can themselves be extended by other extension views. In this case, the later extension is applied to the base view after all preceding extensions have been already applied to it.
For the res.partner model, we can see that there are two base forms: res.partner.form and res.partner.simplified.form. Client Actions, such as the ones in menu items, can specify the particular base view to use. If none are defined, the one with the lowest Sequence is used. You can think of it as being the default view. Clicking on a Views line, we will see a form with the View's details, including the Sequence value.
To learn what the specific view used somewhere in the user interface is, we can inspect it using the Debug menu. Let's try it now. Click on the Contacts app and we will be presented with a list of contact cards. Clicking on any of the cards will show us the corresponding FormViewDebug menu (the bug icon at the top right), select the Edit FormView option:
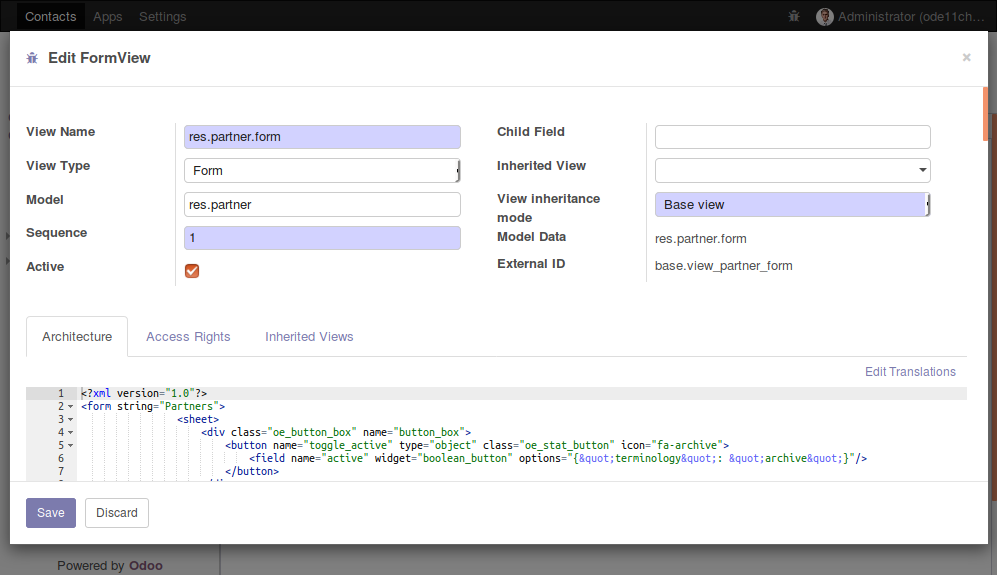
This will show the same view details form we saw before in Models, but positioned on the actual view definition used here. As you can see, it is the res.partner.form view.
In the Architecture field, we can see the XML with the view definition. We could just edit it to add our new field. While that works, in the long run it is not a good idea. This view is owned by an addon module, and if some time in the future that module is upgraded, these customizations would be overwritten and lost. We can learn about the owner module through the External ID field. In this case, it is base.view_partner_form, so we know that this view belongs to the base module.
The proper way to modify a view is to create an Inherited View extension.
First, we need to pick an element from the original view to use as the extension point. We can do that by inspecting the base view and choosing an XML element with a name attribute. Most of the time, this will be a <field> element. Here, we will pick the <field name="category_id" ...> element.
Now, open the Debug menu, click on the Edit Form View option, select the Inherited Views tab, and click on Add an item at the bottom of the list.
A pop-up window, Create: Views which inherit from this one, will be shown, and we should fill it with the following values:
View Name:Contacts - Custom Is Book Author FlagArchitecture: Use the following XML:
<field name="category_id" position="after">
  <field name="x_is_book_author" />
</field>
The other important fields, such as the Model, View Type, and Inherited View, already have correct default values.
We can now Save & Close. Save in the Edit Form View window and then close it. We will be able to see the change done once we reload the Contacts form view. This means reloading the page in your web browser. In most browsers, you would do that by pressing F5.
Now we will be creating new application features, rather than extending already existing ones. We will continue working on our Library project.
First, we want to add a Library top menu, and we can already add the Books Authors menu item to it. Next, we will create a new Model for Books, and make it available to users by adding a menu item for it. Finally, we will create the list and form views for the Books model.
We now have a way to list Authors. It is the list of all Partners with the Is Book Author? flag checked.
Now, we want to add an Authors menu item that opens that list, filtering away the other Partners that are not Authors. The good news is that we can do this pretty easily by reusing the already existing Partner views.
Before that, we want to create the top menu item for our shiny new Library app, under which we will be including the menu item for the Authors, and later a menu item for Books.
The menu definitions can be seen in the Settings app, at Technical | User Interface | Menu Items. Create a new menu item using the following values:
- Menu:
Library - Parent Menu: (empty)
- Action: (empty)
In the Submenus tab, click on Add an item to add a sub-menu using these values:
- Menu:
Book Authors - Parent Menu:
Library(the default value) - Action: Select
ir.actions.act_window, and in the selection list on the right click onCreate and Edit, opening a form to create the related Window Action. Set the following values on the Window Action:- Action name:
Book Authors - Object:
res.partner(the technical name of the target Model):
- Action name:

Save all the forms we opened, and the menu tree for our Library app should be ready to use:

To see changes in the menu, we need to reload the web client. We can see that the menu is a tree of menu items, with parent/child relations. The leaf menu items have a related Action, defining what happens when it is selected. This Action name is what will be used as the title of the presented views.
There are several Actions types available, and the most important ones are Window, Reports, and Server Actions. Window Actions are the most frequent ones, and are used to present Views in the web client. Report Actions are used to run reports and Server Actions are used to define automated tasks.
At this point, we are concerned with Window Actions that are used to display views.
The Menu Item we just created for Book Authors uses a Window Action, which was created directly from the Menu Item form. We can also view and edit it from the Settings | Technical | Actions menu options. In this particular case, we are interested in the Window Actions menu option.
It happens that the Book Authors Action we created is too simple, and does not perform what we want: it opens a list with all Partners, regardless of whether they have the Is Book Author? set. We need to fix that.
Open the Window Actions menu item, look up our recently created Book Authors action, and edit it. We are interested in the Filters section, found inside the General Settings tab.
Note
In many cases, it is more convenient to use the Edit Action option in the Debug menu, providing a convenient shortcut to edit the Window Action that was used to access the current view.
The Domain Value field can have an expression defining a filter for the records to be presented. This "domain expression" follows an Odoo-specific syntax that will be explained in later chapters. For now, it's enough to know that it is a list of triplets, where each triplet is a filter condition.
In our case, the expression to use for the Domain Value is:
[('x_is_book_author', '=', True)]For usability, we would also want new records created to have the Is Book Author? flag checked by default. An Action is able to do this, allowing us to set default values on the views it presents. This is done using the Context Value. The Context is the way Odoo passes around session information, including default values to be used. It will be discussed in detail in later chapters, and for now we just need to know that it is a dictionary of key-value pairs. Values prefixed with default_ provide the default value for the corresponding field.
In our case, the expression needed for the Context Value is:
{'default_x_is_book_author': True}
That's it. If we now try the Library | Book Authors menu option, it should list only Partners with the Is Book Author? flag checked, if any. And if we try to create a new Book Author, we will see that the Is Book Author? checkbox will be conveniently checked by default.
Note
The Domain filter we used can't be removed by the user. It is possible to set default filters that can be removed, using the Context to enable a default Search filter instead. This is done with a search_default_<field> key, as explained in Chapter 9, Backend Views – Design the User Interface.
We now have a Library top menu with a menu item for Book Authors. It's time to add a Books menu item to hold the records for books.
Let's visit again, in Settings, the Technical | Database Structure | Models menu, and click on Create. Fill in the Model form with these values:
- Model Description:
Book - Model:
x_library_book
We should save it before we can properly add new fields to it. So click on Save and then Edit it again. You can see that a few fields were automatically added. The ORM includes them in all Models, and they can be useful for audit purposes.
The x_name (or name) field is a title representing the record in lists or when it is referenced in other records. For us, it makes sense to use it for the book title. You may edit it and change the Field Label to a more meaningful Title.
We also add a field for the book authors. A book can have many authors, and any author can have many books. So this is a many-to-many relationship.
On the Fields list, click on Add an item to create a new field with these values:
- Field Name:
x_author_ids - Field Label:
Authors - Field Type:
many2many - Object Relation:
res.partner - Domain:
[('x_is_book_author', '=', True)]
The many-to-many field has a few specific definitions: the Relation Table, Column1, and Columns2 fields. These are automatically filled out for you and the defaults are good for most cases, so we don't need to worry about them now. These will be discussed in more detail in Chapter 4, Models – Structuring the Application Data.
The Domain attribute is optional, but we used it so that only book authors are selectable from the list. Otherwise, all Partners would be available for selection.
We now need to make this Model available in the user interface. If we create a menu item for a new model, it can be used right away, since Odoo will automatically generate default views for it.
In Settings, navigate to Technical | User Interface | Menu Items and create a new record with the following values:
- Menu:
Books - Parent Menu:
Library - Action: Select
ir.actions.act_window, and in the selection list on the right, click onCreate and Editto open a form for the creation of the related Window Action:- Action name:
Books(will be the title used for the presented views) - Object:
x_library_book(the technical name of the target Model)
- Action name:
Save the Action and Menu Item, and once we reload the web client the Library top menu app will show the Books option alongside the Book Authors option.
Try it and you will see the basic, but functional, automatically generated views. We will want to create our own views, so that's what we will be working on in the next section.
We have created the Books model and made it available in the user interface with a Menu Item. Next, we will be creating the two essential views for it: a list (also called a tree) and a form.
In Settings, navigate to Technical | User Interface | Views and create a new record with the following values:
- View Name:
Books List View - View Type:
Tree - Model:
x_library_book
In the Architecture tab, we should write XML with the view structure. Use the following XML code:
<tree>
  <field name="x_name" />
  <field name="x_author_ids" widget="many2many_tags" />
</tree>
The basic structure of a list view is quite simple: a <tree> element containing one or more <field> elements for each of the columns to display in the list view. We added the widget attribute to the Authors field, to have it presented as button-like tags.
We can do a few more interesting things with list views, and will explore them in more detail in Chapter 9, Backend Views – Design the User Interface.
Next, we will create the form view. Create another new record, and use the following values:
- View Name:
Books Form View - View Type:
Form - Model:
x_library_book
In the Architecture tab, type the following XML code:
<form>
  <group>
    <field name="x_name" />
    <field name="x_author_ids"
           widget="many2many_tags"
           context="{'default_x_is_book_author': True}" />
  </group>
</form>
The form view structure has a root <form> element, containing elements such as <field>, among others that we will learn about in Chapter 9, Backend Views – Design the User Interface. Here, we also chose a specific widget for the Authors field, to be displayed as tag buttons instead of a list grid. We also added a context attribute, so that when new Authors are created directly from here, they will already have the Is Book Author checkbox enabled.
Odoo includes built-in access control mechanisms. A user will only be able to use the features he was granted access to. This means that the Library features we created are not accessible by users. The admin user can because it is a special case; the access control mechanisms don't apply to it.
The access control is based on Groups. A security Group is given access to Models, and this will determine the menu items available to the users belonging to that Group. For more fine-grained control, we can also give access to specific Menu Items, Views, Fields, and even data records (with Record Rules).
The security Groups are also organized around apps, and usually each app provides at least two Groups: User, capable of performing the daily tasks, and Manager, able to perform all configurations for that app.
We cover this topic in more detail in Chapter 5, Import, Export, and Module Data, but will give a short introduction to it here, so that our users can use the Library app.
Let's create a new security Group. In the Settings top menu, navigate to Users & Companies | Groups. Create a new record using the following values:
- Application: Type
Library, and select theCreate "Library"option in the popup - Name:
User - Inherited tab: Add the item
Employees / Employee:
>

The Library app is not available yet in the Application selection list, so we added it directly from the Group form.
We also made it "inherit" the Employee Group. This means that members of this Group will also be made members of the inherited Groups (recursively), effectively having the permissions granted to all of them. Employee is the basic access Group, and app security Groups usually inherit it.
Now we can grant access to specific Models to the Library / User Group. We can use the Access Rights tab of the Groups form for this. Add an item there, using these values:
- Object: select
Library Bookfrom the list - Read, Write, Create and Delete Access: Checked
- Name:
Library Book User Access
The Name attribute is just informative but is mandatory. The Model access can also be managed from the Technical | Security | Access Control List menu item.
We don't need to add access to the Partner model because we inherit the Employees Group that already has access to it.
We can now try this new security group on a user. If you are using an Odoo instance with demo data installed, you should have the DemoUser that we can use for this. If not, no problem, you can create or use an existing user. The point here is to not use the admin user, since it has special security privileges and bypasses access control.
Select the Users & Companies | Users menu item and edit the DemoUser

In the Access Rights tab, in Application Accesses section, we should see a Library option, where we can select the User security group. Select it, save, log out from the Administrator account, and log in with the demo user (the default password is demo).
If everything was done correctly, you should be able to see the Library top menu, and use it to add books and authors.
Throughout this chapter, we have had the chance to create a new Books Model, but also to make use of the already existing Partners Model. It is worth learning more about these out-of-the-box models.
At the core of Odoo, we have the base addon module. This provides the essential features needed for Odoo apps. Then, we have a set of built-in addon modules, providing the official apps and features made available with the standard product.
The base module provides two kinds of Models:
- Information Repository,
ir.*models - Resources,
res.*models
The Information Repository is used to store data needed by Odoo to know how to work as an application, such as Menus, Views, Models, Actions, and so on. The data we find in the Technical menu is usually stored in Information Repository models. Some relevant examples are:
ir.action.act_windowfor Windows Actionsir.ui.menufor Menu Itemsir.ui.viewfor Viewsir.modelfor Modelsir.model.fieldsfor Model Fields
The resources contain basic data about the world, which can be useful for many of the applications. These are a few relevant resource models:
res.partnerfor business partners, such as customers, suppliers, and so onres.companyfor company datares.currencyfor currenciesres.countryfor countriesres.usersfor application usersres.groupsfor application security groups
This should provide you with a useful context to better understand where the Models come from whenever you come across them in the future.
In this chapter, not only did we present an overview of how Odoo components are organized, but we also made use of the Developer mode to dive into the Odoo internals and understand how these components work together to create applications.
We used these tools to build a simple application, with Models, Views, and the corresponding Menu. We also learned the usefulness of the developer tools to inspect existing applications or make quick customizations directly from the user interface.
In the next chapter, we will start getting more serious about Odoo development, and will learn to set up and organize our development environment.