


 Download code from GitHub
Let's Get Started
In this chapter, we will cover the following recipes:
- A quick installation guide
- Configuring NGINX
- Stopping/starting NGINX
- Enabling modules
- Deploying a basic website
- Basic monitoring
- Real-time statistics
Introduction
NGINX is a powerful software suite which has progressed well beyond a basic web server package. Some of the additional features, such as the reverse proxy and load balancing options, are well known.
Originally designed to tackle the C10k problem of handling 10,000 concurrent connections, NGINX differentiated itself from Apache with an event-driven architecture. While Apache 2.4 added event-driven processing also, there are a number of distinct differences where NGINX still remains more flexible.
This book describes how to use NGINX in a number of different scenarios and is aimed at providing you with a working solution rather than being an in-depth review of all NGINX features. If you're unfamiliar with NGINX, I highly recommend that you read Nginx HTTP Server - Third Edition, by Clément Nedelcu, also published by Packt Publishing.
http://nginx.org/en/docs/
A quick installation guide
Since the mainline release (currently 1.11.19) has all of the latest features, you'll need to install it directly from the NGINX repositories. Thankfully, NGINX is kind enough to provide Red Hat Enterprise Linux (RHEL), CentOS, SUSE Linux Enterprise Server (SLES), Debian, and Ubuntu repositories, as well as OS X and Windows binaries.

The stable and mainline branches don't necessarily reflect system stability, but configuration and module integration stability. Unless you have third-party integration which requires the stable release, we highly recommend the mainline release.
How to do it...
Different Linux distributions have varying package managers, so we'll briefly cover the installation procedures for the more commonly used ones. If the distribution you use isn't covered here, refer to the official NGINX documentation for further guidance.
Packages – RHEL/CentOS
To install the latest NGINX release, add the NGINX mainline repository by adding the following to /etc/yum.repos.d/nginx.repo:
[nginx]
name=nginx repo
baseurl=http://nginx.org/packages/mainline/OS/OSRELEASE/$basearch/
gpgcheck=0
enabled=1
You'll also need to replace OS with either rhel or centos, and replace OSRELEASE with 5, 6, or 7, for your correct release.
Once you have the repository installed, refresh the packages and then install NGINX.
yum update
yum install nginx
If you have any issues, double check your repository for the correct syntax.
Packages – Debian/Ubuntu
First, download the NGINX signing key for the packages and install it:
wget http://nginx.org/keys/nginx_signing.key
apt-key add nginx_signing.key
Then, using your preferred Linux editor, we can add the sources to /etc/apt/sources.list.d/nginx.list:
deb http://nginx.org/packages/mainline/debian/ codename nginx
deb-src http://nginx.org/packages/mainline/debian/ codename nginx
Replace codename with the release name; for example, if you're using Debian 8, this will be set to jessie.
For Ubuntu-based systems, you'll need to use the following:
deb http://nginx.org/packages/mainline/ubuntu/ codename nginx
deb-src http://nginx.org/packages/mainline/ubuntu/ codename nginx
Replace codename with the release name; for example, if you're using Ubuntu 14.04, this will be set to trusty.
After adding the new source, we can then update the apt database and install NGINX:
apt-get update
apt-get install nginx
Installation should now be complete.
Compiling from scratch
Although having the precompiled packages is nice, not all of the modules are available out of the box. NGINX requires you to compile these into the NGINX installation and it's not a simple module like Apache.
You can simply build from source without any of the packaging tools for CentOS or Debian, however, it makes upgrades and compatibility more difficult. By default, user compiled programs will default to /usr/local, which means that any documentation which refers to the package defaults (/usr/etc) will be incorrect.
My preference is to base the build on the official package sources, rather than the plain source code. There aren't many extra steps involved, but it makes the ongoing management much easier. If you're looking for vanilla build instructions (without packages), these are easily available on the web.
Debian/Ubuntu
On Ubuntu/Debian, install the required build tools:
apt-get install devscripts
This will install quite a few packages on your system, so if you're trying to keep your production environment lean, then I'd recommend that you use a separate build box to complete this.
We can now install the build prerequisites for NGINX:
apt-get build-dep nginx
Once you have the required build dependencies, we can now get a copy of the source code. Again, rather than the plain TAR file, we're going to get the packaged variant so that we can easily build them. Here's how we do it:
mkdir ~/nginxbuild
cd ~/nginxbuild
apt-get source nginx
You should now have a directory with the original TAR file, the Debian description, and any Debian specific patches. The apt-get source command will automatically extract and apply patches, as required, into a source directory.
To build without any changes, enter the directory and create the packages:
cd nginx-1.9.10/
fakeroot debian/rules binary
Compiling the code may take a while, depending on how many processors your workstation or server has. Once it has compiled, you should see two binaries in the parent (nginxbuild) directory. The resulting files should be:
- nginx-dbg_1.9.10-1~jessie_amd64.deb
- nginx_1.9.10-1~jessie_amd64.deb
You can now install NGINX via the newly compiled package:
sudo dpkg -i nginx_1.9.10-1~jessie_amd64.deb
CentOS/RHEL
Like the Debian build process, first we'll need to install the package build tools and the additional Extra Packages For Enterprise Linux (EPEL) repository:
sudo yum install yum-utils epel-release mock
Next, update /etc/yum.repos.d/nginx.repo and add the additional source repository:
[nginx-source]
name=nginx source repo
baseurl=http://nginx.org/packages/mainline/centos/7/SRPMS/
gpgcheck=0
enabled=1
In this example, we'll be using a CentOS 7-based release. Refer to the Packages – RHEL/CentOS section for how to modify it for other CentOS versions.
With the updated repository, we then create a directory for the build, and download the Source RPM (SRPM):
mkdir ~/nginxbuild
cd ~/nginxbuild
yumdownloader --source nginx
Next, download the required packages to complete the build:
yum-builddep nginx
Once all of the development packages have been downloaded, we can now extract the files from the SRPM:
rpm2cpio nginx-1.9.10-1.el7.ngx.src.rpm | cpio -idmv
You should see an output of the source files similar to this:

If we want to update the configuration and apply a patch or change one of the defaults, then this can simply be done by editing the files.
We can now rebuild these files from source using mock, which is a tool for building packages. The advantage of mock is that all of the development dependencies are contained within a chrooted environment, so it doesn't clutter your main installation. This chrooted environment can be cleaned and removed without any impact on the host system, which is great if you want repeatable builds.
To build, we run the following command:
mock --buildsrpm --spec ~/nginxbuild/nginx.spec --sources ~/nginxbuild
This generates the SRPMs, and they will be located in the /var/lib/mock/epel-7-x86_64/result directory, along with the associated log files. Now that we have a rebuilt SRPM, we can now compile it. Again, we're going to use mock so that everything is neatly contained:
mock --no-clean --rebuild var/lib/mock/epel-7-x86_64/result/nginx-1.9.11-1.el7.ngx.src.rpm
Depending on your processing power, this may take five minutes or more to complete. Once the build is complete, you should see the resultant binary RPM as well as a debug RPM in the /var/lib/mock/epel-7-x86_64 directory. Here's an example:
-rw-rw-r-- 1 demo mock 159K Feb 10 20:59 build.log
-rw-r--r-- 1 demo mock 889K Feb 10 20:57 nginx-1.9.11-1.el7.ngx.src.rpm
-rw-r--r-- 1 demo mock 803K Feb 10 20:59 nginx-1.9.11-1.el7.ngx.x86_64.rpm
-rw-r--r-- 1 demo mock 3.1M Feb 10 20:59 nginx-debuginfo-1.9.11-1.el7.ngx.x86_64.rpm
-rw-rw-r-- 1 demo mock 45K Feb 10 20:59 root.log
-rw-rw-r-- 1 demo mock 1000 Feb 10 20:59 state.log
Now that we have the new binary file, we can install it via yum:
sudo yum install /var/lib/mock/epel-7-x86_64/result/nginx-1.9.11-1. ngx.x86_64.rpm
You should now have a fully installed NGINX installation, which you compiled from source.
Testing
Regardless of your installation method, once you have NGINX up and running, you should be able to browse to it via the IP address and/or Fully Qualified Domain Name (FQDN) and see something very similar to what is shown here:

To start, stop, and restart NGINX (if installed using official binaries), you can use the standard Linux init systems. There's a very slight variance between the different OS versions, so it's important to ensure you're using the correct command for the correct variant.
How to do it...
Here's a quick reference table of the available commands:
|
Activity/OS |
CentOS / RedHat 6 |
CentOS / RedHat 7 |
Ubuntu 14.04 / Debian 8 |
|
Start NGINX |
service nginx start | systemctl start nginx | service nginx start |
|
Stop NGINX |
service nginx stop | systemctl stop nginx | service nginx stop |
|
Restart NGINX |
service nginx restart | systemctl restart nginx | service nginx restart |
|
Reload NGINX |
service nginx reload | N/A | N/A |
Some modifications to NGINX will require a full restart, whereas others only need the configuration reloaded. In most instances where a configuration file has been modified, a reload is all which is required. NGINX will fork a new set of worker processes, allowing existing workers to complete and cleanly exit so that there is no downtime.
There's more...
We can check the NGINX configuration files after changes are made to ensure the syntax is correct. To do this, we run the following:
/usr/sbin/nginx -t
You should see the following if everything is correct:
nginx: the configuration file /etc/nginx/nginx.conf syntax is ok
nginx: configuration file /etc/nginx/nginx.conf test is successful
If you have any errors, double check your configuration for syntax errors on the lines indicated.
Configuring NGINX
Editing the configuration for NGINX is paramount to the way it operates. To integrate NGINX with your particular website or need, you'll need to edit a number of areas within the configuration files. To get started, we'll go through the basics here.
How to do it...
By default, NGINX will have two main configuration files. The first is /etc/nginx/nginx.conf, which contains the main server configuration. The second is /etc/nginx/default.conf, which defines a basic site out of the box for you.
Before you make any changes, be 100 percent sure that you understand the implications. Out of the box, NGINX is a highly performant web server which already gives great performance. The age-old programmer's saying that premature optimization is the root of all evil continually rings true here. Simply increasing some figures may lead to increased memory usage, decreased stability, and decreased performance. In Chapter 11, Performance Tuning, we'll go through some of the more advanced areas to tweak, but make sure to hit limits before attempting this.
Here's the default configuration:
user  nginx;
worker_processes 1;

error_log  /var/log/nginx/error.log warn;
pid        /var/run/nginx.pid;

events {
    worker_connections  1024;
}

http {
    include       /etc/nginx/mime.types;
    default_type  application/octet-stream;

    log_format  main  '$remote_addr - $remote_user [$time_local]
     "$request" '
    '$status $body_bytes_sent "$http_referer" '
    '"$http_user_agent" "$http_x_forwarded_for"';

    access_log  /var/log/nginx/access.log  main;

    sendfile        on;
    #tcp_nopush     on;

    keepalive_timeout  65;

    #gzip  on;

    include /etc/nginx/conf.d/*.conf;
}
The configuration files have two main components in them—simple directives and block directives. Simple directives are one-line items which are simple name and value, followed by a semicolon (;). A block directive has a set of brackets and allows configuration items to be set within a specific context. This makes the configuration files easier to follow, especially as they get more complex.
How it works...
Here are a few of the key configuration items. Firstly, user nginx defines the user in which NGINX will run as. This is important to note if you have a server-side script which requires the ability to write files and a user will also require permission to read the files.
Secondly, worker_processes sets the number of worker processes that NGINX will start. While a default of 1 doesn't sound very high, the event-driven nature means that this certainly won't be a limitation initially. The optimal number of processes depends on many factors, but an easy starting reference is to go by the number of CPU cores your server has.
Next, worker_connections is the maximum amount of simultaneous connections that a worker process can open. In the default configuration, this is set to 1024 concurrent connections.
Lastly, the include /etc/nginx/conf.d/*.conf; line tells NGINX to load all of the .conf files as if they were all part of the main nginx.conf file. This allows you to separate the configuration for different sites.
Enabling modules
By default, not every module for NGINX has been compiled and is available. As of version 1.9.11 (released in February 2016), NGINX added dynamic modules, similar to the Dynamic Shared Objects (DSO) like the Apache HTTP server.
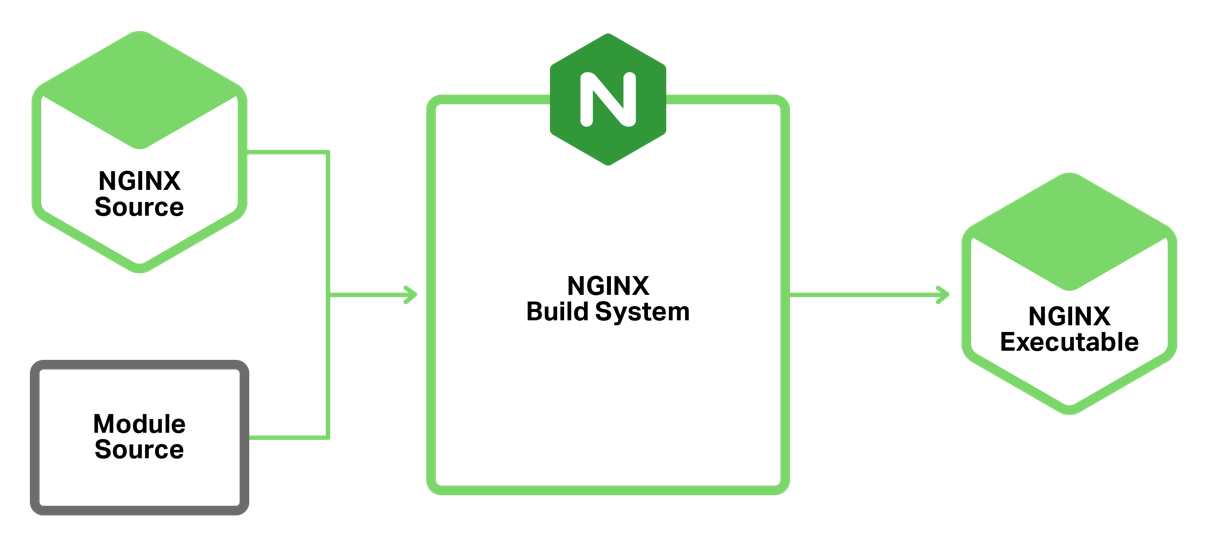
Previous to this, you needed to recompile NGINX every time you updated a module, so this is a big step forward. Being statically compiled into the main binary also meant that each instance of NGINX loaded all the modules internally, regardless of whether you needed them or not. This is why the mail modules were never compiled in with the standard binaries.
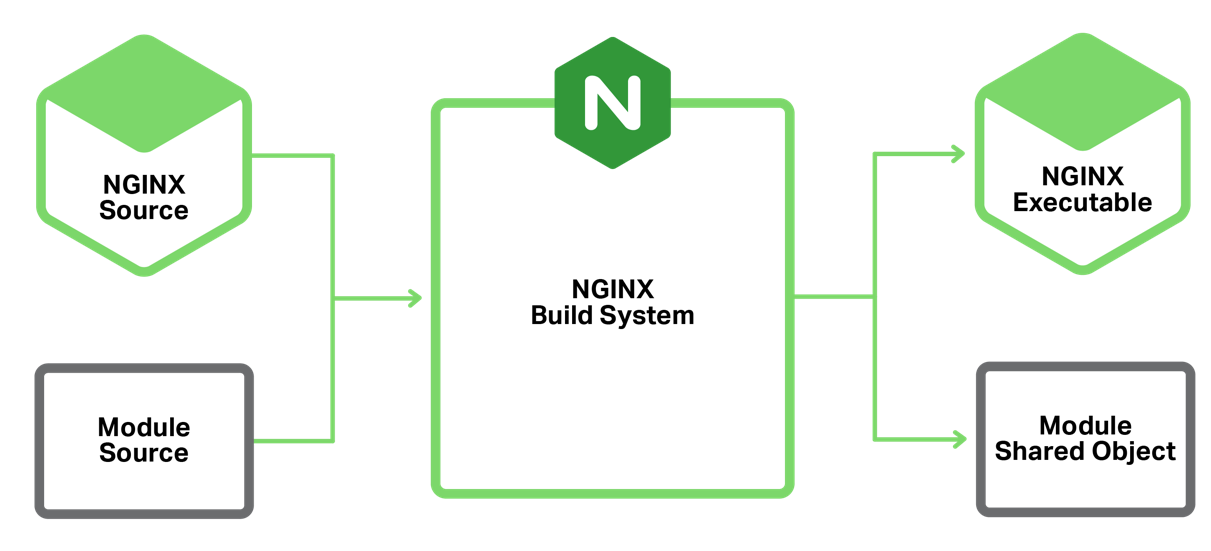
How to do it...
However, even though 1.9.11 added the dynamic modules, none of the standard modules are dynamic by default. To make them into dynamic modules, you'll need to update the configure options. For example, to make the mail module dynamic, update --with-mail to --with-mail=dynamic.
The main nginx.conf configuration file will then need the following:
load_module "modules/ngx_mail_module.so";
See also
There are a number of third-party modules for NGINX, some of which we'll be using later in this book and can be found at https://www.nginx.com/resources/wiki/modules/.
Deploying a basic site
If you have a static website, this is very easy to deploy with NGINX. With systems such as Jekyll (which powers the GitHub Pages), static site deployments can be easy to generate and are far less hassle when it comes to security and exploits. Quite simply, a static website can't be hacked and doesn't suffer from any performance issues.
How to do it...
- To serve static files, we're going to edit the default site configuration file /etc/nginx/conf.d/default.conf and make a few small changes.
Edit the file and add the following:
      server {
          listen 80;
          server_name server.yourdomain.com;
          access_log /var/log/nginx/log/host.access.log combined;

          location / {
              root /var/www/html;
              index index.html;
          }
      }
- If the folder doesn't exist, create the /var/www/vhosts directory with the following command:
mkdir -p /var/www/vhosts
- Copy your existing website files into the /var/www/vhosts directory.
- Ensure the files and folders have permission to be read by the nginx user:
      chmod -R o+r /var/www/vhosts
      chown -R nginx:nginx /var/www/vhosts
- From your web browser, browse the site and check that it's working.
How it works...
Let's go through this setup file to understand each directive:
- listen 80;: This defines the port which NGINX will listen to. Port 80 is the default standard for HTTP, which is why it doesn't need to be specified in the browser URL.
- server_name server.yourname.com;: This directive tells the server what hostname to match from the request. This allows you to run name-based virtual servers from one IP address, but with different domain names. You can also use different aliases here; for example, you can have both www.yourname.com and yourname.com.
- access_log /var/log/nginx/log/host.access.log combined;: The access log records all client access to the site, stores it in the specified file (the second parameter), and uses the third parameter to define the format of the log (combined is the default).
- location: Lastly, we have a location block directive. This one is for a root directive (represented by /), meaning everything in the URL path. There are then two directives contained within this block—the first is the root directive. This defines where NGINX should look for the files.
- index: The second is the index directive. This lets NGINX know what name of a file to try if it hasn't been specified in the path. For example, if you put http://server.yourname.com/ into your browser, NGINX will try to load http://server.yourname.com/index.html instead of displaying a 404 error.
Basic monitoring
Monitoring both the performance and uptime of a web server is paramount when you want to ensure consistent performance. There are a number of ways both these aspects can be monitored, all with varying levels of complexity and information. We'll focus on some of the simpler examples to give you a starting point to go forward with.
How to do it...
We can enable the basic NGINX stub_status page to give some rudimentary statistics and service status. To enable, edit your site config and add the following:
location = /nginx_status {
    stub_status on;
    access_log   off;
    allow <YOURIPADDRESS>;
    deny all;
}
To prevent information leakage about your system, we have added the allow command. This should be your IP address. This is followed by the deny all command to prevent anyone else from loading the URL. We've also turned off access logs for this URL to save space.
After reloading your configuration (hint: systemctl reload nginx for systemd-based OS), you can now load the new URL /nginx_status in your browser.
You should see something like the following:
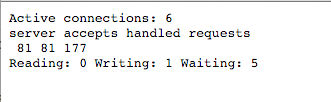
How it works...
Let's take apart the details line-by-line:
- The Active connections line lists the amount of connections to the server. For a quiet server, this could be less than a dozen. For a busy server, expect this to be in the hundreds.
- The server accepts handled requests line is little confusing, since it's represented by three numbers (81, 81, and 177 in this example). The first number represents the amount of accepted connections. The second number represents the total number of handled connections. Unless there's a resource limitation, the number of accepted and handled connections should be the same. Next, we have the total number of client requests.
- The last line represents the state of the active connections. Reading means NGINX is reading the request headers, Writing means NGINX is writing data back to the client, and Waiting means that the client is now idle but still has the connection open (due to keep-alives).
Real-time statistics
When your web server is important to you, you'll want to see what's going on in real-time. One great utility to do this is ngxtop. This program monitors your real-time access log in to display useful metrics such as the number of requests per second, HTTP statuses served, and pages/URLs served. This information can be a great aid to determine what your top pages are and if there is an increased rate of errors.
How to do it...
To install ngxtop, you'll first need to install the Python package manager, pip. On a Debian/Ubuntu-based system, you'll need to run the following:
apt-get install python-pip
For a Red Hat- / CentOS-based system, the EPEL repository is required first. To install, run the following:
yum install epel-release
yum install python-pip
Once you have pip installed, you can now install ngxtop:
pip install ngxtop
This will download the required files and install ngxtop for you. It's now ready to use.
How it works...
The ngxtop utility can be simply called from the command line, and it will attempt to read the log file location from the configuration. However, if you're running virtual hosts, it may not read the access log location correctly. The easiest way in this scenario is to manually specify the log location.
Consider the following example:
ngxtop -l /var/log/nginx/access.log
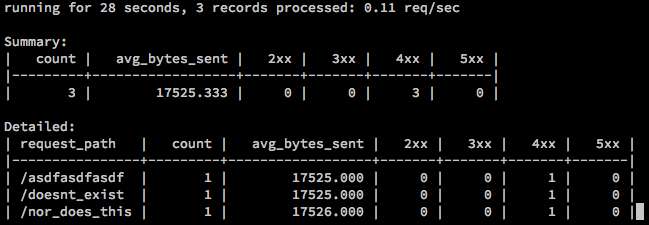
This will display a console-based view of what URLs are being accessed. Here's a basic example:
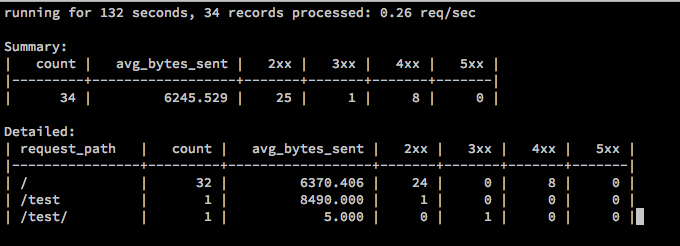
This will refresh every second, giving you near instantaneous information about what URLs NGINX is serving, but that's not all. The ngxtop utility is quite configurable and there are a number of different ways it can display information.
We can filter only the 404 pages with the following:
ngxtop -l /var/log/nginx/access.log --filter 'status == 404'
Only those URLs which had a 404 are now going to be displayed within ngxtop. Here's an example output:
There are quite a number of other options easy to tailor to your scenario, especially if you know what you're hunting for.
See also
To know more about ngxtop, refer to https://github.com/lebinh/ngxtop.