In this chapter, we will cover the following recipes:
- Creating a C#-based console application
- Creating a C# class library
- Creating a classic Windows application to use the library
- Creating a WPF-based application to use the library
- Hello Universe – My first .NET Standard class library
- Creating a Windows console-based application to use the library
- Creating a ASP.NET Core-based web application to use the library
Readers should have a basic knowledge of C#. They should also have a basic knowledge of using Visual Studio, installing packages using NuGet, and referencing libraries within projects from other projects.
The code files for this chapter can be found on GitHub:https://github.com/PacktPublishing/DotNET-Standard-2-Cookbook/tree/master/Chapter01
Check out the following video to see the code in action:https://goo.gl/PoR4HM
Microsoft .NET is a general-purpose development platform with support for multiple programming languages, which is a key feature. Other key features include asynchronous and concurrent programming models and native interoperability. The .NET Framework supports multiple programming languages, such as C#, VB.NET, and F#, which are actively developed and supported by Microsoft. In this book, we are going to look at C#.
C# is a modern, object-oriented, type-safe programming language that helps developers build robust, secure applications using the .NET Framework. C# was introduced with .NET Framework 1.0 in 2002. Since that time, C# has evolved and matured. At the time of writing, the current version of C# is 7.0 and .NET has various flavors to use with the following:
- .NET Framework: The full flavor of .NET that is distributed with Windows. Used by developers to build ASP.NET 4.5/4.6 under Windows or desktop Windows applications.
- .NET Core: Another flavor of .NET that runs under Windows, Mac, and Linux. Used by developers to build cross-platform .NET-based applications including cross-platform web applications, using ASP.NET Core.
- Xamarin: A mono-based framework used for mobile applications for iOS, Android, and Windows phone devices. macOS desktop applications are supported with this flavor.
- .NET Standard: A replacement for Portable Class Libraries (PCL) used by developers to share code among all platforms, but supported with APIs in the latest version, 2.0. Also, you should note that .NET Standard 2.0 is supported in .NET Core 2.0, .NET Framework 4.6.1, and later versions, as well as in Visual Studio 2017 (version 15.3).
Let's get started with a simple C#-based console application. This console application will introduce some basic C# code and get things up and running for the library we are going to build in the next recipe. Our main focus is to get to the C# coding and prepare ourselves for all the excitement we are going to have later.
To step through this recipe, you will need a running copy of Visual Studio 2017 with the latest version of .NET Framework. If you don't have a copy of Visual Studio 2017, you can download it from https://www.visualstudio.com/.
This will take you to Microsoft's Visual Studio website. Follow the instructions on the site to get a copy of Visual Studio and get things started.
- Open Visual Studio 2017.
- Click
File|New|Projectand, in theNew Projecttemplate dialog box, selectVisual C#in the left-hand pane andConsole App (.NET Framework)in the right-hand pane:

- In the
Name:text box, type a name for your application. In this case, typeHelloCSharp. Select a preferred location in theLocation:drop-down list or click theBrowse...button and select a location. Leave the defaults as they are:

- Now Click
OK. - You will be presented with a default code template for a C# console application. Let's hit F5 to give it a test run. If everything is fine, a console will pop up and close.
- At the end of the
Mainmethod, type the following code snippet:
      private static string SayHello(string yourName)
      {
          return $"Hello, {yourName}";
}- Now, inside your
Mainmethod, type the code that calls the previous method we just created:
      var message = SayHello("Fiqri Ismail");
      Console.WriteLine(message);
Console.ReadLine(); static void Main(string[] args)
{
var message = SayHello("Fiqri Ismail");
Console.WriteLine(message);
Console.ReadLine();
}
private static string SayHello(string yourName)
{
return $"Hello, {yourName}";
}- Let's hit F5 and test the application. If everything is OK, you should see the following screen. Press Enter to exit:

Let us take a quick look at what we did in the previous recipe. In steps 1 to 4, we created a C#-based console application. The skeleton for a console application already comes with Visual Studio as a template. Giving a proper name to your project and a location is a good habit. These things will help you to track down your project easily for future use. In step 5, we just make sure the default console application template works fine and that there are no surprises waiting for us before doing any actual coding.
In step 6, we created a static method that takes a string parameter and returns a message with that parameter; this is called String Interpolation. It's a new feature introduced in C# 6.0 and can be used instead of the traditional string.format() method. Step 7 uses that method inside the main method. As in a normal console application, Console.ReadLine() will wait till any key is pressed before exiting. Finally, in step 9, we debug the code to check that everything works fine and as expected.
In this recipe, we are going to build a simple C# class library. This library will have a simple public method that takes a parameter and returns a string. Also, we will be creating a blank Visual Studio solution and adding the library project. This solution will be used in later recipes.
Make sure you have installed a flavor of Visual Studio 2017 and its latest updates. At the time of writing, the latest Visual Studio 2017 version is 15.3.5.
- Open Visual Studio 2017.
- Click
File|New|Projectand, in theNew Projecttemplate dialog box, selectVisual Studio Solutionsunder theOther Project Typesnode in the left-hand pane, and selectBlank Solutionin the right-hand pane:


- Now you have a blank solution. Let's add a C# class library project to the solution. Click
Project|Add NewItem...or you can right-click on theChapter1.Librarysolution label in theSolution Explorer, and selectAdd|New Project.... - In the
Add New Projecttemplate dialog box, selectVisual C#in the left side, pane and selectClass Library (.NET Framework)in the right-hand pane:


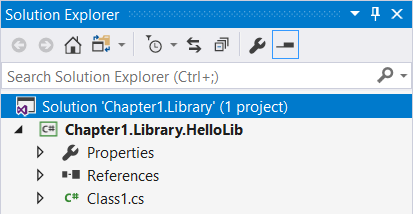
- Now we have a brand new .NET Framework-based class library. In the
Solution Explorer(press Ctrl + Alt + L if you don't see theSolution Explorer), the default structure should look like this:
- Now we have a default template for a class library project. Let's rename
Class1.csto something more meaningful. Rename itHelloWorld.cs. You can simply soft click on the label of the file in theSolution Explorerand type the new name (or click on the filename label and press F2). ClickYesin the confirmation box to confirm the renaming. - Type the following code snippet in the
HelloWorldclass body:
      public string SayHello(string name)
      {
          return $"Hello {name}, congratulations !!!,
          this message is from the class library you created.";
}- Let's build our code to check that everything is fine. Click
Build|Build Solution, or press Ctrl + Shift + B, and the solution should build successfully. Let's test our class library in the next recipe. - Click
File|Save All, or press Ctrl + Shift + S, to save the solution and the class library project.
Let's see what we have done so far in this recipe and how it works. In steps 1 to 3, you have created a blank solution. Blank solutions are a very good starting point for any size of project. It gives you a whole new solution to start with. Later on, you can add more bits and pieces to your solution. Even though this is a simple introduction to class libraries, it is good practice to stick with proper naming conventions. It's not a must, but good practice. As you can see, we have given a name Chapter1.Library, so the name is meaningful and it says what our solution is about.
In the next steps, from 4 to 8, we have added a class library project to our blank solution. Now you have an idea how a solution will grow over time, from start to end. The template we have chosen is a full .NET Framework class library. We renamed the default Class1.cs template provided by Visual Studio. It's good practice to give a meaningful name to classes and the files we work with.
In steps 9 and 10, we added code to our class and checked all the syntax was correct by building the solution. It is also good practice to check for typos and other errors in syntax once in a while.
So far, from the previous recipe, we have created a blank solution and a class library that uses the full .NET Framework. In this recipe, let's create a classic Windows Forms application that uses the class library created in the previous recipe. We are going to build a Windows form that takes a name using a text box and a button, and that triggers the public method we have created in the class library.
For this recipe, you will require the solution and the class you built in the previous recipe. Open Visual Studio 2017 and prepare for the project. Click Build | Build Solution, or press Ctrl + Shift + B, and the solution should build successfully. Everything's ready for testing our class library.
- Open Visual Studio 2017.
- Now open the solution from the previous recipe. Click
File|Open|Project/Solution, or press Ctrl + Shift + O, and select theChapter1.Librarysolution. - Now click on the
Chapter1.Librarysolution label. ClickFile|Add|New Project.... - In the
Add New Projecttemplate dialog box, expand theVisual C#node in the left-hand pane. - Select
Windows Classic Desktopand selectWindows Forms App (.NET Framework)in the right template pane:

- Now, in the
Name:textbox, type a name for the new project. Let's typeChapter1.Library.HelloWindowsFormsand leave theLocation:textbox as it is and the defaults as well. ClickOKto create the new project.


- Now let's do some cleaning of the names. Change
Form1.cstoMainForm.cs. Remember, giving a meaningful name to your files is very important and a very good practice. - Select the Form in the
MainForm [Design]tab and go to thePropertieswindow (or press F4). Now change theTextproperty toHello World.
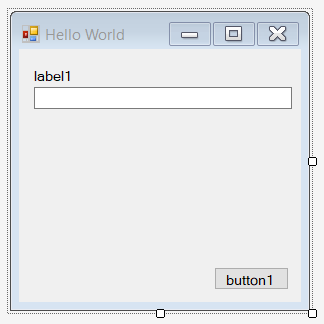
- Let's add some UI components to the form. Go to the tool box window (or press Ctrl + Alt + X ) and drag and drop a
Label, aTextBox, and aButtonto the form. Arrange them as per the following screenshot:
Component | Property | Value |
|
|
|
|
|
|
|
|
|
|
|
|
|
|
|
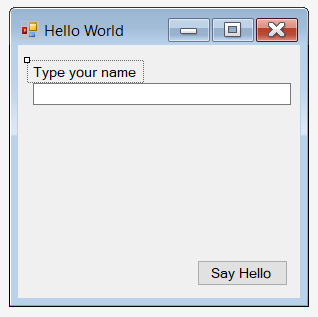
After the changes, the Windows form designer should look like this:
- Let's add our library to the Windows Forms project. To do this, expand
Referencesunder theChaper1.Library.HelloWindowsFormsproject. Right-click on theReferenceslabel and selectAdd Reference.... - Under the
Reference Managerdialog box, click on theProjectslabel in the left-hand pane. In the middle pane, check theChapter1.Library.HelloLibproject:

- Click
OK. - Now double-click on the
Say Hellobutton to open the code window. - In the code window, scroll to the top and type the following code, at the end of the very last line of
usingdirective:
using Chapter1.Library.HelloLib;
- Now scroll down to the
HelloButton_Clickmethod. In between the curly brackets, type the following code:
      var helloMessage = new HelloWorld();
      var yourName = NameTextBox.Text;
MessageBox.Show(helloMessage.SayHello(yourName));- Time to test our classic Windows application with the class library created in the previous recipe. Hit F5 to debug the code. Now you should see the Windows form created.

- Congratulations!!! You have just used a class library from a classic Windows application.
If you have a closer look at the recipe we just completed, we have used a solution created from a previous recipe. In a real-world application, this is a day-to-day process. From steps 1 to 7, we opened an existing solution that contained the class library from the previous recipe and added a Classic Windows Forms application to the solution.
In steps 8 to 11, we prepared the Windows Form projects. Proper naming of the components and files is good practice. Even though this is a small application, proper naming is a good discipline. Steps 12 to 14 are the most important steps in this recipe. In these steps, we have added our class library to the Windows project as a reference. Now you can access all the public methods given by the class library from your Windows application.
In steps 15 to 17, we have added code to the button click event of HelloButton. Double-clicking on a component will get you to the C# code of the Windows form. Visual Studio will generate the code for you. In this case, it's the button click event. The default event of a component will vary depending on the component you have selected. In step 17, we created a variable to hold the instance of the HelloWorld class from the class library created. Then, we created another variable to hold the user input to the text box. The last line of code will call the HelloWorld.SayHello(string name) method with the string parameter supplied from the variable created in the previous line of code. Finally, a default message box will display the string returned from the SayHello(string name) method from the HelloWorld class.
Step 19 will execute the default project, in this case, our Windows-based application. Sometimes, if the class library project is selected as the default project, Visual Studio will complain that you cannot execute this sort of project. So make sure you have selected the Windows project as the default startup project.
Now, in this recipe, let's add a Windows Presentation Foundation (WPF)-based application to the solution and use the class library created in a previous recipe. WPF is the shortened name for Windows Presentation Foundation. The purpose of this recipe is to demonstrate how to share a library within the different .NET-based applications.
For this recipe, you will require the solution and the class library you built in the previous recipe. Open Visual Studio 2017 and prepare for the project. Click Build | Build Solution, or press Ctrl + Shift + B, and the solution should build successfully. Everything's ready for testing our class library.
- Open Visual Studio 2017.
- Now open the solution from the previous recipe. Click
File|Open|Open Project/Solution, or press Ctrl + Shift + O, and select theChapter1.Librarysolution. - Now click on the
Chapter1.Librarysolution label. ClickFile|Add|New Project. - In the
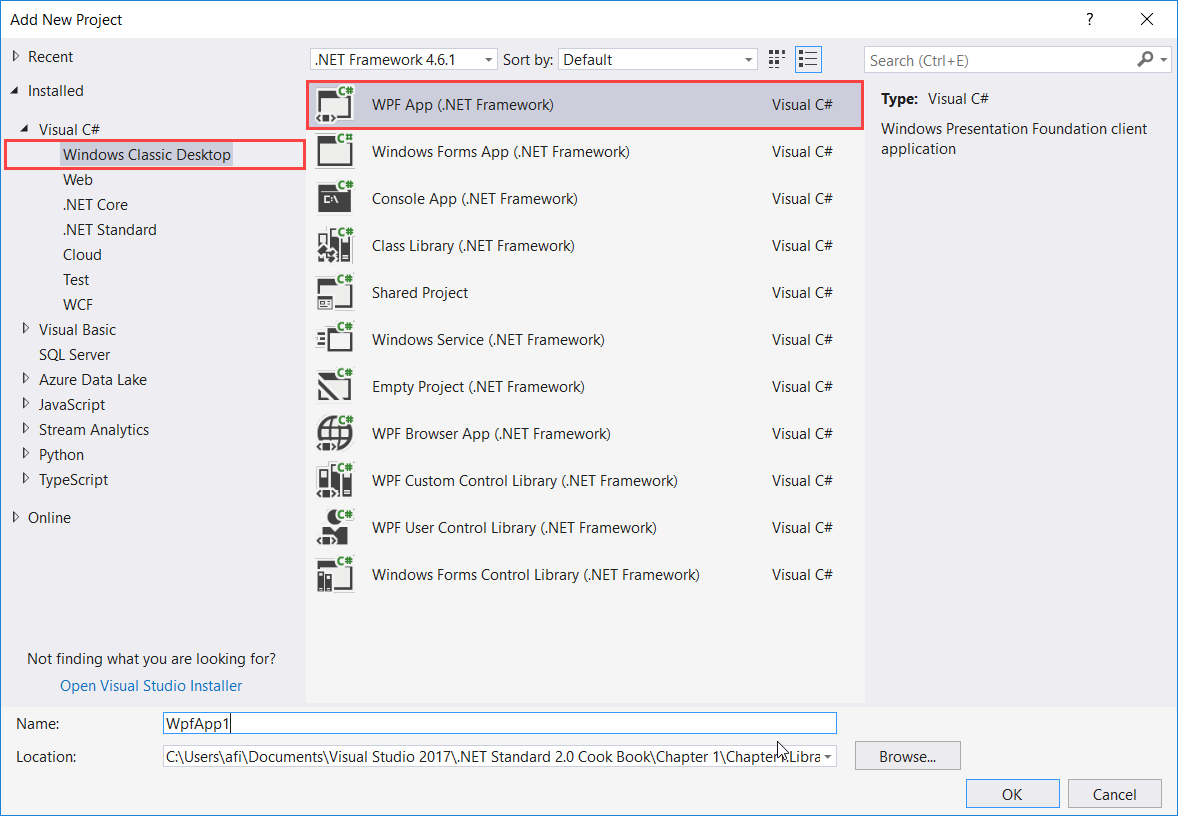
Add New Projecttemplate dialog box, expand the Visual C# node in the left-hand pane. - Select
Windows Classic Desktopand selectWPF App (.NET Framework)in the right template pane.

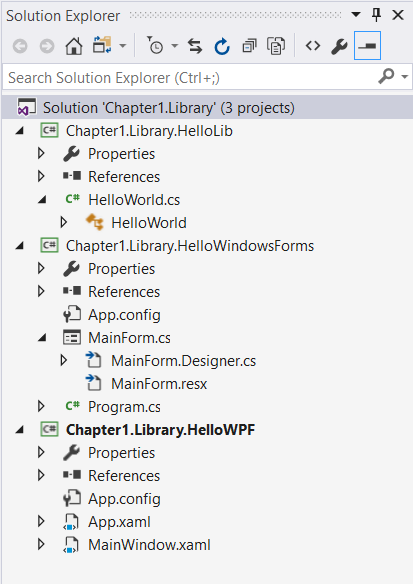
- Now the
Solution Explorer(if it's not visible, press Ctrl + Alt + L) should look like this:
- Now click on the
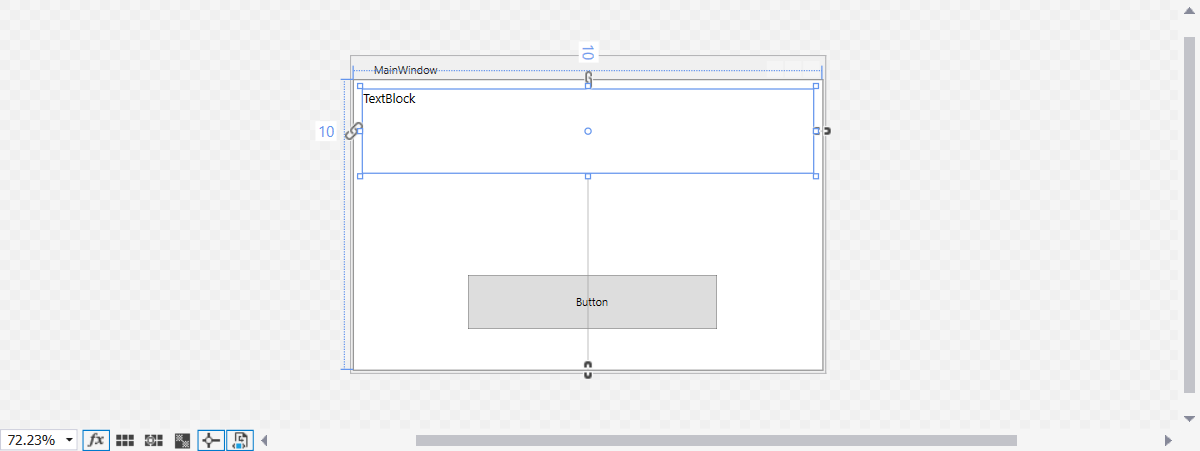
MainWindow.xamltab and make sure you are in the Design mode. - Now, drag and drop a
Buttonand aTextBlockfrom the tool box (to view the tool box, press Ctrl + Alt + X). You can find these components underCommon WPF Controls. - The main window should look like this:
- Let's name our controls and change some properties as follows:
Control
Property
Value
TextBlockNameMessageLabelTextBlockLayout | Width498TextBlockLayout | Height93TextBlockText | FontBoldTextBlockText | FontSize 14TextBlockCommon | TextPress the button to see the messageButtonNameHelloButtonButtonLayout | Width276ButtonLayout | Height60ButtonCommon | ContentSay Hello
- Let's add our class library as a reference to the WPF project we have just created. Expand the
Chapter1.Library.HelloWPFproject node and expand theReferencesnode in theSolution Explorer(if you don't see theSolution Explorerpress Ctrl + Alt + L). - Right-click on the
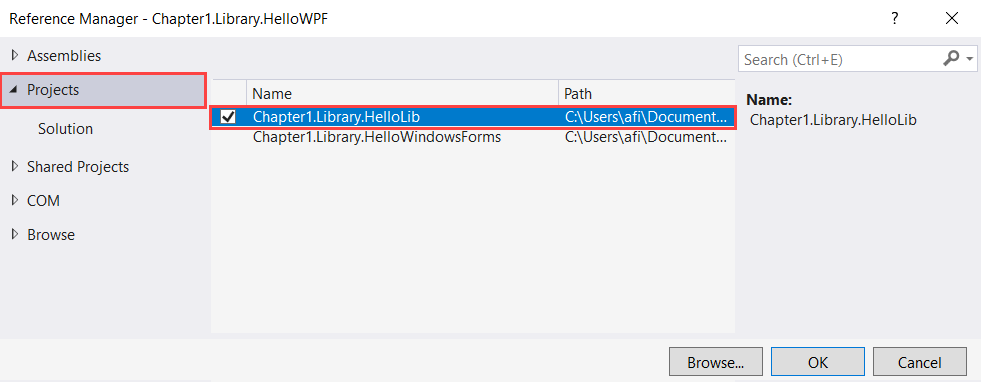
Referenceslabel and selectAdd Reference.... - Under the
Reference Managerdialog box, click on theProjectslabel in the left-hand pane. In the middle pane, check theChapter1.Library.HelloLibproject:
- Click
OK. - In the
MainWindow.xamltab, double-click on theSayHellobutton. - In the
MainWindow.xamal.cstab, scroll up till you see theusingcode block. Add this code as the last line of theusingcode block:
using Chapter1.Library.HelloLib;
- Now scroll down till you reach the
HelloButton_Clickmethod. Type the following code block in between the curly brackets of theHelloButton_Clickmethod:
      var yourName = "Fiqri Ismail";
      var helloMessage = new HelloWorld();

      MessageLabel.Text = helloMessage.SayHello(yourName);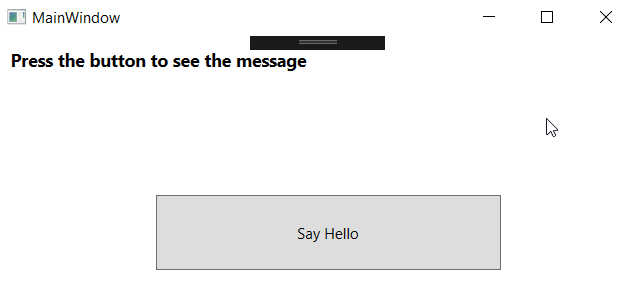
- Click on the
Say Hellobutton to see the message from the class library:
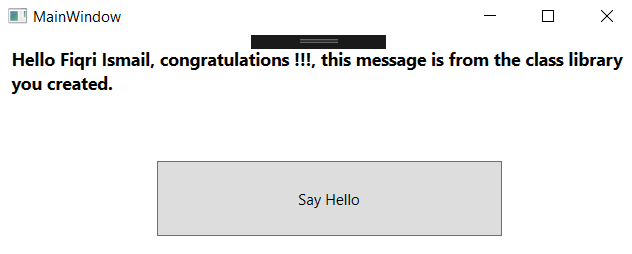
- Congratulations!!! You have just used a library created with a WPF application.
Let's have a look at the bits and pieces and how they are bound together. From steps 1 to 7, we have opened an existing solution and added a WPF project to that solution. In steps 8 to 10, we added a control to the WPF main form, from the toolbox. Since this is a WPF application, we went through an additional element; setting up the UI. In step 11, we have set up the UI elements using the properties window.
In steps 12 to 15, we added a reference to the WPF project. Referencing the library we have created is the most important part. Without referencing, the WPF project is totally unaware of the library. After referencing the library only, it will available to the WPF project. Step 17 tells the compiler to use the namespace of the library. Now we don't have to call the full namespace of the class inside the library. In step 18, we created a simple variable and stored a name. The next line creates an instance of the HelloWorld class inside the library. Finally, we used the Text property of the WPF TextBlock control to store the value from the SayHello(string name) method.
In the final steps – 19 to 20, we have executed the code and tested it.
Now it's time to move on and take a look at the Microsoft .NET Standard. In this recipe, we will be looking at version 2.0 of the .NET Standard library. At the start, we will be building a small .NET Standard class library and using it with different .NET-based applications.
Let's make sure we have downloaded and installed one of the flavors of Visual Studio 2017. If you are running on Windows, you have the option of choosing Visual Studio 2017 Community Edition, Professional Edition, or Enterprise Edition. If you are running on a mac, you have the choice of Visual Studio 2017 for macOS. Also, Visual Studio Code is available for all Windows, Mac, and Linux platforms. Visit http://www.visualstudio.com and follow the instructions to download the Visual Studio of your choosing.
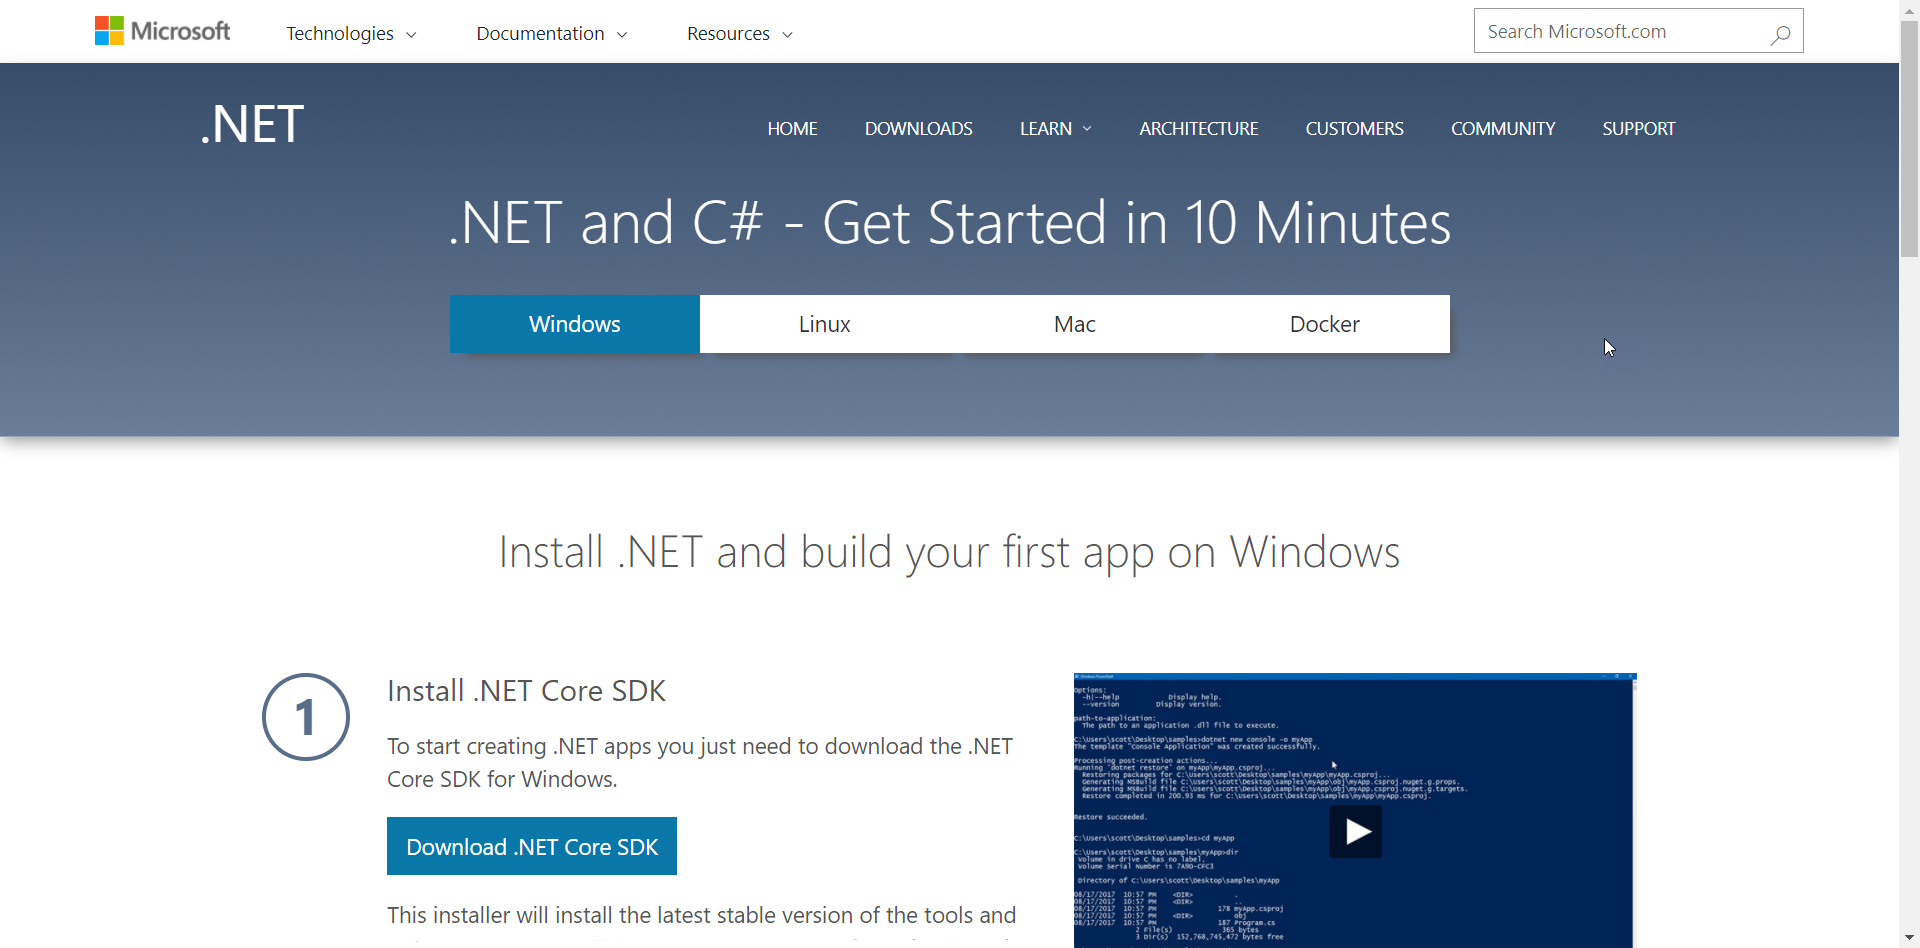
In the next step, we will be required to download and install .NET Core 2.0. Again, simply visit http://www.dot.net/core and download the latest version, in this case, version 2.0 of .NET Core. The site has a very simple and informative set of instructions on how to install .NET Core 2.0 on your system.
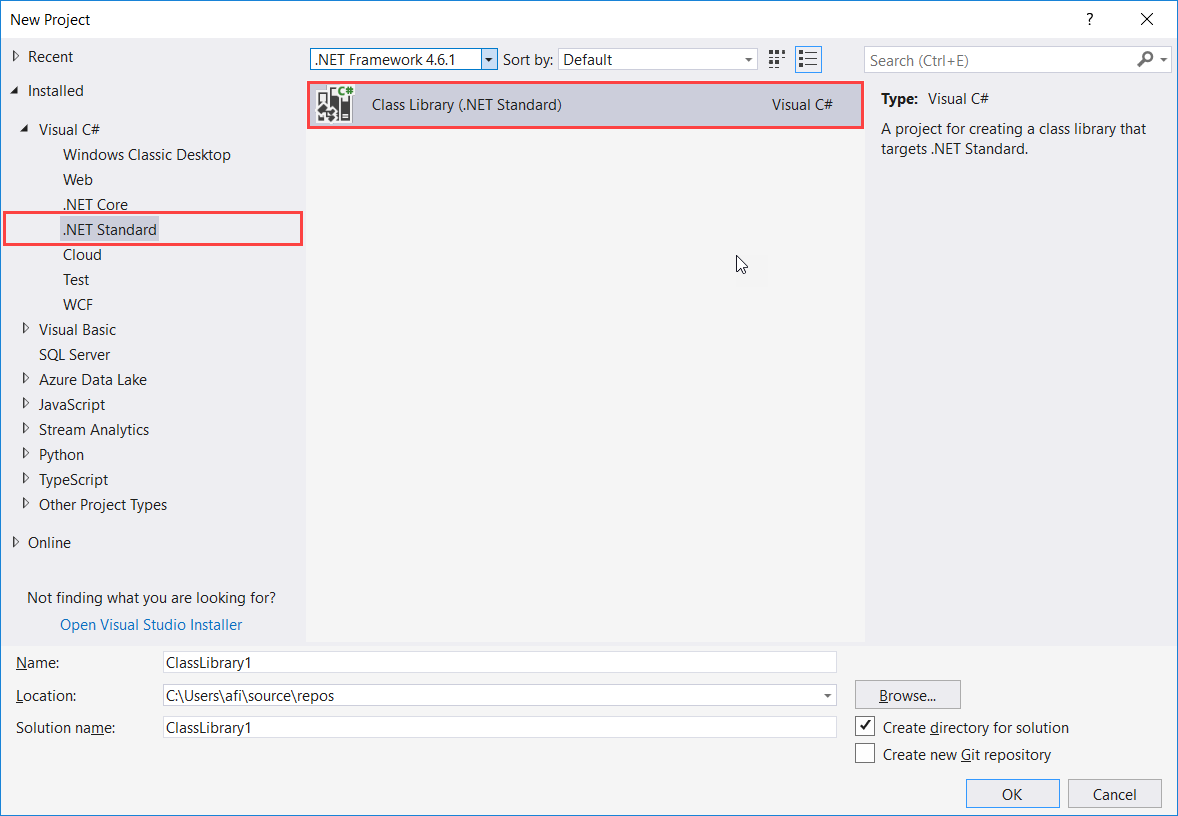
- In the
Name:text box, type a name for your class library. Let's typeChapter1.StandardLib.HelloUniverseand select a preferred location under theLocation:drop-down list, or click theBrowse...button and select a location. Leave the defaults as they are. Finally, in theSolution name:text box, typeChapter1.StandardLib.

- Click
OK.
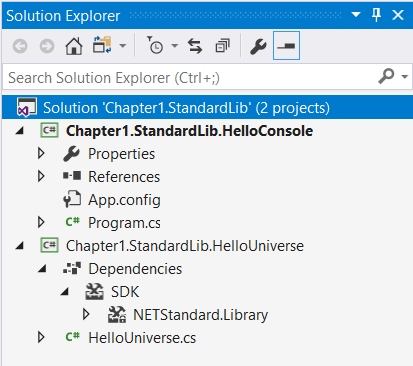
- In the
Solution Explorer(press Ctrl + Alt + L) , click onClass1.cs, press F2, and rename itHelloUniverse.cs. Confirm the renaming by selecting Yes in the confirmation box. - Change the namespace from
Chapter1.StandardLib.HelloUniversetoChapter1.StandardLib. - Now, in between the curly brackets of the
HelloUniverseclass, type the following code:
      public string SayHello(string name)
      {
          return $"Hello {name},
          welcome to a whole new Universe of .NET Standard 2.0";
}- Press Ctrl + S to save the changes and press Ctrl + Shift + B to build the code. If the build completes without any errors, we are good to go with the next recipe on how to use this class library.
.NET Standard 2.0 is the latest release of its kind. .NET Standard is all about sharing code. Unlike .NET Framework class libraries, .NET Standard class library code can be shared across almost all of the .NET ecosystem. The latest version of .NET Standard is 2.0. At the time of writing, it can be shared across NET Framework 4.6.1, .NET Core 2.0, Mono 5.4, Xamarin.iOS 10.14, Xamarin.Mac 3.8, Xamarin.Android 7.5, and the upcoming version of Universal Windows Platform (UWP). It also replaces Portable Class Libraries (PCLs) as the tool for building .NET libraries that work everywhere.
In steps 1 to 5, we have created a new .NET Standard 2.0-based class library project. In step 4, we have given a proper name to the class library as well as to the solution. It is good practice to give a meaningful name to the project and to the solution. In step 6, we have changed the name of the default class to HelloUniverse.cs, and it automatically changed the class name thanks to refactoring features in Visual Studio. If you look at the layout of the .NET Standard 2.0 library template, you will see a Dependencies node. In a normal .NET Framework class library, we had References. The Dependencies node will list all the dependent components for that class library.
In step 8, we added a simple public method that takes a string parameter and returns a message with the parameter sent to the method. Finally, we checked for syntax errors and typos by building the solution.
We have created a .NET Standard 2.0-based class library in the previous recipe. In this recipe, we will be creating a Windows console-based application to use the library. The console-based application will be using the full .NET Framework under Windows, the current version of .NET Framework is 4.6.1.
Let's get ready to create the Windows console application to use the .NET Standard library we have built in the previous recipe. If you haven't followed the previous recipe, make sure you have completed it. We are going to use that solution and add the Windows console application to it. Open Visual Studio 2017 and open the solution we saved from the previous recipe. Click Build | Build Solution, or press Ctrl + Shift + B, and the solution should build successfully. Everything's ready for testing our class library.
- Open Visual Studio 2017.
- Now, open the solution from the previous recipe. Click
File|Open|Open Project/Solution, or press Ctrl + Shift + O, and select theChapter1.StandardLibsolution. - Now, click on the
Chapter1.Librarysolution label. ClickFile|Add|New Project.
- In the
Add New Projecttemplate dialog box, expand theVisual C#node in the left-hand pane. SelectWindows Classic Desktopand selectConsole App (.NET Framework)from the right-hand pane.

- Now, in the
Name:text box, typeChapter1.Standard.HelloConsoleand leave theLocation:text box as it is.

- Click
OK. - Now, the
Solution Explorer(if not visible, press Ctrl + Alt + L) should look like this:
- Click
OK. - In the
Solution Explorer, double-click on theProgram.csfilename under theChapter1.StandardLib.HelloConsoleproject. - Scroll up till you reach the
usingdirective part of the code and add the following code as the last line of that section:
using Chapter1.StandardLib;
- Now, in between the curly brackets of the
Main()method, type the following code:
      var myName = "Fiqri Ismail";
      var helloMessage = new HelloUniverse();
      Console.WriteLine(helloMessage.SayHello(myName));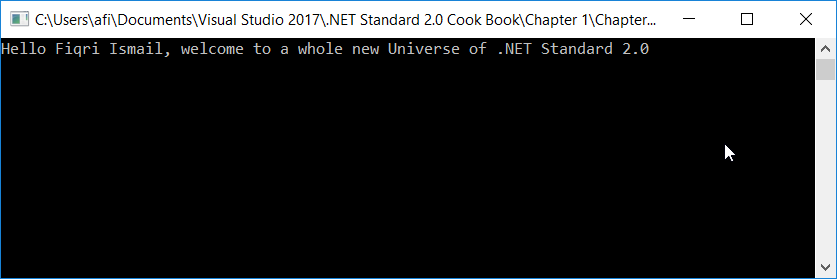
Console.ReadLine();- Hit F5 and see the code running:
- Press Enter to exit from the
Command Prompt.
OK, let's dive behind the scenes of the stuff we just completed. From steps 1 to 7, we opened an existing project and added a new Windows console application. This project is a full .NET Framework project and its version is .NET Framework version 4.6.1. In steps 9 and 10, we added the reference to a .NET Standard class library project from the Windows console application. This is required to test the class library. Then, we can reference it and use it from the application, as we did in step 12.
In step 13, we created a variable to store the name (keep in mind, hardcoding is not a good practice). And then we have created an instance of the HelloUniverse class that we created in the .NET Standard 2.0 class library. To display the output of the SayHello() method to the console window, we have directly used the Console.WriteLine() method. Finally, we waited until the user presses a key to exit from the console by using the Console.ReadLine() method, or else the end user wouldn't be able to see any output in the console.
So far, we have tested the .NET Standard 2.0 class library with a Windows console application that runs under full .NET Framework version 4.6.1. In this recipe, we are going to create an ASP.NET Core 2.0 application. ASP.NET Core uses .NET Core, which is an open source, cross-platform supported .NET flavor.
Let's get ready to create the ASP.NET Core application to use the .NET Standard library we have built in the previous recipe when we created the .NET Standard library. If you haven't followed that recipe, make sure you have completed it. We are going to use that solution and add the ASP.NET Core application to it. Also, make sure you have downloaded and installed the latest version of .NET Core Framework, which is available at http://www.dot.net/core.
Open Visual Studio 2017 and open the solution we saved from the previous recipe. Click Build | Build Solution, or press Ctrl + Shift + B, and the solution should build successfully. Everything's ready for testing our class library.
- Open Visual Studio 2017.
- Now, open the solution from the previous recipe. Click
File|Open|Open Project/Solution, or press Ctrl + Shift + O, and select theChapter1.StandardLibsolution.

- In the
Name:text box, typeChapter1.StandardLib.AspNetCoreas the name of the project and leave theLocation:as it is:

- Click
OK.

- Leave the defaults as they are and Click
OK.
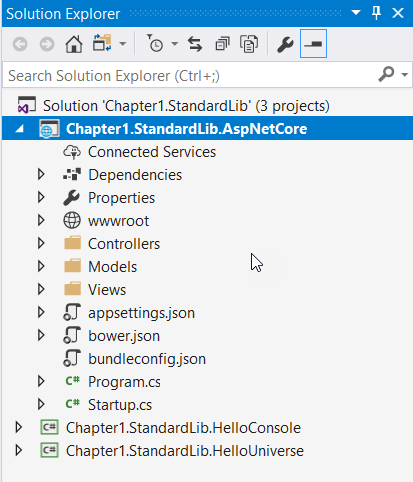
- Now, the
Solution Explorershould look like this:
- Select the
Chapter1.StandardLib.AspNetCoreproject, right-click, and selectSet as Startup Project.

Default ASP.NET Core template running on your default browser
- Let's close the browser and add our .NET Standard class library as a reference. To do this, expand the
Chapter1.StandardLib.AspNetCoreproject tree and selectDependencies. - Right-click on the
Dependencieslabel and selectAdd Reference.
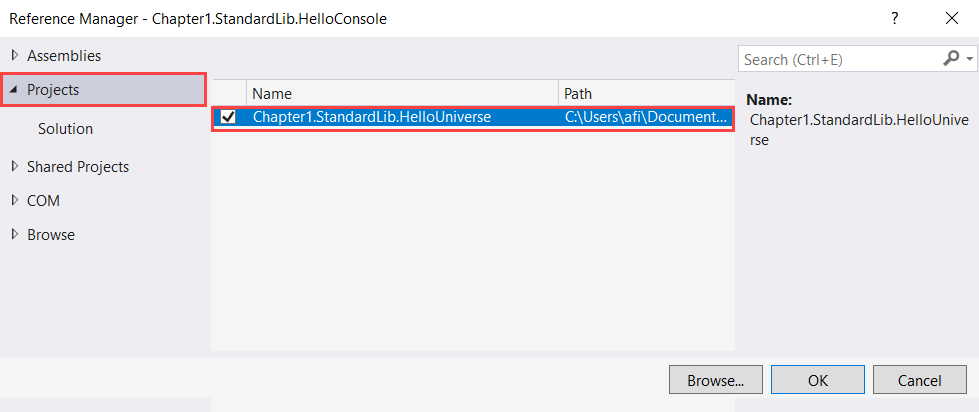
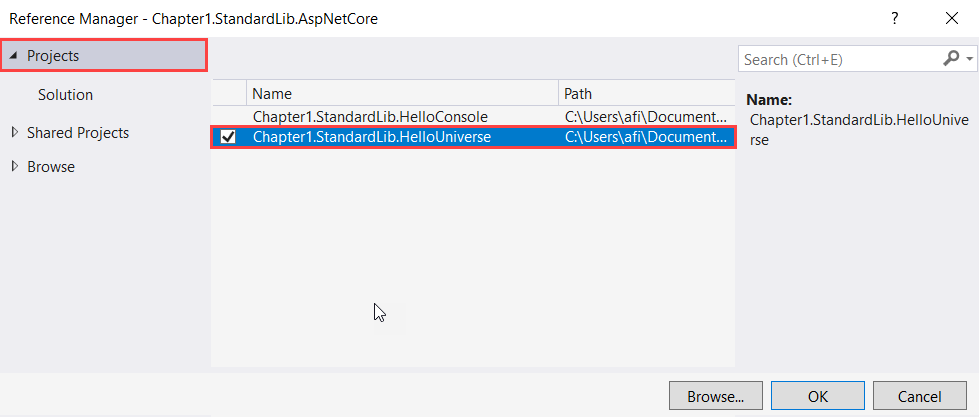
- Under the
Reference Managerdialog box, click on theProjectslabel in the left-hand pane. In the middle pane, check theChapter1.StandardLib.HelloUniverseproject and clickOK.
- Let's expand the
Controllersfolder and double-clickHomeController.cs. - In
HomeController.cs, add this code right next to the last line of theusingdirective block:
using Chapter1.StandardLib;
- Now, inside the
About()action, add the following code block after theViewData["Message"]line (by default, this is after line 21 in the default template):
      var myName = "Fiqri Ismail";
      var helloMessage = new HelloUniverse();
ViewData["HelloMessage"] = helloMessage.SayHello(myName);- Now expand the
Viewsfolder. Again, expand theHomefolder as well. - Double-click on
About.cshtml. - At the end of
About.cshtml, add the following code:
<p>@ViewData["HelloMessage"]</p>
- Now press F5 to see it in action.

About.cshtml page
- Excellent, now you have used a .NET Standard 2.0 library with an ASP.NET Core 2.0 web application.
Let's have a look what we did just now. From steps 1 to 9, we opened and previously built an existing solution containing .NET Standard 2.0 library code. Then, we added an ASP.NET Core project to that solution. In step 10, we told Visual Studio to execute the ASP.NET Core project when we hit F5 or started debugging. In step 11, we tested the default template of ASP.NET Core in a default browser.
In steps 12 to 14, we added the reference to our ASP.NET Core application from the .NET Standard 2.0 class library. This allows you to access the library from an ASP.NET Core 2.0 web application. In step 16, we referenced the class library using the using directive. In step 17, we created a variable to hold the name and created an instance of the HelloUniverse class.
Finally, we have stored the message from the SayHello() method in the ViewData collection. The ViewData collection allows you to transfer data from Controllers to Views. In steps 19 and 20, we opened the relevant view for the About() action, which is About.cshtml. Finally, in step 20, we added simple HTML code to display the stored value in ViewData in the HomeController class. As a last step, we executed the web application and tested it.