


 Download code from GitHub
In this chapter, we will start our journey towards the usage of the preferred IoT publish-subscribe lightweight messaging protocol in diverse IoT solutions combined with mobile apps and web applications. We will learn how MQTT and its lightweight messaging system work. We will learn MQTT basics, the specific vocabulary for MQTT, and its working modes. We will use different utilities and diagrams to understand the most important concepts related to MQTT. We will:
Understand convenient scenarios for the MQTT protocol
Work with the publish-subscribe pattern
Work with message filtering
Learn basic concepts related to MQTT
Understand the MQTT puzzle: clients, servers or brokers, and connections
Install a Mosquitto MQTT server on Linux, macOS, or Windows
Publish messages
Subscribe to topics
Unsubscribe from topics
Work with best practices when creating topics
Understand wildcards
Learn about the different Quality of Service levels
Work with at least once delivery
Work with exactly once delivery
Imagine that we have dozens of different devices that must exchange data between them. These devices have to request data to other devices and the devices that receive the requests must respond with the demanded data. The devices that requested the data must process the data received from the devices that responded with the demanded data.
The devices are Internet of Things (IoT) boards that have dozens of sensors wired to them. We have the following IoT boards with different processing powers: Raspberry Pi 3, Raspberry Pi Model B, Intel Edison, and Intel Joule 570x. Each of these boards has to be able to send and receive data. In addition, we want many mobile devices to be able to send and receive data, some of them running iOS and others Android. We have to work with many programming languages.
We want to send and receive data in near real time through the Internet and we might face some network problems, that is, our wireless networks are somewhat unreliable and we have some high-latency environments. Some devices have low power, many of them are powered by batteries and their resources are scarce. In addition, we must be careful with the network bandwidth usage because some of the devices use metered connections.
Tip
A metered connection is a network connection in which we have a limited amount of data usage per month. If we go over this amount of data, we get billed extra charges.
We can use HTTP requests and build a publish-subscribe model to exchange data between different devices. However, there is a protocol that has been specifically designed to be lighter than the HTTP 1.1 protocol and work better when unreliable networks are involved and connectivity is intermittent. The MQ Telemetry Transport (MQTT) is better suited for this scenario in which many devices have to exchange data between themselves in near real time through the Internet and we need to consume the least possible network bandwidth.
The MQTT protocol is a Machine-to-Machine (M2M) and IoT connectivity protocol. MQTT is a lightweight messaging protocol that works with a broker-based publish-subscribe mechanism and runs on top of Transmission Control Protocol / Internet Protocol (TCP/IP).
The following diagram shows the MQTT protocol on top of the TCP/IP stack:

Note
The most popular versions of MQTT are 3.1 and 3.1.1. In this book, we will work with MQTT 3.1.1. Whenever we reference MQTT, we are talking about MQTT 3.1.1, that is, the newest version of the protocol. The MQTT 3.1.1 specification has been standardised by the OASIS consortium. In addition, MQTT 3.1.1 became an ISO standard (ISO/IEC 20922) in 2016.
MQTT is lighter than the HTTP 1.1 protocol, and therefore, it is a very interesting option whenever we have to send and receive data in near real time with a publish-subscribe model and we require the lowest possible footprint. MQTT is very popular in IoT, M2M, and embedded projects, but it is also gaining presence in web applications and mobile apps that require assured messaging and an efficient message distribution. As a summary, MQTT is suitable for the following application domains in which data exchange is required:
Asset tracking and management
Automotive telematics
Chemical detection
Environment and traffic monitoring
Field force automation
Fire and gas testing
Home automation
In-Vehicle Infotainment (IVI)
Medical
Messaging
Point of Sale (POS) kiosks
Railway
Radio-Frequency Identification (RFID)
Supervisory Control and Data Acquisition (SCADA)
Slot machines
As a summary, MQTT was designed to be suitable to support the following typical challenges in IoT, M2M, embedded, and mobile applications:
Be lightweight to make it possible to transmit high volumes of data without huge overheads
Distribute minimal packets of data in huge volumes
Support an event-oriented paradigm with asynchronous bidirectional low latency push delivery of messages
Easily emit data from one client to many clients
Make it possible to listen for events whenever they happen (event-oriented architecture)
Support always-connected and sometimes-connected models
Publish information over unreliable networks and provide reliable deliveries over fragile connections
Work very well with battery-powered devices or require low power consumption
Provide responsiveness to make it possible to achieve near real-time delivery of information
Offer security and privacy for all the data
Be able to provide the necessary scalability to distribute data to hundreds of thousands of clients
Before we dive deep into MQTT, we must understand the publish-subscribe pattern, also known as the pub-sub pattern. In the publish-subscribe pattern, a client that publishes a message is decoupled from the other client or clients that receive the message. The clients don't know about the existence of the other clients. A client can publish messages of a specific type and only the clients that are interested in specific types of messages will receive the published messages.
The publish-subscribe pattern requires a broker, also known as server. All the clients establish a connection with the broker. The client that sends a message through the broker is known as the publisher. The broker filters the incoming messages and distributes them to the clients that are interested in the type of received messages. The clients that register to the broker as interested in specific types of messages are known as subscribers. Hence, both publishers and subscribers establish a connection with the broker.
It is easy to understand how things work with a simple diagram. The following diagram shows one publisher and two subscribers connected to a broker:

A Raspberry Pi 3 board with an altitude sensor wired to it is a publisher that establishes a connection with the broker. An iOS smartphone and an Android tablet are two subscribers that establish a connection with the broker.
The iOS smartphone indicates to the broker that it wants to subscribe to all the messages that belong to the sensor1/altitude topic. The Android tablet indicates the same to the broker. Hence, both the iOS smartphone and the Android tablet are subscribed to the sensor1/altitude topic.
Tip
A topic is a named logical channel and it is also referred to as a channel or subject. The broker will send publishers only the messages published to topics to which they are subscribed.
The Raspberry Pi 3 board publishes a message with 100 feet as the payload and sensor1/altitude as the topic. The board, that is, the publisher, sends the publish request to the broker.
Tip
The data for a message is known as payload. A message includes the topic to which it belongs and the payload.
The broker distributes the message to the two clients that are subscribed to the sensor1/altitude topic: the iOS smartphone and the Android tablet.
Publishers and subscribers are decoupled in space because they don't know each other. Publishers and subscribers don't have to run at the same time. The publisher can publish a message and the subscriber can receive it later. In addition, the publish operation isn't synchronized with the receive operation. A publisher requests the broker to publish a message and the different clients that have subscribed to the appropriate topic can receive the message at different times. The publisher can send messages as an asynchronous operation to avoid being blocked until the clients receive the messages. However, it is also possible to send a message to the broker as a synchronous operation with the broker and to continue the execution only after the operation was successful. In most cases, we will want to take advantage of asynchronous operations.
A publisher that requires sending a message to hundreds of clients can do it with a single publish operation to a broker. The broker is responsible for sending the published message to all the clients that have subscribed to the appropriate topic. Because publishers and subscribers are decoupled, the publisher doesn't know whether there is any subscriber that is going to listen to the messages it is going to send. Hence, sometimes it is necessary to make the subscriber become a publisher too and to publish a message indicating that it has received and processed a message. The specific requirements depend on the kind of solution we are building. MQTT offers many features that make our lives easier in many of the scenarios we have been analyzing.
The broker has to make sure that subscribers only receive the messages they are interested in. It is possible to filter messages based on different criteria in a publish-subscribe pattern. We will focus on analyzing topic-based filtering, also known as subject-based filtering.
Consider that each message belongs to a topic. When a publisher requests the broker to publish a message, it must specify both the topic and the message. The broker receives the message and delivers it to all the subscribers that have subscribed to the topic to which the message belongs.
The broker doesn't need to check the payload for the message to deliver it to the corresponding subscribers; it just needs to check the topic for each message that has arrived and needs to be filtered before publishing it to the corresponding subscribers.
A subscriber can subscribe to more than one topic. In this case, the broker has to make sure that the subscriber receives the messages that belong to all the topics to which it has subscribed. It is easy to understand how things work with another simple diagram. The following diagram shows two future publishers that haven't published any messages yet, a broker and two subscribers connected to the broker:

A Raspberry Pi 3 board with an altitude sensor wired to it and an Intel Edison board with a temperature sensor wired to it will be two publishers. An iOS smartphone and an Android tablet are two subscribers that establish a connection to the broker.
The iOS smartphone indicates to the broker that it wants to subscribe to all the messages that belong to the sensor1/altitude topic. The Android tablet indicates to the broker that it wants to subscribe to all the messages that belong to any of the following two topics: sensor1/altitude and sensor42/temperature. Hence, the Android tablet is subscribed to two topics while the iOS smartphone is subscribed to just one topic.
The following diagram shows what happens after the two publishers connect and publish messages to different topics through the broker:

The Raspberry Pi 3 board publishes a message with 120 feet as the payload and sensor1/altitude as the topic. The board, that is, the publisher, sends the publish request to the broker. The broker distributes the message to the two clients that are subscribed to the sensor1/altitude topic: the iOS smartphone and the Android tablet.
The Intel Edison board publishes a message with 75 F as the payload and sensor42/temperature as the topic. The board, that is, the publisher, sends the publish request to the broker. The broker distributes the message to the only client that is subscribed to the sensor42/temperature topic: the Android Tablet. Thus, the Android tablet receives two messages.
The MQTT broker is known as MQTT server in MQTT 3.1.1, and therefore, we will refer to it as the server. However, we must take into account that the documentation for MQTT servers, tools and client libraries can use the old MQTT broker name to refer to the server.
The MQTT server uses the previously explained topic-based filtering to filter and distribute messages to the appropriate subscribers. There are many MQTT server implementations that provide additional message filtering features by providing custom plug-ins. However, we will focus on the features that are part of the MQTT requirements.
As previously explained, in MQTT the publishers and the subscribers are completely decoupled. Publishers and subscribers are MQTT clients that only establish a connection with the MQTT server. An MQTT client can be both a publisher and a subscriber at the same time, that is, the client can publish messages to specific topics and also receive messages that belong to the topics to which the client has subscribed to.
There are MQTT client libraries available for the most popular programming languages and platforms. One of the most important things that we must consider when we select the MQTT client library is the list of MQTT features that they support and the ones that we need for our solution. Sometimes, we can choose between many libraries for a specific programming language and platform and some of them might not implement all the features. We will use many libraries for diverse programming languages and platforms throughout the book and we will learn how to evaluate whether a library is suitable or not for our needs. Specifically, we will work with Python, Java, JavaScript and Swift.
Any device that has a TCP/IP stack and is capable of using an MQTT library can become an MQTT client, that is, a publisher, a subscriber or both a publisher and a subscriber. The MQTT library makes it possible for the device to talk MQTT on top of TCP/IP and to interact with specific types of MQTT servers. For example, any of the following can become an MQTT client: an Arduino board, a Raspberry Pi 3 board, an Intel Joule board, an iPhone, an iPad, a laptop running Windows, a server running Linux, a Macbook running macOS, and Android tablet, among other devices.
There are many MQTT servers available for the most popular platforms, including Linux, Windows and macOS. Many of them are servers that can work as MQTT servers among other features. An MQTT server might implement only a subset of the MQTT capabilities and might have specific limitations. Hence, it is very important to check all the capabilities we will require in our solution before selecting an MQTT server. As happens with other middleware, we have open source versions, free versions and paid versions. Thus, we also have to make sure we select the appropriate MQTT server based on our budget and our specific needs.
Throughout this book, we will work with the Eclipse Mosquitto MQTT server (http://www.mosquitto.org). Mosquitto is an open source MQTT server with an EPL/EDL license that is compatible with MQTT versions 3.1 and 3.1.1. We can take advantage of everything we learn with any other MQTT server such as Erlang MQTT Broker (EMQ), also known as EMQTT (http://www.emqtt.io), and HiveMQ (http://hivemq.com), among others. In addition, we might use our knowledge to work with a cloud-based MQTT server such as CloudMQTT (http://www.cloudmqtt.com).
The MQTT server is the central hub of the publish/subscribe model we previously analyzed. The MQTT server is responsible of the authentication and authorization of the MQTT clients that will be able to become publishers and/or subscribers after they are authenticated and authorized. So, the first thing that an MQTT client must do is to establish a connection with the MQTT server.
In order to establish a connection, the MQTT client must send a CONNECT control packet to the MQTT server with a payload that must include all the necessary information to initiate the connection and proceed with the authentication and authorization. The MQTT server will check the CONNECT packet, perform authentication and authorization and send a response to the client with a CONNACK control packet that we will analyze in detail after understanding the CONNECT control packet. In case the MQTT client sends an invalid CONNECT control packet, the server will automatically close the connection.
The following diagram shows the interaction between an MQTT client and an MQTT server to establish a connection.

Tip
After a successful connection has been established between an MQTT client and an MQTT server, the server will keep the connection open until the client loses the connection or sends a DISCONNECT control packet to the server to close the connection.
The CONNECT control packet must include values for the following fields in the payload and bits for a special flags byte that is included in the control packet. We want to understand the meaning of these fields and flags because we will be able to specify their values when we work with MQTT tools and MQTT client libraries.
ClientId: The client identifier, also known as Client ID, is a string that identifies each MQTT client that connects to an MQTT server. Each client that connects to the MQTT server must have a uniqueClientIdand the server uses it to identify the state that it holds related to the MQTT session between the client and the server. If a client specifies an empty value as theClientId, the MQTT server must generate a uniqueClientIdto identify the client. However, this behavior depends on the value specified for theCleanSessionfield.CleanSession: The clean session flag is a boolean value that specifies what happens after an MQTT client disconnects from the MQTT server and then reconnects. IfCleanSessionis set to1ortrue, the client indicates to the MQTT server that the session will only last as long as the network connection is alive. After the MQTT client disconnects from the MQTT server, any information related to the session is discarded. A new connection from the same MQTT client to the MQTT server will not use the data from the previous session and will be a new clean session. IfCleanSessionis set to0orfalse, we will work with a persistent session. In this case, the MQTT server stores all the subscriptions for the MQTT client and when the MQTT client disconnects, the MQTT server stores all the messages that arrive with specific quality of service levels that match the subscriptions that the MQTT client had at the time the disconnection occurred. This way, when the same MQTT client establishes a new connection with the MQTT server, the MQTT client will have the same subscriptions and will receive all the messages that it couldn't receive when it lost the connection. We will dive deep on the quality of service level for the messages and their relationship with the clean session flag or the persistent session option later.
Tip
When the clean session flag is set to 0 or false, the client indicates to the server that is wants a persistent session. We just have to remember a clean session is the opposite of a persistent session.
UserName: If the client wants to specify a user name to request authentication and authorization from the MQTT server, it must set theUserNameflag to1ortrueand specify a value for theUserNamefield.password: If the client wants to specify a password to request authentication and authorization from the MQTT server, it must set thePasswordflag to1ortrueand specify a value for thePasswordfield.
Tip
We will dedicate the entire next chapter to MQTT security, and therefore, we just mention the fields and the flags that are included in the CONNECT control packtet.
ProtocolLevel: The protocol level value indicates the MQTT protocol version that the MQTT client requests the MQTT server to use. Remember we will always work with MQTT version 3.1.1.KeepAlive:KeepAliveis a time interval expressed in seconds. If the value for keep alive is not equal to0, the MQTT client commits to send control packets to the server within the time specified forKeepAlive. If the MQTT client doesn't have to send any control packet, it must send aPINGREQcontrol packet to the MQTT server, that is, a ping request to tell the MQTT server that the client connection is alive. The MQTT server responds to thePINGREQcontrol packet with aPINGRESPresponse to the MQTT client, that is, a ping response to tell the MQTT client that the connection with the MQTT server is alive. The connection is closed when there is an absence of any of these control packets. If the value for keep alive is0, the keep alive mechanism is turned off.Will,WillQoS,WillRetain,WillTopicandWillMessage: These flags and fields allow the MQTT client to take advantage of the last will and testament feature of MQTT. If the MQTT client sets theWillflag to1or true, it specifies that it wants the MQTT server to store a last will message associated with the session. TheWillQoSflag specifies the desired quality of service for the lastWillMessageand theWillRetainflag indicates whether this messsage must be retained when it is published or not. If the MQTT client sets theWillflag to1or true, it must specify the topic for theWillMessageand the message in theWillTopicandWillMessagefields. If the MQTT client is disconnected or loses the connection with the MQTT server, the MQTT server will publish the message specified in theWillMessagefield to the topic indicated in theWillTopicfield with the chosen quality of service. We will analyze this feature in detail later.
The MQTT server will process a valid CONNECT control packet and it will respond with a CONNACK control packet. This control packet will include values for the following flags included in the header. We want to understand the meaning of these flags because we will be able to retreive their values when we work with MQTT tools and MQTT client libraries.
SessionPresent: If the MQTT server received a connection request with theCleanSessionflag set to1ortrue, the value for theSessionPresentflag will be0orfalsebecause no stored session will be reused. If theCleanSessionflag was set to0orfalsein the connection request, the MQTT server will work with a persistent session and the value for theSessionPresentflag will be1ortrueif the server had a persistent session for the client from a previous connection and retrieves it. Otherwise, SessionPresent will be0orfalse. The MQTT client that wanted to work with a persistent session can use the value of this flag to determine whether it has to request subscription to the desired topics or whether the subscriptions have been restored from the persisted session.ReturnCode: If the authorization and authentication passed and the connection was successfully established, the value forReturnCodewill be0. Otherwise, the return code will be different than0and the network connection between the client and the server will be closed. The following table shows the possible values forReturnCodewith their meaning.
|
ReturnCode value |
Description |
|
|
The connection was accepted |
|
|
The connection was refused because the MQTT server doesn't support the MQTT protocol version requested by the MQTT client in the CONNECT control packet |
|
|
The connection was refused because the |
|
|
The connection was refused because the network connection was established but the MQTT service isn't available |
|
|
The connection was refused because the user name or password values are malformed |
|
|
The connection was refused because authorization failed |
Now, we will learn the necessary steps to install a Mosquitto broker, also known as Mosquitto MQTT server on the most popular operating systems: Linux, macOS and Windows. First, we will start with Linux; specifically, we will work with Ubuntu Linux. In case you want to work with a different Linux distribution, you can find details about the installation procedure in the Mosquitto downloads section: http://mosquitto.org/download.
Follow these steps to install a Mosquitto broker on Ubuntu Linux. Take into account that you will require root privileges:
Open a Terminal window and run the following command to add the Mosquitto repository:
sudo apt-add-repository ppa:mosquitto-dev/mosquitto-ppaAfter you enter the password, you will see an output similar to the next lines (the temporary file names will be different).
      gpg: keyring `/tmp/tmpj3a50p1p/secring.gpg' created
      gpg: keyring `/tmp/tmpj3a50p1p/pubring.gpg' created
      gpg: requesting key 262C4500 from hkp server keyserver.ubuntu.com
      gpg: /tmp/tmpj3a50p1p/trustdb.gpg: trustdb created
      gpg: key 262C4500: public key "Launchpad mosquitto" imported
      gpg: Total number processed: 1
      gpg:               imported: 1  (RSA: 1)
      OK
Run the following command to update the packages with the recently added Mosquitto repository.
sudo apt-get updateYou will see an output similar to the next lines.
      Get:1 http://ppa.launchpad.net/mosquitto-dev/mosquitto-ppa/      ubuntu xenial InRelease [23,8 kB]
      Hit:2 http://security.ubuntu.com/ubuntu xenial-security InRelease
      Hit:3 http://ar.archive.ubuntu.com/ubuntu xenial InRelease
      Hit:4 http://ar.archive.ubuntu.com/ubuntu xenial-updates InRelease
      Get:5 http://ppa.launchpad.net/mosquitto-dev/      mosquitto-ppa/ubuntu xenial/main amd64 Packages [2.048 B]
      Hit:6 http://ar.archive.ubuntu.com/ubuntu xenial-backports InRelease
      Get:7 http://ppa.launchpad.net/mosquitto-dev/      mosquitto-ppa/ubuntu xenial/main i386 Packages [2.048 B]
      Get:8 http://ppa.launchpad.net/mosquitto-dev/mosquitto-ppa/      ubuntu xenial/main Translation-en [1.292 B]
      Fetched 29,2 kB in 1s (21,5 kB/s)
      Reading package lists... Done
Now, run the following command to install the package for the Mosquitto server.
sudo apt-get install mosquittoYou will see an output similar to the next lines. Enter Y and press Enter to answer the question and complete the installation process.
      Reading package lists... Done
      Building dependency tree
      Reading state information... Done
      The following additional packages will be installed:
        libev4 libuv1 libwebsockets7
      The following NEW packages will be installed:
        libev4 libuv1 libwebsockets7 mosquitto
      0 upgraded, 4 newly installed, 0 to remove and 299 not upgraded.
      8 not fully installed or removed.
      Need to get 274 kB of archives.
      After this operation, 714 kB of additional disk space will be used.
      Do you want to continue? [Y/n]
The last lines should include a line that says
Setting up mosquitto, as shown in the following lines:Setting up mosquitto (1.4.10-0mosquitto3) ... Processing triggers for libc-bin (2.23-0ubuntu3) ... Processing triggers for systemd (229-4ubuntu7) ... Processing triggers for ureadahead (0.100.0-19) ...
Run the following command to install the Mosquitto client packages that will allow us to run commands to publish messages to topics and subscribe to topic filters.
sudo apt-get install mosquitto-clientsYou will see an output similar to the next lines. Enter Y and press Enter to answer the question and complete the installation process.
      Reading package lists... Done
      Building dependency tree
      Reading state information... Done
      The following additional packages will be installed:
        libc-ares2 libmosquitto1
      The following NEW packages will be installed:
        libc-ares2 libmosquitto1 mosquitto-clients
      0 upgraded, 3 newly installed, 0 to remove and 299 not upgraded.
      Need to get 138 kB of archives.
      After this operation, 332 kB of additional disk space will be used.
      Do you want to continue? [Y/n]
The last lines should include a line that says
Setting up mosquitto-clients, as shown in the following lines:Setting up libmosquitto1:amd64 (1.4.10-0mosquitto3) ... Setting up mosquitto-clients (1.4.10-0mosquitto3) ... Processing triggers for libc-bin (2.23-0ubuntu3) ...
Run the following command to check the status for the
mosquittoservice that was recently installed.sudo service mosquitto statusThe first lines of the output should be similar to the following lines with an
active (running)status displayed. The details after CGroup indicate the command-line that started the service. The-coption followed by/etc/mosquitto/mosquitto.confspecifies that Mosquitto is using this configuration file.mosquitto.service - LSB: mosquitto MQTT v3.1 message broker Loaded: loaded (/etc/init.d/mosquitto; bad; vendor preset: enabled) Active: active (running) Docs: man:systemd-sysv-generator(8) CGroup: /system.slice/mosquitto.service └─17560 /usr/sbin/mosquitto -c /etc/mosquitto/mosquitto.conf
You can also run the following command to check whether the Mosquitto MQTT server is listening at the default port: 1883.
netstat -an | grep 1883The following lines show the results of the previous command that indicate the Mosquitto MQTT server has opened an IPv4 and an IPv6 listen socket on port 1883:
      tcp        0      0 0.0.0.0:1883    0.0.0.0:*    LISTEN
      tcp6       0      0 :::1883         :::*         LISTEN
Follow these steps to install a Mosquitto broker on macOS (known as OS X before version Sierra):
In case you don't have Homebrew installed, open a Terminal window and run the command indicated in the Homebrew homepage, http://brew.sh , to install this popular package manager for macOS. The following command will do the job. However, it is convenient to check the Homebrew homepage and check all the detailed instructions that are always updated with the newest versions of macOS that become available. In case you already have Homebrew installed, move to the next step.
/usr/bin/ruby -e "$(curl -fsSL
https://raw.githubusercontent.com/Homebrew
/install/master/install)"
Open a Terminal window and run the following command to request Homebrew to install Mosquitto:
brew install mosquittoThe following lines show the last messages shown in the Terminal that indicate that Homebrew has installed Mosquitto and the instructions to start the MQTT server.
      ==> Installing mosquitto
      ==> Downloading https://homebrew.bintray.com/bottles/mosquitto-      1.4.10.el_capitan.bottle.tar.gz
      ###################################################### 100.0%
      ==> Pouring mosquitto-1.4.10.el_capitan.bottle.tar.gz
      ==> Caveats
      mosquitto has been installed with a default configuration file.
      You can make changes to the configuration by editing:
          /usr/local/etc/mosquitto/mosquitto.conf
      To have launchd start mosquitto now and restart at login:
        brew services start mosquitto
      Or, if you don't want/need a background service you can just run:
        mosquitto -c /usr/local/etc/mosquitto/mosquitto.conf
      ==> Summary
        /usr/local/Cellar/mosquitto/1.4.10: 32 files, 618.3K
After the Mosquitto installation has been completed, run the following command in a new Terminal window to launch Mosquitto with the default configuration file. The
-coption followed by/usr/local/etc/mosquitto/mosquitto.confspecifies that we want to use this configuration file./usr/local/sbin/mosquitto -c /usr/local/etc/mosquitto/mosquitto.confThe following is the output after you run the previous command:
      Gastons-MacBook-Pro:~ gaston$ /usr/local/sbin/mosquitto -c       /usr/local/etc/mosquitto/mosquitto.conf
      1482518967: mosquitto version 1.4.10       (build date 2016-08-31 20:09:41+0100) starting
      1482518967: Config loaded from       /usr/local/etc/mosquitto/mosquitto.conf.
      1482518967: Opening ipv4 listen socket on port 1883.
      1482518967: Opening ipv6 listen socket on port 1883.
The last lines indicate the Mosquitto MQTT server has opened an IPv4 and an IPv6 listen socket on port 1883. Leave the Terminal window opened because we need Mosquitto running on the local computer to work with the next examples.
Follow these steps to install a Mosquitto broker on Windows. Take into account that you will require Windows Vista or higher (Windows 7, 8, 8.1, 10 or greater).
Download the executable file listed under Binary Installation and Windows that provides the native build in the Mosquitto downloads web page: http://mosquitto.org/download . For Moquitto 1.4.10, the file name is
mosquito-1.4.10-install-win32.exe. You must click or tap on the file name and you will be redirected to the Eclipse repository with many mirror options, including a default recommendation, from which you can download the executable file.Run the previously downloaded executable file and the Mosquitto Setup Wizard will display its Welcome dialog box. Click Next > to continue. The setup wizard will display the dependencies that you must install: OpenSSL and pthreads. The dialog box will display the links that you can use to download and run installers for these two requirements.
If you don't have Win32 OpenSSL v1.0.2j Light installed on Windows, go to the Win32 OpenSSL web page: http://slproweb.com/products/Win32OpenSSL.html and download the Win32 OpenSSL v1.0.2k Light file listed in a table under Download Win32 OpenSSL. Do not download the Win64 version because you will need the Win32 version to make it possible for Mosquitto to have its dependencies. If you already have Win32 OpenSSL v1.0.2k Light installed, advance to step number 7. For Win32 OpenSSL v1.0.2k Light, the file name is
Win32OpenSSL_Light-1_0_2j.exe. Run the downloaded executable file and OpenSSL Light (32-bit) will display its Welcome dialog box. Click Next > to continue.The setup wizard will display the License Agreement. Read it, select I Accept the agreement and click Next >. Select the folder in which you want to install OpenSSL Light (32-bit) in case you don't want to use the default folder. Remember the folder you specify because you will need to copy a few DLL files from this folder later. The default folder is
C:OpenSSL-Win32.Click Next > to continue, specify a different Start Menu folder if necessary and click Next >. Select The OpenSSL binaries (/bin) directory as the desired option to Copy OpenSSL DLLs to. This way, the installation will copy the DLLs to a
binsub-folder within the previously specified folder, by default,C:OpenSSL-Win32bin.Click Next > to continue. Review the selected installation options and click Install to complete the installation for OpenSSL Light (32-bit). Finally, consider a donation to the Win32 OpenSSL project and click Finish to exit setup.
Go to the following address in your web browser: ftp://sources.redhat.com/pub/pthreads-win32/dll-latest/dll/x86 . The browser will display many files for this FTP directory. Right click on pthreadVC2.dll and save the file in your
Downloadsfolder. You will have to copy this DLL to the Mosquitto installation folder later.Now, go back to the Mosquitto Setup window and click Next > to continue. By default, Mosquitto will install the files and the Mosquitto Service. Use the default components installation options and click Next > to continue.
Select the folder in which you want to install Mosquitto in case you don't want to use the default folder. Remember the folder you specify because you will need to copy a few DLL files to this folder later. The default folder is
C:Program Files (x86)mosquitto. Click Install to complete the installation. Once the installation has completed click Finish to close the Mosquitto Setup Wizard.Open a File Explorer window and go to the
binsub-folder within the folder in which you installed OpenSSL Light (32-bit), by default,C:OpenSSL-Win32bin.Copy the following two DLLs:
libeay32.dllandssleay32.dll. Now, go to the folder in which you installed Mosquitto and paste these two DLLs. By default, the Mosquitto installation folder isC:Program Files (x86)mosquitto. You will need to provide administrator permission to paste the DLLs in the default folder.Open a File Explorer window and go to your
Downloadsfolder. Copy the pthreads DLL you downloaded in one of the previous steps:pthreadVC2.dll. Now, go to the folder in which you installed Mosquitto and paste this DLL. You will need to provide administrator permission to paste the DLL in the default Mosquitto installation folder.Now that all the dependencies are included in the Mosquitto installation folder, it is necessary to run the installation again to make the Mosquitto Setup configure the Windows service. Run the previously downloaded Mosquitto installation executable again. For Moquitto 1.4.10, the file name is
mosquito-1.4.10-install-win32.exe. Make sure you specify the same installation folder as the folder in which you copied the DLLs and that theServicecomponent is activated. Click Next > many times and click Install to complete the configuration for the Windows service. Once the installation has completed click Finish to close the Mosquitto Setup Wizard.Open the Services application in Windows and search for the service whose name is Mosquitto Broker. Right click on the service name and select Start. The Status will change to Running. By default, the service is configured to have its Startup Type set to Automatic. If you don't want to automatically start the Mosquitto Broker service, change the Startup Type to Manual. You will have to repeat the step you just did to manually start the service before working with Mosquitto on the Windows computer.
Open a Command Prompt window and run the following command to check whether the Mosquitto MQTT server is listening at the default port: 1883.
netstat -an | findstr 1883
The following lines show the results of the previous command that indicate the Mosquitto MQTT server has opened an IPv4 and an IPv6 listen socket on port 1883:
TCP    0.0.0.0:1883           0.0.0.0:0              LISTENING
TCP    [::]:1883              [::]:0                 LISTENING
A drone is an IoT device that interacts with many sensors and actuators, including digital electronic speed controllers linked to engines, propellers and servomotors. A drone is also known as an Unnamed Aerial Vehicle (UAV). Let's imagine that we have to monitor many drones. Specifically, we have to display their altitude and the speed for each of their servomotors. Not all of the drones have the same number of engines, propellers and servomotors. We have to monitor quadcopters (4 propellers), hexacopters (6 propellers) and octocopters (8 propellers).
Each drone will publish its altitude every two seconds to the following topic: sensors/dronename/altitude, where dronename must be replaced by the name assigned to each drone. For example, the drone named drone01 will publish its altitude values to the sensors/drone01/altitude topic and the drone named drone20 will use the sensors/drone20/altitude topic.
In addition, each drone will publish the speed for each of its rotors every two seconds to the following topic: sensors/dronename/speed/rotor/rotornumber, where dronename must be replaced by the name assigned to each drone and rotornumber must be replaced by the rotor number for which the speed is going to be published. For example, the drone named drone01 will publish its speed values for its rotor number 1 to the sensors/drone01/speed/rotor/1 topic.
We will use the mosquitto_sub command-line utility included in Mosquitto to generate a simple MQTT client that subscribes to a topic and print all the messages it receives. Open a Terminal in macOS or Linux, or a Command Prompt in Windows, go to the directory in which Mosquitto is installed and run the following command:
mosquitto_sub -V mqttv311 -t sensors/drone01/altitude -d
The previous command will create an MQTT client that will establish a connection with the local MQTT server and then will make the client subscribe to the topic specified after the -t option: sensors/drone01/altitude. We specify the version of the MQTT protocol that we want to use when the client establishes the connection with -V mqttv311. This way, we indicate the MQTT server that we want to use MQTT version 3.1.1. We specify the -d option to enable debug messages that will allow us to understand what happens under the hoods. We will analyze additional options for the connection and the subscription later.
The Terminal or Command Prompt window will display debug messages similar to the following lines. Take into account that the generated ClientId will be different from the one shown after Client: mosqpub/5449-Gastons-Ma.
Client mosqsub/5449-Gastons-Ma sending CONNECT
Client mosqsub/5449-Gastons-Ma received CONNACK
Client mosqsub/5449-Gastons-Ma sending SUBSCRIBE (Mid: 1, Topic: sensors/drone01/altitude, QoS: 0)
Client mosqsub/5449-Gastons-Ma received SUBACK
Subscribed (mid: 1): 0
The Terminal or Command Prompt window will display the messages published to the topic to which we subscribed as they arrive from the MQTT server to the MQTT client. Keep the window opened. You will see that that the client sends PINGREQ packets to the MQTT server and receives PINQRESP packets from the MQTT server. The following lines show examples of the messages displayed for these packets:
Client mosqsub/5449-Gastons-Ma sending PINGREQ
Client mosqsub/5449-Gastons-Ma received PINGRESP
MQTT.fx is a GUI utility implemented with JavaFX that is available for Windows, Linux and macOS. This tool allows us to connect with an MQTT server, subscribe to topic filters, see the received messages and publish messages to topics. You can download the appropriate version for your operating system from the downloads section of the main web page for this utility: http://www.mqttfx.org .
Now, we will use the MQTT.fx GUI utility to generate another MQTT client that subscribes to the same topic, sensors/drone01/altitude, and displays all the messages it receives. Follow the next steps:
Launch MQTT.fx, select local mosquitto in the dropdown located at the upper-left corner and click on the configuration icon at the right-hand side of this dropdown and at the left-hand side of the Connect button. MQTT.fx will display the Edit Connection Profiles dialog box with different options for the connection profile named local mosquitto. We analyzed many of these options when we learned about the data that the MQTT client sends to the MQTT server to establish a connection.
Make sure the General button is pressed and deactivate the MQTT Version Use Default checkbox. Make sure 3.1.1 is selected in the dropdown below MQTT Version. This way, we indicate to the MQTT server that we want to use MQTT version 3.1.1. Notice that the Client ID textbox specifies MQTT_FX_Client. This is the
ClientIdvalue that MQTT.fx will send to the MQTT server (Mosquitto) in theCONNECTcontrol packet. The following screenshot shows the dialog box with the selected options:
Click OK and then click on the Connect button. MQTT.fx will establish a connection with the local Mosquitto server. Notice that the Connect button is disabled and the Disconnect button is enabled because the client is connected to the MQTT server.
Click Subscribe and enter
sensors/drone01/altitudein the dropdown at the left-hand side of the Subscribe button. Then, click the Subscribe button. MQTT.fx will display a new panel at the left-hand side with the topic to which we have subscribed, as shown in the next screenshot.
In case you don't want to work with the MQTT.fx utility, you can run another mosquitto_sub command to generate another MQTT client that subscribes to the topic and print all the messages it receives. You just need to open another Terminal in macOS or Linux, or another Command Prompt in Windows, go to the directory in which Mosquitto is installed and run the following command again. In this case, it isn't necessary to specify the -d option.
mosquitto_sub -V mqttv311 -t sensors/drone01/altitude
Now, we have two MQTT clients subscribed to the same topic: sensors/drone01/altitude. Now, we will understand what happens under the hoods when a client subscribes to a topic.
The MQTT client sends a SUBSCRIBE packet to the MQTT server with a packet identifier (PacketId) in the header and one or more pairs of a topic filter and the desired quality of service level in the payload.
Hence, a single SUBSCRIBE packet can request the MQTT server to subscribe a client to many topics. The SUBSCRIBE packet must include at least one topic filter and QoS pair to comply with the protocol.
In the two cases in which we requested a subscription, we used a specific topic name as the value for the topic filter, and therefore, we request the MQTT server to subscribe to a single topic. We will learn about the usage of wildcards in topic filters later.
We used the default options, and therefore, the quality of service requested is the default level of 0. We will dive deep on the QoS levels later. Now, we will stay focused on the simplest subscription cases. If the QoS level is equal to 0, the value for the PacketId field will be 0. In case the QoS level is equal to 1 or 2, the packet identifier will have a number value to identify the packet and make it possible to identify the responses related to this packet.
The MQTT server will process a valid SUBSCRIBE packet and it will respond with a SUBACK packet that indicates the subscribe acknowledgement and confirms the receipt and processing of the SUBSCRIBE packet. The SUBACK packet will include the same packet identifier (PacketId) in the header that was received in the SUBSCRIBE packet. The SUBACK packet will include one return code for each pair of a topic filter and the desired QoS level received in the SUBSCRIBE packet. The number of return codes will match the number of topic filters included in the SUBSCRIBE packet. The following table shows the possible values for these return codes. The first three return codes indicate a successful subscription and each value specifies the maximum QoS that can be delivered based on the requested QoS and the MQTT server possibilities to grant it.
|
ReturnCode value |
Description |
|
|
Successfully subscrib with a maxium QoS of |
|
|
Successfully subscrib with a maxium QoS of |
|
|
Successfully subscrib with a maxium QoS of |
|
|
Failed to subscribe |
If the subscription was successful, the MQTT server will start sending every published message that matches the topic filters specified in the subscription to the MQTT client with the QoS specified in the return code.
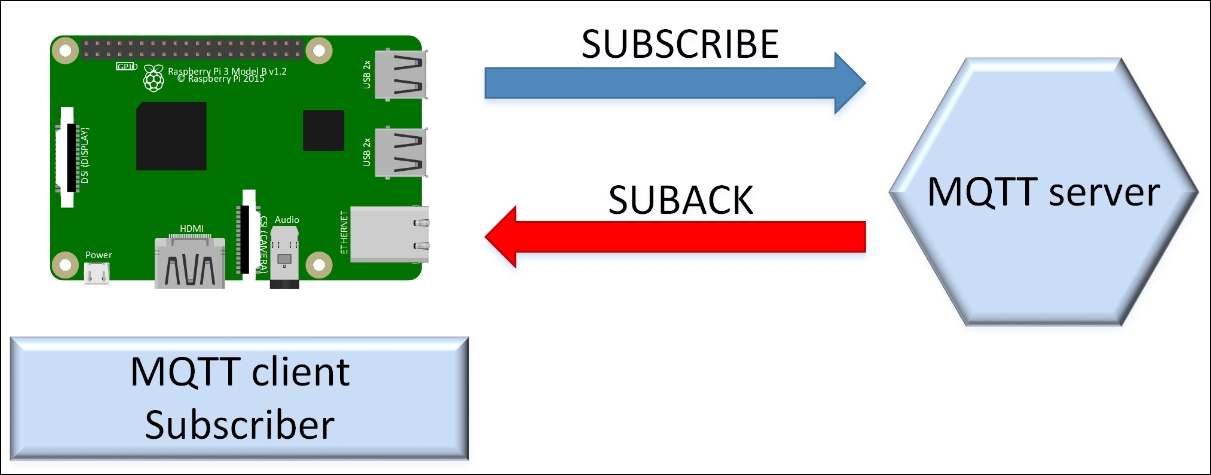
The following diagram shows the interaction between an MQTT client and an MQTT server to subscribe to one or many topic filters.
We will use the mosquitto_pub command-line utility included in Mosquitto to generate a simple MQTT client that publishes a message to a topic. Open a Terminal in macOS or Linux, or a Command Prompt in Windows, go to the directory in which Mosquitto is installed and run the following command:
mosquitto_pub -V mqttv311 -t sensors/drone01/altitude -m "10 f" -d
The previous command will create an MQTT client that will establish a connection with the local MQTT server and then will make the client publish a message to the topic specified after the -t option: sensors/drone01/altitude. We specify the payload for the message after the -m option: "10 f". We specify the version of the MQTT protocol that we want to use when the client establishes the connection with -V mqttv311. This way, we indicate the MQTT server that we want to use MQTT version 3.1.1. We specify the -d option to enable debug messages that will allow us to understand what happens under the hoods. We will analyze additional options for the connection and the publication later.
The Terminal or Command Prompt window will display debug messages similar to the following lines. Take into account that the generated ClientId will be different from the one shown after Client:mosqpub/5303-Gastons-Ma. After publishing the message, the client disconnects.
Client mosqpub/5308-Gastons-Ma sending CONNECT
Client mosqpub/5308-Gastons-Ma received CONNACK
Client mosqpub/5308-Gastons-Ma sending PUBLISH (d0, q0, r0, m1, 'drones/altitude', ... (5 bytes))
Client mosqpub/5308-Gastons-Ma sending DISCONNECT
Now, we will use the MQTT.fx GUI utility to generate another MQTT client that publishes another message to the same topic, sensors/drone01/altitude. Follow the next steps:
Go to the MQTT.fx window in which you established a connection and subscribed to a topic.
Click Publish and enter
sensors/drone01/altitudein the dropdown at the left-hand side of the Publish button.Enter the following text in the textbox below the Publish button:
20 f, as shown in the following screenshot:
Then, click the Publish button. MQTT.fx will publish the entered text to the specified topic.
In case you don't want to work with the MQTT.fx utility, you can run another mosquitto_pub command to generate another MQTT client that publishes a message to the topic. You just need to open another Terminal in macOS or Linux, or another Command Prompt in Windows, go to the directory in which Mosquitto is installed and run the following command.
mosquitto_pub -V mqttv311 -t sensors/drone01/altitude -m "20 f"
Now, go back to the Terminal or Command Prompt window in which you executed the mosquitto_sub command and subscribed to the sensors/drone01/atitude topic. You will see lines similar to the following ones:
Client mosqsub/5532-Gastons-Ma received PUBLISH (d0, q0, r0, m0, 'sensors/drone01/altitude', ... (4 bytes))
10 f
Client mosqsub/5532-Gastons-Ma received PUBLISH (d0, q0, r0, m0, 'sensors/drone01/altitude', ... (4 bytes))
20 f
If we clean up the debug messages that start with the Client prefix, we will see just the next two lines. These lines show the payloads for the two messages that we received as a result of our subscription to the sensors/drone01/altitude topic.
10 f
20 f
Go to the MQTT.fx window and click Subscribe. You will see 2 at the right-hand side of the title for the topic filter used to subscribe in the panel located at the left-hand side of the window. MQTT.fx is telling you that you have received two messages in the sensors/drone01/altitude topic. Click on this panel and MQTT.fx will display all the received messages at the right-hand side of the panel. MQTT.fx will display a number at the right-hand side of each message to specify the message number since we started the subscription to the topic filter. Click on each message and MQTT.fx will display the QoS level for the message (0), the date and time that it was received and the payload for the message in the default plain string format. The following picture shows the payload for the second message that has been received by the subscriber generated by MQTT.fx.

We created two publishers and each of them published a message to the same topic: sensors/drone01/altitude. The two subscribers for this topic received both messages. Now, we will understand what happens under the hoods when a client publishes a message to a topic.
The MQTT client that has already established a connection sends a PUBLISH packet to the MQTT server with a header that includes the following fields and flags. We want to understand the meaning of these fields and flags because we will be able to specify some of their values when we work with MQTT tools and MQTT client libraries.
PacketId: If the QoS level is equal to 0, the value for this field will be 0 or it won't be present. In case the QoS level is equal to 1 or 2, the packet identifier will have a number value to identify the packet and make it possible to identify the responses related to this packet.Dup: If the QoS level is equal to 0, the value for this field will be 0. In case the QoS level is equal to 1 or 2, the MQTT client library or the MQTT server can resend a message that was previously published by the client when the subscribers haven't ackowledged the first message. Whenever there is an attempt to resend a message that has already been published, the value for theDupflag must be1ortrue.QoS: Specifies the QoS level for the message. We will dive deep on the quality of service level for the messages and their relationship with many other flags later. So far, we have been working with QoS level0.Retain:If the value for this flag is set to1ortrue, the MQTT server will store the message with its specified QoS level. Whenever new MQTT clients subscribers to a topic filter that matches the topic for the stored or retained message, the last stored message for this topic will be sent to the new subscriber. If the value for this flag is set to0orfalse, the MQTT server won't store the message and won't replace a retained message with the same topic in case there is one message retained for this topic.TopicName: A string with the topic name to which the message must be published. Topic names have a hierarchy structure where slashes (/) are used as delimiters. In our examples, the value forTopicNamewas"sensors/drone01/altitude". We will analyze best practices for topic names later.
Tip
The payload contains the actual message that the MQTT client wants the MQTT server to publish. MQTT is data agnostic, and therefore, we can send any binary data and we don't have restrictions such as those imposed by JSON or XML. Of course, we can use these or others to organize the payloads if we wish. In our examples, we sent a string that included a number that represented the altitude followed by a space and an "f" that indicates the unit of measure is feet.
The MQTT server will read a valid PUBLISH packet and it will respond with a packet only for QoS levels greater than 0. In case the QoS level is 0, the MQTT will not respond. The MQTT server will determine all the subscribers whose subscribed topic matches the topic name specified for the message and the server will publish the message to these clients.
The following diagram shows the interaction between an MQTT client and an MQTT server to publish a message with a QoS level of 0.

The other QoS levels have a different flow with additional interaction between the publisher and the MQTT server and increased overheads that we will analyze later.
Whenever we don't want a subscriber to receive more messages whose destination topic name matches one or more topic filters, the subscriber can send a request to unsubscribe to a list of topic filters to the MQTT server. Obviously, unsubscribing from topic filters is the opposite operation of subscribing to topic filters. We will use the MQTT.fx GUI utility to unsubscribe the MQTT client from the sensors/drone01/altitude topic. Follow the next steps:
Go to the MQTT.fx window in which you established a connection and subscribed to a topic.
Click Subscribe.
Click on the panel that displays the
sensors/drone01/altitudetopic name at the left-hand side of the window. Then, click on the Unsubscribe button located in this panel. The following screenshot shows this button.
MQTT.fx will unsubscribe the client from the
sensors/drone01/altitudetopic, and therefore, the client won't receive any new message published to thesensors/drone01/altitudetopic.
Now, we will use the MQTT.fx GUI utility to use the MQTT client to publish another message to the sensors/drone01/altitude topic. Follow the next steps:
Go to the MQTT.fx window in which you established a connection and subscribed to a topic.
Click Publish and enter
sensors/drone01/altitudein the dropdown at the left-hand side of the Publish button.Then, click the Publish button. MQTT.fx will publish the entered text to the specified topic.
Enter the following text in the textbox below the Publish button:
30 f, as shown in the following screenshot:

In case you don't want to work with the MQTT.fx utility, you can run a mosquitto_pub command to generate another MQTT client that publishes a message to the topic. You just need to open another Terminal in macOS or Linux, or another Command Prompt in Windows, go to the directory in which Mosquitto is installed and run the following command.
mosquitto_pub -V mqttv311 -t sensors/drone01/altitude -m "30 f"
Now, go back to the MQTT.fx window and click Subscribe. The client has unsubscribed from the sensors/drone01/altitude topic before we published a new message to this topic, and therefore, this published message isn't displayed.
Go back to the Terminal or Command Prompt window in which you executed the mosquitto_sub command and subscribed to the sensors/drone01/atitude topic. You will see lines similar to the following ones:
Client mosqsub/5532-Gastons-Ma received PUBLISH (d0, q0, r0, m0, 'sensors/drone01/altitude', ... (4 bytes))
30 f
This client is still subscribed to the sensors/drone01/altitude topic, and therefore, it received the message with the payload of "30 f".
The MQTT client sends an UNSUBSCRIBE packet to the MQTT server with a packet identifier (PacketId) in the header and one or more topic filters in the payload. The main difference with a SUBSCRIBE packet is that it isn't necessary to include the QoS level for each topic filter because the MQTT client just wants to unsubscribe.
Tip
After an MQTT client unsubscribes from one or more topic filters, the MQTTserver still keeps the connection opened and the subscriptions to the topic filters that don't match the topic filters specified in the UNSUBSCRIBE packet payload will continue working.
Hence, a single UNSUBSCRIBE packet can request the MQTT server to unsubscribe a client from many topics. The UNSUBSCRIBE packet must include at least one topic filter in the payload to comply with the protocol.
In the previous example in which we requested the MQTT server to unsubscribe, we used a specific topic name as the value for the topic filter, and therefore, we requested the MQTT server to unsubscribe from a single topic. As previously mentioned, we will learn about the usage of wildcards in topic filters later.
The packet identifier will have a number value to identify the packet and make it possible to identify the response related to this UNSUBSCRIBE packet. The MQTT server will process a valid UNSUBSCRIBE packet and it will respond with an UNSUBACK packet that indicates the unsubscribe acknowledgement and confirms the receipt and processing of the UNSUBSCRIBE packet. The UNSUBACK packet will include the same packet identifier (PacketId) in the header that was received in the UNSUBSCRIBE packet.
The MQTT will remove any topic filter that matches exactly any of the specified topic filters in the UNSUBSCRIBE packet's payload for the specific client that sent the packet. The topic filter match must be exact to be deleted. After the MQTT server deletes a topic filter from the subscription list for the client, the server stops adding new messages to be published to the client. Only messages that have already started delivery to the client with QoS levels of 1 or 2 will be published to the client. In addition, the server might publish existing messages that have been buffered for their distribution to the subscriber.
The following diagram shows the interaction between an MQTT client and an MQTT server to unsubscribe from one or many topic filters.

We already know that MQTT allows us to publish messages on topics. A publisher always has to to specify the topic name to which a message will be published. The easiest way to understand topic names in MQTT is to think about them like paths in a file system.
If we have to save dozens of files that have information about different types of sensors for a diverse number of drones, we can create a hierarchy of directories or folders to organize all the files that we will save. We can create a directory named sensors, then one sub-directory for each drone, such as drone01, and finally a sub-directory with the sensor name, such as altitude. The path in macOS or Linux will be sensors/drone01/altitude because these operating systems use a forward slash (/) as a delimiter. In Windows, the path will be sensorsdronealtitude because this operating system uses a backslash () as a delimiter.
Then, we will save the files that have information about the altitude sensor for the drone named drone01 in the created path. Instead of saving files in a path, we can think about publishing a message to a path and use the same mechanism we use to organize files in paths to arrange messages in topics.
Instead of directories or folders, a topic has topic levels, specifically, a hierarchy of topic levels and the slashes (/) are used as delimiters, that is, topic level separators. If we use sensors/drone01/altitude as the topic name, sensors is the first topic level, drone01 is the second topic level and altitude is the third topic level.
Tip
Topic names are case-sensitive, and therefore, sensors/drone01/altitude is different from sensors/Drone01/altitude, Sensors/drone01/altitude and Sensors/Drone01/Altitude. In fact, the four strings will be considered as four individual topic names. We must make sure we select a casing scheme for the topic names and we use it for all the topic names and topic filters.
We can use any UTF-8 character in topic names with the exception of the two wildcard characters that we will analyze later: the plus sign (+) and hash (#). Hence, we must avoid + and # in the topic names. However, it is a good practice to restrict the character set to avoid unexpected problems with client libraries. For example, we can avoid accents and characters that are not common in English as we do whenever we build URLs. It is possible to use these characters but be sure that you can face issues when using them.
We should avoid creating topics starting with the dollar sign ($) because many MQTT servers publish statistics data, related to the servers, in topics that start with $. Specifically, the first topic level is $SYS.
We must maintain consistency when sending messages to different topic names as we do when we save files in different paths. For example, if we want to publish the altitude for a drone named drone20, we will use sensors/drone20/altitude. We must use the same topic levels that we used for the same goal for drone01 and just change the drone name from drone01 to drone20. It would be a really bad practice to use a topic with a different structure or inconsistent casing, such as altitude/sensors/drone20 or Sensors/Drone20/Altitude. We have to take into account that we can subscribe to multiple topics by using topic filters, and therefore, it is very important to create topic names accordingly.
When we analyzed the subscription operation, we learn that an MQTT client can subscribe to one or more topic filters. In case we specify a topic name as a topic filter, we will only subscribe to a single topic. We can take advantage of the following two wildcards to create topic filters that subscribe to all the topics that match the filter:
Plus sign (
+): It is a single level wildcard that matches any name for a specific topic level. We can use this wildcard instead of specifying a name for any topic level in the topic filter.Hash (
#): It is a multi level wildcard that we can use only at the end of the topic filter, as the last level and matches any topic whose first levels are the same as the topic levels specified at the left-hand side of the#symbol.
For example, in case we want to receive all the messages related to the altitudes for all the drones, we can use the + single level wildcard instead of a specific drone name. We can use the following topic filter: sensors/+/altitude.
If we publish messages to the following topics, the subscriber that used the sensors/+/altitude topic filter will receive all of them:
sensors/drone01/altitudesensors/drone02/altitudesensors/superdrone01/altitudesensors/thegreatestdrone/altitude
The subscriber to the sensors/+/altitude topic filter won't receive messages sent to any of the following topics, because they won't match the topic filter.
sensors/drone01/speed/rotor/1sensors/superdrone01/speed/rotor/2sensors/superdrone01/remainingbattery
In case we want to receive all the messages related to all the sensors for the drone named drone01, we can use the # multi level wildcard after the drone name and the slash (/). We can use the following topic filter: sensors/drone01/#.
If we publish messages to the following topics, the subscriber that used the sensors/drone01/# topic filter will receive all of them:
sensors/drone01/altitudesensors/drone01/speed/rotor/1sensors/drone01/speed/rotor/2sensors/drone01/speed/rotor/3sensors/drone01/speed/rotor/4sensors/drone01/remainingbattery
We used a multi level wildcard, and therefore, no matter the additional topic levels after sensors/drone01/, we will receive all of them.
The subscriber to the sensors/drone01/# topic filter won't receive messages sent to any of the following topics, because they won't match the topic filter. None of the following has sensors/drone01/ as a prefix, and therefore, they don't match the topic filter.
sensors/drone02/altitudesensors/superdrone01/altitudesensors/thegreatestdrone/altitudesensors/drone02/speed/rotor/1sensors/superdrone02/speed/rotor/2sensors/superdrone02/remainingbattery
Obviously, we must be careful when we use any wildcard because we might be subscribing to a huge number of topics with a single topic filter. We have to avoid subscribing to topics aren't of interest to the client to avoid wasting unnecessary bandwidth and the broker server resources.
We will use these wildcards in subscriptions later to analyze how different QoS levels work with MQTT.
Now that we understand how the connection, subscription and publication works in combination with topic names and the topic filters with wildcards, we can dive deep on the QoS levels. So far, we have analyzed how both the subscription and publication worked with a QoS level equal to 0. Now, we will understand what this number means and how things work when we use the other available QoS levels for the publication and the subscription.
Note
Remember that publication involves publishing from the MQTT client to the MQTT server and then from the server to the subscribed client.It is very important to understand that we can publish with a QoS level and subscribe with another QoS level. Hence, there is a QoS level for the publish process between the publisher and the MQTT server and another QoS level for the publish process between the MQTT server and the subscriber. We will use sender and receiver to identify the parties involved in a message delivery for the different QoS levels. In the publish process between the publisher and the MQTT server, the publisher will be the sender and the MQTT server the receiver. In the publish process between the MQTT server and the subscriber, the sender will be the MQTT server and the receiver will be the subscriber.
Based on the QoS level, we have differences in the meaning of a successfully delivered message in the MQTT protocol between the involved parties. The QoS level is the agreement between a sender and a receiver of a message about the guarantees of actually delivering the message. These warranties might include the number of times that a message might arrive and the possibility or not of duplicates. MQTT supports the following three possible QoS levels:
0, At most once delivery: This QoS level offers the same warranty as the underlying TCP protocol. The message is not acknowledged by the receiver or destination. The sender just sends the message to the destination and nothing else happens. The sender neither stores nor schedules new deliveries for any messages that might fail to reach the destination. The key advantage of this QoS level is that it has the lowest possible overhead, compared to the other QoS levels.
1, At least once delivery: This QoS level adds a confirmation requirement to the destination that has to receive the message. This way, QoS level 1 provides a warranty that the message will be delivered at least once to the subscriber. One of the key disadvantages of this QoS level is that it might generate duplicates, that is, the same message might be sent more than once to the same destination. The sender stores the message until it receives an acknowledgement from the subscriber. In case the sender doesn't receive the acknowledgement within a specific time, the sender will publish the message again to the receiver. The final receiver must have the necessary logic to detect duplicates in case they shouldn't be processed twice.
2, Exactly once delivery: This QoS level provides a warranty that the message is delivered only once to the destination. QoS level 2 has the highest overhead, compared to the other QoS levels. This QoS level requires two flows between the sender and the receiver. A message published with QoS level 2 is considered successfully delivered after the sender is sure that it has been successfully received once by the destination.
Sometimes, we just want messages to be delivered with the least possible bandwidth usage, we have a very reliable network and it doesn't matter if for some reason a few messages are lost. In these cases, QoS level 0 is the appropriate choice.
In other cases, the messages are extremely important because they represent commands to control an IoT device, the network is unreliable and we must make sure that the message reaches the destination. In addition, a duplicate command might generate a big problem because we don't want the IoT device to process a specific command twice. In these cases, QoS level 2 is going to be the appropriate choice.
Note
If a publisher works with a QoS level higher than the QoS level specified by the subscriber, the MQTT server will have to downgrade the QoS level to the lowest level that the specific subscriber is using when it publishes the message from the MQTT server to this subscriber. For example, if we use QoS level 2 to publish a message from the publisher to the MQTT server but one subscriber has requested QoS level 1 when making the subscription, the publication from the MQTT server to this subscriber will use QoS level 1.
First, we will use wildcards to subscribe to a topic filter with QoS level 1 and then we will publish one message to a topic name that will match the topic filter with QoS level 1. This way, we will analyze how both publishing and subscription work with QoS level 1.
We will use the mosquitto_sub command-line utility included in Mosquitto to generate a simple MQTT client that subscribes to a topic filter with QoS level 1and prints all the messages it receives. Open a Terminal in macOS or Linux, or a Command Prompt in Windows, go to the directory in which Mosquitto is installed and run the following command:
mosquitto_sub -V mqttv311 -t sensors/+/altitude -q1 -d
The previous command will create an MQTT client that will establish a connection with the local MQTT server and then will make the client subscribe to the topic filter specified after the -t option: sensors/+/altitude. We specify that we want to use QoS level 1 to subscribe to the topic filter with the -q 1 option. We specify the -d option to enable debug messages that will allow us to understand what happens under the hoods and the differences with publishing a message with QoS level 0.
The Terminal or Command Prompt window will display debug messages similar to the following lines. Take into account that the generated ClientId will be different from the one shown after Client mosqsub/1795-Gastons-Ma. Notice that QoS: 1 indicates that the subscription is done with QoS level 1.
Client mosqsub/1795-Gastons-Ma sending CONNECT
Client mosqsub/1795-Gastons-Ma received CONNACK
Client mosqsub/1795-Gastons-Ma sending SUBSCRIBE (Mid: 1, Topic: sensors/+/altitude, QoS: 1)
Client mosqsub/1795-Gastons-Ma received SUBACK
Subscribed (mid: 1): 1
We will use the mosquitto_pub command-line utility included in Mosquitto to generate a simple MQTT client that publishes a message to a topic with QoS level 1 instead of the QoS level 0 that we used when we published messages before. Open a Terminal in macOS or Linux, or a Command Prompt in Windows, go to the directory in which Mosquitto is installed and run the following command:
mosquitto_pub -V mqttv311 -t sensors/drone02/altitude -m "65 f" -q 1 -d
The previous command will create an MQTT client that will establish a connection with the local MQTT server and then will make the client publish a message to the topic specified after the -t option: sensors/drone02/altitude. We specify the payload for the message after the -m option:"65 f". We specify that we want to use QoS level 1 to publish the message with the -q 1 option. We specify the -d option to enable debug messages that will allow us to understand what happens under the hoods and the differences with publishing a message with QoS level 0.
The Terminal or Command Prompt window will display debug messages similar to the following lines. Take into account that the generated ClientId will be different from the one shown after Client: mosqpub/1516-Gastons-Ma. After publishing the message, the client disconnects.
Client mosqpub/1516-Gastons-Ma sending CONNECT
Client mosqpub/1516-Gastons-Ma received CONNACK
Client mosqpub/1516-Gastons-Ma sending PUBLISH (d0, q1, r0, m1, 'sensors/drone02/altitude', ... (4 bytes))
Client mosqpub/1516-Gastons-Ma received PUBACK (Mid: 1)
Client mosqpub/1516-Gastons-Ma sending DISCONNECT
The previous lines show that the generated MQTT client sends a PUBLISH packet to the MQTT server and then receives a PUBACK package from the server.
Now, go back to the Terminal or Command Prompt window in which you executed the mosquitto_sub command and subscribed to the sensors/+/atitude topic filter. You will see lines similar to the following ones:
Client mosqsub/1795-Gastons-Ma received PUBLISH (d0, q1, r0, m1, 'sensors/drone02/altitude', ... (4 bytes))
Client mosqsub/1795-Gastons-Ma sending PUBACK (Mid: 1)
65 f
The previous lines show that the generated MQTT client, that is, the subscriber, received a PUBLISH packet from the MQTT server and then sent a PUBACK package to the server to acknowledge the message. If we clean up the debug messages that start with the Client prefix, we will see just the last line that shows the payloads for the message that we received as a result of our subscription to the sensors/+/altitude topic filter: 65 f.
The MQTT client that has already established a connection, that is, the publisher, sends a PUBLISH packet to the MQTT server with the header we have already described, QoS set to 1, and including a PacketId numeric value that will be unique for this client. At this time, the publisher will consider the PUBLISH packet identified with the PacketId as an unacknowledged PUBLISH packet.
The MQTT server reads a valid PUBLISH packet and it will respond to the publisher with a PUBACK packet with the same PacketId value that has been used for the PUBLISH packet. Once the publisher receives the PUBACK packet, it discards the message and the MQTT server is responsible of publishing it to the appropriate subscribers.
The following diagram shows the interaction between a publisher and an MQTT server to publish a message with a QoS level of 1.

The MQTT server can start publishing messages to the appropriate subscribers before it sends the PUBACK packet to the publisher. Hence, when the publisher receives the PUBACK packet from the MQTT server, it doesn't mean that all the subscribers have received the message. It is very important to understand the meaning of this PUBACK packet.
For each subscriber to which the message has to be published, the MQTT server will send a PUBLISH packet and the subscriber must acknowledge the reception of the message by sending a PUBACK packet to the MQTT server. The following diagram shows the interaction between an MQTT server and the subscribers when a message is published with a QoS level of 1.

If the application is able to tolerate duplicates and we have to make sure that the messages arrive at least once to the subscribers, QoS level 1 is an excellent choice. In case there is no way to handle duplicates, we have to use QoS level 2.
First, we will use wildcards to subscribe to a topic filter with QoS level 2 and then we will publish one messages to a topic that will match the topic filter with QoS level 2. This way, we will analyze how both publishing and subscription work with QoS level 2.
We will use the mosquitto_sub command-line utility included in Mosquitto to generate a simple MQTT client that subscribes to a topic filter with QoS level 1 and prints all the messages it receives. Open a Terminal in macOS or Linux, or a Command Prompt in Windows, go to the directory in which Mosquitto is installed and run the following command:
mosquitto_sub -V mqttv311 -t sensors/drone03/# -q 2 -d
The previous command will create an MQTT client that will establish a connection with the local MQTT server and then will make the client subscribe to the topic filter specified after the -t option: sensors/drone03/#. We specify that we want to use QoS level 1 to subscribe to the topic filter with the -q 2 option. We specify the -d option to enable debug messages that will allow us to understand what happens under the hoods and the differences with publishing a message with QoS levels 0 and 1.
The Terminal or Command Prompt window will display debug messages similar to the following lines. Take into account that the generated ClientId will be different from the one shown after Client mosqsub/1795-Gastons-Ma. Notice that QoS: 2 indicates that the subscription is done with QoS level 2.
Client mosqsub/2017-Gastons-Ma sending CONNECT
Client mosqsub/2017-Gastons-Ma received CONNACK
Client mosqsub/2017-Gastons-Ma sending SUBSCRIBE (Mid: 1, Topic: sensors/drone03/#, QoS: 2)
Client mosqsub/2017-Gastons-Ma received SUBACK
Subscribed (mid: 1): 2
We will use the mosquitto_pub command-line utility included in Mosquitto to generate a simple MQTT client that publishes a message to a topic with QoS level 2 instead of the QoS levels 0 and 1 that we used when we published messages before. Open a Terminal in macOS or Linux, or a Command Prompt in Windows, go to the directory in which Mosquitto is installed and run the following command:
mosquitto_pub -V mqttv311 -t sensors/drone03/speed/rotor/1 -m "362 f" -q 2 -d
The previous command will create an MQTT client that will establish a connection with the local MQTT server and then will make the client publish a message to the topic specified after the -t option: sensors/drone03/speed/rotor/1. We specify the payload for the message after the -m option: "362 f". We specify that we want to use QoS level 2 to publish the message with the -q 2 option. We specify the -d option to enable debug messages that will allow us to understand what happens under the hoods and the differences with publishing a message with QoS levels 0 and 1.
The Terminal or Command Prompt window will display debug messages similar to the following lines. Take into account that the generated ClientId will be different from the one shown after Client: mosqpub/2026-Gastons-Ma. After publishing the message, the client disconnects.
Client mosqpub/2026-Gastons-Ma sending CONNECT
Client mosqpub/2026-Gastons-Ma received CONNACK
Client mosqpub/2026-Gastons-Ma sending PUBLISH (d0, q2, r0, m1, 'sensors/drone03/speed/rotor/1', ... (5 bytes))
Client mosqpub/2026-Gastons-Ma received PUBREC (Mid: 1)
Client mosqpub/2026-Gastons-Ma sending PUBREL (Mid: 1)
Client mosqpub/2026-Gastons-Ma received PUBCOMP (Mid: 1)
Client mosqpub/2026-Gastons-Ma sending DISCONNECT
The previous lines show that the generated MQTT client, that is, the publisher, had the following packet exchanges with the MQTT server:
The publisher sent a
PUBLISHpacket to the MQTT server.The publisher received a
PUBRECpacket from the MQTT server.The publisher sent a
PUBRELpacket to the MQTT server.The publisher received a
PUBCOMPpacket from the MQTT server.
Now, go back to the Terminal or Command Prompt window in which you executed the mosquitto_sub command and subscribed to the sensors/drone03/# topic filter. You will see lines similar to the following ones:
Client mosqsub/2017-Gastons-Ma received PUBLISH (d0, q2, r0, m1, 'sensors/drone03/speed/rotor/1', ... (5 bytes))
Client mosqsub/2017-Gastons-Ma sending PUBREC (Mid: 1)
Client mosqsub/2017-Gastons-Ma received PUBREL (Mid: 1)
362 f
Client mosqsub/2017-Gastons-Ma sending PUBCOMP (Mid: 1)
The previous lines show that the generated MQTT client, that is, the subscriber, had the following packet exchanges with the MQTT server:
The subscriber received a
PUBLISHpacket from the MQTT server.The subscriber sent a
PUBRECpacket to the MQTT server.The subscriber received a
PUBRELpacket from the MQTT server.The subscriber sends a
PUBCOMPpacket to the MQTT server after it successfully received the message with the payload.
If we clean up the debug messages that start with the Client prefix, we will see just the last line that shows the payloads for the message that we received as a result of our subscription to the sensors/drone03/# topic filter: 362 f.
The MQTT client that has already established a connection, that is, the publisher sends a PUBLISH packet to the MQTT server with the header we have already described, QoS set to 2, and including a PacketId numeric value that will be unique for this client. At this time, the publisher will consider the PUBLISH packet identified with the PacketId as an unacknowledged PUBLISH packet.
The MQTT server reads a valid PUBLISH packet and it will respond to the publisher with a PUBREC packet with the same PacketId value that has been used for the PUBLISH packet. The PUBREC packet indicates the MQTT server accepted the ownership of the message. Once the publisher receives the PUBREC packet, it discards the message and it will store the PacketId related to the message and the PUBREC packet.
The publisher sends a PUBREL packet to the MQTT server as a response to the received PUBREC packet. This PUBREL packet will be considered unacknowledged until it receives the PUBCOMP packet related to the PacketId from the MQTT server. Finally, the MQTT server sends a PUBCOMP packet with the PacketId to the publisher and at this point, both the publisher and the MQTT server are sure that the message has been successfully delivered.
The following diagram shows the interaction between a publisher and an MQTT server to publish a message with a QoS level of 2.

For each subscriber with QoS level 2 to which the message has to be published, the MQTT server will send a PUBLISH packet and the same packet exchange that we have analyzed between the publisher and the MQTT server will happen between the MQTT server and the subscriber. However, in this case, the MQTT server is the one that acts as a publisher and starts the flow. The following diagram shows the interaction between an MQTT server and the subscribers when a message is published with a QoS level of 2.

If the application isn't able to tolerate duplicates and we have to make sure that the messages arrive only once to the subscribers, QoS level 2 is the appropriate choice. However, magic comes with a price: we must take into account that QoS level 2 has the highest overhead, compared to the other QoS levels.
MQTT runs on top of:
The MQIP protocol.
The TCP/IP protocol.
The IoT protocol.
The data for an MQTT message is known as:
Payload.
Packet.
Upload.
In MQTT version 3.1.1, the broker is named:
MQTT agent.
MQTT client.
MQTT server.
QoS level 0 for MQTT means:
Exactly once delivery
At most once delivery
At least once delivery
QoS level 1 for MQTT means:
Exactly once delivery
At most once delivery
At least once delivery
QoS level 2 for MQTT means:
Exactly once delivery
At most once delivery
At least once delivery
In this chapter, we started our journey toward understanding the MQTT protocol. We understood convenient scenarios for this protocol, the details of the publish/subscribe pattern and message filtering. We learned basic concepts related to MQTT and understood the different components: clients, brokers and connections.
We learned to install a Mosquitto broker or server on Linux, macOS and Windows. We used the default configuration to learn how everything works under the hoods while using Mosquitto. This way, it will be easier for us to use the client libraries in different programming languages to publish MQTT messages and subscribe to MQTT topic filters.
We learned best practices related to topics, single level and multi level wildcards. We studied in detail the different Quality of Service levels supported by MQTT and when it is convenient to use each of them. We analyzed their advantages and disadvantages.
Now that we understood how the MQTT basics work, we will learn how to secure an MQTT server and to follow best practices related to security, which is what we are going to discuss in the next chapter.


