Connecting the ideas of our students is one of the most difficult tasks to carry out in the teaching process. This is primarily because they find it very hard to do. Therefore, these types of Exercises using Moodle 1.9.5 will help you to overcome such situations. Your students will be attracted to the proposed assignments because they are quite appealing.
In this chapter, we will cover the following topics:
Matching sentences
Unjumbling and connecting sentences
Using Twitter and Facebook for surveys
Brainstorming ideas using Forums
Answering a quiz designed in a lesson
Uploading pictures from Microsoft Word
Connecting events—uploading drawings from Microsoft Word
Linking to a website and writing a description
In this chapter, you will be able to design several types of Exercises concerning reading comprehension, writing, and composing through Moodle 1.9.5. You will learn to use Facebook, Twitter, Wikis, and Forums so that students can interact among themselves while completing the Moodle courses. Apart from that, you will be given some hints on how to develop the same activity in another way using resources from the Web 2.0, and uploading clipart and drawings from Microsoft Word.
In this virtual classroom, students will enrich the use of connectors. For starters, they will work with connectors on simple activities—for example, they will connect sentences. Then they will use those connectors in different Exercises. These connectors were used previously in a simpler way. I designed the activities in such a way that the level of difficulty increases throughout the book along with the writing of the students. That is because I believe in the premise that students have to read in order to write. We have to bear in mind that on the one hand, reading is a passive and receptive skill, while on the other hand, writing is an active or productive one.
As a teacher, I always add a personal touch to any methodology, Exercise, or suggestion, and the recipes in this book are the results. I hope that you enjoy them. You can follow my instructions or add a personal touch to any recipe. Let's Moodle it!
In this Exercise, we are going to match pairs of sentences. We should focus on connectors, as the difficult or misleading part of the suggested Exercise is that the sentences tend to be confusing. The students will change the meaning if they match them with the wrong connector. I propose to do this task using Moodle 1.9.5 and Hot Potatoes.
Note
Hot Potatoes is a freeware, whose suite includes six applications, enabling you to create interactive multiple-choice, short-answer, jumbled-sentence, crossword, matching or ordering and gap-fill Exercises for the World Wide Web. We will discuss it further at the end of the recipe.
Let's create an Exercise to work on compound sentences. The connectors are to vary according to the age of the students. Since this is the first recipe, we are going to create a course in Moodle called Reading Comprehension, Writing, and Composing. In this course, we are going to add the foregoing activities in the book. Afterwards, you have to turn editing on (remember that on the top right margin of the screen it has to say Turn editing off).
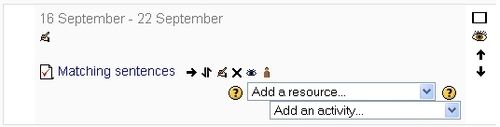
Enter the course that you have already created and choose the Weekly outline section that you want to add the activity to. Then follow these steps:

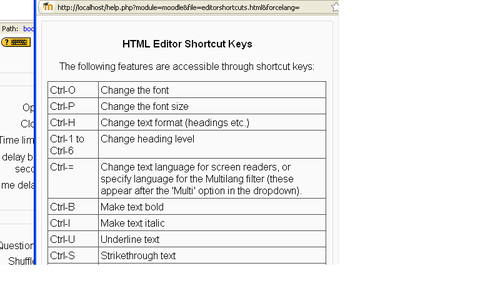
3. At the bottom of the Introduction block, a yellow icon appears with a question mark and a keyboard next to it. It is HTML Editor Shortcut Keys. If you click on it, a table appears, and if you scroll down the table, you can see all the shortcuts available along with their explanations (however, they don't work on all browsers or OS systems), as shown in the following screenshot:
4. In the Timing block, there are some options such as enabling an opening and closing date for the quiz—if you want to do so, you will have to uncheck Disable and you are allowed to use these options. Time limit works if you enable the block.
5. In the Display box, you have three options: Questions per page, which can be Unlimited (this is not the best option) or you can choose the number of questions to be shown using Shuffle questions. You can also Shuffle within questions. This will vary according to the way you want to design the activity.
6. In the Attempts block, you can choose whether or not to limit the attempts.
7. Grades: As regards grading method, I think it is a personal choice according to the type of group or activity that you are dealing with.
8. Common module settings are really optional.
9. Scrolling down, Overall feedback appears that is to be completed according to your group of students. It contains the percentages that are quite individualized, the amount of questions that you introduce in the quiz, and the way of marking your Exercises. You may also add more feedback fields if necessary.
10. Finally click on Save and display.
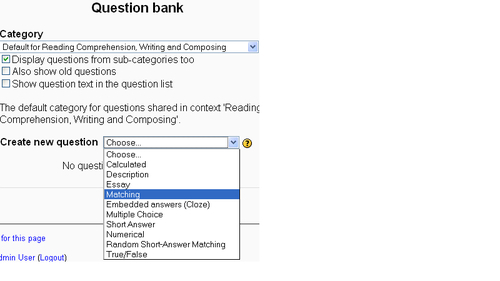
Now another screen appears in which you will have to click on the drop-down menu next to Create new question. Then choose Matching (which is the title of our activity), as shown in the following screenshot:
Now we can design our matching activity by following the next steps:
1. You have to complete the Question name.
2. As regards Question text, you can write something related to the activity or write the same as Question name.
3. In General feedback, you can give information about the usage of connectors that you are going to deal with in the activity.
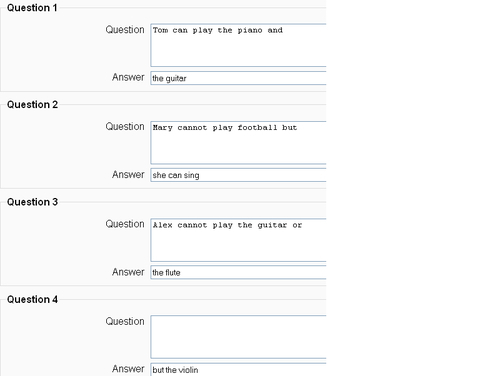
4. Next, add the questions. There appear three available choices to fill in. You may add more (I always do). By the way, the question does not need to be a question per se, but half of the sentence, as we are doing a matching sentences activity.
5. Another possibility that Moodle provides is to complete one more answer to mislead our students. Instead of having an even matching activity, we have an extra one which is not used, as shown in the following screenshot:
Let's Moodle it! Your quiz has to appear on your Moodle course, as shown in the following screenshot:
We can also carry out the same type of activity through Hot Potatoes and upload it to our Moodle course.
We can also carry out this type of quiz in Hot Potatoes using JMatch (the green potato) and uploading it in Moodle 1.9.5. It is much simpler to design a matching activity in Hot Potatoes than in Moodle. Apart from that, JMatch activities are quite appealing to the eye.
Downloading the Hot Potatoes software is quite easy (if you already have Moodle you can download without any difficulty whatsoever). The website is http://hotpot.uvic.ca/#downloads.
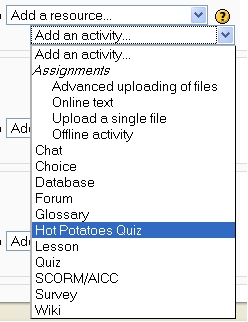
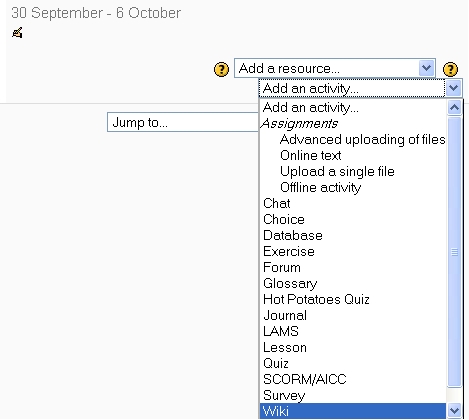
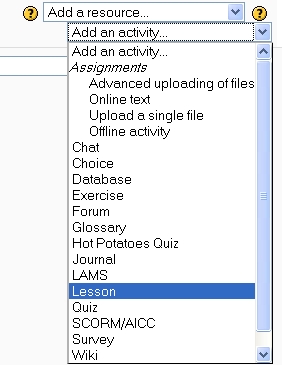
Once you have installed Hot Potatoes, you have to make sure that Moodle has been set up to display it as an activity. In other words, by clicking on Add an activity, the following option should appear, as shown in the next screenshot:
If you do not have the option Hot Potatoes Quiz, you have to ask for the admin rights or the required access in order to follow these steps:
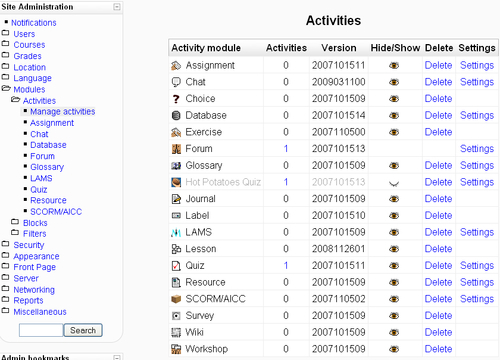
1. Go to the first page where all the courses available are displayed. In Site Administration, click on Modules.
2. Next, click on Activities and then on Manage activities.
3. Hot Potatoes Quiz has a closed eye symbol and we are going to click on it to open. This means that it was hidden, and now it is displayed. The same happens with the other activities. These steps are shown in the following screenshot:
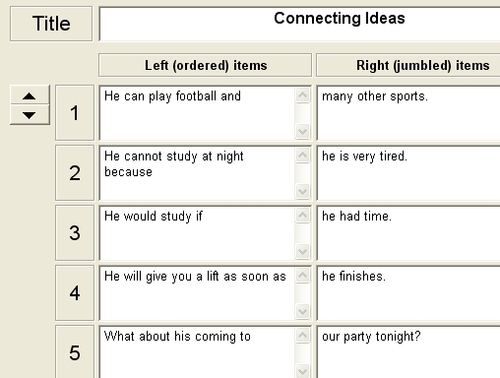
Let's create a quiz in Hot Potatoes using JMatch and upload it in our Moodle course. After downloading Hot Potatoes and displaying it, let's take advantage of its resources! I have designed the following activity for our students to connect their ideas. After clicking on JMatch, you have to fill in the blanks, as shown in the following screenshot:
1. After filling in the blanks, we are going to save the file in order to upload it into our Moodle course. Click on File and select Save as, then give a name to your file. Remember to write a name without spaces so that it is easier to work with later.
2. After that, you are going to save it as a web page. Click on File and select Create a web page. Then choose Drag/Drop format and click on Save. You may try this activity and click on View the Exercise in my browser, or just click on Nothing and save the file.
3. Let's upload the activity into Moodle and go back to our Moodle course.
4. Choose the Weekly outline section where you want to display the activity.
5. Choose Add an activity | Hot Potatoes Quiz.
6. Complete the Name block, click on the drop-down box and choose Specific text, else it will just get the name from the Hot Potatoes Quiz.
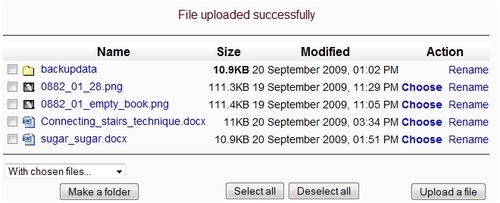
7. After that, click on Choose or upload a file .Then you will have to click on Upload a file.
8. Click on Browse and choose your file. After that, click on Upload a file again and then click on Choose.
9. Click on Save and display. Now you can do the quiz!
With this recipe, you are going to design a reading comprehension activity carried out in Moodle 1.9.5. We are going to link to the webpage of http://www.biography.com to check the biography of Lewis Carroll. Students are to read his biography, and then they are going to order the sentences into a paragraph. You can choose another webpage or a story instead of a biography. I found this quite appealing—a very important characteristic to bear in mind when choosing a webpage. Let's Moodle it!
As mentioned previously, I have just chosen the webpage in which we can read the biography of Lewis Carroll. Later, we have to unjumble his biography. The best way to do it is through Hot Potatoes. We are going to link to a webpage so that students can have hints, though they can do it in Hot Potatoes by clicking on the word Hint when they are stuck in an activity.
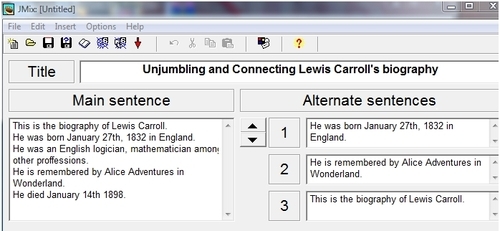
First, you are to go through the Lewis Carroll biography yourself and rewrite and mix it so that you can create the Exercise in Hot Potatoes. This time you are going to use JMix—the light blue potato. You are going to complete the main text in the correct order, and later you are going to alternate the sentences, as shown in the following screenshot:
We have just created the activity in Hot Potatoes. However, as a contrast to the activity created in the first recipe, I am going to add a link to a website through the activity. So let's do it!
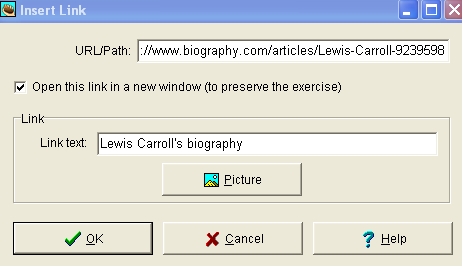
2. The Link text block will be completed automatically because those words were chosen to link to the website. What you have to complete is the URL/Path connecting to the website.
3. You may choose whether to Open this link in a new window or not. I always do this so as to preserve the activity in another window.
4. Click on OK.
5. In the Title box, some words that you did not type will appear. This is the link to the website.
6. Save the file. Click on File, select Save as, complete the filename block, and then click on Save.
After creating the activity in Hot Potatoes and linking it to a website, we can upload it in Moodle as previously done in the first recipe. This can be done by using the following steps:
1. Let's upload the activity into Moodle. Select Add an activity | Hot Potatoes | Quiz.
2. Click on Choose or upload a file. Click on Upload a file | Browse and then select your file. Afterwards, click on Upload a file again and then click on Choose. Now click on Save and display.
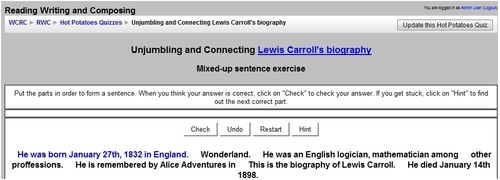
3. You can do the quiz! The quiz title will appear with the words Lewis Carroll's biography in blue and it will be underlined as shown in the following screenshot:
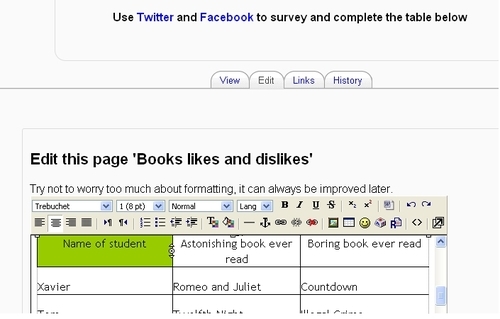
In this recipe, we are going to create a survey Exercise in Moodle. In this Exercise, students can update the content of a table about their likes and dislikes regarding books they have already read. We are going to create two links to websites where they can ask more people about this so that they can gather more data for the survey. Apart from that, they can write a report on this topic later. Let's Moodle it!
We are going to create an activity in which all the students can give their opinion and update the same table as soon as they know about people's likes and dislikes on books. This can be done using Wiki. Let's Moodle it!
We are going to enter the course and select the Weekly outline section where we want to add this activity for designing.
2. Complete the Name block with the title of the survey that the students are going to execute.
3. In the Summary block, broaden the target of the activity. You can add the links to the websites. Your students can use these links to complete the survey.
4. Create two links to websites: one to Facebook.com and the other to Twitter.com.
5. When you type the title in the Summary block, highlight the word Twitter and create a link to its website by clicking on the chain icon of the editor, as shown in the following screenshot:

6. In URL, write the name of the website and in Target choose New window, as shown in the previous screenshot so that students can go on working with both windows. Then click on OK.
7. The same steps are to be followed when linking to Facebook, but you have to highlight the word Facebook and write its website address, which is http://www.facebook.com/.
8. Click on Save and display.
After saving the changes in Wiki, we have to prepare the activity that our students must complete. You have several options, such as choosing the books to ask about, requesting people to give the names of those books, or just changing the topic of the survey. In this case, you will be giving a personal touch to the activity that I propose. Follow these steps to finish designing the activity:
1. The following screen will appear and you are going to design the table that your students are going to complete.
2. To insert the table, you have to click on its icon that lies between the mountain and the smiling face.
3. You are going to need a table consisting of 2 Rows and 3 Cols. Once you enter the values for number of rows and columns, click on OK. Your activity will be displayed, as shown in the following screenshot:

Make sure that that whenever the students have to complete the task, they have to click on Edit so that they can complete the activity, as shown in the next screenshot:
There is an organization which protects the rights and privacy of students. Before designing this type of activity, it would be advisable to take this into consideration.
The Family Educational Rights and Privacy Act (FERPA) protects students' rights and privacy. Disclosing personal information of the student should be consented by the parents as well as from the school. You can read more in the following website http://www2.ed.gov/policy/gen/guid/fpco/ferpa/index.html.
In this recipe, we are going to connect different images. We are going to use Forums so that all the students can comment on two different things, and we are going to guide their writing with general questions. I propose that the title gives them a hint on what they are going to deal with, but the images that they are going to see are two websites with information. You may wonder, 'Why?' Remember the premise of reading before writing. They are to read about two different places and then they are going to write about them. A way to enhance the students' vocabulary is to make them read and give them hints on it.
We are going to design a Forum activity. We enter the course and select the Weekly outline section in which we want to add the activity. Let's Moodle it!
To design the activity previously introduced, you are going to follow these steps:
1. Click on Add an activity and select Forum, as shown in the following screenshot:

2. In the Forum name block, write the title of the activity, and in Forum introduction, write what they are going to do. Visit the two websites, and after visitation, answer the guiding questions (it is somewhat similar to the 'Six Thinking Hats Technique' by Edward de Bono).
3. We are going to create a link to the two websites. One of them is http://www.statueofliberty.org/, which is a link to the official website of the Statue of Liberty, and the other is a link to http://www.yosemite.org/, which is a link to the official website of Yosemite National Park.
4. Highlight the words Website number one, click on the Insert Web Link icon, and then complete the block. In Target, select New window.
5. Repeat the same process for Website number two, and create a link to the Yosemite National Park website.
6. This activity is displayed in the next screenshot:

7. Click on Save and return to course.
When students click on the activity, it appears as shown in the next screenshot:
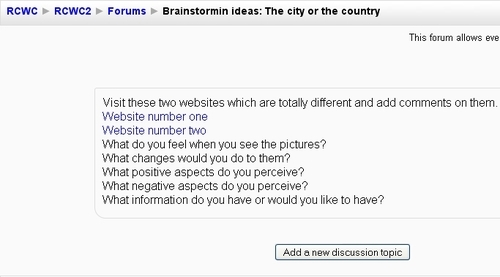
Students are to click on Add a new discussion topic, and an editor appears where they can write the answers to the questions given there. They can also keep these websites open in different windows so that they don't have to close the activity.
The aim is that each student should comment on these two different places explaining what they think. They are expected to write simple paragraphs, as they will write articles or descriptions in further chapters. In order to answer these questions, they will have to think and use some of the vocabulary that they have already seen in the websites.
Answering a quiz may lead towards a well-written personal description. We are going to design a quiz so that our students can write their biography or just their habits and routines, including their personal likes and dislikes. They can answer questions about themselves or we can add a link to a website showing the life of a famous person so that they write about him or her.
We are going to design a guided writing activity using a Lesson. First of all, we are going to design the activity so that our students write about themselves. Then we will put in details about a famous person, and finally add a link about that person's life to the website. We enter the course and select the Weekly outline section in which we want to add the activity. Let's Moodle it!
You are going to design this activity in a Lesson, so you have to click on Add an activity and select Lesson, as shown in the next screenshot:
1. Complete the Name block by writing the title of the activity, as shown in the next screenshot:

Then what do you do? You have to write questions for guided writing! A screen appears with four options. You have to select Add a Question Page and write the questions for guided writing. These are the steps to follow:
1. Click on Add a Question Page.
2. Choose Essay.
3. Write a title in the Page title block.
4. Complete the Page contents with the questions for the guided writing, as shown in the next screenshot:

You may also design another similar type of activity, but in this case students can write about the biography of a famous person.
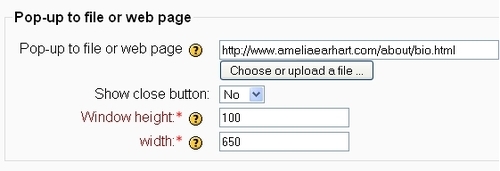
You are going to add a link to a website so that students can write a biography about a famous person. You can ask students to rewrite the biography of Amelia Earhart in a simpler way. They are going to answer questions similar to the ones designed for their biography, or you may change them.
You are going to follow these steps:
2. Complete the Name block by writing Amelia Earhart's biography in this block.
3. Scroll down the page and complete the block Pop-up to file or web page by entering the name of the website http://www.ameliaearhart.com/about/bio.html, as shown in the following screenshot:
4. Click on Save and display.
5. Select Add a Question Page, click on Essay, and fill Page title with the title of the activity. Then fill out Page contents with the questions that guide the writing.
6. Click on Add a Questions Page.
7. Go back to the course.
When students want to do an activity, the difference between this activity and the previous one is that they are going to see the Linked media icon. When they click on Click here to view, the website link will appear, as shown in the following screenshot:

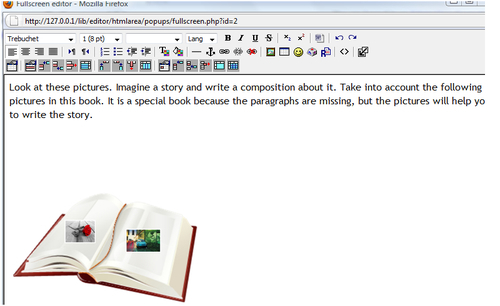
Isolated pictures of different items are to be presented on an empty book. The idea is that this empty book, which is full of different objects, should have a story written. The items are of any kind. Students are to write a story using these images and connectors.
We are going to design a guided writing activity through a Journal. We are going to design the activity so that our students write a story out of some pictures. We enter the course and choose the Weekly outline section in which we want to add the activity. Let's Moodle it!
Before creating the activity in Moodle, we have to create the file with the images to upload. In this case, we are going to do it in Microsoft Word. These are the steps to follow in case you have created similar files. After you have opened the software, create a new document and follow these steps:
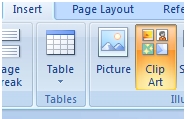
1. Click on Insert and choose Clip Art, as shown in the following screenshot:
2. In the Search for block, write the word book and click on Go, as shown in the following screenshot:
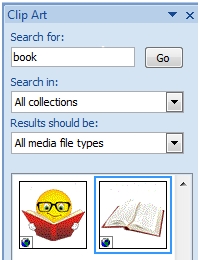
3. Find an image—in this case, the empty book—and add other clipart images on it to guide the story that the students are going to write.
4. Look for the pictures to insert inside the book so that students can write the story. Select a rose, a couple, and a car.
5. Repeat the same process and create a picture document.
6. Select the pictures from Microsoft Word, copy and paste them in Paint, Inkscape, or Image Editor, and copy them in
.png, .jpeg, or.jpgformats. This is shown in the following screenshot:

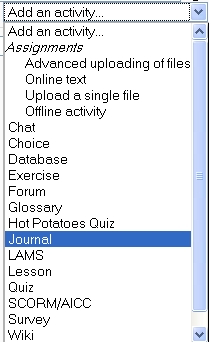
Choose the Weekly outline section where you want to carry out the activity. You are going to design this activity in a Journal. It is a good option to carry out this activity. Choose Add an activity and click on Journal, as shown in the following screenshot:
1. Fill the Journal name block with the title of the activity.
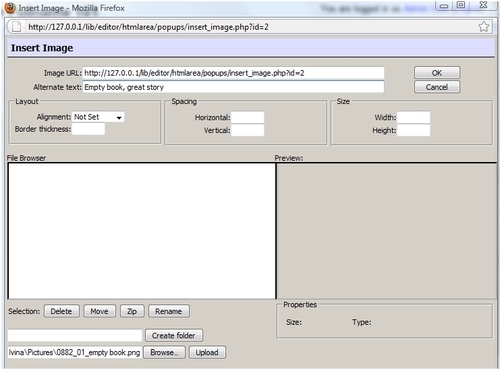
2. In the Journal question, write the description of the activity and add the pictures on the empty book (by empty book, I mean a book with pictures without any text whatsoever). Copy and paste the file we created using Word in Paint. To upload the pictures, click on the icon to insert a picture.
3. Click on Browse to find the file.
4. When you have found the file, click on Open.
5. Click on Upload. Click on the image's link and its URL is automatically inserted into the Image URL block.
6. Complete the Alternate text block as shown in the following screenshot:
In this recipe, I have adapted what is known as "staircase writing". It is what occurs to you as you descend stairs at the end of the evening. The French call it "L'espirit d'escalier". We are not going to tell the students to go down the stairs with their notebook to write a beautiful story. Instead, my proposal is to draw stairs with keywords and events. We are going to draw a set of stairs in Microsoft Word, and then upload it to Moodle. Let's Moodle it!
We are going to open a new file in Microsoft Word. While doing so, we are going to draw a staircase, and then add some key, linking words. The main purpose is to supply our students with enough tools to gather the data and write a beautiful piece of writing.
First of all, you are going to open a new file and draw the staircase. Then add the key, linking words that you want your students to use. To draw the staircase, you can decide either to draw it or to upload a clipart in Word. In this case, I decided to draw it and here are the steps to follow:
1. Choose Insert Shapes and click on the Elbow Connector.
2. Draw the staircase using the elbow connector. After drawing it, you can add 3D effects so that it looks like a staircase. Then add a title and the description of the activity, as shown in the following screenshot:

The activity is already done, but in Microsoft Word. What we need to do is upload this activity in Moodle and let our students write. These are the steps that you need to follow in order to design this activity. We are going to use two types of activities; static and dynamic. The static activity is to upload the Microsoft Word file into Moodle and the dynamic activity is to create a Journal and a link towards the Microsoft Word file so that students are to read the file and write the activity in Moodle through the Journal. It is not as difficult as it sounds. Let's Moodle it!
1. Click on Add a resource and select Link to a file or a website.
2. In the Name block, write Connecting stairs.
3. In the summary, you can write the description of the activity.
4. Click on Choose or upload a file.
5. Then click on Upload a file.
6. Click on Browse and look for your file.
7. Select your file, click on it, and then click on Open.
8. Click on Upload a file again.
9. Your file has just uploaded. Now click on Choose as shown in the following screenshot:
10. Click on Save and return to course.
11. You have done part of this task. What you now need to do is create the dynamic activity for the students so that they can use this file.
We can also create a link to the file designed in Microsoft Word. We can do this using the insert a link icon.
We have to link the file in Microsoft Word that we have just uploaded into Moodle with an activity. By default, this activity doesn't allow us to upload a file. But we are going to do it using a link. Follow these steps:
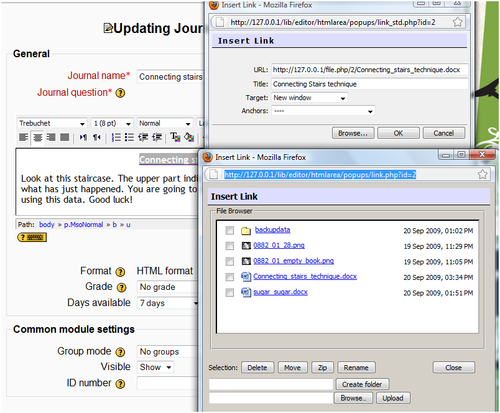
2. Complete the Journal name block with the title of the activity.
3. Write the description of the activity in the Journal question block. Highlight the words Connecting stairs technique in the Journal question block and click on the chain icon.
4. Click on Browse and click on the file you want to upload.
5. Write a title in the Title block.
6. In the Target block, choose New window, as shown in the next screenshot:
In this recipe, I suggest that you write about an endangered animal. For example, the first animal that comes to my mind whenever people mention the topic, "endangered species," is the Panda bear. Therefore, I am going to design this very simple and short activity about Panda bears. What I propose is a link to the same website—first watching a video and then reading an article.
We have already used the Journal, so this is a very simple activity. What we are going to do is select which endangered animal we are going to deal with. In this case, as I have already mentioned, it is the Panda bear. The chosen website is the http://www.national geographic.com, which gives us accurate data about this topic. Therefore, we are going to choose in which Weekly outline section we want to design the activity. Let's Moodle it!
After choosing the Weekly outline section in which you want to display the activity, you are going to follow these steps:
2. Complete the Journal name block.
3. Then complete the Journal question block with the description of the activity.
4. Write the words Pandas' video and Pandas' article. You are going to use the same procedure for both links to the website.
5. Highlight the words Pandas' video and click on the chain icon, then complete the link to the website window, as shown in the following screenshot:

When your students click on the activity, they can see the words underlined Pandas' video and Pandas' article. After clicking on those words, they will read the article and watch the video about Panda bears. In this way, they can gather data and write the article about Pandas taking into account the keywords. They can also express their opinion about taking care of the Panda bear.