Using computers to test is becoming commonplace. Computers are everywhere and they are able to speed up and do so many things that they have become necessary in many fields, and testing is no exception. The Moodle team has put together a variety of activities that allow us to create and deliver a variety of tests with ease, many of them graded automatically and with instant feedback, making Moodle Quiz a very useful tool.
In this chapter, we will:
Talk briefly about testing
Learn about the Quiz module
Explore Basic options available with the Quiz module
Explore True/False questions
Make your True/False questions with the Quiz module
Before going into a lot of detail about testing with Moodle, we need to ask the question, What is a test? A test is a series of questions or problems used to evaluate the abilities or skills of an individual or group. Pretty clear, right? There are all kinds of tests. There are aptitude tests, IQ tests, algebra tests, science experiments, and the list could go on and on. Achievement, cognitive, diagnostic, placement, and proficiency are all different kinds of tests in various fields. There are also different varieties of these tests: direct and indirect, discrete and integrated, norm- and criterion-referenced, objective and subjective tests. Tests!
Our purpose in this book is not to teach you about theories on what is a good test or how and why tests are important, although we will cover some important considerations related to computer-based testing later in the chapter?. Our goal here is to show you how to use Moodle for testing and offer a practical guide to doing it.
Now, if you are reading this book, chances are you are already using Moodle in some way in your classroom, school, or program. You will already understand some or many of the features Moodle has available for enabling administrators and educators to enhance classroom activities, improve the quality of education, and help student-teacher communication. Moodle also allows the teacher to set assignments anytime, allows students to upload files, allows for student-to-class communication, and so much more. The focus of this book is one of these more's. This book will help you understand how to use Moodle for testing and assessment and walk you through some of the features of Moodle that relate to testing and assessments.
Using Moodle to start testing your students will be a big change for them and for you. Some of the things you want to consider before making the change are as follows:
What you are planning to test
Item types that you plan on using
Student access and familiarity with computers and the Internet
Moodle experience
Online learning experience
Physical resources
The most important thing to keep in mind, regardless of the format your test takes, is that it is still a test. It needs to be developed, edited, revised, evaluated, and the student's answers need to be assessed just like a paper-based test. You need to give the students taking the test clear instructions and specific rules to follow, and you also need to make sure that the student understands how to use all the features you included in the test.
The Quiz module is one of the core components of the Moodle VLE (Virtual Learning Environment). It is intended to help the instructors to develop tests quickly and easily and offer computer-based tests to their students inside their Moodle course. There are many types of items available for use in the tests including: True/False, Multiple Choice, Short Answer, Essay, Embedded Answer, and several others.
Moodle Quiz is a powerful tool for instructors with the ability to offer tests via the course, as well as providing a range of tools that help to research and develop better questions. Moodle Quiz can provide immediate, teacher-created feedback, as well as allow students to immediately see their test scores for most item types.
I have downloaded and installed Moodle version 1.9.7 for this book and I created a no-frills, topic-based course that we will use as a model when developing our Moodle-based tests. I did this for two reasons. The first is simplicity and showing how things are built over time. An unused course is fresh and empty, and will allow me to show you what we are going to do and how it will look without anything else interfering. The second reason is that I need to explain how to show hidden items, and install contributed and third party modules and blocks in Moodle. I have made one small change to the course. I have changed the default theme to make some of the screenshots look better. If you want to change the theme of your site, and you have administrative privileges, go to Site Administration|Appearance |Themes|Theme Selector and you will see a list of available themes. So, while your course may have different themes or modules, you will have the same functionality as I do.
In this chapter, we are going to work with Moodle Quiz to develop our first questions in the Quiz module. If you have been using Quiz , this section might be a little basic for you; however, you may find some new ideas or explanations of Quiz functionality that you were unaware of. I would recommend reading through this part even if you are comfortable with Quiz, as all the tests we develop from here on out will be done using the information here and will not be reviewed later in the book.
We'll be walking through the steps I took to create our first questions in a moment. We will be looking at three basic functions in the Quiz module: the Question bank, quiz creation, and previewing.
Before we get into the making of a quiz, I want to point out some of the more important options available when creating a Quiz. First, we will take a look at the Quiz page as it looks when you first open it.
To create a new Quiz, you will need to go to your course page and click on the Turn editing on button. Once this is done, you will see two drop-down menus in each of the topics. The one on the left-hand side is titled Add a resource and the one on the right-hand side is Add an activity. Clicking on the Add an activity drop-down menu will display the activity options available. One of the activities is Quiz. Selecting the Quiz option will open the Adding a New Quiz page, the one we see in the next screenshot. Once you have finished looking it over, We'll talk about why each section exists and what each of them does.

Don't worry! There is a lot of information there, and we are going to work through it together. You'll notice that there are nine basic fieldsets that can be modified. I want to describe them all to you now so we can begin the process with full knowledge of the possibilities in Quiz.
This section only has two separate fields, Name and Introduction. They are both simply explained, but very important for both students and teachers.
While this may seem like a silly thing to mention, it isn't. The name of the quiz is important for several reasons. First, it allows the students to quickly and easily locate the quiz on the course page. The second reason is that the name of the test will mean much more a few weeks after it has been taken. A test called 'Test 4' doesn't mean as much to a student as 'Adding and Subtracting Fractions Quiz'. Finally, the score the student receives is recorded in the Moodle Gradebook with the same name, making it easier for the instructor and student to understand where he/she excelled or had troubles in the course.
It is important to note that overly long names can clutter the Gradebook display. You may want to view the Gradebook to see how the name has affected the view.
This is the section where you can give instructions, explanations, as well as insert images, links, and tables. The person taking the test will only see the Introduction before the test starts, so this is also the only time before the test begins that you can give students last-minute advice or a reminder. The clearer this section is the better, so take your time when writing your introductions to your tests. This is also the place where you can communicate to your students what they need to study before taking the quiz.
This section allows you to set all the parameters related to the time frame for the test. You can set the time and date the student can access and take the test. If you don't have a specific time-frame in mind for the student to complete the test, in a self-directed study course, for example, you have the option to disable the time and date function. You are also able to determine the amount of time allowed for the test, and whether or not the student is allowed to take the test a second time. If you allow the student to take the test a second time, you can also set how much time they will need to wait until their second attempt.
This option allows you to decide how many questions appear on each page of the test, or whether the test will simply be a scrolling single-page. It also allows you to give unique tests to all students by adding a bit of variety. This section allows you the option to shuffle question order, answer order, or both. In addition, inside individual questions, you have the option to override the option selected here.
This option allows you to determine how many tries a student taking the test will get. It also allows you to create a test in which a student can work on the test, stop, and then come back to it later, starting where he/she left off. The final tool available in this section is what is termed Adaptive mode.
Adaptive mode is an interesting feature. It creates a Submit button next to each question, which when clicked, gives the answer and feedback to the student. If the student answers a question incorrectly, he/she can be given the same question again or asked a variation on the question. This question can either be a completely new form, such as going from a Multiple-choice item to a True/False one, or something simpler like rewording the question. In addition, we can apply penalties to adaptive items. For example, if a student answers a question incorrectly and is given an alternative one, he/she will lose a percentage of his/her grade. This happens each time they incorrectly respond to the question. This is a powerful tool and something that we will be using when we make our last test.
This option allows you to decide how to grade the student, basing grades on either the highest score, the first or last attempt, or the average of each of the student's attempts. It also allows you to apply penalties to adaptive tests based on the number of attempts made on the question. There is also an option that allows you to set the decimal place for the score if desired.
This section is built into Quiz for feedback purposes. It gives you the option of allowing students to see their responses, the correct answers, their grade, and teacher feedback. This option is also used to control when that feedback is given, it can either be immediate or delayed. Depending on your needs, there are a lot of options available here.
This fieldset details security measures that can be taken in Moodle. It allows the teacher to add an additional layer of test protection by opening a browser with no navigation options. This will help stop cheating in some ways by not allowing students any browser options. It also has the capability of limiting access to the test by requiring a password or a specified IP Address. For example, if you want to make sure the test was taken in the school computer lab, you could use this feature.
While these two options are useful in some ways for stopping cheaters, they are not going to stop it all. Savvy students will be able to do things that, unfortunately, we cannot prevent. Ideally, high-stakes tests will be done in class, or in an environment that allows for proctors and student monitoring.
This section allows you to set up groups in a course, if you feel that is appropriate. You can have everyone in the class in the same group, or divide them however you see fit, for example, by level. Whichever method you choose, either using the option or not, will carry over to all aspects of the quiz.
This section lets you give a set feedback to the students. You are able to set grade parameters, say 90 percent to 100 percent, and if the student's score falls between those scores, they will receive the message you enter. This feedback is the same for all students taking the test. You are also given the option of adding additional feedback should you want to offer more comments based on a narrower range of student results.
All of these sections have default settings in place, one that many people find works for them. However, it is important for you to think about your needs and what you want from the test. Do you need to know whether a student is able to solve the equation in five minutes? Do you require that the student gets every question correct, no matter how many attempts it takes? It is impossible for me to know your situation, but think carefully about the choices you make in this section and your reasons for making them, because once the students begin working on the Quiz, you can't adjust the settings.
Now, let's get down to business and create our first Quiz.
The first thing that needs to be done is to make sure that you have all the editing and administrative access required to create and edit things in the course you are using. You should see a Turn editing on or Turn editing off button in the upper right-hand side corner, similar to the next image, if you have editing rights in the course:

Once you have confirmed that you are able to add activities to the course, click on the Turn editing on button.
Once the toggle is changed to Turn editing on, you will see two drop-down menus, one called Add a resource and one named Add an activity in each Week or Topic section of the course. The Quiz module is found under the Add an activity drop-down menu as seen in the next screenshot:

Once you have opened the Quiz module, you should see something like the following screenshot. I showed you a full page shot earlier, but you'll only see this part of the screen when you open the module.
This is where we begin to add information and create the test. The first thing you see is the General section. Here, we will enter the name of the test and a brief introduction to the quiz. We will call the test My First Quiz. Under Introduction, we will write what the quiz is about:

For the time being, we are not going to make any changes to the Timing, Display, or anything else. Our goal here is to show you how to set up the most basic test using the Quiz module. After entering the Introduction, scroll down to the bottom of the page and you will see three buttons: Save and return to course, Save and display, and Cancel. Click on the Save and display button.
This option will save the test and bring you to the front page of your course.
You always have the option of going back in the test and making changes, which is done with the Update this Quiz button located in the upper right-hand side corner of the Quiz Edit tab, as you will see in the next image. So, if you decide that you want to change the name of the test, the test date, or other settings later, you can. For example, I've decided I don't like the name of the quiz I made, so I am going to change the name of My First Quiz to Testing with Moodle.
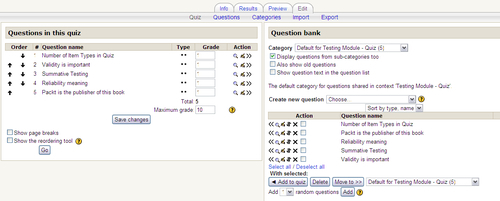
Now that we have edited the name of the test, written a brief introduction, and clicked on Save and display, we have been taken to the Editing Quiz page. This page shows the Question bank on the right-hand side, where all the questions available are stored and where we can create new ones. On the left-hand side, we see the questions that are currently part of the test.
Note the Update this Quiz button on right-hand side of the screen. Clicking on it will bring you back to the Updating Quiz page where you can make changes to the global Quiz settings.

As you can see, there are several tabs, as shown in the previous screenshot: Info, Results, Preview, and Edit. Each of the tabs has a variety of options, which can help in many ways.
Opening this tab will show information about the test. It will show us the test name, the introduction, the grading method, and a link to preview the test.
As you can imagine, this is where we can look at the test results. We are able to see the general overview of the results on the first page. The other options available are Regrade, which allows us to go in and alter the grades; Manual Grade, which disables computer grading and allows us to go in and assign grades to everything; and Item Analysis, which gives us a variety of ways to look at the responses and analyze the quiz data.
This tab does as its name implies, it allows us to preview the entire test. We are able to see all the questions, look at the format of each question, take the test, and see the results, although, as a teacher, nothing is recorded. We go here to make sure there are no mistakes and everything is as it should be before we have our students take the test. Preview is a very useful tool and something I use every time I make a test in Moodle, and I hope you will use it for every test you make in Quiz too.
In the Edit tab that we are using, you can see Quiz, Questions, Categories, Import, and Export. We are currently looking at the Quiz heading and under this option, we can see the questions that have been added to the test and the bank of available questions to be added. As mentioned earlier, I specifically created this course because I wanted to build it up together with you; therefore, there are no questions in the bank yet. However, when we add questions, we will return here and talk more about some additional functions of the Question bank.
Under the Question bank, located at Home|Quiz|Quizzes|Testing with Moodle|Editing Quiz in the Breadcrumbs tab, you can see Category with its drop-down menu and several options related to what questions will be seen and how they will be displayed. You can also see the Create New Question, with its associated drop-down menu. This is what we are going to be working with now. We'll get back to the other functions once we have some questions built into the bank!
Now, before we move on, we need to know what a Question bank is. The Question bank is where all the questions available in the Quiz are made. The Question Bank allows you to make a variety of questions and edit and preview them. All the questions made in the Question bank are stored at the course level, but they can be made available for use site-wide, course-wide, or quiz Question bank specific, depending on your needs.

We have looked at the general options available in the quiz module, but even more important are the question types. There are ten item types available in Quiz. The item choice you select for your test should be something that the students are familiar with and one that is appropriate to the subject material.
These item types are particularly valuable to math and science teachers. They allow the teacher to input questions that need to be solved using a calculation. The teacher writes a formula in Moodle, adds a set of specific variables, and Moodle can draw on the variables to produce questions. This is a great tool, but it does have its limits. There are only certain types of calculations it is able to handle: many single-variable and a few multi-variable ones. This particular item type is a bit more complicated than some, because a formula needs to be input, but once you get the hang of formulating these types of questions, the process is fairly easy.
These item types are not really questions, and they have no response options or grade component. They allow the instructor to add a piece of text, image, audio, or video related to questions that follow it in the test. Many people use Description questions for reading comprehension, graph or chart interpretation, and art-related questions.
This is the essay writing option included in Quiz, and mainly is used for open-ended responses. The student is required to read a prompt and write a response. The response can be written either in the test itself or in a separate word-processor and copy and pasted in, depending on your needs. This type of question is not graded by Moodle and requires you to read it and assign an appropriate mark based on whatever criteria you are using. You are also able to give individual feedback after reading the essay.
This option is the traditional matching item type. Students are given a list of items they need to match with another set. The questions and answers are placed in a mixed order. The answers are given in drop-down menus on the right-hand side of the screen. The results are marked by Moodle. If some answers are correct and some are wrong, Moodle will give a partial result based on the number of correct and incorrect matches.
This option is a fun item to work with. Using this item type, you can create a variety of fill-in-the-blank type questions and variations on multiple-choice questions. Cloze can handle numeric and written responses, and even allows hyperlinks to function inside of it. Embedded Answers (Cloze) however, isn't the easiest of the item types to use. It requires very simple coding to make the items look the way you want. The coding, which we will be demonstrating later, is fairly simple and limited to a few specific commands. Take it from me, a guy with only the most basic skills in this area, it's a breeze to learn. These questions are scored automatically by Moodle based on the parameters you set, so we need to be careful here and make sure we haven't made any mistakes.
This option is one of the most commonly used of the Quiz item types. It is easy to create quizzes with, allows for many different types of questions from text to image-based, and is familiar and easy to use. Questions can be made with single correct responses or multiple ones, and you can create any number of possible responses for each question. Responses can be shuffled, points can be awarded for multiple possible answers, penalties included for incorrect responses, and feedback given for individual items.
This is a fill-in-the-blank type of item. You create a question and the student must type in the correct answer. This item type can be a good tool for a variety of Test. Vocabulary and spelling are commonly tested using this item type, however there are multiple applications. You can include case sensitivity and what Moodle terms 'wildcards', search terms, which allow you to accept a variety of responses that include one of the set 'wildcard' phrases. For example, if students in an English language program were required to answer a question with the word 'color', you might add a wildcard with 'colour', since both spellings are considered correct.
These questions are similar to questions of the 'short answer' type in that the student is required to type in a response The only difference is that with the Numerical item type, the answer needs to be a number. You may set a correct answer as an exact-only response, or you may allow anything that falls within a given set of numbers to be accepted. Again, like in Short Answer, the answer you expect might be 4.33, but you could make 4.3 or 4.35 acceptable answers, as well.
This item type looks just like Matching items to students, the difference is where the items are taken from. These items randomly take questions from the pool of Short Answer questions available in the category and mix up the answers to provide a matching-type question. This is a randomly generated test; therefore, students taking the test at the same time will not necessarily have the same questions. In addition, this type of item can be used as a test several times and, assuming the Question bank is large enough, students will be presented with a different test each time. This item type is also a way for you to have students review past material in no specific order or emphasis on the topic.
This is a simplified Multiple Choice item. Students are given a statement, question, reading, or some other prompt and asked to respond with either True or False. These tests have the advantage of being simple and fast to make, as well as helping with review situations. The drawback being, students have a high chance of guessing the correct answer without really knowing it.
These are all the item types Moodle has available in the Quiz module. There are also a few other question types available from third parties but they are not part of the core system.
Now, I'd like to continue showing you how to create a simple quiz using questions of the True/False type.
The True/False item creation screen is shown in the next screenshot:

Each question type will contain several decisions for you to make. True/False is the simplest and has the fewest number of options, which is one of the reasons we are starting with it.
As you can see from the previous screenshot, in True/False we are limited in the number of things that we can do. However, some of these options do carry over into other item types. A brief explanation of the information and options available in True/False is as follows.
This drop-down menu tells us where the questions will be saved. When making tests in multiple courses, it is important to know where the questions can be found. Also, you may want to use some of these questions on a different test, so knowing the location of specific questions can be important. If you want to change the category the question is in, you can do so at a later time.
Simply put, this option is where you write the name of the question. The name can be of any length, although, only the first 256 characters are stored in the database.
This option is where you enter the text of your question. You may include images and links, as well. You can also adjust the font size and style. Remember, this text is what the students taking the test will see, so make sure it is of good quality and an appropriate font and size for them.
This area is preset in the Quiz. You do have the option to change it, depending on how you are entering text and the browser you use. Moodle recommends that you leave the setting as it is. Beginning to intermediate users should ignore this setting, because, whichever setting it is on will work for what you are doing.
If you have added any images to your course, you will be able to see which one will be displayed in the question. You can see in my course that I have yet to upload any images, so the screen states that'No images have been uploaded to your course yet'.
This option is the number of points that will be deducted for each incorrect answer. However, the 'penalty factor' only applies when the question is used in a quiz using adaptive mode, that is, where the student is allowed multiple attempts at a question even within the same attempt at the quiz. If the penalty factor is more than zero, then the student will lose that proportion of the maximum grade for each successive attempt. For example, if the default question grade is 10, and the penalty factor is 0.2, then each successive attempt after the first one will incur a penalty of 0.2 x 10 = 2 points.
Here is where the teacher can give some advice, background, or anything else related to the question asked. This option is often used to help the student understand what was being asked, to give some additional information, or some background. The student will not see the feedback until after the question has been answered. This feedback is shown to all students, regardless of their response. If this option is left empty, there will be no general teacher feedback.
Here is where the correct answer is selected from the drop-down menu. Since we are using True/False, you can choose either True or False. Clicking on your choice will display the correct response in the drop-down window.
Here you can give specific feedback to students who answered 'True'. If the answer is correct, it could be praise. If the answer is incorrect, it could be an explanation as to why it is incorrect. This option can be a very useful tool for teachers to give specific information to students regarding important course information. This option does not need to be filled in. If it is left blank, there will simply be no teacher-given feedback for that question.
This is identical to the Feedback for the response 'True' section except it relates to an answer of 'False'.
Let's begin actually making the question now. We already have the page open, so from here, our first thing to deal with is the category. I am going to keep mine where it is because all the questions I am going to use are associated with the course I created; therefore, I'll use the Course setting. If you wanted the question available to a larger or smaller group, for example, all teachers using Moodle for just this Quiz, choose that setting.
Now we decide on the name of the question and what the question will ask. Curly decided to ask about the number of item types in Quiz, so I think I'll name my question Number of Item Types in Quiz.
Tip
Naming Your Questions:
When naming a question, it is much better to give it a name that makes it quick and easy to identify. Questions with names like 'Question 11' or 'Q4' are not very helpful. For instance, if you are testing vocabulary, the word being tested is a good option for the question name. You may also want to include a 'command' term like identify, evaluate, and others.
Once I have entered the name of the question and the text of the question in the appropriate places, I'll scroll down to just under the Question text, where I can see the Format option, images in the question, penalty points, for the correct response, and the General feedback area. I'm going to keep all of these the same for now and add some brief comments in the general feedback area.
Under the general feedback option, is a drop-down, which allows us to choose whether the response is True or False. After selecting the appropriate choice (I'm not telling what it is yet, you are going to have to try and guess!), move down to the True and False feedback options.
In both True and False, I enter some feedback. Once I have finished all my work, I go back to the top of the page and check to make sure everything is correct. Once this is done, at the bottom of the page, I click on the Save changes button.
Once the question has been saved, we are sent back to the page where all this started. Take a look at the Question bank area of the Edit tab. You will see here that the question has been saved and is now available to be added to the test. You will notice that the newly made question has a gray background, which makes it stand out and easy to find.

Just under the Create new question drop-down, all of our newly available options for manipulating the question can be seen. Information and options about the question itself is displayed in three separate columns: Action, Question name, and Type.
This drop-down, directly under Create new question, allows you to determine how you are going to view your questions. You have three options here, Sort by name, type, or age. While this isn't that useful to us now, because we only have one question, later on it will become apparent how useful this option can be, especially when you are working in courses with hundreds of questions.
This bar has five icons and a checkbox. These symbols are, in fact, buttons. You can use them to perform a variety of functions with the question they are associated with.


This button will show you the question as it will look in your browser. It is useful, in that it gives you a way to check the question quickly to make sure everything is as it should be.

This button serves as an edit question button. It allows you to go in and make changes to the question if there are any problems.

This button allows you to move the question to a different category. For example, if the question was in Course, but you wanted it to be in System, you could move it there.

This button is dangerous! It can completely delete any question you have entered. If you really want to get rid of the question, this is the button to use. Don't worry, if you make a mistake and click on it accidently, you will be prompted to confirm that you really want to erase it. Once you have deleted a question, you can't get it back.

Select all/Deselect all options are just below the single button actions. This feature allows you to choose all the questions in your Question bank to work with, as well as giving you the option to clear all the questions you selected and start over.
Below the Select all/Deselect all feature, there are three buttons that allow you to manipulate multiple questions. These buttons function just like the single button features mentioned previously, but they will allow you to add all the selected questions to the test, delete all the selected questions, or move them all to a different area. The Move to button has a drop-down menu alongside it, making it easy to select where you want to move the questions to. First select the destination, then click on the Move to button.
Just like the title implies, this entry shows you what the question is called. A good naming scheme will save you hours in the long run, so start out with one.
This part displays the type of question you are working with. Some of the icons are not immediately recognizable, but moving your pointer over them will show you what kind they are. Once you have used this module enough, these little icons will help you determine quickly what you are working with and help you discriminate between questions with similar names, but of different types. This is something you will encounter often.
Now that we have the question in the Question bank, we're going to use one of the icons just mentioned. We're going to use the Add to quiz function. After we add the previously created question to the quiz, the Questions in this quiz section appears, as shown in the following screenshot:

Looking at this, we can see a few new options.
While you can see nothing here now, this is because there is only one question in the quiz. Once we add more questions, you will see up and down arrows. These arrows allow you to move the question position to a higher or lower place in the quiz.
This option shows the numeric order of the item in the test. The first item under '#' shows that this is the first item in the test.
Here, we are able to see the question name, which allows us to confirm whether we moved the correct question to the test.
We are also able to see the type of question it is, which helps us quickly determine the type of question and keep things organized. Also, placing your mouse over the icon will show its function, in case you have forgotten.
This entry allows us to set the number of points each question will be worth. The number entered into the textbox is how much this particular question is worth in terms of points in the test. By default, this number is the same as the question grade defined in the question. You can change this number simply by typing a new number into the textbox. This is an important feature to use, especially for tests containing items that are more complex or important than other items. We will look at grades more closely later in the book.
This number shows the total possible points from questions in the test. You are not able to directly manipulate this number. If you want this number to change, you will need to look at the questions and make a change in the points assigned to each of them. Do not forget to click on Save changes after doing so!
This text box contains is the maximum possible points a student will be able to get in the test. This feature helps in grade scaling. You are able to adjust this value simply by typing a new number in the box. For example, if you give a weekly vocabulary quiz, and each quiz needs to be worth 5 percent of the student's grade, you might want to put a "5" in the box. Even if you have ten questions in the test, this option will scale the score to a maximum five-point total, so each question would be worth 0.5 points.
There are three buttons here, each of which is the same as explained previously. There is a Preview, Edit, and Move.
This function allows you to put pages into the quiz. If this option is selected, the Questions in this quiz pane will be divided. Once you select the Show Page Breaks, you will see a drop-down menu that allows you to set the number of questions that will be added to each page. Select the number you want and click on the Go button. You will now see that the quiz has been divided into a number of pages with each having the selected number of items. You are free to adjust the number of items per page later by using the Move icon located next to the Page Break line. You also have the option to delete the page breaks if you want.
Tip
Items Per Page
You should never have more than 10 items per page. This helps reduce the risk of page timeouts.
Since we only have one question right now, we'll get back to that function when we have a few more entries.
As seen previously, we can change the order of questions by clicking on the Move icon. However, if we enable the Show Reordering Tool option, we will see a new textbox under the Order column, on the left-hand side of the Move icons. Each of the boxes will contain a number ending in a "0", for example: 40, 100, 250. You can move items around quickly by placing the numbers in the boxes into an order you want. So, if you wanted to move a question with the number 50 to a spot between 20 and 30, you would simply need to enter some number between 20 and 30. Once you move the items, the numbers will automatically reset. You can move the items around this way as often as necessary.
If you decide to change any of the information, make sure you click on the Save changes button. If you don't, any work you did will be gone!
What we want to do now is take a look at the question to see how it looks, and to give it one final review, which includes making sure that the answer is correct.
We can click on the Preview icon in the Questions in this Quiz pane to see the question. This action will create a pop-up window, as shown in the following screenshot:
In the preview, we can see several pieces of information related to the question.
The question is displayed next. It includes the number of the question, the question text, the possible responses, and the point value assigned to the question.
This button allows the student to submit each answer as he/she finishes the question. It allows the student to immediately know if he/she got the answer correct or not. This feedback can be a useful feature, especially in tests that are completed over a period of time. However, in longer or timed tests, these buttons may be a problem because students might spend valuable test time reviewing their choices and not moving forward in the quiz. These buttons can be removed by going to the Attempts section in Update Quiz and selecting No in Adaptive mode.
If you have multiple questions, and you have decided to use the Show Page Breaks option, this button will allow you to complete the questions and see the results for the page you are working on.
This function will mark all the correct answer choices in the quiz. This is a useful function for teachers, because it helps make sure that the answers are correct without having to work through, or read, the items.
This feature will allow you to begin again. It will erase all selections made and move you to the beginning of the test.
This option will close the Preview panel and you will return to the Edit page for the Quiz.
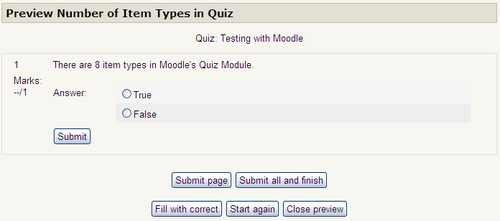
Now, let's attempt the question in Preview mode. I'll move my mouse over the checkboxes and choose the correct answer by clicking on them. How much do you remember about the Quiz? Look at the question, There are 8 item types in Moodle's Quiz Module. Is the Answer True or False?
I'll make my selection, and let's see the results.
Now, we can see here that we have selected True, which is the wrong answer. The answer choice is highlighted, and there is a red X next to it. The correct answer has a green check beside it. This is what the students will see if the Adaptive mode is enabled.
Under the True and False radio buttons, , you can see that the feedback entered for an incorrect response has appeared. There button is another Submit button. This allows the student to change his/her answer if multiple attempts with a True/False test is allowed. This means that they only have to click on the other choice to get a correct response.
You can also see under the Submit button a message telling me the response was incorrect and the marks I received for this remained zero. The penalties applied note simply means that I will lose one point from the total possible in the test.
You also notice a new function has appeared at the bottom of the page, a button called Previous state. This functions as a Back button, allowing you to move back one step. This is useful if you are working through a set of questions and want to see how feedback is displayed, based on the response. This button is obviously only available in the teacher-preview mode.
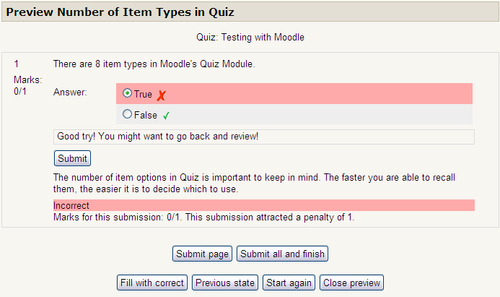
Now, I'm going to select the correct response, so you can see how it would look.
As you can see, I received both the correct answer and general feedback, and I was given one point for the answer. Note that the Marks in the preview under the question number didn't change. This is because we are in our second attempt. If we wanted the mark to be shown correctly, we would need to click on the Previous state button, which would mark this question correctly.
Now that we have confirmed that the question is correct, we repeat the process. You can add as many questions as you like to the test, but for now, we're going to make four more. Here is how the entire test looks from the Editing tab with the new questions added.
Take a quick look at Order in the Questions in this Quiz section. See the Up and Down arrows? These are the Move icons mentioned earlier.
Now that we have all the questions we want in place, we are ready to move on.
Now, I know that we have already gone through each question, but just to make sure everything is just the way we want it to look, it is a good idea to sit down and take the test. Here you might find one or two hopefully minor errors that you overlooked earlier. We need to click on the Preview tab at the top of the page and we will see how the test looks from a student's point of view.
I have decided that I want to get rid of the small Submit buttons next to the questions. I'm going to go back to Update this Quiz button and find the Attempts section. Then, I'm going to turn off Adaptive mode by moving the choice to No. This means that whoever takes this test will need to answer all the questions and they will get their results at the end when they click on Submit all and finish.
We are only offering a single attempt at this quiz, but leaving on the Adaptive mode would allow the student to answer each question multiple times, even in a quiz with single attempt. This setting would also apply a penalty, if one were set, to the marks for each question incorrectly answered. Our updated test is shown in the following screenshot:
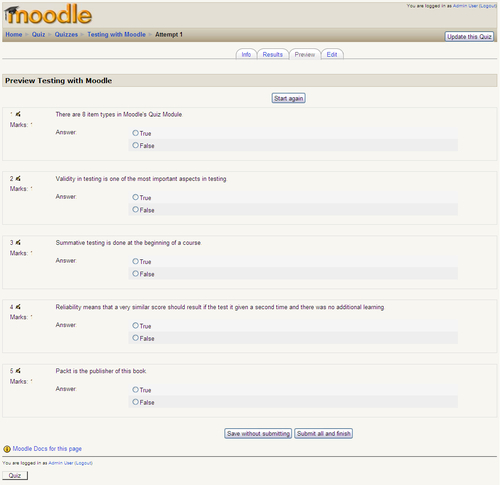
As you can see, changing the Adaptive mode option to No got rid of the Submit buttons and made the test look a little less cluttered compared to the earlier screenshot.
Tip
Careful with Arrow Keys
Arrow keys are really useful in navigating, but when you are taking a test in Quiz, they can move your selection. If you have selected an answer and it is still highlighted, and you click on the Down Arrow key for example, your answer will be changed. Make sure your students are aware of this!
Everything looks good, but now we need to check the answers. We will select True/False for each of the items and instead of clicking on the Submit button next to each of the items, we will go to the bottom of the page and click on the Save all and finish button. This will close the test for us, and show us the results. This is the page we get after clicking on the button.
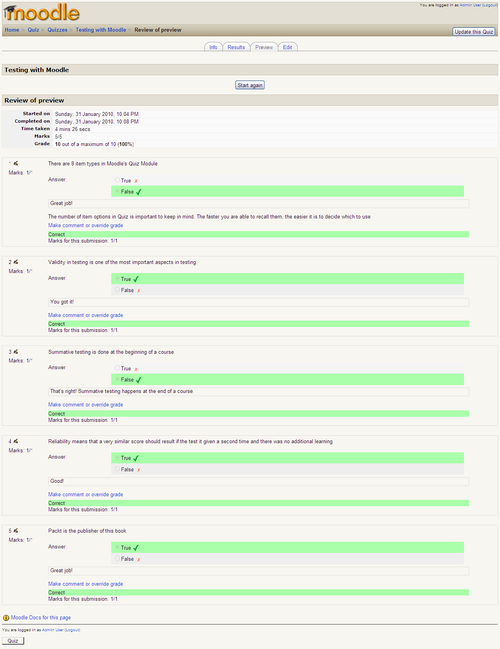
As you can see, all the answers are correct, and each received the proper number of points and feedback.
Tip
Teachers, Groups, and Quizzes
As a teacher, your marks will not be recorded when you are previewing the quiz. However, if you have added yourself as a teacher to a group, your results will be stored, even though you are a teacher. This action will prevent further testing of the quiz.
Also, look at the top left-hand side of the page. There is a small information section called Review of preview. This is a lot of very useful information. The information here tells us when the quiz was started, when it was completed, and the total time the person was taking the quiz. As the test developer, you are able to look at the time taken and possibly make decisions about how to time the test in the future. If the quiz time is simply too long, you might be able to cut some questions. If it is too short, you can create more. In addition, students will see this section once they finish the quiz.
You are also shown the number of points scored and the grade. These numbers are probably some of the most important pieces of information for most teachers, since we need this to ensure that all the correct responses are given the correct point value.
That is all there is to making a simple True/False test in Moodle Quiz. Now all that needs to be done is to make sure your students know where the test is and have them take it.
Now that I've shown you how to create a True/False quiz, it's your turn to give it a try. I'm going to give you three statements and I want you to make a True/False quiz using them. The three statements are as follows:
Mice are smaller than cats.
Cats are smaller than dogs.
Dogs are bigger than horses.
Go to the front page of your course and turn editing on by going to the upper right-hand side of the page. Make a new Quiz by going to the Add an activity drop-down in any of the topic sections and selecting Quiz.
Now you will need to name the quiz and give it an introduction. Please call the quiz My First Moodle Quiz and repeat the name in the Introduction textbox.
We are going to leave all the default settings as they are, except for one. We want to go down the page and locate the Attempts section. In this section, please find and turn off the Adaptive mode.
When you have done this, scroll down to the bottom of the page and click on the Save and Display button.
We should now be in our quiz question creation area. Go to the category and change it to Default for My First Moodle Quiz. This will help us keep all our questions organized.
Once you have done this, find the Create a new question drop-down and select True/False.
We will need to fill in all the required fields now. For Question name and Question text, enter Mice are smaller than cats. For correct answer, select True.
We will also include some feedback here. In the Feedback for Response True enter Yes, mice are smaller than cats. In the Feedback for Response False enter Sorry, but cats are bigger than mice.
Go to the Preview tab and look over the questions to make sure there are no mistakes. Answer all the questions correctly and then click on Submit all and finish.
When you finish all these steps, you should see the following screenshot:

From here, you can see that I was able to put all the questions together into a quiz, the answers are all correct, and the score I received was a 100 %. You can also see the feedback each student receives from the correct answer.
I hope you were able to quickly and easily complete this little project. As I said before, if you were unsure of something, or got something other than I did, go back and review the chapter and make sure you followed all the steps outlined previously.
When using True/False questions to test students, there are a few assessment-related issues to keep in mind.
The math makes these types of items the least useful in some ways. Students have loved these questions for years, because regardless of whether or not they know the material, they have a 50 percent chance of guessing correctly. Because of this, these question types are probably not the best way to ask things in high-stakes types of tests. There are, however, ways to compensate for this problem, such as only awarding points for those reaching a minimum score.
On the other hand, these questions are simple to write. They only require, at minimum, a simple statement. Instructors wishing to simply see if a student is aware of a basic piece of information can create a list of them in just a few minutes.
Now, even though these types of items are not the best for summative assessment, they do hold some value for formative testing and self-assessment.
In formative testing, we are concerned with teaching and instruction. These kinds of tests can help teachers guide students and help them determine student weaknesses or areas i which the teacher can provide additional instructions. If a teacher notices a large number of students are having trouble with the information being taught, the teacher can do several things: look at the way the material is being presented and see if there is a better approach to take with the class, give review sessions for those needing it, assign more time to the skill in question, or something else that will likely improve the situation.
By creating True/False tests in Moodle, which are fast and easy to produce, it is simple to create more formative tests, giving teachers an even easier way of checking on student progress. In addition, the use of the shuffle question and random question functions, which will be looked at later, allow any questions from the bank to be used. By creating a category based on a specific skill, you can load it with any questions you have based around that skill and Moodle will randomly generate tests for you. Assuming you are using the same types of questions focused on the same skill, you will be able to use the Quiz reporting tool to help you see any student improvement in that skill area.
Self-assessment is about learning. It is about finding which areas you are weak in and working on improving them. Teachers that use this kind of activity are attempting to make their students become active and independent learners. Using True/False questions is a useful way to help students with this type of assessment. If you prepare a review quiz in Moodle using True/False question types, students can quickly see what they know and don't know. This knowledge will help dedicated learners decide how best to spend their time and energy.
Even with the ability to compensate somewhat for guessing, with a 50 percent chance of guessing the correct answer at random, True/False itself is not the most effective item type available. In addition, students have no choice but to guess even if they don't know the answer. In fact, even if they don't want to answer because they know they don't know the answer, they are forced to either avoid clicking on either response option, or if they accidentally do click on an answer, make a guess. This situation is not all bad though, because there are some who argue that this process will force students to think carefully before selecting an answer. The problem is that there is no way to remove a response completely once one has been selected. An inclusion of a feature that would allow students to 'pass' if they didn't want to answer, I feel, would be a great addition. It could help in assessment and validity issues related to testing in Moodle.
In this chapter, we learned how to create True/False questions with the Quiz module. This introduction was, hopefully, an easy first step in learning how to use Quiz. We looked at many of the options available in generating a Quiz, using the Question bank, and we looked at every option available when creating a True/False item.
You should now be comfortable in making True/False questions in Quiz; however, I would like to caution you again about using these too often or for too many things. As mentioned earlier, these types of questions can be good for homework and review, because they are easy to develop and produce, and the results are easy to analyze. They are also useful as self-assessment tools, allowing students to see what they know and what they don't, quickly and easily. Students who are active learners and understand how to do self-assessment, will look at their results and make changes in their study habits or focus on the areas where they see a gap in their learning.