


When we create exercises for e-Learning platforms, the main focus is to present well-organized information for the students. However, children with special education needs require unique activities. They like computers and they usually enjoy visually rich and interactive activities because they allow them to focus on solving simple or complex exercises. Graphics, videos, sounds and toy-like hardware are their best friends when they need to improve their skills. It is necessary to combine multimedia resources with funny environments to allow them to enjoy their homework. They don't need boring exercises. Luckily, Moodle is an open e-Learning platform that is indeed useful to support the implementation of the most exciting activities for children with special education needs.
We can combine Moodle, Web 2.0 tools, commercial and free software, and general purpose hardware devices to develop rich and interactive activities with pictures for children with special education needs.
In this chapter, Alice, a seven year old girl, goes to school. We will learn how to create activities related to her journey. By reading it and following the exercises we shall:
Learn to create composite pictures
Create activities to match composite pictures with sentences
Search and organize 3D models to create a 3D scene
Work with colors to define skill levels
Create rich exercises to stimulate both the attention and the concentration
Learn to take advantage of a gamepad and a digital pen to create funny exercises
Add, run, and evaluate different kinds of rich and interactive activities
It was a very nice day. The sun was shining in the sky and the birds flew happily.
The school playground was full of children ready to begin their first day in school. Alice was among them.
The bell rang. Everyone had to go to class. All the children sat down and opened their schoolbags. Alice saw a lot of interesting things in the classroom. Shall we help her sort them out?
We must first download and install some additional tools that will help us in searching, editing, combining, and converting 2D scalable clipart to the most appropriate file formats to use in Moodle and its related applications:
Note
The necessary tools will depend on the original 2D scalable clipart. However, we will be using some tools that will work fine with our examples.
1. Download the following files:
|
Application's name |
Download link |
File name |
Description |
|---|---|---|---|
|
Inkscape |
|
This is a very complete free, open source, vector drawing program. This tool will enable us to import many vector assets in different popular file formats and export them to a format recognized by Moodle and Hot Potatoes. | |
|
Microsoft Office Home and Student 2007 |
|
This is a commercial tool, but the trial offers a free fully functional version for 60 days. Microsoft Word 2007 will enable us to search vector assets in Office Online Clip Art & Media. |
2. Run the installers and follow the steps to complete the installation wizards.
3. Once Inkscape's installation is completed, you will be able to load and edit many vector assets in different file formats, as shown in the following screenshot:

4. Once Office 2007 installation is completed, you will be able to use the powerful clipart search capabilities offered by Word 2007, as shown in the next screenshot:
The creation of scalable vector graphics assets for a matching composite pictures exercise is very complex and involves professional skills. We are going to simplify this process by using existing clipart.
1. Create a new folder in Windows Explorer (
C:\School).2. Start Inkscape and minimize it. You will use it later.
3. Start Word 2007. You will be working in a new blank document.
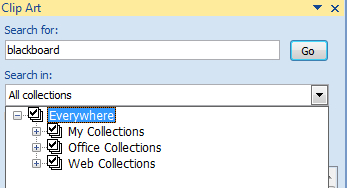
4. Click on Insert | Clip Art. The Clip Art panel will appear on the right-hand side of the main window.
5. Click on the Search in combo box and activate the Everywhere checkbox. This way, Word will search for clipart in all the available collections, including the Web Collections as shown in the following screenshot:
6. Click on the Search for text box and enter
blackboard.7. Click on the Go button. Word will begin downloading and displaying clipart related to the blackboard keyword, as shown in the next screenshot:
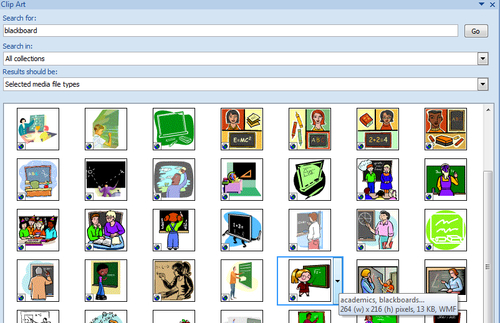
8. Position the mouse pointer over the desired clipart's thumbnail. Since you want to change the picture size without losing quality using Inkscape, make sure it is a WMF (Windows Meta-File) or an EMF (Enhanced Meta-File) file. Word displays the file format on the right-hand side of the tooltip that appears when you move the mouse pointer over each picture's thumbnail.
Note
WMF is an old scalable vector format. Neither Moodle nor Hot Potatoes offer direct support to WMF graphics. However, using the next steps, we can also combine any vector formats supported by Inkscape, such as SVG (Scalable Vector Graphics), AI (Adobe Illustrator), PDF (Adobe PDF), and EMF (Enhanced Meta-File), among others.
9. Right-click on the desired clipart's thumbnail and select Preview/Properties in the context menu that appears. Word will display a new dialog box showing a larger preview of the scalable clipart and a temporary file name, as shown in the next screenshot:
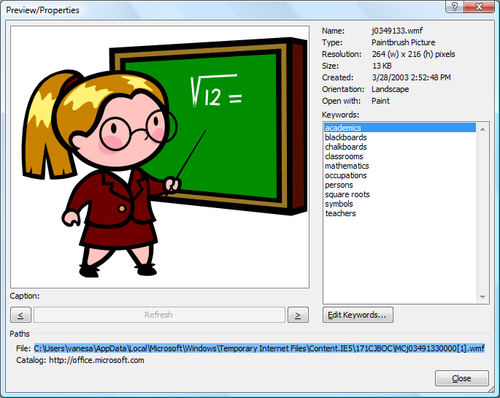
10. Triple-click on the long path and file name shown after File. This way, you will be sure that the temporary file's full path is selected. Then, right-click on it and select Copy in the context menu that appears.
11. Next activate Inkscape—remember that it was running minimized. You can use Alt + Tab or Windows + Tab. Don't close the clipart's preview window.
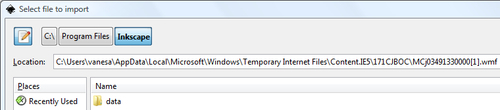
12. Select File | Import from the main menu. Click on the Type a file name button (the pencil with a paper sheet icon) and paste the previously copied temporary file's full path in the Location text box. The path is going to be similar to
C:\Users\Username\AppData\Local\Microsoft\Windows\Temporary Internet Files\Content.IE5\171CJBOC\MCj03491330000[1].wmf, as shown in the next screenshot:
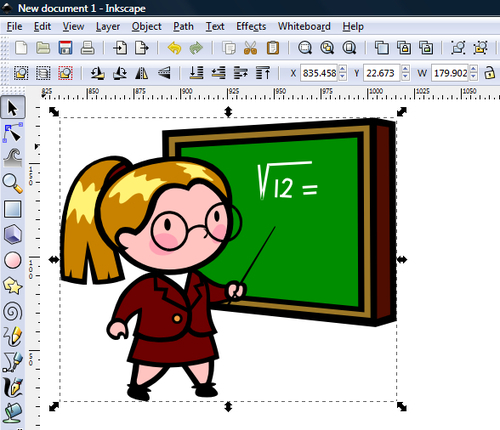
14. Return to Word 2007, close the Preview/Properties dialog box and repeat the aforementioned steps (6 to 13) for each vector graphic to combine inside a box—Inkscape's drawing area. In this case, repeat those steps searching for an
eraser. Now, two scalable clipart items will appear with different sizes in Inkscape's drawing area, as shown in the following screenshot:
15. Select File | Save from Inkscape's main menu. Save the file as
image010101.svgin the previously created folder,C:\School.16. Now, repeat the aforementioned steps (6 to 14) to create a new drawing composed of two vector graphics, a
caseandscissors. Two new scalable clipart items will appear with different sizes in Inkscape's drawing area, as shown in the next screenshot:
17. Select File | Save from Inkscape's main menu. Save the file as
image010102.svgin the previously created folder,C:\School.
We combined two pairs of 2D scalable clipart items in Inkscape's drawing areas. We searched for vector assets in Office Online Clip Art & Media and we imported the temporary files created by Word into Inkscape's drawing area.
We now have the following two boxes:
image010101.svg:A blackboard and an eraserimage010102.svg:A case and a pair of scissors
The exercise will look nice using these vector digital art assets.
We are now going to manipulate, resize, and save the new versions of the combined pictures for the exercise using Inkscape.
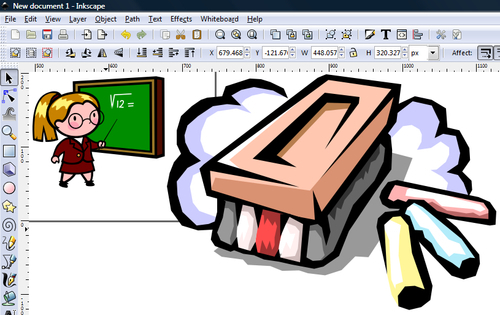
1. Open the vector graphic file in Inkscape (
C:\School\image010101.svg).2. Click on the blackboard picture to select it. Eight double-headed arrows will appear in a rectangle around the selection, as shown in the following image:
3. Drag-and-drop one of the diagonal double-headed arrows and scale the image both in the horizontal (X) and vertical (Y) directions. You can do it holding the Ctrl key down in order to maintain the original aspect ratio.
4. Next, click on the eraser picture to select it and enlarge it to match the blackboard's size.
5. Drag-and-drop the eraser to move it below the blackboard, as shown in the next screenshot:

6. Select File | Save, to save the changes made to the original Inkscape SVG file.
7. Select File | Export Bitmap. A dialog box showing many export options will appear. Enter
30on the first dpi (Dots Per Inch) textbox.8. Click on the Drawing button, and then on Export. Inkscape will export the drawing in PNG (Portable Network Graphics) format. The exported bitmap graphics with a big blackboard and a big eraser will be saved in
C:\School\image010101.png.9. Next, open the other vector graphic file in Inkscape (
C:\School\image010102.svg).10. Repeat the aforementioned steps (2 to 7) to export a new bitmap graphic with a big case and a pair of big scissors, as shown in the next screenshot. The exported bitmap graphic will be
C:\School\image010102.png.


14. Select File | Save As, to save the new manipulated vector graphic with a new name. Enter
image010103as the new name and click on the Save button.15. Select File | Export Bitmap. A dialog box showing many export options will appear. Click on the Drawing button, and then on Export. Inkscape will export the edited drawing in PNG format. The exported bitmap graphics file with a small case and a pair of small scissors will be
C:\School\image010103.png.16. Next open the previously manipulated vector graphic file in Inkscape (
C:\School\image010101.svg).17. Repeat the aforementioned steps (11 to 15) to edit the vector graphic and export a new bitmap with a small blackboard and a small eraser, as shown in the next image. Use
image010104as the new Inkscape file. Thus, the new exported bitmap graphic will beC:\School\image010104.png.

We edited the two pairs of 2D scalable clipart pictures using Inkscape. As we had used vector graphics to create the drawings, we could change their size without losing quality and we exported the resulting images to the PNG format.
Note
PNG is an open, extensible image format with lossless compression. Both Moodle and Hot Potatoes work great with PNG images. We didn't use the JPEG (Joint Photographic Experts Group) format for these graphics, because it uses a lossy compression method, which removes some information from the image. As the exported images are small in size, we can use the PNG format.
We now have the following four bitmap graphics ready to be used in our matching composite pictures exercise:
image010101.png:A big blackboard and a big eraserimage010102.png:A big case and a pair of big scissorsimage010103.png:A small case and a pair of small scissorsimage010104.png:A small blackboard and a small eraser
First, we must download and install Hot Potatoes 6.3. Next, we will prepare the sentences for our matching composite pictures exercise.
1. If you do not have it yet, download and install Hot Potatoes 6.3 (http://hotpot.uvic.ca/#downloads).
2. Start Hot Potatoes and click on JMatch. A new window with the JMatch application will appear.
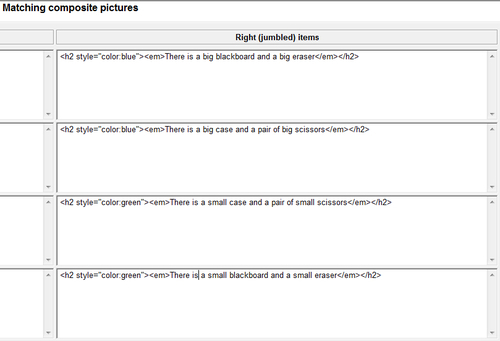
4. Click on the corresponding Right (jumbled) items textbox and enter the text shown in the next table for each row, as seen in the next screenshot:
|
Row number |
Text to enter in the Right (jumbled) items textbox |
|---|---|
|
1 |
|
|
2 |
|
|
3 |
|
|
4 |
|
5. Select File | Save from JMatch's main menu. Save the file as
matching0101.jmtin the previously created folder,C:\School.6. Next select File | Create Web Page | Drag/Drop Format. JMatch will create a new web page. Save the new file as
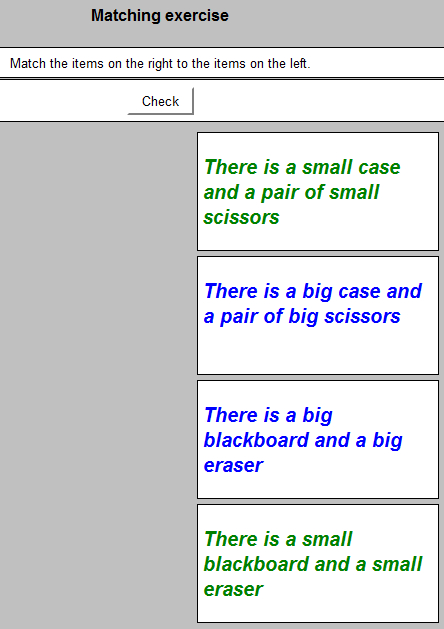
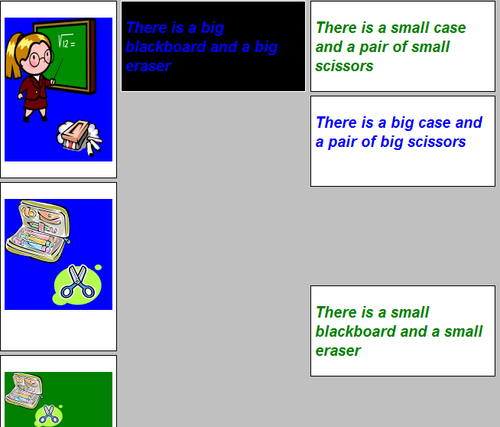
matching0101.htmlin the aforementioned folder.7. A new dialog box will appear. Click on View the exercise in my browser. You want to preview the previously entered text with colors and fonts on the screen.
8. The default web browser will appear showing the matching exercise with a drag/drop format. You will be able to see the four sentences with a big font. Two of them are in blue (the ones talking about big things) and the other two are in green (the ones talking about small things), as shown in the next screenshot:
We installed Hot Potatoes 6 and we prepared the sentences for our matching composite pictures exercise, using a drag-and-drop format.
We used JMatch to edit and preview the following four sentences as items on the right-hand side:
There is a big blackboard and a big eraser
There is a big case and a pair of big scissors
There is a small case and a pair of small scissors
There is a small blackboard and a small eraser
We didn't want to use the default fonts and colors. We added HTML code to specify different colors for the aforementioned sentences. JMatch doesn't offer a simple way to select fonts and colors for the sentences. However, it allows us to work with standard HTML tags. Therefore, we used the following header to specify a Heading 2 style with a blue color and emphasized text:
<h2 style="color:blue"><em>
Next, we entered the plain text for the sentence:
There is a big blackboard and a big eraser
Finally, we used the following footers:
</em></h2>
We used the same tags for the other sentences. We just replaced the color:blue code by color:green in the sentences colored in green.
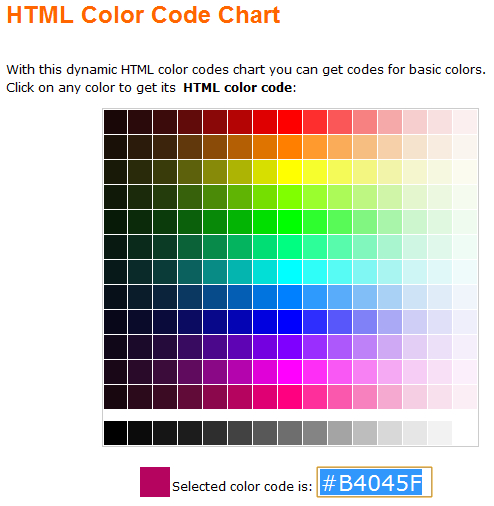
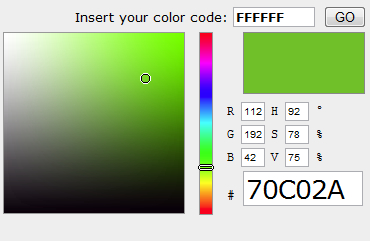
If we need other colors, we can use a dynamic HTML color-code chart or an HTML color picker, such as the ones offered by the HTML Color Codes website, http://html-color-codes.info.
We can click on one of the color boxes in the chart and the site will display the selected color code, as shown in the next screenshot:
If we want to use a Heading 2 style with the previously selected color and emphasized text, we should use the following HTML tags as a header:
<h2 style="color:#B4045F"><em>
Note
HTML codes define a color using a symbol (#) and a group of three two-digit hexadecimal numbers. Therefore, you will see the # followed by six letters (A-F) or numbers (0-9). The three two-digit hexadecimal numbers represent the intensity of the red, green, and blue colors. This way, combining the intensity of red, green and blue you can produce millions of different colors.
We can also move a vertical slider to choose the hue and then click into the color square in the HTML Color Picker and the site will display the selected color code, as shown in the following screenshot:
We now have to add the composite pictures with different sizes to our exercise in JMatch:
1. Stay in the JMatch exercise,
matching0101.2. Click on the first Left (ordered) items textbox.
3. Select Insert | Picture| Picture from local file from JMatch's main menu. Choose the previously exported bitmap image
image010101.pnginC:\Schooland click on the Open button. A dialog box will appear displaying the image preview and some options, as shown in the next screenshot:
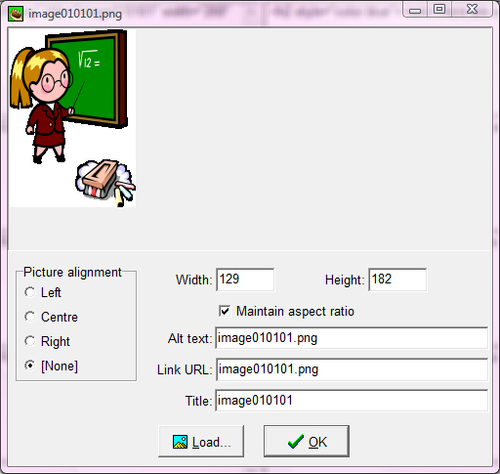
4. Click on OK. JMatch will show the following HTML code in the textbox:
<img src="image010101.png" alt="image010101.png"
title="image010101" width="129" height="182"></img>
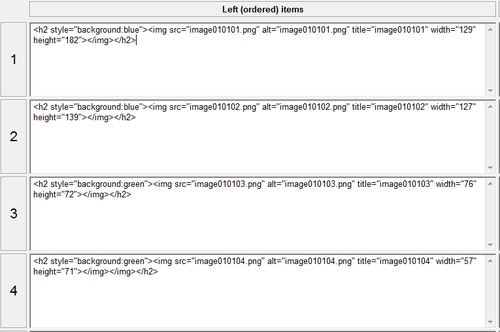
5. Edit the HTML code in the textbox, adding the following header (prefix). We want to specify a background color for the picture.
<h2 style="background:blue">
6. Add the following footer (suffix):
</h2>
7. The HTML code shown in the textbox should be as follows:
<h2 style="background:blue">
<img src="image010101.png" alt="image010101.png"
title="image010101" width="129" height="182"></img></h2>
8. Click on the corresponding Left (ordered) items textbox and repeat the aforementioned steps (2 to 8) using the information shown in the next table. You have to replace the color name entered after the
background:tag, with the color specified for each row.
|
Row number |
Picture file name |
Background color name |
|---|---|---|
|
2 |
|
|
|
3 |
|
|
|
4 |
|
|
10. Save the changes and select File | Create Web Page | Drag/Drop Format. Replace the existing web page and click on View the exercise in my browser.
11. The default web browser will appear showing the matching exercise with a drag/drop format. You will be able to see the four pictures and the jumbled sentences. Two of the pictures show a blue background (the pictures with big things) and the other two a green one (the pictures with small things), as shown in the next screenshot:

12. Perform the last two steps repeatedly. The jumbled sentences will change their order each time the matching exercise appears on the web browser.
We added the composite pictures with different sizes to our matching composite pictures exercise. We inserted the corresponding picture in the left-hand side for each sentence on the right-hand side.
When we run the exercise loading the web page created by JMatch, it jumbles the sentences on the right-hand side of the screen.
We didn't want to use the default background colors for the pictures. We added HTML code to specify different background colors for the aforementioned composite pictures. As previously explained when defining colors for the text in the sentences, JMatch doesn't offer a simple way to select background colors for the pictures. Therefore, we had to use HTML tags again. We used the following header to specify a Heading 2 style with a blue background color:
<h2 style="background:blue">
We left the HTML code added by JMatch to insert the picture without changes and finally we used the following footer:
</h2>
We used the same tags for the other pictures. We just replaced the backgroundcolor:blue code with backgroundcolor:green in the pictures with a green background color.
We now have to add the matching composite pictures exercise to an existing Moodle course.
1. Log in to your Moodle server.
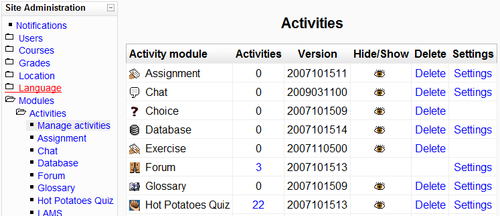
2. As we are going to add a Hot Potatoes exercise, you have to make sure that the Hot Potatoes Quiz activity module isn't hidden. Click on Modules | Activities | Manage activities in the Site administration panel. If the Hot Potatoes Quiz activity module appears in grey and displaying a closed eye icon in the Hide/Show column, you must click on this icon and it will change to an opened eye icon. This way, Moodle will enable this activity, as shown in the following screenshot:
3. Click on the desired course name (School). You can create a new course or use an existing one.
4. Click on Turn editing on. The web page will change to enable you to edit the Weekly outline.
5. Position the mouse pointer over the desired week under Weekly outline and click on the Edit summary icon (a small hand with a pencil).
6. Enter
Exercise 1in Summary and click on the Save changes button.7. Next, click on the Add an activity combo box for the selected week and select Hot Potatoes Quiz, as shown in the next screenshot:

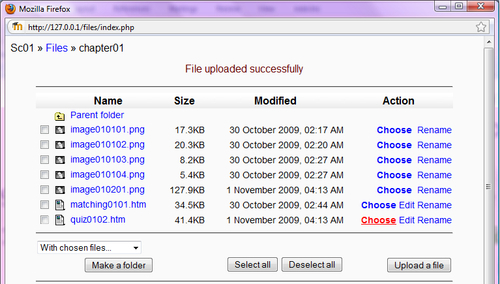
8. A new web page will appear displaying the title Adding a new Hot Potatoes Quiz. Click on the Choose or upload a file button and a pop-up window displaying information about files and folders will appear.
9. Click on the Make a folder button.
10. Enter
chapter01in the textbox and click on Create. Moodle will create a folder with this name and it will allow us to organize the necessary files for our exercise.11. Click on chapter01 (the recently created folder's hyperlink).
12. Click on the Upload a file button.
13. Click on the Browse button. Browse to the folder that holds the images and the files used in the exercise (
C:\School) and select the file to upload,image010101.png. Then, click on Open and on the Upload this file button.14. Repeat the aforementioned steps (12 to 13) for each of the files shown in the following list. You have to upload the following files in the
chapter01folder.image010102.pngimage010103.pngimage010104.pngmatching0101.html
15. Next, position the mouse pointer over the
matching0101.htmlname and move it horizontally to the Choose action hyperlink in the same row. Then, click on Choose, as shown in the following screenshot:
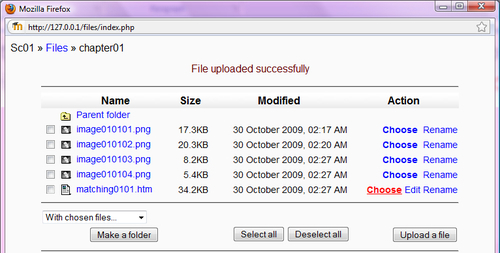
16. Moodle will display
chapter01/matching0101.htmlin the File name textbox. This is the web page that will run the exercise previously created using JMatch.17. Scroll down and click on the Save and display button, located at the bottom of the web page. The web browser will show the matching exercise with a drag/drop format, as shown in the next screenshot:

18. Click on the short course hyperlink on the top of the web page and the exercise will appear listed on the previously selected week, as shown in the following screenshot:

We added the matching composite pictures exercise to a Moodle course. Now, the students are going to be able to run the activity by clicking on its hyperlink on the corresponding week.
We created a new folder, chapter01. This folder will hold all the necessary files for the activities related to the school journey.
We then uploaded the four bitmap images and the HTML file created with JMatch (matching0101.html). This file has links to the bitmap images inserted with JMatch, therefore, it was very important to upload these image files.
It is possible to upload all the necessary files for an exercise as a single ZIP file, also known as a ZIP folder. A ZIP file is a file with the .zip extension that contains many compressed files.
You can select File | Create Zip Package | Create Drag/Drop Zip Package from JMatch's main menu and enter the name for the new ZIP file. JMatch will create a ZIP file with all the necessary files to upload to Moodle in order to run the JMatch exercise.
You can then upload this single file to Moodle by following the previously explained steps. Once the file is uploaded, an Unzip command will appear at the right of the new ZIP file, under the Action column. You have to locate the mouse pointer over the ZIP file name and move it horizontally to the Unzip action hyperlink in the same row. Moodle will extract all the compressed files from this ZIP file and you will be able to choose the main HTML file, in this case, matching0101.html.
It is time to run the activity as a student and to check the results as a teacher.
1. Click on the course name (School) and click on the Switch role to combo box (located on the left-hand side of the Turn editing on button) and select Student.
2. Click on the Matching composite pictures link on the corresponding week. The web browser will show the matching exercise with a drag/drop format.
3. Drag-and-drop each sentence to its corresponding image, as shown in the following screenshot:
4. After repeating the aforementioned step for the four sentences, click on the Check button to test the results, as shown in the next screenshot:
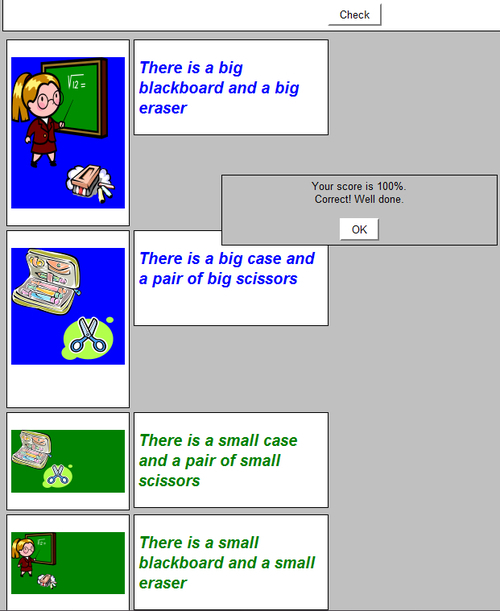
5. If the student's score is 100%, Moodle will save the results and will go back to the course web page.
6. Run the exercise with a different number of correct matches and click on the Check button each time. Moodle will remove the incorrect matches and will let you run the activity again. However, it will save the student's results for each attempt.
7. Click on the Return to my normal role button (located on the upper right-hand side corner of the web page). You are a teacher again.
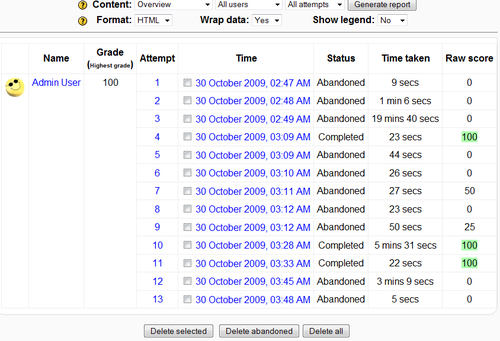
8. Click on Hot Potatoes Quizzes in the Activities panel. The number of attempts will appear in the Attempts column, as shown in the next screenshot:

9. Next, click on the View reports link for the row corresponding to the Matching composite pictures activity and Moodle will display details about all the attempts, grouped by user name, as shown in the next screenshot:
In this activity, we worked with sentences and composite images. Our goal was that the child reads and understands the sentences alone, with the help of a therapist or a family member, so that he/she can run the exercise.
The activity consists of matching one sentence whose meaning belongs to a composite image. We applied the following concepts and resources:
Size notions: For this reason, we have chosen school-related objects with different sizes.
Quantity notions: We worked with composite images, showing more than one element per picture box.
Sensory perception resources: We simplified the execution of the activity using colors. In this case, the sentences talking about big things use the background color found in the related composite pictures.
This morning, Alice gets up very happy. She opens her bedroom door and she sees Clifford, her puppy. He greets her wagging his tail and jumping.
Later, her mother calls her to have breakfast. After that, she prepares to go to school. Today, she has a problem; she doesn't know which school things fit in her bag. Can we help her?
The creation and rendering of 3D models for a discovering sentences exercise is very complex and involves professional skills. We are going to simplify this process by using existing free 3D models rendered in 2D bitmap images.
1. Start Inkscape and minimize it. You will use it later.
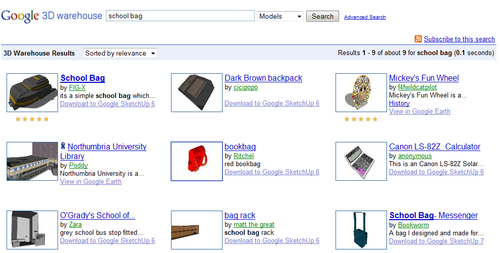
2. Open your default web browser and go to http://sketchup.google.com/3dwarehouse. This web page allows us to search for 3D models in Google 3D warehouse.
3. Enter
school bagin the textbox, select Models in the combo box and click on the Search button. Many models matching the search criteria will appear as shown in the next screenshot:
4. Click on the desired model's thumbnail. The default view for the rendered 3D model will appear.
5. Click on the 3D View button located on the upper right-hand side corner of the 3D model.
6. Position the mouse pointer on the center of the 3D model. Press the mouse button and drag it horizontally to rotate the model until you get the desired view.
7. Position the mouse pointer on the center of the 3D model again. Right-click on it and select Save picture as in the context menu that appears, as shown in the next screenshot:
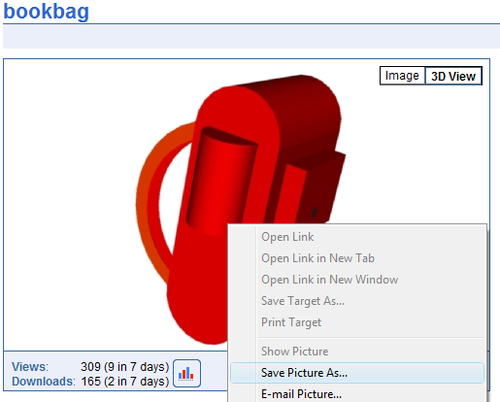
8. Since you want to change the picture size without losing quality using Inkscape, select Bitmap (*.bmp) in the Save as type combo box and save the file as
schoolbag.bmpin the previously created folder,C:\School.9. Now, activate Inkscape—remember that it was running minimized. You can use Alt + Tab or Windows + Tab.
10. Select File | Import from the main menu, select the previously saved file (
C:\School\schoolbag.bmp), and click on the Open button. The rendered 3D model will appear in Inkscape's drawing area.11. Now, go back to the web browser without closing Inkscape and repeat the aforementioned steps (2 to 10) for each 3D model to combine inside a box—Inkscape's drawing area. In this case, repeat those steps searching for the following things and saving the image files with the names shown in the following table:
|
Search for |
Picture file name |
|---|---|
|
|
|
|
|
|
12. The three rendered 3D models will now appear in Inkscape's drawing area, as shown in the next screenshot:
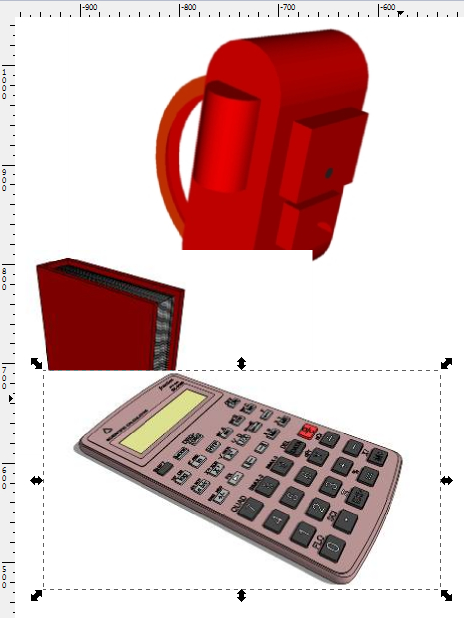
We combined three rendered 3D models in Inkscape's drawing areas. We searched for 3D models in Google 3D warehouse and we imported the bitmap files obtained from the desired views into Inkscape's drawing area.
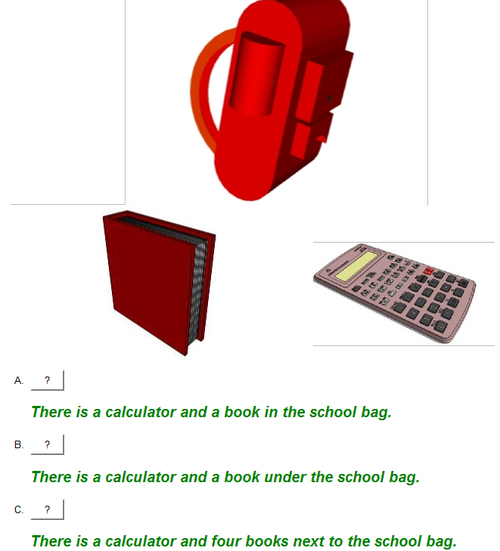
We now have a picture with these three rendered 3D models, representing real-life shapes:
A school bag
A book
A calculator
We are now going to move, resize, and save the new version of the combined rendered 3D models for the exercise using Inkscape.
1. Open the vector graphic file in Inkscape (
C:\School\image010201.svg).2. Resize and move each picture to create a drawing, as shown in the following screenshot:

3. Select File | Save, to save the changes made to the original Inkscape SVG file.
4. Select File | Export Bitmap. A dialog box showing many export options will appear. Enter
90on the first dpi (Dots Per Inch) textbox.5. Click on the Drawing button, and then on Export. Inkscape will export the drawing in PNG format. The exported bitmap graphics with a school bag, a book, and a calculator will be
C:\School\image010201.png.
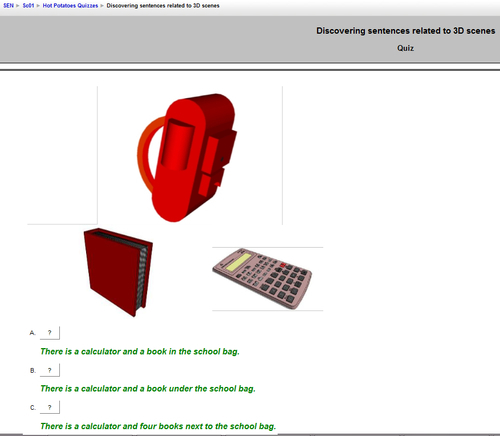
It is time to create the text blocks with the possible answers for a pop quiz related to the 3D scene.
1. Start Hot Potatoes and click on JQuiz. A new window with the JQuiz application will appear.
2. Enter
Discovering sentences related to 3D scenesin the Title textbox.3. Select Multiple-choice in the combo box on the upper-right corner.
4. Click on the textbox below the title's textbox on the right-hand side of question number 1.
5. Select Insert | Picture| Picture from local file from JQuiz's main menu. Select the previously exported bitmap image
image010201.pnginC:\Schooland click on the Open button. A dialog box will appear displaying the image preview and some options.6. Click on OK. JQuiz will show the following HTML code in the textbox:
<img src="image010201.png" alt="image010201.png"
title="image010201" width="640" height="504"></img>
7. Click on the corresponding Answers textbox and enter the text shown in the next table for each row, as seen in the next screenshot:
|
Row label |
Text to enter in the Right (jumbled) items textbox |
|---|---|
|
A |
|
|
B |
|
|
C |
|
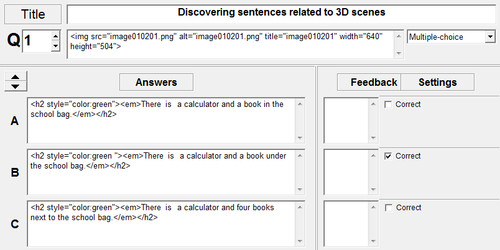
8. Activate the Correct checkbox corresponding to the row labeled with a B. This is the correct answer for the multiple-choice style quiz.
9. Select File | Save from JQuiz's main menu. Save the file as
quiz0102.jqzin the previously created folder,C:\School.10. Next, select File | Create Web Page | Standard Format. JQuiz will create a new web page. Save the new file as
quiz0102.htmlin the aforementioned folder.11. A new dialog box will appear. Click on View the exercise in my browser. You want to preview the exercise.
12. The default web browser will appear showing the image and the three possible answers. You will be able to see these three sentences with a big green font, as shown in the next screenshot:
We inserted the image with the 3D scene and we prepared the sentences for our discovering sentences exercise, using a multiple-choice format.
We used JQuiz to edit and preview the following three sentences as possible answers below the 3D scene:
There is a calculator and a book in the school bag.
There is a calculator and a book under the school bag.
There is a calculator and four books next to the school bag.
We now have to add the discovering sentences exercise to an existing Moodle course.
1. Log in to your Moodle server and make sure that the Hot Potatoes Quiz activity module isn't hidden.
2. Click on the desired course name (School) and then on Turn editing on.
3. Position the mouse pointer over the desired week under Weekly outline (a week later than the matching composite pictures exercise). Then, click on the Edit summary icon (a small hand with a pencil).
4. Enter
Exercise 2in Summary and click on the Save changes button.5. Click on the Add an activity combo box for the selected week and choose Hot Potatoes Quiz.
6. A new web page will appear displaying the title Adding a new Hot Potatoes Quiz. Click on the Choose or upload a file… button and a pop-up window displaying information about files and folders will appear.
7. Click on chapter01 (the folder created in our previous exercise).
8. Click on the Upload a file button and then on Browse. Browse to the folder that holds the images and the files used in the exercise (
C:\School) and select the file to upload,image010201.png. Then, click on Open and on the Upload this file button.9. Repeat the aforementioned step for the file generated by JQuiz,
quiz0102.html.10. Next, position the mouse pointer over the quiz0102.htm name and move it horizontally to the Choose action hyperlink in the same row. Then, click on Choose, as shown in the next screenshot:
11. Moodle will display
chapter01/quiz0102.htmlin the File name textbox. This is the web page that will run the exercise previously created using JQuiz.12. Scroll down and click on the Save and display button, located at the bottom of the web page. The web browser will show the discovering exercise with a multiple-choice format, as shown in the next screenshot:
We added the discovering sentences related to 3D scenes exercise to a Moodle course. Now, the students are going to be able to run the activity by clicking on its hyperlink on the corresponding week.
We used the previously created folder, chapter01. We uploaded the bitmap image with the rendered 3D scene and the HTML file created with JQuiz (quiz0102.html).
We created a folder, chapter01, in which we uploaded all the files for both the matching composite pictures and the discovering sentences exercises. However, sometimes, we need to organize the exercises' files using additional folders.
For example, we can organize the files using the following structure:
chapter01
exercise01
exercise02
We can create two sub-folders, exercise01 and exercise02, in the chapter01 folder. This way, all the files related to the second exercise would have to be uploaded in the chapter01/exercise02 folder.
Note
The organization scheme chosen for the files will depend on the number of exercises and their relationship with your courses. However, in order to simplify your work, it is a good practice to keep all the files related to an exercise in a single folder. You can work with files in different folders; however, it will require you to work with complex paths in HTML code.
It is time to run the discovering sentences activity as a student.
1. Click on the course name (School) and switch your role to student.
2. Click on the Discovering sentences related to 3D scenes link on the corresponding week. The web browser will show the multiple-choice exercise.
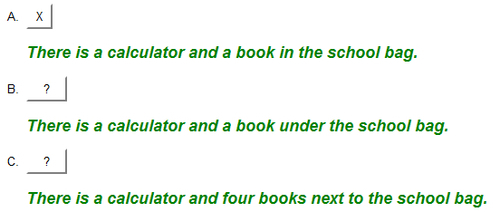
3. Click on the button above the right-hand side sentence, as shown in the next screenshot. Moodle will save the results and go back to the course.

4. Repeat the aforementioned steps (1 to 3) and then click on the button above one of the wrong sentences. Moodle will display a message allowing you to try again and will show an X on the previously clicked wrong answer, as shown in the next screenshot. However, it will save your first wrong attempt in order to calculate a fair score.

In this activity, we worked with sentences and a 3D scene. The objective was to select among several sentences the correct one describing the composite 3D image that was presented in the activity.
Why did we use 3D illustrations? We used them with the purpose of stimulating the motivation, because one of the features of these images is that they are realistic and children are attracted to them.
The activity consists of clicking on the sentence that explains the situation illustrated in the 3D scene. We applied the following concepts and resources in order to stimulate both the attention and the concentration:
Reading comprehension: The child has to read and understand each of the sentences
Listening comprehension: If the child can't read and understand the sentences alone, he/she can can run the exercise with the help of a therapist or a family member
Space notions: The sentences describe the location of the elements within a specific space
We can also use a gamepad instead of a mouse to solve the exercise. Its usage is easier and more attractive to those children who have manual dyspraxia.
We will use a USB gamepad, similar to the one used by the Sony Playstation 3 game console. We want to control the mouse pointer using the gamepad's right-hand side mini stick.
We have to configure the gamepad driver to map its left mini stick to the mouse pointer.
Note
The student needs a USB gamepad with 4 axes and 2 mini sticks in order to complete the following exercise. This example is based on Windows operating systems.
1. Connect the USB gamepad to the computer and install its driver if you haven't already done so.
2. Go to Control Panel | Game controllers. Select the gamepad in the game controllers list and click on Properties (some drivers show the generic name USB Network Joystick). A dialog box will show the buttons for the gamepad, the mini sticks axes and the Point of View Hat (POV), as shown in the following picture:
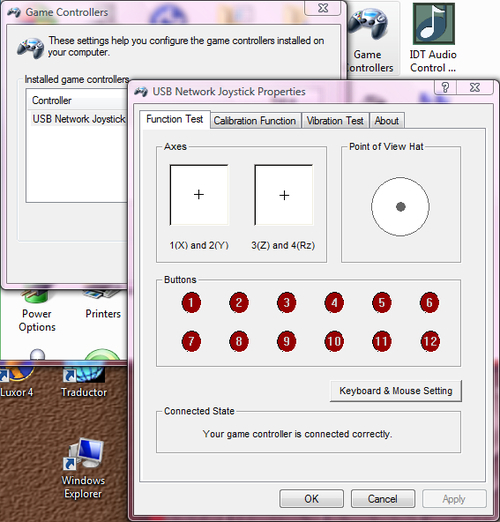
3. Disable the analog mode (the analog mode LED should be turned off). The gamepad must be in digital mode in order to allow us to map the right-hand side mini stick to the mouse's buttons.
4. You can test the relationship between the button numbers shown on the screen and the gamepad's pressed buttons using the aforementioned dialog box.
5. Click on the Keyboard & Mouse Setting button. A new dialog box will appear. It will allow you to change the gamepad mode and map its buttons to your mouse buttons.
6. Activate the checkboxes Keyboard & Mouse mode and POV to arrow.
7. Select Left mouse button in the Key 1 combo box.
8. The values should be similar to the ones shown in the next screenshot:
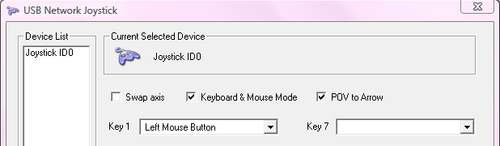
9. Click on OK.
10. Move the gamepad's left mini stick. The mouse pointer should change its position as the mini stick moves.
11. Control the gamepad's POV. The mouse pointer should change its position as it is pressed in different directions.
12. Press the gamepad's action button number 1 (on the upper right-hand side). It should work as the mouse's left button.
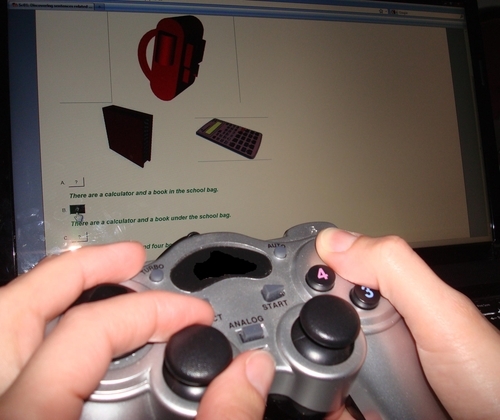
13. Run the discovering sentences activity as a student, following the previously explained steps. This time, use the gamepad instead of the mouse, as shown in the next image:
We configured the gamepad driver to map one of its mini sticks and one action button to the mouse pointer and the left mouse button. Therefore, you were able to execute the exercise using the gamepad without problems.
Children with manual dyspraxia have difficulties in coordinating and sequencing the movements for tasks such as gestures, pointing, and sign language. Therefore, the gamepad's sticks can help them to focus on moving a big mouse pointer on the screen and solve these exercises.
Note
Sometimes, a gamepad isn't the most convenient device. However, it is cheap and easy to find in any computer-related store. We can configure gamepads as previously explained and we will be able to offer students different ways to move the mouse pointer. The same technique can be used for joysticks and flightsticks.
The gamepad is a complex input device. It usually offers many action buttons and two mini sticks, as shown in the following image (top view):
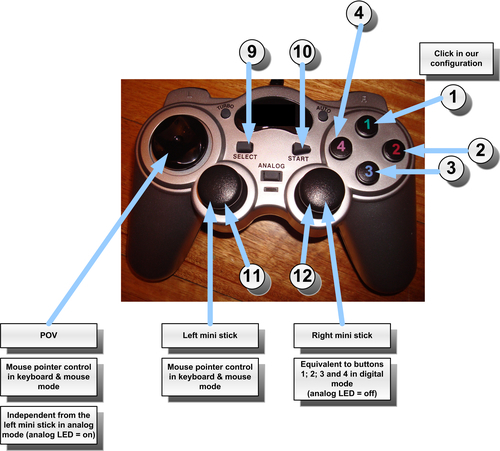
Each button number can be assigned to a different keyboard key or mouse button. Thus, we can take advantage of the 12 action buttons in this kind of gamepad.
Note
The action buttons 11 and 12 are triggered when the player pushes the mini stick (like clicking with a mouse button).
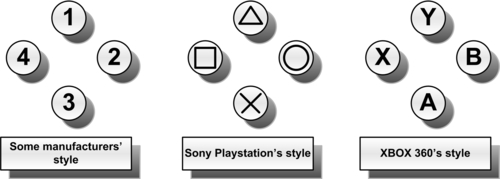
Depending on the manufacturer and the model, its four action buttons on the right-hand side can show different symbols or numbers, as shown in the following diagram:
You can also take advantage of the gamepad in the matching composite pictures exercise.
Configure the gamepad's mapping to simplify the drag-and-drop process used to solve the exercise.
Run the exercise as a student and create new versions of this exercise using different pictures, sentences, and color schemes.
Alice is a very nice girl. She loves going to school, studying and doing her Math homework. She also is keen on playing every afternoon with her friends at break time. Her favorite weekday is Friday. The reason is that she has Art classes.
Every Friday Alice is very happy because together with her Art teacher they paint, model pictures, and draw. This class, her teacher suggested they do a very entertaining comic strip. They read it in the classroom and after that, the teacher asked them to draw the characters.
Can you draw with Alice?
The creation of a comic strip can be a very complex task. Luckily, there are many web pages that offer very simple interactive environments to create strips using speech bubbles and characters. Besides, we can export them to image formats compatible with Moodle and use them in exciting exercises.
1. Open your default web browser and go to http:// stripgenerator.com. This web page allows us to create simple comic strips.
2. Click on Create New Strip!. A new web page will appear displaying three boxes for a comic strip and many characters.
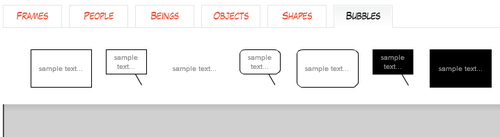
3. Click on the Bubbles button. A list of different bubbles will appear, as shown in the following screenshot:
4. Position the mouse pointer over the desired bubble's thumbnail. Drag-and-drop it to the first box.
5. Double-click inside the new bubble in the box in order to select the original text. Enter
Today is Halloween.6. Change the bubble's size and direction by dragging and dropping the different rectangles that appear, as shown in the next screenshot:

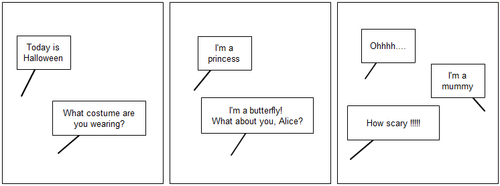
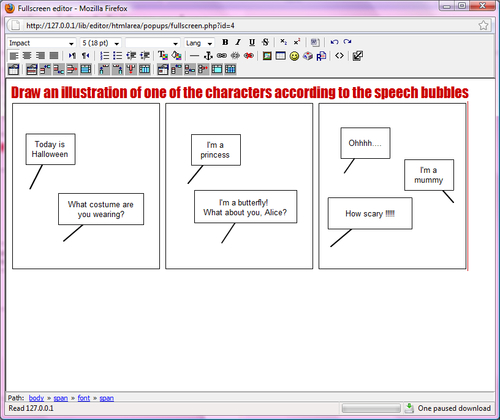
7. Repeat the aforementioned steps (4 to 6) to add speech bubbles and fill them with text using the following dialogues:
Box number 1
Today is Halloween
What costume are you wearing?
Box number 2
I'm a princess
I'm a butterfly! What about you, Alice?
Box number 3
Ohhhh….
I'm a mummy
How scary!!!!!
8. Click on the Finish button, located at the lower left-hand side corner.
9. Enter the desired title in the Title textbox,
Halloween, and then click on Next, last step, because we aren't interested in the thumbnail preview.10. The web page will offer you the opportunity to sign in or remain as an anonymous user. Click on Remain anonymous, then on Publish and the web page will create a bitmap image for the comic strip, as shown in the following image:
11. Position the mouse pointer on the center of the generated comic strip image. Right-click and select Save picture as in the context menu that appears.
12. Save the file as
halloweenstrip01.pngin the previously created folder,C:\School.
We created speech bubbles for a very simple comic strip with three boxes. We used the tools and the simple user interface provided by stripgenerator.com.
We could organize different kinds of speech bubbles, change their size, and enter the text to create a simple comic strip. Then, we exported the resulting image to the PNG format.
We now have to add the drawing and illustration according to speech bubbles to an existing Moodle course.
1. Log in to your Moodle server. Remember to click on the Return to my normal role button if necessary.
2. Click on the desired course name (School) and then on Turn editing on.
3. Edit the summary for a new week. Enter
Exercise 3in Summary and click on the Save changes button.4. Click on the Add an activity combo box for the selected week and choose Upload a single file.
5. Enter
Drawing with a digital penin Assignment name.6. Select
Impactin font and5 (18)in size—the first two combo boxes below Description.7. Click on the Font Color button (a T with six color boxes) and select your desired color for the text.
8. Click on the big text box below Description and enter
Draw an illustration of one of the characters according to the speech bubbles. This is the description of the student's goal for this exercise.9. Press Enter and click on the Insert Image button (a mountain or a tree, according to the Moodle version). A new web page will appear displaying the title Insert image.
11. Click on the Browse button. Browse to the folder that holds the comic strip image (
C:\School) and select the file to upload,halloweenstrip01.png. Then, click on Open and on the Upload button. The label File uploaded successfully will appear inside the File browser box.12. Next, click on the name of the recently uploaded file,
halloweenstrip01.png. The image will appear in the Preview box, as shown in the next screenshot:
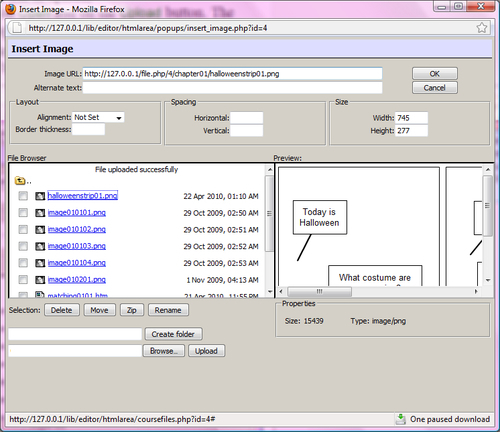
13. Enter
Halloween comic stripin Alternate text. This text will appear if the web browser is not capable of downloading the image. It is a required field for this page.14. Click on OK. The image will appear below the previously entered title. You can click on the Enlarge editor button (a diagonal arrow with two squares) and you will be able to view the title and the whole image, as shown in the next screenshot:
15. Close the enlarged editor's window.
16. Select
10MBin Maximum size. This is the maximum size for the file that each student is going to be able to upload as a result for this activity. However, it is very important to check the possibilities offered by your Moodle server with its Moodle administrator.17. Scroll down and click on the Save and display button. The web browser will show the description and the previously uploaded image with the speech bubbles.
We added the drawing exercise to a Moodle course. The students are now going to be able to upload results for this activity after reading the goals and clicking on its hyperlink in the corresponding week.
We used the previously created folder, chapter01. We uploaded the bitmap image with the speech bubbles organized in a comic strip (halloweenstrip01.png). We added a title with a customized font and color using the description's editor.
The Upload a single file activity allowed us to describe the goals for the activity using a paragraph and an image.
It is time to use a digital pen (also known as pen sketch) as a mouse to draw one of the characters according to the speech bubbles. We will solve the activity as a student.
We can also use a classic mouse to solve the exercise. However, a digital pen is more appropriate.
1. Connect the USB digital pen to the computer and install its driver if you haven't already done so.
2. Click on the course name (School) and switch your role to student.
3. Click on the Drawing with a digital pen link on the corresponding week. The web browser will show the activity's description and the comic strip. Try to imagine one of the characters.
4. Start Inkscape.
5. Click on the Draw calligraphic or brush strokes button in the toolbar. This function will allow you to draw using a digital pen or a mouse, as shown in the next screenshot:
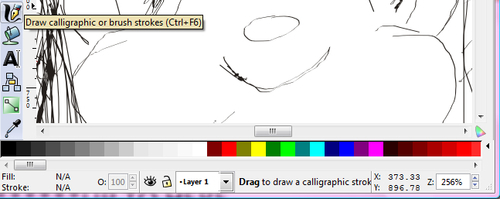
6. Now, imagine and draw the desired character on the tablet using the digital pen as a pencil, as shown in the next image:

7. Select File | Save from Inkscape's main menu. Save the file as
mycharacter.svgin your documents folder.8. Select File | Export Bitmap. A dialog box showing many export options will appear. Enter
90on the first dpi (Dots Per Inch) textbox.9. Click on the Drawing button, and then on Export. Inkscape will export the drawing in PNG format. The exported drawing will be
mycharacter.png.10. Go back to your web browser and click on Browse. Browse to the folder where you saved the drawing, select it, and click on Open.
11. Next, click on Upload this file and the drawing in PNG format will be uploaded to the Moodle server. A File uploaded successfully message will appear if the file finished the upload process without problems. Click on Continue.
12. Now, the previously uploaded drawing in PNG format will appear below the instructions with the name mycharacter.png.
13. Finally, you will be able to download and open the uploaded drawing by clicking on the link that appears at the bottom of the page. The web browser is going to offer the default application to view this kind of file, as shown in the next screenshot.

14. Don't forget to check the results for this exercise as previously learned.
In this activity, we created speech bubbles in a comic strip, using the online tools offered by stripgenerator.com. We asked the child to imagine and draw one of the characters of the comic strip using the digital pen.
This is an amusing and attractive activity for young children. They really enjoy working with a digital pen. We applied the following concepts and resources in order to stimulate both the attention and the concentration:
Reading comprehension: The child has to read and understand the text found in the speech bubbles.
Listening comprehension: If the child can't read and understand the comic strip alone, he/she can work with the help of a therapist or a family member, so that her/she can imagine the character.
Abstraction of situations
Creativity
Why did we use the digital pen? This device offers a great variety of resources to perform artistic activities. Furthermore, it is another resource for those children who have manual dyspraxia.
Children enjoy tracing drawings! Another alternative for solving this exercise is to trace an existing drawing using the digital pen.
You can do it by placing the model drawing on the tablet. You can then use the digital pen to draw over the existing lines, as shown in the next image:

Your new activities are really engaging! You want to add a new matching pictures activity. However, you don't want to use text, just pictures on both sides.
Create a new matching composite pictures activity using JMatch. Add three 3D scenes on the left-hand side and three 2D pictures on the right-hand side. This way, the student will have to match the 3D scene with the corresponding equivalent 2D picture.
Use Inkscape to combine the 2D clipart and the 3D models for each picture. Create four pairs of images, combining the following elements:
A pencil and a compass
A piece of paper and an eraser
A paint brush and colored pencils
A pencil case and a school bag
Create a new Moodle exercise and run it as a student. Then, run the activity using a digital pen as a mouse to drag-and-drop the images to match each 2D picture with its corresponding 3D scene.
Note
You can apply all the techniques learned in this chapter with many other Hot Potatoes exercises. We worked with JMatch and JQuiz to create visual exercises. However, this application offers many other interesting modules. The creation of other kinds of activities using Hot Potatoes is described in depth in Moodle 1.9 for Teaching 7-14 Year Olds: Beginner's Guide by Mary Cooch, Packt Publishing.
1. You can define a background color for a PNG image in a JMatch activity using:
a. HTML tags
b. A simple menu option
c. A color context menu
2. You can define a font for a sentence in JMatch activity using:
a. A simple combo box
b. A font context menu
c. HTML tags
3. JMatch allows you to insert pictures with the:
a. SVG format
b. PNG format
c. TARGA format
4. In order to add a JMatch activity using many images to a Moodle course, you must:
a. Upload the HTML file (.html) generated by JMatch and all the image files
b. Upload only the HTML file (.html) generated by JMatch
c. Upload only the JMT file (.jmt) saved by JMatch
5. In order to test an exercise as a student, you can:
a. Click on the Student picture
b. Restart the Moodle server
c. Click on the Switch role to combo box and choose Student
6. You can find and rotate pictures of rendered 3D models in:
a. Google 3D warehouse
b. Microsoft Office Office Online Clip Art & Media
c. Inkscape 3D warehouse
7. You can map a gamepad's mini stick to the:
a. Mouse wheel
b. Digital pen
c. Mouse pointer
In this chapter, we have learned how to:
Create rich activities using 2D and 3D clipart
Use Inkscape to manipulate many different picture formats and export the results to the PNG format supported by both Moodle and Hot Potatoes
Use JMatch and JQuiz to create visual exercises and then upload and run them on the Moodle server
Take advantage of free 2D clipart, 3D models, and comic strip generation tools
Work with general-purpose hardware in order to create activities that are even more engaging for children with special education needs
Now that we have learned how to create rich matching pictures activities, we're ready to prepare exercises to evaluate and work with abstraction and sequencing disabilities, which is the topic of the next chapter.
