


 Download code from GitHub
Working with JavaScript Development Tools
The recipes we'll be seeing here are as follows:
- Installing Visual Studio Code for development
- Extending Visual Studio Code
- Adding Fira Code font for better editing
- Adding npm for package management
- Doing version control with Git
- Formatting your source code with Prettier
- Documenting your code with JSDoc
- Adding code quality checks with ESLint
- Adding Flow for data types checks
Introduction
JavaScript has gone beyond a simple tool for adding small effects or behaviors to web pages, and has now become one of the world's most-used languages, applied to all sorts of developments. Given the complexity and variety of packages, libraries, and frameworks these days, you wouldn't start working without a full set of tools, and in this chapter we will aim to set up a good development environment, so you can work in a most efficient fashion.
Let's start by setting up some tools that will come in handy for all our JS development. It's been said that a bad craftsman blames his tools, so let's avoid even a hint of that by making some good choices!
Installing Visual Studio Code for development
The first tool we'll need is an Integrated Development Environment (IDE), or at least a powerful code editor. Some people make do with a simple editor, possibly something like vi or Notepad, but in the long run, all the wasted time in doing everything by hand doesn't pay. There are many options, such as (in alphabetic order) Atom, Eclipse, IntelliJ IDEA, Microsoft Visual Studio, NetBeans, Sublime Text, WebStorm, and Visual Studio Code. Personally, I've opted for the latter, though of course you may work perfectly well with any of the others.
Visual Studio Code (VSC) is basically a source code editor, developed by Microsoft in 2015. Despite the similar name, it's not related to Microsoft's more powerful IDE, Visual Studio. The editor is free and open source, and the latest version is (currently) 1.29.1, dated November 2018, though new releases come out monthly. It can be used for JS development, but also for other languages, so if you wanted to, say, do your server-side coding in PHP, you could perfectly well use VSC for that too. However, from our point of view, the fact that VSC ships with IntelliSense for basically all the frontend languages (JS, TypeScript, JSON, HTML, CSS, LESS, SASS) is a good selling point. See https://code.visualstudio.com/docs/editor/intellisense for more on this.
A nice touch is that VSC is written in JS, based on Node, and packaged for the desktop by using the Electron framework. (We'll get to see these topics in Chapter 13, Creating a Desktop Application with Electron.) This automatically lets you use VSC in Linux, macOS, and Windows, which is a good advantage if you work in a team and not everybody shares the same development environment preferences.
In the past, I've worked extensively with Eclipse, Microsoft Visual Studio, and NetBeans. However, nowadays I work exclusively with VSC. Why do I prefer it? My reasons (your mileage may vary!) include the following:
- Availability for multiple operating systems: I personally use it on Mac and Linux all the time, and sometimes on Windows
- Actively developed and maintained: With updates (including bug fixes) provided on a regular basis
- Very good performance: VSC feels quite speedy
- IntelliSense support: Out of the box for all JS needs
- Extensions available through plugins: These become integrated into your work flow, adding new functionality
- Integrated debugging: As we'll see in Chapter 5, Testing and Debugging Your Server
- Integrated source code management: Through Git (see the Doing version control with Git section, later)
- Integrated terminal: You can run commands or launch processes without leaving VSC
On the other hand, there are also some disadvantages; the main two being as follows:
- The interface, configuration, and design of plugins usually varies from one to another, so you'll have to deal with frequent inconsistencies.
- VSC has no knowledge of projects or the links between tools needed to create, for example, a React frontend application that communicates with a Node backend server. VSC at most recognizes folders, but how you organize them, and where you place your pieces of code, is totally up to you.
How to do it...
How do you install VSC? Instructions are different for each operating system, and may vary over time, so we'll just point you to downloading the appropriate package for your system at https://code.visualstudio.com/download, and following the correct platform-specific instructions at https://code.visualstudio.com/docs/setup/setup-overview. For Linux distributions, instead of downloading and installing some package by yourself, there may be another way out. For example, with OpenSUSE, there exists a repository that will allow you to install and update VSC through OpenSUSE itself; check out https://en.opensuse.org/Visual_Studio_Code for instructions on this, or https://code.visualstudio.com/docs/setup/linux for even more distribution-specific instructions.
How it works...
After having installed it, open VSC and try out its settings to start configuring things the way you prefer, see the following screenshot. The bottom-left gear menu provides access to several related items, such as keyboard shortcuts, the color scheme, and icon set. If you have worked with VSC in the past, you'll have access to more recent files and folders:

Configuring VSC is sort of unusual, but maybe to be expected, due to its JS origins. Basically, as seen in the following screenshot, you get a split screen, showing all the available configuration items (more than four hundred!) on the left, in JSON format, and you may change their values by writing new ones on the right side. If you mouse over any setting, you'll get to see the possible values, and you can select a new one just by clicking on it:

One extra advantage of VSC has to do with updates. It will periodically check to see whether there's a new available version, and it will let you download and install it. (On the other hand, if you use Linux and install VSC through a repository, it may get updated automatically, without you even having to confirm it.) After that, you'll get an information screen with the changes for the last month; as seen in the following screenshot:

Configuration of VSC goes beyond what we have just mentioned; see the following sections to find out more ways of extending its power and making it better for you to use.
Extending Visual Studio Code
VSC includes many out-of-the-box features, with which you can actually get started and working with no problems. By means of extensions, you can add support for languages, debugging, code quality, and many more functions. Configuring visual aspects is also provided, and you can change VSC's theme, shortcuts, and general preferences. However, you will want to add even more functionality to VSC, and that's where extensions (plugins) come in.
How to do it...
Extensions are optional installable additions to VSC, which provide specific new functions. Installing new extensions is a breeze. You can bring up the menu of all the available extensions by going to View | Extensions in the main menu (where you can also find a keyboard shortcut for it) or by clicking the Extensions icon at the bottom of the Activities bar at the left of VSC.
You will first get the list of currently installed extensions, as demonstrated in the following screenshot:

If you want, you can disable any specific extension: click on it at the left side of the screen, and then click on Disable at the right. You can also fully uninstall any extension, and it's a sure bet that you'll do this quite a lot; the only way to find out if an extension works for you is by experimenting! Take a look at the following screenshot:

Finding new extensions is also a breeze. You can either go to the VSC Marketplace at https://marketplace.visualstudio.com/ as seen in the preceding screenshot or directly search from within VSC, by typing in the search box, as seen in the following screenshot. I'd recommend paying attention to the total number of installs (the higher the better) and the rating from 1 to 5 stars (also, the higher the better). We'll be using several extensions; see, for example, in this chapter the Formatting your source code with Prettier and Documenting your code with JSDoc sections; there will be more in later chapters:

Extensions are updated automatically, and you won't have to do much. Periodically, I'd recommend having a look at your list of extensions, and possibly searching again for new ones; there have been cases of new versions deprecating old ones, but with a new name, so an update wouldn't have worked. And, finally, be ready to experiment and find for yourself which extensions make you tick!
Adding Fira Code font for better editing
If you want to try a topic that can quickly lead to a (warm? heated?) discussion, say out loud that the best font for programming is such and such, and just wait! I don't want to start any arguments, but I can certainly recommend a font that can make your JS code look much better, and become more readable.
The key to a better font hinges on the concept of ligatures. In typography, a ligature occurs when two or more letters are joined, becoming a single character. OK, the proper technical word would be glyph, but let's not make it more complicated than needed!
In JS, there are many symbols that are written as two or more characters, just because no other way is available. For example, the greater than or equal to symbol is typed as >=, which doesn't look as good as the mathematical symbol ≥, does it? Other combinations are <= (less than or equal to), => (for arrow functions, which we'll meet in Chapter 2, Using Modern JavaScript Features), the binary shift operators << and >>, the equality operators == and === (plus the corresponding != and !==), and more.
How to do it...
While there are many monospaced fonts (meaning all characters have the same width, which helps with onscreen alignment and indentation), there are not so many that also provide ligatures. In my case, after experimenting with many, I can recommend using Fira Code, available online at https://github.com/tonsky/FiraCode. This font provides lots of ligatures, not only for JS but for other programming languages as well. Take a look at following illustration for all the possibilities:

https://raw.githubusercontent.com/tonsky/FiraCode/master/showcases/all_ligatures.png
Download the latest version (1.206, as of December 2018) and install it, according to the standard procedures for your operating system. Afterwards, you'll have to change a pair of VSC settings, as seen earlier in this chapter; just add the following lines, and save your configuration:
"editor.fontFamily": "'Fira Code', 'Droid Sans Mono', 'Courier New'",
"editor.fontLigatures": true,
.
.
.
The first line defines what font you want to use (and in CSS style, I also provided alternatives, just in case I took my settings to a different machine where Fira Code wasn't available) and the second line tells VSC to enable onscreen ligatures.
How it works...
After doing the changes in the previous section, when you open VSC, you'll be able to see code as in the following screenshot:

Note that you don't have to do anything at all when you type in your code. If you want an arrow ligature, you will have to type the two characters = and > as usual; the way they will look on screen is just a result of font rendering. Similarly, if you want to search for an arrow, seek =>, as that's what will be saved to disk.
Now we have got VSC configured to our liking, let's start more packages to help with source code management and other features.
Adding npm for package management
When working either on the frontend or the backend, you will surely want to use already available libraries and frameworks, and that begets an interesting problem: how to deal with those packages' own needs, more packages, which themselves need even more packages, and so on. In Chapter 3, Developing with Node, we'll work with Node, but we need to get ahead of ourselves, and install npm (the package manager of Node) now to be able to set up several other tools.
npm also is the name of a gigantic repository of software, at https://www.npmjs.com/, which counts has around 600,000 packages you can observe that in the following screenshot and it grows at a daily rate of more than 500 packages, according to counts such as at http://www.modulecounts.com/, a place that tracks several well-known code repositories:

It can be safely said that it's probably impossible that a modern JS application doesn't require at least one, and more likely several, packages from npm, so adding a package manager will be mandatory; let's see a couple of them.
How to do it...
To get npm, you must first install Node, and that will come in handy for Chapter 3, Developing with Node, and the following ones. We won't copy the details here from the web (see https://docs.npmjs.com/getting-started/installing-node) but we can resume as follows:
- Install Node, either by downloading it and then doing a manual installation (the most common way for Windows) or by adding an appropriate repository and then using your Linux package manager to install Node (that's the way I do this in my OpenSuse machines). Be careful, and pick the Long Term Support (LTS) version, recognizable by its even major number (such as 8.x.x, for example), unless you feel adventurous enough to use the latest development version, and you don't mind risks such as things stopping working!
- Verify that Node is correctly installed. At the command line, type node -v and get the current version; in my machine, it's v9.7.1, but this will surely change by the time you try this out, and yes, I'm feeling adventurous and not using the LTS version!
- Check if npm is up to its latest version with the npm -v command. If it's not (refer to the following code snippet), you'll have to update it:
> npm -v
5.5.1

    ──────────────────────
   │                                    │
   │  Update available 5.5.1 → 5.7.1    │
   │     Run npm i -g npm to update     │
   │                                    │
    ──────────────────────
If you are working without a package manager (meaning you can get updates for your software automatically, without having to go and look for each on a one-by-one basis) you could also be interested in installing nvm, though it's optional; for more on this, see https://github.com/creationix/nvm.
How it works...
We'll be back to using npm in several places in this text. You'll have to use it in order to install several packages (some of which appear in this very chapter, such as JSDoc or Prettier) and later on we'll see how to configure an application, so all its required packages will be available and up to date.
Creating a project with npm
If you pick any empty directory and just install a package, you'll get some warnings related to a missing file, and you'll also find some new elements:
~ > md sample
~ > cd sample
~/sample > npm install lodash
npm WARN saveError ENOENT: no such file or directory, open '/home/fkereki/sample/package.json'
npm notice created a lockfile as package-lock.json. You should commit this file.
npm WARN enoent ENOENT: no such file or directory, open '/home/fkereki/sample/package.json'
npm WARN sample No description
npm WARN sample No repository field.
npm WARN sample No README data
npm WARN sample No license field.

+ lodash@4.17.11
added 1 package from 2 contributors and audited 1 package in 1.945s
found 0 vulnerabilities

~/sample> dir
total 4
drwxr-xr-x 3 fkereki users  20 Mar 15 11:39 node_modules
-rw-r--r-- 1 fkereki users 313 Mar 15 11:39 package-lock.json
What's happening here? Let's explain the results step by step, and then add whatever's missing. When you install modules, they (plus all their dependencies, and their dependencies' dependencies, and so on) are placed by default in a node_modules directory. This is a good measure, because all the code that will go in that directory is code that you haven't actually written, and that will eventually get updated by npm without your direct control. We can verify that quickly by going to the newly created directory and checking out its contents:
~/sample> cd node_modules
~/sample/node_modules> dir
total 36
drwxr-xr-x 3 fkereki users 20480 Mar 15 11:39 lodash
But, how would you control what packages (and their versions) are to be installed? That's the point of the missing package.json file, which, among other things that we'll meet later in the book, lets you specify what packages you want. (We'll also use it to specify parameters for other tools, such as Babel or ESLint, as we'll see later in this chapter.) You can create this file by hand, but it's easier to use npm init and just answer a few questions. This will create the required file, which will eventually describe all the dependencies of your project, plus other features (such as build or deploy procedures) that we'll see later:
~/sample> npm init
This utility will walk you through creating a package.json file.
It only covers the most common items, and tries to guess sensible defaults.
See `npm help json` for definitive documentation on these fields
and exactly what they do.
Use `npm install <pkg>` afterwards to install a package and
save it as a dependency in the package.json file.

Press ^C at any time to quit.
package name: (sample) simpleproject
version: (1.0.0)
description: A simple project to show package.json creation
entry point: (index.js)
test command:
git repository:
keywords:
author: Federico Kereki
license: (ISC)
About to write to /home/fkereki/sample/package.json:

{
  "name": "simpleproject",
  "version": "1.0.0",
  "description": "A simple project to show package.json creation",
  "main": "index.js",
  "scripts": {
    "test": "echo \"Error: no test specified\" && exit 1"
  },
  "author": "Federico Kereki",
  "license": "ISC"
}
Is this ok? (yes)
Let's quickly go over each field, but remember these are only the basic ones; you can find more complete, official descriptions at https://docs.npmjs.com/files/package.json. As we skipped some answers, not all fields are present in the produced project file, but you can add everything later:
- name: Whatever name you want to assign to the project; by default, the directory's name.
- version: The semantic version number for your project. You would update this number whenever you create a newer version. See https://semver.org/ for more information on semantic versioning.
- description: A simple description of your project, used by the npm search command.
- main: The name of the primary entry point to your program. It's common to use index.js for this.
- test command: A command (script) that you would run in order to execute unit tests for your code. We'll also be seeing this later in the book.
- git repository: If you are going to use source control, here you would give the details for it. We'll get to this in the Doing version control with Git section later in this chapter.
- scripts: This is an object that contains script commands you can run with npm run; for example, you could write scripts to build a project, deploy it, check it for code quality rules, and so on.
- author: Who created the project.
- license: Whatever license you want to assign to your project; this is meant for other people to know how they may use your package (permissions, restrictions) should you allow it. You can find a (quite long!) list of possible licenses at https://spdx.org/licenses/, and be careful when selecting one; there are legal aspects involved!
But, where are the packages? Let's see about that in the next section.
Installing packages for different purposes
There are two ways of installing npm packages: globally or locally:
- If you plan to use the package from the command line, install it globally; for example, npm install prettier -g would install the prettier command so you can use it anywhere. (We'll see more of prettier in the Formatting your source code with Prettier section.) You may need to run the command as an administrator, or with sudo.
- Otherwise, if you just need the package for your project, install it locally.
Installing packages locally can also be done in more than one way:
- If you need the package for your own project, then you install it as a production package with npm install lodash --save
- Instead, if you need the package in order to build your project, but not as a part of the final, produced code, install it as a development package with npm install eslint --save-dev
After running these two latter commands, if you inspect package.json, you'll notice that some lines were added:
~/sample> cat package.json
{
  "name": "simpleproject",
  "version": "1.0.0",
  "description": "A simple project to show package.json creation",
  "main": "index.js",
  "scripts": {
    "test": "echo \"Error: no test specified\" && exit 1"
  },
  "author": "Federico Kereki",
  "license": "ISC",
  "dependencies": {
    "lodash": "^4.17.5"
  },
  "devDependencies": {
    "prettier": "^1.11.1"
  }
}
The dependencies and devDependencies entries refer to the production and development packages you require. If you are writing your software, and you decide you need a new package, there are two ways of doing this:
- Add an entry to package.json, in the proper place, and then do npm install to get it
- Alternatively, use npm install with either --save or --save-dev, and package.json will be updated by npm
If you need specific versions, you will have to learn about semantic versioning. Version rules may become complex, and we'll just see the main ones; check https://docs.npmjs.com/files/package.json#dependencies and https://github.com/npm/node-semver#versions for a complete description:
|
4.5.6
|
Version 4.5.6, and none other |
|
^4.0.0
|
Latest compatible version 4.x.x |
|
^4.2.0
|
Latest compatible version 4.2.x |
|
>5.6.7
|
A version greater than 5.6.7 |
|
~8.7.6
|
A version approximately equivalent to 8.7.6; should be 8.7.x |
There's more...
Maintaining your packages and updating them is an important task, and if you are part of a development team, with people possibly even in different regions or countries, it becomes mandatory that everybody should be working with the same configuration at all times. If the project is very dynamic (meaning that packages will be added, removed, or updated frequently), npm can become a bit slow and also produce consistency or security problems; to address this situation, in 2016 Facebook released a new package manager, yarn. (See https://yarnpkg.com/en/.)
A key feature is that you can seamlessly replace npm with yarn, and just start using the latter, because it shares the same feature set (apart from some minor differences) while working in a faster, more reliable, and more secure way. For instance, yarn can manage downloads in parallel, and even work with cached packages, so it would even be possible to do some updates without a connection to the internet!
Installation is quite simple, and a bit ironic. Use npm with npm install -g yarn, and from that moment on, you will be able to use yarn directly and forget npm. See https://yarnpkg.com/en/docs/install for more complete documentation on the installation process.
Doing version control with Git
In modern software development, it goes without saying that you will need some SCM (Software Configuration Management) software to keep track of all changes in your code. Today, the most-used tool is Git, which we'll also be using. Git was created in 2005 by Linus Torvalds (who also created Linux!) for the development of the Linux kernel; not a small task considering that its source is over 25 million lines of code!
We won't be delving into how Git works, what commands to use, and so on, because that would be material enough for a book! We will focus on how to use Git with VSC. This is rather simple because not only was VSC written with Git access in mind, but there are also some extensions that can make work even easier, so you don't have to memorize lots of commands and options; take look at following illustration:
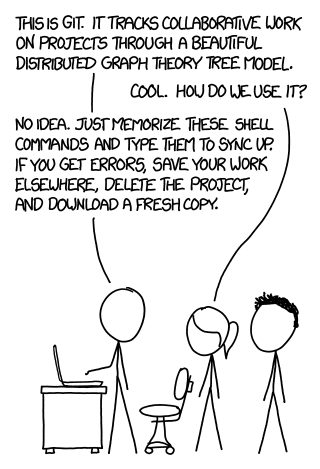
This XKCD comic is available online at https://xkcd.com/1597/.
How to do it...
Personally, I have a GitHub account, and I decided to use it for the code for this book. This is not only a way of being able to quickly share all the code with readers, but also (and quite important!) a way to ensure I wouldn't be able to accidentally lose my work, which I am quite capable of doing! See https://github.com/fkereki/modernjs for all code. I will assume that you have an appropriate Git server, and that you are able to initialize a project, connect it to the server, and so on. Also, VSC needs Git to be pre-installed in your machine; if you haven't installed it, checkout https://git-scm.com/book/en/v2/Getting-Started-Installing-Git to get started.
VSC provides full access to commands through its Command Palette.... as seen in the following screenshot. You can search for a command there, and after clicking on it, VSC will ask for all possible parameters one at the time, so you don't have to do them by memory:

Committing code is quite frequent, so you can directly do it by clicking on the source control icon (third from the top, at the left) and entering the commit message that you want. In that screen, you can also revert local changes and more; mouse over to get all possible features.
There's more...
There is a single Git extension that I would recommend for VSC: look for GitLens (also called Git Supercharged) and install it. This extension provides access to practically all Git information.
Take a look at the following screenshot:

Among other features, GitLens provides the following:
- A lens, to show recent commit and author information
- An explorer, to browse repositories and file histories
- A blame annotation, to show who made the last change to a line, as with git blame
- The ability to search for commits in different ways, and much more
For more detailed information, see http://gitlens.amod.io/. Pay particular attention to customization at https://github.com/eamodio/vscode-gitlens/#configuration, because most features can be twiddled to better suit your work style. You can access them through the standard Settings page (look for all configuration items whose names start with GitLens), or by opening the Command Palette and looking for GitLens: Open Settings, which will open a special setup screen as seen in the following screenshot:

Now that we have a development environment set up, and we have chosen and installed a minimum set of tools, let's go further and add some optional, but highly recommended, additional packages that will help produce better code.
Formatting your source code with Prettier
If you work in a project with several other developers, sooner or later arguments as to how code should be formatted are certain to pop up, and they can keep going for a long time! Deciding upon a single standard for your source code is really needed, but if formatting depends on each person, it's certain that you will end with even more "standards" than team members! Take a look at the following illustration. Something you don't want to have in a team is extra friction or aggravation, and style arguments can take forever:

This XKCD comic is available online at https://xkcd.com/927/.
The problem is worsened by the fact that modern JS projects will not only include JS source code, but also possibly TypeScript or Flow (see the Adding Flow for data types checks section later), JSX (see Chapter 6, Developing with React), JSON, HTML, CSS or SCSS, and even more.
After having tried out many source code formatters, I finally decided to use Prettier for all purposes. Prettier is an opinionated code formatter, which supports all the languages that I listed previously, reformatting source code according to a set of rules, thus ensuring that all code conforms to an expected style.
What does it mean, that it is opinionated? Many (or most) code formatters provide a very big set of configuration options that you can twiddle in order to get the code to look as you wish. On the other hand, Prettier has its own set of rules, with little leeway for configuration, and thus cuts short all arguments. Moreover, you can get it to work seamlessly with VSC, meaning that whenever you save the code, it will get reformatted.
Let's see some examples of this opinionating. Working with arrow functions (which we shall see in more detail in the Defining functions section of Chapter 2, Using Modern JavaScript Features), if the function has a single parameter, enclosing it in parentheses is optional:
const plus1= (x)=> 1+x
However, Prettier decides that in this case the parentheses should not be included. Also, note that it added several spaces for clarity, as well as the (optional) missing semicolon:
const plus1 = x => 1 + x;
Similarly, if you use promises (we'll see them in the Doing async calls compactly section of Chapter 2, Using JavaScript Modern Features) you may write something such as the following:
fetch('http://some.url').then((response) => {
    return response.json();
  }).then((myJson) => {
    console.log(myJson);
  }).catch(e => { /* something wrong */ });
However, it will get reformatted to the more usual following code:
fetch("http://some.url")
    .then(response => {
        return response.json();
    })
    .then(myJson => {
        console.log(myJson);
    })
    .catch(e => {
        /* something wrong */
    });
Note how each .then(...) was pushed to a separate line, according to the most common style for JS. The formatting rules that Prettier applies are derived from usual practice, and it wouldn't be possible to list them all here. But, what really matters is that by using this tool, you may be certain that your whole team will be working in the same fashion.
How to do it...
Installing Prettier is very simple: you should just add the VSC extension, which you can find by searching for Prettier Code Formatter; as a check, the latest version (as of December, 2018) is 1.16.0, and the author is Esben Petersen. The plugin itself can be found in the VSC marketplace, at https://marketplace.visualstudio.com/items?itemName=esbenp.prettier-vscode. You can also install it globally (as we saw in the Installing packages for different purposes section earlier in this chapter) to be able to use it in scripts or from the command line with npm or yarn. See https://prettier.io/docs/en/install.html, and I'd recommend doing that.
There is one change you will want to make in the VSC preferences. Go to File | Preferences | Settings, and add the following line to your user configuration, so every file will be formatted automatically whenever you save it:
"editor.formatOnSave": true,
.
.
.
If you'd rather only apply Prettier to JS, then you should use this instead:
"[javascript]": {
    "editor.formatOnSave": true
},
.
.
.
As we said, Prettier is pretty opinionated as to how code should look, and there are only a few options that you can change. The available options can be set in package.json (which makes it easier for all the team to share them) in a "prettier" key. Some of the possibilities (meaning the ones you might want to modify) are as follows:
|
Option
|
Default value
|
Meaning
|
|
arrowParens
|
false
|
For arrow functions with a single parameter, whether to enclose it in parentheses. |
|
bracketSpacing
|
true
|
Include a space after the opening brace of an object, and before the closing brace. |
|
jsxBracketSameLine
|
false
|
If true, the ending > for a multiline JSX element will be added at the end of the last line; if false, it will be on a separate line. |
|
printWidth
|
80
|
Maximum line size. |
|
semi
|
true
|
Add semicolons at the end of every line, even if not needed. |
|
singleQuote
|
false
|
Use single quotes for strings. |
|
tabWidth
|
2
|
Indentation size. |
|
trailingComma
|
none
|
Specify whether to add trailing commas or not, wherever possible. Options are none (never add such commas), es5 (add them where ES5 allows, as in arrays or objects), or all (add them even to function arguments). |
|
useTabs
|
false
|
Use tabs for indentation. |
Personally, the only ones I use are tabWidth:4 and printWidth:75, but the latter is for the sake of the book only, not for other work. My package.json thus includes the following; I have it just before the dependencies key, but you can place it elsewhere:
"prettier": {
    "tabWidth": 4,
    "printWidth": 75
},
.
.
.
You can also use Prettier independently of VSC, and in that case the configuration options should go in a .prettierrc file. See https://prettier.io/docs/en/cli.html and https://prettier.io/docs/en/configuration.html for more on this.
Finally, if you want to avoid Prettier code formatting for some reason or another, you can do the following:
- Avoid all formatting for a given file by adding its path and name to a .prettierignore text file at the project root
- Avoid reformatting a single sentence by preceding it with a // prettier-ignore comment
For the latter option, remember to use the appropriate comment style depending on the source code language. For example, in an HTML file's you would use <!-- prettier-ignore -->, while in CSS, it should be /* prettier-ignore */, and for JSX, {/* prettier-ignore */}.
How it works...
There are two ways of using Prettier. The first is to configure VSC to automatically format the code whenever you save it; following the instructions we saw earlier when we installed VSC, change the editor Format on save option to true, and you'll be set. Of course, you can also format the code whenever you want by right clicking and selecting the Format Document option.
You can also use Prettier online. Go to https://prettier.io/playground/, paste your code into the left panel, and you'll instantly get a formatted version in the right panel. Take a look at the following screenshot for an example of code reformatting:

If you want to experiment with the few available options, click Show Options at the bottom-left corner, and you'll be able to configure Prettier, according to what we saw in the previous section, see the following screenshot:

When preparing the code for this book, I set the right margin at 75, because that's what will fit in a printed page. I also set indentation to 4 characters, because I find it clearer. Other than that, I left everything as the default; fewer style arguments to deal with this way!
Documenting your code with JSDoc
A good rule for maintainability is that code should be documented. JSDoc (or JSDoc3; the name reflects the current version, 3.6.0) is an API documentation generator, which can produce an HTML website with full documentation for your code. You only have to add comments (in a specific format) to your source code, and JSDoc will scan the code to pick them up and generate the documentation. Let's first see how those comments should be written, and then turn to a tool to make the work easier with VSC.
How to do it...
The main idea for JSDoc is to document your APIs, including functions, classes, methods, and whatnot. JSDoc comments are expected to precede the code that is being documented. Comments start with /** and end with */; the double star distinguishes them from normal comments.
The following code block shows the simplest possible example, how you might document a function by providing a description of its goals and arguments:
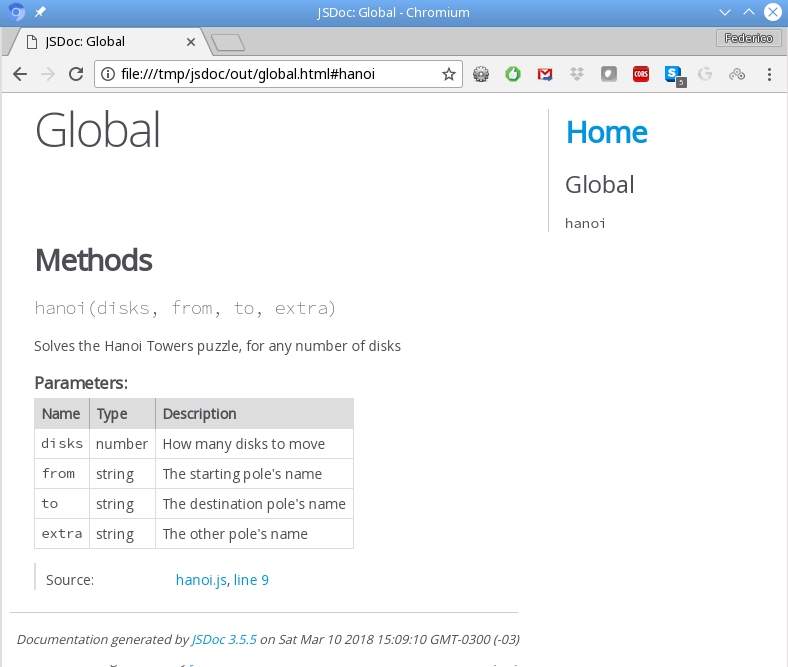
/**
 * Solves the Hanoi Towers puzzle, for any number of disks.
 *
 * @param {number} disks - How many disks to move
 * @param {string} from - The starting pole's name
 * @param {string} to - The destination pole's name
 * @param {string} extra - The other pole's name
 */
const hanoi = (disks, from, to, extra) => {
    if (disks === 1) {
        console.log(`Move disk 1 from post ${from} to post ${to}`);
    } else {
        hanoi(disks - 1, from, extra, to);
        console.log(`Move disk ${disks} from post ${from} to post ${to}`);
        hanoi(disks - 1, extra, to, from);
    }
};
The @param notation is a block tag, which introduces a code item, in this case, a parameter of the function. A (partial) list of common tags is as follows:
| @author | The developer's name. |
| @class | Defines a class. |
| @constructor | Marks a function a constructor. |
| @copyright, @license | Legal details. |
| @deprecated | Marks a function or method as deprecated. |
| @exports | An exported module member. |
| @function, @callback | Defines a function, and more specifically, one used as a callback. |
| @param | What parameters are expected. The data type may be added within braces. |
| @property or @prop | A property of an object. |
| @return or @returns | What the function or method returns. |
| @throws or @exception | An exception thrown by a method. |
| @version | A library's version. |
There are more tags, such as @private, to identify a member as private, but since JS doesn't really provide that feature, I skipped it. Other tags are more specific, and you may not use them, such as @generator or @mixin. If you want to see the complete list of possible block (and also a couple of inline) tags, checkout http://usejsdoc.org/index.html.
How it works...
Writing this sort of comment can quickly become tedious, but you can use the Document This VSC extension to automatically generate the needed template, which you will then complete. You can find the extension at https://marketplace.visualstudio.com/items?itemName=joelday.docthis,but it's simpler to install it through VSC itself: search for Document This and it will quickly appear.
After including this extension, if you right-click on the code, a new command will appear that will automatically generate (mostly empty) comments for you to complete.
As for generating the automatic documentation, checkout http://usejsdoc.org/about-commandline.html; we won't go into this because it's fairly straightforward. You can configure JSDoc, and also change the template it uses for the generated page; see http://usejsdoc.org/about-configuring-jsdoc.html and http://usejsdoc.org/about-configuring-default-template.html for these topics. See the following screenshot:
Of course, documenting a single function won't be your use case! But for our purposes, it's enough; for normal use, you'd get an index with links to every class, function, and so on, fully documenting your code.
You have set up your working environment, and you are able to write documented, well-indented code in the latest version of JS, but that's still not proof against some error that may be committed, so let's now look into ways of enhancing your code more deeply.
Adding code quality checks with ESLint
JS is a very potent language, but there's also great potential for misuse. For example, most people would agree that if a==b is true, and b==c is also true, then a==c should be true too, but because of the data type conversion rules that JS applies for the == operator, you have the following:
""==0   // true
0=="0"  // true
""=="0" // false!?
Another example follows; what does this very simple function return?
function mystery() {
    return
    {
        something: true
    }
}
If you answered an object, you would have been bitten by a missing semicolon. This code is actually interpreted by JS as follows:
function mystery() {
    return ;
    {
        something: true;
    }
}
Note the semicolon after return. This function returns undefined, and something is interpreted as a label for an expression that happens to be true; bad! These kinds of situations are common enough, and even if you know what you are doing, getting at least a warning about possible problems with your code could help root out a bug, and that's the kind of warning that ESLint produces.
How to do it...
Linters are a class of programming tools that analyze your source code, and raise warnings and errors about poor-quality uses or constructs that could even imply bugs. We are going to use ESLint, created by Nicholas Zakas in 2013; the tool's current version is 5.10.0, as of December, 2018.
ESLint is based upon pluggable rules, which may be enabled or disabled at will, or configured according to your specific preferences. (You could even develop your own rules, but that's beyond the scope of this book.) There are also bundles of rules that let you avoid having to individually configure dozens of distinct rules.
Installing ESLint is quite simple, and just requires doing the following:
npm install eslint eslint-config-recommended --save-dev
Then, you will have to add ESLint options to the package.json configuration file; let's get into this. First, we'll add a script to apply ESLint to our complete source directory (which has only a single file at this time!) with npm run eslint:
"scripts": {
    "build": "babel src -d out",
    "eslint": "eslint src",
    "test": "echo \"Error: no test specified\" && exit 1"
}
We must also specify some configuration for ESLint itself. We'll add a completely new section for this:
"eslintConfig": {
    "parserOptions": {
        "ecmaVersion": 2017,
        "sourceType": "module"
    },
    "env": {
        "browser": true,
        "node": true
    },
    "extends": "eslint:recommended",
    "rules": {}
}
Let's go item by item:
- parserOptions lets you specify what JS version you want to process (I'm going with 2017, for ES8), and whether you are going to use modules (I'm indicating this, in advance of what we'll see in the Organizing code in modules section of Chapter 2, Using Modern JavaScript Features).
- env lets you specify the environment(s) you are going to work with, and that really means that some global variables will be assumed to exist. In this case, I'm saying I will be working both with code for browsers and for Node, but there are plenty more possible environments; checkout the Specifying Environments section at https://eslint.org/docs/user-guide/configuring. Later on, we will be adding some more environments, for example, for unit testing.
- extends lets you select a predefined set of rules, which you will later be able to modify to suit your tastes. I'm going with the recommended set; you can read more about it at https://github.com/kunalgolani/eslint-config. The available sets of rules change only whenever the ESlint major version changes, so they are reasonably stable. Furthermore, the recommended set represents a usually agreed upon list of rules, so before you start tinkering with specific changes, give it a try as is. The complete set of rules is available at https://eslint.org/docs/rules/, and the recommended rules can be found at https://github.com/eslint/eslint/blob/master/conf/eslint-recommended.js.
- rules lets you change some of the rules to better suit your style. We'll see good reasons for this soon.
How it works...
If we use npm run eslint as is, we will get the following result:
> npm run eslint
> simpleproject@1.0.0 eslint /home/fkereki/sample
> eslint src

/home/fkereki/sample/src/eight_queens.js
 32:1 error Unexpected console statement no-console
> X 1 problem (1 error, 0 warnings)
The standard rules do not allow using console.log(...), since you don't probably want to include them in your shipped application; this is the no-console rule at https://eslint.org/docs/rules/no-console. We can enable or disable rules on a global or local basis. If we approve of this console.log(...), we must then disable the no-console rule locally. We'll do this by adding a comment to the source code, just before the problem line:
// eslint-disable-next-line no-console
console.log(`Solutions found: ${solutions}`);
If you had used // eslint-disable no-console, you would have disabled the no-console rule for the whole source file; // eslint-disable with no further specification would have disabled all rules for the file. After this, if you use npm run eslint, you'll get no errors.
Now, let's set a global rule. Some people don't like the solutions++ line because not everybody feels comfortable with the ++ operator; there's a no-plusplus rule for this, at https://eslint.org/docs/rules/no-plusplus, but by default it's not enabled in the recommended set, so we will enable it globally by adding to the rules section in package.json:
"rules": {
    "no-plusplus": "error"
}
After this, if you run ESLint, you'll get a new error, and the developer that supposedly did it should fix the code:
/home/fkereki/sample/src/eight_queens.js
  13:9  error  Unary operator '++' used  no-plusplus
The possible configurations for a rule are "off" (if you want to disable it), "warn" (if you want to get a warning, but accept it), and "error" (rejecting the file). Some rules accept extra configurations, but those are specific; you'll have to read the rule documentation in order to learn about the possible changes. See https://eslint.org/docs/rules/no-empty for a specific example with the no-empty rule, which disallows empty blocks of code but has an extra option to allow them in catch statements.
Deciding what rules to enable or disable is something that usually happens at the beginning of a project, and it can be expected that some new rule changes will happen over time. In any case, no matter what you pick, ideally you should work only with "off" and "error"; if developers get used to warnings, they finally end up not paying attention to them, and that can be bad! Get used to the whole list of rules at https://eslint.org/docs/rules/.
Finally, all projects will be using an out/ directory for the output file, which you would then distribute. If you care to look at some files within it, you don't need ESLint protesting about possible errors in generated code. To avoid this, you can add a small section to the package.json file:
"eslintIgnore": ["**/out/*.js"],
There's more...
Of course, all these checks are very good, but if you had to stop working, save everything, and run a separate tool each time you wanted to check for problems in your code, it would soon become unbearable. However, with VSC you can add a plugin to interact with ESLint in real time. Go to the extensions view and search for ESLint; you should find and install an extension, currently at version 1.7.2 (March 2018), written by Dirk Baeumer.
Once you install this extension, errors will be shown on screen with a wavy red underline, and if you mouse over them, you'll get an explanation about the failed rule. Take a look at the for an example:

There are very few configuration items for ESLint; the only one I use is "eslint.alwaysShowStatus": true, so the status bar will show whether ESLint is enabled or not.
Adding Flow for data types checks
Let's finish this chapter by considering a tool that turns JS into a (sort of) new language, a typed one. One of the characteristics of JS is being untyped; for example, a variable can hold, or a function may return, any kind of value, there's no way to declare what type(s) should be stored in a variable or returned from a function. In this section, we will add Flow, a tool developed by Facebook, which allows for data type controls.
We will be getting into how to fully use Flow in the Adding types section of Chapter 2, Using JavaScript Modern Features, but let me give you a preview of what we expect; then, we'll get to install all the needed packages, and afterwards we'll go into more details. Imagine you wrote a highly complex function to add two numbers:
function addTwoNumbers(x, y) {
    return x + y;
}

console.log(addTwoNumbers(22, 9)); // 31, fine
However, since JS won't check types and has some conversion rules, the following two lines would also work:
console.log(addTwoNumbers("F", "K")); // FK - oops...
console.log(addTwoNumbers([], {}));   // [object Object]! more oops...
You could, on principle, add a lot of data type checking code to your function to verify typeof(x)==="number", but that can become a chore. (Although, of course, for some cases it's the only solution.) However, many errors can be detected before even running the code, as would happen here.
If you modify the function to include data type declarations, Flow will be able to detect the two wrong uses, and you will be able to solve the situation before even running the code:
function addTwoNumbers(x: number, y: number) {
    return x + y;
}
Basically, that's all there is! Of course, there are many details about what data types are available, defining new ones, using interfaces, and much more, but we'll get to that in the next chapter. For the time being, let's just install it with the promise that we will learn more about its use very shortly.
How to do it...
Installing Flow depends on whether you are working with Babel (as would be the case for client-side browser code) or not (as you would do for server-side code). We will see how to deal with Node starting in Chapter 3, Developing with Node; here, we'll just consider Babel.
To start, execute the following command to get the needed Flow packages, including the Babel and ESLint ones:
npm install flow-bin babel-preset-flow eslint-plugin-flowtype --save-dev
Then, add the "flow" preset for Babel in package.json:
"babel": {
    "presets": ["env", "flow"]
},
Add some lines to the ESLint configuration, also in package.json:
"eslintConfig": {
    "parserOptions": {
        "ecmaVersion": 2017,
        "sourceType": "module"
    },
    "env": {
        "browser": true,
        "node": true
    },
    "parser": "babel-eslint",
    "extends": ["eslint:recommended", "plugin:flowtype/recommended"],
    "plugins": ["flowtype"],
    "rules": {
        .
        .
        .
    }
},
Add a "flow" script in package.json:
"scripts": {
    "build": "babel src -d out",
    "flow": "flow",
    .
    .
    .
},
Finally, perform npm run flow init to initialize Flow, only once, to create a .flowconfig file with information that will be used by the Flow process. (See https://flow.org/en/docs/config/ for more information on this file.)
How it works...
With the configuration you just wrote, you are set! Just do npm run flow whenever you start to work, to run a background process that will check your code incrementally and let you know about possible data type problems. However, you may even skip this step if you work with VSC; see the next section.
Configuring Flow's linting
Even though ESLint has us well covered for avoiding JS bad coding practices, it doesn't do much with regard to data types, but Flow can help us in this area.
There is a set of rules you can apply, and you will configure them through the .flowconfig file we mentioned in the previous section:
[lints]
all=warn
unsafe-getters-setters=off
The first line, all=warn, is a catch-all, which defines the standard setting for all rules; possible values are off, warn, and error. After that, you can specify settings for individual rules; for example, in the preceding code I decided to ignore warnings about unsafe getters or setters. Some rules are as follows:
- sketchy-null, which applies whenever you test the value of a variable that could be false (for example, zero) but also null or undefined, in the context of something like if (x) { ... }. This warning is meant to remind you that the variable might have a value you weren't considering.
- sketchy-null-bool, sketchy-null-number, sketchy-null-string, and sketchy-null-mixed are more granular versions of sketchy-null, and apply only to the specified data types.
- unclear-type warns about using any, Object, or Function as data type annotations.
- untyped-import and untyped-type-import warn you against importing from untyped files.
- unsafe-getters-setters advises against using getters or setters, because of their side effects.
You should also set include_warnings to true, in order to be able to get warnings in VSC:
[options]
include_warnings=true
Whatever settings you include in .fontconfig will apply globally to your entire project, but you can also change them on a file-by-file basis, or even for a single line of code, along the same lines as with ESLint. You can disable warnings for a line by using a flowlint-next-line comment and listing the rules you want to change:
// flowlint-next-line sketchy-null-bool:off
if (x) {
    // ...
}
There is another comment, flowlint, that applies to the complete file. Checkout https://flow.org/en/docs/linting/flowlint-comments/ for more possibilities.
Using Flow within VSC
As we have been doing previously, we'll want to see Flow problems right in VSC. There's a simple solution: just go to Extensions, search for Flow Language Support, and install the package; that's it!
You'll also have to change two settings for VSC:
- Add "flow.useNPMPackagedFlow": true and this will remove the need to do npm run flow at the beginning; the extension will do that on its own
- Add "javascript.validate.enable": false to avoid clashes between Flow's syntax and JS
After that, you will be able to see Flow errors onscreen; see following screenshot for an example: