


 Download code from GitHub
Chapter 1: First Steps with CMake
There is something magical about turning source code into a working application. It is not only the effect itself, that is, a working mechanism that we devise and bring to life, but the very process or act of exercising the idea into existence.
As programmers, we work in the following loop: design, code, and test. We invent changes, we phrase them in a language that the compiler understands, and we check whether they work as intended. To create a proper, high-quality application from our source code, we need to meticulously execute repetitive, error-prone tasks: invoking the correct commands, checking the syntax, linking binary files, running tests, reporting issues, and more.
It takes great effort to remember each step every single time. Instead, we want to stay focused on the actual coding and delegate everything else to automated tooling. Ideally, this process would start with a single button, right after we have changed our code. It would be smart, fast, extensible, and work in the same way across different OSs and environments. It would be supported by multiple Integrated Development Environments (IDEs) but also by Continuous Integration (CI) pipelines that test our software after a change is submitted to a shared repository.
CMake is the answer to many such needs; however, it requires a bit of work to configure and use correctly. This is not because CMake is unnecessarily complex but because the subject that we're dealing with here is. Don't worry. We'll undergo this whole learning process very methodically; before you know it, you will have become a building guru.
I know you're eager to rush off to start writing your own CMake projects, and I applaud your attitude. Since your projects will be primarily for users (yourself included), it's important for you to understand that perspective as well.
So, let's start with just that: becoming a CMake power user. We'll go through a few basics: what this tool is, how it works in principle, and how to install it. Then, we'll do a deep dive on the command line and modes of operation. Finally, we'll wrap up with the purposes of different files in a project, and we'll explain how to use CMake without creating a project at all.
In this chapter, we're going to cover the following main topics:
- Understanding the basics
- Installing CMake on different platforms
- Mastering the command line
- Navigating the project files
- Discovering scripts and modules
Technical requirements
You can find the code files that are present in this chapter on GitHub at https://github.com/PacktPublishing/Modern-CMake-for-Cpp/tree/main/examples/chapter01.
To build examples provided in this book always use recommended commands:
cmake -B <build tree> -S <source tree>
cmake --build <build tree>
Be sure to replace placeholders <build tree> and <source tree> with appropriate paths. As a reminder: build tree is the path to target/output directory, source tree is the path at which your source code is located.
Understanding the basics
The compilation of C++ source code appears to be a fairly straightforward process. Let's take a small program, such as a classic hello.cpp application, as follows:
chapter-01/01-hello/hello.cpp
#include <iostream>
int main() {
  std::cout << "Hello World!" << std::endl;
  return 0;
}
Now, all we need to do to get an executable is to run a single command. We call the compiler with the filename as an argument:
$ g++ hello.cpp -o a.out
Our code is correct, so the compiler will silently produce an executable binary file that our machine can understand. We can run it by calling its name:
$ ./a.out
Hello World!
$
However, as our projects grow, you will quickly understand that keeping everything in a single file is simply not possible. Clean code practices recommend that files should be kept small and in well-organized structures. The manual compilation of every file can be a tiresome and fragile process. There must be a better way.
What is CMake?
Let's say we automate building by writing a script that goes through our project tree and compiles everything. To avoid any unnecessary compilations, our script will detect whether the source has been modified since the last time we ran it (the script). Now, we'd like a convenient way to manage arguments that are passed to the compiler for each file – preferably, we'd like to do that based on configurable criteria. Additionally, our script should know how to link all of the compiled files in a binary or, even better, build whole solutions that can be reused and incorporated as modules in bigger projects.
The more features we will add the higher the chance that we will get to a full-fledged solution. Building software is a very versatile process and can span multiple different aspects:
- Compiling executables and libraries
- Managing dependencies
- Testing
- Installing
- Packaging
- Producing documentation
- Testing some more
It would take a very long time to come up with a truly modular and powerful C++ building application that is fit for every purpose. And it did. Bill Hoffman at Kitware implemented the first versions of CMake over 20 years ago. As you might have already guessed, it was very successful. It now has a lot of features and support from the community. Today, CMake is being actively developed and has become the industry standard for C and C++ programmers.
The problem of building code in an automated way is much older than CMake, so naturally, there are plenty of options out there: Make, Autotools, SCons, Ninja, Premake, and more. But why does CMake have the upper hand?
There are a couple of things about CMake that I find (granted, subjectively) important:
- It stays focused on supporting modern compilers and toolchains.
- CMake is truly cross-platform – it supports building for Windows, Linux, macOS, and Cygwin.
- It generates project files for popular IDEs: Microsoft Visual Studio, Xcode, and Eclipse CDT. Additionally, it is a project model for others such as CLion.
- CMake operates on just the right level of abstraction – it allows you to group files in reusable targets and projects.
- There are tons of projects that are built with CMake and offer an easy way to include them in your project.
- CMake views testing, packaging, and installing as an inherent part of the build process.
- Old, unused features get deprecated to keep CMake lean.
CMake provides a unified, streamlined experience across the board. It doesn't matter if you're building your software in an IDE or directly from the command line; what's really important is it takes care of post-build stages as well. Your Continous Integration/Continous Deployment (CI/CD) pipeline can easily use the same CMake configuration and build projects using a single standard even if all of the preceding environments differ.
How does it work?
You might be under the impression that CMake is a tool that reads source code on one end and produces binaries on the other – while that's true in principle, it's not the full picture.
CMake can't build anything on its own – it relies on other tools in the system to perform the actual compilation, linking, and other tasks. You can think of it as the orchestrator of your building process: it knows what steps need to be done, what the end goal is, and how to find the right workers and materials for the job.
This process has three stages:
- Configuration
- Generation
- Building
The configuration stage
This stage is about reading project details stored in a directory, called the source tree, and preparing an output directory or build tree for the generation stage.
CMake starts by creating an empty build tree and collecting all of the details about the environment it is working in, for example, the architecture, the available compilers, the linkers, and the archivers. Additionally, it checks whether a simple test program can be compiled correctly.
Next, the CMakeLists.txt project configuration file is parsed and executed (yes, CMake projects are configured with CMake's coding language). This file is the bare minimum of a CMake project (source files can be added later). It tells CMake about the project structure, its targets, and its dependencies (libraries and other CMake packages). During this process, CMake stores collected information in the build tree such as system details, project configurations, logs, and temp files, which are used for the next step. Specifically, a CMakeCache.txt file is created to store more stable variables (such as paths to compilers and other tools) and save time during the next configuration.
The generation stage
After reading the project configuration, CMake will generate a buildsystem for the exact environment it is working in. Buildsystems are simply cut-to-size configuration files for other build tools (for example, Makefiles for GNU Make or Ninja and IDE project files for Visual Studio). During this stage, CMake can still apply some final touches to the build configuration by evaluating generator expressions.
Note
The generation stage is executed automatically after the configuration stage. For this reason, this book and other resources often refer to both of these stages when mentioning "configuration" or "generation" of a buildsystem. To explicitly run just the configuration stage, you can use the cmake-gui utility.
The building stage
To produce the final artifacts specified in our project, we have to run the appropriate build tool. This can be invoked directly, through an IDE, or using the CMake command. In turn, these build tools will execute steps to produce targets with compilers, linkers, static and dynamic analysis tools, test frameworks, reporting tools, and anything else you can think of.
The beauty of this solution lies in the ability to produce buildsystems on demand for every platform with a single configuration (that is, the same project files):

Figure 1.1 – The stages of CMake
Do you remember our hello.cpp application from the Understanding the basics section? CMake makes it really easy for you to build it. All we need is the following CMakeLists.txt file next to our source and two simple commands, cmake -B buildtree and cmake --build buildtree, as follows:
chapter01/01-hello/CMakeLists.txt: Hello world in the CMake language
cmake_minimum_required(VERSION 3.20)
project(Hello)
add_executable(Hello hello.cpp)
Here is the output from the Dockerized Linux system (note that we'll discuss Docker in the Installing CMake on different platforms section):
root@5f81fe44c9bd:/root/examples/chapter01/01-hello# cmake -B buildtree.
-- The C compiler identification is GNU 9.3.0
-- The CXX compiler identification is GNU 9.3.0
-- Check for working C compiler: /usr/bin/cc
-- Check for working C compiler: /usr/bin/cc -- works
-- Detecting C compiler ABI info
-- Detecting C compiler ABI info - done
-- Detecting C compile features
-- Detecting C compile features - done
-- Check for working CXX compiler: /usr/bin/c++
-- Check for working CXX compiler: /usr/bin/c++ -- works
-- Detecting CXX compiler ABI info
-- Detecting CXX compiler ABI info - done
-- Detecting CXX compile features
-- Detecting CXX compile features - done
-- Configuring done
-- Generating done
-- Build files have been written to: /root/examples/chapter01/01-hello/buildtree
root@5f81fe44c9bd:/root/examples/chapter01/01-hello# cmake --build buildtree/
Scanning dependencies of target Hello
[ 50%] Building CXX object CMakeFiles/Hello.dir/hello.cpp.o
[100%] Linking CXX executable Hello
[100%] Built target Hello
All that's left is to run it:
root@68c249f65ce2:~# ./buildtree/Hello
Hello World!
Here, we have generated a buildsystem that is stored in the buildtree directory. Following this, we executed the build stage and produced a final binary that we were able to run.
Now you know what the end result looks like, I'm sure you will be full of questions: what are the prerequisites to this process? What do these commands mean? Why do we need two of them? How do I write my own project files? Do not worry – these questions will be answered in the following sections.
Getting Help
This book will provide you with the most important information that is relevant to the current version of CMake (at the time of writing, this is 3.20). To provide you with the best advice, I have explicitly avoided any deprecated and no longer recommended features. I highly recommend using, at the very least, version 3.15, which is considered "the Modern CMake." If you require more information, you can find the latest, complete documentation online at https://cmake.org/cmake/help/.
Installing CMake on different platforms
CMake is a cross-platform, open-source software written in C++. That means you can, of course, compile it yourself; however, the most likely scenario is that you won't have to. This is because precompiled binaries are available for you to download from the official web page at https://cmake.org/download/.
Unix-based systems provide ready-to-install packages directly from the command line.
Note
Remember that CMake doesn't come with compilers. If your system doesn't have them installed yet, you'll need to provide them before using CMake. Make sure to add the paths to their executables to the PATH environment variable so that CMake can find them.
To avoid solving tooling and dependency problems while learning from this book, I recommend choosing the first installation method: Docker.
Let's go through different environments on which CMake can be used.
Docker
Docker (https://www.docker.com/) is a cross-platform tool that provides OS-level virtualization, allowing applications to be shipped in complete packages, called containers. These are self-sufficient bundles that contain a piece of software with all of its libraries, dependencies, and tools required to run it. Docker executes its containers in lightweight environments that are isolated one from another.
This concept makes it extremely convenient to share whole toolchains, which are necessary for a given process, configured and ready to go. I can't stress enough how easy things become when you don't need to worry about minuscule environmental differences.
The Docker platform has a public repository of container images, https://registry.hub.docker.com/, that provides millions of ready-to-use images.
For your convenience, I have published two Docker repositories:
swidzinski/cmake:toolchain: This contains the curated tools and dependencies that are necessary to build with CMake.swidzinski/cmake:examples: This contains the preceding toolchain and all of the projects and examples from this book.
The first option is for readers who simply want a clean-slate image ready to build their own projects, and the second option is for hands-on practice with examples as we go through the chapters.
You can install Docker by following the instructions from its official documentation (please refer to docs.docker.com/get-docker). Then, execute the following commands in your Terminal to download the image and start the container:
$ docker pull swidzinski/cmake:examples
$ docker run -it swidzinski/cmake:examples
root@b55e271a85b2:root@b55e271a85b2:#
Note that all of the examples are available in the directories matching this format:/root/examples/examples/chapter-<N>/<M>-<title>.
Windows
Installing in Windows is straightforward – simply download the version for 32 or 64 bits. You can pick a portable ZIP or MSI package for Windows Installer.
With the ZIP package, you will have to add the CMake bin directory to the PATH environment variable so that you can use it in any directory without any such errors:
'cmake' is not recognized as an internal or external command, operable program or batch file.
If you prefer convenience, simply use the MSI installer:
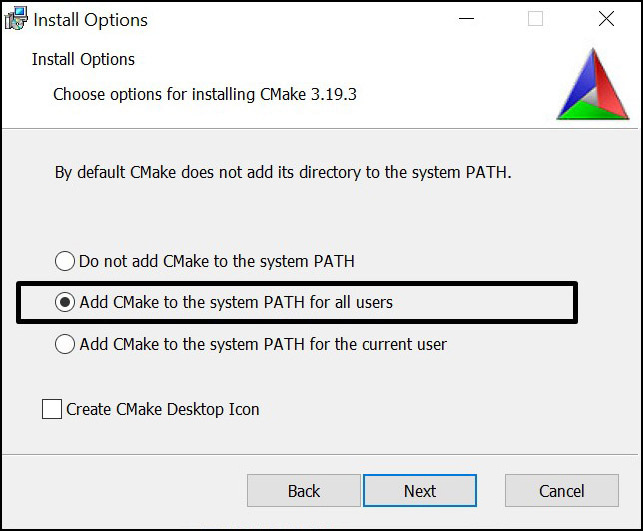
Figure 1.2 – The installation wizard can set up the PATH environment variable for you
As I mentioned earlier, this is open-source software, so it is possible to build CMake yourself. However, first, you will have to get a binary copy of CMake on your system. So, why use other build tools if you have your own, right? This scenario is used by CMake contributors to generate newer versions.
On Windows, we also require a build tool that can finalize the build process started by CMake. A popular choice here is Visual Studio, for which the Community Edition is available for free from Microsoft's website: https://visualstudio.microsoft.com/downloads/.
Linux
Getting CMake on Linux is the same as getting any other popular package. Simply use your package manager from the command line. Packages are usually kept up to date with fairly recent versions. However, if you are after the latest version, you can download the installation script from the website:
The script for Linux x86_64
$ wget -O - https://github.com/Kitware/CMake/releases/download/v3.20.0/cmake-3.20.0-linux-x86_64.sh | bash
The script for Linux aarch64
$ wget -O - https://github.com/Kitware/CMake/releases/download/v3.20.0/cmake-3.20.0-Linux-aarch64.sh | bash
The package for Debian/Ubuntu
$ sudo apt-get install cmake
The package for Red Hat
$ yum install cmake
macOS
This platform is also strongly supported by CMake developers. The most popular choice of installation is through MacPorts:
$ sudo port install cmake
Alternatively, you can use Homebrew:
$ brew install cmake
Building from the source
If all else fails – or if you're on a special platform – download the source from the official website and compile it yourself:
$ wget https://github.com/Kitware/CMake/releases/download/v3.20.0/cmake-3.20.0.tar.gz
$ tar xzf cmake-3.20.0.tar.gz
$ cd cmake-3.20.0
$ ./bootstrap
$ make
$ make install
Building from source is relatively slow and requires more steps. However, by doing it this way, you're guaranteed to use the latest version of CMake. This is especially apparent when compared to packages that are available for Linux: the older the version of the system, the fewer updates it gets.
Now that we have our CMake readily installed, let's learn how to use it!
Mastering the command line
The majority of this book will teach you how to prepare CMake projects for your users. To cater to their needs, we need to thoroughly understand how users interact with CMake in different scenarios. This will allow you to test your project files and ensure they're working correctly.
CMake is a family of tools and consists of five executables:
cmake: This is the main executable that configures, generates, and builds projects.ctest: This is the test driver program used to run and report test results.cpack: This is the packaging program used to generate installers and source packages.cmake-gui: This is the graphical wrapper aroundcmake.ccmake: This is the console-based GUI wrapper aroundcmake.
CMake
This binary provides a few modes of operation (also called actions):
- Generating a project buildsystem
- Building a project
- Installing a project
- Running a script
- Running a command-line tool
- Getting help
Generating a project buildsystem
This is the first step required to build our project. Here are a few options in terms of how the CMake build action can be executed:
The syntax of the generation mode
cmake [<options>] -S <path-to-source> -B <path-to-build>
cmake [<options>] <path-to-source>
cmake [<options>] <path-to-existing-build>
We'll discuss these options in the upcoming sections. Right now, let's focus on choosing the right form of command. One important feature of CMake is the support for out-of-source builds or the production of artifacts in a separate directory. In contrast to tools such as GNU Make, this ensures the source directory is kept clean from any build-related files and avoids polluting our Version Control Systems (VCS) with unnecessary files or ignore directives. This is why it's best to use the first form of command of generation mode: specify the path to source tree with -S option followed by path to the directory of the produced buildsystem specified with -B:
cmake -S ./project -B ./build
The preceding command will generate a buildsystem in the ./build directory (or create it if it's missing) from the source in the ./project directory.
We can skip one of the arguments and cmake will "guess" that we intended to use the current directory for it. However, watch out. Skipping both will get you an in-source build, and that is messy.
Not Recommended
Do not use the second or third form of the cmake <directory> command. This is because it can produce a messy in-source build (we'll learn how to block that in Chapter 3, Setting Up Your First CMake Project). As hinted in the syntax snippet, the same command behaves differently if a previous build already exists in <directory>: it will use the cached path to the sources and rebuild from there. Since we often invoke the same commands from the Terminal command history, we might get into trouble here: before using this form, always check whether your shell is currently working in the right directory.
Examples
Build in the current directory, but take the source from one directory up (note that -S is optional):
cmake -S ..
Build in the ./build directory, and use a source from the current directory:
cmake -B build
Options for generators
As discussed earlier, you can specify a few options during the generation stage. Selecting and configuring a generator decides which build tool from our system will be used for building, what build files will look like, and what the structure of the build tree will be.
So, should you care? Luckily, the answer is often "no." CMake does support multiple native buildsystems on many platforms; however, unless you have a few of them installed at the same time, CMake will correctly select it for you. This can be overridden by the CMAKE_GENERATOR environment variable or by specifying the generator directly on the command line, such as in the following:
cmake -G <generator-name> <path-to-source>
Some generators (such as Visual Studio) support a more in-depth specification of a toolset (compiler) and platform (compiler or SDK). Additionally, these have respective environment variables that override the default values: CMAKE_GENERATOR_TOOLSET and CMAKE_GENERATOR_PLATFORM. We can specify them directly, as follows:
cmake -G <generator-name>
      -T <toolset-spec> -A <platform-name>
      <path-to-source>
Windows users usually want to generate a buildsystem for their favorite IDE. On Linux and macOS, it's very common to use Unix Makefiles or Ninja generators.
To check which generators are available on your system, use the following command:
cmake --help
At the end of the help printout, you should observe a full list like this one:
There are plenty of generators available on Windows 10
The following generators are available on this platform:
Visual Studio 16 2019
Visual Studio 15 2017 [arch]
Visual Studio 14 2015 [arch]
Visual Studio 12 2013 [arch]
Visual Studio 11 2012 [arch]
Visual Studio 10 2010 [arch]
Visual Studio 9 2008 [arch]
Borland Makefiles
NMake Makefiles
NMake Makefiles JOM
MSYS Makefiles
MinGW Makefiles
Green Hills MULTI
Unix Makefiles
Ninja
Ninja Multi-Config
Watcom Wmake
CodeBlocks - MinGW Makefiles
CodeBlocks - NMake Makefiles
CodeBlocks - NMake Makefiles JOM
CodeBlocks - Ninja
CodeBlocks - Unix Makefiles
CodeLite - MinGW Makefiles
CodeLite - NMake Makefiles
CodeLite - Ninja
CodeLite - Unix Makefiles
Eclipse CDT4 - NMake Makefiles
Eclipse CDT4 - MinGW Makefiles
Eclipse CDT4 - Ninja
Eclipse CDT4 - Unix Makefiles
Kate - MinGW Makefiles
Kate - NMake Makefiles
Kate - Ninja
Kate - Unix Makefiles
Sublime Text 2 - MinGW Makefiles
Sublime Text 2 - NMake Makefiles
Sublime Text 2 - Ninja
Sublime Text 2 - Unix Makefiles
Options for caching
CMake queries the system for all kinds of information during the configuration stage. This information is cached in CMakeCache.txt in the build tree directory. There are a few options that allow you to manage that file more conveniently.
The first thing that is at our disposal is the ability to prepopulate cached information:
cmake -C <initial-cache-script> <path-to-source>
We can provide a path to the CMake script, which (only) contains a list of set() commands to specify variables that will be used to initialize an empty build tree.
The initialization and modification of existing cache variables can be done in another way (for instance, when creating a file is a bit much to only set a few variables). You can simply set them in a command line, as follows:
cmake -D <var>[:<type>]=<value> <path-to-source>
The :<type> section is optional (it is used by GUIs); you can use BOOL, FILEPATH, PATH, STRING, or INTERNAL. If you omit the type, it will be set to the type of an already existing variable; otherwise, it will be set to UNINITIALIZED.
One particularly important variable contains the type of the build: for example, debug and release. Many CMake projects will read it on numerous occasions to decide things such as the verbosity of messages, the presence of debugging information, and the level of optimization for created artifacts.
For single-configuration generators (such as Make and Ninja), you'll need to specify it during the configuration phase with the CMAKE_BUILD_TYPE variable and generate a separate build tree for each type of config: Debug, Release, MinSizeRel, or RelWithDebInfo.
Here's an example:
cmake -S . -B build -D CMAKE_BUILD_TYPE=Release
Note that multi-configuration generators are configured during the build stage.
We can list cache variables with the -L option:
cmake -L[A][H] <path-to-source>
Such a list will contain cache variables that aren't marked as ADVANCED. We can change that by adding the A modifier. To print help messages with variables - add the H modifier.
Surprisingly, custom variables that are added manually with the -D option won't be visible unless you specify one of the supported types.
The removal of one or more variables can be done with the following option:
cmake -U <globbing_expr> <path-to-source>
Here, the globbing expression supports the * wildcard and any ? character symbols. Be careful when using these, as you might break things.
Both of the -U and -D options can be repeated multiple times.
Options for debugging and tracing
CMake can be run with a multitude of options that allow you to peek under the hood. To get general information about variables, commands, macros, and other settings, run the following:
cmake --system-information [file]
The optional file argument allows you to store the output in a file. Running it in the build tree directory will print additional information about the cache variables and build messages from the log files.
In our projects, we'll be using message() commands to report details of the build process. CMake filters the log output of these based on the current log level (by default, this is STATUS). The following line specifies the log level that we're interested in:
cmake --log-level=<level>
Here, level can be any of the following: ERROR, WARNING, NOTICE, STATUS, VERBOSE, DEBUG, or TRACE. You can specify this setting permanently in the CMAKE_MESSAGE_LOG_LEVEL cache variable.
Another interesting option allows you to display log context with each message() call. To debug very complex projects, the CMAKE_MESSAGE_CONTEXT variable can be used like a stack. Whenever your code enters a specific context, you can add a descriptive name to the stack and remove it when leaving. By doing this, our messages will be decorated with the current CMAKE_MESSAGE_CONTEXT variable like so:
[some.context.example] Debug message.
The option to enable this kind of log output is as follows:
cmake --log-context <path-to-source>
We'll discuss logging in more detail in Chapter 2, The CMake Language.
If all else fails – and we need to use the big guns – there is always trace mode. This will print every command with the filename and exact line number it is called from alongside its arguments. You can enable it as follows:
cmake --trace
Options for presets
As you might have gathered, there are many, many options that users can specify to generate a build tree from your project. When dealing with the build tree path, generator, cache, and environmental variable, it's easy to get confused or miss something. Developers can simplify how users interact with their projects and provide a CMakePresets.json file that specifies some defaults. To learn more, please refer to the Navigating the project files section.
To list all of the available presets, execute the following:
cmake --list-presets
You can use one of the available presets as follows:
cmake --preset=<preset>
These values override the system defaults and the environment. However, at the same time, they can be overridden with any arguments that are explicitly passed on the command line:
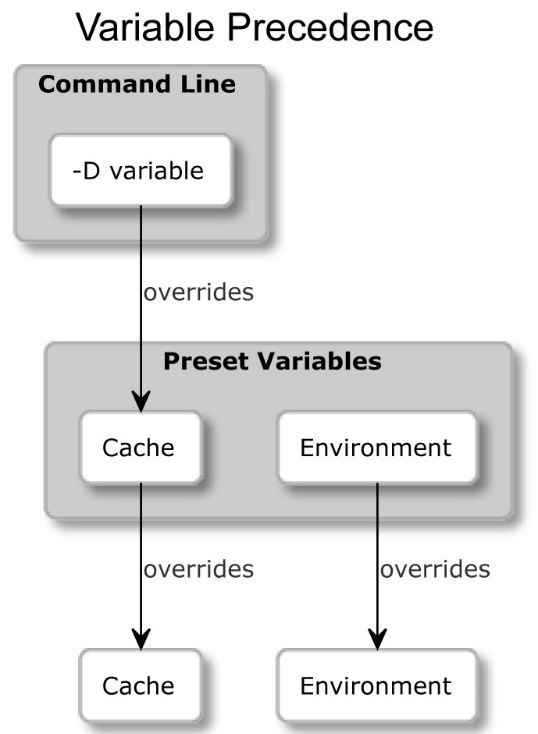
Figure 1.3 – How presets override CMakeCache.txt and the system environment variables
Building a project
After generating our build tree, we're ready for the next stage: running the builder tool. Not only does CMake know how to generate input files for many different builders, but it can also run them for you with arguments that are specific to our project.
Not Recommended
Many online sources recommend running GNU Make directly after the generation stage: make. This is a default generator for Linux and macOS, and it usually works. However, we prefer the method described in this section, as it is generator-independent and is supported across all platforms. As a result, we don't need to worry about the exact environment of every user of our application.
The syntax of the build mode
cmake --build <dir> [<options>] [-- <build-tool-options>]
In the majority of these cases, it is enough to simply provide the bare minimum to get a successful build:
cmake --build <dir>
CMake needs to know where the build tree is that we generated. This is the same path that we passed with the -B argument in the generation stage.
By providing a few options, CMake allows you to specify key build parameters that work for every builder. If you need to provide special arguments to your chosen, native builder, pass them at the end of the command after the -- token:
cmake --build <dir> -- <build-tool-options>
Options for parallel builds
By default, many build tools will use multiple concurrent processes to leverage modern processors and compile your sources in parallel. Builders know the structure of project dependencies, so they can simultaneously process steps that have their dependencies met to save users' time.
You might want to override that setting if you're building on a powerful machine (or to force a single-threaded build for debugging). Simply specify the number of jobs with either of the following options:
cmake --build <dir> --parallel [<number-of-jobs>]
cmake --build <dir> -j [<number-of-jobs>]
The alternative is to set it with the CMAKE_BUILD_PARALLEL_LEVEL environment variable. As usual, we can always use the preceding option to override the variable.
Options for target
We'll discuss targets in the second part of the book. For now, let's just say that every project is made up of one or more parts, called targets. Usually, we'll want to build all of them; however, on occasion, we might be interested in skipping some or explicitly building a target that was deliberately excluded from normal builds. We can do this as follows:
cmake --build <dir> --target <target1> -t <target2> ...
As you will observe, we can specify multiple targets by repeating the -t argument.
One target that isn't normally built is clean. This will remove all artifacts from the build directory. You can call it like this:
cmake --build <dir> -t clean
Additionally, CMake offers a convenient alias if you'd like to clean first and then implement a normal build:
cmake --build <dir> --clean-first
Options for multi-configuration generators
So, we already know a bit about generators: they come in different shapes and sizes. Some of them offer more features than others, and one of these features is the ability to build both Debug and Release build types in a single build tree.
Generators that support this feature include Ninja Multi-Config, Xcode, and Visual Studio. Every other generator is a single-configuration generator, and they require a separate build tree for that purpose.
Select Debug, Release, MinSizeRel, or RelWithDebInfo and specify it as follows:
cmake --build <dir> --config <cfg>
Otherwise, CMake will use Debug as the default.
Options for debugging
When things go bad, the first thing we should do is check the output messages. However, veteran developers know that printing all the details all of the time is confusing, so they often hide them by default. When we need to peek under the hood, we can ask for far more detailed logs by telling CMake to be verbose:
cmake --build <dir> --verbose
cmake --build <dir> -v
The same effect can be achieved by setting the CMAKE_VERBOSE_MAKEFILE cached variable.
Installing a project
When artifacts are built, users can install them on the system. Usually, this means copying files into the correct directories, installing libraries, or running some custom installation logic from a CMake script.
The syntax of the installation mode
cmake --install <dir> [<options>]
As with other modes of operation, CMake requires a path to a generated build tree:
cmake --install <dir>
Options for multi-configuration generators
Just like in the build stage, we can specify which build type we want to use for our installation (for more details, please refer to the Building a project section). The available types include Debug, Release, MinSizeRel, and RelWithDebInfo. The signature is as follows:
cmake --install <dir> --config <cfg>
Options for components
As a developer, you might choose to split your project into components that can be installed independently. We'll discuss the concept of components in further detail in Chapter 11, Installing and Packaging. For now, let's just assume they represent different parts of the solution. This might be something like application, docs, and extra-tools.
To install a single component, use the following option:
cmake --install <dir> --component <comp>
Options for permissions
If installation is carried on a Unix-like platform, you can specify default permissions for the installed directories, with the following option, using the format of u=rwx,g=rx,o=rx:
cmake --install <dir>
      --default-directory-permissions <permissions>
Options for the installation directory
We can prepend the installation path specified in the project configuration with a prefix of our choice (for example, when we have limited write access to some directories). The /usr/local path that is prefixed with /home/user becomes /home/user/usr/local. The signature for this option is as follows:
cmake --install <dir> --prefix <prefix>
Note that this won't work on Windows, as paths on this platform usually start with the drive letter.
Options for debugging
Similarly, to the build stage, we can also choose to view a detailed output of the installation stage. To do this, use any of the following:
cmake --build <dir> --verbose
cmake --build <dir> -v
The same effect can be achieved if the VERBOSE environment variable is set.
Running a script
CMake projects are configured using CMake's custom language. It's cross-platform, quite powerful, and already present. So, why not make it available for other tasks? Sure enough, you can write standalone scripts (we'll get to that at the end of this chapter).
CMake can run these scripts like so:
Syntax of the script mode
cmake [{-D <var>=<value>}...] -P <cmake-script-file>
      [-- <unparsed-options>...]
Running such a script won't run any configurations or generate stages. Additionally, it won't affect the cache. There are two ways you can pass values to this script:
- Through variables defined with the
-Doption. - Through arguments that can be passed after a
--token. CMake will createCMAKE_ARGV<n>variables for all arguments passed to the script (including the--token).
Running a command-line tool
On rare occasions, we might need to run a single command in a platform-independent way – perhaps copy a file or compute a checksum. Not all platforms were created equal, so not all commands are available in every system, or they have a different name.
CMake offers a mode in which to execute the most common ones in the same way across platforms:
The syntax of the command-line tool mode
cmake -E <command> [<options>]
As the use of this particular mode is fairly limited, we won't cover it in depth. However, if you're interested in the details, I recommend calling cmake -E to list all the available commands. To simply get a glimpse of what's on offer, CMake 3.20 supports the following commands:
capabilities, cat, chdir, compare_files, copy, copy_directory, copy_if_different, echo, echo_append, env, environment, make_directory, md5sum, sha1sum, sha224sum, sha256sum, sha384sum, sha512sum, remove, remove_directory, rename, rm, server, sleep, tar, time, touch, touch_nocreate, create_symlink, create_hardlink, true, and false.
If a command you'd like to use is missing, or you need a more complex behavior, consider wrapping it in a script and running it in -P mode.
Getting help
It comes without surprise that CMake offers extensive help that is accessible through its command line.
The syntax of the help mode
cmake ––help[-<topic>]
CTest
Automated testing is very important in order to produce and maintain high-quality code. That's why we devoted an entire chapter to this subject (please refer to Chapter 8, Testing Frameworks), where we do a deep dive into the usage of CTest. It is one of the available command-line tools, so let's briefly introduce it now.
CTest is about wrapping CMake in a higher layer of abstraction, where the building stage becomes just one of the stepping stones in the process of developing our software. Other tasks that CMake can do for us include updating, running all kinds of tests, reporting the state of the project to external dashboards, and running scripts written in the CMake language.
More importantly, CTest standardizes running tests and reporting for solutions built with CMake. This means that as a user, you don't need to know which testing framework the project is using or how to run it. CTest provides a convenient façade to list, filter, shuffle, retry, and timebox test runs. Additionally, it can call CMake for you if a build is required.
The simplest way to run tests for a built project is to call ctest in the generated build tree:
$ ctest
Test project C:/Users/rapha/Desktop/CMake/build
Guessing configuration Debug
    Start 1: SystemInformationNew
1/1 Test #1: SystemInformationNew .........   Passed 3.19 sec
100% tests passed, 0 tests failed out of 1
Total Test time (real) =   3.24 sec
CPack
After we have built and tested our amazing software, we are ready to share it with the world. In a rare few instances, power users are completely fine with the source code, and that's what they want. However, the vast majority of the world is using precompiled binaries because of convenience and to save time.
CMake doesn't leave you stranded here; it comes with batteries included. CPack is built for the exact purpose of creating packages for different platforms: compressed archives, executable installers, wizards, NuGet packages, macOS bundles, DMG packages, RPMs, and more.
CPack works in a very similar way to CMake: it is configured with the CMake language and has many package generators to pick from (just don't confuse them with CMake buildsystem generators). We'll go through all the specific details in Chapter 11, Installing and Packaging, as this is quite a hefty tool that is meant for the final stages of CMake projects.
The CMake GUI
CMake for Windows comes with a GUI version to configure the building process of previously prepared projects. For Unix-like platforms, there is a version built with QT libraries. Ubuntu offers it in the cmake-qt-gui package.
To access the CMake GUI, run the cmake-gui executable:
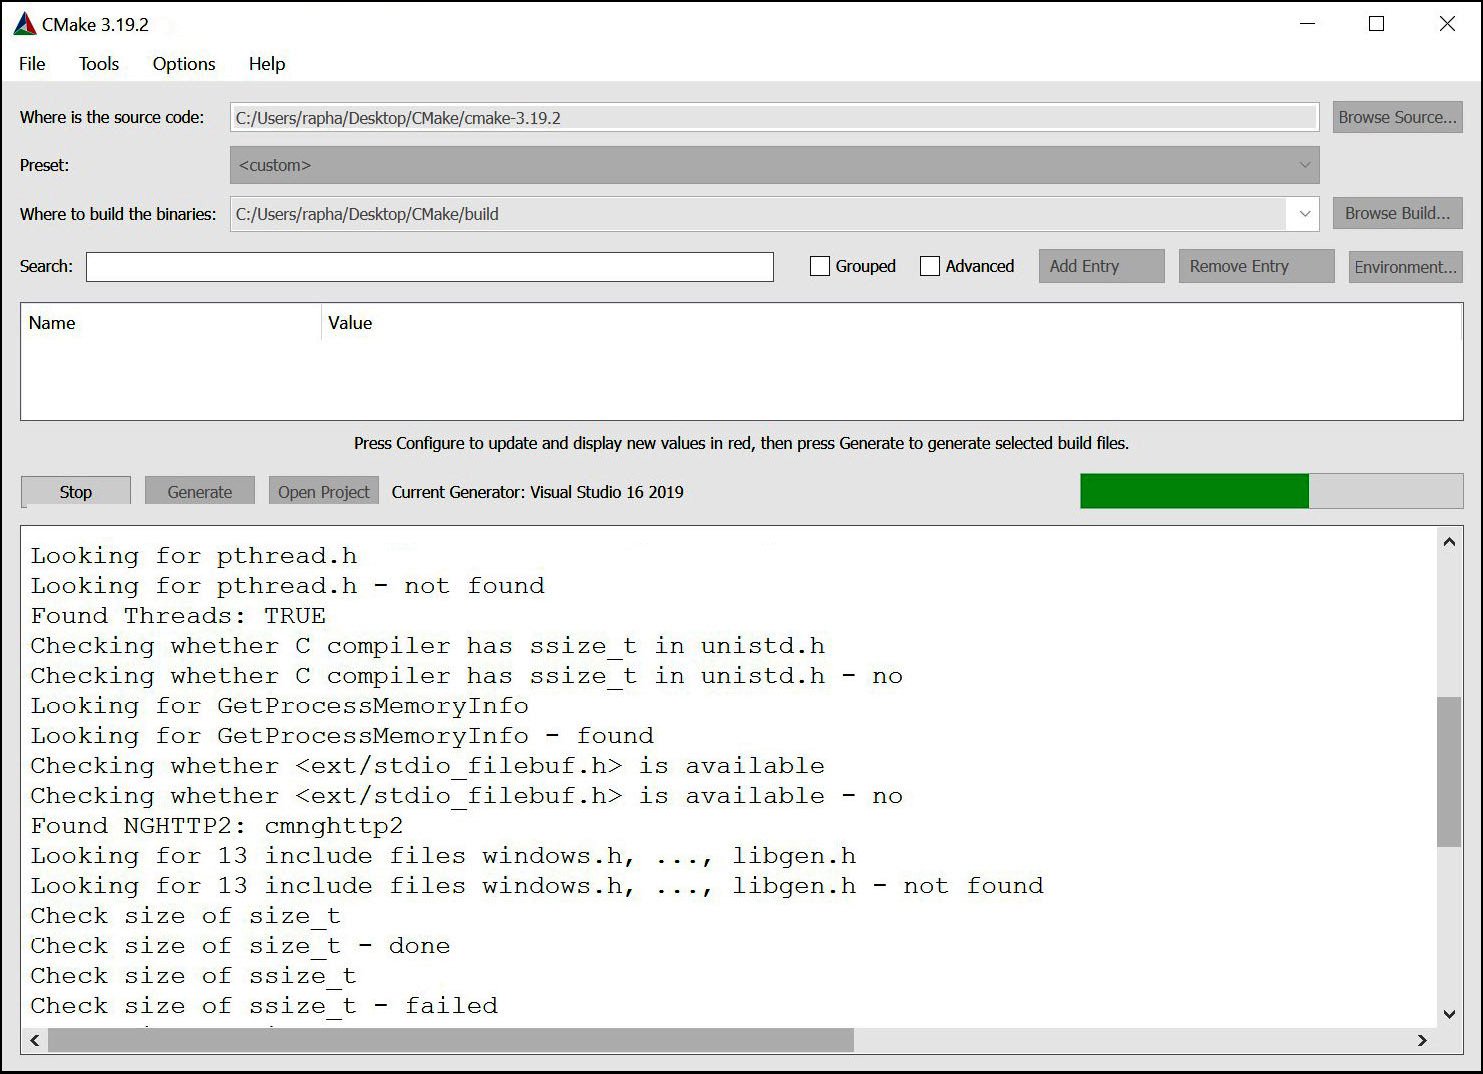
Figure 1.4 – The CMake GUI – the configuring stage for a buildsystem using a generator for Visual Studio 2019
The GUI application is a convenient tool for users of your application, as the options found there are rather limited. It can be useful for those who aren't familiar with the command line and would prefer a window-based interface.
Not Recommended
I would definitely recommend GUI to end users craving convenience; however, as a programmer, I avoid introducing any manual, blocking steps that would require clicking on forms every time I build my programs. This is especially important for build automation in CI pipelines. These tools require headless applications so that the build can be fully executed without any user interaction.
CCMake
The ccmake executable is the CMake curses interface for Unix-like platforms (it's unavailable for Windows). It's not available as part of the CMake package, so users have to install it separately.
The command for Debian/Ubuntu systems is as follows:
$ sudo apt-get install cmake-curses-gui
Note that the project configuration settings can be specified interactively through this GUI. Brief instructions are provided at the bottom of the Terminal when the program is running:
The syntax of the CCMake command
ccmake [<options>]
ccmake {<path-to-source> | <path-to-existing-build>}
CCMake uses the same set of options as cmake:
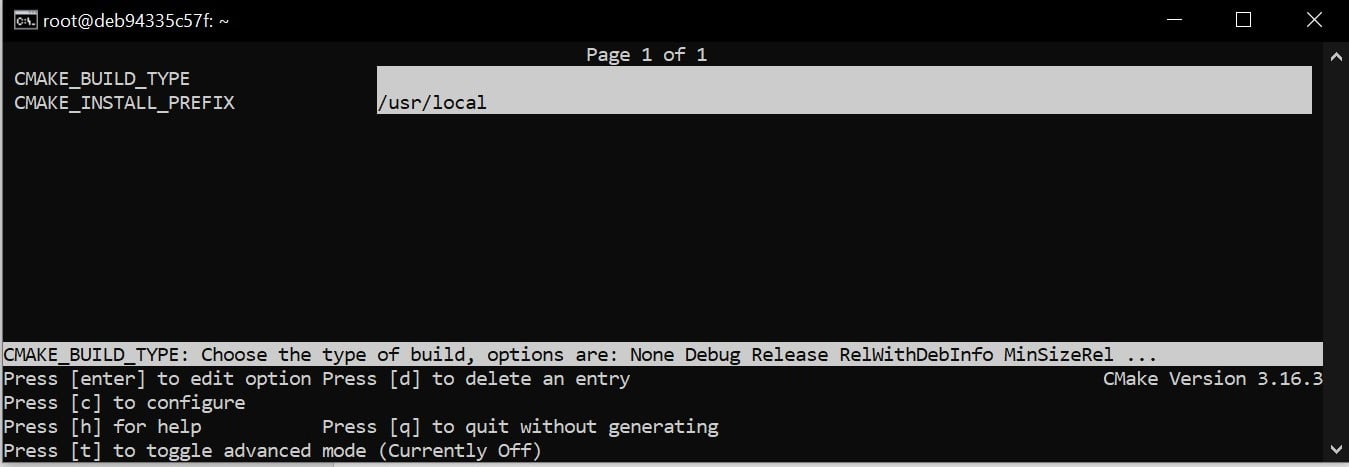
Figure 1.5 – The configuring stage in ccmake
As with Graphical User Interfaces (GUIs), this mode is fairly limited and is intended to be used by less experienced users. If you're using a Unix machine, I recommend that you take a quick look and move on even quicker.
This concludes the basic introduction to command line of CMake. It's time to discover what is the structure of a typical CMake project.
Navigating the project files
CMake uses quite a few files to manage its projects. Let's attempt to get a general idea of what each file does before tinkering with the contents. It's important to realize, that even though a file contains CMake language commands, it's not certain that it's meant for developers to edit. Some files are generated to be used by subsequent tools, and any changes made to those files will be written over at some stage. Other files are meant for advanced users to adjust your project to their individual needs. Finally, there are some temporary files that provide valuable information in specific contexts. This section will also specify which of them should be in the ignore file of your version control system.
The source tree
This is the directory where your project will live (it is also called the project root). It contains all of the C++ sources and CMake project files.
Here are the key takeaways of this directory:
- It is required that you provide a
CMakeLists.txtconfiguration file in its top directory. - It should be managed with a VCS such as
git. - The path to this directory is given by the user with a
-Sargument of thecmakecommand. - Avoid hardcoding any absolute paths to the source tree in your CMake code – users of your software can store the project under a different path.
The build tree
CMake uses this directory to store everything that gets generated during the build: the artifacts of the project, the transient configuration, the cache, the build logs, and anything that your native build tool will create. Alternative names for this directory include build root and binary tree.
Here are the key takeaways of this directory:
- Your binary files will be created here, such as executables and libraries, along with object files and archives used for final linking.
- Don't add this directory to your VCS – it's specific to your system. If you decide to put it inside the source tree, make sure to add it to the VCS ignore file.
- CMake recommends out-of-source builds or builds that produce artifacts in a directory that is separate from all source files. This way, we can avoid polluting our project's source tree with temporary, system-specific files (or in-source builds).
- It is specified with
-Bor as a last argument to thecmakecommand if you have provided a path to the source, for example,cmake -S ../project ./. - It's recommended that your projects include an installation stage that allows you to put the final artifacts in the correct place in the system, so all temporary files used for building can be removed.
Listfiles
Files that contain the CMake language are called listfiles and can be included one in another, by calling include() and find_package(), or indirectly with add_subdirectory():
- CMake doesn't enforce consistent naming for these files, but usually, they have a
.cmakeextension. - A very important naming exception is a file called
CMakeLists.txt, which is the first file to be executed in the configuration stage. It is required at the top of the source tree. - As CMake walks the source tree and includes different listfiles, the following variables are set:
CMAKE_CURRENT_LIST_DIR,CMAKE_CURRENT_LIST_FILE,CMAKE_PARENT_LIST_FILE, andCMAKE_CURRENT_LIST_LINE.
CMakeLists.txt
CMake projects are configured with CMakeLists.txt listfiles. You are required to provide at least one in the root of the source tree. Such a top-level file is the first to be executed in the configuration stage, and it should contain at least two commands:
cmake_minimum_required(VERSION <x.xx>): Sets an expected version of CMake (and implicitly tells CMake what policies to apply with regard to legacy behaviors).project(<name> <OPTIONS>): This is used to name the project (the provided name will be stored in thePROJECT_NAMEvariable) and specify the options to configure it (we'll discuss this further in the Chapter 2, The CMake Language).
As your software grows, you might want to partition it into smaller units that can be configured and reasoned about separately. CMake supports this through the notion of subdirectories and their own CMakeLists.txt files. Your project structure might look similar to the following example:
CMakeLists.txt
api/CMakeLists.txt
api/api.h
api/api.cpp
A very simple CMakeLists.txt file can then be used to bring it all together:
CMakeLists.txt
cmake_minimum_required(VERSION 3.20)
project(app)
message("Top level CMakeLists.txt")
add_subdirectory(api)
The main aspects of the project are covered in the top-level file: managing the dependencies, stating the requirements, and detecting the environment. In this file, we also have an add_subdirectory(api) command to include another CMakeListst.txt file from the api directory to perform steps that are specific to the API part of our application.
CMakeCache.txt
Cache variables will be generated from listfiles and stored in CMakeCache.txt when the configure stage is run for the first time. This file resides in the root of the build tree and has a fairly simple format:
# This is the CMakeCache file.
# For build in directory:
  c:/Users/rapha/Desktop/CMake/empty_project/build
# It was generated by CMake: C:/Program
  Files/CMake/bin/cmake.exe
# You can edit this file to change values found and used by
  cmake.
# If you do want to change a value, simply edit, save, and
  exit the editor.
# The syntax for the file is as follows:
# KEY:TYPE=VALUE
# KEY is the name of a variable in the cache.
# TYPE is a hint to GUIs for the type of VALUE, DO NOT EDIT
  TYPE!.
# VALUE is the current value for the KEY.
########################
# EXTERNAL cache entries
########################
//Flags used by the CXX compiler during DEBUG builds.
CMAKE_CXX_FLAGS_DEBUG:STRING=/MDd /Zi /Ob0 /Od /RTC1
// ... more variables here ...
########################
# INTERNAL cache entries
########################
//Minor version of cmake used to create the current loaded
  cache
CMAKE_CACHE_MINOR_VERSION:INTERNAL=19
// ... more variables here ...
As you can observe from comments in the heading, this format is pretty self-explanatory. Cache entries in the EXTERNAL section are meant for users to modify, while the INTERNAL section is managed by CMake. Note that it's not recommended that you change them manually.
Here are several key takeaways to bear in mind:
- You can manage this file manually, by calling
cmake(please refer to Options for caching in the Mastering the command line section), or throughccmake/cmake-gui. - You can reset the project to its default configuration by deleting this file; it will be regenerated from the listfiles.
- Cache variables can be read and written from the listfiles. Sometimes, variable reference evaluation is a bit complicated; however, we will cover that in more detail in Chapter 2, The CMake Language.
The Config-files for packages
A big part of the CMake ecosystem includes the external packages that projects can depend on. They allow developers to use libraries and tools in a seamless, cross-platform way. Packages that support CMake should provide a configuration file so that CMake understands how to use them.
We'll learn how to write those files in Chapter 11, Installing and Packaging. Meanwhile, here's a few interesting details to bear in mind:
- Config-files (original spelling) contain information regarding how to use the library binaries, headers, and helper tools. Sometimes, they expose CMake macros to use in your project.
- Use the
find_package()command to include packages. - CMake files describing packages are named
<PackageName>-config.cmakeand<PackageName>Config.cmake. - When using packages, you can specify which version of the package you need. CMake will check this in the associated
<Config>Version.cmakefile. - Config-files are provided by package vendors supporting the CMake ecosystem. If a vendor doesn't provide such a config-file, it can be replaced with a Find-module (original spelling).
- CMake provides a package registry to store packages system-wide and for each user.
The cmake_install.cmake, CTestTestfile.cmake, and CPackConfig.cmake files
These files are generated in the build tree by the cmake executable in the generation stage. As such, they shouldn't be edited manually. CMake uses them as a configuration for the cmake install action, CTest, and CPack. If you're implementing an in-source build (not recommended), it's probably a good idea to add them to the VCS ignore file.
CMakePresets.json and CMakeUserPresets.json
The configuration of the projects can become a relatively busy task when we need to be specific about things such as cache variables, chosen generators, the path of the build tree, and more – especially when we have more than one way of building our project. This is where the presets come in.
Users can choose presets through the GUI or use the command line to --list-presets and select a preset for the buildsystem with the --preset=<preset> option. You'll find more details in the Mastering the command line section of this chapter.
Presets are stored in the same JSON format in two files:
CMakePresets.json: This is meant for project authors to provide official presets.CMakeUserPresets.json: This is dedicated to users who want to customize the project configuration to their liking (you can add it to your VCS ignore file).
Presets are project files, so their explanation belongs here. However, they are not required in projects, and they only become useful when we have completed the initial setup. So, feel free to skip to the next section and return here later, if needed:
chapter-01/02-presets/CMakePresets.json
{
  "version": 1,
  "cmakeMinimumRequired": {
    "major": 3, "minor": 19, "patch": 3
  },
  "configurePresets": [ ],
  "vendor": {
    "vendor-one.com/ExampleIDE/1.0": {
      "buildQuickly": false
    }
  }
}
CMakePresets.json specifies the following root fields:
Version: This is required, and it is always1.cmakeMinimumRequired: This is optional. It specifies the CMake version in form of a hash with three fields:major,minor, andpatch.vendor: An IDE can use this optional field to store its metadata. It's a map keyed with a vendor domain and slash-separated path. CMake virtually ignores this field.configurePresets: This is an optional array of available presets.
Let's add two presets to our configurePresets array:
chapter-01/02-presets/CMakePresets.json : my-preset
{
  "name": "my-preset",
  "displayName": "Custom Preset",
  "description": "Custom build - Ninja",
  "generator": "Ninja",
  "binaryDir": "${sourceDir}/build/ninja",
  "cacheVariables": {
    "FIRST_CACHE_VARIABLE": {
      "type": "BOOL", "value": "OFF"
    },
    "SECOND_CACHE_VARIABLE": "Ninjas rock"
  },
  "environment": {
    "MY_ENVIRONMENT_VARIABLE": "Test",
    "PATH": "$env{HOME}/ninja/bin:$penv{PATH}"
  },
  "vendor": {
    "vendor-one.com/ExampleIDE/1.0": {
      "buildQuickly": true
    }
  }
},
This file supports a tree-like structure, where children presets inherit properties from multiple parent presets. This means that we can create a copy of the preceding preset and only override the fields we need. Here's an example of what a child preset might look like:
chapter-01/02-presets/CMakePresets.json : my-preset-multi
{
  "name": "my-preset-multi",
  "inherits": "my-preset",
  "displayName": "Custom Ninja Multi-Config",
  "description": "Custom build - Ninja Multi",
  "generator": "Ninja Multi-Config"
}
Note
The CMake documentation only labels a few fields as explicitly required. However, there are some other fields that are labeled as optional, which must be provided either in the preset or inherited from its parent.
Presets are defined as maps with the following fields:
name: This is a required string that identifies the preset. It has to be machine-friendly and unique across both files.Hidden: This is an optional Boolean hiding the preset from the GUI and command-line list. Such a preset can be a parent of another and isn't required to provide anything but its name.displayName: This is an optional string with a human-friendly name.description: This is an optional string describing the preset.Inherits: This is an optional string or array of preset names to inherit from. Values from earlier presets will be preferred in the case of conflicts, and every preset is free to override any inherited field. Additionally,CMakeUserPresets.jsoncan inherit from project presets but not the other way around.Vendor: This is an optional map of vendor-specific values. It follows the same convention as a root-levelvendorfield.Generator: This is a required or inherited string that specifies a generator to use for the preset.architectureandtoolset: These are optional fields for configuring generators that support these options (mentioned in the Generating a project buildsystem section). Each field can simply be a string or a hash withvalueandstrategyfields, wherestrategyis eithersetorexternal. Thestrategyfield, configured toset, will set the value and produce an error if the generator doesn't support this field. Configuringexternalmeans that the field value is set for an external IDE, and CMake should ignore it.binaryDir: This is a required or inherited string that provides a path to the build tree directory (which is absolute or relative to the source tree). It supports macro expansion.cacheVariables: This is an optional map of cache variables where keys denote variable names. Accepted values includenull,"TRUE","FALSE", a string value, or a hash with an optionaltypefield and a requiredvaluefield.valuecan be a string value of either"TRUE"or"FALSE". Cache variables are inherited with a union operation unless the value is specified asnull– then, it remains unset. String values support macro expansion.Environment: This is an optional map of environment variables where keys denote variable names. Accepted values includenullor string values. Environment variables are inherited with a union operation unless the value is specified asnull– then, it remains unset. String values support macro expansion, and variables might reference each other in any order, as long as there is no cyclic reference.
The following macros are recognized and evaluated:
${sourceDir}: This is the path to the source tree.${sourceParentDir}: This is the path to the source tree's parent directory.${sourceDirName}: This is the last filename component of${sourceDir}. For example, for/home/rafal/project, it would beproject.${presetName}: This is the value of the preset's name field.${generator}: This is the value of the preset's generator field.${dollar}: This is a literal dollar sign ($).$env{<variable-name>}: This is an environment variable macro. It will return the value of the variable from the preset if defined; otherwise, it will return the value from the parent environment. Remember that variable names in presets are case-sensitive (unlike in Windows environments).$penv{<variable-name>}: This option is just like$envbut always returns values from the parent environment. This allows you to resolve issues with circular references that are not allowed in the environment variables of the preset.$vendor{<macro-name>}: This enables vendors to insert their own macros.
Ignoring files in Git
There are many VCSs; one of the most popular types out there is Git. Whenever we start a new project, it is good to make sure that we only check in to the repository files that need to be there. Project hygiene is easier to maintain if we just add generated, user, or temporary files to the .gitignore file. In this way, Git knows to automatically skip them when building new commits. Here's the file that I use in my projects:
chapter-01/01-hello/.gitignore
# If you put build tree in the source tree add it like so:
build_debug/
build_release/
# Generated and user files
**/CMakeCache.txt
**/CMakeUserPresets.json
**/CTestTestfile.cmake
**/CPackConfig.cmake
**/cmake_install.cmake
**/install_manifest.txt
**/compile_commands.json
Using the preceding file in your projects will allow for more flexibility for you and other contributors and users.
The unknown territory of project files has now been charted. With this map, you'll soon be able to write your own listfiles, configure the cache, prepare presets, and more. Before you sail on the open sea of project writing, let's take a look at what other kinds of self-contained units you can create with CMake.
Discovering scripts and modules
Work with CMake is primarily focused on projects that get built and the production of artifacts that get consumed by other systems, such as CI/CD pipelines and test platforms, or deployed to machines or artifact repositories. However, there are two other concepts of CMake that enable you to create with its language: scripts and modules. Let's take a closer look.
Scripts
To configure project building, CMake offers a platform-agnostic programming language. This comes with many useful commands. You can use this tool to write scripts that come with your project or are completely independent.
Think of it as a consistent way to do cross-platform work: instead of using bash scripts on Linux and batch or PowerShell scripts on Windows, you can have one version. Sure, you could bring in external tools such as Python, Perl, or Ruby scripts, but this is yet another dependency and will increase the complexity of your C/C++ projects. Yes, sometimes, this will be the only thing that can get the job done, but more often than not, we can get away with something far simpler.
We have already learned from the Mastering the command line section that we can execute scripts using the -P option: cmake -P script.cmake. But what are the actual requirements for the script file provided? Not that many: a script can be as complex as you like or an empty file. However, it is recommended that you call the cmake_minimum_required() command at the beginning of the script. This command tells CMake which policies should be applied to subsequent commands in this project (more details in Chapter 3, Setting Up Your First CMake Project).
chapter-01/03-script/script.cmake
# An example of a script
cmake_minimum_required(VERSION 3.20.0)
message("Hello world")
file(WRITE Hello.txt "I am writing to a file")
When running scripts, CMake won't execute any of the usual stages (such as configuration or generation), and it won't use the cache. Since there is no concept of a source/build tree in scripts, variables that usually hold references to these paths will contain the current working directory instead: CMAKE_BINARY_DIR, CMAKE_SOURCE_DIR, CMAKE_CURRENT_BINARY_DIR, and CMAKE_CURRENT_SOURCE_DIR.
Happy scripting!
Utility modules
CMake projects can use external modules to enhance their functionality. Modules are written in the CMake language and contain macro definitions, variables, and commands that perform all kinds of functions. They range from quite complex scripts (CPack and CTest also provide modules!) to fairly simple ones, such as AddFileDependencies or TestBigEndian.
The CMake distribution comes packed with almost 90 different utility modules. If that's not enough, you can download more from the internet by browsing curated lists, such as the one found at https://github.com/onqtam/awesome-cmake, or write a module from scratch.
To use a utility module, we need to call an include(<MODULE>) command. Here's a simple project showing this in action:
chapter-01/04-module/CMakeLists.txt
cmake_minimum_required(VERSION 3.20.0)
project(ModuleExample)
include (TestBigEndian)
test_big_endian(IS_BIG_ENDIAN)
if(IS_BIG_ENDIAN)
 message("BIG_ENDIAN")
else()
 message("LITTLE_ENDIAN")
endif()
We'll learn what modules are available as they become relevant to the subject at hand. If you're curious, a full list of bundled modules can be found at https://cmake.org/cmake/help/latest/manual/cmake-modules.7.html.
Find-modules
In the The Config-files for packages section, I mentioned that CMake has a mechanism that allows it to find files belonging to external dependencies that don't support CMake and don't provide a CMake config-file (or haven't). That's what find-modules are for. CMake provides over 150 modules that are able to locate different packages in the system. As was the case with utility modules, there are plenty more find-modules available online and another option is to write your own as a last resort.
You can use them by calling the find_package() command and providing the name of the package in question. Such a find-module will then play a little game of hide and seek and check all known locations of the software it is looking for. Following this, it defines variables (as specified in that module's manual) that allow you to build against that dependency.
For example, the FindCURL module searches for a popular Client URL library and defines the following variables: CURL_FOUND, CURL_INCLUDE_DIRS, CURL_LIBRARIES, and CURL_VERSION_STRING.
We will cover find-modules in more depth in Chapter 7, Managing Dependencies with CMake.
Summary
Now you understand what CMake is and how it works; you learned the key components of the CMake tool family and how to install them on a variety of systems. Like a true power user, you know all the ways in which to run CMake through the command line: buildsystem generation, building a project, installing, running scripts, command-line tools, and printing help. You are aware of the CTest, CPack, and GUI applications. This will help you to create projects, with the right perspective, for users and other developers. Additionally, you learned what makes up a project: directories, listfiles, configs, presets, and helper files, along with what to ignore in your VCS. Finally, you took a sneak peek at other non-project files: standalone scripts and modules.
In the next chapter, we will take a deep dive into CMake's programming language. This will allow you to write your own listfiles and open the door to your first script, project, and module.
Further reading
For more information, you can refer to the following resources:
- The official CMake web page and documentation: https://cmake.org/
- Single-configuration generators: https://cgold.readthedocs.io/en/latest/glossary/single-config.html
- The separation of stages in the CMake GUI: https://stackoverflow.com/questions/39401003/why-there-are-two-buttons-in-gui-configure-and-generate-when-cli-does-all-in-one