


In this chapter, we will cover:
Creating the first WF program: HelloWorkflow
Creating a WF program using C# code
Initializing a WF program using InArguments
Creating a WF program using OutArgument
Creating a WF Program using InOutArgument
Using Variable in a WF program
Running a WF program asynchronously
Customizing a MyReadLine activity with Bookmark
Converting a WF program instance to XAML
Loading up a WF program from an XAML file
Testing a WF program with a unit test framework
Debugging a WF program
Considering workflow programs as imperative programs, we need to think of three fundamental things:
How to define workflow programs
How to build (compile) workflow programs
How to execute workflow programs
In WF4, we can define a workflow in either managed .NET code or in XAML. There are two kinds of code workflow authoring styles:
There are also two ways to author workflow in XAML:
By WF designer (recommended)
Typing XML tags manually
Essentially, a workflow program is a .NET program, no matter how we create it.
After defining workflows, we can build workflow applications as we build normal .NET applications.
When it comes to workflow execution, we need to consider three basic things:
How to flow data into and out of a workflow
How to store temporary data when a workflow is executing
How to manipulate data in a workflow
This chapter is going to focus on answering these questions.
Before moving ahead, make sure we have the following installed on our computer:
Windows Vista/7 or Windows Server 2008
Visual Studio 2010 and .NET framework 4.0
We can also use Windows XP; however, its usage is not recommended.
In this task we will create our first workflow to print "Hello Workflow" to the console application.
Create a Workflow Console Application project:
After starting Visual Studio 2010, select File | New Project. A dialog is presented, as shown in the following screenshot. Under the Visual C# section, select Workflow, and choose Workflow Console Application. Name the project
HelloWorkflow. Name the solutionChapter01and make sure to create a directory for the solution.
First, drag a
Sequenceactivity to the designer from Toolbox, next drag a WriteLine activity into the Sequence activity. Finally, input "Hello Workflow" in the expression box of theWriteLineactivity. We can see in the following screenshot:
Run it:
Press Ctrl+F5 to run the project without debugging. The result is as shown in the following screenshot:

When we press Ctrl+F5, Visual Studio saves the current project, and then it runs the project from the Main method in the Program.cs file.
WorkflowInvoker.Invoke(new Workflow1());
The preceding statement starts the workflow. After the workflow starts running, the WriteLine activity prints the "Hello Workflow" to the Console Application.
The workflow we created in WF Designer is actually an XML file. We can open Workflow1.xaml with an XML editor to check it.
Tip
Right-click on Workflow1.xaml then click Open With…, and choose XML Editor to open Workflow1.xaml as an XML file.
All XAML files will be compiled to .dll or .exe files. That is why when we press Ctrl+F5, the program just runs like a normal C# program.
In this task, we will create the same "HelloWorkflow" function workflow using pure C# code, beginning from a Console Application.
Create a Console Application project:
Create a new Console Application project under the
Chapter01solution. Name the projectHelloCodeWorkflow. The following screenshot shows the Console Application new project dialog:
Add reference to the
System.Activitiesassembly:By default, a new Console Application doesn't have reference to the
System.Activitiesassembly, due to which we need to perform this step.Create workflow definition code:
Open
Program.csfile and change the code present as follows:using System.Activities; using System.Activities.Statements; namespace HelloCodeWorkflow { class Program { static void Main(string[] args) { WorkflowInvoker.Invoke(new HelloWorkflow()); } } public class HelloWorkflow:Activity { public HelloWorkflow() { this.Implementation = () => new Sequence { Activities = { new WriteLine(){Text="Hello Workflow"} } }; } } }Run it:
Set
HelloCodeWorkflowasStartUpproject and press Ctrl+F5 to run it. As expected, the result should be just like the previous result shown.
We use the following namespaces:
using System.Activities;
using System.Activities.Statements;
Because WorflowInvoker class belongs to System.Activities namespace. Sequence activity, WriteLine activity belongs to System.Activities.Statements. namespace.
public class HelloWorkflow:Activity {
    public HelloWorkflow() {
        this.Implementation = () => new Sequence {
            Activities = {
                new WriteLine(){Text="Hellow Workflow"}
            }
        };
    }
}
By implementing a class inherited from Activity, we define a workflow using imperative code.
WorkflowInvoker.Invoke(s);
This code statement loads a workflow instance up and runs it automatically. The WorkflowInvoker.Invoke
method is synchronous and invokes the workflow on the same thread as the caller.
In this task, we will create a WF program that accepts arguments when initialized in the WF host. In WF4, we can use InArguments to define the way data flows into an activity.
Create a workflow project:
Create a new Workflow Console Application under the
Chapter01solution. Name the projectUseInArgument.Create a workflow as shown in the following screenshot:

Write code to host the workflow.
Open the
Program.csfile and change the host code as follows:using System.Activities; using System.Activities.Statements; namespace UseInArgument { class Program { static void Main(string[] args) { WorkflowInvoker.Invoke(new Workflow1() { FirstName="Andrew", SecondName="Zhu" }); } } }Run it:
Set
UseInArgumentas StartUp project. Press Ctrl+F5 to build and run the workflow without debugging. The application should run in a console window and print the following message:
Consider the following statement from the code we saw in the preceding section:
FirstName="Andrew"
FirstName is an InArgument type, but how can we assign a string to InArgument without any explicit cast? This is because InArgument is declared with an attribute System.ComponentModel.TypeConverterAttribute(System.Activities.XamlIntegration.InArgumentConverter). The class inheritance is shown in the following diagram:
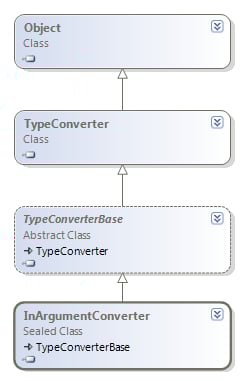
It is the InArgumentConverter that makes assigning a string to an InArgument possible. If we want to know more about TypeConverter, we can check MSDN the reference at http://msdn.microsoft.com/en-us/library/system.componentmodel.typeconverter.aspx
In WF3/3.5, we can pass values to Workflow wrapped in a Dictionary<T> object. This also applies to WF4.
using System.Activities;
using System.Activities.Statements;
using System.Collections.Generic;

namespace UseInArgument {
    class Program {
        static void Main(string[] args) {
            IDictionary<string, object> inputDictionary =
                new Dictionary<string, object>()
            {
                {"FirstName","Andrew"},
                {"SecondName","Zhu"}
            };
            WorkflowInvoker.Invoke(new Workflow1(),
                                   inputDictionary);
        }
    }
}
If we are creating workflows using imperative code, we can use InArgument in the following way:
public class WorkflowInCode:Activity {
    public InArgument<string> FirstName { get; set; }
    public InArgument<string> SecondName { get; set; }
    public WorkflowInCode() {
        this.Implementation = () => new Sequence() {
            Activities = {
                new WriteLine(){
                    Text=new InArgument<string>(
                            activityContext=>"My name is "+FirstName.Get(activityContext)
                        )
                },
                new WriteLine(){
                    Text=new InArgument<string>(
                            ActivityContext=>SecondName.Get(ActivityContext)
                        )
                }
            }
        };
    }
}
In this task, we will create a WF program that can return a result to the workflow host.
Create a new Workflow Console Application under the
Chapter01solution; name the project asUseOutArgument.Author a workflow:
Author the workflow shown in the following screenshot. Here are the detailed actions:
Drag a
Sequenceactivity from Toolbox to the designer panel.In the bottom of the designer panel, click the Arguments button, and click Create Argument to create an
OutArgumentstring namedOutMessage.Drag two
WriteLineactivities from Toolbox into theSequenceactivity and fill the textboxes with "Start…" and "End" respectively.Drag an
Assignactivity from Toolbox to the designer panel. Fill the right expression box withOutArgumentasOutMessage, whereas fill the right expression box with the following string: This is a message from workflow.
Write code to host the workflow:
Open
Program.csfile and change the host code as follows:Run it:
Set
UseOutArgumentasStartupproject. Press Ctrl+F5 to build and run the workflow without debugging. The application should run in a console window and print the message as shown in the next screenshot:
Look at the following code snippet:
IDictionary<string,object> output=
     WorkflowInvoker.Invoke(new Workflow1());
Console.WriteLine(output["OutMessage"]);
OutMessage is the name of OutArgument we defined in Workflow1.xaml. the WorkflowInvoder.Invoke method will return a IDictionary type object.
There is a third type of workflow argument: InOutArgument. It is a binding terminal that represents the flow of data into and out of an activity. In most cases, we can use InOutArgument instead of InArgument and OutArgument. But there are still some differences—for example, we cannot assign a string to InOutArgument, while it is allowed to assign a string to InArgument
directly in the host program.
In this task, we will create a WF program using InOutArgument. This type of argument is used to receive values and is also used to pass values out to the caller (WF host).
Create a new Workflow Console Application under the
Chapter01solution and name the project asUseInOutArgument.Create an
InOutArgumenttype argument:InOutMessage. Author a WF program as shown in the following screenshot. In the Assign activity textbox, type InOutMessage = "Now, I am an OutMessage".
Write code to host the workflow:
Open the
Program.csfile and alter the code as shown:using System; using System.Activities; using System.Activities.Statements; using System.Collections.Generic; namespace UseInOutArgument{ class Program{ static void Main(string[] args){ IDictionary<string, object> input = new Dictionary<string, object>() { {"InOutMessage","Now, I am InMessage"} }; IDictionary<string,object> output= WorkflowInvoker.Invoke(new Workflow1(),input); Console.WriteLine(output["InOutMessage"]); } } }Run it:
Set
UseInOutArgumentasStartupproject. Press Ctrl+F5 to build and run the workflow without debugging. The application should run in a console window and print the message as shown in the following screenshot:

The following code block initializes the InArgument value:
IDictionary<string, object> input =
                new Dictionary<string, object>()
            {
                {"InOutMessage","Now, I am InMessage"}
            };
This statement will run the workflow program with the input dictionary.
IDictionary<string,object> output=
                WorkflowInvoker.Invoke(new Workflow1(),input);
The string Now, I am InMessage is printed by the workflow. The string Now, I am an OutMessage is a message altered in the workflow and passed to the host and then printed by the host program.
We cannot assign a string to InOutArgument directly, and the following style of parameter initialization is not allowed:
IDictionary<string, object> output =
    WorkflowInvoker.Invoke(new Workflow1()
    {
        InOutMessage="Now,I am InMessage"
});We can use Variable temporarily to store a value when a WF program is running. In this task, we will create a WF program that prints five numbers to the console in a loop. We will use the NumberCounter variable
as a number counter.
Create a new Workflow Console Application under the
Chapter01solution and name the project asUseVariable.Add a
Sequenceactivity, click the Sequence activity, create anInt32NumberCountervariable, and set its Scope to Sequence. Then, author the workflow as shown in the following screenshot. In the second Assign activity type NumberCounter=NumberCounter+1.
Run it:
Set
UseVariableas Startup project. Press Ctrl+F5 to build and run the workflow without debugging. The application should run in a console window and print the following message:
To make the workflow logic easy to understand, translate the workflow into C# code. It will look like:
int NumberCounter = 0;
do
{
    Console.WriteLine(NumberCounter);
    NumberCounter++;
}while (NumberCounter <= 5);
While we can use arguments to flow data into and out of a workflow, we use Variable to store data in a workflow. Every variable has its scope, and can be accessed by activities within its scope. Variable in WF4 is pretty much like variables in imperative language such as C#.
In the previous tasks, we used the WorkflowInvoker.Invoke method to start a workflow instance on the same thread as the main program. It is easy to use; however, in most real applications, a workflow should run on an independent thread. In this task, we will use WorkflowApplication to run a workflow instance.
Create a workflow project:
Create a new Workflow Console Application under the
Chapter01solution and name the project asUseWorkflowApplication.In the opening
Workflow1.xamldesigner, click on Arguments, create twoInt32InArgumentsfor Number1 and Number2. Create anInt32 OutArgumentfor Result. Add an Assign activity to the workflow designer panel. In the Assign activity, type Result=Number1+Number2.
Write code to host the workflow:
Open
Program.csfile and change code as follow:using System; using System.Activities; using System.Activities.Statements; using System.Threading; using System.Collections.Generic; namespace UseWorkflowApplication{ class Program{ static void Main(string[] args){ AutoResetEvent syncEvent = new AutoResetEvent(false); IDictionary<string, object> input = new Dictionary<string, object>() { {"Number1",123}, {"Number2",456} }; IDictionary<string,object> output=null; WorkflowApplication wfApp = new WorkflowApplication(new Workflow1(),input); wfApp.Completed = delegate(WorkflowApplicationCompletedEventArgs e) { Console.WriteLine("Workflow thread id:"+ Thread.CurrentThread.ManagedThreadId); output = e.Outputs; syncEvent.Set(); }; wfApp.Run(); syncEvent.WaitOne(); Console.WriteLine(output["Result"].ToString()); Console.WriteLine("Host thread id:"+Thread.CurrentThread.ManagedThreadId); } } }Set
UseWorkflowApplicationasStartupproject. Press Ctrl+F5 to build and run the workflow without debugging. The application should run in a console window and print the following message:
The function of this workflow is adding two InArgument Numbers and assigning the result to an OutArgument Result.
AutoResetEvent syncEvent = new AutoResetEvent(false);
As the workflow thread runs simultaneously with the caller thread, the caller thread may terminate before the workflow thread. To prevent this unexpected program quit, we need to use AutoResetEvent
to synchronize caller and workflow thread.
syncEvent.WaitOne();
The caller thread will wait there, until syncEvent is set.
wfApp.Completed =
delegate(WorkflowApplicationCompletedEventArgs e)
{
   output = e.Outputs;
   syncEvent.Set();
};
When the workflow completes, syncEvent.Set() is invoked. After that, the caller can continue running to its end.
Another thing we should be aware of is how we get the result when the workflow ends. Unlike the WorkflowInvoker.Invoker method, in a WorkflowApplication-style caller, we get dictionary output from WorkflowApplicationCompletedEventArgs's Outputs property; see the preceding code snippet.
By using InArgument, OutArgument, and InOutArgument, we can flow data into the workflow when it starts and out of the workflow when it ends. But how can we pass data from the caller into the workflow when it is executing?—Bookmark will help us to do this. In this task, we will create a MyReadLine activity using a bookmark.
Create a workflow project:
Create a new Workflow Console Application under the
Chapter01solution and name the project asUseBookmark. Next, add a code file to this project and name the file asMyReadLineActivity. We can see this in the following screenshot:
Customize the activity with Bookmark:
Fill the opening
MyReadLineActivity.csfile with the following code:using System.Activities; namespace UseBookmark{ public class MyReadLine : NativeActivity<string>{ [RequiredArgument] public InArgument<string> BookmarkName { get; set; } protected override void Execute( NativeActivityContext context) { context.CreateBookmark(BookmarkName.Get(context), new BookmarkCallback(OnResumeBookmark)); } protected override bool CanInduceIdle { get { { return true;} } } public void OnResumeBookmark( NativeActivityContext context, Bookmark bookmark, object obj) { Result.Set(context, (string)obj); } } }
Save the file and press F6 to build the project so that the activity will appear in the WF designer activity toolbox.
Open
Workflow1.xamland author the workflow as shown in the following screenshot:
Write code to host the workflow:
Open
Program.csfile and change the code as follows:using System; using System.Linq; using System.Activities; using System.Activities.Statements; using System.Threading; namespace UseBookmark{ class Program{ static void Main(string[] args) { AutoResetEvent syncEvent = new AutoResetEvent(false); string bookmarkName="GreetingBookmark"; WorkflowApplication wfApp = new WorkflowApplication(new Workflow1() { BookmarkNameInArg=bookmarkName }); wfApp.Completed = delegate( WorkflowApplicationCompletedEventArgs e) { syncEvent.Set(); }; wfApp.Run(); wfApp.ResumeBookmark(bookmarkName, Console.ReadLine()); syncEvent.WaitOne(); } } }Set
UseBookmarkasStartupproject. Press Ctrl+F5 to build and run the workflow without debugging. The application should run in a console window and print the message as shown in the following screenshot:
In the code shown in the second step, we create a class inherited from NativeActivity. NativeActivity is a special abstract activity that can be used to customize complex activities; we will talk about it more in Chapter 5, Custom Activities.
context.CreateBookmark(BookmarkName.Get(context),
        new BookmarkCallback(OnResumeBookmark));
By this statement, the WF context creates a Bookmark with arguments BookMarkName and BookMarkCallback. When the wfApp.ResumeBookmark
method is called, the OnResumeBookmark that was defined in the Customized Activity body will be executed.
protected override bool CanInduceIdle{
    get
    {
        { return true;}
    }
}
This is a built-in property that indicates whether the customized activity can cause the workflow to become idle; the default value is false.
Consider the following code snippet of step 3:
wfApp.ResumeBookmark(bookmarkName,
                Console.ReadLine());
When this statement is executed, the OnResumeBookmark method defined in the MyReadLine activity will be called and the method will accept the value passed via Console.ReadLine().
In real applications, we would like to write and test WF programs in imperative code, while storing, running, and transmitting workflow as an XAML string or file. In this task, we will convert a WF program instance to an XAML string.
Create a new Workflow Console Application under the
Chapter01solution and name the projectConvertWFInstanceToXML. Delete theWorkflow1.xamlfile that is created by default.Write code to create the workflow and its host:
Open
Program.csfile and change the code as follows:using System; using System.Activities; using System.Activities.Statements; using System.Text; using System.Xaml; using System.Activities.XamlIntegration; using System.IO; namespace ConvertWFObjectToXML { class Program { static void Main(string[] args) { //Create a Workflow instance object ActivityBuilder ab = new ActivityBuilder(); ab.Implementation = new Sequence() { Activities = { new WriteLine{Text="Message from Workflow"} } }; //Convert Workflow instance to xml string StringBuilder sb = new StringBuilder(); StringWriter sw = new StringWriter(sb); XamlWriter xw = ActivityXamlServices.CreateBuilderWriter( new XamlXmlWriter(sw, new XamlSchemaContext())); XamlServices.Save(xw, ab); Console.WriteLine(sb.ToString()); } } }Run it:
Set
ConvertWFInstanceToXMLas Startup project. Press Ctrl+F5 to build and run the workflow without debugging. The application should run in a console window and print the message as shown in the following screenshot:
Consider the following XML string reformatted from the screenshot:
<?xml version="1.0" encoding="utf-16"?>
<Activity  x:Class="{x:Null}"
                  xmlns="http://schemas.microsoft.com/netfx/2009/xaml/activities"
                  xmlns:x="http://schemas.microsoft.com/winfx/2006/xaml">
       <Sequence>
            <WriteLine Text="Hello" />
       </Sequence>
</Activity>Consider the following code line:
XamlServices provides services for the common XAML tasks of reading XAML and writing an object graph, or reading an object and writing out an XAML file. This statement reads an ActivityBuilder object and writes XAML to an XamlWriter object.
We use ActivityBuilder as an activity wrapper so that the output XAML is a loadable workflow. In other words, if we save, say, a Sequence activity to an XamlWriter directly, then the output XML workflow will be unloadable for further use.
In this task, we will run a WF program by loading it from an XAML file.
Create a new Workflow Console Application under the
Chapter01solution and name the project asLoadUpWorkflowFromXML.Author the
Workflow1.xamlfile; this workflow will print a string to console as shown in the following screenshot:
Create code to load up the workflow instance from an XAML string:
Open
Program.csfile and change code as follow:using System; using System.Activities; using System.Activities.Statements; using System.IO; using System.Collections; using System.Text; using System.Activities.XamlIntegration; namespace LoadUpWorkflowFromXML { class Program { static void Main(string[] args) { string filePath= @"C:\WF4Cookbook\Chapter01\LoadUpWFFromXML\Workflow1.xaml"; string tempString=""; StringBuilder xamlWFString = new StringBuilder(); StreamReader xamlStreamReader = new StreamReader(filePath); while (tempString != null){ tempString = xamlStreamReader.ReadLine(); if (tempString != null) { xamlWFString.Append(tempString); } } Activity wfInstance = ActivityXamlServices.Load( new StringReader(xamlWFString.ToString())); WorkflowInvoker.Invoke(wfInstance); } } }
Run it:
Set
LoadUpWorkflowFromXMLas Startup project. Press Ctrl+F5 to build and run the workflow without debugging. The application should run in a console window and print the message as shown in the following screenshot:

We use the following code block to read a workflow XML string from file and store the string in xamlWFString:
string filePath=           @"C:\WF4Cookbook\Chapter01\LoadUpWFFromXML\Workflow1.xaml";
string tempString="";
StringBuilder xamlWFString = new StringBuilder();
StreamReader xamlStreamReader =
new StreamReader(filePath);
while (tempString != null)
{
    tempString = xamlStreamReader.ReadLine();
    if (tempString != null)
    {
        xamlWFString.Append(tempString);
    }
}
Then, using the following statement, ActivityXamlServices reads the XML workflow and builds up a workflow object graph:
In this task, we will create a Test Project to do unit testing for a WF program.
Add a Test Project to the solution:
Add a Test Project to the
Chapter01solution and name the project asUnitTestForWFProgramas shown in the following screenshot:
Add a workflow file to the Test Project:
Add a workflow activity to this project. Right-click the newly created Test Project, then go to Add | New Items… | Workflow | Activity and name the activity as
WorkflowForTest.xaml. In the opening WF designer, create anOutArgumentas OutMessage. Next, drag an Assign activity to the Designer panel and assign the string "Test Message" to the OutMessage argument as shown in the following screenshot:
Open the
UnitTest1.csfile and fill the file with following code:using Microsoft.VisualStudio.TestTools.UnitTesting; using System.Activities; namespace UnitTestForWFProgram { [TestClass] public class UnitTest1 { [TestMethod] public void TestMethod1() { var output = WorkflowInvoker.Invoke(new WorkflowForTest()); Assert.AreEqual("Test Message", output["OutMessage"]); } } }Run it:
Set
UnitTestForWorkflowas Startup project. Press Ctrl+F5 to build and run the test without debugging as shown in the following screenshot:
In this task, we will debug a WF program.
Create a new Workflow Console Application project under the
Charpter01solution. Name the project asDebugWFProgram. In the opening WF designer panel, author a workflow as shown in the following screenshot:
Open
Program.csfile and change the code to:Right-click an activity and select Breadpoint | Insert Breakpoint to add debug break point.
Debug it:
Press F5 to debug the WF Program; we can refer the following screenshot: