


In this chapter, we will cover:
Installing Windows Server AppFabric
Configuring Windows Server AppFabric (hosting and monitoring)
Configuring Windows Server AppFabric (caching)
Installing caching Client Assemblies
Changing the Windows Server AppFabric configuration after installation
Starting a Caching service
Troubleshooting Windows Server AppFabric configuration errors
Troubleshooting Windows Server AppFabric auto restart issues
Windows Server AppFabric is an extension of the Application server role on the Microsoft Platform. Windows Server AppFabric offers in-memory, super-fast, scalable caching capabilities for web applications and services. For applications built using Windows Communication Foundation (WCF) and Workflow Foundation (WF), Windows Server AppFabric provides streamlined hosting and monitoring capabilities that support composition scenarios.
Windows Server AppFabric is built on top of an existing set of technologies on the Windows platform including, but not limited to Internet Information Services (IIS), Windows Process Activation Service (WAS), .NET Framework v 4.0, and Event Tracing for Windows (ETW).
In this chapter, we will look at how to set up Windows Server AppFabric using the different configuration options. We will also see how the configuration of Windows Server AppFabric can be changed after the installation. Lastly, at the end of the chapter, we will see how to troubleshoot some common problems with Windows Server AppFabric installations.
Windows Server AppFabric is an extension of the Application Server role on the Windows platform. At the time of this writing there are two ways to install Windows Server AppFabric. One is the standard direct install and the other is using Microsoft's new and exciting Web Platform Installer (WPI).
In this recipe, we will go through the step-by-step instructions to install Windows Server AppFabric using WPI. Needless to say, if you already have Windows Server AppFabric installed on your machine, then you can skip this recipe.
Note
WPI is the preferred approach because it streamlines the installation process by smartly identifying and installing the prerequisite software.
Windows Server AppFabric can be installed on Windows 7, Windows Server 2008 SP 2, Windows Vista R2, and Windows Server 2008 R2 (it supports both 32 and 64 bit architectures). You will also need Microsoft .NET Framework v4, IIS7, and Windows PowerShell 2.0. In terms of hardware, officially, any 1GHz+ CPU (900MHz+ for Dual Core and 700MHz+ for Quad Core) with 2 GB of RAM will be sufficient to get up and running with Windows Server AppFabric. However, it is recommended that you have at least 4 GB of RAM to run Windows Server AppFabric.
Note
If you want to try Windows Server AppFabric before actually installing it on your host machine, it makes sense to use a virtual machine that has Windows Server AppFabric installed on it so that you can play with it. The good news is that Microsoft has made a preconfigured Windows Server AppFabric VM available on MSDN that can be downloaded and used with Microsoft's Virtual PC. This download is available as a part of Microsoft's training kit for Windows Server AppFabric. The download is available at: http://www.microsoft.com/download/en/details.aspx?id=7956.
WPI offers a highly streamlined package/software download installation mechanism. You can get WPI from Microsoft's website at: http://www.microsoft.com/web/downloads/platform.aspx. After downloading and installing WPI, you can use the following steps to launch Windows Server AppFabric Installer:
1. Under the Start menu, go to All Programs. If you are using Windows 7, type Web Platform Installer in the custom menu item, find the WPI as shown in the following screenshot, and launch it:

2. Accept the User Account Control (UAC) warning. This will allow WPI to make changes to your computer.
3. Click on Next at the bottom of the screen to get started with the WPI.
4. Type AppFabric in the search box (in the top right-hand corner of the screen) and press the Enter key:

5. This will reveal a search result showing Windows Server AppFabric. Click on Add and then on Install to continue:

6. Now, WPI will ask to review the download and install of all the required software components to run Windows Server AppFabric. Select I Accept to continue.

7. Once you select I Accept, WPI will download and install all the required software components one by one. Sometimes this may result in multiple reboots for the host machine.
8. Once all the required software components are installed, the Windows Server AppFabric installation will be complete. Click on Finish:

The Windows Server AppFabric installation adds three new Windows services: AppFabric Caching Service, AppFabric Event Collection Service, and AppFabric Workflow Management Service, for caching, monitoring, and hosting scenarios respectively. These services can be seen when the Services Snap-in is launched from the Control Panel (or by typing Services.msc in the search box under the Windows Start menu).

As we can see in the preceding screenshot, only AppFabric Event Collection Service and AppFabric Workflow Management Service have Status as Started and have Startup Type defined as Automatic. By default, Windows Server AppFabric Caching Service is not available for use after a machine reboot.
Note
AppFabric Event Collection Service, AppFabric Workflow Management Service, and Windows Server AppFabric Caching Service form the heart of Windows Server AppFabric. These services work in the background and perform tasks such as collecting events, managing the workflow's life cycle, connecting to the cache cluster, and serving cache related requests.
Once Windows Server AppFabric is installed, the next step is to configure it using the Windows Server AppFabric Configuration wizard.
There are a number of configuration options available when configuring Windows Server AppFabric, and in this recipe we will go through them. At this point, we should appreciate Microsoft's efforts in designing Windows Server AppFabric, as it allows a fair bit of customization.
Configuring Windows Server AppFabric is available via the Windows Server AppFabric Configuration wizard. It is a fairly simple task, but it requires careful consideration of a number of options and possibilities. We will need the following items ready in order to configure Windows Server AppFabric:
Service accounts to run (with administrative privileges)
AppFabric Hosting's Event Collection service
AppFabric Hosting's Persistence service
SQL server database for:
(SQL server based) monitoring provider
(SQL server based) persistence provider
AppFabric caching store service provider (if your machine is part of a domain)
UNC file share for Windows Server AppFabric Caching service configuration provider (if the host machine is running in a workstation mode)
Information on cluster set up (for a high-availability scenario)
Note
When HA (High Availability) is enabled Windows Server AppFabric Cache stores a copy of each cached object or region in a separate cache host. HA is discussed in detail in Chapter 7, Monitoring Windows Server AppFabric Deployment.
Unique port numbers for cache, cluster, arbitration, and replication
To launch the Window Servers AppFabric Configuration wizard, go to All programs under the Start menu, find AppFabric, and then select Configure AppFabric.
The following is a sequence of steps that will take you through the configuration wizard for Windows Server AppFabric:
1. Run the Configure AppFabric wizard.
2. Accept the User Account Control (UAC) dialog, confirming that you will allow this program to make changes to your host machine:

3. Click on Next at the bottom of the screen to start the configuration of Windows Server AppFabric.
4. Once you are at the Configure Hosting Services screen, select the box titled Set monitoring configuration:

5. Select the service account required to run the AppFabric Event Collection service by clicking on Change.
6. If you do not have a ready-made account available for the event collection service, then you can leave the default value of NT Authority\Local Service, (as this can be modified later on). For more details on security, please refer to the How it works... section, as well as Chapter 9, Configuring Windows Server AppFabric Security.
7. Now select the Monitoring provider, as this will provide access to the monitoring database. (As there is only one default SQL-based implementation, select the System.Data.SqlClient option.)
Note
Windows Server AppFabric by design allows adding multiple providers for monitoring and persistence. Configuring multiple persistence providers is discussed in Chapter 5, More Windows Server AppFabric Hosting Features.
8. Now click on Configure to launch the SQL configuration screen to help you select/configure the SQL server instance that will be used to store monitoring information.
9. Select Register AppFabric monitoring store in root web.config.
11. Under Connection String, provide the SQL Server name, for example,
<HostServerName>\<SQLInstanceName>.12. Provide the Database name for the SQL Server.
13. The first half of your configuration screen should appear as follows:

14. Now we will set up the Security Configuration to access the SQL Server database instance that we selected/created previously. For Windows authentication, if you have selected a complete install, then you will see default values for Administrators, Readers, and Writers in Security Configuration. If you already have roles defined and you have opted to initialize the Monitoring Database, then you can browse and select the appropriate roles. Otherwise, use the default values of AS_Administrators and AS_Observers as Administrators/Writers and Readers respectively. This is shown in the following screenshot:

Note
Windows Server AppFabric's AS_Administrators is a conceptual and administrative role. As the name implies it allows full control over AppFabric's configuration, monitoring, and persistence capabilities. Event Collection and Workflow Persistence services run under this role.
Likewise, AS_Observer is also a conceptual and administrative role. It allows you to view the application and services configuration, monitor data, as well as view persisted instances, all without being able to modify anything.
15. However, if you wish to choose SQL Server Authentication, you will need to provide a username and password that will be used to connect to SQL Server database. In this recipe we will only use Windows authentication.
16. Once you click on OK you should see a confirmation dialog asking you to validate whether you want these settings to take effect:

17. Click on Yes, and the wizard will go ahead and create and initialize the monitoring store. Once completed, you should see a validation dialog advising you that the Monitoring store was initialized and registered successfully:

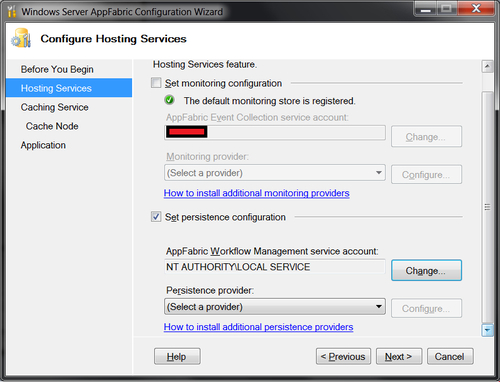
18. On the Configure Hosting Services screen, select Set persistence configuration.
19. Now, select an AppFabric Workflow Management service account. Just like the service account for monitoring, we will need a service account that has admin rights and can access the persistence provider/store. If you have an account already available for this then click on Change and select it. Otherwise, use the default value of the NT AUTHORITY\LOCAL SERVICE account:
20. From the Persistence provider dropdown, select a sqlStoreProvider and then click on Configure. Now this screen should look familiar, as it is the same one we used to set up Windows Server AppFabric Monitoring earlier on. We will once again select Register AppFabric persistence store in root web.config. We will also select Initialize persistence store and provide the SQL Server and Database names:

21. Just like we set up the Security Configuration for the Windows Server AppFabric Monitoring database, repeat the same steps and use built-in accounts for the persistence database.
22. Click on OK and proceed to confirm the changes. This will complete the configuration of the Hosting and Monitoring parts of Windows Server AppFabric.
The configuration of Windows Server AppFabric provides contextual information to run Windows Server AppFabric services that are responsible for monitoring and hosting services. The values that we configured can be changed later, either by running the AppFabric Configuration wizard again or by using Windows Server AppFabric PowerShell commandlets (Cmdlets).
Note
Windows PowerShell is built on top of Microsoft.NET and offers a task based command-line shell and scripting language. Windows PowerShell has built in commands called Cmdlets (pronounced as commandlets). Cmdlets are lightweight commands and typically return a Microsoft.NET Framework object type to the next command in the pipeline.
It should be noted that monitoring and persistence services should be run under accounts with administrative privileges so that they can read and persist events to the preconfigured monitoring and persistence databases.
Once you have finished configuring the Hosting Services as discussed in the preceding recipe, the next task is to configure the Caching Services for AppFabric. Just like in the preceding recipe, we will select a service account that should be part of the administrator group so that it has an administrative access to the caching configuration provider. Once again we will consider a workstation configuration and select a valid local system account.
We will see how to setup the Caching Configuration Store Provider. At the end of this recipe, we will also see how to join/create a new cache cluster (that this, the instance of Window Server AppFabric Cache is part of) along with the end point details (that is, port addresses) used by AppFabric services to communicate on the network.
Once we have configured Windows Server AppFabric Caching Services, we will be able to start using AppFabric Caching.
To begin this recipe, we will need the following in place:
A service account for the AppFabric Caching service.
A file share (UNC Server Share) to store XML based cache configurations or a SQL Server database for a SQL Server based AppFabric Configuration store. (This is required for configuring a High Availability Caching Service scenario that runs on Windows Server 2008.)
To set up Windows Server AppFabric Caching follow these steps:
2. Accept the User Account Control (UAC) dialog, confirming that you will allow this program to make changes to your computer.
3. Click on Next on the Before you Begin and Configure Hosting Services screens to reach Configure Caching Service.
4. Once you are on the Caching Service screen of the Configure AppFabric wizard, select the Set Caching Service configuration.
5. Under Caching Service Account, click on Change. This will allow you to select the identity for the Caching Service Account.
6. If your machine is in workstation mode, then you cannot change the service account. Otherwise, you can browse and select a local account (that has administrative access to the Caching Configuration store).
7. Select XML from the Caching Service configuration provider dropdown.
8. The SQL Server based configuration is not available for the Caching Configuration Service in workstation mode. If you select SQL provider and click on Configure, you will get the following error message:

Note
We discuss the use of SQL Server AppFabric Caching Service Configuration Store Provider in more detail in Chapter 7, Monitoring Windows Server AppFabric Deployment.
9. Under File Share, provide a file path of an existing UNC file share. This will allow Windows Server AppFabric's Configuration Service to store and manage information stored as an XML file under this provided path. Your screen will appear as follows:

10. It should be noted that the File share (UNC server share) selection wizard will not allow you to create a new file share. As highlighted in the beginning of the recipe, it is required to have a UNC file share readily available. Under cluster information select New Cluster and click on Next.
11. Configure AppFabric Cache Node by providing a unique port number value (numbers must be between 1024 and 65535) for the Cache port, Cluster port, Arbitration port, and Replication port.
Note
The Cache port is used for transmitting data between Cache Clients and Cache Hosts. The Cluster port enables Cache Cluster formation and Management. The Arbitration port is used to double check if the Cache Host is unavailable. Arbitration is used when the Cache Host fails. The Replication Host is used to move data between the Cache Hosts. Replication is used when Cache is configured for High Availability.
12. Configure Windows firewall exceptions by selecting the rules for Windows Server AppFabric Caching Service and Remote Service Management. Your screen should appear similar to the following:

13. After clicking on Next, click on Yes on the Windows Server AppFabric Configuration Wizard dialog box and you will come to the end of the wizard with an option to launch IIS to further manage Windows Server AppFabric. Click on Finish to close the wizard.
14. Congratulations! You have fully configured Windows Server AppFabric. Click on Finish.

Note
The High Availability feature of Windows Server AppFabric Caching can only be enabled on Enterprise versions of Windows Server 2008/2008 R2. This implies that all the nodes in the cluster must have enterprise editions of Windows Server 2008/2008 R2. For more information you may refer to: http://go.microsoft.com/fwlink/?LinkId=164929.
The Windows Server AppFabric Caching Service requires a service account to run its Windows service as well as a configuration provider where it can store its configuration. As the caching service runs under the identity of the provided account, the account must have administrative privileges so that it can access and modify the configuration.
The Windows Server AppFabric Caching Service needs to identify which ports to connect to in order to communicate with the other hosts in the cluster. Once the port numbers are specified, ensure that any software or hardware firewalls are not blocking these ports.
As we experienced in this recipe, the Windows Server AppFabric Caching Service is highly configurable and the configuration wizard makes it extremely easy to set up (or change) the existing configuration.
Now that we have configured Services for AppFabric and all the services are up and running under valid service accounts along with firewall rule definitions, we can now start coding to test and start consuming the caching service.
For non-production/client environments, we do not need to install the complete Windows Server AppFabric. Instead, we can use Client Assemblies to connect to an instance of AppFabric. In this recipe, we will see how to set up a Client Machine that can connect to and communicate with Windows Server AppFabric. Once we have set up the Client Assemblies, then we can use Visual Studio, for example, to write applications that can use Windows Server AppFabric Caching capabilities.
Note
Cache Client, as the name implies, refers to the applications or services that can access and modify cached items by connecting to a configured or specified cache cluster.
To set up the Cache Client, you will need the following assemblies:
Microsoft.ApplicationServer.Caching.Core.dllMicrosoft.ApplicationServer.Caching.Client.dllMicrosoft.WindowsFabric.Common.dllMicrosoft.WindowsFabric.Data.Common.dll
Setting up the Client Caching environment is a very simple task; it is just a matter of copying the binaries highlighted at the start of the recipe to a particular location. These binaries can be obtained by installing Windows Server AppFabric on a workstation. You will need the Caching feature installation to get the required Caching binaries. The default location for these assemblies is .\Windows\System32\AppFabric:
1. On Windows 7, type
C:\Windows\System32\AppFabricin the custom menu; you should be able to see a number of binaries and the configuration file:
2. Obtain the following assemblies from the Windows Server AppFabric Cache installation:
Microsoft.ApplicationServer.Caching.Core.dllMicrosoft.ApplicationServer.Caching.Client.dllMicrosoft.WindowsFabric.Common.dllMicrosoft.WindowsFabric.Data.Common.dll
3. Copy the assemblies mentioned in step 2 to a place where they are available under a known path to your Client application.
Note
To cache-enable an application server, you will need to install the Windows Server AppFabric Caching Assemblies on it. It is as simple as having an application/service installed on the server along with the AppFabric Caching assemblies. As long as your application installation copies the AppFabric Cache Assemblies and has a valid configuration in place, your application server is Cache enabled.
The Windows Server AppFabric Caching Client application requires an API to talk to the Caching Service. This API (provided as a set of assemblies highlighted earlier in this recipe) must be available for the client to program against it. By copying these assemblies on the client machine, we ensure that the client does not need to do a complete installation of Windows Server AppFabric.
Once the Client Assemblies are available, we can write applications that can use AppFabric's Caching capabilities and connect to the AppFabric Caching cluster.
Once Windows Server AppFabric is configured, it is still possible to change its configuration.
There could be a number of reasons for changing the configuration of an existing deployment. The following are some of the most common scenarios that would require such changes:
Changes database repository (SQL instance for example)
Changes to system accounts (for security reasons)
Port number related changes for caching.
You can use the Windows Server AppFabric configuration wizard and make the required changes as they are required. In this recipe, we will see how to re-configure Windows Server AppFabric after installation.
You will need an existing instance of AppFabric that has been installed and configured to get started with this recipe. In this recipe, we will learn how to change Windows Server AppFabric configuration after it has been installed on the host OS.
To begin, launch the AppFabric Configuration wizard to go through the configuration options on an existing installation of AppFabric to easily select the options that we want to change.
1. Start the Window Server AppFabric Configuration wizard.
2. Accept the User Account Control (UAC) warning. Click on Next at the bottom of the screen to get started with the configuration.
3. Give the wizard a few seconds while it loads the existing configuration. The screen should look as follows:

Note
Once the configuration is loaded, you will notice that the green tick under the monitoring and persistence configurations states that the default monitoring store is registered.

4. We can now go ahead and change the monitoring configuration by selecting Set monitoring configuration and clicking on Change.
5. This will launch a Windows Server AppFabric Monitoring Store Configuration wizard that we have already used in the recipe Configuring Windows Server AppFabric (hosting and monitoring) earlier in this chapter.
6. By selecting Register AppFabric monitoring store in root web.config, we can specify the Server and Database name.
Note
Registering the monitoring or persistence store in the configuration implies that that the connection string (with the name
= ApplicationServerMonitoringConnectionString)is placed in the rootWeb.Configfile and is made available to all subsequent websites.
Note
The Initialize monitoring store option will create a new database (if it does not already exist) and it will also initialize the schema and the structure of the database (based on the Microsoft SQL Server provider for the AppFabric monitoring site).
It should also be noted that if you skip the Register AppFabric monitoring store in root web.config option, then the monitoring database will not be available on this computer.
7. We can repeat steps 4, 5, and 6 by selecting Set persistence configuration.
8. Next move to Caching Service and select Set Caching Service configuration, as shown in the following screenshot:

9. Change the Caching Service account by selecting Change and opting for a relevant account.
10. Change the File share (UNC server share) by browsing and selecting the appropriate share that we want to store the XML configuration file.
11. Join an existing cluster (as opposed to creating a new one) by selecting the Join cluster option, as shown in the following screenshot:

12. If you are joining an existing cluster, you will not be able to change the cluster size.
Note
It should be noted that the cluster size does not dictate the possible number of machines in the cluster; however, it does optimize the whole cluster based on the size selected. So for example, you can add seven machines to a cluster that is defined as "Small" (1-5 machines). However, Windows Server AppFabric will optimize the caching configuration based on cluster configuration of 1-5 machines.
13. To change port numbers for caching, click on Next and change the values as required.
One of the best things about Windows Server AppFabric is that it is highly configurable. Configuration can be changed in a variety of ways. For example, in this recipe our changes were driven by the Windows Server AppFabric configuration wizard; however, we could have achieved similar results using AppFabric PowerShell commandlets. We will learn more about PowerShell commandlets in the following chapters.
Another possible way to change configuration is to modify the configuration manually. For example, when using the XML provider, we can always go to the file share and modify the ClusterConfig.xml file.

Windows Server AppFabric uses providers to abstract the implementation details of its Cache configuration as well as persistence and monitoring stores. In this recipe we used out of the box providers, but configuration storage and management can be further extended to implement a custom provider.
At runtime, Windows Server AppFabric looks up the registered configuration provider. Based on the provider it then accesses a specific configuration store. The configuration store is then used to fetch relevant information for that provider. For example, with the Caching configuration provider, the configuration store will store information such as port numbers, service accounts, and so on. Similarly, for the persistence and monitoring configuration providers, the configuration store will maintain information relevant to monitoring and persistence stores such as connection strings, for example.
Windows PowerShell plays an extremely important role in the overall management of Windows Server AppFabric. There are hundreds of cmdlets and functions available that allow administrators (and developers alike) to perform day-to-day management tasks on AppFabric. As Caching is one of the biggest features in Windows Server AppFabric, it is no surprise that AppFabric Caching has a dedicated set of PowerShell cmdlets that allow developers and administrators to interact with the distributed Cache environments in an interactive and streamlined manner.
In this recipe, we will look at how to use PowerShell cmdlets to interact with the AppFabric Caching service.
Note
There are two ways that you can configure your Windows Server AppFabric installation/environment. One option is to use the Windows Server AppFabric Configuration wizard (that we have extensively used in this chapter) and another option is to use the Windows Server AppFabric PowerShell cmdlets. Using PowerShell to manage AppFabric Caching introduces a number of useful possibilities, including but not limited to automating build and deployment scenarios, and enabling command line monitoring and troubleshooting.
Assuming that you have the Windows Server AppFabric administration feature installed, you can launch the AppFabric PowerShell console via Administrative tools (available under Start | Control Panel | Administrative Tools) or by going to the Windows Server AppFabric folder under Program Files and selecting Caching Administration Windows PowerShell:

After starting the Caching Administration Windows Powershell console with administrative privileges, we can start our Cache Cluster for the first time:
1. To set the context of the Windows PowerShell session, we will execute the
use-CacheClustercommand first.2. Once the context has been set, we will execute the
start-CacheClustercommand. This should result in a status that shows that the Caching Service is up and running:
3. Once the Caching Service is up and running, we can query it for the caches that are available in this cluster by using the
Get-Cachecommand.
The Caching Administration PowerShell commandlets give us complete control for managing an AppFabric Cache Cluster. When starting PowerShell sessions and running on a non-host computer, you must provide the -Provider (xml or System.Data.SqlClient) and ConnectionString (file path for XML or connection string for database).
Note that Cache services do not automatically start after a system reboot, so the Start-CacheCluster command must be invoked. We can also use the Start-CacheHost command with HostName and Port parameters to start a particular host in the cluster.
We will see much more on each of these PowerShell commands in the following chapters of this book.
It is not too uncommon to come across errors while installing and configuring Windows Server AppFabric. As long as we know where something wrong, most installation related errors are fairly trivial to fix.
In this recipe we will troubleshoot some common Windows Server AppFabric installation and configuration errors.
The first thing to do is to find the log file under the %temp% folder and then search for errors. Once error(s) are found, we can look up in MSDN for the error details as well as their corresponding resolutions.
1. To find installation related errors, find a log file created by the AppFabric installer available in the
%temp%folder with the file name:AppServerSetup(yyyy-MM-dd H-mm-ss).log.2. These errors can either be viewed by clicking on the link in the last page of the installation wizard by or by browsing to the file and then opening it with Notepad (or your favorite text editor).
3. Search for
errorsin the text file. Note the error codes and look up their reasons and associated workarounds at this URL: http://msdn.microsoft.com/en-us/library/aa368542(VS.85).aspx.4. Likewise, for configuration errors, find a file under the
%temp%folder with the name:Microsoft.ApplicationServer.Configuration (yyyy-MM-dd H-mm-ss) <process code>.log.5. Errors mentioned in the configuration log can be looked up for details along with possible remediation at: http://msdn.microsoft.com/en-us/library/ms681381(v=VS.85).aspx.
Note
Configuration errors are AppFabric specific but descriptive enough to point you in the right direction; providing information that let's you know the issue is related to network resource, firewalls, and so on. It is also worth noting that you can see all PowerShell commands that are executed by the wizard logged in this file as well.
Windows Server AppFabric uses a very detailed logging mechanism, and writes log entries for configuration and installation related errors in separate physical log files available under the %temp% folder.
Troubleshooting configuration errors revolves around going to a relevant log file and finding the error entries and then looking up each error on the corresponding MSDN help page (as highlighted in the How to do it... section) to find a solution for each issue reported.
For more information on error codes please visit the following MSDN links:
When a cache host is rebooted, Windows Server AppFabric does not start the caching services by default. Although services can always be started manually using the PowerShell commandlets, this intervention is far from ideal. Furthermore, this lack of auto-start for caching services is problematic because even when the host is backed up its caching services are not available to the cluster. In this recipe, we will learn about two possible workarounds that will allow caching services to be available after a host has been rebooted.
We will first set the Startup type of the AppFabricCachingService to be automatic so that the Caching Service is started every time a cache host is rebooted:
1. Set the AppFabric Caching Service's Startup type to be Automatic, as shown in the following screenshot:
Note
To get to AppFabric Caching Service Properties launch
services.msc(available under Start | Control Panel | Administrative Tools), select AppFarbric Caching Service, and then click on Action followed by the Properties menu item.
2. Another option is to schedule a startup task to execute the
Use-CacheClusterandStart-CacheHostcommands.
Note
For more details on how to configure a startup task in Windows 7, visit: http://windows.microsoft.com/en-US/windows7/schedule-a-task.
Every time a Cache Host is rebooted, by default it is necessary to restart the AppFabric Caching Service manually. This is because Windows Server AppFabric Caching Services do not have a built-in mechanism for auto-start. By setting the service to start automatically, we worked around the limitation, but it is important to note that doing so carries some important caveats.
The reason Microsoft chose to require a manual restart of the caching service by default is that under certain conditions, waiting for the service to start can result in significantly longer boot times (sometimes several minutes).
On development machines, it can be useful to configure the service to start automatically so that you aren't pulling you hair out when caching all of a sudden stops working. However, if you experience excessive boot times, or errors resulting from applying this tip, it is probably best to skip it all together.
As we discussed, another option is to schedule a startup task which is a better approach as it still uses the same Windows Server AppFabric PowerShell cmdlets including Use-CacheCluster and Start-CacheHost, and you can define the trigger most appropriate to your environment for executing the start up task.
