


The tasks you will accomplish in this chapter are essential for any System Center Endpoint Protection (SCEP) administrator. Although many of the procedures can also be performed from within your System Center 2012 Configuration Manager (SCCM) console, it is also vital to understand how to perform these procedures at a local client level. As isolating infected PCs (or PCs that are suspected to be infected) from the rest of your corporate network is a commonly accepted best practice, a hands-on approach is often needed to remediate malware issues.
This chapter will cover all the essential skills an AV admin using SCEP will need to know, from finding and understating the SCEP client logs, to performing on demand scans with just the command line.
Primarily, reporting data is accessed through the SCEP dashboard within your SCCM console, or by executing SCEP reports in SQL Server Reporting Services. However, you may find yourself attempting to troubleshoot a malware issue on a client PC without an access to either of those resources. This is when you come to know where to find your SCEP client-side logs, and understand how to interrupt them, which will prove very useful.
In this section, you'll be working with the most vital SCEP log, which is known as the MPLog and using it quickly will locate pertinent information, such as definition update history and malware detection history.
The local SCEP client logs are stored in the program data folder. Keep in mind, this directory is hidden by default and you will not be able to browse to it without enabling view hidden files, folders, and drives in Windows Explorer. A log parsing utility, such as
Microsoft's Trace32 or the new version that comes with SCCM 2012 CMTrace, can be utilized to expedite the process of locating data inside the MPLog, but in the following example, we will be utilizing Notepad.
Follow these steps:
1. To locate your SCEP client-side logs on a Windows 7, Vista, or Windows Server 2008 system, navigate to the following path:
%systemdrive%\ProgramData\Microsoft\MicrosoftAntimalware\Support2. Open
MPLog-XXXXXXXX-XXXXXX.logwith Notepad.3. Once Notepad is open, hit CTRL-F to open the Find window.
4. Type in
Threat Nameto locate a record of malware detection, and press the F3 key to move to the next instance.5. Back in the Find window, enter
signature updated viato locate a record of the client's definitions updating.6. Next, search for
Scan Sourceto locate a record of a scheduled scan running or record a running scan that is on demand.7. Then, enter
Expensive fileto locate an instance of an expensive file detection during a scan.8. Click on File from the menu bar and select Exit to close the logfile.
While the MPLog contains an abundance of data, the keywords we searched for will allow you to quickly locate some of the most pertinent data.
SCEP supports multiple definition update methods, which will be discussed later. Although the SCEP reports will show you which definition version a client is running, it does not reflect where a client receives its update. You should be able to find entries similar to this: Signature updated via InternalDefinitionUpdateServer on Sun Jan 02 2011 21:33:50.
In this case, InternalDefinitionUpdateServer would indicate that the definition update was pulled from a WSUS/SUP server within your corporate network.
In addition to this, there are several other entries you may find, such as Signature updated via MicrosoftUpdateServer on Sat Mar 12 2011 17:54:56. This would indicate that a definition was pulled from Microsoft Updates over the Internet. This should be common for remote users. Signature updated via UNC \\Server
name\share indicates that an update was pulled from a UNC file share.
The MPLog also records any malware incidents the client has detected. If the client has experienced a virus detection, you will find an entry similar to Threat Name:VirTool:JS/Obfuscator. The following lines can provide some more background information about the virus detection, for example:
Threat Name:VirTool:JS/Obfuscator
ID:2147632206
Severity:5
Number of Resources:2
Resource Schema:file
Resource
Path:C:\Users\username\AppData\Local\Microsoft\Windows\Temporary Internet Files\Low\Content.IE5\OG2NNMHR\badwebpage.htm
The resource path can provide some very useful information when determining the attack vector or source of an outbreak. In the previous example, the malware was detected in the user's temporary internet files, indicating the attempted infection likely occurred when the user browsed to a website containing malicious code.
To find out what actions the client took after detecting the malware, continue to scroll downwards a few lines, where you'll locate an entry similar to the following:
Beginning threat actions Start time:Fri May 13 2011 15:41:51 Threat Name:Virus:DOS/EICAR_Test_File Threat ID:2147519003 Action:remove File to act on SHA1:3395856CE81F2B7382DEE72602F798B642F14140 File cleaned/removed successfully File Name:C:\Users\username\AppData\Local\Microsoft\Windows\Temporary Internet Files\Low\Content.IE5\X2GCUOEX\eicar[1].com Resource action complete:Removal
In this case, the infected file was successfully removed.
The MPLog also records detections of what are known as Expensive Files. These are files which take the SCEP client an abnormally long amount of time to scan. Knowing what files are considered expensive can be valuable when tuning your SCEP policies for optimized scanning performance. If your SCEP client has detected expensive files during a scan, you may find a log entry similar to the following:
!WARNING
Expensive file
File Name:C:\Program Files (x86)\Program\largefile.exe
File Size:107374882
Time:6552
If you know whether this is a safe and valid file, you may consider adding a custom exclusion for this file in your SCEP policy.
In addition to the uses outlined in the recipe, there are other logs generated by the SCEP client that may prove useful to you.
The MPLog is the primary client side log for SCEP. It will contain information on almost every aspect of a SCEP client. The MPLog will have a filename that matches to the following criteria: MPLog-01012011-174035.log. In this example, the value 01012011-174035 corresponds to the date and time the logfile was first created, January 1, 2011 at 5:40 pm. Typically the MPLog is created during the installation of the SCEP client.
The MPLog is not the only logfile which SCEP writes events to; MPDetection-XXXXXXXX-XXXXXX.log records an event every time malware is detected.
If you've enabled the
Network Inspection System (NIS) component of SCEP in your SCEP policy, then it will append data to NisLog.txt.
NIS is the network monitoring component of
SCEP. It creates a logfile in the following directory: C:\ProgramData\Microsoft\Microsoft Antimalware\Network Inspection System\Support
Note
If you've chosen to utilize NIS monitoring, the NISLog on your clients is important, because events generated by the NIS service are not sent to the SCEP infrastructure and therefore, cannot be viewed in SCEP reports.
The NIS service starts during bootup, and creates log entries similar to the following sample:
01/03/11-11:23:10] *********************************************
[01/03/11-11:23:10] Network Inspection System service starting.
[01/03/11-11:23:10] Built on "Nov 11 2010" "14:31:02"
[01/03/11-11:23:10] Version: 3.0.8107.0
[01/03/11-11:23:10] *********************************************
[01/03/11-11:23:10] Updating configuration
[01/03/11-11:23:10] [Load  ] Consumer: {fc9058d8-dc9f-4416-bad1-09a6ad347c2a} IpsConsumer.dll (Type: 1)
[01/03/11-11:23:10] Loading engine from folder c:\ProgramData\Microsoft\Microsoft Antimalware\Definition Updates\{1BF8C8F4-9AA1-42A8-87CA-F1A9D94E1034}, fAllowEngineReload=0
[01/03/11-11:23:12] --Signature list start--
[01/03/11-11:23:12] [Off] Sig {887ab750-5912-11dd-ae16-0800200c9a66} Plcy:Win/SMTP.DNSLookups.RCE!2004-0840 - Signature not Host-Detect or Host-Block
What you can see from this entry is that the NIS service started successfully and loaded its signatures. If the system running SCEP is fully patched, it will not be uncommon to see the most, if not all, of the modules are set to [Off].
NIS is designed to monitor for known network-based exploits and to cease monitoring for a given exploit, once the corresponding Hotfix is installed. In other words, NIS is aware of the patch level of the OS it is running on and will not waste resources scanning for attacks, despite the OS being no longer vulnerable.
All anti-malware clients depend on a constant stream of updates to be successful in protecting against new threats. Depending on how your SCEP policies are configured, it is possible for a user to perform a manual definition update. This section will detail the procedures for updating the client through the SCEP user interface.
Open the SCEP client User Interface (UI) by navigating to the Start menu under All Programs, or double-clicking on the SCEP shield icon in the system tray, as shown in the following screenshot:


If you've built your SCEP policies with multiple update sources, the SCEP client will first attempt to pull a definition update from the source listed first in the policy. If that source is not available, it will default to the second update source in the policy, and so on.
Note
One thing to be aware of is that if your SCEP policy points the clients to an internal resource, such as Windows Server Update Services (WSUS) that has long intervals for synchronizing with Microsoft Updates, it is possible that your clients won't receive the most up-to-date definition file. For this reason, it's a best practice to set the synchronization interval to a minimum of three times per day.
If you are using WSUS or Microsoft Updates to provide SCEP definitions, an event will be logged in the Windows Update logfile, %SystemDrive%\Windows\WindowsUpdate.log. If you are utilizing UNC file shares to provide definitions, the Windows Update logfile will not be updated as the UNC delivery method does not utilize the automatic updates agent component of Windows.
You may have noticed in the previous example that both the virus definition and spyware definition file have the same version number; this is because Microsoft utilizes a unified definition file. Virus definitions, spyware definitions, and engine updates all come in the same package.
With something as vital to the security of PC as steady stream of new defintions is fortunate that Microsoft has provided a number of alternate sources. This helps to ensure that if one source of definitions becomes unavailable, then the client can fail over to another source.
In addition to providing SCEP definitions through Microsoft Updates, Microsoft also provides SCEP definitions as a self-contained executable file on their Malware Protection Center website, which is as follows: http://www.microsoft.com/security/portal/
The screenshot of the previous link is as follows:
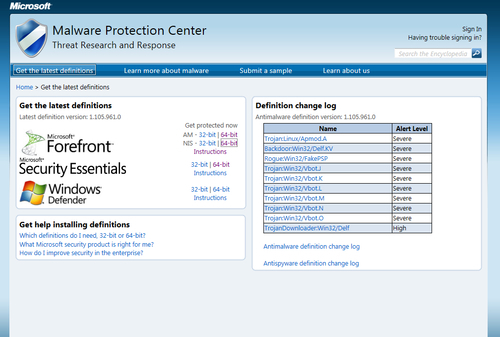
From this web page, you can download either the 32-bit or 64-bit version of the definition file, as well as updates for the NIS service. The file mpam-fe.exe (for 32 bit) or mpam-fex64.exe (for 64 bit) contains a full update for both the anti-virus and anti-spyware definitions, as well as the most up-to-date engine version. Once the file is downloaded, simply executing it will update your SCEP client automatically.
As SCEP is not considered by Microsoft to be a core piece of OS software, it will be necessary to opt-in to receive SCEP updates through Windows Updates if your SCEP client is attempting to connect directly to Microsoft Updates on the Internet. This is accomplished by opening the Windows Update interface in Control Panel and clicking on Get updates for other Microsoft products and agreeing to the end user license agreement.
This is something to be particularly aware of when creating new images that include the SCEP client. Whether a system has been opted-in or not, it will still be able to receive definitions from internal resources, such as WSUS or UNC file share.
This recipe will detail how to modify the settings of a SCEP client using the Settings tab of the SCEP client UI. Although, typically in a large-scale environment, the settings for a SCEP client will be defined in a SCEP policy on the SCCM server, it is useful to understand how to modify these settings at a local client level for testing and troubleshooting purposes.
If a SCEP client is receiving a policy from an SCCM server, or through GPO, the extent to which the local SCEP policy settings can be modified in the client user interface is defined in that policy. A stand-alone SCEP client's setting can be fully modified, although in both cases, local administrator rights will be needed to save changes.
1. To begin, open the SCEP client UI and select the Settings tab, as shown in the following screenshot:

2. Select the Scheduled scan menu option to modify the frequency and type of scans.
3. Select the Default actions menu option to modify SCEP's reactions to malware detections of the listed severities.
4. Select the Real-time protection menu option to modify the behavior of SCEP's real time anti-malware engine.
5. Select the Excluded files and locations menu option to add or remove custom file and directory exclusions, as shown in the following screenshot:

6. Select the Excluded file types menu option to add or remove custom exclusions for specfic file types.
7. Select Excluded processes to add or remove custom exlusions for specific applications and programs as depicted in the following screenshot:

8. Select the Advanced menu option to modify how SCEP handles removable drives, how long it stores files in quarantine, and how long it keeps events in the History tab. Refer to the following screenshot:

9. Select the Microsoft SpyNet tab also known as the Microsoft Active Protection Service (MAPS) menu option to enable or disable particpation in Microsofts Spynet system.

10. Click on Save changes to complete your modifications.
On the Scheduled scan page, you can define the interval for how often a scan will occur and whether it will perform a full or quick scan. You can also disable scheduled scan altogether by unchecking Run a scheduled scan on my computer.
Microsoft has also added a couple of options for scheduled scans, which are designed to minimize the performance impact for end users. The Start scheduled scan only when my computer is on but not in use option will delay the starting of scan until the system is idle. The Limit CPU usage during a scan to setting allows for CPU throttling between 10 percent and 100 percent; this is an especially valuable setting when configuring a SCEP policy for an application or file server.
The next page of settings covers Default Actions, which are preset reactions the SCEP client will take when malware is detected. What category a piece of malware will fall into is defined within the SCEP definitions.
If any SCEP policy has been assigned to a PC from SCCM, you will not be able to modify the Default Actions settings locally. A standalone client on the other hand does allow for the modification of the Default Actions settings, which are as follows:
The Real Time Protection page allows you to modify how the anti-malware engine interacts with the OS. Real time protection can be completely disabled here, although it's never recommended to do so, unless you're troubleshooting an issue with a client.
The Monitor file and program activity on your computer setting allows for some performance tweaking on file servers. You could choose to only scan incoming files or only outgoing files. It's recommended to leave this setting at the default setting of Monitor all files unless you have an explicit reason to do otherwise, such as troubleshooting I/O performance on a file server.
The Enable behaviour monitoring setting allows you to toggle the Behavior Monitoring feature of SCEP. This is a new technology that Microsoft has developed which monitors running processes for suspicious actions that could indicate an infection. For example, a process that loads and then attempts to modify certain sections of the registry known to be favored by viruses could trigger a Behavior Monitoring event.
Enable Network Inspection System allows you to turn the NIS service on or off. As I mentioned earlier, NIS monitors network traffic for patterns that correspond to known vulnerabilities in Windows. NIS is only supported on Windows Vista SP1, Windows 7, and Windows 2008 server systems.
The Excluded Files and Locations page allows for either specific files or entire directories to be excluded from scanning.
When a SCEP client is installed, some preset exclusions will already be defined. Adding additonal exclusions should be done with caution. If a new exclusion is needed, the specific files should be excluded before choosing to exclude an entire directory. The use of wildcards, such as an asterisk (*) and system variables, are allowed.
The Excluded File Types page
allows you to exclude specfic file extensions. To exclude a file type, simply enter the three-character file extension, such as MDB. A period symbol (.) is not needed and will be stripped out if used. Common file types will have a description added automatically. As a best practice, it is recommended to use file type exclusions sparingly. Adding exclusions for a specific file is more secure approach.
The SCEP client has the ability to exclude .Exe, .Com, and .Scr processes. To add an exclusion for a process, you must know the complete path to .Exe, .Com, or .Scr. The path can either be typed in manually or browsed to.
The Advanced page provides some additional settings, including how SCEP treats archive files, whether the client will automatically scan removable drives and it also enables the creation of system restore points before taking action on a detected piece of malware. You can also grant the user the ablitly to view the malware incedent history and define how long items will be stored in the quarantine.
Although it might have a nefarious sounding name, Spynet is actually Microsoft's cloud-based service that allows SCEP clients to report information about programs that display suspicious behavior. The name Spynet is being phased out and rebranded as Microsoft Active Protection Service (MAPS). Keep in mind, on the local client side, the option is still called Spynet in the UI. Future service packs will most likely alleviate this discrepancy.
Spynet must be enabled if you plan on utlizing the Dynamic Signature Service component of SCEP. Dynamic Signatures are essentially cloud-based partial signatures files for new emerging threats, meaning these threats are so new that Microsoft has not had time to add these patterns to the latest version of the full SCEP definiton file.
One of the most vital tools for a SCEP admin is MpCmdRun.exe. With this command-line utility, you can perform a definition rollback, force a signature update, restore a file from quarantine, or kick off a scan. Almost any operational scripting tasks you wish to perform will center on MpCmdRun.exe.
By default, MpCmdRun is stored in the C:\Program Files\Microsoft Security Client\Antimalware directory. Although MpCmdRun can be used to accomplish many tasks with SCEP, this recipe will only describe how to launch a full scan from the command line.
To view all options available for the utility, enter MpCmdRun -? in the Command Prompt window. A partial output is included for reference in the following example. The full contents of the MpCmdRun help file can be found in the appendix.
Usage:
MpCmdRun.exe [command] [-options]

Command Description
   -? / -h                                    Displays all available options for this tool
   -Scan [-ScanType #] [-File <path> [-DisableRemediation]]  Scans for malicious

   -Scan [-ScanType value]
        0  Default, according to your configuration
        1  Quick scan
        2  Full system scan
        3  File and directory custom scan

           [-File <path>]
Below are some alternate examples of ways in which MpCmdRun could be utilized.
One example of how MpCmdRun could be useful is a scenario where your WSUS infrastructure has gone offline and you want to temporarily force your clients to pull a definition from an alternate source without modifying the SCEP policy.
In this case, you would need to either manually enter the following command or create a script that contains the command:
MpCmdRun –signatureupdate –servername\sharename
