


In this chapter, we will cover:
Validating data when an item is added to a list
Adding a custom error message to the Event Receiver
Adding an Application Page to an Event Receiver
Working with List Event Receiver
Deploying Event Receivers
Creating a Feature Receiver
Debugging a Feature Receiver
Debugging Feature Installed events
SharePoint 2010 has a very robust event handling capability that can be used for custom pre and post list event processing. When you create your custom event receivers, you are writing event handlers for different events that SharePoint fires due to an action. The main events triggered by SharePoint can be classified as follows:
The preceding events are triggered by SharePoint when changes, creations, or deletions happen on different objects like Lists, Sites, Site Collections, List Items, and so on.
All the events listed previously can be further classified as, Synchronous and Asynchronous events. Synchronous events are those that are fired before an action takes place (for example, the ItemAdding event or the ItemDeleting event on a List Item). Synchronous events are executed on the same thread as the code, before sending the response to the browser.
Asynchronous events are those that take place after the action has happened for example, the FeatureActivated event or FeatureInstalled event on Features.
For example, a Synchronous event ItemAdded on list item can be used to verify the data that is being added to a list before it gets added. This way you have control over the data that gets added and if needed, you can cancel the data getting added to the list. You cannot cancel an Asynchronous event. Asynchronous events are used for business process flow like sending an e-mail after the item gets added to the list.
Typical scenarios that include creating event handlers are as follows:
Custom data validation so you can avoid adding an item to the list if data validation fails
Sending a custom e-mail when an item is added to a list
Logging to external database for audit purposes and so on
The custom event receiver you write will be packaged as a solution file (with .wsp extension) to deploy to SharePoint event host. Every event receiver is bound to some SharePoint object which is also its host. Site, Web, List, Features, and so on are some of the examples of the hosts. In the previous versions of the Visual Studio, there were no out-of-the-box templates that supported SharePoint development. You had to manually create your manifest files and feature.xml files and use MakeCab.exe
for creating your solution files to deploy. The other alternative was to use open source tools like WSPBuilder for making life a little easier. However, this is not the case with Visual Studio 2010. There are templates available for Event Receivers, Workflows, List Definitions, Visual Web Parts, and many more. We will work with many of them in the subsequent chapters.
Note
Do not use event handlers for long running processes. Use Workflows for that purpose. We will handle Workflows in Chapter 2, Workflows.
Feature receivers like List Event Receivers are handlers that you write when certain events happen from Features. In the Feature Event Receivers, you can write custom handlers when events like Feature Installation, Feature Activation, Feature Deactivation, or Feature Uninstall happens.
Feature Event Receivers are used when you, as a programmer, needs to create entries in web.config for database access or if you are a product vendor, then activate license files, and so on when a Feature is installed or activated. You can also use event receivers for clean-up activities like removing an entry from web.config or delete a list, and so on when a Feature is removed or deactivated.
In this recipe, we will learn how to create a custom event handler for the ItemAdding synchronous event. We will validate the data that is being added to the contact list. We will validate the format of the phone number and e-mail address. The phone number should be of U.S. format. It must consist of three numeric characters, optionally enclosed in parenthesis, followed by a set of three numeric characters, and a set of four numeric characters. The e-mail should follow the standard e-mail notation. We will not allow users to enter some garbage information in these fields. If the data fails, our custom validation will cancel the event so that the data is not inserted into the list.
You should have a fully functional development machine with SharePoint 2010 installed and configured. You also need Visual Studio 2010 IDE installed on the same development machine. The following is the baseline software that is needed to set up the development machine:
Windows 64-bit compliant OS (like Windows 7 or Windows 2008 R2 server)
NET Framework 4.0 (Visual Studio 2010 will install Framework 4.0 whereas SharePoint 2010 requires .NET Framework 3.5)
Visual Studio 2010 with or without Service Pack 1
Expression Blend (optional, but would be helpful in following on Silverlight example)
SQL Server 2008 or SQL Server 2008 R2 (express version is also okay)
SharePoint Designer (optional)
SharePoint Server 2010
Microsoft Office 2010 (InfoPath forms)
You can refer to step-by-step installation instructions of SharePoint on MSDN (http://msdn.microsoft.com/en-us/library/ee554869.aspx). You can also refer to Microsoft 2010 SharePoint Administration Cookbook by Peter Serzo published by Packt Publishing for initial configuration tasks. Peter provides detailed, step-by-step instructions on enabling Developer Dashboard, configuring Secure Store, and so on, which we will be using in the coming chapters. As a developer, it is good to have an understanding of SharePoint Administration as well.
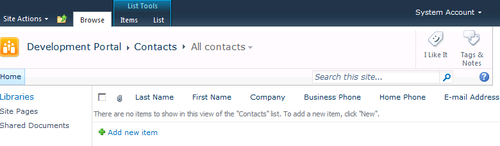
Create a list from the SharePoint user interface called Contacts of template Contacts. The following screenshot shows the end result:
Launch your Visual Studio 2010 IDE as an administrator (right-click the shortcut and select Run as administrator).
Select File | New | Project. The new project wizard dialog box as shown will be displayed (Make sure to select .NET Framework 3.5 in the top drop-down box):

Select Event Receiver under Visual C# | SharePoint | 2010 node from Installed Templates section on the left-hand side.
Name the project ListItemEventReceiver and provide a directory location where you want to save the project and click on OK to proceed to the next step in the wizard.
By default, Visual Studio selects the SharePoint site available on the machine. Select Deploy as a Farm Solution and click on Next to proceed to the next step in the wizard:

In here, make sure to select List Item Events from the drop-down for What type of event receiver do you want? and select Contacts for What item should be the event source?. Select the An Item is being added checkbox in the Handle the following events list box. The following screenshot indicates the selection:

Click on Finish and Visual Studio adds in the necessary files and opens up the
EventReceiver1.cs. This is the code file in which you are going to write your custom event handler.Add the code necessary to validate the phone numbers and e-mail address of the list. Your code should look as follows:
using System;
using System.Security.Permissions;
using Microsoft.SharePoint;
using Microsoft.SharePoint.Security;
using Microsoft.SharePoint.Utilities;
using Microsoft.SharePoint.Workflow;
using System.Text.RegularExpressions;

namespace ListItemEventReceiver.EventReceiver1
{
    /// <summary>
    /// List Item Events
    /// </summary>
    public class EventReceiver1 : SPItemEventReceiver
    {
       /// <summary>
       /// An item is being added.
       /// </summary>
       public override void ItemAdding(SPItemEventProperties properties)
       {
           base.ItemAdding(properties);

           string sWorkPhone = properties.AfterProperties["WorkPhone"].ToString();

           string sEmail = properties.AfterProperties["Email"].ToString();

           if (!string.IsNullOrEmpty(sWorkPhone))
           {
               if (!System.Text.RegularExpressions.Regex.IsMatch(sWorkPhone, @"^[01]?[- .]?(\([2-9]\d{2}\)|[2-9]\d{2})[- .]?\d{3}[- .]?\d{4}$"))
               {
                   properties.Cancel = true;
               }
           }

           if (!string.IsNullOrEmpty(sEmail))
           {
               if (!System.Text.RegularExpressions.Regex.IsMatch(sEmail, @"^(?("")("".+?""@)|(([0-9a-zA-Z]((\.(?!\.))|[-!#\$%&'\*\+/=\?\^`\{\}\|~\w])*)(?<=[0-9a-zA-Z])@))(?(\[)(\[(\d{1,3}\.){3}\d{1,3}\])|(([0-9a-zA-Z][-\w]*[0-9a-zA-Z]\.)+[a-zA-Z]{2,6}))$"))
               {
                   properties.Cancel = true;
               }
           }

       }


    }
}
Build and execute the solution by pressing F5 or from menu Debug | Start Debugging. This should bring up the default browser with the local site that you provided in the project creation wizard.
From your contacts list, select Add new Item to add a new item to the contact list. Here, we will deliberately enter a bad phone format for the Business Phone field as shown in the following screenshot to verify our list event handler:

Click on the Save button on the toolbar, this will invoke the event handler and throws an error as shown in the next screenshot. If you notice, the error page indicates that an event receiver cancelled the request:

Close the error dialog and enter a new contact, but this time using the proper phone and e-mail format. The contact gets added without any problem as follows:

When Visual Studio created the EventReceiver solution, it created a project item called EventReceiver1. This project item is a folder with two files Elements.xml and EventReceiver1.cs. The file
EventReceiver1.cs is used to write our custom event handler code.
Elements.xml is the configuration file for our event receiver. It contains properties such as Name, Type, and ListTemplateId. Property Type indicates the event that we are handling. In this case we are handling ItemAdding event. In our solution, we associated our event receiver with the contacts list in the wizard. That information can be seen from the value associated with ListTemplateId attribute as shown in the next code snippet. The ListTemplatId of 105 corresponds to the contacts template. For the complete list of template IDs refer to MSDN at: http://msdn.microsoft.com/en-us/library/microsoft.sharepoint.splisttemplatetype.aspx.
If we deploy
this solution to our website then any lists that are created using this template as the base will have our event receiver associated. Our code will get executed whenever SharePoint triggers the ItemAdding event for this ListTemplateId.
<?xml version="1.0" encoding="utf-8"?>
<Elements xmlns="http://schemas.microsoft.com/sharepoint/">
  <Receivers ListTemplateId="105">
      <Receiver>
        <Name>EventReceiver1ItemAdding</Name>
        <Type>ItemAdding</Type>
        <Assembly>$SharePoint.Project.AssemblyFullName$</Assembly>
        <Class>ListItemEventReceiver.EventReceiver1.EventReceiver1</Class>
        <SequenceNumber>10000</SequenceNumber>
      </Receiver>
  </Receivers>
</Elements>
Assembly element has some funny looking string. This is called the Visual Studio substitution token. When we build the package, these tokens are substituted by the actual value. In our case, the full assembly name will be added at this location. Class element just provides the fully qualified class name including the namespace.
In the Elements.xml, the SequenceNumber element has a special task. If there is multiple event receivers for the same list and if all are handling the same ItemAdding event like ours then SharePoint refers to this sequence number to determine the order of execution of the handlers. There is a missing element named Synchronization—that is an optional item not shown. It refers to execution of the event. You can set this to execute an event asynchronously or synchronously. But this element does not apply to a synchronous event like ItemAdding. Do not set this property in the Elements.xml file for synchronous events. You can set this property for asynchronous events like ItemAdded to run synchronously.
Visual Studio also added another project item called Features. This is another folder which contains a feature called Feature1. Features are the way to deploy customizations like Event Receivers, Visual Web Parts, Workflows, and so on to a SharePoint environment. If you have a large custom code that makes changes for example to site templates and creates various lists and so on, by using Features, you can package this code together and deploy this code across all the web front ends of your SharePoint farm in one go. This reduces the complexity of going to each and every location of your site template to add your customizations. Some of the capabilities that Features provide in SharePoint are as follows:
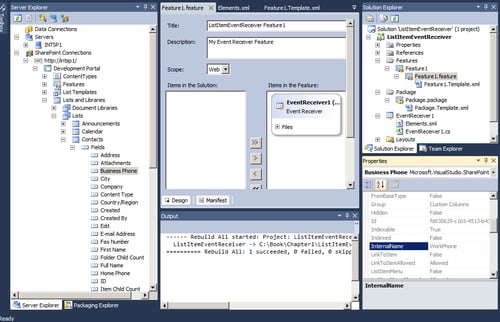
Using Features reduces the inconsistencies and versioning discrepancies across the web farm. In our case, it helps us deploy our custom Event Receiver. If you double-click on the Feature1.feature in Visual Studio, you can see as shown in the following screenshot that our Event Receiver is an item inside this feature. Here you can make modifications to the Feature's Title, Scope, and Description. We can deploy this feature across different sites and also on different farms.

When we built and ran our solution, Visual Studio automatically created a package with an extension WSP and deployed it to our test site and activated it. When we stopped debugging the solution, Visual Studio deactivated this feature, uninstalled it, and did all the necessary clean-up work.
WSP extension files are SharePoint solution files. This is basically a CAB file with one or more features. Each of these features can refer to one or more items like Event Receivers, List Definitions, Web Parts, Workflows, and so on.
Document libraries or form libraries in SharePoint are lists but with different content types. We will learn about content types in Chapter 4, List Definitions and Content Types. The recipe we learnt in here will work with any kind of list template. But some list templates populate different values in BeforeProperties and AfterProperties. For more information on AfterProperties and BeforeProperties, refer to MSDN (http://msdn.microsoft.com/en-us/library/microsoft.sharepoint.spitemeventproperties_members.aspx).
Event Receivers you create in Visual Studio inherits from particular SharePoint event receiver class that corresponds to the object to which you are writing the handler. For example, in the recipe we inherited our handler from SPItemEventReceiver. If we were to write an event handler for the List events, we would have inherited our class from SPListEventReceiver. The following table shows the complete list of the Event Receivers class that are used to inherit the event handlers.
|
List Item events |
SPItemEventReceiver |
|---|---|
|
Web events |
|
|
List events |
|
|
Workflow events |
|
|
List Email events |
|
The entire event receivers except for Feature Event Receivers and List Email Event Receivers are derived from a base class called SPEventReceiverBase. FeatureReceivers are derived from a base class called SPFeatureReceiver and Email Event Receiver is derived from a base class called System.Object.
Not all event hosts will support all the event types. Say for example, the list event type ListAdding makes sense from the site or web level perspective. It does not make sense at the list level. Whereas FieldAdding event makes lots of sense for List even though both of these event types have the same base class. For a full list of hosts for event types and their supported events, refer to MSDN at: http://msdn.microsoft.com/en-us/library/gg749858.aspx.
To debug Event Receivers, like any other Visual Studio project, put a breakpoint on the line you want to break. In our example, put a breakpoint on the first line in the method ItemAdding in the file EventReceiver1.cs and press F5 to debug the solution.
Debugging helps you understand your code better. You must build your code with debug configuration enabled for debugger to work. By default, Visual Studio starts with this configuration. When you use debugging, you should stop your code at a certain location and complete the following:
Inspect it for data that is being used by the code
Inspect it for exceptions that occur on conditions
Test while you write your code
Figure out any logical errors
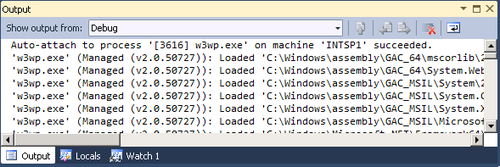
When you press F5, Visual Studio automatically starts a w3wp.exe process and attaches the debugger to that process. W3wp.exe is an IIS worker process that handles all the requests for a particular application pool. The following screenshot shows the output window (you can open the output window from menu View | Output). Here you can see that the first line indicates the process that the debugger has attached to. It also provides the process ID (in this case it is 3616—it may be different for you).
So whenever any requests arrive through this process, the debugger will be able to break at the line you have indicated and highlight the line as shown here. From here on, you can step into code by pressing F11 or step over the code by pressing F10.

You can add watch on the variables in the code. But you cannot change the variable values while running.
SharePoint 2010 offers Developer Dashboard
which provides information that can help developers to debug a problem. By default, Developer Dashboard is not turned on. Turn it on by executing the following command. The following command sets a value on a property named developer-dashboard to ondemand:
Stsadm –o setproperty –pn developer-dashboard –pv ondemand

When you refresh your site, you should be able to see a green icon next to the login name on the right-hand side as shown. Clicking that will open the Developer Dashboard which provides information on all the calls SharePoint makes in order to open a page or to execute an event handler.
The following screenshot shows the Developer Dashboard on the initial opening page. If you look closely, you can see that it also provides information on how long certain methods took to process. It also provides information on SQL stored procedures or queries that were executed. You can click on each of these procedures and verify the data that is passed to the queries. Remember, Developer Dashboard does not provide information on how long the custom code took to execute, it provides information on the calls that the custom code made.
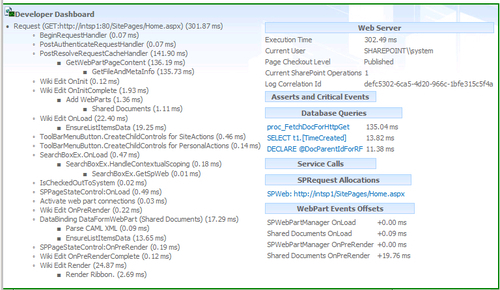
The Log Correlation Id helps you to dig through the ULS logs and find any corresponding problems related to the events that are shown in the Developer Dashboard. Using both the Developer Dashboard and ULS logs, you should be able to find any problem with your custom code.
When we created our Event Receiver in the previous recipe, we saw that if we cancelled the insertion of an item into a list (due to a data validation error), an ugly error message appeared indicating that an Event Receiver had cancelled the request. It is difficult for users to comprehend this error message, it does not indicate that the error is due to data validation and that there is nothing wrong with SharePoint. In this recipe, we will customize this error message that indicates what the error is.
The solution from the previous recipe is used for further modifications. You should complete the previous recipe successfully to follow this one.
If you have closed your Visual Studio IDE, launch it now as an administrator and open the solution file that we created in the previous recipe.
Open EventReceiver1.cs and add the following two lines of code just before the properties.cancel = true line in the
workphoneregular expression match "if statement":string sErrMsg = "Business Phone is not in correct format"; properties.ErrorMessage = sErrMsg;
Do the same for the
Emailregular expression matchifstatement. YourItemAddingmethod should look like the following code bundle:public override void ItemAdding(SPItemEventProperties properties) { base.ItemAdding(properties); string sWorkPhone = properties.AfterProperties["WorkPhone"].ToString(); string sEmail = properties.AfterProperties["Email"].ToString(); if (!string.IsNullOrEmpty(sWorkPhone)) { if (!System.Text.RegularExpressions.Regex.IsMatch(sWorkPhone, @"^[01]?[- .]?(\([2-9]\d{2}\)|[2-9]\d{2})[- .]?\d{3}[- .]?\d{4}$")) { string sErrMsg = "Business Phone is not in correct format"; properties.ErrorMessage = sErrMsg; properties.Cancel = true; } } if (!string.IsNullOrEmpty(sEmail)) { if (!System.Text.RegularExpressions.Regex.IsMatch(sEmail, @"^(?("")("".+?""@)|(([0-9a-zA-Z]((\.(?!\.))|[-!#\$%&'\*\+/=\?\^`\{\}\|~\w])*)(?<=[0-9a-zA-Z])@))(?(\[)(\[(\d{1,3}\.){3}\d{1,3}\])|(([0-9a-zA-Z][-\w]*[0-9a-zA-Z]\.)+[a-zA-Z]{2,6}))$")) { string sErrMsg = "Email is not in correct format"; properties.ErrorMessage = sErrMsg; properties.Cancel = true; } } }When you build and run this solution, as done previously, you should be directed to the site that you provided in the solution creation wizard.
Enter a new contact with an improper phone format for the Business Phone field. You should see the same error screen as shown previously including a custom error message that you coded as shown here:

The properties object that you use in the ItemAdding method has a property called Error Message. It is null by default. When SharePoint encounters a null value, it just uses the default error message. Adding a custom error message to this field will cause SharePoint to display your error message.
If you want to just cancel the insertion of an item into the list to list without displaying the error page as done previously, just set the properties object's status property as shown in the following code. This will cancel the insert, but will not display the error page.
properties.Status = SPEventReceiverStatus.CancelNoError;
More information on SPEventReceiverStatus can be found on MSDN (http://msdn.microsoft.com/en-us/library/microsoft.sharepoint.speventreceiverstatus.aspx)
In the
Event Receiver we have used field name WorkPhone for the Business Phone and Email for the Email Address fields. How did I figure these names? In Visual Studio 2010 there is a new tool called Add SharePoint Connection. You can access it from menu Tools | Add
SharePoint
Connection
It will ask the URL to connect. Provide URL information for your site and it will list all the information pertaining to your site in a tree structure. This information is read-only and you cannot make any changes through the IDE. You can navigate to the Contacts List and to the fields as shown here:
You
can select the Business Phone field and in the Properties window look for InternalName. This is the field name that we used in the code to get the values. Just go through the different properties of the field in the properties window, and you will find some interesting properties like Field ID which is a GUID, whether the field is hidden or not, and so on.
Well, we know how to write an Event Receiver, we know how to customize the error message that is displayed to the user but is there a way to customize the error page that is displayed? The answer is—YES. Visual Studio provides a very easy way to customize these error pages. In the following recipe, we will find out how it is done.
If you have closed Visual Studio IDE, launch it as an administrator.
Open the previously created ListItemEventReceiver solution.
Right-click on the project and select Add New Item to add an Application Page as shown in the following screenshot:

Name it
EventReceiverErrorPage.aspxand click Add. This will generate an.aspxpage underneath a folder calledLayouts. This is a SharePoint mapped folder hence the green circular icon next to this folder. Underneath this mapped folder a subfolder with the same name as the project (in our caseListItemEventReceiver) is created and this is where you will find you're newly created Application Page.Open up the
.aspxpage and add a label under the section:<asp:Content ID="Main" ContentPlaceHolderID="PlaceHolderMain" runat="server">
Change the ID of the label to "
lblErrMsg" and clear out theTextattribute. Your ASPX mark-up should be as follows:<%@ Assembly Name="$SharePoint.Project.AssemblyFullName$" %> <%@ Import Namespace="Microsoft.SharePoint.ApplicationPages" %> <%@ Register Tagprefix="SharePoint" Namespace="Microsoft.SharePoint.WebControls" Assembly="Microsoft.SharePoint, Version=14.0.0.0, Culture=neutral, PublicKeyToken=71e9bce111e9429c" %> <%@ Register Tagprefix="Utilities" Namespace="Microsoft.SharePoint.Utilities" Assembly="Microsoft.SharePoint, Version=14.0.0.0, Culture=neutral, PublicKeyToken=71e9bce111e9429c" %> <%@ Register Tagprefix="asp" Namespace="System.Web.UI" Assembly="System.Web.Extensions, Version=3.5.0.0, Culture=neutral, PublicKeyToken=31bf3856ad364e35" %> <%@ Import Namespace="Microsoft.SharePoint" %> <%@ Assembly Name="Microsoft.Web.CommandUI, Version=14.0.0.0, Culture=neutral, PublicKeyToken=71e9bce111e9429c" %> <%@ Page Language="C#" AutoEventWireup="true" CodeBehind="EventReceiverErrorPage.aspx.cs" Inherits="ListItemEventReceiver.Layouts.ListItemEventReceiver.EventReceiverErrorPage" DynamicMasterPageFile="~masterurl/default.master" %> <asp:Content ID="PageHead" ContentPlaceHolderID="PlaceHolderAdditionalPageHead" runat="server"> </asp:Content> <asp:Content ID="Main" ContentPlaceHolderID="PlaceHolderMain" runat="server"> <asp:Label ID="lblErrMsg" runat="server" Text=""></asp:Label> </asp:Content> <asp:Content ID="PageTitle" ContentPlaceHolderID="PlaceHolderPageTitle" runat="server"> Event Receiver Error </asp:Content> <asp:Content ID="PageTitleInTitleArea" ContentPlaceHolderID="PlaceHolderPageTitleInTitleArea" runat="server" > Event Receiver Error </asp:Content>Right-click anywhere on the ASPX page and select View Code to open the
EventReceiverErrorPage.apsx.csfile in order to wire the label created previously to the error message. The code inside thePage_Loadmethod should be as follows:protected void Page_Load(object sender, EventArgs e) { string sErrMsg = Request.Params["ErrMsg"]; lblErrMsg.Text = sErrMsg; }Now we need to wire this page in our Event Receiver whenever there is an error. To do that, we will open
EventReceiver1.csfile and add the following code after the line that saysproperties.Cancel=true:.properties.Status = SPEventReceiverStatus.CancelWithRedirectUrl; properties.RedirectUrl = string.Format("/_layouts/ListItemEventReceiver/EventReceiverErrorPage.aspx?ErrMsg={0}", sErrMsg);Enter a new contact with an improper phone format for the Business Phone field. You should see your custom error screen and custom error message as follows:

As indicated in the previous recipe, the properties object can be set with different statuses. One such status is CancelWithRedirectUrl. This directs SharePoint to look at another property called RedirectUrl. This is the property where you set up your custom URL and send the error message to it as a query parameter.
When you added the Application Page to the project, we saw a mapped folder called Layouts getting added. Mapped folders are file system locations on the SharePoint server. The Layouts folder can be found at: "\Program Files\Common Files\Microsoft Shared\Web Server Extensions\14\TEMPLATE". Generally this location is referred to as Root. Some SharePoint developers refer to this location as Hive. Any subfolders that are added underneath these mapped folders will be created on the disk on each of the SharePoint servers in the farm.
Whenever
you create a web application in SharePoint, all these mapped folders are mapped for the web application. The layouts mapped folder is mapped as _layouts and CONTROLTEMPLATES as _controltemplates and so on. So all the site collections and sites in the web application can access these mapped folders through their relative paths. This is the reason why we qualified the link to our Application Page with /_layouts/.
Visual Studio follows a good development model of creating subfolders underneath mapped folders when you need to add your custom resources. This way you do not overwrite any of the OOB SharePoint components with the same name. Also, do not try to change the files in the Root. This will affect the entire farm.
Until now we worked with List Item Event Receivers. Let us take a look at List Event Receiver in this recipe. In this recipe, whenever a new list is created on the site, we need to log an audit entry into another list.
If you have closed your Visual Studio IDE, launch it now as an administrator and create a new Event Receiver project. Name the project ListEventReceiver.
By default, Visual Studio selects the SharePoint site available on the machine. Select Deploy as Sandboxed Solution and click Next to proceed to the next step in the wizard.
In here, make sure to select List Events from the drop down for What type of event receiver do you want? Check A List is being added in the Handle the following events list box.
Click on Finish and Visual Studio adds in the necessary files and opens up the
EventReceiver1.cs. This is the code file in which you are going to write your custom event handler.Now add the code necessary to write an entry into the EventReceivers custom list that we created in the Getting Ready section of this recipe. Your code should be as follows:
using System;
using System.Security.Permissions;
using Microsoft.SharePoint;
using Microsoft.SharePoint.Security;
using Microsoft.SharePoint.Utilities;
using Microsoft.SharePoint.Workflow;
namespace ListEventReceiver.EventReceiver1
{
    /// <summary>
    /// List Events
    /// </summary>
    public class EventReceiver1 : SPListEventReceiver
    {
       /// <summary>
       /// A list is being added.
       /// </summary>
       public override void ListAdding(SPListEventProperties properties)
       {
          AddMessage(ref properties, "Adding List");
base.ListAdding(properties);
       }

       private void AddMessage(ref SPListEventProperties properties, string sMessage)
       {
           using (SPWeb web = properties.Web as SPWeb)
           {
               SPList list = web.Lists["EventReceivers"];
               SPListItem li = list.AddItem();
               li["Title"] = properties.ListTitle;
               li["Message"] = sMessage + " - " + properties.ListId;
               li.Update();
               li = null;
               list = null;
           }

       }

    }
}
Build and execute the solution by pressing F5 or by navigating to menu Debug | Start Debugging. This should bring up the default browser with the local site that you provided in the project creation wizard.
Add a new list of custom list templates and call it TestList. You should be able to see an entry in the EventReceivers List as shown below. Your List ID, and the GUID may be different from what is shown in the following screenshot:

It works in the same way as the List Item Event Receivers works, except for the fact that the List Event Receivers have a base class of SPListEventReceiver. You can compare the elements.xml file from the List Item Event Receiver (created in our first recipe) with this one. The only difference you will see is that it does not have a ListTemplateId attribute. This makes sense as this is applied to all lists in the site. The Event Receiver in this case is acting at the site level. That means, whenever you create a new list in the site where this is deployed, this event gets triggered.
If you have noticed, base.ItemAdding method is called first in some cases and called last in some other. Where should we call this method and how do we know if it should be called first or last? The rule of thumb for calling this method is very simple. If you are going to cancel the event then call it in the end. If not, call it in the beginning. So for synchronous events like ListAdding or ListItemAdding events, where you are doing some data validations and will cancel the events, call it in the end.
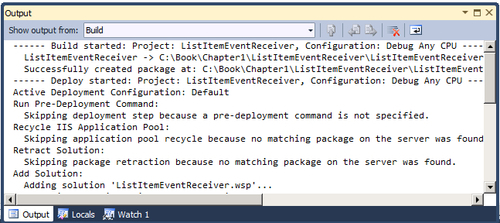
During the previous recipes, we saw Visual Studio automatically uploading a solution and activating it for our test purposes. The entire step-by-step process that Visual Studio does in order to deploy a solution to the site can be seen in the output window as shownin the following screenshot Development is all done and now we need to deploy this solution to production. Here are the step-by-step instructions on how we deploy solutions:
It is necessary to understand the concept of event receivers to follow through this recipe. It is advised to complete the previous recipes sucessfully.
If you have closed Visual Studio IDE, launch it as an administrator.
Open the previously created ListItemEventReceiver solution.
Open the project properties window by right-clicking the project and selecting Properties.
Select the Build Tab and set the Configuration to Active (release).
Rebuild the solution from menu Build | Rebuild.
From the same build menu, select Package to make a package of this solution. This will generate a
.wspsolution file in thebinfolder of your solution as shown:
You can use the
stsadmcommand to deploy this solution file to any site in the farm.To add the solution to the solution store use the command:
stsadm –o addsolution –filename ListItemEventReceiver.wspTo deploy the solution use the command:
stsadm –o deploysolution –name ListItemEventReceiver.wsp –local -allowgacdeploymentNow install the feature by using the command:
stsadm –o installfeature –filename ListEventReceiver_Feature1\Feature.xmlYou can navigate to Manage Site Features from Site Action | Site Actions | Manage Site Features. You should see your Feature deployed to the site but not activated as shown:

You can activate the feature by clicking the Activate button.
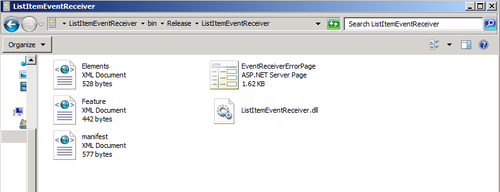
When we built and packaged our solution, a .wsp solution file was created. This is nothing but a CAB file contaning feature file and the items that the feature is going to install. You can rename the .wsp file to a .CAB extension and open it through any ZIP file extractor. The following is a screenshot showing the contents of a .wsp file:
The
.wsp file contains the DLL, Application Page, and three different XML documents. These XML documents provide the necessary information on where the resources need to be deployed. Open up the manifest.xml in notepad. You can see it lists the locations of the Application Page, Event Receiver DLL, and the Feature.
In SharePoint, a Feature is nothing but an XML file. The XML file is named Feature.xml. This XML contains the name, the ID, and the scope information of the feature. The name and the ID attributes of the Feature uniquely identifies the Feature. An ID is a GUID in the format "xxxxxxxx-xxxx-xxxx-xxxx-xxxxxxxxxxxx" where x is a hexadecimal number that can be from 0-9 and a-f. When you created the solution, Visual Studio automatically created this GUID. Feature.xml also includes the location of the Event Receiver's Elements.xml.
Scope indicates how the Feature needs to be scoped. You can scope a Feature in four ways:
Farm Level: This can be activated at a farm level. That is, all the web applications in the farm will have access to the feature.
Site Level: Can be activated at site collection level, meaning all the sites in the sites collection will have access to this feature.
Web Level: Can be activated for a specific website.
Web Application Level: Can be activated for all sites in the web application.
We
already went through the Elements.xml in the previous recipe and it basically contains the information about the Event Receiver that we deployed.
You can use PowerShell commands to install and activate features instead of stsadm commands. The corresponding PowerShell commands for the STSADM commands that we have used in this recipe are:
Add-SPSolution –LiteralPath <Location of your wsp>
Install-SPSolution -Identity <WSPName> -WebApplication <URLname>
Enable-SPFeature FeatureFolderName -Url <URLName>
Feature Receiver as the name indicates is an event handler written to handle events triggered by Features. In this recipe, we will handle some of the Feature events and add a message to a custom list in our site.
Create a custom list from the SharePoint user interface called FeatureEventReceiver. By default, SharePoint adds a column called Title. Add a new column called Message to this list. The end result should look like the following:

Launch Visual Studio as an administrator.
Create an empty SharePoint project and name it FeatureEventReceiver.
Stick with the defaults and click on Finish on the New Solution Wizard. As this is an Empty SharePoint project, there are no items in the project.
Add a new Feature to this project by right-clicking on the Features folder. This should add a new feature called Feature1 and should open the Feature Designer in the IDE.
Right-click this new feature to add an Event Receiver. This should add a code file named Feature1.EventReceiver.cs. Uncomment FeatureActivated and FeatureDeactivating methods. The project structure should look similar to the following screenshot:

Add the following method to the class
Feature1EventReceiver:private void AddMessage(ref SPFeatureReceiverProperties properties, string sMessage) { using(SPWeb web = properties.Feature.Parent as SPWeb) { SPList list = web.Lists["FeatureEventReceiver"]; SPListItem li = list.AddItem(); li["Title"] = properties.Feature.Definition.DisplayName; li["Message"] = sMessage; li.Update(); li = null; list = null; } }Call this method from the
FeatureActivatedandFeatureDeactivatingmethods. Your code should look like the following:public override void FeatureActivated(SPFeatureReceiverProperties properties) { AddMessage(ref properties, "Feature Activated"); } public override void FeatureDeactivating(SPFeatureReceiverProperties properties) { AddMessage(ref properties, "Feature Deactivating"); }Put break points on both the
FeatureActivatedandFeatureDeactivatingmethods and build and run the solution. This will open the default browser with the site that was provided in the solution creation wizard. The debugger never stops at the break points that were set. Exit out of this site to close the debugger so that the Visual Studio can retract the solution as well.Navigate to your site and open up the FeatureEventReceiver list where you should see two list items corresponding to Feature Activated and Feature Deactivating message as shown here, even though you could not see your code getting executed:

From the code perspective, it is very simple. All we are doing is from the Feature properties, we get the reference to the site where Feature is being activated and deactivated. From this site reference, we will get the list object and add new items to it.
When we
built and ran the solution, behind the scenes, Visual Studio packaged the solution as .wsp file and executed all the commands for activating the solution. The debugger has not yet attached to the process and hence cannot stop at the break point provided.
Visual Studio first builds the solutions and during this process also deploys the solution and activates it. The next step in the process is to run the solution, during which time the Visual Studio debugger attaches itself to the w3wp.exe process. At this time, the Feature is already installed and activated and there is no way for the debugger to stop at the break point indicated. Closing the browser does not indicate that the Feature will be deactivated either and hence the break point for FeatureDeactivating never gets executed.
Debugging a Feature Receiver is a different process. It is not like debugging the List Item Event Receivers. As described in the previous recipe, Visual Studio does lots of work behind the scenes and so we are unable to hit the break points.
Apart from that, debugging Feature Receivers are dependent on events that we are trying to debug. In this recipe, we will follow through the process of debugging FeatureActivated and FeatureDeactivating events.
Launch Visual Studio as an administrator and open the solution that was created in the previous recipe.
In the solution explorer, select the project and press F4 to bring open the project properties window.
Set the Active Deployment Configuration to No Activation as shown here:

Put break points on both
FeatureActivatedandFeatureDeactivatingmethods and run the project.This will bring up the site in the default browser. Navigate to Site Actions | Site Settings | Site Actions | Manage site features. This should bring up the page as shown in the following screenshot and you should be able to see your
Featureinstalled, but not activated.
Clicking the Activate button should invoke the debugger now.

Similarly, clicking the Deactivate button should invoke the debugger to hit the break point on the
FeatureDeactivatingmethod.
By default Visual Studio sets up for Activation of the features. This makes sense as all the different SharePoint projects make use of Features and for test purposes it is very necessary to activate it and execute the solution. So every time a developer creates a SharePoint project, they do not need to remember to set this flag.
This does create a problem for Feature Receivers though. Hence we set the flag to No Activation and there by Visual Studio just installs the solution without activating it.
That's right, now we know how to debug Feature Receivers events like Feature Activated and Feature Deactivating. Is there a similar flag that we can set in Visual Studio to Debug Feature Installed and Feature Uninstalled? No, there are no flags that you can set to make debugger stop on the break points on Feature Installed and the Feature Uninstalling methods.
The commands for installing the features are part of the deployment process in Visual Studio. There are no flags or properties that you can set to debug this event in the Feature Receiver. In this recipe, we will guide you through the step-by-step process to accomplish this task.
Launch Visual Studio as an administrator and open the solution that was created in the previous recipe.
Retract the solution if it was already deployed to a site.
Uncomment the FeatureInstalled method and press F9 to put in a break point.
Build the solution and package it.
From the command prompt use
stsadmto add solution to solution store and deploy it as described in the recipe Deploying the Event Receivers. Follow the steps 8 and 9 in that recipe to deploy the solution.In the Visual Studio, go to project properties from menu Project | FeatureEventReceiver Properties.
In the Debug tab, set the external program to
ProgramFiles\CommonFiles\MicrosoftShared\WebServerExtensions\14\BIN\STSADM.exe.Enter the command line arguments in the same tab as follows:
-o installfeature –name FeatureEventReceiver_Feature1 –forceYour debug tab should be similar to the one shown in the following screenshot:

In the window, open the SharePoint tab. Create a new Active Deployment Configuration and name it Empty Configuration as shown here and click OK.

Select the new configuration in the Active Deployment Configuration drop-down.
When you press F5, the debugger stops at the break point on
FeatureInstalledmethod as shown in the following screenshot:
In here, we
are manually attaching an external process to the Visual Studio debugger. In our case, STSADM.exe is our external program. We did the preliminary work of adding the solution to the solution store and deploying the solution. We bypassed the entire deployment process that Visual Studio uses, so we can debug our Feature Receiver.
By default, Visual Studio provides two configurations: the Default configuration and the No Activation configuration. You cannot edit those configurations. None of these configurations are good for our purpose here. What we needed was a configuration that just deploys the solution without installing it. So we created an empty configuration and resorted to a manual process to debug this solution.
Use the same process as used previously to debug the uninstalled event in the Feature Receiver. In step 8, substitute command line arguments as follows:
-o uninstallfeature –filename FeatureEventReceiver_Feature1\Feature.xml