


In this chapter, we will cover:
Building our first Windows Store app
Adding a splash screen (and app tiles) to our app
Improving the application to make it compliant with the Windows 8 lifecycle model
Improving our application tile
Improving our application with toast notifications
We are clearly speaking of a new, modern, and touch-friendly kind of application with the Windows Store apps style.
Windows Store app style application development, for the latest Windows 8 platform, is a very important part of this release of the .NET Framework 4.5.
We will explore Windows Runtime managed development in our development recipes. We also have the power of a very simple, well designed, and lightweight base class library API at our disposal (C# and VB) for developing Windows Store apps. This is called Windows Runtime, more commonly known as WinRT.
The following image clarifies the overall structure and components that we will have to use for developing Windows Store apps:

Portable libraries are there to help us port our existing code into multi-targeting scenarios such as Windows Store apps, Windows Phone, Silverlight, desktop, or X-box code with a strong focus on Model-View-ViewModel (MVVM). MVVM is an architectural design pattern designed for modern user interface (UI) development, very commonly used in XAML development. This will allow us to share the Model and ViewModel code with only the need for rewriting the UI and the application model, apart from the device integration.
Windows Store apps are designed for tablet devices and touch interaction, mainly for consumers. However, the good old desktop is still there and we can develop classic Windows applications, now called desktop apps, through the desktop mode.
Both of these execution and development modes coexist and are here for different scenarios. This chapter focuses on Windows Store apps development.
The Windows 8 app programming model basically:
Implements the new Windows Store app style
Provides a simple programming model for developers
Provides WinRT, which provides a natural .NET-like interaction with Windows APIs
Provides a Silverlight-like XAML UI model to develop with
Is sandboxed, providing self-contained secure applications
Is designed to be asynchronous, which if well applied, makes our applications fast and fluid
WinRT provides projections that expose the API to the different development environments. With this we can use WinRT from the .NET Framework 4.5.
The UI can be created with XAML (or HTML and CSS if we prefer), which is rendered with DirectX 11.1 (also known as Direct2D), so that we have a high performing UI. We can also implement the interface using DirectX.
So the good news is that the development is very straightforward and easy if we have some experience in Silverlight, Windows Presentation Foundation (WPF), or Windows Phone. If not, it will only be easy.
Note that the Base Class Library (BCL) used by WinRT is not the full desktop version but a reduced set, very similar to the Silverlight types.
There are also some very important Windows Store app principles to keep in mind. We will explore the following principles through the recipes in this book:
Windows Store app style design: Focus on the content, minimalism, and emphasis on typography
Fast and fluid: Fast user interactions and transitions that are intuitive and executed without delays (performance)
Touch first: Simple and consistent touch interaction language
Scale beautifully: Windows Store apps are readily executed on tablets with less than 10-inch and up to 27-inch screens
Support for multiple states: Full screen, portrait, landscape, or snapped
Using the right contracts: Contracts provide a way for Windows Store apps to collaborate, allowing the user to search or share content between applications
Live tiles: Useful information appears on the app's tile on the start screen while the app is not in execution
Settings and data roam to the cloud: Users get the same experience regardless of where they sign in from
It's your turn; go ahead and explore our recipes! They will help you explore progressively how to implement the different flavors of this new era of Windows Store apps. Let's get started!
First things first; we will start with the creation of our first base application that we will re-use for most of the following recipes in this chapter, improving it one step (or more) at a time. This recipe will show you how to implement a basic application and help you get familiar with Visual Studio 2012 and Blend for Visual Studio 2012.
In order to use this recipe, you should have a Windows 8 operating system, Visual Studio 2012, and Blend for Visual Studio 2012. We will also need a Windows 8 developer license to create Windows Store apps, which we can get for free from Visual Studio 2012, as shown in the following image:

First we will open Visual Studio 2012 in Windows 8 and create a new project. For this we must perform the following steps:
Select the Menu option from File | New Project (or press Ctrl + Shift + N).
In the New Project window, we will select Visual C# from Installed | Templates. Then select the Windows Store app style and finally the Grid App (XAML) template. We will give it a proper name such as
OurFirstMetroApp, and location, and click on the OK button.
We will build the solution from the menu option Build | Build Solution (or press F7) and then debug it from the menu option Debug | Start Debugging (we can also press F5 or click on the play icon on the actions bar). If everything is working properly, we should get the following output:

Now, we can scroll horizontally, click (or touch if we have a tactile screen) on a group title to open the group view, and click on an item title to open the item view. In the item view, we have buttons at the edges of the screen to navigate through the group items.
We will go back to the Windows 8 desktop mode, then to Visual Studio 2012 and stop the debugging session (or press Shift + F5).
Next, we will go to Solution Explorer and double-click on the
Package.appxmanifestfile.Once the Application Manifest Editor window opens, we will go to the Capabilities tab and uncheck the Internet (client) capability option, as our current application does not need outbound access to the Internet.
To add a new item to the project, on the Visual Studio 2012 Solution Explorer right-click on the project and select Add | New Item… (or Ctrl + Shift + A).

Select the Windows Store app style, and from there select the Basic Page item, name it
HelloPage.xaml, and then click on the Add button at the lower-right corner of the window.
Open HelloPage.xaml, expand the design view, and then click on the Unfold button on the section that separates the WYSWIG render view of the XAML from the XAML code. There we will select Fit all at the left-hand side of the screen.

Let's add the finishing touches to our Visual Studio XAML workspace. To do so, we will expand the TOOLBOX and the DOCUMENT OUTLINE panels and pin them.
To use our project-defined name, we will comment the page's
AppNameresource, which is now overriding the globalAppNameresource. We will go and comment the line defining this on the<Page.Resources>tag of HelloPage.xaml, which is located in the topmost area of the XAML code, similar to the following code:<Page.Resources> <!-- TODO: Delete this line if the key AppName is declared in App.xaml --> <!--<x:String x:Key="AppName">My Application</x:String>--> </Page.Resources>
Next, we will add a grid control to the bottom section of the design area by dragging it from the TOOLBOX panel and dropping it just below the title. It will be added inside the first grid and will appear on the DOCUMENT OUTLINE panel following the hierarchy.
We also want it to occupy all the available space on the grid row and column where we created it, so we will right-click on the grid, select Reset Layout, and then select All.

As the grid will handle the body section's layout, we will name it
grBody. Select the grid and change the property Name on the Properties panel, or we can change it directly in the DOCUMENT OUTLINE panel.Next, we will add a row separator to the
grBodygrid. We will move our cursor to the left-hand side of the grid, and an orange marker with the shape of an arrow will appear, indicating a grid separator. Clicking on that region, we will be able to add, modify, or delete a row. The same applies to the columns. We will add a row about 150 pixels from the bottom.
We will continue and change the size of the row to a fixed one. Select the row and move the cursor to the left-hand side of the blue zone that defines the row manipulation section. A pop-up menu will appear where we will choose the Pixel option for a fixed bottom row.

Next, we will add a TextBlock control on the top row of the grid that we just divided (adding a row separator creates two rows). We will reset the layout of the TextBlock control as we did previously with the grid.
Next, we will style the TextBlock using a default style by right-clicking on the TextBlock and then selecting the option Edit Style | Apply Resource | PageSubheaderTextStyle.

To finish the TextBlock, we will edit the Text property in the Properties panel by writing
This is our First Windows Store App.We will drag a Button control from TOOLBOX to the lower row of the grid that we added recently. We will change some of its properties in the Properties panel, setting its HorizontalAlignment and VerticalAlignment to Center, its FontSize to 20, its Name to
btnStart, and its Content toStart.Next, we will change its font style property. For this we will click on the box next to the property and select System Resource and then ContentControlThemeFontFamily.

We will double-click on the start button and then the code behind
HelloPage.xamlwill be seen, where an empty method has been created. There we will enter the following code (note that for this to work, we will have to add the data to the namespace):private void btnStart_Click(object sender, RoutedEventArgs e) { this.Frame.Navigate(typeof(GroupedItemsPage), "AllGroups"); }We will open the
App.xaml.cscode behind the file and comment theNavigateinstruction on theOnLaunchedevent, adding a new one that brings us toHelloPage.xaml://if (!rootFrame.Navigate(typeof(GroupedItemsPage), "AllGroups")) if (!rootFrame.Navigate(typeof(HelloPage)))
Next, we will save all from the menu or with the Ctrl + Shift + S shortcut.
We will build the solution and debug our first Windows Store app. We should see that our application launches and shows the page we just added.
We created an application from the Grid Application template, which does a lot of work for us, creating an app that allows us to navigate through a hierarchy of groups and group items. We can explore them in the touch-ready Windows Store app GridView (the Windows Store app control that displays a grid of data items) and from there we can go to the group view and the item view, where we can navigate to other items.
If we look at the structure that has been created for us by the project template, we have the typical Properties and References sections of a Visual Studio .NET project. The App.xaml file is the entry point to our application and has the same meaning and overall structure as the same file on Silverlight, WPF, or Windows Phone projects containing defined or referenced global resources. When the application starts, it creates a frame-based navigation system, similar to that of the Windows Phone, and navigates to our first page, in our case, HelloPage.xaml.

To move between pages, the code behind App.xaml creates a frame and adds it as the application's main content. The navigation actions just change the page contained by the frame, and the navigation stack is maintained for us so we can go forward and navigate back automatically. The following diagram explains it clearly:

So, we can navigate to a particular page with the following instruction:
this.Frame.Navigate(typeof(GroupedItemsPage), "AllGroups");
The previous instruction indicates the page we want to navigate to and the navigation parameter. Additionally we can navigate back with the following instruction:
if (this.Frame.CanGoBack) {
this.Frame.GoBack();
}
Note that the CanGoback check is not obligatory, but not doing so can throw an exception.
We have also specified the application's capabilities through the Package.appxmanifest designer.
We added a basic page of type LayoutAwarePage, which provides layout awareness, that is, this page is now able to detect changes in how it is viewed. This can be either portrait, landscape, snapped, or filled. Being the two last ones (snapped and filled) special views of the application provided by the Windows Store App design style that our application is expected to support.
On our basic page, we deleted a resource so the page could get the app.xaml file predefined. The AppName resource added a grid with some layout and two controls to it, TextBlock and Button. Then we adjusted their layout and properties to change the default application behavior with the click event of the start button. We finally changed the default code of the App.xaml.cs OnLaunched method to navigate to our new page instead of the previous GroupedItemsPage location.
Moreover, we have been doing several tasks in various ways with Visual Studio 2012 so now we should be more familiar with it.
Other options to create our Windows Store app would be to create a blank application or a split application. The blank application creates an extremely basic application structure for us to fill. The split application shows information in a master-detail way, showing the master information on one half of the screen and the details on the other half.
There are also the classic Class Library and Unit Test Library templates.
We have built this first project as a grid application as we will use it for further recipes, adding more features to it so that it becomes a fully compliant Windows Store app style application.
With this recipe, we have also created an application and extended it with a first page and made it compliant with the Windows Store app style design and principles, providing a clean and open layout that minimizes distractions, with enough breathing room and a clear information hierarchy founded on a clean typography.
So, we have an application and want to take full advantage of the Windows Store app style design, right? One of the easiest ways of accomplishing this is to provide a splash screen.
We should have an application ready, such as the previous recipe app. Any app will do. In fact, you can create an empty project and you will be ready to start this recipe.
Here we are going to take some steps to provide our app with a splash screen and app. tiles. There are some predefined places in our app that we can customize with default images.
We will put an image in our splash screen that consists of a background color and an image of 620 x 300 pixels. We already have a default image,
SplashScreen.png, in theAssetsfolder so we will need to replace this image with our own.We will also prepare our application logo in three flavors, 150 x 150 pixels for our main logo, 50 x 50 pixels for our store logo, and 30 x 30 pixels for our small logo image.
Additionally, we can add a
Wide Logoimage to display when the application goes on expanded mode, in which case our tile doubles its space. Thus, we must make a tile of 310 x 150 pixels.Next, we will add the images to our
Assetsfolder, replacing the current predefined placeholder images with the new ones for our project.Following that, we will open the
Package.appxmanifestfile with the manifest designer; a double-click on the file will do. Add a reference at the Wide logo section of our new wide logo. Then we will change the Show name section to No Logos, as our logo will showcase the application name. And finally we will change Background color to#FFFFFF.
We will deploy our solution to see how it fits in the Windows 8 UI. We should locate quickly our application tile, select it and make it larger, and launch it to see our brand new custom splash screen.

The custom splash screen after launching will look something like this:

We just added some graphical assets and changed completely how the application looks in the Windows 8 UI, re-styling it and providing it with a bit of branding. Our app is now much closer to the Windows Store app design style.
We have also shown how easy this is and explained some of the properties from the Package.appxmanifest file.
We could use additional splash screens for 1.4x and 1.8x scaling if we want better adaptation for higher resolution displays.
We could also capture the SplashScreen.Dismissed event and react quickly to it, for example, to provide a follow-up screen that mimics the splash screen while our application loads.

This behavior would be beneficial if the application has to perform some processing or data loading/caching before providing control to the user.
The official Microsoft Developer Network (MSDN) splash screen sample, for example, exhibits this precise behavior.
Another option would be to start the transition to our application's main screen after the SplashScreen.Dismissed event.
An important requirement for a Windows Store app is that it should comply with the Windows 8 UI lifecycle model, which is to save its state and important data when we stop using the application. So if it gets unloaded from memory, we can restore its state without any problem. It gives our application a good user experience (UX) and aligns itself with the expectations of the customers, in that when we open it back, it will seem as if it has never been closed.
As any Windows Store app would do, we propose evolving the resultant application from the previous recipe.
Here we will add some data to showcase the lifecycle steps that our application goes through, binding it to our interface and feeding it while stepping through the lifecycle events. To do this, we should start from the app resulting from our previous recipe.
In the
DataModelfolder, we will add a new class namedAppData.cs.Next we will add the following code to it:
using System;
using System.Collections.Generic;
using System.Collections.ObjectModel;
using System.Linq;
using System.Text;
using System.Threading.Tasks;

namespace OurFirstMetroApp.DataModel
{
public class AppData : OurFirstMetroApp.Common.BindableBase
    {
private string _appKeyValue = string.Empty;
public string AppKeyValue
        {
get { return this._appKeyValue; }
set { this.SetProperty(ref this._appKeyValue, value); }
        }
    }
}
We will open
App.xaml.cs, and, in theconstructormethod, locate the following line of code:this.Suspending += OnSuspending;
Add the following lines of code to implement the event handler of the
Resumingevent as theSuspendingevent is already handled. There we will accept the automatically created method that Visual Studio proposes after pressing += and the Tab key. The code should end as follows://We handle the suspending event to save the state this.Suspending += OnSuspending; //And the Resuming to control when we resume our app. this.Resuming += App_Resuming;
After this, we will add the
MyAppBindableDataproperty in theAppclass atApp.cs:Public AppData MyAppBindableData{ get; set; }We might need to add a reference to the
DataModelnamespace:using OurFirstMetroApp.DataModel;
We will initialize the
MyAppBindableDataproperty in the application's constructor with the following code://We initialize the AppBindableData this.MyAppBindableData = new AppData();
Next we will add the following code onto the
Suspendingevent handler method:private async void OnSuspending(object sender, SuspendingEventArgs e) { SaveUserSessionData(); }Note that there is already an implementation doing some work. We will avoid exploring or re-using that code for simplicity, but it would be a good exercise to explore the code, which is in the
SuspensionManager.cssource file in theCommonfolder of the project.Add the
SaveUserSessionDatamethod as follows at the end of theAppclass:private void SaveUserSessionData() { //Save application state and stop any background activity ApplicationDataContainer localSettings = null; localSettings = ApplicationData.Current.LocalSettings; localSettings.Values["KeyValue"] = " - I have been suspended "; }Note that we will have to add a reference to the
Windows.Storagenamespace:using Windows.Storage;
Implementing the other generated function,
App_Resuming, will result in the following code:Void App_Resuming(object sender, object e) { PrepareMessage (" and resumed"); }To implement the
PrepareMessagemethod, we will code it as follows:Void PrepareMessage(String msg) { ApplicationDataContainer localSettings = null; localSettings = ApplicationData.Current.LocalSettings; var kv = localSettings.Values["KeyValue"]; if (kv != null) { this.MyAppBindableData.AppKeyValue = this.MyAppBindableData.AppKeyValue + kv.ToString(); } this.MyAppBindableData.AppKeyValue = this.MyAppBindableData.AppKeyValue + msg; }Next we will override the application's
OnActivatedevent by adding the following code:protected override void OnActivated(IActivatedEventArgs args) { String msg = String.Empty; if (args.Kind == ActivationKind.Launch) { msg = msg + " - Previously I was " + args.PreviousExecutionState.ToString(); msg = msg + " and have been Activated"; } PrepareMessage(msg); base.OnActivated(args); }Next we will manage the application's
OnLaunchedmethod by adding the following code at the end of the method:String msg = String.Empty; if (args.Kind == ActivationKind.Launch) { msg = msg + " - Previously I was " + args.PreviousExecutionState.ToString(); msg = msg + " and have been Launched"; } PrepareMessage(msg);To wire this all up, we will go to our
HelloPage.xamlpage, and there we will createTextBlockthat we will name astbAppLifeHistory, binding this text property to theAppKeyValueproperty. We will locate it under the firstTextBlockcode of the application description. Note that we will have to add a row to the grid to properly position this new control. The result can be seen as follows: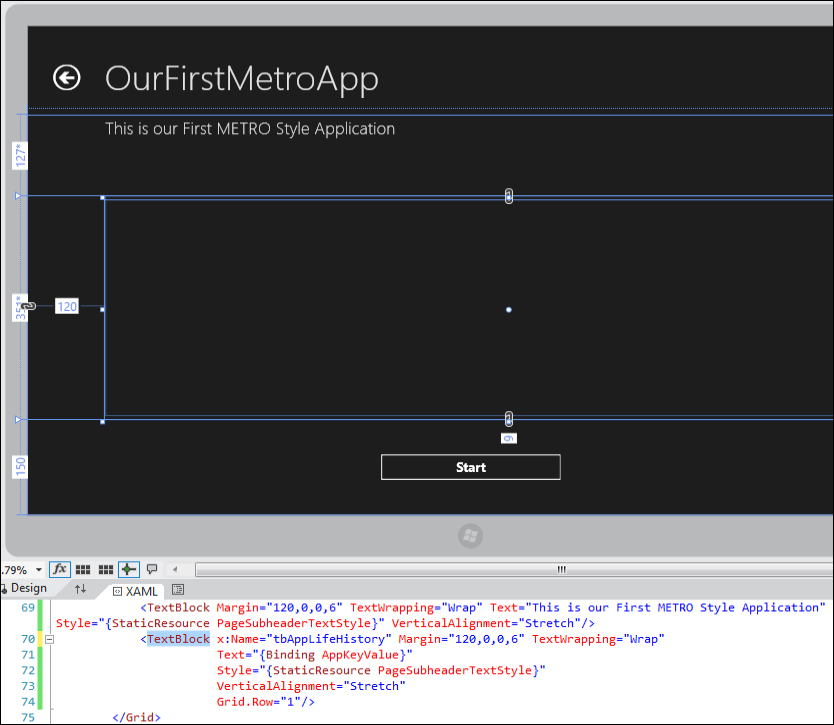
The XAML code for the
TextBlockwill look as follows:<TextBlock x:Name="tbAppLifeHistory" Margin="120,0,0,6" TextWrapping="Wrap" Text="{Binding AppKeyValue}" Style="{StaticResource PageSubheaderTextStyle}" VerticalAlignment="Stretch" Grid.Row="1"/>To finish our wiring, we will go to the code behind
HelloPage.xamland on the constructor, add a call to theCheckPreviousExecution()method as follows:Void CheckPreviousExecution() { this.tbAppLifeHistory.DataContext = (App.Current as App).MyAppBindableData; ApplicationDataContainer localSettings = null; localSettings = ApplicationData.Current.LocalSettings; localSettings.Values["KeyValue"]=""; }Note that we will have to add a
usingsclause for theWindows.Storagenamespace.Now we just have to compile and try it. A good way is to build and then deploy the solution to our Windows 8 operating system. We can use the menu option Build | Deploy Solution. We could also use the simulator and suspend/resume it.
Next we will go to our Windows 8 UI and run it. The first time we run our application, we will see the following message:

Now we will go to desktop mode where we will launch the Task Manager window. After approximately 5 seconds, we will see that our application goes into the Suspended state. Note that an easy way to launch the Task Manager is to right-click on the bottom taskbar and then click on Task Manager.

Go back to the Windows 8 UI and launch our application again. This is what we will see:

Next we will go back to the desktop mode and terminate the application from the Task Manager. If we go back to the Windows 8 UI and launch our application, this is what we will see:

We started creating the AppData class that inherits from BindableBase, which in turn implements the INotifyPropertyChanged interface and is used to notify the value changes in a property that we have bound to the user interface through binding.
Next we add an AppData property in our application class so that we can reference this property globally anywhere within our application.
Continuing, we will handle the suspending and resuming events that occur when the application is suspended, which will happen after we switch to another task or application. After 5 seconds, our application will save its state and become Suspended. In our case, we will only indicate that our application has been suspended.
For that we have the SaveUserSessionData() method responsible. There we will access our application data through the application data's ApplicationDataContainer class where we can store the settings and other information belonging to our application. The ApplicationDataContainer class is a private storage for our application and current user that we can access in many different ways, such as the key-to-value dictionary or through a filesystem-like method. This is very similar to Silverlight's isolated storage and if you have used it before it should feel very familiar.
For the resuming event, we are calling the PrepareMessage method. We will pass one message string to it and it will fetch the value from our application's localSettings property and concatenate it with the message, adding it to the AppKeyValue property.
Basically we are indicating our application lifecycle status changes and are concatenating them on a global property.
To finish, we must indicate the changes on the
OnActivated and OnLaunched
methods; there we will also add the PreviousExecutionState enumeration to the message that declares the original state from which the application comes.
We then added TextBlock control and bound it to the AppKeyValue property. In the code, we added its data context to the corresponding property of the application class holding this property; we did this to separate it from the App.cs class implementation and to take advantage of the BindableBase base class that the template had already provided.
We have also seen how to deploy our application, launch the task manager, and control our application states from it.
To properly understand the states, we have the following diagram:

Here we see clearly that when the application is not running, it can be put into the terminated (on purpose) or the not running (nobody terminated it, we just installed or deployed it, for example) state.
Then, we can launch it from the Windows 8 UI and the application will be in the running state. From this state we can close or terminate it or we can move to another application or window. After 5 seconds, our application will be automatically suspended. If we come back to it, our application will resume and get activated (not launched, as this would happen when we do it from the terminated or the not running state).
The application will remain as it was when it was suspended and we will have no clue that it has stopped its execution, unless we code the application to be aware of it.
It could be a good idea to save the user state and the application data, for example, if the user was working on a form. It would be nice that when he returns, he goes back to the same form he was working on and finds the same data.
If the application has been deactivated for a long period of time, a recommended practice would be to start afresh, as the user might not remember what was happening or where he was. Of course, it all depends on the application and the tasks being performed in it.
If the application works with online data, the activated and resuming events could be used to refresh the information from the online sources. For example, we could have an app with a financial purpose or our app is alive such as a chat, RSS reader, or a twitter app.
We could also associate our app with a file or a protocol so that it would be the default application for managing these file extensions or we could define auto-launching capabilities for AutoPlay or other contracts and extensions. Some possible contracts might be the camera, contact picker, print task, protocol, search, or share target.
One of the principles of the Windows Store style apps is to invest in a great tile. As the entry point to our applications and the main point of interaction with the Windows 8 UI, it is obviously extremely important.
A tile is the main interface of our application in the Windows 8 UI, which can provide a much more engaging experience than a traditional icon, as it is much more personal. We can update it while our app is not running, thereby keeping it alive.
We will dedicate this recipe to improving our application's main tile.
We will implement this recipe on the application we have been developing, but we could apply what we are going to do to any Windows Store app.
Here we are going to see how to add notification capabilities to our application tile.
Open the application and, from the project, open
App.xaml.csand add the following namespaces:using Windows.UI.Notifications; using Windows.Data.Xml.Dom;
Create a method with the name
CreateTileNotificationusing the following code:private void CreateTileNotification() { //Wide Tile XmlDocument tileXml = TileUpdateManager.GetTemplateContent(TileTemplateType.TileWideText03); XmlNodeList tileTextAttributes = tileXml.GetElementsByTagName("text"); tileTextAttributes[0].AppendChild(tileXml.CreateTextNode("A group was added or updated...")); //Square Tile XmlDocument squareTileXml = TileUpdateManager.GetTemplateContent(TileTemplateType.TileSquareText04); XmlNodeList SquareTileTextAttributes = squareTileXml.GetElementsByTagName("text"); SquareTileTextAttributes[0].AppendChild(squareTileXml.CreateTextNode("A group was added or updated...")); //We add the square tile to the wide tile as a sibling of the wide tile IXmlNode node = tileXml.ImportNode(squareTileXml.GetElementsByTagName("binding").Item(0), true); tileXml.GetElementsByTagName("visual").Item(0).AppendChild(node); //We create the notification with the tiles and send it to the app tile TileNotification tileNotification = new TileNotification(tileXml); tileNotification.ExpirationTime = DateTimeOffset.UtcNow.AddSeconds(10); TileUpdateManager.CreateTileUpdaterForApplication().Update(tileNotification); }Add a call to this method at the end of the
OnLaunchedmethod:CreateTileNotification();We will open
Package.appxmanifestand under the Tile: section, put#222222as the Background color property.We should execute the application and immediately go back to the Windows 8 UI to see the tile update in action.

In the
OnLaunchedmethod, just before theCreateTileNotification();call, we will add the following lines of code to enable notification cycling://We enable the notification cycling TileUpdateManager.CreateTileUpdaterForApplication().EnableNotificationQueue(true);
Next we are going to update our
CreateTileNotificationmethod to accept two string parameters, one for the message and another for the tag of the notification, which will serve to uniquely identify a notification in our app. Add the following code:private void CreateTileNotification(String msg, String Tag) { //Wide Tile XmlDocument tileXml = TileUpdateManager.GetTemplateContent(TileTemplateType.TileWideText03); XmlNodeList tileTextAttributes = tileXml.GetElementsByTagName("text"); tileTextAttributes[0].AppendChild(tileXml.CreateTextNode(msg)); //Square Tile XmlDocument squareTileXml = TileUpdateManager.GetTemplateContent(TileTemplateType.TileSquareText04); XmlNodeList SquareTileTextAttributes = squareTileXml.GetElementsByTagName("text"); SquareTileTextAttributes[0].AppendChild(squareTileXml.CreateTextNode(msg)); //We add the square tile to the wide tile as a sibling of the wide tile IXmlNode node = tileXml.ImportNode(squareTileXml.GetElementsByTagName("binding").Item(0), true); tileXml.GetElementsByTagName("visual").Item(0).AppendChild(node); //We create the notification with the tiles and send it to the app tile TileNotification tileNotification = new TileNotification(tileXml); //We add a tag to the tileNotification tileNotification.Tag = Tag; tileNotification.ExpirationTime = DateTimeOffset.UtcNow.AddSeconds(10); TileUpdateManager.CreateTileUpdaterForApplication().Update(tileNotification); }We will substitute the previous
CreateTileNotification()call that we added at the end of theOnLaunchedevent handler with these new lines:CreateTileNotification("Message number one", "one"); CreateTileNotification("Message number two", "two"); CreateTileNotification("Message number three", "three");Launch the application and immediately after launching it go back to our Windows 8 UI. Watch how the tile now shows the three message tiles in a cycle that repeats itself.

After the latest
CreateTileNotificationcall, add the following code://We add a Numeric badge XmlDocument badgeXml = BadgeUpdateManager.GetTemplateContent(BadgeTemplateType.BadgeNumber); XmlElement badgeElement = (XmlElement)badgeXml.SelectSingleNode("/badge"); badgeElement.SetAttribute("value", "7"); BadgeNotification badge = new BadgeNotification(badgeXml); BadgeUpdateManager.CreateBadgeUpdaterForApplication().Update(badge);If we now run the application, we will observe a number at the bottom-right corner; that's our numeric badge.

We will comment the previous code and add these lines after it:
//And we add a Glyph badge
XmlDocument badgeXml_Glyph = BadgeUpdateManager.GetTemplateContent(BadgeTemplateType.BadgeGlyph);
XmlElement badgeElement_Glyph = (XmlElement)badgeXml_Glyph.SelectSingleNode("/badge");
badgeElement_Glyph.SetAttribute("value", "newMessage");
BadgeNotification badge_Glyph = new BadgeNotification(badgeXml_Glyph);
BadgeUpdateManager.CreateBadgeUpdaterForApplication().Update(badge_Glyph);
Run the application and switch immediately to see the new look of our application tile with a glyph badge.

First, we picked a template for our tile and loaded it into an XmlDocument variable.
XmlDocument tileXml = TileUpdateManager.GetTemplateContent(TileTemplateType.TileWideText03);
Next we accessed the element that we wanted to change from within the template and changed its value.
XmlNodeList tileTextAttributes = tileXml.GetElementsByTagName("text");
tileTextAttributes[0].AppendChild(tileXml.CreateTextNode("A group was added or updated..."));
We repeated the same operation but with another SquareTile template, so we ended up with two customized tile templates.
    //Square Tile
XmlDocument squareTileXml = TileUpdateManager.GetTemplateContent(TileTemplateType.TileSquareText04);
XmlNodeList SquareTileTextAttributes = squareTileXml.GetElementsByTagName("text");
SquareTileTextAttributes[0].AppendChild(squareTileXml.CreateTextNode("A group was added or updated..."));
Then we added the square tile as a sibling of the wide tile.
    //We add the square tile to the wide tile as a sibling of the wide tile
IXmlNode node = tileXml.ImportNode(squareTileXml.GetElementsByTagName("binding").Item(0), true);
tileXml.GetElementsByTagName("visual").Item(0).AppendChild(node);
Once the tile XML code was ready, we created TileNotification from it.
    //We create the notification with the tiles and send it to the app tile
TileNotification tileNotification = new TileNotification(tileXml);
Then we added an expiration time for the tile to go away after 10 seconds.
tileNotification.ExpirationTime = DateTimeOffset.UtcNow.AddSeconds(10);
We ended by sending createdTilenotification to TileUpdater of our application.
TileUpdateManager.CreateTileUpdaterForApplication().Update(tileNotification);
We enabled the cycling tile notifications, which allow us to show various notifications one after another in a queue with instructions:
TileUpdateManager.CreateTileUpdaterForApplication().EnableNotificationQueue(true);
And then we created TileNotification with a tag to differentiate between different TileNotifications while removing ExpirationTime.
Continuing our recipe, we created in a similar way the numeric badge from a template (basic badge templates are BadgeNumber or BadgeGlyph) and then set the badgeattribute, created the BadgeNotification, and used BadgeUpdateManager to update it.
A BadgeNumber template can display a number from 1 to 99 and a BadgeGlyph template can contain one of the following status glyphs:
noneactivityalertavailableawaybusynewMessagepausedplayingunavailableerror
We have seen that improving a tile with custom notifications or cycling through different tile notifications are easy to implement. Moreover, we have a good number of tile templates to explore.
Creating badges is also really easy and might add a lot of value to our application tile.
We should use tile improvements, notifications, and badges with care and only when they make sense and add value to our application.
We could also implement secondary tiles in response to user actions.
Finally, we can update the tile while the application is not running through the Windows Push Notification Service (WNS), improving our app with toast notifications.
Toasts notify the user of relevant and time-sensitive events such as the reception of a new e-mail or a reminder for an approaching appointment.
They will help our application to accomplish another of the Windows Store app principles, which is to feel connected and alive.
We will implement this recipe on the application that we have been developing, but we could apply what we are going to do to any Windows Store app.
Here we are going to add the capability of creating toasts to our app.
Open the application and
HelloPage.xaml.csand add the followingusingnamespaces:using Windows.Data.Xml.Dom; using Windows.UI.Notifications;
Add there the following method:
private void GenerateToastNotification()
{
ToastTemplateType toastTemplate = ToastTemplateType.ToastText01;
XmlDocument toastXml = ToastNotificationManager.GetTemplateContent(toastTemplate);
XmlNodeList toastTextElements = toastXml.GetElementsByTagName("text");
toastTextElements[0].AppendChild(toastXml.CreateTextNode("A toast!"));
    //The duration
XmlNodeList rootElement = toastXml.GetElementsByTagName("toast");
    ((XmlElement)rootElement[0]).SetAttribute("duration", "long");
    //Create and send the toast
ToastNotification toast = new ToastNotification(toastXml);
ToastNotificationManager.CreateToastNotifier().Show(toast);
}
Open
HelloPage.xaml. Add a button near the header with the textGenerate Toast.On the code behind the click event handler of the added button, add a call to the newly created
GenerateToastNotification()method.Open the
Package.appmanifestdesigner and on the Application UI tab, we will look for the Toast Capable option and select Yes on the combobox.If we execute the application and click a number of times on the Launch Toast button, our display should look similar to the following image:

In a way very similar to our tile notification, we picked up the toast template type and loaded the template content into an XmlDocument variable.
After this we accessed the element that we wanted to change, in our case the text element, and changed its value.
We changed its duration by setting one of the attributes of the toast element.
Finally, we created ToastNotification from the resulting XML and showed the toast.
We could navigate to a specific destination in our app when the user taps on the toast, as that might be an invitation to explore new and interesting data.
We can use different toast templates, schedule toast notifications, or even send toast push notifications through the WNS.
The toast can be extensively customized with images, sounds, or an expiration time.


