


The Hyper-V PowerShell module includes several significant features that extend its use, improve its usability, and allow you to control and manage your Hyper-V environment with more granular control.
Various organizations have moved on from Hyper-V (V2) to Hyper-V (V3). In Hyper-V (V2), the Hyper-V management shell was not built-in and the PowerShell module had to be manually installed. In Hyper-V (V3), Microsoft has provided an exhaustive set of cmdlets that can be used to manage and automate all configuration activities of the Hyper-V environment. The cmdlets are executed across the network using Windows Remote Management.
In this chapter, we will cover:
The basics of setting up a Hyper-V environment using PowerShell
The fundamental concepts of Hyper-V management with the Hyper-V management shell
The updated features in Hyper-V
Here is a list of all the new features introduced in Hyper-V in Windows Server 2012 R2. We will be going in depth through the important changes that have come into the Hyper-V PowerShell module with the following features and functions:
Shared virtual hard disk
Resizing the live virtual hard disk
Installing and configuring your Hyper-V environment
Before you proceed with the installation and configuration of Hyper-V, there are some prerequisites that need to be taken care of:
Once the prerequisites have been taken care of, let's start with installing the Hyper-V role:
Open a PowerShell prompt in Run as Administrator mode:
Type the following into the PowerShell prompt to install the Hyper-V role along with the management tools; once the installation is complete, the Hyper-V Server will reboot and the Hyper-V role will be successfully installed:
Install-WindowsFeature –Name Hyper-V -IncludeManagementTools -RestartOnce the server boots up, verify the installation of Hyper-V using the
Get-WindowsFeaturecmdlet:Get-WindowsFeature -Name hyper*You will be able to see that the Hyper-V role, Hyper-V PowerShell management shell, and the GUI management tools are successfully installed:

In this section, we will look at some of the fundamental concepts of Hyper-V management with the Hyper-V management shell. Once you get the Hyper-V role installed as per the steps illustrated in the previous section, a PowerShell module to manage your Hyper-V environment will also get installed. Now, perform the following steps:
Open a PowerShell prompt in the Run as Administrator mode.
PowerShell uses cmdlets that are built using a verb-noun naming system (for more details, refer to Learning Windows PowerShell Names at http://technet.microsoft.com/en-us/library/dd315315.aspx). Type the following command into the PowerShell prompt to get a list of all the cmdlets in the Hyper-V PowerShell module:
Get-Command -Module Hyper-VHyper-V in Windows Server 2012 R2 ships with about 178 cmdlets. These cmdlets allow a Hyper-V administrator to handle very simple, basic tasks to advanced ones such as setting up a Hyper-V replica for virtual machine disaster recovery.
To get the count of all the available Hyper-V cmdlets, you can type the following command in PowerShell:
Get-Command -Module Hyper-V | Measure-ObjectThe Hyper-V PowerShell cmdlets follow a very simple approach and are very user friendly. The cmdlet name itself indirectly communicates with the Hyper-V administrator about its functionality. The following screenshot shows the output of the
Getcommand:
For example, in the following screenshot, the
Remove-VMSwitchcmdlet itself says that it's used to delete a previously created virtual machine switch:
If the administrator is still not sure about the task that can be performed by the cmdlet, he or she can get help with detailed examples using the
Get-Helpcmdlet. To get help on the cmdlet type, type the cmdlet name in the prescribed format. To make sure that the latest version of help files are installed on the server, run theUpdate-Helpcmdlet before executing the following cmdlet:Get-Help <Hyper-V cmdlet> -FullThe following screenshot is an example of the
Get-Helpcmdlet:
This new and improved feature in Windows Server 2012 R2 allows an administrator to share a virtual hard disk file (the .vhdx file format) between multiple virtual machines. These .vhdx files can be used as shared storage for a failover cluster created between virtual machines (also known as guest clustering). A shared virtual hard disk allows you to create data disks and witness disks using .vhdx files with some advantages:
Shared disks are ideal for SQL database files and file servers
Shared disks can be run on generation 1 and generation 2 virtual machines
This new feature allows you to save on storage costs and use the .vhdx files for guest clustering, enabling easier deployment rather than using virtual Fibre Channel or Internet
Small Computer System Interface (iSCSI), which are complicated and require storage configuration changes such as zoning and Logic Unit Number (LUN) masking.
In Windows Server 2012 R2, virtual iSCSI disks (both shared and unshared virtual hard disk files) show up as virtual SAS disks when you add an iSCSI hard disk to a virtual machine. Shared virtual hard disks (.vhdx ) files can be placed on
Cluster Shared Volumes (CSV) or a Scale-Out File Server cluster
Let's look at the ways you can automate and manage your shared .vhdx guest clustering configuration using PowerShell. In the following example, we will demonstrate how you can create a two-node file server cluster using the shared VHDX feature. After that, let's set up a testing environment within which we can start learning these new features. The steps are as follows:
We will start by creating two virtual machines each with 50 GB OS drives, which contains a sysprep image of Windows Server 2012 R2. Each virtual machine will have 4 GB RAM and four virtual CPUs.
Note
D:\vhd\base_1.vhdxandD:\vhd\base_2.vhdxare already existing VHDX files with sysprepped image of Windows Server 2012 R2.The following code is used to create two virtual machines:
New-VM –Name "Fileserver_VM1" –MemoryStartupBytes 4GB –NewVHDPath d:\vhd\base_1.vhdx -NewVHDSizeBytes 50GB

New-VM –Name "Fileserver_VM2" –MemoryStartupBytes 4GB –NewVHDPath d:\vhd\base_2.vhdx -NewVHDSizeBytes 50GB
Next, we will install the file server role and configure a failover cluster on both the virtual machines using PowerShell.
Note
You need to enable PowerShell remoting on both the file servers and also have them joined to a domain.
The following is the code:
Install-WindowsFeature -computername Fileserver_VM1 File-Services, FS-FileServer, Failover-Clustering

Install-WindowsFeature -computername Fileserver_VM1 RSAT-Clustering –IncludeAllSubFeature

Install-WindowsFeature -computername Fileserver_VM2 File-Services, FS-FileServer, Failover-Clustering

Install-WindowsFeature -computername Fileserver_VM2 RSAT-Clustering -IncludeAllSubFeature
Once we have the virtual machines created and the file server and failover clustering features installed, we will create the failover cluster as per Microsoft's best practices using the following set of cmdlets:
New-Cluster -Name Cluster1 -Node FileServer_VM1, FileServer_VM2 -StaticAddress 10.0.0.59 -NoStorage –VerboseYou will need to choose a name and IP address that fits your organization.
Next, we will create two vhdx files named
sharedvhdx_data.vhdx(which will be used as a data disk) andsharedvhdx_quorum.vhdx(which will be used as the quorum or the witness disk). To do this, the following commands need to be run on the Hyper-V cluster:New-VHD -Path c:\ClusterStorage\Volume1\sharedvhdx_data.VHDX -Fixed -SizeBytes 10GB New-VHD -Path c:\ClusterStorage\Volume1\sharedvhdx_quorum.VHDX -Fixed -SizeBytes 1GB
Once we have created these virtual hard disk files, we will add them as shared
.vhdxfiles. We will attach these newly created VHDX files to theFileserver_VM1andFileserver_VM2virtual machines and specify the parameter-shared VHDX files for guest clustering:Add-VMHardDiskDrive –VMName Fileserver_VM1 -Path c:\ClusterStorage\Volume1\sharedvhdx_data.VHDX –ShareVirtualDisk Add-VMHardDiskDrive –VMName Fileserver_VM2 -Path c:\ClusterStorage\Volume1\sharedvhdx_data.VHDX –ShareVirtualDisk
Finally, we will be making the disks available online and adding them to the failover cluster using the following command:
Get-ClusterAvailableDisk | Add-ClusterDisk
Once we have executed the preceding set of steps, we will have a highly available file server infrastructure using shared VHD files.
With Windows Server 2012 R2, a newly added feature in Hyper-V allows the administrators to expand or shrink the size of a virtual hard disk attached to the SCSI controller while the virtual machines are still running. Hyper-V administrators can now perform maintenance operations on a live VHD and avoid any downtime by not temporarily shutting down the virtual machine for these maintenance activities.
Prior to Windows Server 2012 R2, to resize a VHD attached to the virtual machine, it had to be turned off leading to costly downtime. Using the GUI controls, the VHD resize can be done by using only the Edit Virtual Hard Disk wizard. Also, note that the VHDs that were previously expanded can be shrunk.
The Windows PowerShell way of doing a VHD resize is by using the Resize-VirtualDisk cmdlet. Let's look at the ways you can automate a VHD resize using PowerShell. In the next example, we will demonstrate how you can expand and shrink a virtual hard disk connected to a VM's SCSI controller. We will continue using the virtual machine that we created for our previous example. We have a pre-created VHD of 50 GB that is connected to the virtual machine's SCSI controller.
Let's resize the aforementioned virtual hard disk to 57 GB using the Resize-Virtualdisk cmdlet:
Resize-VirtualDisk -Name "scsidisk" -Size (57GB)
Next, if we open the VM settings and perform an inspect disk operation, we'll be able to see that the VHDX file size has become 57 GB:

Also, one can verify this when he or she logs into the VM, opens disk management, and extends the unused partition. You can see that the disk size has increased to 57GB:

Let's resize the earlier mentioned VHD to 57 GB using the Resize-Virtualdisk cmdlet:
For this exercise, the primary requirement is to shrink the disk partition by logging in to the VM using disk management, as you can see in the following screenshot; we're shrinking the VHDX file by 7 GB:

Next, click on Shrink. Once you complete this step, you will see that the unallocated space is 7 GB. You can also execute this step using the
Resize-PartitionPowerShell cmdlet:Get-Partition -DiskNumber 1 | Resize-Partition -Size 50GBThe following screenshot shows the partition:

Next, we will resize/shrink the VHD to 50 GB:
Resize-VirtualDisk -Name "scsidisk" -Size (50GB)
Once the previous steps have been executed successfully, run a re-scan disk using disk management and you will see that the disk size is 50GB:

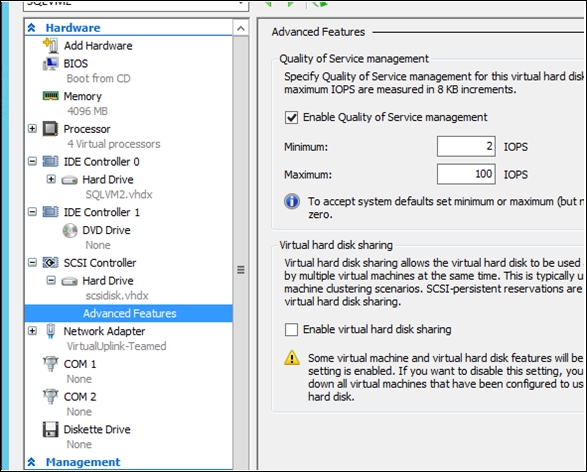
The storage quality of service (QoS) feature in Windows Server 2012 R2 allows us to set a specific level of I/O throughput for virtual machines. This is best done on virtual machines that are resource-hungry. You can effectively set an automatic hard cap by specifying the maximum input/output operations per second (IOPS) for a virtual hard disk associated with a particular virtual machine.
This allows the administrator to set a throttle limit on the IOPS consumed by a virtual machine, thereby controlling it from consuming resources of other virtual machines. So, let me show you an example on how you can set the storage level QoS for the virtual machine. We will be using the sample virtual machine that we used for our previous example, by making use of the following code:
Get-VM Fileserver_VM1| Get-VMHardDiskDrive -ControllerType SCSI | Set-VMHardDiskDrive -MaximumIOPS 100 -MinimumIOPS 2
As you can see in the previous example, we get the virtual machine properties for FileServer_VM1 or FileServer_VM2 using Get-VM. Next, we get the VHD drives attached to the SCSI controller on the virtual machine using Get-vmharddiskdrive. Finally, we set the maximum and minimum IOPs for the virtual machine using the set-vmharddiskdrive cmdlet.
Once we execute this cmdlet on a PowerShell prompt, we are able to see that the QoS properties for the VM have been modified:
With the introduction of the concept of virtual machine generation in Windows Server 2012 R2, the virtual machines have been classified broadly into two generations: generation 1 and generation 2. Generation 1 VMs can boot only from a disk attached to the IDE controller or network boot from a legacy network adapter. In addition, the boot configurations are taken care by BIOS. Generation 2 virtual machines are UEFI-based, which gives us features like secure boot; it allows us to boot the virtual machines from the SCSI disk and there is no requirement for an IDE controller-based boot method. Also, it allows network boot over the synthetic network adapter. Generation 2 virtual machines are UEFI based; this feature is supported only on windows 2012 or later versions and only on 64-bit operating systems. The boot time in generation 2 virtual machines is quicker than generation 1 virtual machines.
Creating either generation 1 or generation 2 virtual machines is very simple with PowerShell. You just need to specify an integer value for the generation parameter. The following examples show how you can go about doing this:
To create a generation 1 virtual machine, you can specify the generation type as
1, as shown in the following example:New-VM –Name "new 3" –MemoryStartupBytes 1GB –VHDPath d:\vhd\BaseImage.vhdx -Generation 1Similarly, to create a generation 2 virtual machine, you can specify the generation type as
2, as shown in the following example:New-VM –Name "new 3" –MemoryStartupBytes 1GB –VHDPath d:\vhd\BaseImage.vhdx -Generation 2
The newly updated integration services in Hyper-V allow the administrator to copy a file to a VM without shutting it down and also without accessing a network. For this feature to work, the Guest Services feature needs to be enabled on a virtual machine's integration services properties; this feature is disabled by default and can be enabled on virtual machines using the Enable-VMIntegrationService Windows PowerShell cmdlet. The following command shows how you can enable this feature on a virtual machine:
Enable-VMIntegrationService -Name "Guest Service Interface" -VMName Fileserver_VM1
Once this feature is enabled, you can use the Copy-VMFile cmdlet to copy files to a virtual machine. The following command shows how you can use this cmdlet to copy files to a virtual machine:
Copy-VMFile "Fileserver_VM1" -SourcePath "D:\Test.txt" -DestinationPath "C:\Temp\Test.txt" -CreateFullPath -FileSource Host
With the updated Hyper-V features in Windows Server 2012 R2, you can export a live VM and its snapshot without shutting down the VM, which had to be done in Windows 2012. This helps the administrator to avoid unnecessary downtime for the virtual machine export. There are two cmdlets that can be used for the live export of virtual machines and its snapshots; these are the Export-VM and the Export-VMSnapshot cmdlets.
The Export-VM cmdlet exports a virtual machine to disk. This cmdlet creates a folder at a specified location with three subfolders: Snapshots, Virtual Hard Disks, and Virtual Machines. The Snapshots and Virtual Hard Disks folders contain the snapshots and the VHDs of the specified virtual machine respectively. The Virtual Machines folder contains the configuration XML of the specified virtual machine. The following command exports all virtual machines to root of the D drive. Each virtual machine will be exported to its own folder:
Get-VM | Export-VM –Path D:\
The export of a live VM is very different from the export of a snapshot of a live VM. The export of a live VM can be done by creating a snapshot first, then exporting it, and then finally removing the snapshot. The following cmdlet shows you how to do this:
Get-VM | Checkpoint-VM| Export-VMSnapshot -path d:\ | Remove-VMSnapshot
The Export-VMSnapshot cmdlet exports a virtual machine snapshot to disk:
PS C:\>Export-VMSnapshot –Name 'Base Image' –VMName TestVM –Path D:\
The preceding command exports the Base Image snapshot of the TestVM virtual machine to D:\.
Windows Server 2012 R2 brings in new and updated features to Hyper-V Replica called extended replication, which allows the replica information from the primary site to be sent to a third extended replica server that will be used to further business continuity protection. Also, there is an addition of the feature that allows us to configure the frequency of replication, which was previously a fixed value. Hyper-V Replica provides a comprehensive disaster recovery solution for the Hyper-V infrastructure.
The Hyper-V Replica feature in Windows Server 2012 R2 allows you to configure replication intervals to three intervals: 30 seconds, 5 minutes, and 15 minutes. In Windows Server 2012, it was hardcoded to a 5 minute interval.
The concept of extended replica allows you to send an additional copy of the VM to an extended replica server. This allows a VM copy to be present in three or more separate locations, which allows us to keep multiple copies of the virtual machines that are mission-critical. When you create an extended replica of a virtual machine, it can be kept at either 5 minutes or 15 minutes.
The following syntax can be used to configure Hyper-V. Here, we use the Enable-VMReplication cmdlet to enable replication of a VM VM01 virtual machine onto an extended replica Hyper-v server called HYPERVSERVER3 on a replication server port of 80 with the replication frequency of 300 seconds (5 minutes):
Enable-VMReplication –VMName VM01 -ReplicaServerName HYPERVSERVER3 -ReplicaServerPort 80 -AuthenticationType Kerberos -ReplicationFrequencySec 300
In this chapter, we went through the basics of setting up a Hyper-V environment using PowerShell. We also explored the fundamental concepts of Hyper-V management with Hyper-V management shell.
In the next chapter, we will be covering the installation and configuration of your Hyper-V environment on a Windows Server 2012 R2 environment using PowerShell. Also, we will learn how to set up your PowerShell environment to get started using the Hyper-V management shell.

