In this chapter, we start with recipes for users of Microsoft Dynamics GP where we will look at ways of:
Improving visibility by setting required fields to bold and red
Getting faster access to data with the shortcut bar.
Reducing clicks with start-up shortcuts
Personalizing the Home page by selecting the right role
Further personalizing the Home page by customizing the layout
Speeding access to data with Quick Links
Rearranging navigation to make it easier
Jumping to the right location with breadcrumbs
Managing personal reports with My Reports
Viewing open items with the Task List
Visualizing information with Business Analyzer on the Home page
Accessing accounts faster with favorites in lookups
Cleaning up the mess by fixing AutoComplete errors
This chapter explores recipes designed to enhance the usefulness of Microsoft Dynamics GP by personalizing the look and feel of the application. These recipes provide the first few steps in harnessing the full power of Dynamics GP. They are designed to improve productivity today so don't wait to put them to use.
In almost all cases, the recipes in this chapter do not require an administrator and are available to the average user. The ability of each user to tailor these items to their own needs is what makes them so powerful.
By personalizing Dynamics GP, users get the opportunity to fine tune the system to the way that they work. There is something incredibly satisfying about tailoring a system to make it more efficient and we'll cover some of those personalizing options here.
While the nature of these recipes makes them useful right away, it is strongly recommended that these items be attempted in a test environment first.
Microsoft Dynamics GP provides an option for each user to identify required fields on any form. By activating this setting, users can get an obvious visual cue indicating the minimum required fields on any form. This recipe shows how to turn Required Fields bold red and what the end result looks like.
Prior to changing the appearance of required fields, the feature Show Required Fields needs to be turned on. To activate this feature:
Select Help (the white question mark on a blue background in the upper-right corner) from the main Home page of Dynamics GP.
Ensure that Show Required Fields has a check mark next to it. If it does not, click on the Show Required Fields item to turn this option on.
To improve visibility of required fields, follow these steps:
The shortcut bar is the vertical bar on the top-left side of the screen when the Home button is selected on the left. From the shortcut bar, click on User Preferences then click on the Display button to open the User Display Preferences window; if you don't have User Preferences on the shortcut bar, click on the Microsoft Dynamics GP menu and then click on User Preferences.
On the bottom-right side, under the heading Required Fields, set the Font Color field to Red and Font Style to Bold.

Click on OK to accept the changes and close the window, then click on OK to close User Preferences. Now any windows that allow data entry will show their required fields in bold red, as shown in the following screenshot:

Dynamics GP contains identifiers behind the scenes to mark fields as required. Dynamics GP uses these identifiers to change the color of the field name. Highlighting required fields provides a quick visual cue to ensure that at least the minimum amount of data is entered prior to saving a form. This will save hours of time by preventing annoying messages indicating that required fields have not been completed, especially since there is no indicator as to what field is missing.
By default, activating Show Required Fields simply sets required fields to black and regular. That is, it doesn't distinguish them at all. This is important because if Show Required Fields is off completely, Dynamics GP 2013 will prompt users to turn it on but it won't appear to have any effect.
There are some areas in Dynamics GP where required fields are not marked in red and bold despite this feature being properly applied. In almost all cases, these required fields occur in the grid section of a transaction entry form. This area of a form has a heading at the top and a grid that allows multiple entries under one heading. The nature of the programming behind the grid format prevents Dynamics GP from properly highlighting these fields and, unfortunately, there is way to force a field inside the grid to reflect the Show Required Fields setting.
When a user receives a warning that a required field is missing but all required fields appear to be correctly filled in, they should examine the fields in the grid for missing information. The most common culprits are Unit of Measure (U of M) and Site ID fields.
With the available Modifier with VBA utility for Dynamics GP, an administrator or developer can make additional fields required, and in most cases Dynamics GP will properly apply the red and bold formatting automatically. More information on Modifier with VBA is available from the manuals in Dynamics GP or from an authorized Microsoft Dynamics partner.
The shortcut bar provides fast access to Dynamics GP's windows and SmartLists along with web pages and external applications. Often, external shortcuts are used for quick access to things such as currency websites, budget spreadsheets, shipping sites, or other applications. Almost anything used to improve a user's productivity can be linked to via the shortcut bar. In this recipe, we'll spend some time looking at how to get the most out of it.
The vertical area to the left side of the Dynamics GP Home page is known as the Navigation Pane. Select Home on the Navigation Pane to make the shortcut bar visible on the top left side.
Selecting other Navigation Pane sections makes other navigation options available. Only the Home selection makes the shortcut bar available.
There are six types of items that can be added to the shortcut bar:
Dynamics GP windows
SmartLists
Macros
Web pages
External files
Folders
The most common use of the shortcut bar is to add a Dynamics GP window for fast access. The simplest way to do that is as follows:
Select Financial from the Navigation Pane on the left side. In the center area page, select General. This opens the Transaction Entry window.
From the Transaction Entry window, select File | Add to Shortcuts.

Click on the Home button to see the Transaction Entry window added to the shortcut bar.

The shortcut bar in Microsoft Dynamics GP works a lot like shortcuts on the Microsoft Windows desktop. Dynamics GP places a pointer to the window or file inside the shortcut and launches the appropriate selection when the shortcut is clicked.
Typically, users simply accumulate shortcuts on the shortcut bar but to really get the most out of the Shortcut Bar requires are a few extra techniques.
For web pages and external shortcuts, right-click on the Shortcut Bar. Then select Add followed by Add Web Page or Add External Shortcut.
Selecting Add Web Page provides the option to enter the location (URL) along with a button to test that the link works correctly.
Selecting Add External Shortcut provides an option to browse for the external file on your system. This can be an application file such as an Excel spreadsheet or a Microsoft Word document. It can also be a link to an application such as Microsoft CRM, budgeting software, or Solitaire for a much needed break.
Setting a keyboard shortcut allows the use of a set of keystrokes to launch a shortcut. For example, this means that Ctrl + Shift + J could be setup to launch the Transaction Entry window for a journal entry or F2 to launch Microsoft Office Excel.

Right-clicking on the Shortcut Bar and selecting Add | Folder provides an option to add a folder to the Shortcut Bar that can be used to organize entries. For example, a Month End folder can be used to hold links to windows, routines, and reports that are used as part of the month end closing process. This is a great place to start organizing shortcuts.
Microsoft's Developing for Dynamics GP site provides additional information on dealing with complex shortcuts for scenarios such as launching an application and opening a specific file. More information is available at http://blogs.msdn.com/developingfordynamicsgp/archive/2009/08/24/creating-external-shortcuts-with-parameters.aspx.
For information about activating shortcuts when Dynamics GP starts, look at the Reducing clicks with start-up shortcuts recipe. For more information about folders, take a look at the Remembering processes with Ad Hoc Workflow recipe in Chapter 3, Organizing Dynamics GP.
For users who want the same set of features available every time Dynamics GP opens, the shortcut bar supports automatically opening a window, SmartList Favorite, web page, macro, or external file when Dynamics GP starts.
For example, someone with heavy accounts payable responsibilities would regularly use the Payables Transaction Entry window. Adding that window as a start-up shortcut would open that window immediately after Dynamics GP starts without the user having to do anything. In this recipe, we'll look at how to activate a shortcut automatically when Dynamics GP starts.
To use this recipe, users need a basic familiarity with shortcuts. Since that was covered in the last recipe, everyone should be in good shape.
To set shortcuts to open automatically, complete the following steps:
Open the Payables Transaction window in Dynamics GP by selecting Purchasing from the Navigation Pane and clicking on Transaction Entry.
Select File | Add as a Shortcut to add the shortcut to the shortcut bar.
Select Home to see the shortcut that was just added.
Right-click on the shortcut that was just created and select Cut. Right-click on the Startup folder and select Paste. Once Dynamics GP is restarted, the window represented by the shortcut will start automatically.

The Startup folder on the shortcut bar is designed to open items when Dynamics GP starts, providing consistent, quick access to regularly used items in the system. These are unique for each user.
The Startup shortcut folder is designed for more than just windows in Dynamics GP.
Another option to add items to the Startup folder on the shortcut bar is to right-click on the folder and select Add | Add External Shortcut. Name the shortcut and select Browse. Find the external file in the menu system and click on Open.
Optionally add a keyboard shortcut then click on Add.
Experienced users will comment that it is also possible to select the shortcut with the left mouse button and drag it to the Startup folder. That works as well except for a bug in Dynamics GP that prevents dragging and dropping the first shortcut onto the Startup folder. If there is already a shortcut in the folder, dragging and dropping works fine, but until the first one has been created, dragging and dropping a shortcut onto a folder is impossible.
Interestingly, dragging shortcuts to folders worked correctly in Version 9 and seems to have broken with Version 10 and has not been fixed in either version 2010 or 2013.
For more information on how the shortcut bar works, refer to the Getting faster access to data with the shortcut bar recipe in this chapter and the Improving consistency with shortcuts and user classes recipe in Chapter 4, Automating Dynamics GP.
Since Version 2010 of Dynamics GP, Microsoft has placed a strong emphasis on a user's role in both the organization and the software. Selecting the right role in the system presents many of the best Home page options by default.
A role is usually selected by default when a user is created and it's often wrong because at setup the focus is placed on job titles, not on tasks the user performs. Additionally, user's roles evolve and change over time. Fortunately, changing a user's role is easy, so we'll look at how to do it in this recipe.
To change a user's Home page role, complete the following steps:
On the Home page, click on the Customize this Page link in the upper-right corner.
Click on the Change Role button in the bottom-right corner.
Changing the role resets any customizations that a user has made to their Quick Links or Business Analyzer settings on the Home page; the user is prompted with a warning that their customizations will be lost and given the choice of cancelling the change of role.
Click on OK to indicate an understanding of the consequences of changing a role.
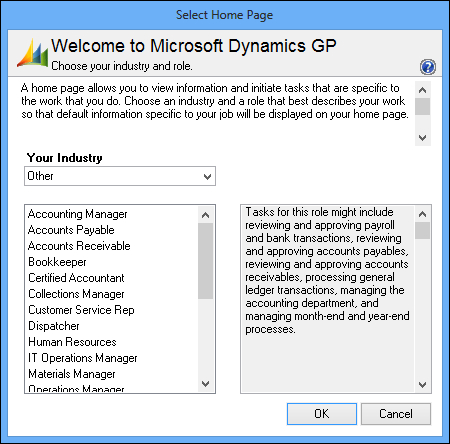
Select an industry at the top. Changing an industry simply adds or removes available role options below. Selecting Other as the industry provides all of the role options.
On the left side, select the role closest to a user's responsibilities. As a role is highlighted, a description of that role's tasks is included on the right side. Click on OK to accept the role.
The Managing personal reports with My Reports recipe
The Further personalizing the Home page by customizing the layout recipe
The Visualizing information with Business Analyzer on the Home page recipe
The Speeding up navigation lists by disabling Business Analyzer recipe in Chapter 10, Maintaining Dynamics GP
The customization possible on the Home page has been enhanced further in Microsoft Dynamics GP from the options that were available in Microsoft Dynamics GP 2010.
A default two column layout will be loaded when the Home page role is selected but can be customized by the user.

To change a user's Home page role, complete the following steps:
On the Home page, click on the Customize this Page link in the upper right corner.
The content being displayed can be amended in the top Mark content to display section. To disable a piece of content, such as Connect, unmark the checkbox and click on OK and this section will be removed from the Home page.
The expansion buttons, represented by horizontal blue arrows, allow additional criteria to be defined. Business Analyzer has an additional option, Show All, which will show all of the selected Business Analyzer reports on the Home page.
The three available Column Layouts can be selected by marking the required radio button.
The final customization option available is the Column Stack option, which controls the display of Home page sections when one is maximized by moving the remaining small windows to the top, bottom, right, or left.
A section is maximized by clicking on the Maximize/Multicolumn Mode button (a square containing four arrows pointing outwards from the center).

Once the desired customization options have been selected, click on the OK button.
In Microsoft Dynamics GP 2010, sections on the Home page were reorganized within the Customize this page… window. In both the Microsoft Dynamics GP 2013 Desktop client and Web client, reorganization is accomplished on the Home page itself by using the mouse to drag and drop the section in the same way you would for a window.
The Home page will automatically shuffle the other sections around as the selected one is being moved. When placed in the required position release the mouse button and the section will click into place.

The Managing personal reports with My Reports recipe
The Visualizing information with Business Analyzer on the Home page recipe
The Speeding up navigation lists by disabling Business Analyzer recipe in Chapter 10, Maintaining Dynamics GP
Like the shortcut bar, Quick Links provides fast access to data both inside and outside of Dynamics GP. Though there is some overlap with Shortcuts, Quick Links provide some unique features. For starters, related Quick Links are provided based on the user's Home page role. Additionally, Quick Links also provide fast access to Navigation Lists, something that shortcuts can't do. In this recipe we'll select an included Navigation List and then add it as a Quick Link.
Navigation Lists provide another way to work with data in Dynamics GP and they aren't available to add to the shortcut bar. For our Quick Links example, we will look at adding a Navigation List as a Quick Link.
To add a Navigation List as a Quick Link, perform the following steps:
Click on the Home button on the Navigation Pane to the left. On the main Home screen, find the section labeled Quick Links.
Place the cursor in the Quick Links box and a pencil will appear in the upper-right corner. Click on the small pencil icon and select Add | Dynamics GP Navigation List.

Click the plus (+) sign next to Sales to expand those lists.
Click the plus (+) sign next to Accounts and select Customers. Click on OK to finish.
In the open Quick Links Details box, find and select the Customers link. Click on the Move Up button repeatedly until Customers is at the top of the list and click on OK.

This process put the Customer Quick Link at the top of the Quick Links area. Now, clicking on the Customer Quick Link will immediately open that Navigation List. Without this Quick Link, a user would need to select Sales from the Home page and find the Customer link every time they needed to add a customer. Simply selecting a Quick Link is a much faster way to get deep into Dynamics GP.
The Navigation Pane on the left side of Dynamics GP is full of useful functions. Sometimes it is too full! For many users, it's beneficial to rearrange items on the Navigation Pane to better suit their role. We'll look at how to do that in this recipe.
Most users quickly discover that left-clicking and dragging the separator above the Home button on the left allows them to shrink and expand the space available for Navigation Pane buttons. This expands the room for lists and shortcuts above by transforming the large buttons into smaller but less intuitive icons. But there is so much more that can be done to personalize the Navigation Pane.
Cleaning up the Navigation Pane can provide faster and simpler navigation options. Let's see how by completing the following steps:
On the Navigation Pane, select the bottom-right corner of the pane and pick Option.
From here, select Purchasing and move it to the top using the Move Up and Move Down buttons at the right side.
Then select the Sales module and uncheck that selection. Click on OK.

Now the Purchasing choice has been moved to the top where a user can easily get at it and the Sales option not required for this user has been removed.
Dynamics GP 2010 and later has embraced the concept of breadcrumbs. Breadcrumbs provide a fantastic opportunity to ease system navigation. By showing the path through the system, new users gain an understanding of how to navigate within Dynamics GP. Experienced users learn that it's a fast way to hop through the system without accessing menus. In this recipe, we'll look at how to use breadcrumbs to improve navigating through Dynamics GP.
In Dynamics GP, select Financials from the Navigation Pane. On the Financial area page, select Transaction Entry in the Transactions area. This will open the Transaction Entry window for a General Journal Entry.
Let's now look at how breadcrumbs can improve navigation for a user by completing the following steps:
On the upper left of the screen is the breadcrumbs trail. It shows Home | Financial | Financial.

This is the path through the system to this window. It indicates that from the Home page the user is in the Financial area and has selected the Financial area page.
On the Navigation Pane to the left, select Accounts. This opens the Accounts Navigation List and changes the breadcrumb to show Home | Financial | Accounts. Select Financial from inside the breadcrumb trail to go back one step and return to the Financial area page.
My Reports is a section of the Dynamics GP Home page designed to provide fast access to reporting options in Dynamics GP. Similar to Quick Links functionality, My Reports provides single click access to reports, replacing multiple clicks and drill downs with a direct connection.
In Dynamics GP, every prebuilt report (also known as a
Report Writer report) requires an option. An option is simply a named group of settings for a particular report. For example, a user may have a Receivables Aged Trial Balance report with date and selection criteria designed for month end reporting. The report name is always Receivables Aged Trial Balance but the option name to describe those particular month end settings might be Month End.
The My Reports feature provides one click access to reports with saved options. In this recipe we'll look at how to add a report to My Reports.
To add a report to My Reports, we will need to complete the following steps:
Select the Sales button from the Navigation Pane on the left side. In the list on the left select Report List.
In the center section, scroll down to the report named Aged Trial Balance with the Option column value of demo and check the box to the left.
Demo is a prebuilt, saved report option. Report options are saved report settings for items like dates and restrictions.
Click on the Add to button to add this to the My Reports section of the Home page. Accept the default name for the report by clicking on OK.

Click on the Home button on the Navigation Pane to return to the Home page. The Aged Trial Balance-demo report now appears on the Home page under My Reports.

Clicking on the Aged Trial Balance-demo link under My Reports now runs the report automatically.
Other features and options are available to assist with managing reporting in Dynamics GP.
Reports without options cannot be added to the My Reports section of the Home page. Consequently, users need to create and save report options to make those reports available to the Home page.
A technique for setting up report dates for automatic reporting is covered in detail in the Controlling reporting dates with Beginning and Ending Periods recipe in Chapter 4, Automating Dynamics GP.
The Personalizing the Home Page by selecting the right role recipe
The Speeding access to data with Quick Links recipe
The Viewing open items with the Task List recipe
The Controlling reporting dates with beginning and ending periods recipe in Chapter 4, Automating Dynamics GP
Dynamics GP provides a Task List for managing items to be accomplished within the system. While not quite as powerful as, say, Outlook's tasks, the Task List in Dynamics GP can provide direct links to the appropriate window, web page, or external file needed to accomplish the task. Even Outlook can't provide a direct link to the right window in Dynamics GP. In addition, tasks can be assigned to other users in the system to better delegate the workload. Let's look at how to use the Task List in Dynamics GP in this recipe.
Open tasks are displayed on the Home page in Dynamics GP under the To Do heading.
To get started, select New Task from the Home Page to see the full task list. Yes, that's not particularly intuitive but that is how it works.

As an example, we'll look at adding a month end bank reconciliation task by completing the following steps:
To create a new task, select New Task from the Home page in the To Do section to open the full task list.
Select New Task on the Task List window. In the Task section enter
Reconcile Bank Statement. Set the due date to the fifth of the next month and set the status to pending.
In the Task Assigned To box, select a user to assign this task to. In the Link To box, pick Microsoft Dynamics GP window.
To attach the Reconcile Bank Statements window, click on the blue arrow next to Name.
In the new Add Command box that opens, pick Transactions on the left side then click on the plus (+) sign next to Financial on the right.
In the right-side pane select Reconcile Bank Statement and click on OK.

Click on Save to save the task. If the task was assigned to another user, it will now appear in that user's task list.
The new task now appears in the Tasks area on the Home page. Checking the box next to a task marks it as complete and sets the user who completed the task as well as the date completed.

Even better, tasks can be repeated, which means that they work great for regular processes such as month end or quarter end tasks.
To set a task as recurring:
Select the Recurrence button during task creation or double-click on an existing task and pick Recurrence.
From the previous example, select the Reconcile Bank Statement task and double-click the line.
Click on the Recurrence button. Set the recurrence pattern to Monthly, select Day, and enter values
5and1in the appropriate fields, as shown in the next screenshot.This means the task will recur on the fifth of each month. That's about five days after a typical bank statement cut off.
Leave the range of recurrence set to No End Date and click on OK.
Now this task will repeat each month on the fifth day of the month, perfect for a calendar month end bank cut off. Obviously, if a company's bank statement cuts off at some other time during the month, these settings can be easily changed.

The Using Reminders to remember important events recipe in Chapter 4, Automating Dynamics GP
On the Home page, Dynamics GP provides a default set of reports via charts and graphs designed to provide better visualization of data based on a user's role. Individual users can include or exclude various charts from their Home pages and select default charts. In this recipe, we'll look at ways to tailor Business Analyzer reports for each user.
Business Analyzer reports provide charts for additional analysis. Let's see how to put them to use by completing the following steps:
On the Home page in the Business Analyzer section, move the mouse over the report title to expose additional options on the right side. Select the pencil icon that now appears on the title bar to the right side.
The left side shows all the reports available to a particular user. Selecting a report on the left and clicking Insert moves that report to the right and makes it available on the user's Home page. Selecting a chart on the right and clicking on Remove eliminates that chart from the Home page.

The Business Analyzer functionality was added in Version 2013 and replaces Metrics from Versions, 10 and 2010. In Dynamics GP 2013, users can add multiple reports to their Home pages. Additionally, users can create their own reports using SQL Server Reporting Services (SSRS) and apply those reports to their Home pages. The creation of new reports is beyond the scope of this book but more information is available via the Dynamics GP manuals.
Dynamics GP 2013 provides an option to view multiple reports on the home screen, open reports in a browser window, and drill back for more information.
Inserting multiple reports in the Selected Reports box can place all of those reports on the Home page.

The option to display all of the selected reports is controlled by the Customize this page selection on the Home page. Once opened, the Show All check box under the Business Analyzer selection of the Customize Home Page window controls whether all of the reports appear or one report with an option to scroll through the others.

Clicking on the Full View option below a report opens the SSRS report behind that report in a web browser. Selecting individual items in the report drills back to reports with more information. For example, clicking on Full View below the Top Customer Balances report and then clicking the CONTOSOL001 column drills down into that customer's balance detail.

In larger organizations it is common for users to only work with a subset of the chart of accounts. Often these accounts are limited to a certain division or department. To find a set of accounts fast, Dynamics GP provides a mechanism to lookup a more limited set of accounts and save them as favorites. This provides faster access when selecting accounts in transactions. In this recipe, we'll look at using favorites in lookups. Favorites are actually part of SmartLists, which are covered in detail in Chapter 5, Harnessing the Power of SmartLists.
This recipe showcases the power of integrating SmartLists into the application interface. It provides an unlimited number of ways to target account selection including selection based on department, company, account type, financial statement type, and more, all with just a few clicks.
To begin this recipe, we are required to set up a simple SmartList to setup the account limits:
Select the Microsoft Dynamics GP menu and click on SmartList to open SmartLists.
Click on the plus sign (+) next to Financial and select Accounts:

Now, select the Search button. Click on the lookup icon (it looks like a magnifying glass) and select Account Number. Click on OK.
Set the Filter dropdown to begins with and enter the value
000. Click on OK to close:
Select the Favorites button. In the Name box enter
Segment 000and click on Add | Add favorite:
This process creates a specialized list based on a segment in the chart of accounts and then saves it to make it available for account selection.
The favorites list only needs to be built once. After that, the real fun starts.
First, select Financial from the Navigation Pane on the left side and pick General from the Financial area page.
Click on the Account field in the middle and select the lookup button. Click on the arrow next to View and hover over Favorites.
Pick Segment 000, the favorite created in the Getting ready section:

This presents a specialized list to users giving them a more targeted list of accounts to select from when creating a transaction.
There are more options than just this recipe for limiting the selections from the chart of accounts.
New in Dynamics GP 2010 and improved in Dynamics GP 2013 is the ability to save a favorite as the default view. Once a favorite has been selected in the view, simply click Set as Default View from the View menu. Default views are per user and only available for master record lookup, not transactions.
If users only need to restrict the available accounts occasionally there is a temporary option. After selecting the lookup button and clicking on the arrow next to View, users can select Restricted List instead of Favorites. The Restricted List option provides similar functionality to Favorites but the search is not saved and restricted lists cannot be set as the default view.
Account security is a feature in Dynamics GP that limits a user's access to certain accounts in the chart. A user cannot even see an account that they don't have access to. This is another option to limit the selection of accounts available to a user but it requires an administrator and a lot of thought to set up correctly. Setting up account security is less like a recipe and more like a seven course meal so it's not covered here.
Activating account security without proper setup makes it appear as if the chart of accounts has been deleted. Deactivating account security returns users' access to the chart but not before triggering a gut wrenching fear that it's time to find a new job.
Chapter 5, Harnessing the Power of SmartLists
Dynamics GP includes a fantastic feature known as AutoComplete that remembers what a user has typed in a field and later makes data entry suggestions based on that information. This can significantly reduce repetitive data entry. However, if a user makes an error during data entry, such as a misspelled or incorrect word, that error will continue to be suggested over and over again.
There is a simple way to remove erroneous entries and we'll look at how in this recipe.
To demonstrate this feature, we first need to intentionally create an autocomplete error:
Select Sales from the Navigation Pane on the left.
On the area page for Sales, select Customer under Cards on the right to open up the Customer Maintenance window.

With the Customer Maintenance window open, type
MISPELLin the Customer ID field and click on the Tab key. Press the Clear button to remove this customer entry.
Now that we have an error, let's see how to fix it:
Back in the Customer ID field type
MIS. Dynamics GP will suggest MISPELL. Right-click on the suggested wordMISPELLand select Remove From List.
Now typing MIS in the Customer ID field doesn't provide the MISPELL suggestion.
AutoComplete is controlled in User Preferences, which is accessed via the shortcut bar. The AutoComplete settings are defined for each user. This means that each user has a different set of AutoComplete entries so removing an errant entry doesn't affect other users.
To better manage AutoComplete there are some other settings that can be adjusted on a per user basis.
The AutoComplete cache of entries can grow quite large and unwieldy, leading to a significant number of entries to sort through and reducing the effectiveness of this feature. A consistent way to manage the size of the AutoComplete list is by letting AutoComplete remove unused entries automatically. To set this up:
Select User Preferences from the shortcut bar and click on Auto Complete.
In the Remove Unused Entries After field enter
90and click on OK.This means that any AutoComplete entries will be removed after 90 days without any use.
Another option for managing the size of the AutoComplete cache is to limit the maximum number of AutoComplete entries. To accomplish this:
Select User Preferences from the shortcut bar and click on Auto Complete.
For the Max. Number of Entries to Store per Field entry, the default is
10,000, which is a huge limit.This can safely be lowered to 1,000 by changing the number in the Max. Number of Entries to Store per Field box to
1,000.