In this chapter, we will cover:
Opening a free 30-day trial of Dynamics CRM 2011 Online
Using solutions to package our work
Creating and managing entities
Creating and managing fields
Creating and managing forms
Creating and managing scripts
Creating and managing other resources
Creating and managing workflows
Creating and managing dialogs
Starting a workflow from a dialog
Working with security roles and permissions
One of the most useful features of Dynamics CRM is the use of scripting. Version 2011 brings a new object model that is much clearer and concise. Using this object model guarantees that future cumulative updates will not break your scripts, thus it is highly recommended that you convert your old scripts that are using Dynamics CRM 4.0 or standard JavaScript to the new object model as much as possible.
The new object model revolves around the Xrm.Page object hierarchy, and brings capabilities to manipulate user interface elements, user forms, and navigational elements. While at first glance the new syntax might seem overwhelming, with some practice it can prove easy to learn.
The object hierarchy of Xrm.Page is described in detail on TechNet, at http://technet.microsoft.com/en-us/library/gg328474.
In order to follow along with the recipes described in this book, you should sign up for a 30-day trial of Dynamics CRM 2011 Online rather than using an existing production server. This way, all customizations implemented in this environment will not affect your production environment, but they can all be packaged and moved to any other environment once you feel comfortable to do so.
Dynamics CRM Online has now been packaged with Office 365. In order to sign up for a new online instance, you will need to provide a few details as described in the following section.
Creating a new instance of Microsoft Dynamics 2011 Online is a quick and painless task. All you need to figure out is what URL you want to use, and fill in the wizard-driven configuration.
Navigate to http://crm.dynamics.com.
On the GET STARTED tile, click on the Free trial icon.
On the following page click on the Start your CRM trial button.
The next screen presents you with a form where you provide your personal information as well as the new domain you want to use. This sign-up creates your Office 365 trial account of which Dynamics CRM 2011 is a part.
When choosing your domain name, check its availability by clicking on the Check availability button. If the selected name is already taken, you will be prompted to select a different one.
Pay close attention to the Country or region field. This selection cannot be modified once the instance is created, as it sets global parameters for your environment. Note that this will not stop you from configuring additional currencies and territories.
Once you confirm the domain name availability, you are prompted to create a user ID. As part of the validation process, your mobile number is required and a text message with a confirmation code is sent.
Once all the fields are completed, click on the create your account button. You are being directed to the Administrative page for your organization. You will observe here the message about the remaining trial period, as well as the navigation to set up and manage your subscription services.

The Microsoft Dynamics configuration usually takes a little while longer, and you will see a status of "complete" when done.
From here on you are ready to add new users and to navigate to your newly created Dynamics CRM 2011 Online instance by clicking on the CRM link.
Dynamics CRM 2011 Online is a cloud-based solution offered on the SaaS model. A new instance is provisioned every time a new user goes through this process. With the new model, CRM Online is now part of the Office 365 offering, thus the common familiar account creation process.
As mentioned before, certain instance information cannot be modified after they are provisioned during the wizard. These include the organization's name, country, currency, and language. While the default values cannot be modified, additional languages and currencies can be customized, and additional territories can be configured.
A new concept introduced with Dynamics CRM 2011 is that of solution packages. This allows for code separation, ease of deployment, and cleans up the mess sometimes created in previous version by the large number of possibly unorganized customizations.
In order to follow through with this recipe, log in to your instance of Dynamics CRM 2011 with an account that has either an administrator or system customizer role. These roles have the necessary out-of-the-box permission to allow you to work with solutions.
A solution package is a collection of customizations and configurations that can be generated in an environment and relocated to an additional environment. Creating a new solution is a process that a system administrator or a system customizer can achieve with the following steps:


Note
When developing a solution for the Marketplace (as an ISV) you will need to fill in most of the provider information.
Removing a solution is also a very simple process. Select the solution to be removed, and click on the Delete icon.
Tip
If this is a managed solution, all solution configurations are cleanly removed from the environment. For an unmanaged solution, the process is not as straight-forward, as the removal of an unmanaged solution will leave behind customizations and trailing components. For additional details on solution see the Solution model section of this recipe.
Creating a new solution requires you to assign a publisher. By default, each instance of Dynamics CRM 2011 includes a default publisher for the instance. For environments where a solution is to be published to production, create a publisher that includes the organization details of the customizer.
Solutions offer additional features such as versioning, which can be essential in tracking progress and deploying to the production environment.
Also, with solutions, we have two very important models, a managed and unmanaged solution model. A managed solution is a restrictive package, which can only be edited by specific users, and can be cleanly rolled back. An unmanaged solution on the other hand is a type of package used mostly for development environments, and it allows various developers to move customizations from one environment to another, while keeping all customizations editable by all users with the proper permissions. Unmanaged solutions, when removed, will not be removed cleanly, and will leave behind traces of customizations. For this reason, they are not the recommended way of deploying to the production environment.
For additional details on working with solutions, consult the TechNet library at http://technet.microsoft.com/en-us/library/gg334530.aspx.
In this recipe, we'll go through the process of creating a new entity, look at how to configure such an entity, and in the end, how to clean up an entity that's not required in our solution package.
All customizations in this book are created as part of a solution. As such, we will be reusing the previously created solution.
In order to proceed, log in to your existing Dynamics CRM 2011 instance and navigate to the solution we created previously.
In the created solution package, we will be adding a new entity to store a list of all countries. We want this listing to be manageable by a user with proper permissions, so that it can be updated as they do business with new countries.
Open the solution, and navigate to the Entities tab.

Click on New to add a new entity to the solution.
Fill in the mandatory fields, and define where this entity will be visible. In our case, we will make this entity visible only in the Settings area. We are setting the Ownership of this entity to Organization, thus making it available across the environment.

Additionally, the Options for Entity section allows you to define some of the standard elements and behaviors that can be included with the entity. These are comprised of behavioral settings, data settings, and configurations for mobile and Outlook. These settings give you a granular access to configure how an entity can interact with the system and other entities, what processes can be run against this entity, and storage options for related files.

Before clicking on the Save icon, direct your attention to the second tab named Primary Field. All entities will need to have a primary field, and we can define the properties of such fields on this tab. We will define the display name as
Country, leave the Requirement Level with the default value Business Required, and the Type as Single Line of Text.
Now we click on Save.
Once the entity is created, additional options to edit Forms, Views, Fields, and Relationships become available.
Great job! Now we have the entity created and we can start working with it.
Removing an entity that is not being used by our customization is again a relatively simple task.
In our solution package, select the entity.
Click on the Delete button.
Each entity is stored in the database as a set of two tables. The first one stores the base entity, while the second one stores the customizations to the entity. Creating a new entity in fact creates this set of tables, one that stores the entity generic properties, and another that stores each data fields defined. So, in our case, we will have a table called new_countryBase, and another called new_countryExtensionBase, as seen in the following two images:

The extended table has the following definition:

This information is only available while working On-Premise. With a Dynamics CRM 2011 Online instance, there is no direct access to the database.
Making modifications directly to the database in Dynamics CRM 2011 is not supported. This can cause various issues. All data access should go through web services. When creating custom reports, use the views. They also present the trimmed data security.
Additional information related to entities can be found on TechNet at http://technet.microsoft.com/en-us/library/gg309396.aspx.
Once we have an entity ready to work with, whether it's a new custom entity or an existing out-of-the-box entity, we can start managing the information to be captured.
In this recipe, we will be building on the custom Country entity we created in the previous recipe. Open the created solution and navigate to the created Country entity. We will be adding two more fields to capture the country code and display sequence.
In order to add the additional fields to capture information, we will follow these steps:
Expand the Entities section in the solution, and expand the Country custom entity that we created:

Select the Forms option, and look at the view of forms associated with this entity.

By default, we will be presented with two views, one that we will customize, and another mobile form. We will open the first form, of type Main.
From the bottom-right of the screen, we will click on the New Field button.

We will create a field with the display name of
Country Code, no requirements constraint, and of type text, single line, with a maximum length of3. We will be using this field to capture country codes such as CA, USA, and UK.
Once complete, we'll click on Save and Close. The new field will show in the listing of All Fields in Field Explorer.

Now we can simply drag this field on the form, under our Country field.

With this field already added to the form, we can add a new field called Display Sequence, of type Whole Number, as described by the following screenshot:

We will be adding this field to the same form. This entity will be used in the next recipe. The end result should look like the following image:

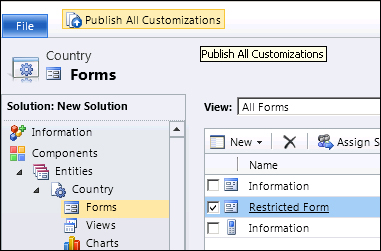
Now we can click Save on the form screen, and then Publish. All customizations must be published before they are visible to all users.
Once all customizations are published, we can verify the form by navigating to the Settings area, and looking under Extensions. We will find our custom Countries entity there.

Clicking on Countries will show us a view of all Active Countries (default view). We can click on New to see how the customized form will look.

If we are not satisfied with the way the form looks, we can go back to the solution and tweak the look of it again, or else we can proceed further.
Because we have configured the new entity to be visible only in the Settings section, we will have to navigate to Settings to get access to the listing of countries we will be adding to the system. We have customized it as such so that when we build a more complex solution later in the book, we can make sure that only authorized users will be able to see and modify the listing of all countries in such a way.
Dynamics CRM 2011 allows us to define a large number of field types. We have only covered two simple examples here, one of text and one of whole numbers. Additional field types will be described in the following recipes, when we start looking at how to script these fields.
For additional information on creating fields and adding them to forms, see the TechNet documentation at http://technet.microsoft.com/en-us/library/gg334527.
In certain instances, we will require additional forms for the same entity. One obvious example is when we need to implement role-based forms. In such instances, a specific role could have access to only a subset of fields, while a different role could have access to other fields. We could have an overlap of fields available to all roles too.
Open the previously created solution, and navigate to the Countries entity we created. In the view of All Forms, by default, we only have the two forms, one for the normal use and one for mobile.
Adding a new form can be achieved as follows:
From the All Forms view, select New | Main Form, or simply click on New.

On this new form, we can remove the Country Code and Display Sequence fields, by selecting each field and clicking on Remove on the ribbon.

Click on the Form Properties button on the ribbon, and on the Display tab (second from the left) to define a new name for our form.

Once the fields are removed and the form renamed, we can save and publish the new form.

With the form published, we can verify the listing of All Forms to make sure the form is saved.
To verify how this form is presented to users, we can navigate to Country created in the system, and select from the available forms.

Now, both forms are available to be selected for users that have permissions to view both. We will be covering role-based forms later in a different recipe.
Removing a form is also a relatively simple process.

JavaScript scripts are added to a solution package just like any other resource. They are becoming part of the package, and thus are easily portable to other environments, along with the solution.
Using the existing solution package we have created, we will be adding a new JavaScript resource.
To add a new JavaScript resource, navigate to Settings, and open your existing solution package. Follow these steps to add a script resource:
In the package, navigate to Web Resources.
In the Web Resources view, select New to add a new script resource.

Give the resource a name, and select the
Script (Jscript)option from the Type drop-down list. The Display Name should be in a readable format. It is good practice to always add a Description for other developers that will follow in your foot steps to easily identify the content of the library without having to open the file.
Click on Save, and then on Publish. Now you have a JavaScript resource added to your solution package. There is no actual script added yet, so let's do that.
Click on the Text Editor button. A new form will open allowing you to type in your script.

Now we have a script added as part of the solution package. It is not related to any action, but we will cover that in one of the later recipes.
Sometimes a script resource can become obsolete, and we would want to remove it. In order to remove a script resource that is not associated with any other system entities, perform the following steps:
From the Web Resources view, select the script.
Click on Delete.
Make sure to click on Publish all Customizations for the changes to take effect. Now your script resource has been removed.
JavaScript resources are not the only available resource that can be added to your solution package. Other file types can be also associated in a similar manner, including HTML pages, stylesheets, image files, as well as Silverlight controls.
On the Web Resources view, follow these steps:
Click on New to add a new resource.
In the new window, give the resource a name, a display name, and add a description if necessary.
Select JPG for Type as we will be adding an image resource.

Once the picture is selected, click on Save and then on Publish. Now your resource is added to the solution package.
Workflows, along with the newly introduced concept of dialogs have all been grouped as Process in Dynamics CRM 2011. The workflow concept remains similar to that of previous versions, with some additional functionality.
We will be adding a very basic workflow to our existing solution package. Open the already created solution package to work with.
In order to add a new workflow using the wizard, perform the following steps:
In the solution package, navigate to Processes and open the Processes view.

Click on New to create a new workflow.
On the Process: New page, give the new workflow a name, select an entity it will work against, and from the Category drop-down, select Workflow.

Leave default the selection for New blank process, and click on the OK button.
The process wizard starts, and it allows us to configure the workflow properties and parameters.
In the Options for Automatic Processes section, I will select the scope to be Organization, and the start to be generated by the Record is created event.

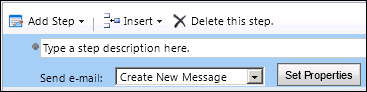
Next, we will add a simple e-mail notification step to be executed. Click on Add Step, and select Send E-mail. This will add the Send e-mail step, and allows us to configure the properties.
Click on Set Properties, and start customizing the e-mail properties. We can add the From to be the current user that creates the record, and the To field to be the owner of the record. Also, we can create a subject and body.

Click on Save and Close to complete the message configuration.
Additionally, you can define a step description in the workflow step wizard window.

With our step created and configured properly, now we can save the workflow. Click on Save. In order to enable this workflow, we have to activate it. Click next on Activate.
Click OK on the Process Activation Confirmation window. If there is no error in the workflow, it will become active.

Once the workflow is activated, we can create a new record and verify that it performs as expected.
This sample workflow we created sends an e-mail confirmation once a new Contact record is created. As long as the workflow stays active in the system, it will execute on each record creation, as configured. Other configuration options include the capture of field value changes, new assignment of record to another user, or on record deletion. The record deletion event captured can also be used to validate record deletion, and stop the process if certain conditions are not met.
For additional information on Processes, including workflows and dialogs, as well as a comparison between the two, see the TechNet articles at http://technet.microsoft.com/en-us/library/gg309471.aspx.
A dialog differs from a workflow through the fact that it is an interactive process, where user input is required. The addition of dialogs offers new possibilities with Dynamics CRM 2011.
Adding a dialog is done by performing the following steps:
Open the existing solution package, and navigate to Processes.
In the Processes view, click on New to add a new process.
On the Process: New window, select Dialog this time.

Keep New blank process selected and click on OK.
The dialog configuration window allows us configure the dialog details. A dialog can be started as either an on-demand process, or as a child of another process. This allows us to create smaller dialogs, and chain them together as required to achieve our final result. We will mark this dialog as an on-demand process, so we can see the very basic functionality available.
To capture user interaction, we will first add a page to the dialog, and then a Prompt and Response on that page.

Click on Set Properties to define the prompt and available answers.

In the process builder, add a new Update step that will fill in the captured details within the form field.

Click on Set Properties to define which value gets assigned to what field. We are being presented with the standard Contact form. Click into the First Name field, and from the Form Assistant, select New contact first name under Local Values in the Look for drop-down list, and Response Text. Click on Add and then OK.

Save and Close this form. Save the dialog and activate it.
To test this newly created dialog, create a new Contact record, and from the ribbon, click on the Start Dialog button.
From the selection window that opens up, select the dialog we created earlier.

Click on OK and answer the prompt question.
Click on Next. When the dialog finishes, an end of dialog window is displayed. Click on Finish.

Once the dialog completes execution, you will see the value captured during the dialog populated into the contact's first name field.
For demonstration purposes we have only captured the contact's first name and populated the first name field. More steps can be added to a dialog to capture additional information and guide a system user in capturing all required details through a dialog rather than by using a free form. This way a "script" can be created for the user to capture information in a specific order, thus enforcing a clean, repeatable process in dealing with customers in a Call Centre scenario.
We have looked at workflows and dialogs. But they can function together to achieve a result. For example, we can start from a dialog, capture specific information, and then kick off a workflow as part of the same process to process the information and generate a result.
Using the same solution package, we will be creating two new processes. One is a workflow that sends an e-mail when a field value changes, which we will mark as a child process. The other is a dialog that will call this workflow.
Create the child workflow by performing the following steps:

Create the parent dialog that will kick-of this workflow by performing the following steps:

The dialog we have created, as simple as it is, prompts the user to decide whether they want to run a workflow or not. When the user selects Yes, the workflow is started.
We can easily test this functionality by going to a new account, and selecting from the ribbon the Start Dialog button. A window prompts us to select the dialog we will run.
We can easily check the execution status of both the dialog and the workflow by navigating on the account to the Processes section.
These two views will give us details about the processes that run against the current account, and the status of each.
Security roles and permission can be configured as part of the same solution package. This allows us to port these configurations from one environment to another. Be aware though that there are some limitations in the use of security roles as part of a solution. One of the most important is a limitation where roles can only be configured at a top business unit when they are saved as part of a solution package.
In order to add a new security role we must perform the following steps:
Open the existing solution package.
Navigate to the Security Roles view.

To create a completely new role, select New. A better approach is to modify one of the existing roles by selecting Add Existing, but for the purpose of this recipe we will create a new role. Click on New.
Give the role a name and make the necessary modifications. Click Save and Close. The new role is added as part of the solution.

With this new role created, we can go back to the custom Country form we previously created. Open the form and click on Assign Security Roles.
Deselect the selected security roles, and select the newly created security role.

At this point we have a new security role added to the solution package. Additionally, we have configured the custom Country form to be visible only by users that are assigned the newly created security role.
For additional details on working with security roles, read the TechNet articles at http://technet.microsoft.com/en-us/library/gg334717.aspx.