


 Download code from GitHub
In this chapter, we will cover the following recipes:
- Modeling denormalized entities
- Modeling normalized entities with a common parent
- Modeling independent normalized entities
- Using a Business Rule to show and hide attributes
- Building a configurable e-mail notification workflow
- Building your first action
- Setting up rollup fields
- Setting up calculated fields
- Duplicate detection using alternate keys
Commercial off-the-shelf products (COTS) are attractive options for enterprise organizations as they are packed with configurable out-of-the-box features that address a good portion of business requirements without writing any code. Dynamics 365 is no exception. Dynamics CRM 365 specifically offers a powerful modularized feature-rich product that can be tailored to suit your organization's needs.
Generally speaking, configurable, no-code extensions are cheaper to implement, easier to maintain, and easier to upgrade, as the product evolves. Modeled correctly, those extensions can greatly enhance the value of your investment. Modeled incorrectly, they can lead to a platform that is locked down to one purpose only.
Using the same analogy as that of the Dynamics 365 suite, you can build your CRM application for general use by loosely coupling your entities, or you can build a specialized application by tightly coupling all the content. The following picture taken from the Dynamics 365 Microsoft marketing pack visualizes a specialized implementation versus a more general one:

A specialized implementation is not necessarily wrong, as some applications won't make sense if rendered generic, especially as some organizations work in siloed business units. That said, most organizations prefer a more flexible implementation.
This chapter will cover different schema-modeling techniques to deal with different business scenarios, along with their respective pros and cons. It will also cover out-of-the-box configurable business logic extensions that were introduced over the last few years, which drastically reduce the amount of code required to configure implementations.
To give context to our configuration, we will model our entities based on a college solution with a student/contact management system. The system will hold contacts that can either be generic individuals, students with graduation details, or contractors working for the college.
Typically, account and contact entities are the most commonly used entities in a Dynamics CRM implementation. In large implementations, those entities are usually also reused for multiple purposes. To illustrate the modeling pattern, this recipe will leverage the college solution described in the introduction. We shall concentrate on creating contacts that can either be individuals or students. Each type of contact requires a different set of attributes.
The easiest way of modeling a multi-purpose entity is to add all the required attributes for the different types to the same entity.
In order to configure the schema, you will need to have access to a Dynamics 365 instance along with a System Customizer or higher security role . As a best practice, it is always recommended that you implement your configuration within a solution. For the purpose of this book, it is expected that you already have a solution created called Packt with a publisher prefix of packt_.
- Navigate to
Settings|Solutions|Packt. - Click on
Add Existing|Entityand selectContact, as shown in the following screenshot:
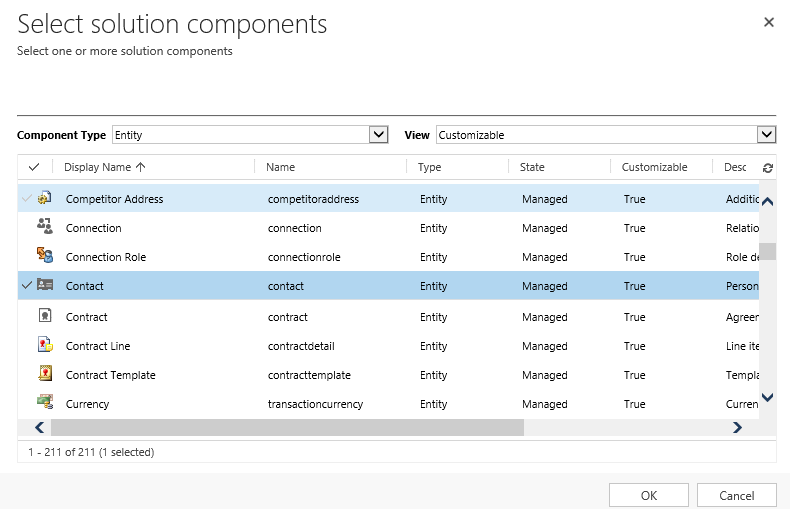
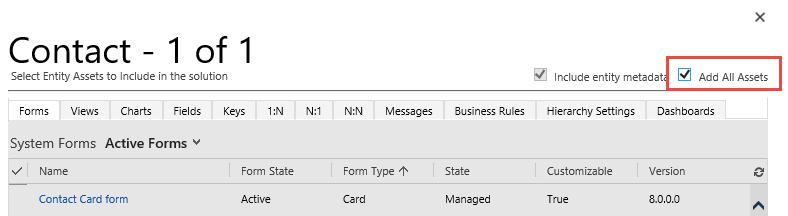
- Select the necessary assets that support your configuration and add them to your solution, or, for simplicity, select
Add All Assetsand click onFinish:
- Click on
No, do not include required components. - Navigate to
Entities|Contacts|Fields. - Click on
New, and create an attribute calledStudent Idof typeSingle Line of Text, and click onSave and New. - Create an
Option Setattribute calledContactType that contains two values;StudentandOther. Then click onSave and Close. - Back in the solution, navigate to
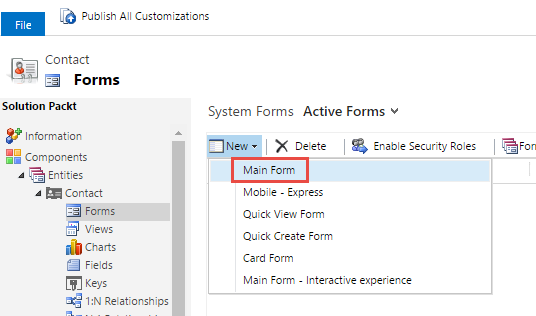
Entities|Contact|Formsand click onNew|Main Formas per this screenshot:
- In the newly created form, add the two newly created fields to your form by dragging and dropping the entities from the right-hand window onto the form.
- Click on the
Publish All Customizationsbutton for your solution.
Just like database modeling, entities can be normalized or denormalized. Normalizing a structure is the action of separating it into several related tables to reduce redundant data or empty fields. Denormalizing a structure is the opposite: we merge two or more tables together to simplify the structure and improve query performance, whilst adding redundant or empty fields. In this recipe, the entity was denormalized to allow different types of contacts to be surfaced through the same contact entity.
In step 1 to step 4, we added the existing contact entity to the Packt solution. Notice that in step 3, we had the option to either add the necessary assets or add all assets. For this recipe's simplicity, we added all assets. With the recent granular solution enhancements, we can simply add what is required.
Note
It is a best practice to minimize the number of unnecessary attributes and relationships in a solution to avoid conflicts and dependencies.
In step 5 to step 7, we created the attributes, and in step 8 and step 9, we added the attributes to a new contact form. In step 10, we published the configuration we implemented.
Note
To avoid multi-solution dependencies and scenarios where a form is overwritten with an updated version from another solution, best practice dictates that you create a new form for your solution and mark it as default. Unnecessary forms can always be hidden by using Apps as described in Chapter 9, Dynamics 365 Extensions.
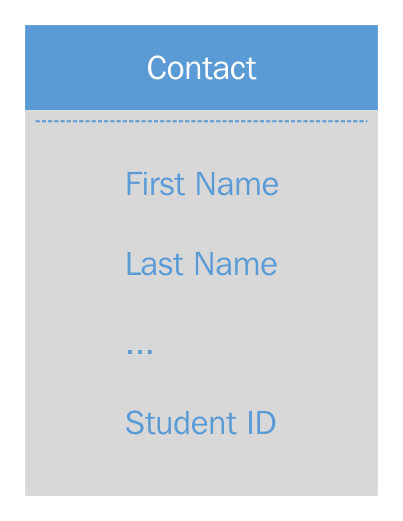
Looking at the design of the updated entity, we have now configured the contact entity to fulfill more than one purpose: it is a generic contact as well as a student one.
A simplifiedEntity Relationship (ER) diagram is depicted in the following screenshot:
The advantages of a denormalized model are:
- Views will appear in the same combined list
- A quick and advanced find will include both types and display the results in the same list
- Positive form user experience, driven by the form configuration
The disadvantages of a denormalized model are:
- Security roles cannot easily be made specific to types
- Configuration/customization is required to show/hide irrelevant attributes or to mark them as mandatory or optional
- Records will contain blank fields when not applicable
- Modeling normalized entities with a common parent
- Modeling independent normalized entities
- Using Business Rule to show and hide attributes
- The Dynamics 365 applications recipe of Chapter 9, Dynamics 365 Extensions
Similar to database modeling, the alternative to a denormalized model, is, you guessed it, a normalized model. Normalizing a structure is the action of separating a table into two or more structures. Normalization reduces the number of redundant or unnecessary fields in a form. In the Dynamics 365 context, normalizing will help avoid overcrowding one entity by spreading the attributes across different entities whilst keeping a common parent.
In this recipe, we will carry on using the contact entity and extending its relationships to include additional attributes: student graduation details.
Similar to the previous recipe, System Customizer or higher security role is required to perform the configuration as well as a solution to contain the changes.
- Navigate to
Settings|Solutions|Packt. - Click on
New|Entity. - Enter
Graduation Detailsin theDisplay Namefield, andGraduations Detailsunder thePlural Namefield.
- Before saving the new entity, untick all the check boxes on the form:

- Click on the
Savebutton. - Navigate to
Fieldson the left-hand side and click onNew. - Create an attribute called
Supervisorof typeLookupwith aTarget Record Typeset touserand click onSave and Close. - Create another attribute called
Post Graduate Start Dateof typeDate and Timeand click onSave and Close. - Navigate to
Formsand double-click theQuick View Formoption. - Add the two attributes on your form by dragging and dropping them from the right-hand
Field Explorer, then click onSave and Close. - Click on
Save and Closeon the entity as well to go back to your solution. - Navigate to
Entities|Contacts|N:1 relationships|New Many-to-1 Relationship. - Enter
Graduation Detailsin the primary contact field,Display Name:Graduation Detailsand click onSave and Close. - Navigate to the contact's
Formsand double-click theMain Informationform. - Add the newly created field to your form by dragging and dropping the
Graduationattribute from the right-hand window on to the form. - Click on the
Inserttab at the top followed byQuick View Form:

- Enter the following details in the
Quick View Control Propertieswindow:Name:Graduation_DetailsLabel:Graduation DetailsLookup Field:Graduation DetailsQuick View Form:Information
- Click on
OK:

- Click on
Save and Close. - Click on the
Publish All Customizationsbutton for your solution.
Although this recipe is simplified, typical normalized models will contain more than one attribute, as well as more than one entity.
In step 2 to step 11, we created a normalized entity that contains the employee details along with its Quick View. In step 4, we avoided keeping the checkboxes ticked. All the checkboxes with a

symbol depict options that cannot be reverted. We can always enable them later if required. As a best practice, if they are not required, don't enable them, otherwise your choice will be irreversible. In step 12 and step 13, we created a relationship between contacts and the newly created entity to provide a navigation path between the parent contact entity and the additional attributes for the specific types (Supervisor and Post Graduate Start Date). In the last steps, step 14 to step 18, we added the lookup as well as the Quick View on the contact form. A Quick View is a simplified sub-view of another record that can be placed on the parent record's form to display the child's subset of attributes in read-only. The red box in the following screenshot highlights the Quick View related to the Graduation Details lookup record:

With this design we can now see the graduate details on the contact form without creating the attributes on the entity itself.
Our ER diagram now looks like this:

The advantages of normalizing your data with a common parent are:
- Lighter multipurpose parent entity
- Security roles can control the normalized entities with the additional attributes
Note
However, the primary field value will still appear on the parent form, even if the user does not have read rights to the child entity. Moreover, field level security can be used to obfuscate the lookup's text.
- Quick Views help display the normalized data on the parent form (read-only)
- Advanced search can still retrieve and filter information from the related entities
- Views can contain data from the related entities (non-sortable)
Note
With quick Views, a user can retrieve data that is two levels deep. Attributes from the related record as well as its 1:N or N:N related lists.
This model also has some cons, which are as follows:
- Degraded user experience as the Quick Views are read-only
- May require some customization to show and hide irrelevant details
- Quick search cannot search attributes across the different normalized entities
- Modeling denormalized entities
- Modeling independent normalized entities
- Using a Business Rule to show and hide attributes
- The Building cumulative security roles recipe of Chapter 7, Security
The third modeling technique is similar to the second, except that the entities are completely independent. This scenario is typically used when there is a logical separation between the entities and there are few commonalities between them, to the point where reusability is not justified.
In this recipe, we will create a new entity called contractor that mirrors the contact entity with some additional attributes.
Similar to the previous recipes, a System Customizer or higher security role is required to perform the configuration, as well as a solution to contain the changes.
- Navigate to
Settings|Solutions|Packt. - Click on
New|Entity. - Enter
Contractorin theDisplay Namefield, andContractorsunder thePlural Namefield, and click onSave:

- Navigate to
Fieldson the left-hand side and click onNew. - Create an attribute called
Hourly Rateof typeCurrencyand click onSave and Close:

- Navigate to
Contractor|Formsand open theMain Informationform. - Add the newly created field to your form by dragging and dropping the attributes from the right-hand window on to the form.
- Click on the
Publish All Customizationsbutton for your solution.
The alternative to the previous two modeling patterns is to keep your entities completely separate. This could prove to be an efficient design as it maximizes your instance's diversity. You can create a multitude of entities without overcrowding and without overlapping functionality. Nonetheless, as a best practice, promote reusability where possible. Keep in mind that a Dynamics 365 online instance has a limit on the number of custom entities that can be created. The limit also includes custom entities introduced by deploying third-party solutions. At the time of writing, the limit is 300 custom entities per Dynamics 365 instance. You can check your limit by navigating to Settings | Administration | Resources In Use:

Your new ER diagram is highlighted in the following screenshot:

The advantages of a completely normalized model are:
- No coupling between entities, resulting in cleaner and easier to manage solutions
- Full independent control using security roles for each of the entities
- Positive user experience with clean independent forms
- No need for complex configuration or customization to show and hide irrelevant sections
This model also has some cons, some of which are:
- Search results will appear in different lists
- Cannot combine views with both entities
- Some out-of-the-box entities (contact, account, and activities, among others) have well-defined core structures that could be difficult to recreate (for example, the regarding field on activities).
- Modeling denormalized entities
- Modeling normalized entities with a common parent
- Using a Business Rule to show and hide attributes
- The Building cumulative security roles recipe of Chapter 7, Security
Business Rules are a Power User's dream come true. They minimize the amount of custom JavaScript required on forms and they can replace some simple calculation plugins when the rule is scoped at the entity level.
In this example, we will create a simple Business Rule to show and hide the Student Id attribute based on the contact types defined in the first recipe of this chapter.
Similar to the previous recipes, a System Customizer or higher security role is required to perform the configuration as well as a solution to contain the changes.
- Navigate to
Settings|Solutions|Packt. - Navigate to
Entities|Contact|Formsand open the previously createdContactform. - Double-click on
Contact Typeand uncheck theVisible by defaultcheckbox. - Click on
OK, then click onSave and Close. - Navigate to
Entities|Contact|Business Rulesand click onNew. - Under
BUSINESS RULE: Contact, enter the title,Show/Hide Student Id. - Click on the first available
CONDITIONand enter the following details in the right pane:Display Name:Check Contact Type StudentSource:EntityField:Contact TypeOperator:EqualsType:ValueValue:Student
- Click on the
Applybutton. - Back in the main editor, click on
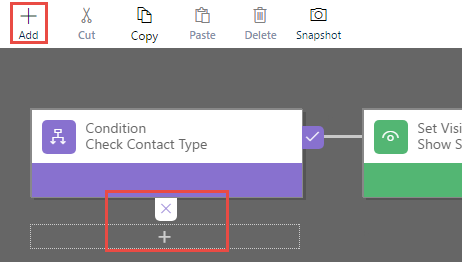
Add|Add Set Visiblyand select the + sign adjacent to the tick sign:

Enter the following details, followed by a click on Apply:
Display Name:Show Student IdField:Student IdStatus:Show field
- Back in the main editor again, click on
Add|Add Conditionand select the+sign adjacent to theXsign:
Enter the following details:
Display Name:Check Contact Type OtherSource:EntityField:Contact TypeOperator:EqualsType:ValueValue:Other
- Click on
Apply.
- Click on
Add action|Add Set Visibilityand select the+sign adjacent to the tick sign for the new condition:
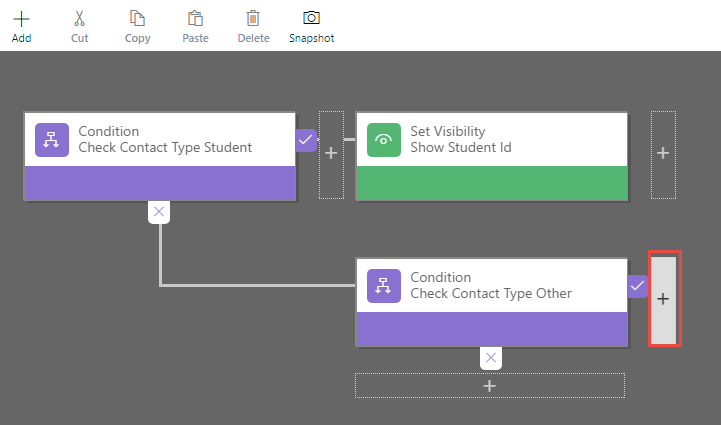
Enter the following in the right-hand pane:
Display Name:Hide Student IdField:Student IdStatus:Hide field
- Click on
Applyin the right navigation pane, followed bySavein the main editor in the top left:
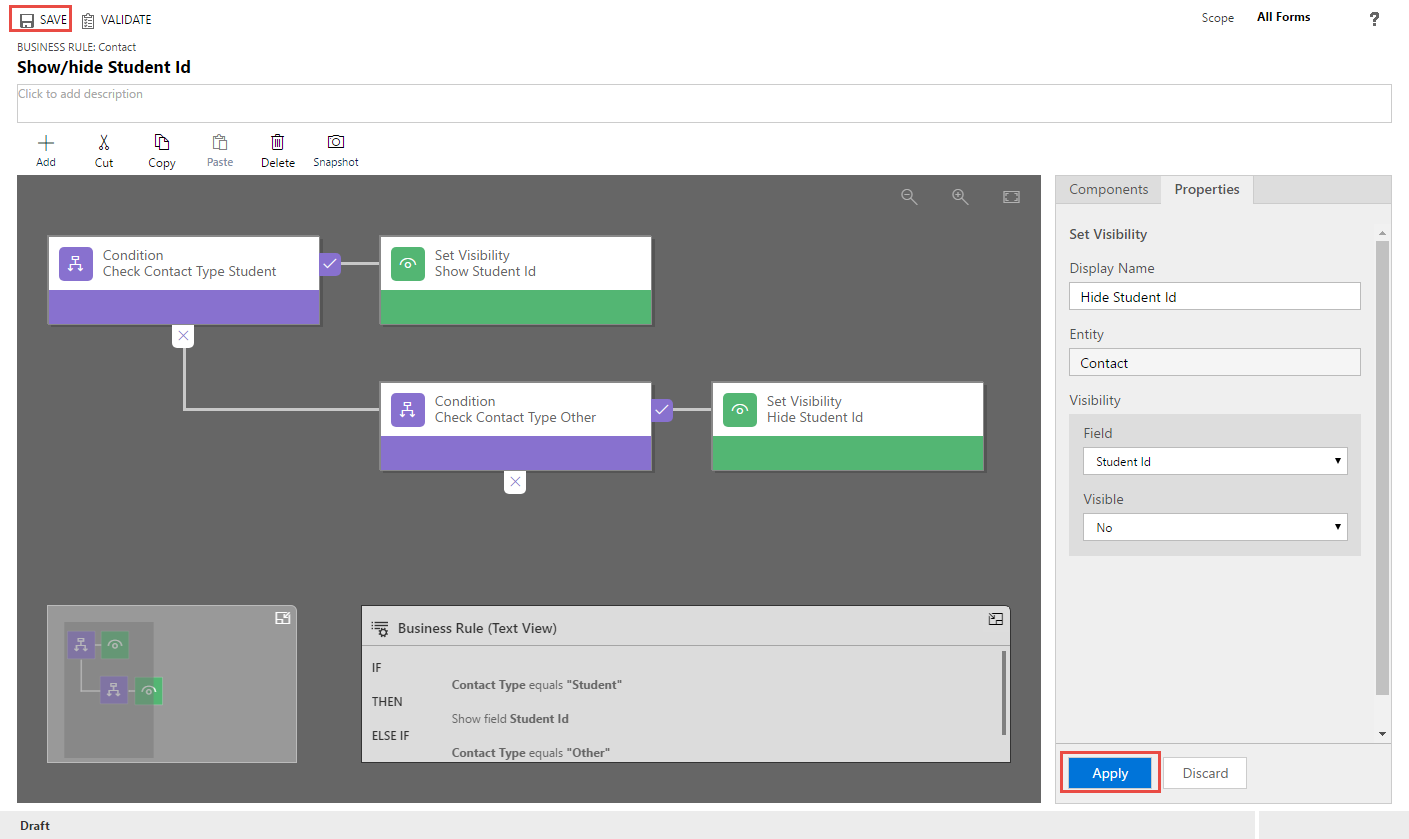
- Once saved, click on
Activateon the main editor followed byActivatein theProcess Activate Confirmationprompt:

- You can optionally click on the
VALIDATEbutton to ensure that your business rules do not have any issues.
We started by marking the field as hidden by default in step 3. As a best practice, it always makes for a better user experience when hidden fields are revealed, as opposed to hiding visible fields on loading a record. In step 7 and step 8, we created the condition and rule to show the field; in step 9 and step 10, we created the converse condition and rule to hide the field. Always think about the reverse scenario when implementing business rules, otherwise, you will be faced with an irreversible action.
Given that the scope of the business rule was set to the default All Forms (top-right corner when editing the business rule), all forms will now respect that rule. If the scope was set to Entity, the rule would also trigger on the server side, which could be useful if implementing calculation rules that need to be respected when manipulating the data outside of a form (for example editable grids, bulk import, or through the Web API or SDK):
Behind the scenes, JavaScript functionality is created to address the rules' requirements. This is also respected in all form factors following the configure once, deploy everywhere design pattern.
Business Rules also have limitations, as follows:
- There is a limit of 10
If Elseconditions per business rule - Business Rules cannot control sections and tabs
- If not set to a scope of Entity, a Business Rule will only run on load and on changes to the field, not on save.
- Conditions cannot be a mixture of AND and OR; it's a set of one or the other
For additional limitations, visit https://technet.microsoft.com/en-us/library/dn531086.
Business Rules provide a wide range of actions that can be performed. Among them are the following:
- Show error message
- Set field value (using another field's value, a static value, a formula, or simply clear it; it's good for simple plugin replacements)
- Set visibility
- Set default value
- Lock or unlock a field
The TechNet article (https://www.microsoft.com/en-us/Dynamics/crm-customer-center/create-business-rules-and-recommendations-to-apply-logic-in-a-form.aspx) covers more details about Business Rule.
Workflows are one of the most powerful no-code extensions you can configure in Dynamics 365; without any code, you can automate repetitive business processes.
Workflows are versatile and can fulfill a wide range of functionalities, ranging from creating entities and sending e-mails to calling actions. In this recipe, we will create a workflow that sends an e-mail to any new students after 24 hours of their record being created.
Similar to the previous recipe, a System Customizer or higher security role is required to perform the configuration as well as a solution to contain the changes.
- Navigate to
Settings|Solutions|Packt. - Under
Processes, click onNew. - Fill in the following details:
Process name:Send Student Welcome EmailCategory:WorkflowEntity:Contact- Tick
Run this workflow in the background Type:New blank process
- In the
Processeditor tickRecord is createdandAs an on-demand. Keep the rest as is with their default values. - Click on
Add Step|Wait Condition. - Click on
<condition> (click to configure)and select the following:- Process in the first column
- Execution time in the second column
- Equals in the third column
- In the last column, use the form assistance on the right-hand side:
- Select
1underDay - Select
After - Look for
Process - Double click
Execution Timein the last list
- Select
- Click on
Save and Close. - Back in your process, click on
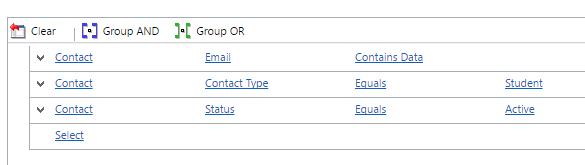
Select this row and click Add Step, then click onAdd Step|Checkcondition. - Click on <condition> (click to configure) and enter the following details:
Contact,Email, andContains DataContact,Contact Type,Equals, andStudent(created in the previous recipe)Contact,Status,Equals, andActive- Click on
Save and Close:
- Click on
Selectthis row and clickAdd Step,followed byAdd Step|Send Email. - Select
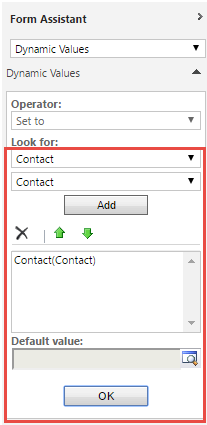
Create New Messagefrom the drop-down and click onSet Properties. - Enter the details of the e-mail as follows:
From:<your name>To: usingForm Assistanceon the right, selectContactunderLook forfollowed byContactfrom the next dropdown, then click on theAddbutton followed by theOKbutton at the bottom:
- Enter
Welcome to Packt Universityin theSubject Lineoption - Enter
Hi - Using the right
Form Assistance, selectContact,Last Name, and click onAdd, thenOK - Follow the salutation with a carriage return (Enter) and
Welcome to Packt University
- Enter
Save and Closethe dialog.
- Click on
Activateat the top of the workflow:

In step 2 to step 4, we created a workflow that triggers on creation (when the contact record is first created, the workflow will start waiting). The workflow can also be called on demand in case we want to trigger it again. In this example, the contact might already be created but not as a Student. Once the contact is set as a Student, the workflow can be triggered manually to send the welcome e-mail.
In step 5 and step 6, we set up the wait condition to wait for a day.
In step 7 and step 8, we checked if the contact is an active student with an e-mail address.
In step 9 to step 12, we created a personalized e-mail for the contact and welcomed them.
In step 13, we activated the workflow.
Note
As a good practice, always add descriptions to your workflow, and to each step, to understand at a high level what the workflow is doing.
When asynchronous workflows are triggered, they enter into a pool to be processed when the asynchronous service is free. Asynchronous workflows are typically executed within seconds or minutes. If the execution is taking hours, then you might want to raise a support ticket with Microsoft to investigate. Executing workflows asynchronously is a great way to lighten the load on your Dynamics instances.
When workflows instances are waiting for a condition to be satisfied, they do not consume resources or affect your instance's performance. However, it is generally agreed by the community that it is a bad practice to have too many workflow instances in a waiting status.
In more recent releases, synchronous workflows that turn your workflow into a configurable plugin became available. Microsoft does not recommend synchronous workflows for long processes due to the load that is associated with them. Furthermore, online instances have a limit of 2 minutes per synchronous workflow or plugin. Nevertheless, synchronous workflows are there to be used. Use them wisely.
- The Creating your first custom workflow activity recipe of Chapter 4, Server-Side Extensions
Have you ever wanted to call a workflow from your JavaScript? If you have, then you will be pleased to learn about Actions. Actions, introduced with Dynamics CRM 2013, are yet another great addition to the configurable extensions. It was created to allow a business logic to be called from within workflows, as well as from JavaScript and Plugin customization.
Actions can be built using a point and click interface, as well as using .NET code. In this recipe, we will create a configured action that takes a few string values, creates a student record, and returns that record as an output parameter.
Similar to the previous recipes, a System Customizer or higher security role is required to perform the configuration as well as a solution to contain the changes.
- Navigate to
Settings|Solutions|Packt. - Under
Processes, click onNew. - Fill in the following details:
Process name:Create StudentCategory:ActionEntity:None (global)
- Click on
OK. - Click on the
+button belowHide Process Argumentsand add the following four arguments:Name:FirstName,Type:String, andDirection:InputName:LastName,Type:String, andDirection:InputName:EmailAddress,Type:String, andDirection:InputName:CreatedStudent,Type:EntityReference,Entity:Contact, andDirection:Output
- Click on
Add Step|Create Record. - In the drop-down next to
create, selectContactand click onSet Properties.
- Enter the following details:
First Name: From the right form assistance, selectArgumentsin theLook Fordropdown, followed byFirstNamein the drop down, click onAdd, and thenOKLast Name: From the right form assistance, selectArgumentsin theLook Fordropdown, followed byLastNamein the drop down, click onAdd, and thenOKEmail Address: From the right form assistance, selectArgumentsin theLook Fordropdown, followed byEmailAddressin the dropdown, click onAdd, and thenOKContact Type:Student
- Click on
SaveandClose. - Click on
Add Step|Assign Value. - Select
Set Propertiesnext toAssign Value. - Enter the following details:
Statement Label:Assign a created studentName:Created student- Go to
Valuefrom the right-handForm Assistanceand selectCreate (Contact)from theLook Fordropdown andContactfrom the next drop down - Click on
AddandOK, and thenSave and Close
- Click on
Activateand thenSave and Close:

In step 2 and step 3, we created the blank action. We ensured that the action's entity is set to None (global), meaning that the process is not bound to any entities (the way workflows are).
In step 4, we created three input parameters and one output parameter.
In step 5 to step 7, we created the student contact record using the input parameters.
In step 8 to step 10, we assigned the created record to the output parameter.
In step 11, we activated the process.
As mentioned previously, actions can be called from workflows, JavaScript, Plugins, or using the Dynamics 365 web services. Every time an action is created, Dynamics 365 creates a message that can be called externally. In the Creating your first custom action recipe in Chapter 4, Server-Side Extensions, you will learn how to generate early-bound types for actions to call using managed .NET code.
Microsoft recommends naming your action using a verb describing what the action is about to ensure your application's vocabulary is something that makes sense from a business flow perspective.
For more information about actions, visit https://technet.microsoft.com/en-us/library/dn531060.aspx.
The Creating your first custom action recipe of Chapter 4, Server-Side Extensions
Rollup fields are one of the most exciting new features that were introduced in recent years that significantly reduced the amount of custom code required. Rollup fields can aggregate values from other attributes. You can calculate sums, averages, minimums, maximums, and counts.
In this recipe, we will create a rollup field that counts how many active activities are associated with a contact.
Similar to the previous recipes, a System Customizer or higher security role is required to perform the configuration as well as a solution to contain the changes.
- Navigate to
Settings|Solutions|Packt. - Create a new field by clicking on
Entity|Contact|Fields|Newand enter the following details:Display Name:Number of ActivitiesData Type:Whole NumberField Type:Rollup
- Click on
Editnext to theField Typedropdown. - In the
Rollup Fielddialog, underRelated Entity, selectActivities (Regarding)and click the tick box. - In the
Filterssection, select the following:Activity StatusunderFieldEqualsunderOperatorValueunderType- Check
Open and ScheduledunderValue
- Click on the tick box.
- Under
Aggregation, select the following:Aggregate FunctionunderCountActivityunderAggregated Related Entityfield
- Click on the tick box. Your
ROLLUP FIELDdialog will look as follows:

- Click on
Save and Closeon theROLLUP FIELDdialog and the attribute dialogue. - Click on the
Publish All Customizationsbutton for your solution.
In step 2 to step 7, we created a new rollup field of type whole number that calculates the total count of active activities associated with a contact.
Note
A couple of things to note about rollup fields: the fields are read-only and the calculation does not take into account a user's security roles.
When a rollup field is created, behind the scenes, a system asynchronous job is scheduled to execute 12 hours after the field is created. Navigate to Settings | System Jobs; you will see a job of type Mass Calculate Rollup field with the name of your new field in System Job Name. You can force the job to run sooner by clicking on Action | Postpone and entering an earlier date/time. It is not recommended to do so when you have a large number of records in a production environment. The first time the job runs, it will have to update all fields, which might lead to a performance impact.
Subsequently, the System Jobs option will have a Calculated Rollup field per entity that has rollup fields configured. By default, subsequent rollup field calculations will take place every hour, (which is the fastest schedule). If an hourly update is not necessary, you can update the value by double-clicking on the System Job option, and selecting Actions | Modify Recurrence. This will present a dialog box that helps you redefine the recurrence of the execution:

Note
Given that the rollup fields are executed as asynchronous jobs, if the calculation is not occurring, consider checking the status of the asynchronous service. For on-premise installation, log on to your backend server and check its status. For online implementations, log a support call with Microsoft to check the status of the service.
On top of the automated schedules, rollup fields can also be executed programmatically by executing CalcualteRollupFieldRequest. Furthermore, if you search online for "rollup field workflow", you will find custom workflow activities built by the community to force recalculations in your configurable workflows.
Rollup fields are a powerful feature in Dynamics 365. On top of the counting capability described in this recipe, rollup fields offer other types of aggregations. Furthermore, in some cases (activities), the aggregation can span across multiple relationship levels.
Counting the number of records is one of the many capabilities of a rollup field. You can also get the maximum, minimum, average, and sum of a field, assuming the field type allows it. As you select a different aggregate function, the entity fields will be filtered accordingly.
Given that our rollup field is aggregating activities, the field can also include indirectly related activities by defining Activity Parties (activities) under indirectly related activities. This will expand the aggregation, not only when the contact is in the regarding field, but also in the parties field.
For more details about rollup fields, visit https://technet.microsoft.com/en-nz/library/dn832162.aspx.
Similar to rollups fields, calculated fields are another recent addition to Dynamics 365's configuration capabilities that significantly reduces the need for custom code extensions.
As the name suggests, calculated fields allow you to set the value of an attribute based on another field, a function, or a formula. Furthermore, calculated fields may trigger based on a set of conditions.
In this example, we will configure a field to calculate the difference in months between two dates: (student start date, and student end date).
Similar to the previous recipes, a System Customizer or higher security role is required to perform the configuration as well as a solution to contain the changes.
- Navigate to
Settings|Solutions|Packt. - Create two new fields by clicking on
Entity|Contact|Fields|Newas follows:Start Dateof typeDate TimeEnd Dateof typeDate Time
- Create a new
Calculatedfield and enter the following details:Display Name:Months for graduationData Type:Whole NumberField Type:Calculated
- Click on
Editnext to theField Typedrop-down. - In the
Calculateddialog underCondition (Optional), click onAdd condition.
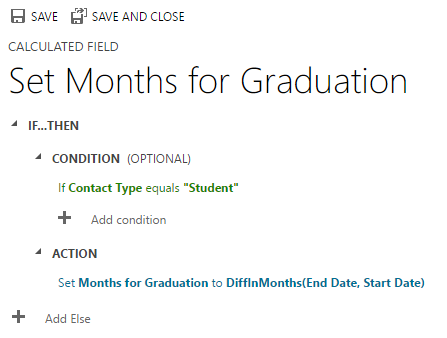
- In the
Ifrow, enter the following details and click on the tick box:Entity:Current Entity (Contact)Field:Contact TypeOperator:EqualsType:ValueValue:Student
- Under
Action, click onAdd action,enterDIFFINMONTHS(packt_enddate, packt_startdate), and then click on the tick button:
- Click on
Save and Closeon the rollup field dialogue and the attribute dialogue.
In this recipe, we used a point and click configuration to set up a calculated field to calculate the number of months' difference between a graduate's start date and end date.
In step 5 and step 6, we defined the condition, and in step 7, we defined the calculation formula.
Note
Calculated fields translate to synchronous server-side code executions. They are similar to plugins and are executed during stage 40 of the execution pipeline of a post update or create message.
Given that the execution takes place on the server side, the users will only see the changes right after a save event is triggered. Unlike business rules and JavaScript customization, the result is not instantaneous. They do not trigger after the condition is met on the form frontend.
Similar to rollup fields, calculated fields are read-only and do not take into account a user's security roles.
Calculated fields are a powerful addition; they can be used in many scenarios, some of which are:
- Number calculations, (for accounting, weights, and so on)
- Retrieving values from related entities
- Constructing a string based on other attributes
The TechNet article (https://technet.microsoft.com/library/dn832103.aspx) covers calculated fields in a few examples. The article also covers some limitations of calculated fields. Among them are the following:
- Calculated fields cannot trigger a plugin or workflows
- Once a field is created as simple, you cannot convert it to a calculated field without deleting it; (something to consider when upgrading old versions)
- A calculated field cannot reference itself, but it can reference another calculated field or rollup field (limit of five chained fields)
- Values in the calculated formula can come from the current entity or a direct parent (no access to 1:N or N:N entities)
- Up to 10 unique calculated fields can be used in saved queries, charts, and visualizations
- You cannot define a maximum or minimum metadata property on a calculated field
At the time of writing, in addition to basic arithmetic operations, the Dynamics 365 supports the following built-in formulas with their respective return types:
Function syntax | Return type |
| Date and Time |
| Date and Time |
| Date and Time |
| Date and Time |
| Date and Time |
| Date and Time |
| Date and Time |
| Date and Time |
| Date and Time |
| Date and Time |
| Whole Number |
| Whole Number |
| Whole Number |
| Whole Number |
| Whole Number |
| Whole Number |
| String |
| String |
| String |
Duplicate detection has been around since the early versions of Dynamics CRM. In 2015, alternate keys were introduced to help identify a record based on a unique combination of attributes to perform an upsert request. An upsert is the action of inserting a record if it is new, or updating it if it already exists, based on the primary key identifier (https://msdn.microsoft.com/en-us/library/dn932135.aspx). Logically, this means whenever an alternate key is defined, any new records that are created with the same key combination will throw a duplicate exception.
This recipe will walk us though defining an alternate key for a contact, and testing the duplicate detection.
Similar to the previous recipes, a System Customizer or higher security role is required to perform the configuration as well as a solution to contain the changes.
- Navigate to
Settings|Solutions|Packt. - Create a new field by clicking on
Entity|Contact|Keys|New. - In the Key definition dialogue, type
Name and Emailin theDisplay Namefield. - Double-click on the
First Name,Last Name, andEmail Addressfields underAvailable Attributes:

- Click on
Save and Close.
- Navigate to contacts and try creating two contacts with the same first name, last name, and e-mail address. You will be prompted with the
Duplicate Recorderror, as shown in the following screenshot:

In step 2 to step 5, we created an alternate key using First Name, Last Name, and Email on an individual. In step 6, we tested the duplicate detection by creating two records with the same key combination.
Alternate keys have a similar behaviour to conventional duplicate detection, except the check happens at a lower level in the database (a unique nonclustered index). Additionally, if a duplicate is detected, primary keys will strictly stop a duplicate from being created, whereas, conventional duplicate detection functionality gives you the option to create it nonetheless. This is particularly important if you want to stop duplicates when using different channels than the frontend forms.
Behind the scenes, Dynamics CRM is creating a nonclustered unique index using the three fields defined in the key. If you have an on-premise deployment, you can run a SQL profiler to intercept commands that are executed on the database. A query similar to the following one will appear in your list:
CREATE UNIQUE INDEX [ndx_for_entitykey_packt_NameandEmail]
ON [ContactBase]
([EMailAddress1] ASC, [FirstName] ASC, [LastName] ASC)
INCLUDE ([ContactId])
WHERE [EMailAddress1] is not null
AND [FirstName] is not null
AND [LastName] is not null
WITH (FILLFACTOR = 80, MAXDOP = 4, SORT_IN_TEMPDB = ON)
The preceding query creates a unique nonclustered index on the ContactBase (the contact table) on the three columns: FirstName, LastName, and EmailAddress1. For more information on nonclustered indexes, read the following article at https://docs.microsoft.com/en-us/sql/relational-databases/indexes/create-nonclustered-indexes
During the duplicate detection process, if a field has an empty value (translated to NULL in the database) in one of the fields, the record will not be identified as a duplicate.
Note that alternate key creation can fail sometimes. Always check, after creating your key, whether the creation has been successful. If a duplicate already exists in your dataset, the key creation will fail. To check the status of a newly created key, in your solution, navigate to Entities | <your entity> | Keys and ensure the Status column states Active. If the creation fails, it will state Failed:


