


 Download code from GitHub
Chapter 2: Multi-Cloud Connectivity
In this chapter, you will learn how to connect your hybrid and multi-cloud computers to Azure and enable Microsoft Defender for Cloud to monitor the security posture of these connected resources.
Connecting your computing resources to Azure provides the convenience of monitoring their security posture through a single pane of glass, seeing recommendations, and performing security-related actions from a central place.
Connecting non-Azure computers to Azure involves several steps and, in this chapter, more complex actions will be divided into multiple recipes, each covering individual steps toward a bigger objective.
We will cover the following recipes in this chapter:
- Connecting non-Azure virtual machines using Azure Arc
- Connecting non-Azure virtual machines using Microsoft Defender for Cloud portal pages
- Setting up Amazon Web Services Config and Amazon Web Services Security Hub
- Creating an Identity and Access Management (IAM) Amazon Web Services (AWS) role for Microsoft Defender for Cloud
- Connecting Amazon Web Services to Microsoft Defender for Cloud
- Configuring GCP Security Command Center and enabling GCP Security Command Center API
- Creating a GCP service account and connecting GCP to Microsoft Defender for Cloud
Technical requirements
To complete the recipes in this chapter, the following are required:
- An Azure subscription
- An Amazon Web Services (AWS) account
- A Google Cloud Platform (GCP) account
- Azure PowerShell
- A web browser, preferably Microsoft Edge
The code samples for this chapter can be found at https://github.com/PacktPublishing/Microsoft-Defender-for-Cloud-Cookbook.
Connecting non-Azure virtual machines using Azure Arc
Before Microsoft Defender for Cloud can monitor your security posture and display security recommendations of your non-Azure computers, you must connect them to Azure. This recipe will show you how to connect a non-Azure server to Azure using Azure Arc.
Getting ready
Before you start connecting servers to Azure using Azure Arc, you must have administrative permissions on a target server to install and configure it.
Open a web browser and navigate to https://portal.azure.com.
How to do it…
To enable Microsoft Defender for Cloud Plans on multiple subscriptions at once, complete the following steps:
- In the Azure portal, open Azure Arc. You can open Azure Arc in multiple ways: by typing Azure Arc in the search bar, by going to All Services, or by clicking on the respective link in Favorites.
- On the left menu, select Servers:
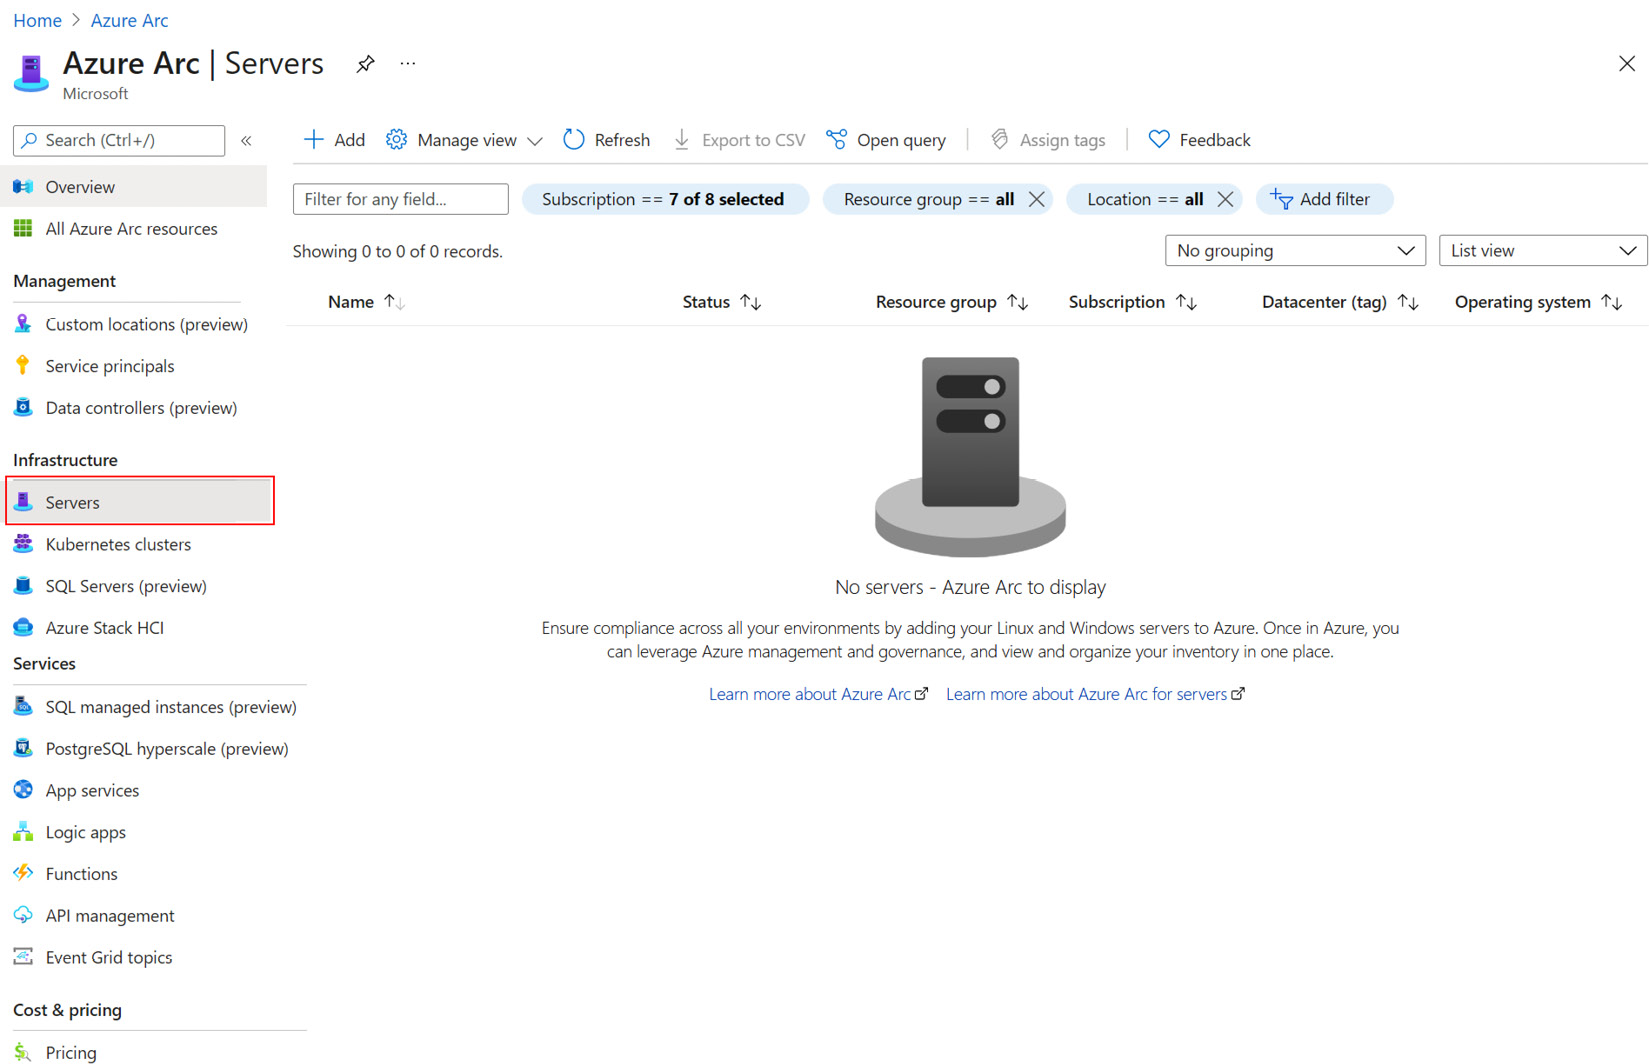
Figure 2.1 – Selecting Azure Arc | Servers
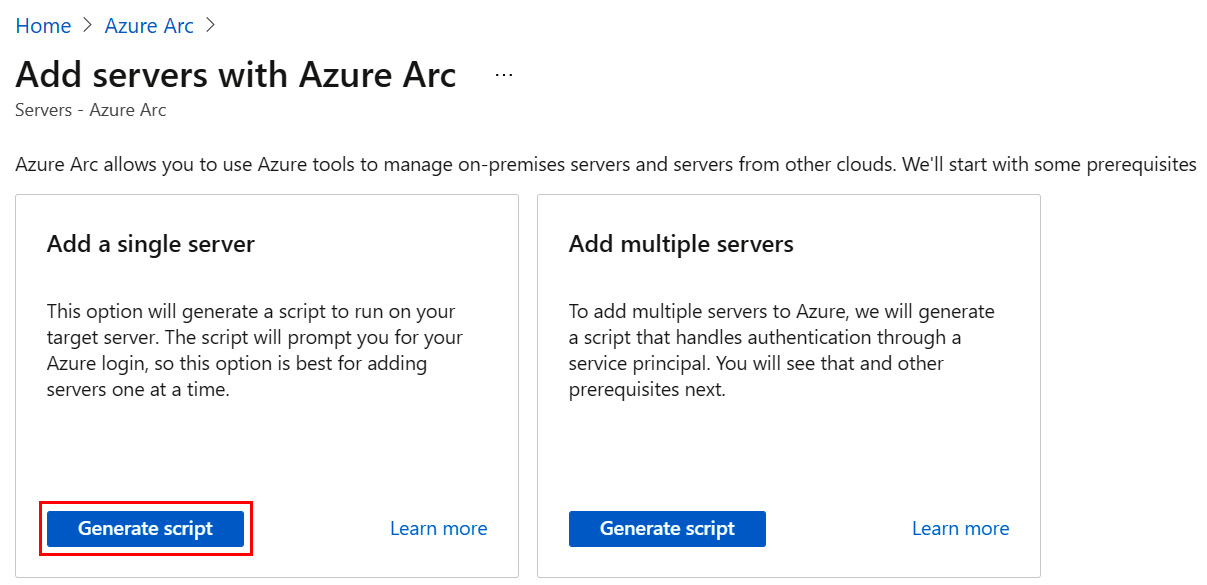
Figure 2.2 – Add servers with Azure Arc
- In Add single server box, select Generate script.
- On the ❶ Prerequisites blade, read the information provided and click Next: Resource details at the bottom of the blade.
- On the ❷ Resource details blade, select the subscription and resource group that will contain the server you are adding and that will be managed in Azure. In addition, select the Azure region where the metadata for resources will be created, and the operating system that the server is running. If the server you are adding is unable to communicate directly to the internet and Azure data centers, specify the URL of the proxy server that the non-Azure server can use. At the bottom of the page, click Next: Tags to proceed to the next step:
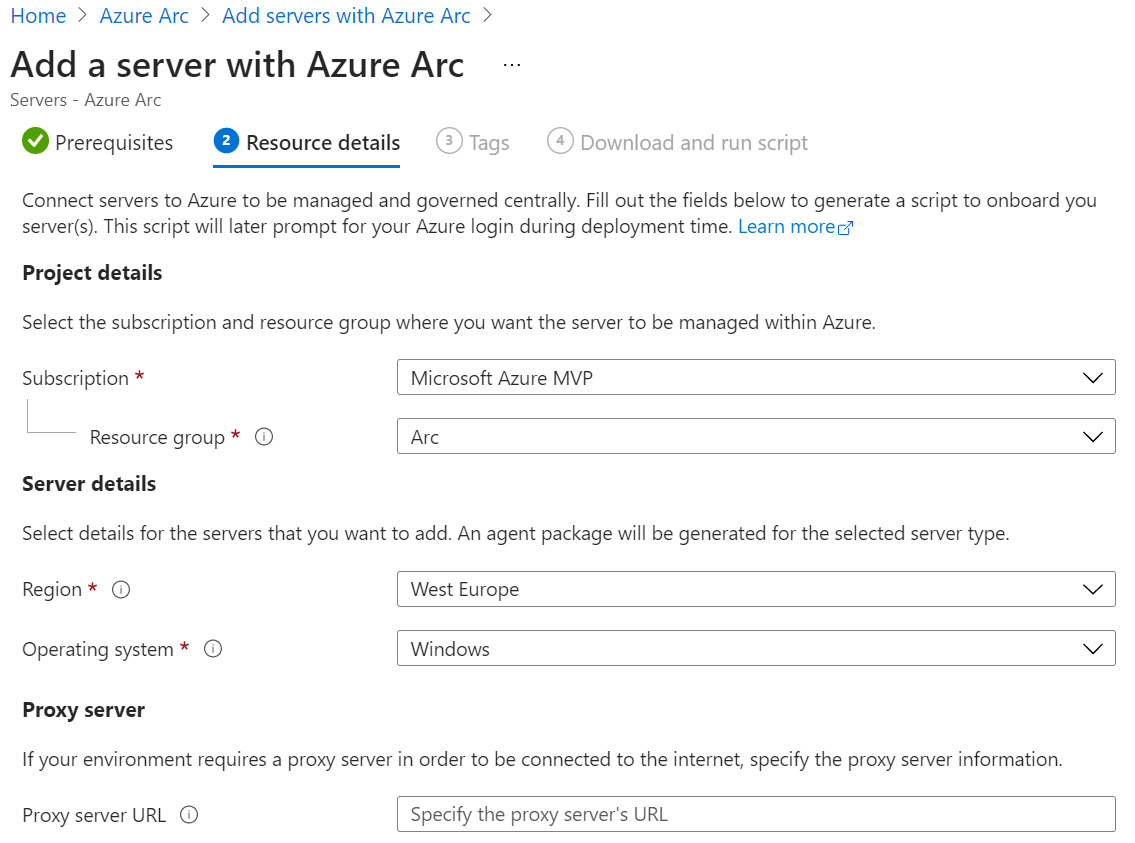
Figure 2.3 – Add a server with Azure Arc – Resource details
- On the ❸ Tags blade, enter physical location tags that will identify the server you are adding, as well as any additional tags that will help you organize the resources better. At the bottom of the blade, click Next: Download and run script:
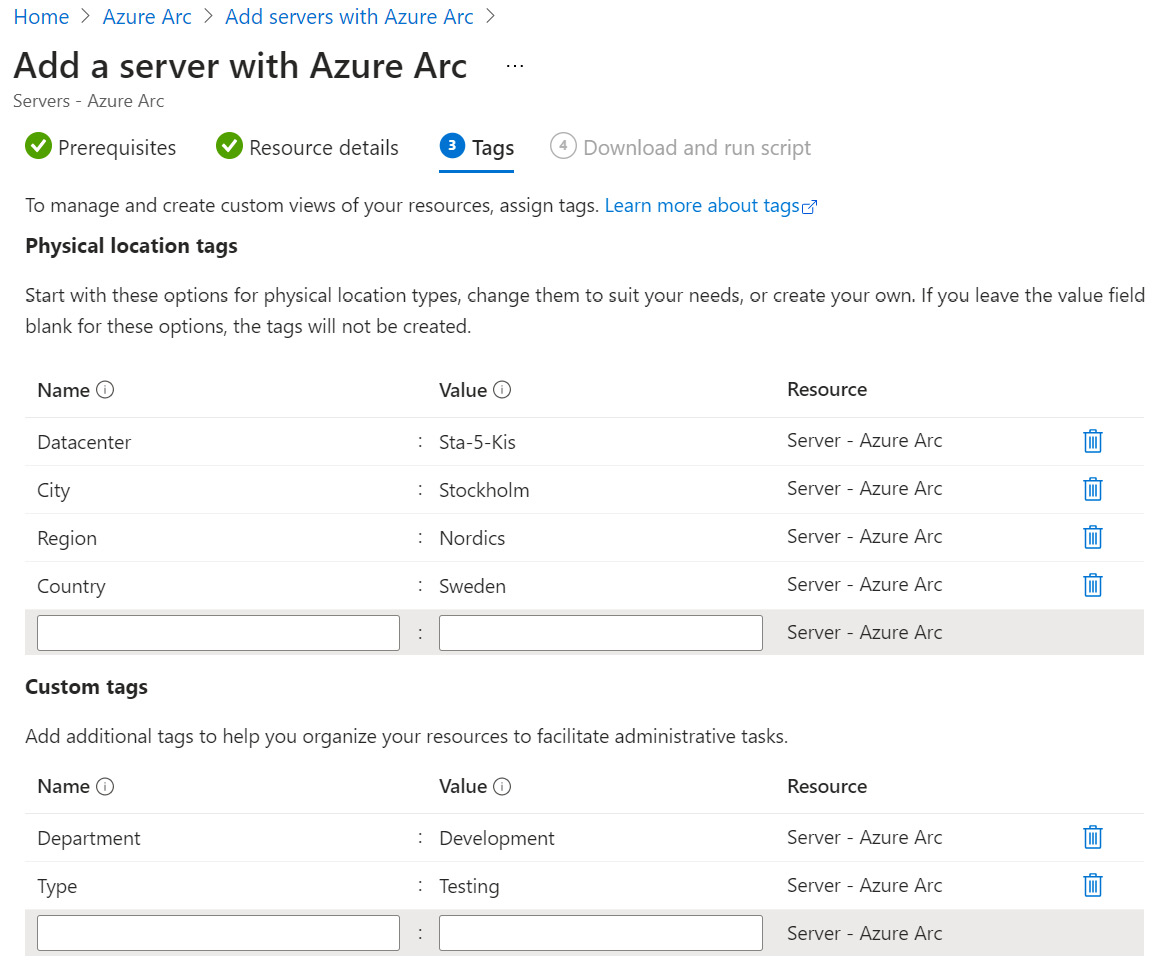
Figure 2.4 – Add a server with Azure Arc – Physical location tags
- In the ❹ Download and run script section, click on the Download button to download and save the
OnboardingScript.ps1script. Copy the script onto the server you are onboarding to Azure Arc. Select Close to finish and close the Add a server with Azure blade. On the top-right side of the Add servers with Azure Arc blade, click X to close the blade and return to the Azure Arc | Servers blade:
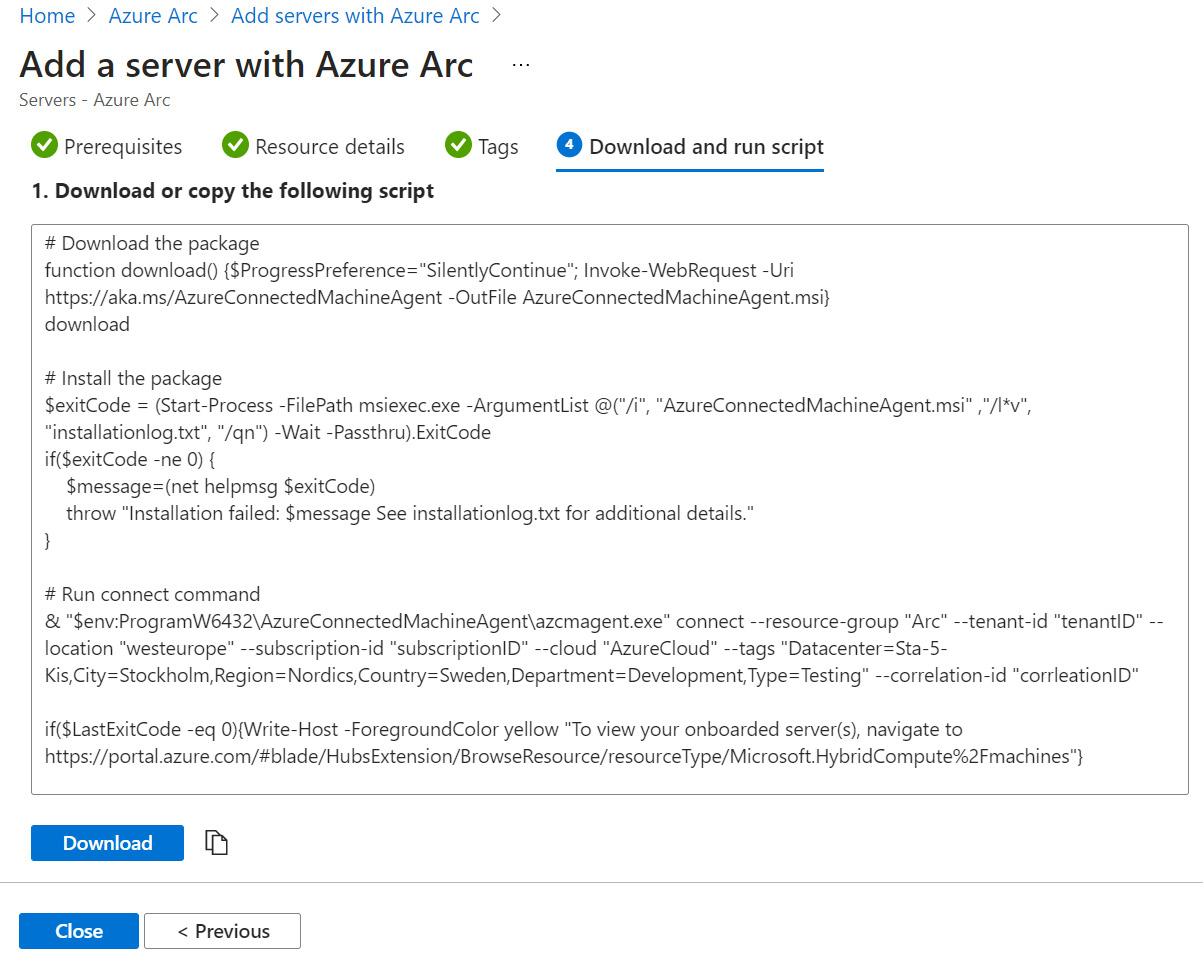
Figure 2.5 – Add a server with Arc – Download and run script
- On the server you are onboarding to Azure Arc, run
OnboardingScript.ps1. The script will download and install Azure Connected Machine Agent, initiate authentication to Azure, create an Azure Arc-enabled server resource, and associate it with the agent:
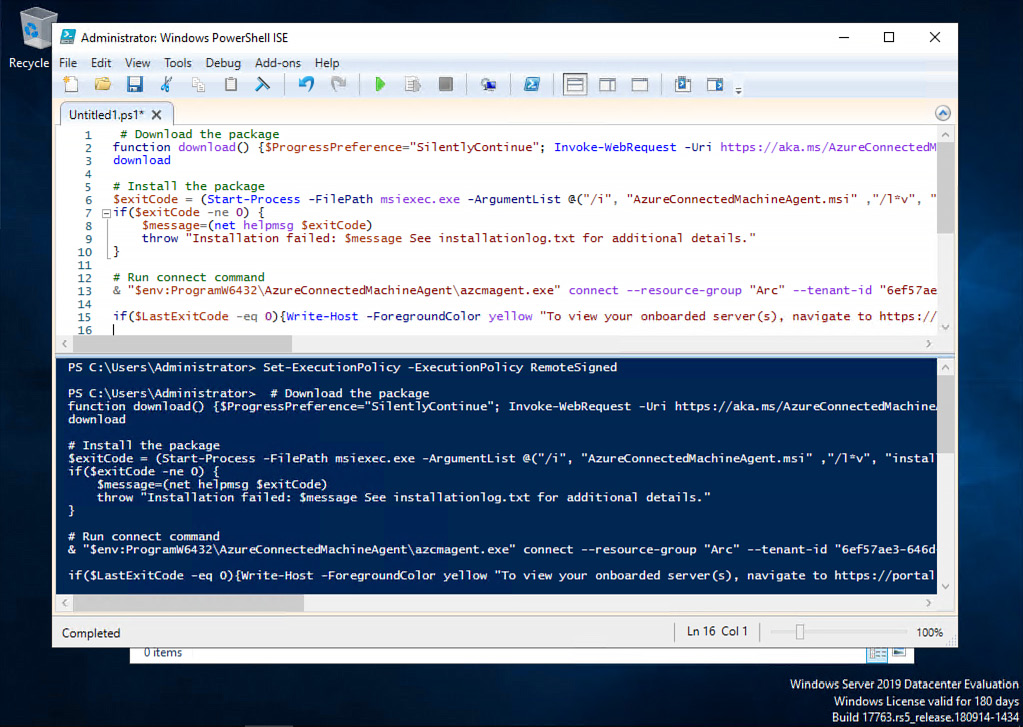
Figure 2.6 – Executing the installation script on a target machine
- After successfully installing Azure Connected Machine Agent, authenticating, and creating an Azure Arc enabled resource in Azure, you should receive a message about having signed into the Azure Connected Machine Agent application:
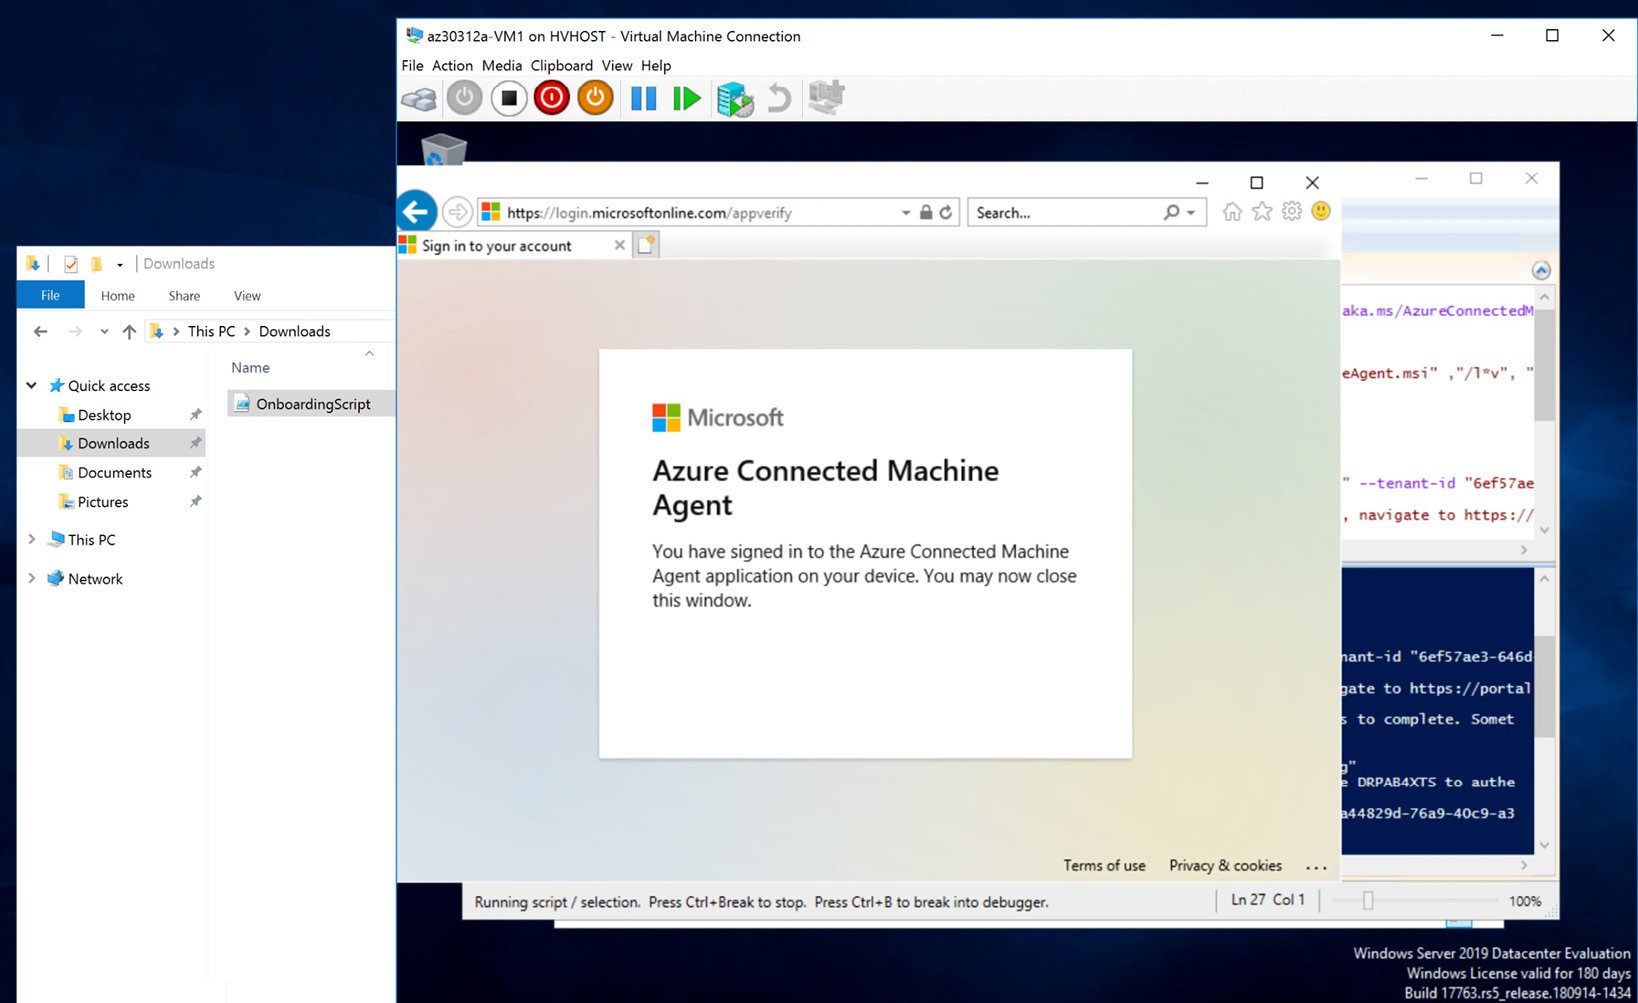
Figure 2.7 – Successful Azure Connected Machine Agent sign-in message
- In the Azure portal, on the Azure Arc | Servers blade, click Refresh to display the newly onboarded server in Azure Arc:
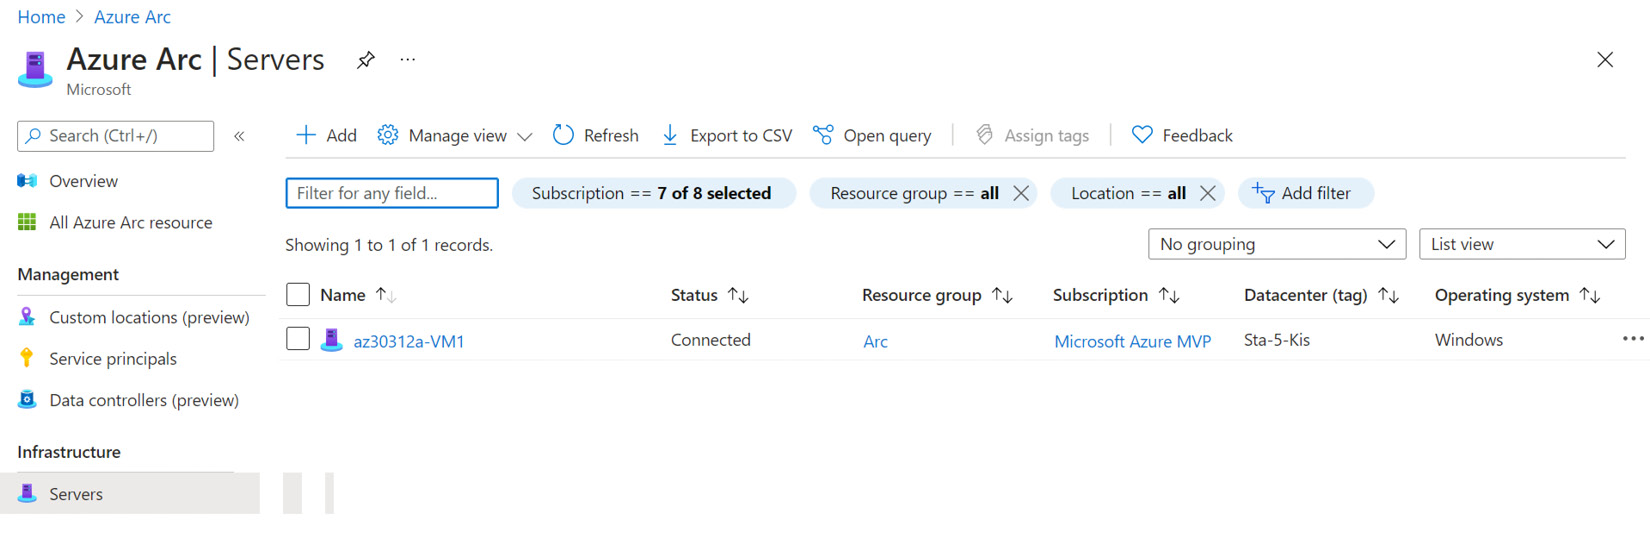
Figure 2.8 – Newly onboarded server visible in the Azure Arc | Servers blade
- After a while, the newly added Azure Arc server will be visible in Microsoft Defender for Cloud, including its Inventory and Recommendations:
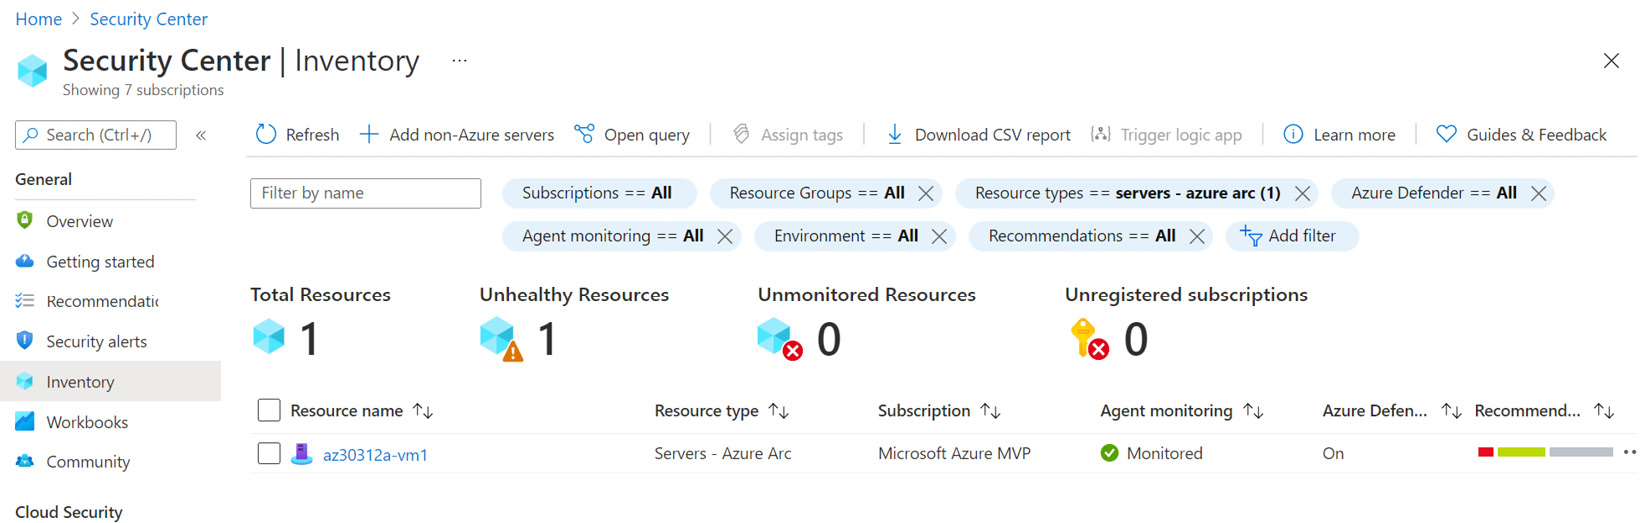
Figure 2.9 – Newly onboarded server visible in Microsoft Defender for Cloud | Inventory
How it works…
Azure Arc-enabled servers is a cloud service that allows you to manage servers hosted outside of Azure, such as on-premises or on other cloud providers, and it is the preferred way of adding non-Azure machines to Microsoft Defender for Cloud. Azure Arc-enabled machines support additional monitoring and configuration management tasks, such as configuration changes reporting, guest configuration policies, VM Insights, simplified deployment, update management, security monitoring, threat detection, and others. Once you connect a non-Azure machine to Azure Arc, it will be visible and protected by Microsoft Defender for Cloud.
Connecting non-Azure virtual machines using Microsoft Defender for Cloud portal pages
Before Microsoft Defender for Cloud can monitor your security posture and display security recommendations for your non-Azure computers, you must connect them to Azure. This recipe will show you how to connect a non-Azure server using Microsoft Defender for Cloud portal pages.
Getting ready
Before you start connecting servers to Azure using Microsoft Defender for Cloud portal pages, you must have administrative permissions on a target server to install and configure it.
Open a web browser and navigate to https://portal.azure.com.
How to do it…
To enable Microsoft Defender for Cloud on multiple subscriptions at once, complete the following steps:
- In the Azure portal, open Microsoft Defender for Cloud. You can open Microsoft Defender for Cloud in multiple ways: typing Microsoft Defender for Cloud in a search bar, clicking on a link to it via Favorite, or by going to All Services. On the left-hand side menu, select Inventory:
Figure 2.10 – Defender for Cloud – Inventory
- On the Onboard servers to Security Center page, you will see the list of Log Analytics workspaces that you have permission for. Click on Upgrade next to the workspace name where you want to store the data. Otherwise, if you want to create a new workspace or if there are no Log Analytics workspaces available, click on Create New Workspace:
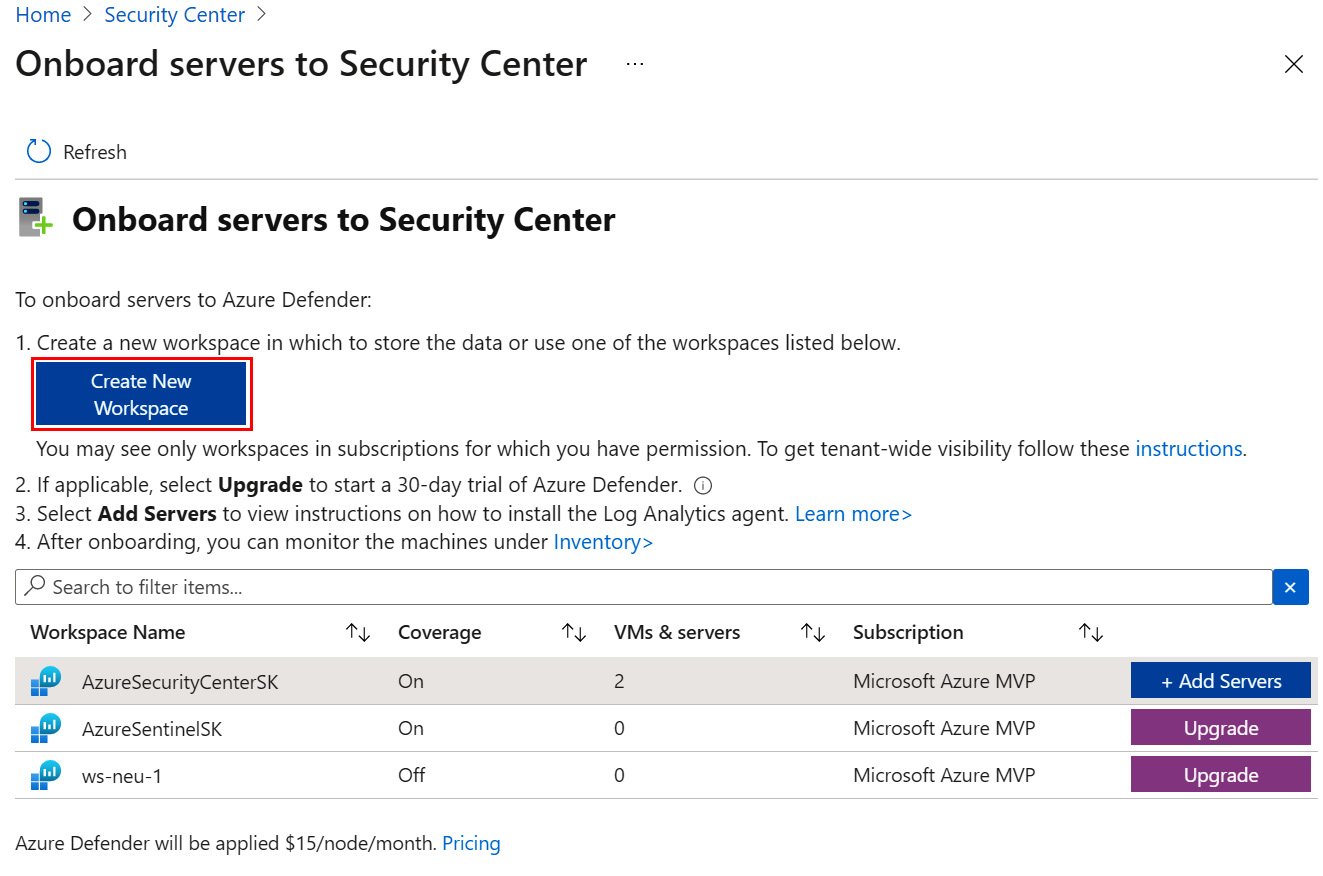
Figure 2.11 – The Onboard servers to Security Center page – Add Servers
- On the right-hand side of the Onboard server to Security Center page, click on the + Add Servers button:
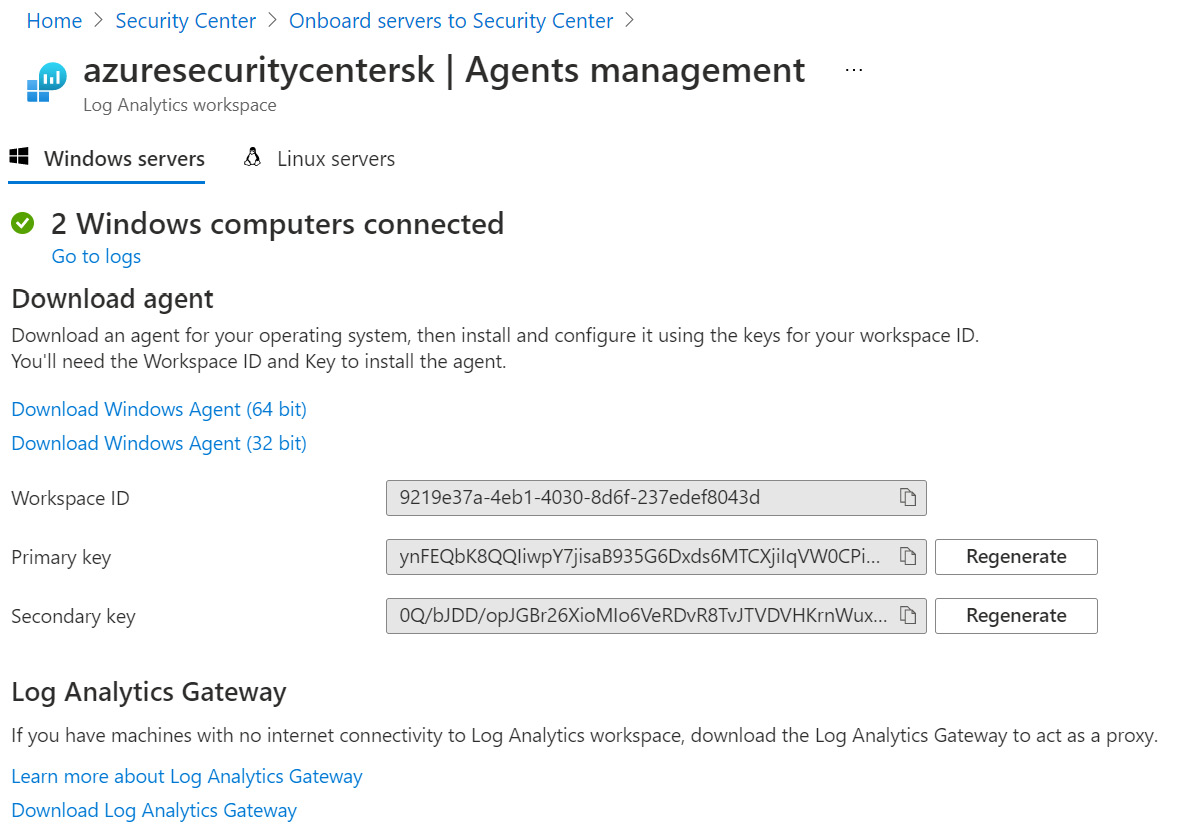
Figure 2.12 – Log Analytics workspace connection – Agents management
- On the workspace Agents management page, download and install an appropriate version (64-bit or 32-bit) of Windows Agent (Microsoft Monitoring Agent) on a machine you are onboarding to Microsoft Defender for Cloud. Note the fields showing the Workspace ID, Primary Key, and Secondary Key values. Leave the Agents Management page open as you will need the Workspace ID and Key values later:
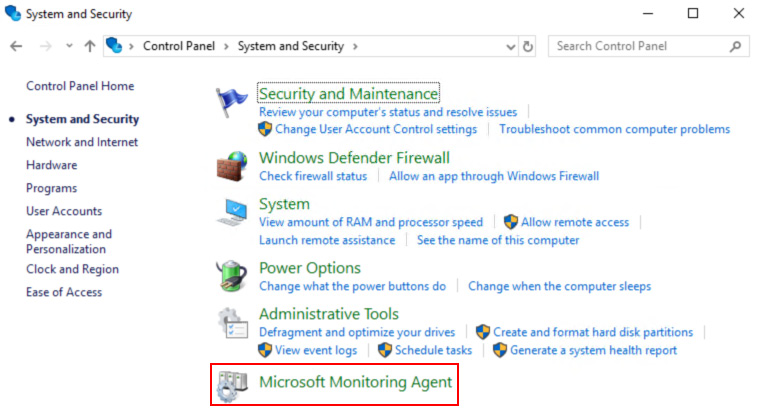
Figure 2.13 – Control Panel displaying the installed Windows Agent (Microsoft Monitoring Agent)
- After successfully installing Windows Agent (Microsoft Monitoring Agent), open Control Panel and click System and Security. Click on Microsoft Monitoring Agent to run the application:
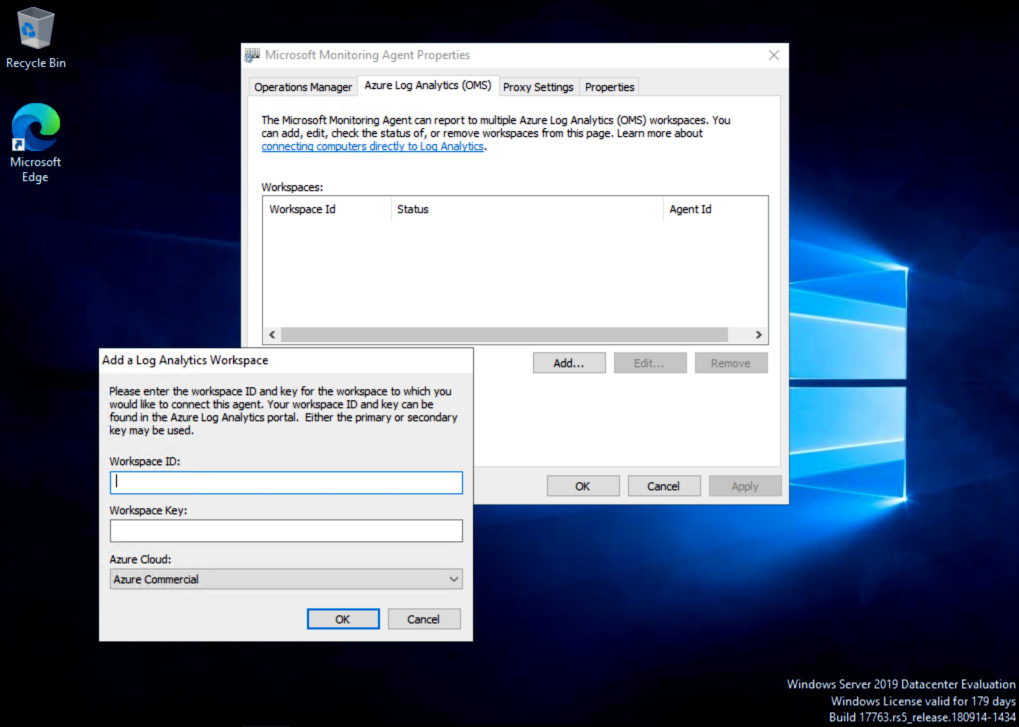
Figure 2.14 – Microsoft Monitoring Agent Properties
- On the Microsoft Monitoring Agent Properties window, select the Azure Log Analytics (OMS) tab and click the Add… button. The Add a Log Analytics Workspace dialog box will open.
- At the Add a Log Analytics Workspace dialog box, enter the Workspace ID value and either the primary or secondary Workspace Key. Both Step 4 and Figure 2.12 refer to the Agent Management page in the Azure portal, which is where these values can be found. Click OK to close the dialog box:
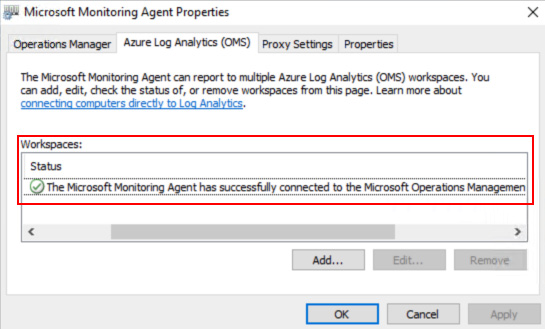
Figure 2.15 – Microsoft Monitoring Agent Properties window showing a successfully connected message
- After a few moments, on the Azure Log Analytics (OMS) tab, an entry in the Workspaces field should show a message confirming that a successful connection has been established to a Log Analytics workspace in Azure. Click OK to close this window.
- In a browser, in the Azure portal, in the search bar, type Log Analytics and click on a Log Analytics workspaces entry in the search results. In the newly opened Log Analytics workspaces blade, click on the workspace name you selected in Step 3; that is, the workspace you chose to store the data in.
- From the left menu, in the General section, select Logs:
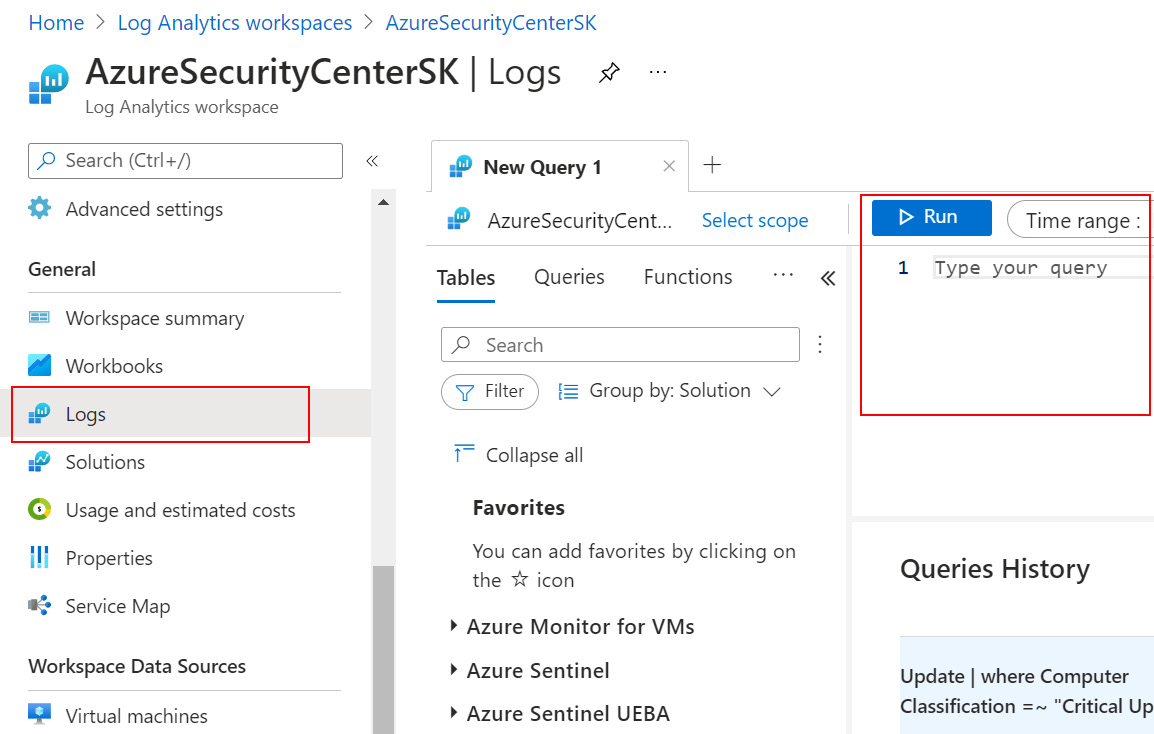
Figure 2.16 – Log Analytics workspace – The Logs blade
- On the right, type and run the following Kusto Query Language (KQL) query to check if a machine you onboarded is connected to the workspace:
Heartbeat
| where OSType == 'Windows'
| summarize arg_max(TimeGenerated, *) by SourceComputerId
| sort by Computer
| render table
- The query results list should contain the name of the newly onboarded (that is, connected) machine:
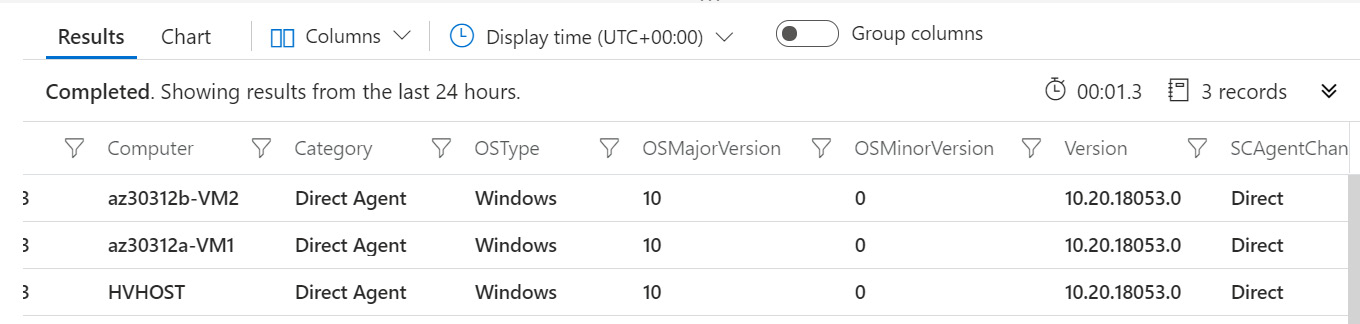
Figure 2.17 – KQL query results showing the newly onboarded machine
- Finally, open Microsoft Defender for Cloud and navigate to the Inventory blade. Use an existing filter entry or add a filter-to-filter resource by going to Resource types. A newly onboarded machine should be displayed in the inventory list.
Check if Microsoft Defender for Cloud is connected:
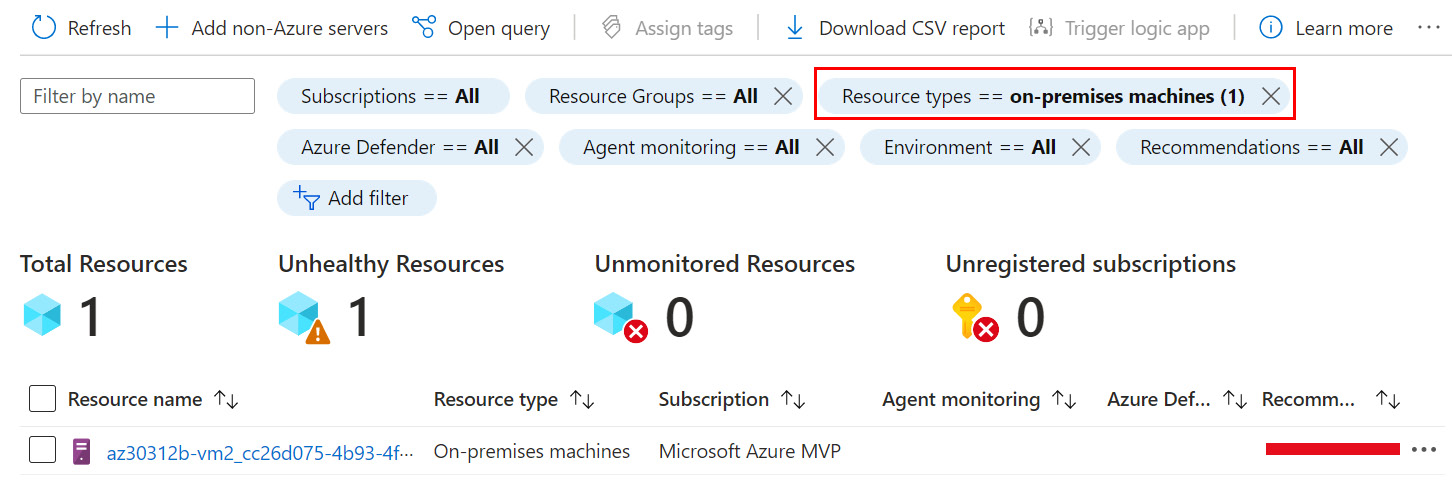
Figure 2.18 – Microsoft Defender for Cloud – Inventory list, filtered by Resource types
- Click on the link representing an on-premises virtual machine. The Resource Health page opens.
- The Resource Health page shows resource information and recommendations applicable to the resource, that is, the on-premises virtual machine.
How it works…
Microsoft Defender for Cloud supports adding a non-Azure machine from Security Center's pages in the Azure portal. To complete this, you must enable Microsoft Defender for Cloud Plans on a Log Analytics workspace, install Microsoft Monitoring Agent on a target server, and connect it securely to the workspace. To check whether the newly onboarded machine has successfully connected to a Log Analytics workspace, you can use a KQL query and check the presence of a machine in Microsoft Defender for Cloud, on the Inventory page.
Setting up Amazon Web Services Config and Amazon Web Services Security Hub
In multi-cloud environments, cloud security services must span multiple cloud platforms as well.
Connecting Amazon Web Services (AWS) to Microsoft Defender for Cloud requires performing multiple steps. Due to this, we will break the whole process into separate recipes, which will make this easier to understand and implement.
To onboard an AWS account in Microsoft Defender for Cloud, you need to enable AWS Config and AWS Security Hub first.
Getting ready
Open a browser and navigate to https://console.aws.amazon.com/. This recipe presumes you have not already enabled AWS Config and AWS Security Hub.
How to do it…
To set up Amazon Web Services Config and Amazon Web Services Security Hub, complete the following steps:
- In the AWS Console, open AWS Config. You can open AWS Config in two ways. First, you can type AWS Config in a search bar and select that option. Second, you can click on Services in the top-left corner and, under Management & Governance, select Config.
- If you have never run AWS Config before, or if you are configuring AWS Config in a new region, you can choose to click on Get started or 1-click setup. Get started will allow you to go through the configuration steps by yourself, while 1-click setup will auto-complete the setup process based on AWS best practices. In this recipe, we will complete the manual process. Click on Get started:

Figure 2.19 – Setting up AWS Config for the first time
- On the Step 1 – Settings page, under the General settings section, for Resource types to record, select Record all resources supported in this region, while for AWS Config role, choose Create AWS Config service-linked role.
- In the Deliver method section, for Amazon S3 bucket, choose Create a bucket. It is strongly recommended that you create a unique S3 bucket name as you cannot change the bucket's name once it has been created. Click Next:

Figure 2.20 – Set up AWS Config – Step 1 – Settings
- On the Step 2 – Rules (AWS Managed Rules) page, you can add additional AWS managed rules to your account to evaluate your AWS resources against the rules you have chosen. This step is optional. Click Next.
- On the Step 3 – Review page, review your AWS Config setup details and click Confirm:

Figure 2.21 – Set up AWS Config – Step 3 – Review
- On the Welcome to AWS Config screen, click on the X button at the top right to close the window and display AWS Config console.
- In AWS Console, open AWS Config. You can open AWS Config in two ways. First, you can type AWS Config in a search bar. Second, you can click on Services in the top-left corner and, under Security, Identity & Compliance, select Security Hub.
- AWS Security Hub – Get started with Security Hub will appear if you have never run AWS Security Hub before. If you have not run AWS Security Hub before, click on Go to Security Hub. Otherwise, skip to Step 10.
- The Welcome to AWS Security Hub page will open. Examine the Security Standards section. Select the checkboxes next to all the security standards and click Enable Security Hub. Once you've enabled Security Hub, it can take up to 2 hours to see the results from security checks in AWS Security Hub.
How it works…
Amazon Web Services Config enables you to view the configuration of your AWS resources in detail, track the configuration of resources, retrieve historical configuration data, receive notifications about resource life cycle-related events, view relationships between resources, and more. Amazon Web Services Security Hub is a security center for AWS resources. It collects security-related data from AWS resources from supported AWS Partner Network security solutions, as well as supported AWS services such as Amazon Macie, Amazon GuardDuty, and Amazon Inspector. AWS Security Hub and Microsoft Defender for Cloud will use AWS Config data for the inventory and security statuses of AWS resources.
Creating an Identity and Access Management AWS role for Microsoft Defender for Cloud
To enable Microsoft Defender for Cloud to connect to and allow it to authenticate to AWS, you have two options: create an AWS user for Microsoft Defender for Cloud or create an AWS Identity and Access Management (IAM) role for Microsoft Defender for Cloud. The first option is less secure, while the second option is the most secure and preferred way to authenticate Microsoft Defender for Cloud to AWS. In this recipe, you will use the more secure option to connect an AWS account to Microsoft Defender for Cloud, you will create an IAM role.
Getting ready
Open a browser and navigate to https://console.aws.amazon.com/. Open a new tab in a web browser and navigate to https://portal.azure.com.
How to do it…
To create an Identity and Access Management (IAM) role for Microsoft Defender for Cloud, complete the following steps:
- In the Azure portal, open Defender for Cloud. From the menu, under the Management section, select Environment settings. Switch back to the classic cloud connectors experience. On the Cloud connectors blade, from the top menu, select Connect AWS account:
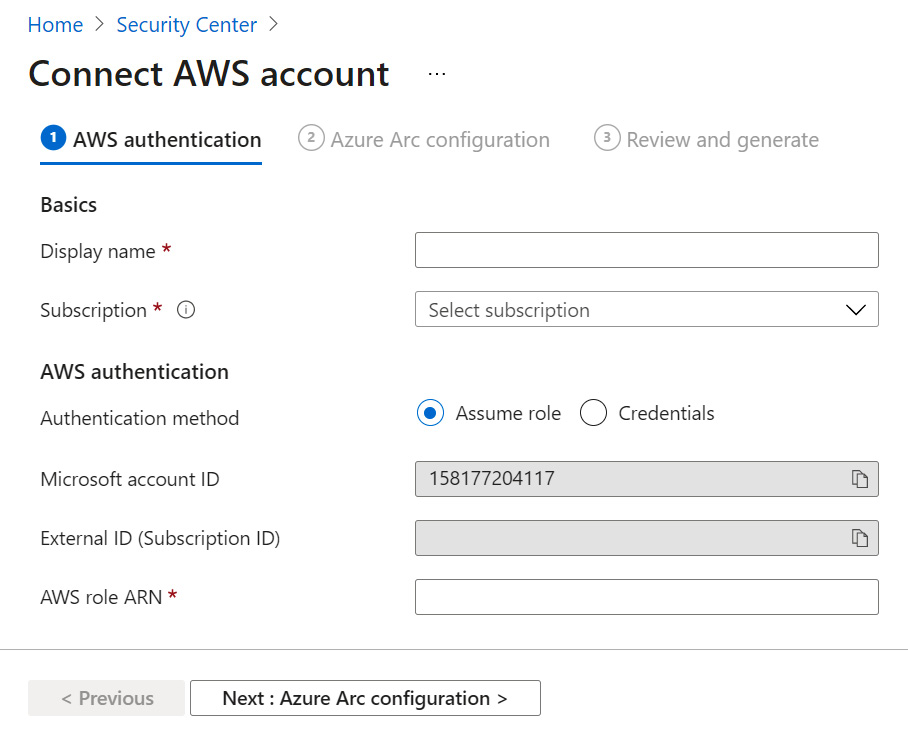
Figure 2.22 – Connect AWS account
- In the Display name field, enter a name to identify the AWS account connection in Microsoft Defender for Cloud. From the Subscription menu, choose an Azure subscription. Take note of the Microsoft account ID and External ID (Subscription ID) values as you will need them in the next steps. Leave the Azure portal browser tab open.
- Switch to the AWS Console browser tab. In the AWS Console, open IAM. You can open IAM in two ways. First, you can type IAM in a search bar and select it. Second, you can click on Services in the top-left corner and, under Security, Identity, & Compliance, select IAM.
- On the left-hand side menu, select Roles and then Create Role:
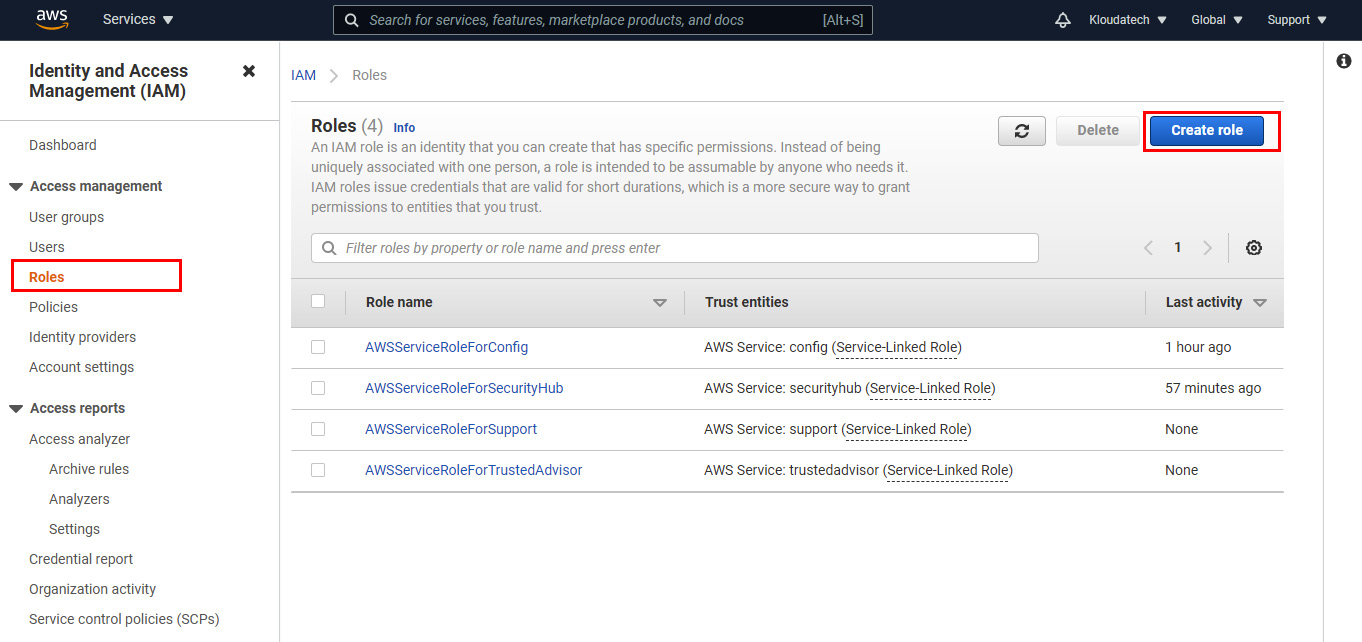
Figure 2.23 - Identity and Access Management (IAM) console
- On the Create role page, select Another AWS Account. This step requires the values that we specified in Step 2. In the Account ID field, enter
158177204117as your Microsoft Account ID. Select the Require external ID checkbox. For External ID, enter the Microsoft Azure subscription ID value. Click Next: Permissions:
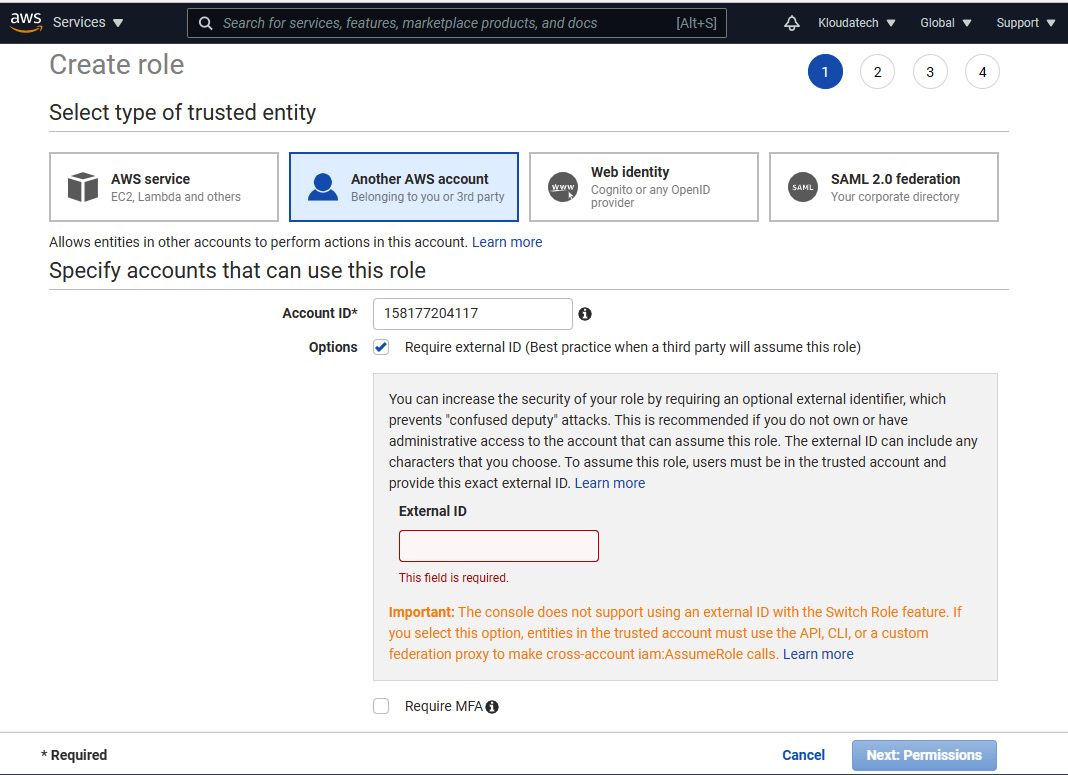
Figure 2.24 – Create role – Specify accounts that can use this role
- On the Attach permission policies page, select the SecurityAudit, AmazonSSMAutomationRole, and AWSSecurityHubReadOnlyAccess policies. Then, click Next: Tags.
- Optionally, you can add Tags. Click Next: Review.
- On the Review page, in the Role Name field, enter the name of the role you just created. Optionally, in the Role Description field, enter some text that will describe the newly created role. Click Create role to finish creating the role.
- On the Identity and Access Management (IAM) page, click on the role name you created.
- On the Summary page, copy the Role ARN value, as you will need it in the following recipe.
How it works…
To be able to connect your AWS account to Microsoft Defender for Cloud, Microsoft Defender for Cloud needs to have permission to access information about AWS resources. For this, you have created an AWS IAM role and attached the appropriate permission policies to it. The policies grant various permissions, including read-only access to AWS Security Hub, and read access to information about AWS services and AWS Systems Manager Agent automation permissions. Later, you will reference this role while connecting your AWS account to Microsoft Defender for Cloud.
Connecting Amazon Web Services to Microsoft Defender for Cloud
The final step for connecting an AWS account to Microsoft Defender for Cloud is to create an AWS connector in Microsoft Defender for Cloud.
Getting ready
Open a web browser and navigate to https://portal.azure.com. Open a new browser tab and navigate to https://console.aws.amazon.com/.
How to do it…
To connect AWS to Microsoft Defender for Cloud and create an AWS connector in Microsoft Defender for Cloud , complete the following steps:
- Open Microsoft Defender for Cloud. From the left menu, under the Management section, select Environment settings. Switch back to the classic cloud connectors experience. On the Cloud connectors blade, from the top menu, select Connect AWS account. In the Display name field, enter a name to identify the AWS account connection in Microsoft Defender for Cloud. From the Subscription menu, choose an Azure subscription.
- In the AWS role ARN field, paste the Role ARN value you copied in the Creating an Identity and Access Management (IAM) Amazon Web Services (AWS) role for Microsoft Defender for Cloud recipe. Click Next: Azure Arc configuration.
- Alternatively, if you do not have a Role ARN string ready, in AWS Console, in the top-left corner, click Services and, under the Security, Identity, and Compliance section, select IAM.
- From the left menu, click Roles and click on the name of an AWS role you created to connect to Microsoft Defender for Cloud. Copy the Role ARN value.
- Switch back to the Azure portal browser tab. In the AWS role ARN field, paste the Role ARN value. Click Next: Azure Arc configuration.
- On the Connect AWS account – ❷ Azure Arc configuration page, choose or create a new Resource group, and then choose a Region.
- In the Authentication section, click on the Create a Service Principal in Azure Active directory with Azure Connected Machine Onboarding role with a few clicks link:
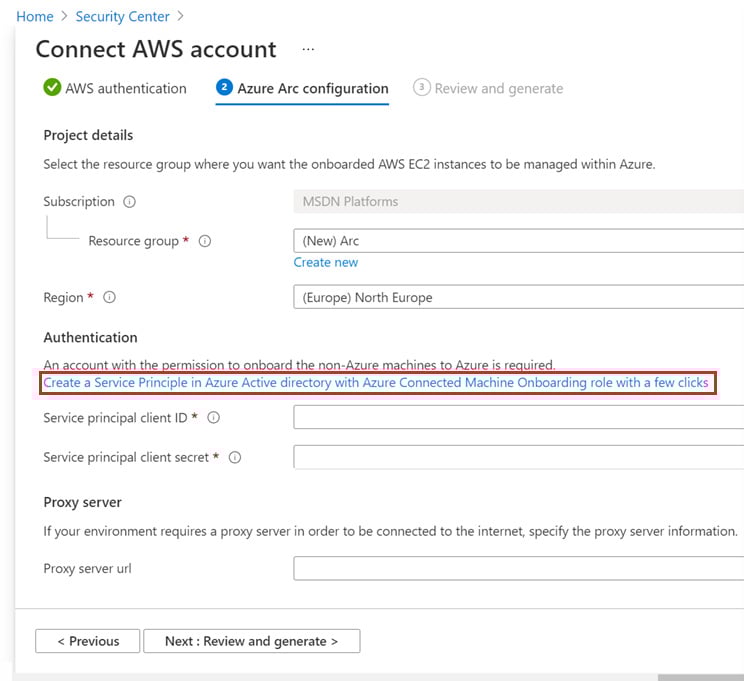
Figure 2.25 – Connect AWS account – ❷ The Azure Arc configuration page
- Copy the script and open Cloud Shell. Paste and execute the script in Azure PowerShell. The script will return a GUID, or an Application (client) ID value, and a Password value.
- Paste the Application (client) ID value into the Service principal client ID field. Paste the Password value into the Service principal client secret field. Then, click Next: Review and generate.
- On the Connect AWS account – ❸ Review and generate page, review the configuration details and click Create.
- In Microsoft Defender for Cloud, on the Cloud Connectors page, you should see the newly added AWS connector. Its Status should be Valid if it connected successfully:
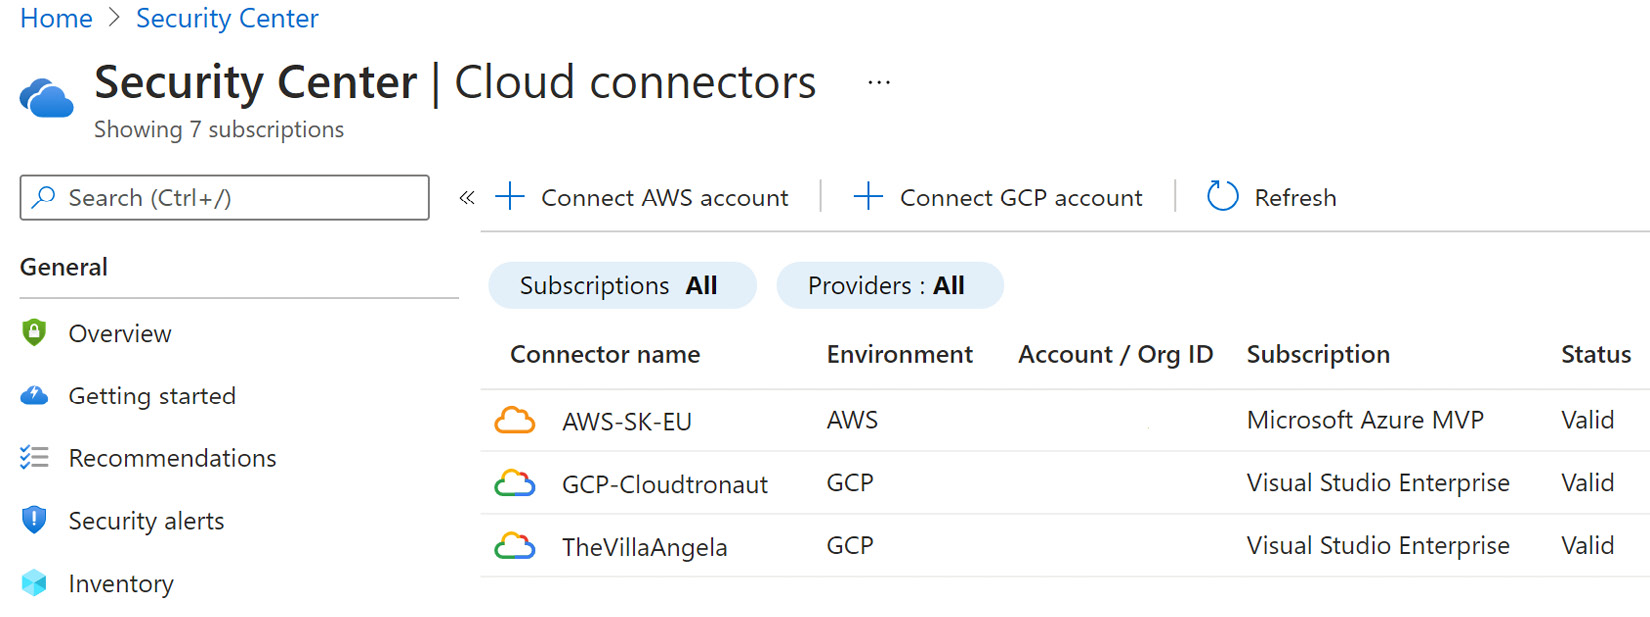
Figure 2.26 – Microsoft Defender for Cloud – Cloud Connectors
- After a few minutes, in Microsoft Defender for Cloud, the Regulatory Compliance section will display the AWS compliance controls, while the AWS resources and recommendations will be visible in the Inventory and Recommendations sections:
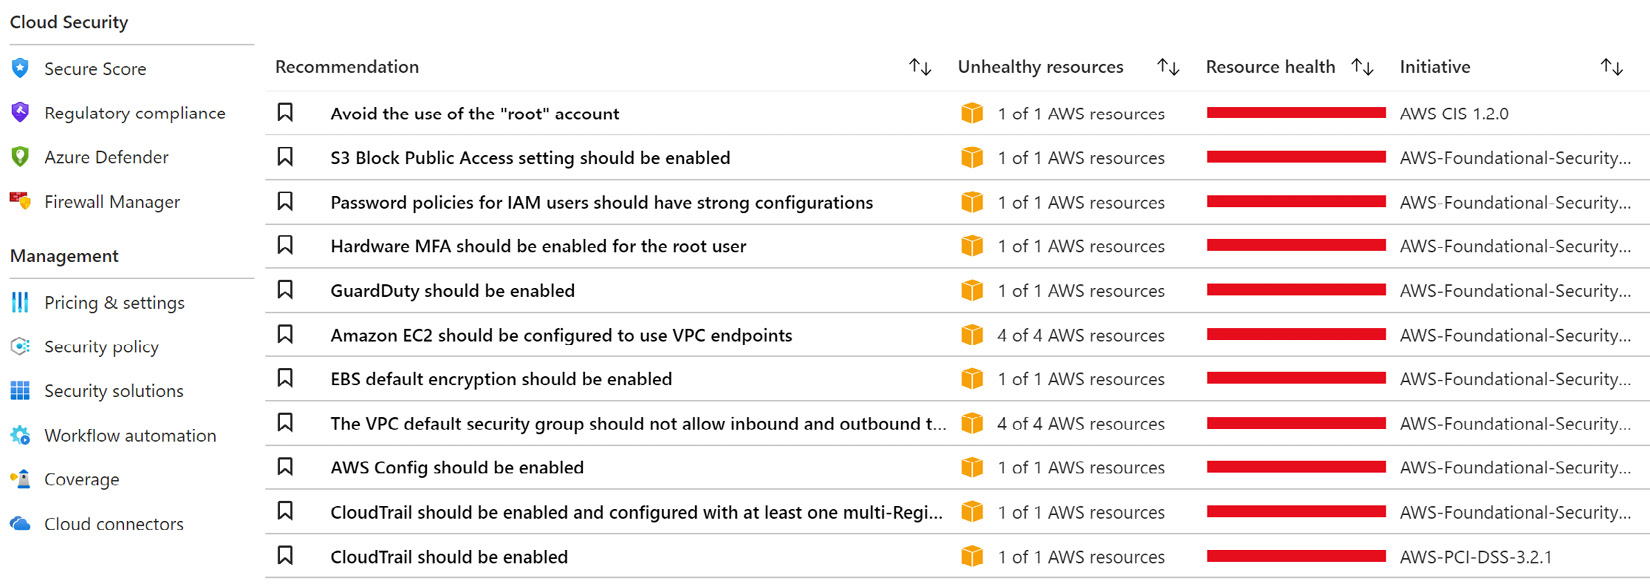
Figure 2.27 – Microsoft Defender for Cloud – AWS Recommendations
How it works…
The final step in connecting an AWS account to Microsoft Defender for Cloud is to create an AWS connector in Microsoft Defender for Cloud. You need to associate an AWS role with an Azure subscription and create a service principal that will be used to authenticate access to Azure. Once you connect your AWS account to Microsoft Defender for Cloud, you can use Security Center's capabilities to protect AWS account assets in Microsoft Defender for Cloud.
There's more…
If you close Cloud Shell and do not know the Service principal client ID and Service principal client secret values anymore, or you want to change the current secret value of the application, complete the following steps:
- In the Azure portal, open Azure Active Directory. From the left menu, under the Manage section, select App registrations.
- On the App registrations blade, click the All applications tab. In the Search field, type
Arcto filter the application entries. In the Application (client) ID column, identify the string to use as a Service principal client ID value. - Click on the application name, then select Certificates & secrets.
- Under Client secrets, click on the recycle bin icon to delete a Secret and click + New client secret.
- Enter a Description and choose an expiration time. Then, click Add.
- Under Client secrets, copy the string representing the Value property of the secret. This will be used as a Service principal client secret value.
Configuring GCP Security Command Center and enabling GCP Security Command Center API
For any environment that spans multiple cloud providers, cloud security services must span multiple cloud platforms as well.
Connecting a Google Cloud Platform (GCP) environment to Microsoft Defender for Cloud involves several steps. We will break this process into separate recipes so that this will be easier to understand and implement.
To onboard a Google Cloud Platform account into Microsoft Defender for Cloud, you need to configure GCP Security Center and enable Security Health Analytics first.
Getting ready
Before configuring GCP Security Center, you should have GCP Organization and a Google Cloud Identity account set up.
Open a web browser and navigate to https://console.cloud.google.com.
How to do it…
To onboard a GCP account into Microsoft Defender for Cloud, complete the following steps:
- In GCP Console, in the top-right corner select, an account. The selected account should belong to a GCP organization that contains or will contain a project you will connect to Security Command Center. If you already have a project, skip to Step 4.
- If the dashboard area is empty and you do not have a project, click Create project.
- On the New Project page, enter a value for Project name. Choose the project's Organization and Location and click Create.
- On the left-hand side menu, under Security, click Security Command Center. If you get a message stating Page not viewable for projects. This page is only viewable in the project/folder scope for Premium Tier organizations. Upgrade your organization to Premium, then from the drop-down menu on the right, select an Organization and click Select.
- If you get an error message stating You do not have sufficient permissions to view this page, from the top-left corner, click Google Cloud Platform. Then, under IAM & Admin menu, select IAM:
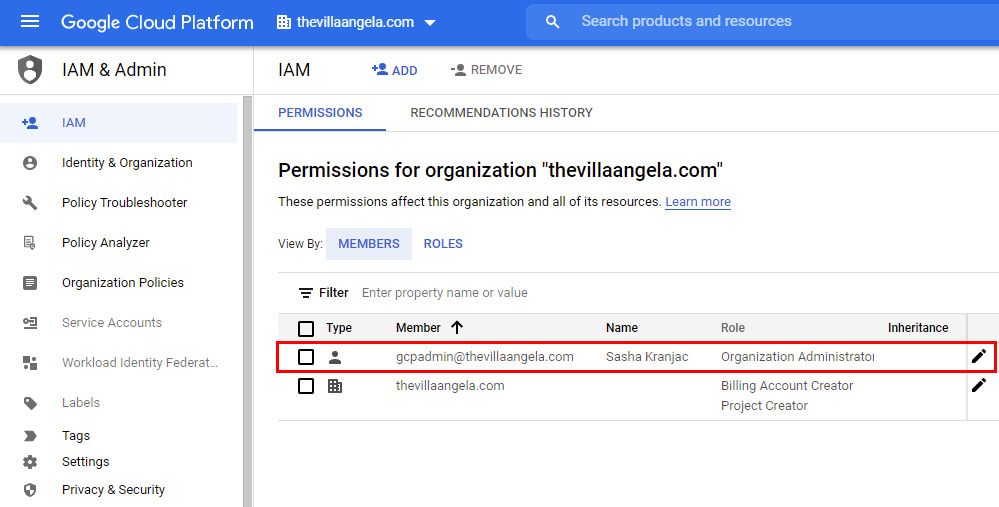
Figure 2.28 – Editing the service account role permissions
- Identify the account with an Organization Administrator role or the account that you are currently logged into and using to set up Security Command Center. To edit the account, click the pencil icon next to it.
- Click + ADD ANOTHER ROLE to add a role. Add the Security Center Admin, Security Admin, and Create Service Account roles and click SAVE:
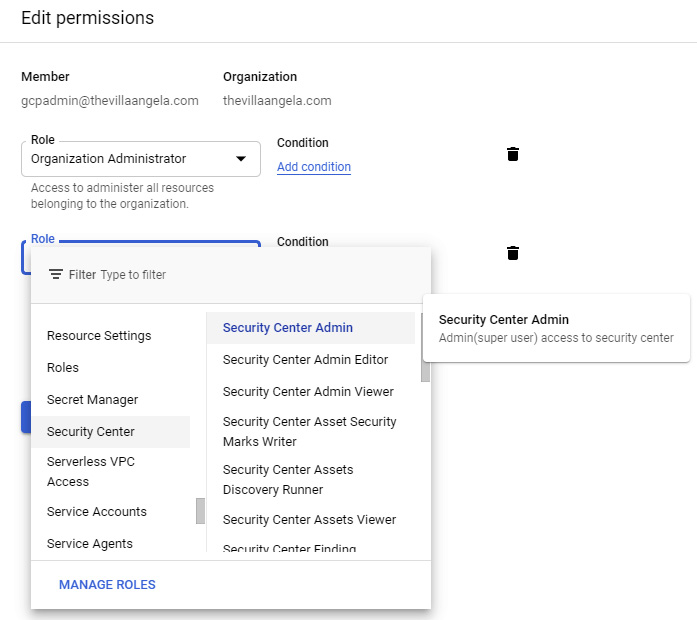
Figure 2.29 – Adding roles to a service account
- If you receive a message stating that Security Command Center has not been onboarded or activated yet, refresh the browser tab. Make sure you selected the right organization. After few moments, the Settings – ❶ Get started page should open, and Security Command Center, Standard tier should be selected. Click NEXT:
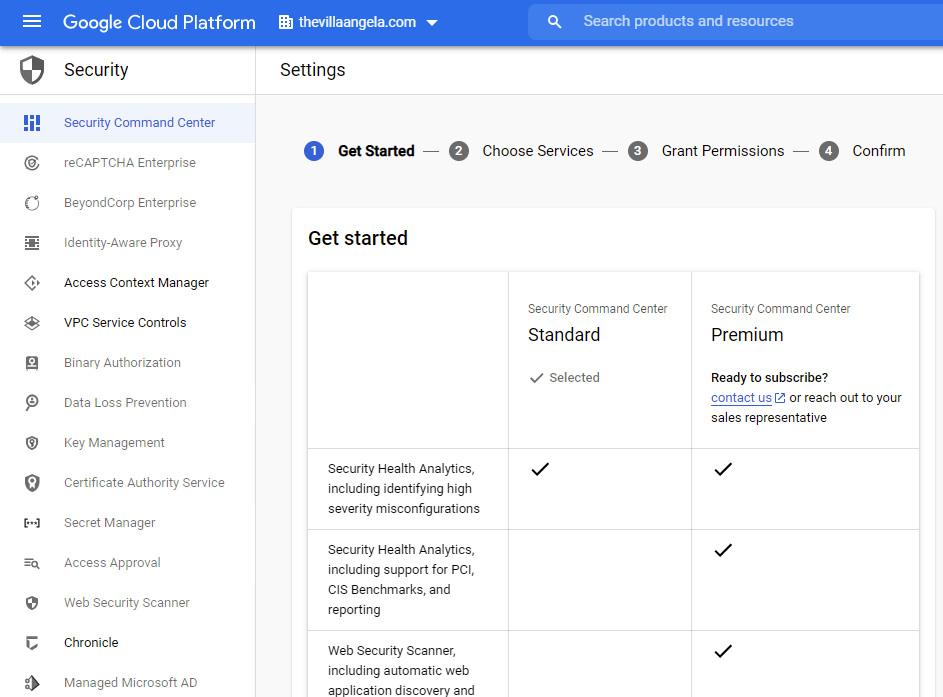
Figure 2.30 – Security Command Center – Choosing a tier
- On the ❷ Choose Services page, check whether Security Health Analytics is Enabled by default, and review the rest of the information. Click NEXT.
- On the ❸ Grant Permissions page, review the Required Roles and Service Account Created information. Click GRANT ROLES. The messages should indicate if the process of granting roles and the test have been completed. Click NEXT:
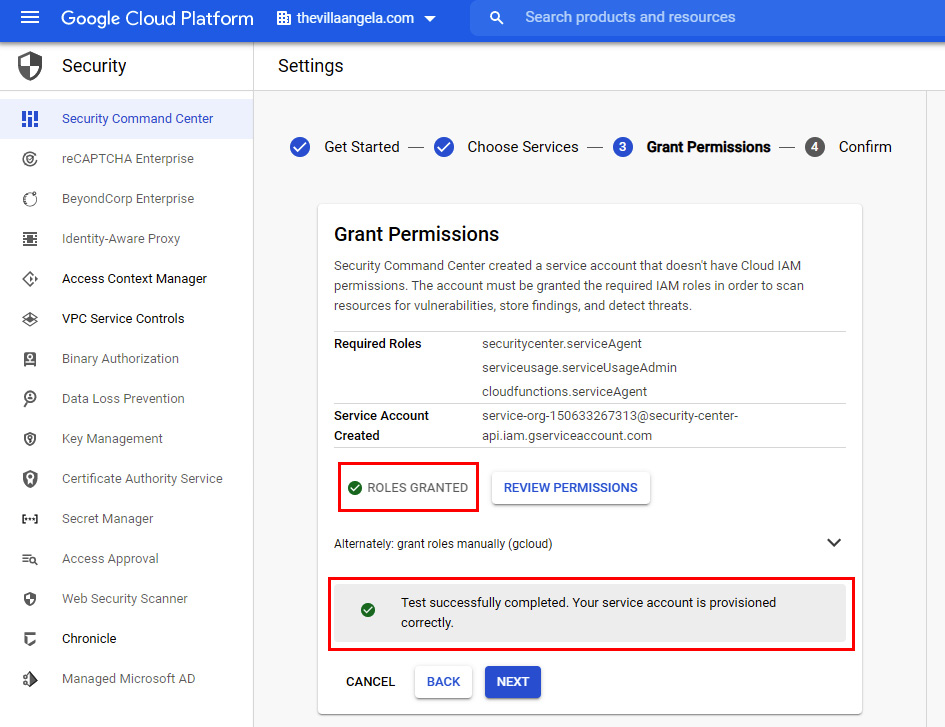
Figure 2.31 – Granting permissions to a service account
- On the ❹ Confirm page, Ready to complete setup will inform you that you are ready to finish setting up Security Command Center. Click FINISH to complete the Security Command Center setup process.
- Click the Vulnerabilities tab to display Security Health Analytics findings for the organization. To display Security Health Analytics for a project, under Projects Filter, click the plus (+) sign to Add a project to the Projects Filter.
- In GCP Console, under APIs & Services, click Dashboard. Click on Library or + ENABLE APIS AND SERVICES.
- On the Welcome to the API Library page, in the Search for APIs & Services search bar, type
security. - Click on an entry representing Security Command Center API:
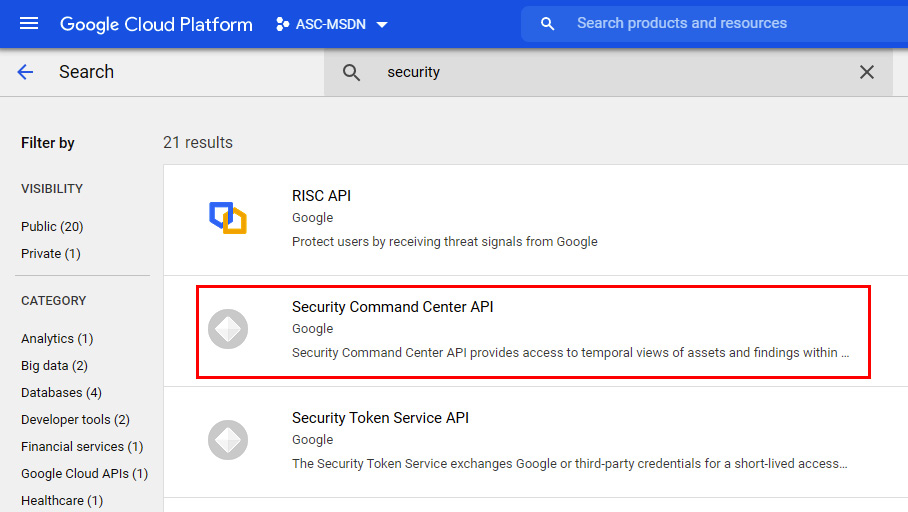
Figure 2.32 – Choosing a Security Command Center API
How it works…
The first part of connecting a GCP account to Microsoft Defender for Cloud is to set up Security Command Center for your organization. First, you must grant appropriate permissions to an administrative account. This way, Security Command Center will display security-related information about services. Once you've completed the necessary setup, it may take some time for security information to be displayed in Security Command Center. To enable Security Command Center's functionality, you must provide access to cloud assets and findings within an organization via the Security Command Center API.
Creating a GCP service account and connecting GCP to Microsoft Defender for Cloud
You will need a GCP service account to access the data that's ingested in GCP's Security Command Center.
Getting ready
Open a web browser and navigate to https://portal.azure.com. Open a new browser tab and navigate to https://console.cloud.google.com.
How to do it…
To create a GCP service account, complete the following steps:
- In GCP Console, from the left menu, under IAM & Admin, select Service Accounts.
- From the top menu, select + CREATE SERVICE ACCOUNT.
- In the Service account name field, enter the account's name. Optionally, in the Service account description field, describe what this service account will be used for. Click CREATE AND CONTINUE.
- When you get to the ❷ Grant this service account access to project step, click on a Select role drop-down menu and select the Security Center Admin Viewer role. Select CONTINUE.
- The Grant users access to this service account step is optional. Click DONE.
- Copy the email of the service account and save it; we will use this later.
- From the Navigation menu, under IAM & Admin, click IAM. Ensure you are viewing IAM permissions for an organization, rather than for a project. From the top menu, switch to the organization level.
- To add a new user, click ADD.
- In the New members field, enter the email value of the service account you copied in Step 6.
- From the Select role menu, select the Security Center Admin Viewer role and click SAVE.
- Select a project to switch to a project level since the Service Accounts page can't be viewed by organizations.
- In the Navigation menu, under IAM & Admin, click Service accounts.
- Next to the service account you created previously, click on the vertical ellipsis (three vertical dots) and select Manage keys:
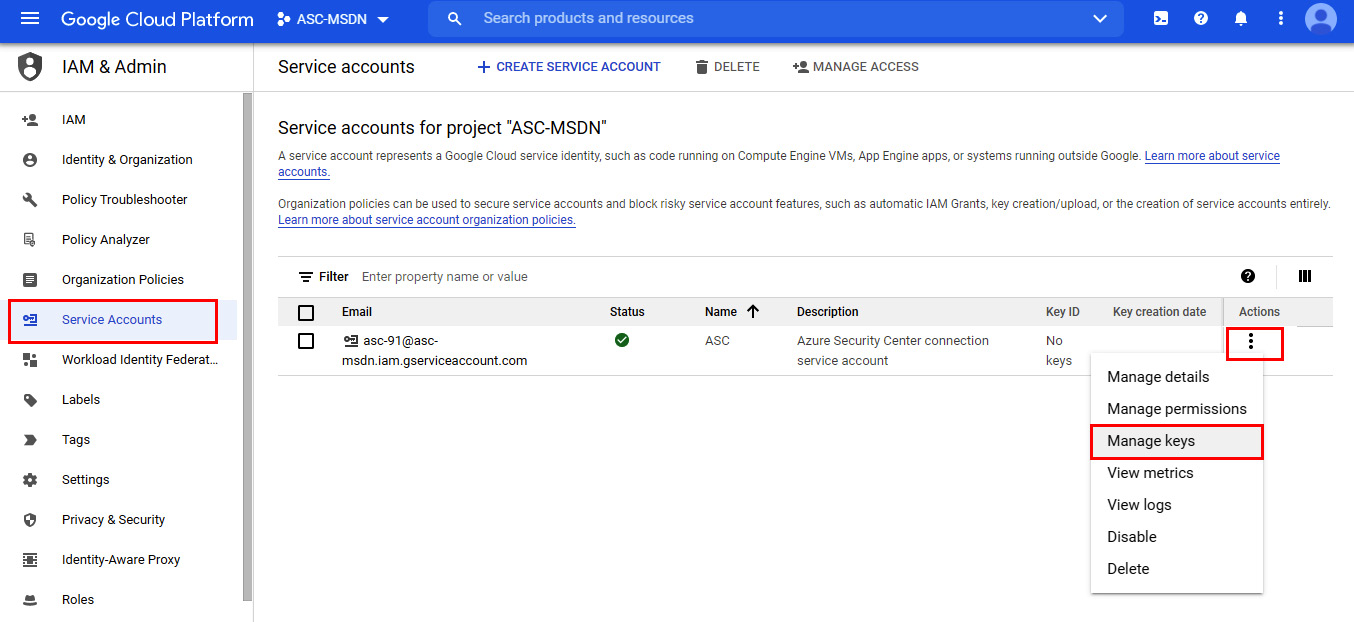
Figure 2.33 – Service accounts for project
- On the Keys page, click ADD KEY and then select Create new key.
- In the Create private key window, choose JSON for Key type and click CREATE.
- Save the JSON file.
- In the Navigation menu, under IAM & Admin, click Settings. Copy the Organization ID value and save it for later use.
- In the Azure portal, open Microsoft Defender for Cloud. Under the Management section, select Cloud connectors.
- Select Connect GCP account:
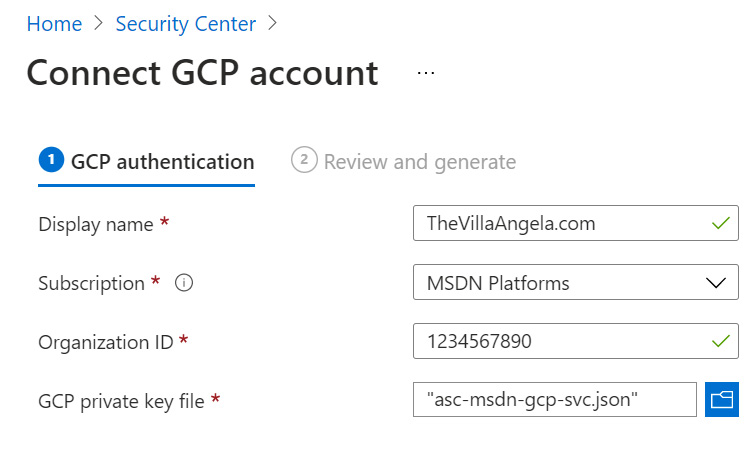
Figure 2.34 – Connect GCP account
- In the Display name field, enter a name for the GCP connector.
- Choose an Azure subscription.
- In the Organization ID field, paste the value you copied in Step 17.
- For GCP private key file, click on a folder icon and select the JSON file you saved in Step 16.
- Select Next: Review and generate.
- On the ❷ Review and generate page, review the details and click Create.
How it works…
To connect the GCP account to Microsoft Defender for Cloud, you created a service account in GCP with the appropriate permissions to read security information from GCP Security Center. This GCP service account is used to read the data in GCP Security Command Center. Then, you created a private key for the service account, which will be used for authentication in the Microsoft Defender for Cloud GCP connector. With all the necessary information at hand, you created a GCP connector in Microsoft Defender for Cloud.