


The WCF LOB Adapter SDK (ASDK) is a set of development tools and runtime components for execution and development of adapters for Line-of-Business Applications (LOB) such as SAP, Oracle, DBMS, and others. The biggest advantage offered by the ASDK-based adapters is that they can be consumed not only from BizTalk, but from any .NET WCF-compliant application using familiar WCF semantics coupled with rich configuration capabilities provided by WCF. If with the previous incarnations of BizTalk server developers had a choice between the ASDK-based adapters and the old COM-based LOB adapters, with the release of BizTalk Server 2010, and BizTalk Adapter Pack 2010 the only option developers would have is mastering the new technology—the old legacy LOB adapters, except the SQL Server adapter, have become history and can't be used with BizTalk 2010. In this chapter, we will cover the following topics:
Understanding the ASDK-based adapter
ASDK-based adapters vs. WCF services
Installation of the BizTalk Adapter Pack 2010
Using the ASDK development tools
The WCF-Custom adapter and SOAP actions
ASDK tools and features
The major goal is to make you familiar with common steps and techniques involved in building BizTalk applications using the ASDK-based adapters, so that in the subsequent chapters, we will be able to concentrate on the features specific to each particular adapter.
If you read the product documentation, you will find that the ASDK-based adapters are built on top of the WCF Channel model and surface as custom WCF bindings. What this means is that WCF clients are able to communicate with ASDK-based adapters as if they were WCF services. Likely, the very first question you want to ask is whether the ASDK-based adapters are in fact WCF services just presented under the new fancy name. No, they are not! The use of the acronym WCF in the WCF LOB Adapter SDK is somewhat misleading; WCF forms the basis of the technology but the software does not revolve around web services. To understand how the adapters fit into the WCF infrastructure, let's recall some of the WCF fundamentals.
In order to establish communication process with clients, any WCF service must expose at least one endpoint. The WCF endpoints are based on three elements, known as the "A, B, and C" of the WCF. These three elements are:
Address: It takes a form of the URI specifying the address where the service can be reached at.
Binding: Bindings specify a communication protocol between the client and the service.
Contract: Contracts specify what operations are exposed by the service.
Communication between client and service is conducted through communication channels; one channel on the client side and its equivalent on the server side. On the server side, when you instantiate the ServiceHost class, it instantiates a channel listener, which in turn builds a communication channel for the service. On the client side, the proxy creates a channel factory, which is responsible for building the channel for the client. The channels consist of binding elements, each responsible for its own part of message processing to form a stack of binding elements.
 |
As you can notice in the previous diagram, the bottom layer in the communication channel is a transport layer, and that's exactly where the ASDK-based adapter fits within the channel stack.
The great thing about WCF is that it has been designed with extensibility in mind, which allows you to use custom transport bindings tailored to your specific needs. Much like the standard WCF transports, such as TCP, named pipes, HTTP, and MSMQ, the ASDK-based adapters are just a custom transport binding elements consumable from BizTalk applications using a standard WCF-custom adapter. As you can see in the following image, in the outbound scenario, the ASDK-based adapter instead of sending a message over the network like standard WCF transports, just communicates with the LOB system and then sends a response message to the client.
 |
In the inbound scenario, ASDK-based adapter either monitors or listens for a notification from the target LOB system for particular events and generates a message containing event-specific data for the hosting application. We go into more details later in this and subsequent chapters.
 |
One of the frequently asked questions in relation to the new adapters is what is the reasoning behind introducing the ASDK technology? What's wrong with good old fashioned WCF-services that have been used for years to provide access to LOB applications and are perfectly consumable from virtually all applications? Why did Microsoft re-invent the wheel? Well, these are absolutely valid questions and here is the answer. There is nothing wrong with the WCF-services; they are as good as they have always been, but there is one big "but"—only if the LOB application is relatively static. Imagine the situation where your LOB application is evolving and you, as a developer, have to expose new metadata to the client applications? You either have to update existing contracts, or implement new ones with subsequent configuration steps applied to both the host and WCF-service. This has been a major pain for the development teams working on the LOB side.
Note
Metadata is usually defined as data about data. This is a very broad definition; metadata in the WCF LOB Adapter SDK can be defined as the data types and the operations available in the target LOB system. For example, for SAP, it can be IDOCs and BAPIs or it can be stored procedures and data tables for the DBMS-based applications. It is up to the adapter designer to determine and expose the metadata for a particular LOB application.
In contrast, the ASDK-based adapters provide design time metadata discovery and resolution automatically, with no efforts from the development team to make new metadata (or functionality, according to our definition of the metadata) available for consumption. Details of this process are beyond the scope of this chapter, but if you are interested in diving deeper, the sample adapters provided with the WCF LOB Adapters SDK are at your disposal. Take a look at how the Contoso sample adapter located in the C:\Program Files\WCF LOB Adapter SDK\Documents\Samples directory implements the IMetadata*group of interfaces and the magic behind the automatic metadata discovery and resolution will become clear. Implementation of the IMetadata* interfaces does require substantial efforts from the adapter developers, but the end result is certainly worth it.
Now that you are familiar with the architectural foundations, let's proceed with installation of the adapters.
The installation procedure of the BizTalk Adapter Pack 2010 is not complicated, but as with everything BizTalk, requires accuracy and some patience. The very first thing to do is make sure your system meets the prerequisite requirements. You have to have the following components installed on your computer:
Windows XP SP2, Windows Server 2003, Windows Server 2008, Windows Vista, or Windows 7
Visual Studio 2010 for development purposes
BizTalk Server 2010 with Windows Communication Foundation Adapter. The WCF adapter is not installed by default; you have to explicitly enable it upon installing BizTalk Server 2010.
 |
Once you've completed the verification, you can proceed with the installation, which essentially is a sequence of the following steps:
1. Installing WCF LOB Adapter SDK.
2. Installing BizTalk Adapter Pack 2010.
3. Installing additional client libraries to enable communication between adapters and their target LOB systems. The only adapter that doesn't require any additional components is the SQL adapter.
From the steps above, installation of the additional client libraries is the most time consuming and error prone process. We will explore this topic in detail in the chapter dedicated to the SAP adapter.
Even though installing the WCF LOB Adapter SDK and BizTalk Adapter Pack are straightforward procedures, there is a pitfall in a 64-bit environment. If your computer is running under a 32-bit operating system, you have to install only 32-bit versions of the WCF LOB Adapter SDK and BizTalk Adapter Pack. In a 64-bit environment, the picture is a bit more complicated. First you have to install 64-bit version of the WCF LOB Adapter SDK and 64-bit version of the BizTalk Adapter Pack 2010. Then, if you are using design time tools like Visual Studio and BizTalk Admin Console or 32-bit BizTalk host instances at the runtime, you will have to install 32-bit version of the BizTalk Adapter pack and the client libraries. This probably sounds counterintuitive, but if you take into account that Visual Studio and BizTalk Admin Console are 32-bit applications and therefore can interact only with 32-bit components, such requirement becomes clear. So, don't be surprised if the BizTalk setup program run in a 64-bit environment offers you to install both 32 and 64-bit versions of the BizTalk Adapter pack 2010. Now that we are familiar with the requirements, we can begin the installation of the ASDK Adapters.
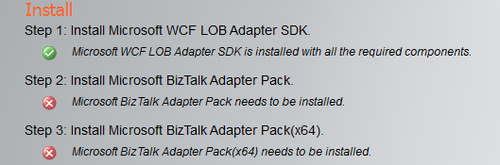
The first step is to lay the foundation, that is install the WCF LOB Adapter SDK.
1. From the
\Setup\BT Setupfolder of the BizTalk installation DVD or ISO, launchsetup.exe, then select Install Microsoft BizTalk Adapters.2. Select Step 1: Install Microsoft WCF LOB Adapter SDK. Note that setup automatically installs the correct version; you don't have to explicitly choose between 32 and 64-bit.

3. On the Welcome screen, click the Next button.
4. Accept the license terms and click Next.
5. On the Installation Type screen, click the Custom button. The Custom Setup screen will show up.
6. You always have to install the runtime components, despite whether you are planning to use the UI tools or not. If you are installing on the computer where you are planning to use the UI design-time components, such as Add Adapter Service Reference plug-in for Visual Studio, and BizTalk Server Add-in for BizTalk Administration Console, you have to enable the installation of the Tools, and the BizTalk Server Add-in components. For the walkthrough later in the chapter, you will also need the Samples provided with WCF LOB Adapter SDK.

7. Click Next, then click Install to start installation.
8. When the installation completes, click the Finish button to close the WCF LOB Adapter SDK setup and return to the main adapter setup window.
We will now install the BizTalk Adapter Pack 2010. Note, that if you are in a 64-bit environment, the setup offers to install both 32 and 64-bit versions of the BizTalk Adapter Pack 2010.
 |
Here is the process to follow:
1. In the main adapter setup window, click the link to install the relevant version of the BizTalk Adapter Pack.
2. On the Welcome screen, click Next.
4. On the Choose Setup Type screen, click the Custom button.
5. On the Custom Setup screen, select the adapters you want to use and click Next.

6. Click Install to begin installation.
7. When the installation completes, click Finish to finalize the procedure and close the setup window.
To complete the installation of the BizTalk Adapter Pack 2010, you have to install additional client components for all adapters except SQL. For the SAP adapter covered in this book, we will provide step-by-step guidance in chapter 4. If you are planning to use the SQL adapter only, no further steps are required and at this point, you have everything you need for using and developing with the SQL adapter.
In this section, we will show you how to use the tools provided by the ASDK to enable BizTalk applications for consumption of the ASDK-based adapters. For this purpose, we will employ the Echo adapter, one of the two sample adapters supplied with the ASDK. This is a very simple adapter simulating operations to a fictitious LOB system, but at this point, we don't need anything complicated since the ASDK tools work in exactly the same fashion regardless of the adapter. So, simplicity of the Echo adapter is to our benefit—we will concentrate on the essence, leaving the complexity of the real-world adaptors to their respective chapters. As an additional bonus, the Echo adapter comes with full source code located in C:\Program Files\WCF LOB Adapter SDK\Documents\Samples directory and an installation package. As of the moment of writing this book, the setup package for the Echo adapter was not updated for use with the Visual Studio 2010 and .NET 4.0; to make you life easier, we prepared setup for .NET 4.0 32/64 bit environments and put the packages in the ZIP file containing code samples for the book. If you didn't download the samples yet, please do it now.
Let's start with a brief discussion of the functionality provided by the Echo adapter. Like its big brothers from the BizTalk Adapter Pack 2010, the Echo adapter supports two message exchange patterns.
Inbound: In the inbound scenario, the Echo adapter, being a part of the receive port infrastructure, monitors a specified file folder for new files with TXT extension; once a new file arrives, the adapter sends a notification to the BizTalk application. The notification takes the form of an XML message conforming to the following XSD schema:
 |
The path element contains the name of the folder being monitored for new files; the content element, as its name suggests, holds the content of a new file. If you wish to map this operation to the functionality provided by the real world adapters from BizTalk Adapters Pack 2010, it resembles the notification operations supported by the SQL adapter. When configured for notification, the adapter notifies the client application that there are data in the database meeting the specified criteria. We will discuss these operations in detail in subsequent chapters.
Outbound: In the outbound scenario, being a part of the send port infrastructure, the adapter echoes (or repeats) an incoming string a specified number of times then sends the response back to a caller. The XSD schema for request and response messages are shown in the following image:
 |
The real world analogy for the EchoString operation is executing for example a select statement against a specified table by the SQL adapter and sending the result set back to a client.
To make its operations fully configurable, the Echo adapter exposes two binding properties:
Since the Echo adapter is not automatically installed with the WCF LOB Adapter SDK, we will have to take care of it. The installation is straightforward and unlikely to cause difficulties.
Here are the steps:
1. Navigate to
C:\LOBIntegration\Chapter01\EchoAdapter\Setup32directory and get familiar with thereadme.docfile.2. Launch
setup.exeand follow the setup wizard. Accept the default values for all screens.3. If you are working in a 64-bit environment, now navigate to
C:\LOBIntegration\Chapter01\EchoAdapter\Setup64and repeat the procedure.
Now that you have installed the Echo adapter, we can proceed with building the BizTalk application consuming the Echo adapter. For your convenience, we provided a complete and ready to deploy application identical to what we are going to build. The application is located in the C:\LOBIntegration\Chapter01\Walkthrough directory; you can use it as a reference to be sure that you are on the right track building your own application.
Our BizTalk application will consist of a single orchestration acting in a pretty much "pass-through" mode. The orchestration will receive an inbound OnReceiveEcho message from the Echo adapter, construct an outbound EchoString message by mapping the content element of the inbound message to the aName element of the outbound message, and then submit it to the adapter for echoing. The response will be received by the orchestration and written to the Application Event Log. When we complete the walkthrough, the orchestration will resemble the following image:
 |
Here is the process to follow:
1. To get started, verify that the
c:\tempfolder exists on your computer. If not, please create it. If you recall, the adapter exposes the FileSystemWatcherFolder property to specify the folder to monitor for the files with*.txtextension. We will use the default value which isc:\temp.2. Open Visual Studio and create a new BizTalk project with the settings shown in the following image. For the location, you can specify a folder of your choice.

3. Now, the most important part. We need to generate the schemas representing the operations exposed by the adapter that you intend to use with the current application. The tool of choice for the task is the Consume Adapter Service plug-in, a metadata browser and artifacts generation tool, which you installed recently as a part of the ASDK. Besides XSD schemas, this plugin also generates a physical port binding file. This means that you can configure the port automatically by importing the binding file using the BizTalk Administration Console. The binding file typically contains physical port configuration settings including the connection string to the target LOB and the port SOAP actions based on the operations for which metadata were generated.

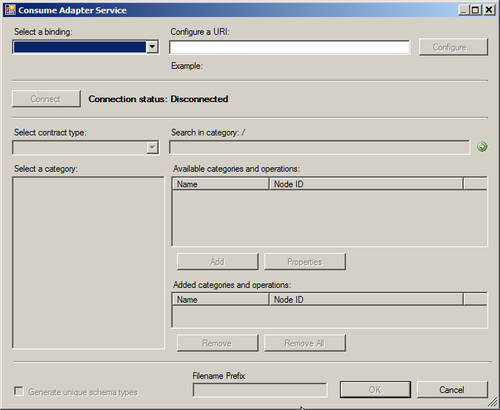


The first step to generating the artifacts is establishing a connection to the target system. Most LOB systems require valid client credentials as part of the connection procedure and our Echo system is not an exception, though it is quite forgiving—after selecting Username for the Client credential type drop down, you can type in anything you like for the User name and Password, but please don't leave them blank.

Further, besides valid credentials, in order to establish a connection we have to provide additional parameters such as host name, port number, and other LOB application specific parameters—this is what the URI Properties tab is for. Switch to this tab and note the properties presented there. As with the user name and password, you can type in anything you like or accept the defaults.

While the Echo Adapter requires only three elements to build the connection URI, the real-world adapters from the BizTalk Adapters Pack 2010 require more details in order to connect to their LOB systems. For comparison, the following image shows the properties required to establish a connection to SAP:


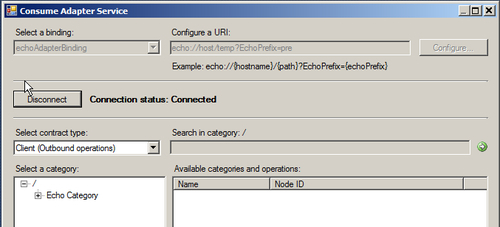
Provided the connection string we've built is correct, clicking the Connect button establishes an active connection to the Echo system. If the connection is accepted, we will see the category tree populated with outbound categories—the outbound contract type is what the Consume Adapter Service plugin chooses by default.
Next, we need to select the operations that we want to use in our application and add them to the list of desired operations. In the Select a category tree click the Echo Category node, then in the Available categories and operations panel, select EchoString and click the Add button. This action adds EchoString to the list of desired operations at the bottom of the screen. The last step is to help the Consume Adapter Service add-in to generate descriptive file names by setting the file name prefix at the bottom of the screen to EchoOutbound.

Finally, click OK to close the Consume Adapter Service Wizard window and return to Visual Studio, where we see two new files added to our BizTalk project. One file is the XSD schema for the EchoString operation, the other is an XML binding file. After deploying the application, you will import this file using the BizTalk Admin Console to create a physical WCF-Custom send port configured to perform the EchoString operation.
Unfortunately, one of the inconveniences we have to deal with is that the Consume Adapter Service add-in doesn't allow generating artifacts for different contract types in one run. To generate the schema and binding file for the inbound operation, we need to open the Consume Adapter Service add-in again and repeat the procedure. On the Security tab, specify the username and password, for the properties on the URI Properties and Binding Properties tabs, you can accept the default values.

Then, once you've established a successful connection, select Service in the Select contract type drop down, click EchoCategory in the Select a category panel, and add OnReceiveEcho to the list of desired operations. Set the Filename Prefix at the bottom of the screen to EchoInbound.

Click OK to return to Visual Studio. Our Visual Studio solution with two new added files should now look like this:


Technically speaking, at this point, we have all bits and pieces required to build our BizTalk application. Before we proceed, let's make a few cosmetic changes.
First, rename the
WcfSendPort_EchoAdapterBinding_Custom.bindinginfo.xmltoSendPort.Bindinginfo.xml. Similarly, rename theWcfReceivePort_EchoAdapterBinding_Custom.bindinginfo.xmltoReceivePort.Bindinginfo.xml.Next, we need to give more descriptive names for the receive port and receive location. Open the
ReceivePort.bindinginfo.xmlfile, and change the ReceivePort and ReceiveLocation Name attributes as follows:

For the
SendPort.bindinginfo.xmlfile, locate the SendPort node and change the Name attribute to SendEchoString.

4. Now that we have prepared all the artifacts, we can proceed and build our sample application.
5. Add a BizTalk orchestration to the project and name it ProcessEcho.

6. Switch to the OrchestrationView and create three orchestration messages with the following values:
Identifier: msgReceiveNotification, Message Type: Walkthrough.EchoInbound
Identifier: msgEchoStringRequest, Type: Walkthrough.EchoOutbound.EchoString
Identifier: msgEchoStringResponse, Type: Walkthrough.EchoOutbound.EchoStringResponse

7. To construct the outbound message, add a map to the project and name it.
8. Inbound_To_Outbound.

9. Specify OnReceiveEcho as the source message type, for the destination schema, specify EchoOutbound, and select EchoString as the root node. Once the source and destination schemas are set, connect the content and aName elements.

10. Next, we need to sketch the orchestration flow. From the toolbox, drag on the orchestration surface the shapes in the order and with the properties as follows:
Shape: Receive, Name: ReceiveNotification, Activate: True, Message: msgReceiveNotification
Shape: Construct, Name: ConstructEchoOutbound, Message Constructed: msgEchoStringRequest. Inside the Construct drag the Transform shape and configure it with the following values: Name: Transform, Input Messages: msgReceiveNotification, Map Name: Inbound_To_Outbound, Output Messages: msgEchoStringRequest
Shape: Send, Name: SendEchoString, Message: msgEchoStringRequest
Shape: Receive, Name: ReceiveEchoResponse, Message: msgEchoStringResponse
Shape: Expression, Name: WriteToLog
11. Configure the WriteToLog expression shape to execute the following code:

12. To enable the orchestration for receiving and sending messages, we need to add two logical orchestration ports. The first port will be a one-way port for receiving an initial inbound message; the second will be a Request-Response port for sending an outbound message to the adapter for processing and receiving a response. Right-click on the Port Surface and select New Configured Port to start the Port Configuration Wizard. Here are the settings for the first one-way port.
Name: ReceiveInitialEcho
Port Type: Create New Port, Port Type Name: InitialEchoType, Communication Pattern: One-Way, Access Restriction: Internal
Port Direction of Communication: I will always be receiving messages on this port, Port Binding: Specify later
13. Run the Wizard one more time to create a logical port for the outbound operation.
Name: SendEchoString
Port Type: Create New Port, Port Type Name: SendEchoStringType, Communication Pattern: Request-Response, Access Restriction: Internal
Port Direction of Communication: I will always be sending request, and receiving response on this port, Port Binding: Specify later
14. Join the logical ports with the relevant shapes. Connect Request of the ReceiveNotification receive port with the ReceiveNotification shape. For the SendEchoString send port, connect Request with the SendEchoString shape, and Response with the ReceiveEchoResponse shape. When you finish, the orchestration should match the following image:
15. Build the application and address error messages, if any.
16. The last thing to do before we deploy the application is specify a strong name key for the application assembly, and provide the name for the BizTalk application. In the Solution Explorer, right-click on the project name and select Properties. From the Project Properties window, switch to the Signing tab to specify a strong name key file. You can either generate a new, or use any existing key file from your computer. Then, activate the Deployment tab and type Chapter01_Walkthrough for the application name.

17. Almost there; we are finally at the deployment stage. Go to the BizTalk Admin Console and create a new application named Chapter01_Walkthrough. You have to create the application first; otherwise Visual Studio will deploy the solution in the default application in the group.
18. In the Solution Explorer, right-click on the solution name, select Deploy, and wait for the message confirming that the deployment succeeded.
19. To complete the deployment, we need to create the application physical ports. This is where the binding files, generated for us by the Consume Adapter Service plugin, come into play. Open the BizTalk Administration Console, expand the Applications node, right-click Chapter01_Walkthrough, and select Import|Bindings. Navigate to the solution directory and import the binding file for the receive port. Then, repeat the procedure to import the bindings for the send port. Disregard a pop-up message informing you of the application name not matching and click Yes.

20. For security reasons, the Consume Adapter Service addin doesn't include the usernames and passwords when generating binding files. For the physical ports, we have to set them manually using the WCF-Custom Transport Properties window. Let's start with the send port. In BizTalk Administration Console, double-click the SendEchoString port, then click Configure, switch to the Credentials tab, and type in any username and password.

21. Specify the username and password for the receive location. In the BizTalk Admin Console, double-click the EchoWcfCustom_ReceiveNotification receive location and then click Configure to open the WCF-Custom Transport Properties window. As you can see, for the receive location, this window has a slightly different look. There is no Credentials tab; instead, you have to switch to the Other tab and specify the username and password there.

22. The last step before we start the application is to bind the orchestration. In the BizTalk Administration Console, double click ProcessEcho orchestration to open the Orchestration Properties window. Activate the Bindings tab and set the properties as shown in the following image:

23. Click OK to close the Orchestration Properties window and then start the application.
If we submit a file to the c:\temp folder monitored by the adapter, we will get the following error message:
The adapter failed to transmit message going to send port "SendEchoString" with URL " echo://host/temp?EchoPrefix=pre ". It will be retransmitted after the retry interval specified for this Send Port. Details:"Microsoft.ServiceModel.Channels.Common.UnsupportedOperationException: Incorrect Action
<BtsActionMapping xmlns:xsi="http://www.w3.org/2001/XMLSchema-instance" xmlns:xsd="http://www.w3.org/2001/XMLSchema">
<Operation Name="EchoString" Action="Echo/EchoString" />
</BtsActionMapping>. Correct the specified Action, or refer to the documentation on the allowed formats for the Actions. Note that Actions are case-sensitive.
The problem is exactly what the error message is telling us—the SOAP action settings applied to the send port are not understood by the adapter. One of the most often asked questions on the MSDN forums is "I imported bindings with the SOAP action settings as generated by the Consume Adapter Service plug-in, so why are they nor understood by the adapter?". We will demystify the subject and shed some light on how the WCF-custom adapter processes the actions shortly, right after we finish the walkthrough. For now, to fix the problem and complete the application, go to the BizTalk Admin Console and do the following:
1. Double-click the
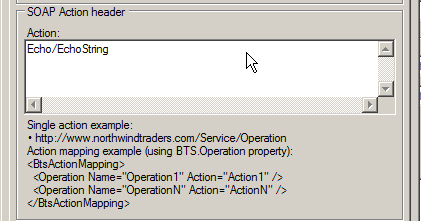
SendEchoStringsend port. In the Send Port Properties windows click Configure to open the WCF-Custom Transport Properties window.
2. In the Action text box of the SOAP Action Header section, note the value of the Name attribute, which is EchoString. What you have to do is to make your orchestration logical send port name match the value of the Name attribute. The first option is to change the logical port name from Operation_1 to
EchoStringand then, of course, to re-deploy the application.
3. An alternative option, if you don't want to redeploy the application, is to set the Name attribute value to Operation_1, so that the content of the Action box looks as follows:

4. Although from a pure technical standpoint this is a perfectly valid solution, using such non-descriptive names is a questionable practice and should be avoided. We presented it here with the only purpose being to illustrate the concept. The best approach is not to leave the operation name with the default value
Operation_1, but to give it a descriptive name upon designing the orchestration and then adjust the physical port action mapping.So, let's do it right and just change the logical port operation name to EchoString. Once done, re-deploy the application. Now, you can create a file containing a single word "Echo", drop it to the C:\temp folder, and watch the event log for the echoed messages returned by the Echo adapter. Please don't forget, the file must have a TXT extension.

Now, as promised, let's take a deeper look at the SOAP actions and how the WCF-Custom adapter deals with them. The idea behind the SOAP actions is quite simple. Essentially, the SOAP action is just a tag attached to the incoming WCF messages telling the adapter what operation it has to perform.
To illustrate the concept by a concrete example, let's refer to the source code provided with the Echo adapter. The point of our interest is the Execute method of the Microsoft.ServiceModel.Channels.Common.IOutboundHandler interface. This interface is one of the core interfaces that all ASDK-based adapters supporting outbound operations must implement. The Execute is called by the ASDK runtime to perform an outbound operation. Here is the implementation:
 |
The code is self-explanatory and as you can clearly see, is action-centric. If the action coming with the SOAP header is recognized, the adapter performs the requested operation, if not, then the adapter responds with "Invalid Operation" exception. Since the Echo adapter exposes only one operation, using actions may seem unnecessary, but imagine the situation when an adapter exposes multiple operations? In such cases, using the SOAP actions is quite a logical way to help the adapter to decide what operation to perform.
There are two different ways to associate a BizTalk message with the appropriate SOAP action (or to attach the appropriate processing tag as you wish). One is to configure physical send ports using so called Action Mappings. The other is to set the actions dynamically at runtime.
You will use the Action Mappings in the majority of cases—this is the easiest way to configure physical ports since the Consume Adapter Service Wizard does most of the job. For each operation that you selected at the design time, the Consume Adapter Service Wizard will generate a corresponding Operation entry inside the BtsActionMapping wrapper and place the mapping into the physical port binding file it will generate. In the general form, the action mapping looks as follows:
 |
To process the actions mappings and attach the SOAP actions tags to incoming messages, the WCF-Custom adapter uses the following algorithm:
When the outbound message leaves an orchestration, the orchestration instance sets the BTS.Operation context property with the logical port operation name. Once the subscription mechanism pulls the message from the message box and hands it over to the physical port for processing, the WCF-Custom adapter tries to look up the actions map for the Operation with the Name matching the BTS.Operation property. If a match is found, then the adapter attaches the corresponding Action value to the message and sends it to the custom binding for execution. If a match was not found, then the WCF-Custom adapter treats the entire BtsActionMapping as one big action, so the custom binding will get the following action:<BtsActionMapping><Operation Name="Operation 1" Action =......</BtsActionMapping> with quite a predictable consequence—"Invalid action" exception. So, the rule is clear: for each orchestration outbound operation, there must be an Operation entry in the corresponding physical port action mappings with the Name attribute value matching the orchestration operation name.
It is important to note that for the content-based routing scenarios, where you don't use orchestrations and rely solely on the functionality provided by the messaging engine, you don't have to write a custom pipeline component to set the BTS.Operation context property. Luckily, the WCF-custom adapter supports an alternative single action format.
 |
Essentially, this means that all messages arriving to the send port configured for the single action processing will be tagged with the same action regardless of the BTS.Operation context property. Since the Echo adapter supports only one operation, the single action approach is an alternative solution perfectly applicable to our sample application.
In the situations where you want to postpone the decision on what operation has to be performed until the runtime, you can use the WCF.Action context property. All you need to do is to add an Expression shape to your orchestration and configure the shape to execute the code similar to the presented below:
YourOutboundMessage(WCF.Action)="DesiredAction"
As you can see, the WCF-Custom adapter offers enough flexibility to address virtually any situation you may encounter. Once you understand the concept and available options, all it takes is accuracy and no longer than a couple of minutes to configure send ports.
At this point, you essentially have all the necessary information to start building applications that rely on the ASDK-based adapters. Nonetheless, as with any serious technology, which the ASDK no doubt is, there are areas and features which can become the source of headaches or make your work less productive if used indiscriminately. And, as with any serious technology, there are tools to help you effectively resolve potential problems.
In this section, we will discuss the following topics, applicable to all ASDK-based adapters:
Generating the schemas - helpful tips
Dealing with timeouts
Tracking and tracing
When you have finished the walkthrough, you will likely come to the conclusion that generating the schemas is probably the most important step to whether your experience with the adapters will be fast and smooth, or whether you will have to spend a considerable amount of time troubleshooting your application. If this was your verdict, you were absolutely right. Here, we would like to provide you with a few tips and suggestions, which may improve your productivity and help to avoid potential issues:
If you are not happy with the names of the schema files generated by the Consume Adapter Service plugin, feel free to change them to your liking or to the naming conventions adopted by your organization.
As you likely know, BizTalk schemas are compiled into .Net classes. You are free to change the name and the namespace of the .NET class to be generated. Just click the schema file in the Solution explorer and make a change in the Properties window. Doing so, you will make referencing the types defined in the XSD files easier and more visual.
Feel free to distinguish or promote schema fields as needed. Nonetheless, be aware that if for whatever reason you need to re-regenerate the schemas, your promotions will be lost.
In the vast majority of cases, you won't have a need to change the namespace and root node name for the schemas generated by the Consume Adapter Service plugin. As you know, these two elements constitute the document type, the cornerstone of the messaging engine subscription mechanism. If you still have a very compelling reason to change the type, the change has to be accompanied by a custom pipeline component. For the inbound scenarios, the pipeline component has to convert the document produced by the adapter to match your custom document type. Otherwise, the messaging engine will throw the infamous "subscription not found" exception. For the outbound scenarios, your custom pipeline component has to convert your custom document to match the type expected by the adapter that is the type generated for you by the Consume Adapter Service plugin. Otherwise the message will be rejected by the adapter.
You have to be extra cautious if you are planning to use the ASDK adapters with more than one application in the same BizTalk group. If you generated the schemas for the same operation in different Visual Studio projects, you will end up with a situation where the same message type will be presented twice in the BizTalk management database. The consequence of this configuration is that the messaging engine will throw exceptions reporting its inability to resolve the message type or find a subscription because multiple schemas matched the message type.
To avoid such a situation, we recommend putting the schemas generated by the Consume Adapter Service add-in into a separate Visual Studio BizTalk project which you will reference from your other Visual Studio BizTalk projects. Upon deployment, you will need to add assembly with the schemas to a separate BizTalk application named for example
YourOrganization.Common, and then reference this application from the other BizTalk applications in the group.An alternative option is to to configure XMLReceive or XMLTransmit pipeline with fully qualified schema name set in the DocumentSpecNames property.
Working with the Consume Adapter Service Wizard, you likely noticed the Generate Unique Schema Types checkbox at the bottom of the Consume Adapter Service Wizard and are wondering whether this might be a simpler solution to the problem we just discussed.
Unfortunately, this checkbox deals with a fundamentally similar, but ultimately different issue. Consider the scenario where you want to generate a schema for the operation called for example LOBOperationA. The schema for LOBOperationA uses a parameter of complex type CT1. Assume you closed the Consume Adapter Service Wizard, and sometime later re-opened it to generate schema for LOBOperationB, which uses the same complex type CT1. After you generate the schema for the LOBOperationB and compile the project, you will get an error message reporting that the same type CT1 is defined twice in different XSD files. To address such situation you can do the following:
Whenever possible, generate the schemas for all operations you are planning to use in a single run to the Consume Adapter Service addin. The addin is able to recognize the situation and place the definition of the shared types in a single, separate XSD file referenced by the main XSD files using the Import directive.
If your application is evolving and your only option is generating schemas across multiple runs, checking off the Generate Unique Schema Types solves the problem by generating unique namespaces for the complex types.
The best approach is to make only one run to the plugin and generate all schemas in one batch, but, as often happens, this solution is not always possible in real life projects. So, in many cases your best bet is to use the Generate Unique Schema Types checkbox. Even if the operation does not use share types, keeping this checkbox checked will do no harm.
If you've followed the walkthrough, you should have noticed the group of timeout-related binding properties available at the design time on the Binding Properties page of the Configure Adapter dialog.
 |
After you imported the binding file generated by the ASDK, these properties are accessible through the Bindings tab of the WCF-Custom Transport properties dialog.
 |
The purpose of each property and the default values as set by the ASDK are listed in the following table:
|
Property |
Purpose |
|---|---|
|
openTimeout |
Open connection timeout. The default value is 1 minute. |
|
closeTimeout |
Close connection time out. The default value is 1 minute. |
|
sendTimeout. |
Outbound request-response timeout. This property specifies for how long the adapter waits for the response from the target LOB before throwing an exception. The default value is 1 minute. |
|
receiveTimeout |
Receive operation timeout. Essentially, this property specifies for how long adapter waits for an inbound message from the target LOB. Default value is 10 minutes. |
When dealing with the timeout exceptions in the outbound scenarios, it may be tempting to solve the problem by simply increasing the sendTimeout value. However, your first line of defense should be communicating with the LOB application administrator to determine whether the problem can be resolved by optimizing performance on the LOB application side. Masking the problem by blindly increasing the sendTimeOut value is definitely not the best solution.
For the inbound operations, you have to set the receiveTimeout property to the value large enough to not interfere with your particular receive location configuration. If you are pulling your hair out trying to figure out why your adapter is behaving totally "unexplainably"—for example, polling the database at random with no apparent pattern intervals instead of using the dedicated configuration properties, the first thing to check is the receiveTimeout settings. In many cases, adjusting this property magically resolves even seemingly unrelated problems. We will return to this subject in subsequent chapters. The default value is 10 minutes; the maximum supported value is 24.20:31:23.6470000 (24 days).
In the situations when your adapter is behaving not as expected, tracing and message logging are handy features provided by the ASDK to help you identify the root of the problem .They are especially useful in the inbound scenarios, where the ASDK adapters and their underlying LOBs may act as clients. In such scenarios, possible exceptions, for example the receive timeouts that we've just discussed, will not be propagated to your BizTalk application. At best, the exceptions may appear in the Event Viewer of your BizTalk computer, or not at all at worst, leaving you guessing in the dark.
Using the tracing and message logging capabilities, you can trace and log communication between BizTalk Server and ASDK adapters, within ASDK adapters, and also between ASDK adapters and their target LOB applications in the case of the SAP adapter. In a nutshell, to activate tracing, all you have to do is add tracing options to your application configuration file—Visual Studio for design-time tracing or BizTalk server for runtime. We have put the file names and their locations in the following table:
|
Application/Environment |
Location |
|---|---|
|
Visual Studio,32-bit environment |
|
|
Visual Studio,64-bit environment |
|
|
BizTalkServer,32-bit environment |
|
|
BizTalkServer, 64-bit environment |
|
The product documentation offers ready-to-use configuration sections that you can copy-paste to the appropriate configuration file. Currently, it is available at http://msdn.microsoft.com/en-us/library/cc185440(BTS.10).aspx. If the location changes, you can search using your favorite search engine by "WCF LOB SDK Diagnostic tracing".
In this chapter, we've laid a good foundation for discussing the features and functionality of the adapters from BizTalk Adapters Pack 2010. We have covered:
Architectural fundamentals and the reasoning behind introducing a new WCF-based technology, the WCF LOB Adapter SDK (ASDK)
The major steps involved in enabling BizTalk Applications for consumption of the ASDK-based adapters
Some of the best practices to make your work more productive and trouble free
In the next chapter, we will introduce you to the WCF SQL Adapter, probably the most widely used adapter from the BizTalk Adapter Pack 2010.
