


 Download code from GitHub
Getting started with MicroPython
It's an exciting time to work with technologies such as MicroPython. They make tiny and inexpensive hardware devices more accessible, as you can use a high-level language such as Python to code on them. Tasks such as retrieving data from web services can easily be done in a few lines of code, compared to other microcontroller languages that would require many more steps, because they operate at such a low level compared to Python. This is very empowering, as you will get results faster and be able to iterate through different designs and prototypes in a shorter amount of time.
In this chapter, we will provide you with the essential skills to get started and be productive with the software and hardware needed to run MicroPython. You'll learn how to update the firmware and libraries on the device. Recipes to load your first program on the board and use advanced features, such as auto-reloading your code, will also be covered. Finally, a number of recipes will cover the usage of the REPL that is a powerful way to quickly interact and experiment with the available components on MicroPython devices.
In this chapter, we will be covering the following recipes:
- Flashing the microcontroller firmware
- Executing your first program
- Using screen to access the REPL
- Using Mu to access the REPL
- Executing commands in the REPL
- Using the auto-reload feature
- Updating the CircuitPython Library
What is MicroPython?
MicroPython is the creation of the Australian programmer and physicist Damien George, who launched a Kickstarter campaign in 2013 to support the development of the language and the initial microcontroller hardware that it would run on. After the success of the project, more and more devices (which have a variety of chipsets from different manufactures) have become supported by MicroPython, creating a wide range of devices from which to choose when you make a project using MicroPython.
MicroPython is a lean implementation of the Python 3 programming language that is capable of running on hardware with very limited resources, such as microcontrollers. MicroPython has implemented the majority of features in the Python programming language, such as functions, classes, lists, dictionaries, strings, reading and writing files, list comprehensions, and exception handling.
The REPL is also implemented and can be interacted with using a serial connection. A selection of the core Python libraries is provided, which allows a range of applications to be implemented. The JSON and socket libraries allow web client and server implementations, making Python-based Internet of Things (IoT) projects on microcontrollers a reality.
By bringing one of the most popular and easy to use programming languages to the exciting world of embedded computing, MicroPython opens up new doors for makers and entrepreneurs to bring their creations to life. This book will explore the different ways to leverage the MicroPython language with a variety of unique microcontroller devices that each bring a different set of capabilities to the table.
One of the unique and fascinating aspects of running MicroPython on microcontrollers is that it does not run on an operating system (OS), but instead runs directly on bare metal. These unique characteristics manifest themselves in many ways, such as the ability to run your Python code at the instant the hardware is powered on, as there is no OS that needs to boot up.
The other aspect of this is that the Python code has direct access to control and interact with the hardware, creating hardware possibilities that would not be possible with a typical Python application running on an OS.
As we know now that MicroPython runs on a microcontroller, let's see what microcontrollers are all about.
What is a microcontroller?
Microcontrollers are small computers on a single chip. They usually include a CPU, memory, and input/output peripherals. They will have more limited computing resources than what might be found on a modern PC.
Compared to a PC, however, they can be made to a much smaller dimension, allowing them to be embedded in all sorts of electronic and mechanical devices. Their power consumption is often far less in orders of magnitude, thus providing battery life for days. They have a much lower cost per unit, which opens up possibilities of having hundreds of such devices to collect sensor data across a broad geographical area and still be financially feasible.
Traditionally, it was a difficult process to create applications on microcontrollers because you would have to write very low-level code that took time and was difficult to debug. MicroPython brings the ease of use of Python to microcontroller. It's able to provide this easier interaction with the hardware, and yet still work in such a resource constrained environment and provide a wide range of functionality with a strong level of responsiveness.
What is CircuitPython?
CircuitPython is a branch of MicroPython created by Adafruit Industries that makes working with microcontrollers simpler. It has excellent support for many of the sensors and components that come with Adafruit devices through its Python libraries. It also allows code to be easily loaded and run without having to install any additional software applications by exposing the microcontroller's storage as a disk drive.
Generally, the differences between MicroPython and CircuitPython are minor, and, in many instances, code will run the same on both implementations.
What is the Circuit Playground Express?
The Adafruit Circuit Playground Express is an inexpensive, yet versatile microcontroller with a rich set of input and output devices that comes built-in with the device. The following are some of the main hardware features present in this device:
- 10 mini NeoPixels, each with the ability to display a full range of colors
- As motion sensor (triple-axis accelerometer with tap detection and free-fall detection)
- A temperature sensor
- A light sensor
- A sound sensor
- A mini speaker
- Two push buttons, which are labeled A and B
- A slide switch
- An infrared receiver and transmitter
- Eight alligator-clip friendly input/output pins
- Supports I2C and PWM output
- Seven capacitive touch inputs
- A red LED
- A reset button
- An ATSAMD21 ARM Cortex M0 processor, running at 3.3 V and 48 MHz
- 2 MB of flash storage
- A micro USB port for connecting to a PC
These will be the only required devices for eight chapters. Later chapters will introduce a different set of devices.
Where to buy
The Adafruit Circuit Playground Express can be purchased directly from Adafruit (https://www.adafruit.com/product/3333). It can also be purchased from online retailers, such as Amazon and Pimoroni.
For the purpose of this book, we recommend buying the Circuit Playground Express – Base Kit (https://www.adafruit.com/product/3517) and also includes a USB cable and battery pack so that projects can easily be made portable.
References
Here are a few references:
- The MicroPython web page at http://micropython.org
- The MicroPython project on Kickstarter at https://www.kickstarter.com/projects/214379695/micro-python-python-for-microcontrollers
- An article in microcontrollers on PC Mag at https://www.pcmag.com/encyclopedia/term/46924/microcontroller
- The Adafruit learning guide on CircuitPython at https://learn.adafruit.com/welcome-to-circuitpython/what-is-circuitpython
- The CircuitPython official documentation at https://circuitpython.readthedocs.io
Flashing the microcontroller firmware
In this recipe, we will show how to flash the firmware on the Circuit Playground Express with the latest CircuitPython firmware. There are two reasons to this before you start working with this device. First, the device also supports the Microsoft MakeCode programming environment and flashing the device with the CircuitPython firmware prepares it for use with the Python language.
Second, the CircuitPython language is under constant development, with a release every few months, so it is a good idea to update the firmware from time to time to load the latest release of the language onto the board.
Getting ready
This chapter's introduction gives us directions on how to buy the Circuit Playground Express, which will be required for all the recipes in this chapter. A USB micro B cable and a computer running macOS, Windows, or Linux will also be required.
How to do it...
Let's look at the following steps:
- Download the latest CircuitPython Circuit Playground Express UF2 file (https://github.com/adafruit/circuitpython/releases/latest). The name of the UF2 file for version 3.1.2 of CircuitPython is adafruit-circuitpython-circuitplayground_express-3.1.2.uf2. For each release of CircuitPython, there are many different uf2 files for different supported microcontrollers. Make sure that you download the file for the Circuit Playground Express device.
- Connect the USB cable to the Circuit Playground Express and the computer.
- Double-click the reset button located at the center of the board. If all goes well, you will see all the LEDs turn green; otherwise, there is most likely an issue with the USB cable being used. In some instances, if a double-click doesn't work, try a single click of the reset button.
- You will see a new disk appear called CPLAYBOOT:

- Copy the UF2 file into this drive.
- Once the UF2 file has been fully written to the device, the firmware will be updated and a new drive will appear, called CIRCUITPY:

Now, our Circuit Playground Express can be used.
How it works...
Traditionally, special software has had to be installed and used to handle the delicate process of flashing a microcontroller. Microsoft developed the UF2 method, which greatly simplifies the process by not requiring any special software or command-line execution to flash the microcontroller.
Once the board is placed into the bootloader mode, it will then expect a UF2 file to be saved to it. When the UF2 is copied to the drive, the microcontroller will detect that the file copy has been completed and then automatically proceed to flash the microcontroller and restart the device, at which point the device is reattached and ready to be used.
There's more...
The UF2 approach to flashing microcontroller firmware makes the process easier and faster compared to previous approaches. Not all MicroPython boards support the UF2 method and so require the more involved approach of installing special software to do the firmware flashing. The exact process and software required varies between different boards and manufactures.
When you use this flashing software, it will frequently require that you know the exact name of the serial device that the device appears as on your computer. The naming of these devices varies between Windows, Linux, and macOS. This type of software is usually required to be run in the Terminal, so you'll have to have some command-line knowledge to inter with it. For all these reasons, the use of UF2 with supported devices such as the Circuit Playground Express is the preferred way of starting your experimentation with MicroPython.
See also
There are a number of resources, both on the Adafruit and Microsoft websites, relating to the process described in this recipe. Here are a few references:
- Documentation of updating CircuitPython can be found at https://learn.adafruit.com/adafruit-circuit-playground-express/circuitpython-quickstart.
- The UF2 process is explained in more detail at https://makecode.com/blog/one-chip-to-flash-them-all.
Executing your first program
In this recipe, we will show you how to load your first program on the Circuit Playground Express and how to modify the program and reload it. The program will then light one of the ten NeoPixels that come available on the board.
Getting ready
Once the Circuit Playground Express has had the CircuitPython firmware flashed, you may load Python scripts onto the board and run them.
How to do it...
Let's have a look at how to do this:
- Make sure that the board is connected to your computer with a USB cable and that the CIRCUITPY drive appears.
- Save a text file on the drive with the following contents and name it main.py:
from adafruit_circuitplayground.express import cpx
import time

cpx.pixels[0] = (255, 0, 0)  # set first NeoPixel to the color red
time.sleep(60)
- Once the file has been saved, eject the drive, and remove and reconnect the USB cable from the computer.
- The first NeoPixel on the drive should light up with a red color.
- Open the main.py file in your text editor of choice and change the cpx.pixels[0] line to cpx.pixels[1]. Save the file. This change will make the second NeoPixel light up instead of the first.
- Eject the drive, remove, and then reconnect the USB cable to see the change take effect.
How it works...
When the device is turned on it looks for certain files, such as code.py or main.py, that, if found, will be executed as part of the startup process. In this way, you can specify the code you want run when the device is powered on. The script first imports the adafruit_circuitplayground.express library so that it can control the NeoPixels. The first NeoPixel is set to the color red by giving it a set of appropriate RGB values.
Finally, the script will sleep for 60 seconds so that the LED remains lit for one minute before the script ends execution.
There's more...
Now that the board has been loaded with a Python script, it can be disconnected from the computer and have the battery pack attached to it. Once the battery pack is powered on by the script, it should run and light up the selected NeoPixel.
This is a simple way to create portable and inexpensive projects that can have a code running directly from the board with no need for a connected PC and can be powered simply by three AAA batteries.
See also
There are a number of files that CircuitPython looks for when it boots up, which are described at https://learn.adafruit.com/welcome-to-circuitpython?view=all#naming-your-program-file-7-30.
Using screen to access the REPL
Linux and macOS have powerful Terminal emulators, such as screen, that can be used to directly connect to the device's Read-Eval-Print Loop (REPL) over a serial (USB) connection. This recipe will show how to connect to the REPL and start running a Python code interactively.
Getting ready
Either macOS or a Linux computer may be used for this recipe and may require the screen command to be available. On macOS, the Screen application is built-in and so requires no installation. On Ubuntu, the Linux Screen can be installed with the apt install screen command.
How to do it...
Let's have a look at how to connect the REPL and run the code:
- Open the computer's Terminal application.
- List device names before plugging in device by running ls /dev/ttyACM* on Linux or ls /dev/tty.* on macOS.
- Connect the board to your computer with a USB cable.
- List the device names again with the same command to discover the device name of the board.
- If the device name is /dev/ttyACM0, then the screen command would be screen /dev/ttyACM0 115200.
- Enter the command in the Terminal and start the Screen application.
- If Screen is able to connect successfully, the Python REPL should appear on the Terminal with output similar to the following text:
Adafruit CircuitPython 3.1.2 on 2019-01-07; Adafruit CircuitPlayground Express with samd21g18
>>>
- If the prompt doesn't appear, you can try pressing Ctrl + C and then press Enter, which will stop the currently running Python script and run the REPL with the following message:
Press any key to enter the REPL. Use CTRL-D to reload.
- Once the REPL prompt appears, we will have to test if the prompt is working by evaluating the 1+1 expression. It should produce the following output:
>>> 1+1
2
How it works...
The Circuit Playground Express exposes a serial device over the USB connection, which can be accessed by a number of different Terminal emulator programs. Besides screen, there are other programs, such as picocom and minicom, that may also be used.
The last parameter that was set as 115,200 in the command sets the baud rate of the connection, which should be set at that speed. Once the connection is successfully established, an interactive session is commenced that allows expressions to be directly evaluated on the device and the output is directly displayed on the Terminal.
There's more...
Many of the recipes in the book will introduce the different parts of a script using the REPL. This will give you a chance to get immediate feedback as you run each snippet of code. Once you've entered the different snippets in the REPL you can also use REPL features to assist in your experimentation with the code. You can use the up and down arrow keys to move through the history of commands that have been entered in the REPL. For example, if you had just executed a line of code in the REPL that turned on a specific pixel on the board, you could press the up key and change which pixel is lit up by editing the line and pressing Enter again.
See also
Here are a few references:
- The use of the REPL on CircuitPython boards is discussed in detail at https://learn.adafruit.com/welcome-to-circuitpython/the-repl.
- Details on using the REPL to access MicroPython can be found at https://learn.adafruit.com/micropython-basics-how-to-load-micropython-on-a-board/serial-terminal.
Using Mu to access the REPL
Mu is an easy-to-use graphical code editor written in Python that runs on Windows, macOS, Linux, and the Raspberry Pi. In this recipe, we will learn how to install Mu and use it to access the REPL on the Circuit Playground Express.
Getting ready
This recipe requires Python and pip to be installed on the computer. The Mu editor will be installed using the pip command, so this recipe can optionally be run within virtualenv.
How to do it...
Let's have a look at how to do this:
- Execute the following pip3 install mu-editor command to install the Mu editor.
- Run the mu-editor command to start the editor.
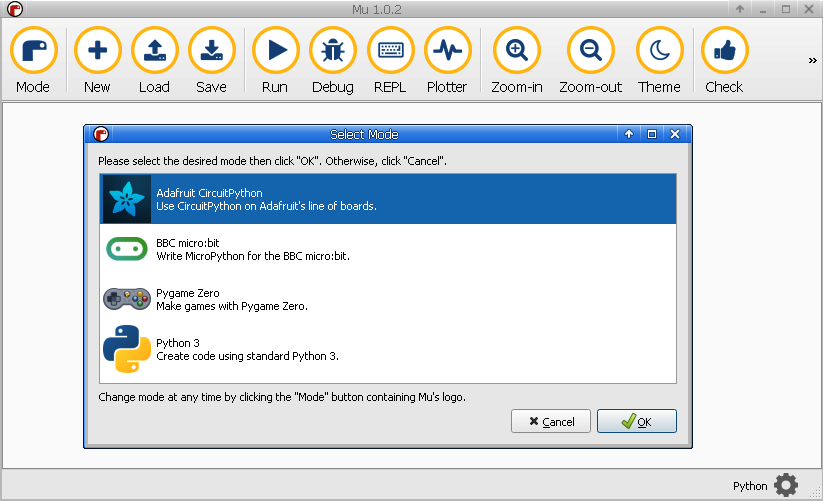
- The first time you run the editor, it will ask which mode it should run in. On the following screenshot, select the Adafruit CircuitPython mode:
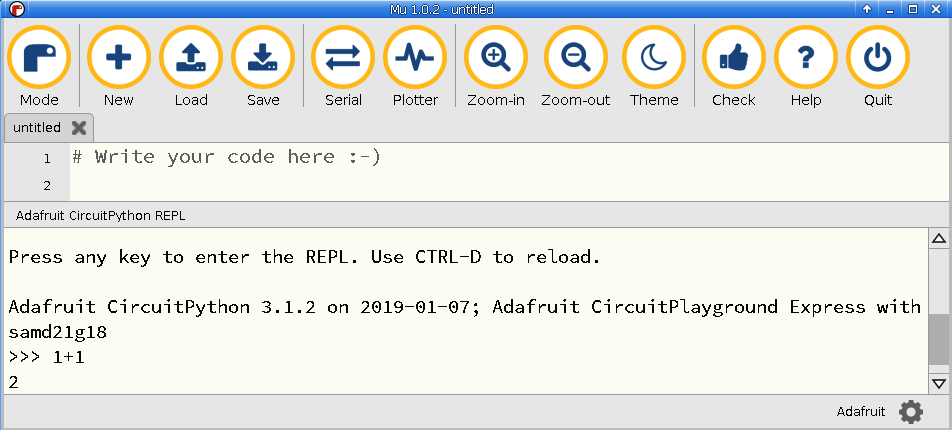
- Click the Serial button on the toolbar to open a REPL session with the device.
- On Linux systems, if a Cannot connect to device error appears, then exit the editor and start it again with the sudo /full/path/to/mu-editor command, where the absolute path to the editor is given.
- Once a connection is successfully made to the device, you can test the REPL by evaluating the 1+1 expression, which should produce output like the following screenshot:
How it works...
When you click on the Serial button in the Mu editor, it will attempt to open a serial connection to the board. If successful, it captures your input, sends it the device, and displays the output just as a typical Terminal emulator would.
The beauty of this application is that it works on all the major desktop OSes and automatically finds the correct device address without the need to manually specify it, as is required by your typical Terminal emulators. It also has a very simple and approachable layout, making it easy to use for first-time users to connect to microcontrollers.
There's more...
The Mu editor is a great graphical application to begin with when you first start working with MicroPython. Its simple and intuitive design makes it easy to get productive fast and makes it fun to explore its different features. Beyond its REPL features, it also has the main part of the Screen, which can be used to edit and save Python scripts. It has code-editing features such as code completion and will show helpful popups with details on a function's accepted arguments and documentation on what the function does.
See also
Here are a few references:
- The GitHub repository for the project can be found at https://github.com/mu-editor/mu.
- The projects homepage can be found athttps://codewith.mu/.
Executing commands in the REPL
The following recipe shows different ways that the REPL can be used.
Getting ready
Any one method can be used from the preceding two recipes here to obtain a REPL.
How to do it...
- Open the REPL through your preferred application.
- Many of the same capabilities provided by the REPL in CPython also work in the MicroPython implementation. The last returned value can be accessed with _:
>>> 2 + 2
4
>>> _ + 2
6
-
Continuation lines are also supported, making it possible to define functions or for loops through the REPL, as shown in the following output:
>>> def add(a, b):
...     return a + b
...
...
...
>>> add(2, 2)
4
>>>
- Arbitrary precision integers are also supported, even on constrained microcontroller hardware. The following code shows arithmetic with integers beyond the limit of a 64-bit integer value:
>>> 2**100 + 2**101
3802951800684688204490109616128
How it works...
The REPL implementation has most of the features that we've come to know and love in the CPython implementation. The MicroPython implementation has to deal with tough hardware constraints so that it can run on a microcontroller. But, even with these constraints, the end user experience of the REPL in both implementations is almost identical, making it an easy transition for Python developers.
There's more...
The REPL can be an invaluable tool when you want to experiment with certain MicroPython libraries or certain features on a device. It lets you easily import different Python modules and call functions provided by those libraries in a more direct fashion to discover how they will actually interact with the hardware. Many components on these microcontrollers can be fine-tuned for different project needs. The REPL frequently ends up being an ideal place to do this fine-tuning.
See also
Here are a few references:
- The MicroPython Interactive Interpreter Mode (REPL) is documented at http://docs.micropython.org/en/latest/reference/repl.html.
- Documentation on the MicroPython built-in types can be found at http://docs.micropython.org/en/latest/genrst/builtin_types.html.
Using the auto-reload feature
The following recipe shows how to use auto-reload so that the cycle of editing and running code can become much faster and more fun.
Getting ready
Any of the methods used in the previous recipes can be used here to obtain a REPL.
How to do it...
Let's have a look at how to do this:
- Open the main.py file and save the print('hi there') statement in the file.
- Open the REPL through your preferred application. With the REPL open, press Ctrl + D. The following output should appear:
Adafruit CircuitPython 3.1.2 on 2019-01-07; Adafruit CircuitPlayground Express with samd21g18
>>>
>>>
soft reboot

Auto-reload is on. Simply save files over USB to run them or enter REPL to disable.
main.py output:
hi there

Press any key to enter the REPL. Use CTRL-D to reload.
-
Edit the main.py file and change the contents to print('hi there again'). The following output should be automatically displayed:
soft reboot

Auto-reload is on. Simply save files over USB to run them or enter REPL to disable.
main.py output:
hi there again

Press any key to enter the REPL. Use CTRL-D to reload.
How it works...
By pressing Ctrl + D, the board will enter into auto-reload mode. In this mode, you can open the main.py file in your text editor of choice, and, the moment you save the file, the board detects that a change has happened and performs a soft reboot.
The soft reboot can be seen in the Screen output and then the new version of the code is executed with its output displayed immediately.
There's more...
It is quite common to start a script with a few basic lines of code to get the initial part of a script functioning. Once you have your first basic version running, you will go through many iterations to tweak and enhance it so that it behaves just the way you want it to. Beyond these tweaks, the inevitable bugs will appear in your code as you wrangle it into submission. The auto-reload feature will become your best friend during these intensive coding sessions as it will let you get results much faster and in an intuitive way.
See also
Here are a few references:
- The soft reset features of MicroPython are described at http://docs.micropython.org/en/v1.8.6/wipy/wipy/tutorial/reset.html.
- Documentation on leaving the REPL can be found at https://learn.adafruit.com/welcome-to-circuitpython?view=all#returning-to-the-serial-console-10-24.
Updating the CircuitPython Library
In addition to updating the firmware, there is also a rich set of Python libraries called the CircuitPython Library that can also be updated with the latest supported features.
Getting ready
Any of themethods used in the previous recipes can be used hereto obtain a REPL.
How to do it...
Let's have a look at how to do this:
- Open the REPL through your preferred application.
- Download the latest CircuitPython Library Bundle release (https://github.com/adafruit/Adafruit_CircuitPython_Bundle/releases/latest). The name of the bundle file is adafruit-circuitpython-bundle-3.x-mpy-20190212.zip. Since our firmware is using the 3.x release, we must select the bundle that is also for the 3.x release. Always use the mpy version, as this is optimized to use less disk space and has reduced memory usage.
- Extract the .zip file to a location on your computer.
- If the CIRCUITPY drive does not contain a lib folder, then create one now.
- Copy the contents of the extracted lib folder into the lib folder on the device.
- Perform a soft reboot in the REPL by pressing Ctrl + D.
- Run import simpleio in the REPL.
- If it has executed successfully, then the libraries have been successfully loaded, as the simpleio module is not part of the firmware and was imported from the library folder.
How it works...
The lib path that was created is one of the standard paths the CircuitPython will look in when importing Python packages. By adding Python packages to this folder, this makes it available for import by any scripts running on the device.
The mpy files are built from the original source py files and bundled all together in one package to make it easier to install.
There's more...
The CircuitPython Library is under constant development, so it's important to know how to update the library on the board so that you can get the latest features. As you experiment with code from projects you find on the internet, you might occasionally find examples that don't work on your board because you are running an outdated version of the CircuitPython Library. Keep your board to the latest version, as this can help prevent this from happening.
See also
Here are a few references:
- For more details on how the mpy files are created, check out the mpy-cross command at https://learn.adafruit.com/building-circuitpython/build-circuitpython.
- Information on installing the CircuitPython Library Bundle is available at https://learn.adafruit.com/adafruit-circuit-playground-express?view=all#installing-the-circuitpython-library-bundle-12-5.


![The Complete Python Course [Video]](https://static.packt-cdn.com/products/9781839217289/cover/9781839217289-original.jpeg)
