


This chapter covers the Configuring a Messaging Architecture part of the exam. It will introduce some of the basic concepts of the messaging architecture in BizTalk, and also give the reader an insight into configuring some of the core Adapters in BizTalk. Other areas in this chapter will be the publish/subscribe engine, port authentication, and some discussions about implementing messaging patterns.
In this chapter, the following topics will be covered:
The publish/subscribe mechanism
BizTalk Platform Settings
Ports
Core Adapters
Messaging patterns
Testing your knowledge
At its core, BizTalk is a publish/subscribe engine, nothing more nothing less. Whenever a message is received, BizTalk will look through all subscriptions and pass a copy of the message to all the subscribers, if any. The following are the three kinds of artifacts inside BizTalk that can subscribe to messages:
Send Ports
Orchestrations
Request-Response Receive Ports
If messages, for some reason, cannot be sent to one or more of the subscribers, BizTalk will store the message for resuming or later analysis as to why the message could not be delivered. When all subscribers have processed their messages, BizTalk will no longer need to hold on to the message, and the message will be removed from BizTalk. A new subscriber will not be able to subscribe to messages that have already been processed and delivered inside BizTalk.
The following model shows how the BizTalk publish/subscribe mechanism works:

The previous diagram shows a BizTalk Server Group. The BizTalk Server Group consists of at least four databases, which are as follows:
SSODB: This is used to store passwords and other configuration parameters that should be hidden from even administratorsBizTalkMgmtDb: This is a management database that is used to store metadata about the BizTalk Server GroupBizTalkDTADb: This is aTrackingdatabase that is used to store tracking information and actual messages of what has passed through BizTalkBizTalkMsgBoxDb: This is used for storing message parts, message metadata, subscriptions, and so on, which will be covered in detail later
First, BizTalk Server will receive a message through the Receive Port. A message is received in a Receive Port through one of the Receive Locations associated with the Port. A Receive Port contains one to many Receive Locations. Each Receive Location contains one Adapter and one Pipeline. Each Receive Port can hold any number of Maps, but no Map is required.
The Adapter, responsible for communicating with the various applications/protocols needed, receives or picks up messages or batches of messages, writes metadata to the Context (message metadata) of the message, and sends the message to the Pipeline.
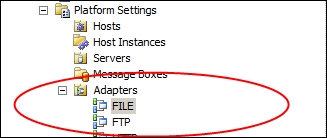
Some examples of Adapters are as follows:
FILE
FTP
SQL
HTTP
Web Service (WCF)
SAP
Third party
Custom build
The main purpose of the Pipeline, on the receive side, is to recognize the message type and transform the native format of the message into XML, if needed. Out of the box, two Receive Pipelines are available: PassThruReceive and
XMLReceive. Of these two Pipelines, only XMLReceive will recognize the Message Type, whereas PassThruReceive will send the message onwards to the MessageBox as an unknown type.
Some examples of native formats are as follows:
XML
Flat Files (comma separated values, positional, and so on)
EDI (X12, EDIFACT, and so on)
Excel *
PDF *
The Receive Pipeline will do parts or all of the following activities:
Decrypt the message if needed
Convert the native format into XML
De-batch the message
Promote properties (write metadata to the Context of the message)
Validate the XML message to a Schema
Resolve the sender of the message if signed (see more about this in Chapter 2, Developing BizTalk Artifacts – Creating Schemas and Pipelines)
The MessageBox is a SQL Server database where all messages received by BizTalk are stored, evaluated with all subscriptions, and sent to matching subscriptions.
The main purposes of the MessageBox are as follows:
Storing all subscriptions
Storing all messages (both bodies and Context) entering BizTalk
Storing all Host queues
Evaluating subscriptions
Distributing messages to the matching subscribers
Storing failed and awaiting messages
Whenever a message is received by BizTalk, the receiving message agent will store the message in the MessageBox. During the publishing of the message, the agent will check all the subscriptions inside the MessageBox with the Context of the message, and all matching subscribers will get a reference to the actual message in their respective Host queues. When all subscribers have successfully processed their messages, the message is no longer required in the MessageBox and it will be removed. The MessageBox also consists of all the subscriptions inside the BizTalk Group. Subscriptions are primarily made by Send Ports and Orchestrations; they will be discussed in the following section.
A subscription in BizTalk means that if certain parameters concerning the message are met, the subscriber will get a copy of that message.
A subscription could look something similar to the following pseudo code:
((Message Type = Order) and (Customer = HP)) or (Message Type = Invoice)
This would result in the subscriber getting all invoices entering BizTalk and also all orders from HP.
Subscriptions are made by Send Ports, Orchestrations, or Request-Response Receive Ports. If a Send Port subscription is met, the message will be sent through the Send Port to the target system/location. If an Orchestration activation subscription is met, a new instance of that Orchestration type will be initialized (read more about Orchestrations in Chapter 4, Developing BizTalk Artifacts – Creating Orchestrations). All the matching subscriptions will get a copy of the message, so a one-way message entering the MessageBox can easily have more than one subscriber, and therefore, be replicated to multiple subscribers.
We will further look into Send Port subscriptions in the Setting up a Send Port section later in this chapter.
When subscribing, it is not possible to subscribe to any content of the actual messages entering BizTalk, but only to what information is stored in the Context of the message. The message metadata is called Context Properties; on receiving the message, the Adapter, Pipeline, and Map will possibly add information to the Context.
Context Properties can either be Promoted or Not promoted. Properties that are promoted can be used for subscribing to the message. However, Not promoted properties cannot be used for subscribing to the message.
An Orchestration can receive messages from the MessageBox, based on its subscriptions. The subscriptions can either be an activating subscription (which will start a new Orchestration) or an instance subscription (which will deliver the message to an existing running Orchestration). If an Orchestration needs to send or receive messages during the execution, it will happen through the MessageBox, with the Orchestration submitting messages just as the Receive Ports and receiving messages similar to the Send Port.
When a message is sent to a Send Port, the process is almost reverse of what happened in the Receive Port, except that the location concept doesn't exist on a Send Port.
First, if Maps are applied to the Port, BizTalk will try to match the type of the message in hand with the source Message Type of the Map(s) on the Port; if a valid Map is found, it will be applied to the message.
This section talks about how the various BizTalk platform settings and Applications work and are configured.
In this section, we will look at the BizTalk Administration Console, which is used for managing and configuring the BizTalk Server and to deploy, manage, monitor, and troubleshoot BizTalk Applications.
The Group Hub window gives the user an overview of what is currently going on inside BizTalk.
To view the Group Hub window, open the BizTalk Administration Console and click on BizTalk Group.
A dashboard will appear where we get an overview of Applications that are currently running, how many running messages are currently in the MessageBox, and how many suspended messages there are.
An overview of the dashboard can be seen in the following screenshot:
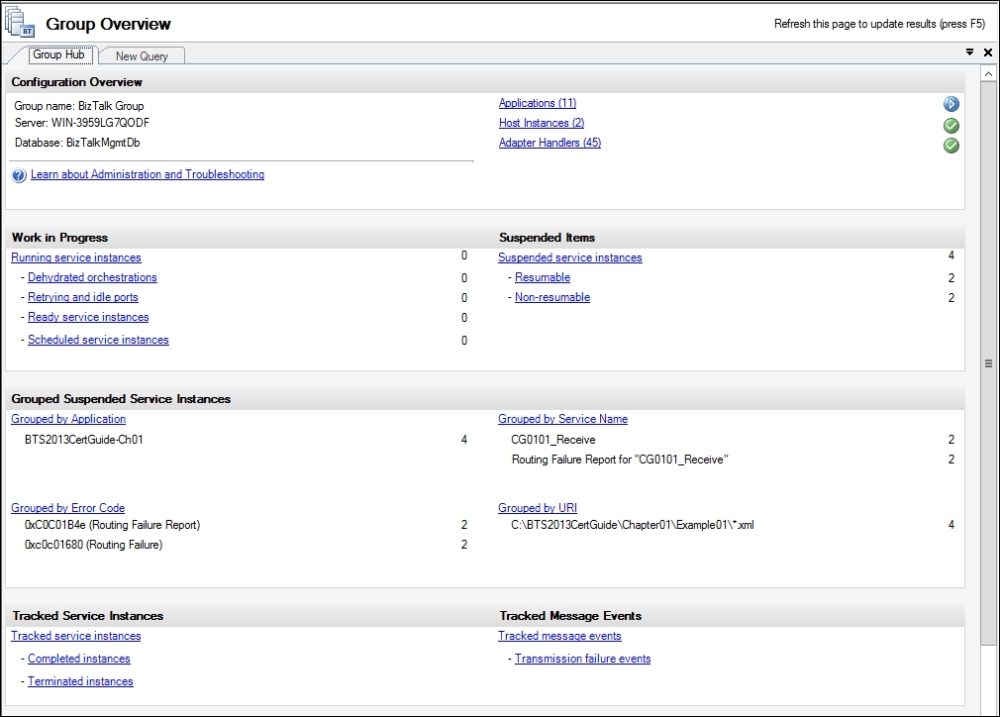
Work in progress should not be of any concern to us unless the amount of messages is large and keeps rising; in that case, we might have a bottleneck in one of the solutions that needs to be addressed.
Suspended Items, on the other hand, requires our attention, since they are messages that for some reason cannot be processed further.
Suspended Items fall into two categories:
For each BizTalk Group, multiple Hosts can be created. Creating a Host is merely creating a logical container where various BizTalk tasks can be assigned.
A Host can have a Host Type of either In-Process or Isolated.
The In-Process type is used for most BizTalk tasks and what In-Process means is that all the tasks performed in the Host will happen in an actual BizTalk process (Windows Service). The Isolated Host, on the other hand, will have its work done by someone other than BizTalk; for example, an IIS receiving service calls and processing the messages on its own. By using various BizTalk Modules, the IIS Host will run the received message through the same steps that would occur when using an In-Process BizTalk service, Adapter and Pipeline processing, and mapping and storing the message in the MessageBox.
Out of the box, the use of Isolated Hosts is limited to the following Adapters:
HTTP Receive
SOAP Receive
WCF-BasicHttp Receive
WCF-CustomIsolated Receive
WCF-WebHttp Receive
WCF-WSHttp Receive
What these Adapter Handlers have in common is that receiving the messages will happen through the IIS and not from a Windows Service (when BizTalk receives HTTP messages, the submitter will actually call a URL on an IIS residing on the BizTalk Server).
Each Host should have at least one corresponding Host Instance running. An In-Process Host Instance is nothing more than a Windows Service running on one or more BizTalk Servers and it performs the tasks assigned to the Host.
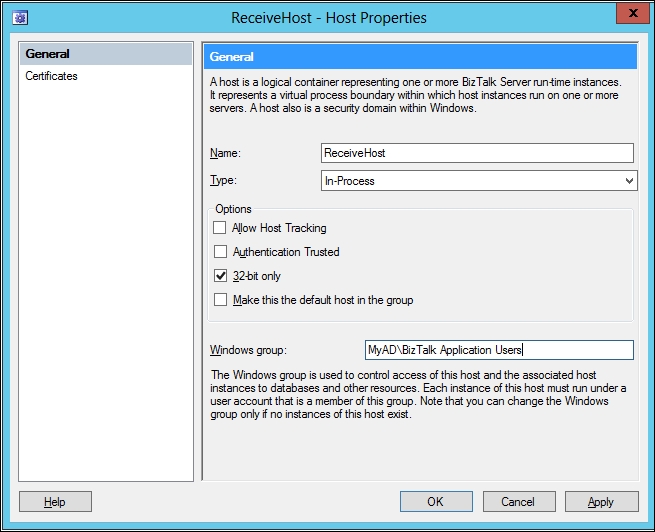
Creating a Host can be done through the BizTalk Server Administration Console by navigating to Platform settings | Hosts | New | Host. The following screen should appear:
Creating a new Host will result in a new entry in the Host table inside the Management database, and also create a new Host Queue inside the MessageBox.
There are a few parameters on each Host that should be taken into consideration when creating Hosts. The parameters are as follows:
Name: The name of the Host is not without importance. When moving a BizTalk Application from one environment to another by the use of Binding files, the naming of Hosts must be the same on each environment.
Type: This is either In-Process or Isolated.
Allow Host Tracking: This checkbox, if enabled, will allow the Host Instances associated with this Host to perform tracking tasks such as moving data from the
MessageBoxto theTrackingdatabase. Only one Host per BizTalk Group should have this feature enabled.Authentication Trusted: When a Host is set to Trusted, the identification of the initial sender of a message will travel together with the message. If the identification needs to stay with the message until the Send Port (possibly for the use of Single Sign-On credential control on the Send Port), all Hosts from receive to send needs to be Trusted.
32-bit only: This flag is enabled by default. If removed, the process will run as a 64-bit process, otherwise a 32-bit process.
Make this the default host in the group: Any BizTalk Group will always have one default Host. If this checkbox is checked and disabled, the Host is already the default Host.
Windows Group: This specifies a Windows Group that will be given access to all the Host queues tables created in the
MessageBox. It is recommended that all users running Host Instances under this Host are members of this group.
There can be several reasons for creating multiple Hosts inside a BizTalk environment. There is no Host setup recommendation that will fit all environments and some considerations will need to be made based on the actual environment and the specific requirements.
Here are a few general guidelines that we must follow:
As best practice, it is recommended to have at least five Hosts:
A Receive Host: This is used for all In-Process receiving.
An Isolated Host: This is used for all IIS receive.
A Processing Host: This is used for all Orchestrations.
A Send Host: This is used for sending of all messages.
A Tracking Host: This is a dedicated Host for moving data from the
MessageBoxto theTrackingandBAMdatabases. As this task can have a performance impact, the other Hosts should not be set to Allow Host Tracking.
When using Adapters that must run in a 32-bit process, 32-bit Hosts may be needed to be created on receive and/or send side to host the 32-bit only Adapters. Another approach could be to have the Receive Hosts and Send Hosts running in the 32-bit mode. If 64-bit processing is required (typically when receiving large messages), a 64-bit Host can be created for handling the tasks where 64 bit is desired.
Some Receive Adapters should not run in a multiserver environment such as FTP, POP3, and MSMQ. In these cases, a special Host for hosting these Receive Locations might be created and only run on one server. If High Availability is required, this Host should be clustered (see more about clustering Hosts in Chapter 6, Deploying, Tracking, and Administrating a BizTalk Server 2010 Solution).
Don't just make too many Hosts. The advantages of multiple Host Instances (Windows Services) on each BizTalk Server are that they will use their own processes, have their own queue, and so on. However, each service will also consume resources (such as memory), thus creating too many Host Instances that can have a negative impact. Therefore, we need to find a balance. If we have a small BizTalk Solution with few messages running through the BizTalk environment, chances are that performance will be fine by just using one In-Process Host for everything.
Unlike creating a Host, creating a Host Instance will happen on both the BizTalk Server and the BizTalk databases. A new Host Instance will result in a new Windows Service running on a BizTalk Server. Only one Instance of a certain Host type can be created on each BizTalk Server in the BizTalk Group. When creating a new Host Instance, we are presented with the following screen:
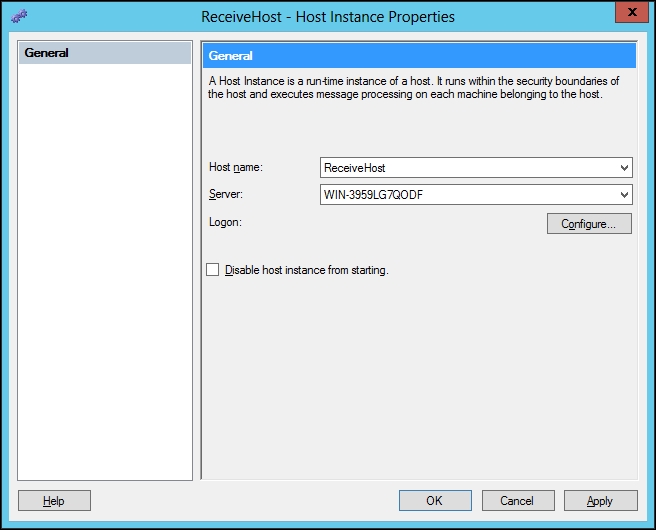
In the previous example, we are creating a new Host Instance of the Host type ReceiveHost on server WIN-3959LG7QODF.
After selecting the correct Host and server, click on Configure to specify which user the service should run as. This user will need access to the Host Queues/tables in the MessageBox, and the easiest way to grant the user these privileges is to add the user to the Windows Group that we associated with the Host when creating it.
If the recommendation of adding the user to the Host Windows Group is followed, the service will be able to do all the tasks needed towards communication with the MessageBox, but not necessarily with the outside world. The user running a Receive Location by using a FILE Adapter will be the user trying to access the source file folder, read the file, move/delete the file, and so on. When dealing with granting the BizTalk Host Instances access to various surrounding environments, the Host Windows Group and not the individual user should be used.
The following are the reasons for granting the required access to the group and not to the users:
It is usually recommended that only groups get permissions so that IT operators never have to deal with individual users, but rather just add and remove users from the relevant groups.
In a BizTalk setup, we might have three BizTalk Servers and therefore three different Host Instances of the same Host. These three Host Instances could be running under three different users. Now, let's say that we configure a FILE Receive Location to poll files from a certain folder and have it run under our Host. Any of the three Host Instances could now be getting the task of having to retrieve files from the folder, and therefore all three users need the correct set of folder permissions. If we make sure that all three users are members of the Host Windows Group and that the group is given the correct set of credentials, we needn't worry about anything else, and at some point, we might even add an additional BizTalk Server with a new Host Instance and a new user, who, as long as they are added as a member of the Host Group, will be able to access the folder immediately.
Each Adapter installed in the BizTalk Group has corresponding Receive and/or Send Handlers that are used to link the Adapter to a certain Host.
Managing the Adapter Handler is done through the BizTalk Administration Console, as shown in the following screenshot:
From BizTalk Administration Console, we can install new Adapters and add Receive or Send Handlers to Adapters.
In order to add a new Handler to an Adapter, click on Adapter and right-click somewhere in the blank space underneath the existing Handlers, or choose Actions | [Adapter Name] | New in the right pane of the window.
Each Handler will be the link between an Adapter and a Host. Only one Handler per Adapter and Host can be created, and only Hosts for which a Handler of the correct type exists can be chosen when choosing Adapters on either Receive Locations or Send Ports.
Some Handlers have the ability to have some basic properties configured that will be applied to all Adapter settings using that Host as default.
The SMTP Adapter is an example where we sometimes set up some basic configuration on the Handler level because these properties will often be the same for all Send Ports using the SMTP Adapter. These Handler properties can be overwritten on the specific Send Port if required, as shown in the following screenshot:
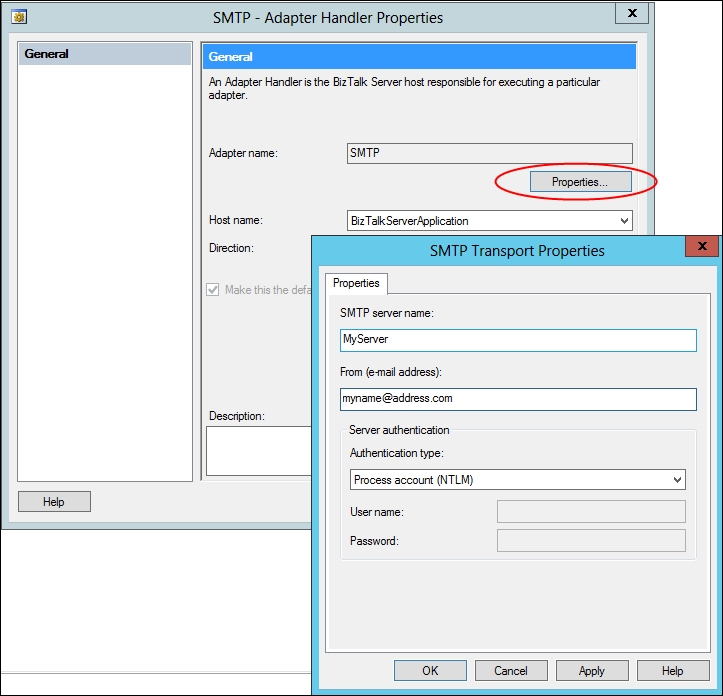
As shown in the previous screenshot, we can configure some general properties for all SMTP Adapter usage under the Host BizTalkServerApplication. For more information, see the SMTP Adapter section later in this chapter.
Applications are logical containers inside the BizTalk Server Administration Console, which allow us to group certain items together. The purpose of Applications is mainly to make planning, deployment, administration, and the general overview easier when working with BizTalk.
To create a new Application, perform the following steps:
Open the BizTalk Server Administration Console.
Right-click on Applications and choose New | Application.
Give the Application an appropriate name and click on OK.
When working inside an Application, we are only able to work directly with the other artifacts in that Application. For example, if we need to use a Pipeline in a Send Port, that Pipeline needs to be deployed in the same Application as the Port, or we need to make a reference to the Application which contains the Pipeline.
When making a reference to another Application, right-click on the Application that needs a reference to another Application, choose Properties, and perform the following steps:
Click on Reference, and then click on Add. We now get a list of all available Applications other than the current Application.
Choose the Application(s) you want to reference.
Click on OK twice.
Note
BizTalk.System is already referenced in all new Applications. As a result of this, we can work with several Pipelines as soon as the Application is created, even though these Pipelines are deployed in the BizTalk.System Application. The BizTalk.System Application is a read-only Application that can neither be deleted nor used for normal BizTalk activities, since no custom artifacts can be added to it.
Inside BizTalk, we have both Receive and Send Ports. Ports are entry points and exit points in and out of BizTalk. All messages entering BizTalk will be received through a Receive Port and almost all messages exiting BizTalk will be through a Send Port. Even if it is possible to send out messages directly through code inside an Orchestration, this will not be the correct approach very often.
Receive Ports are the entry points for messages that enter BizTalk. Each Receive Port contains one to many different Receive Locations (we can create Receive Ports without any Receive Locations, but that wouldn't make much sense since the Port would have no function).
To create a new Receive Port, perform the following steps:
Right-click on the Receive Ports folder in the Application where the Port should be created, and choose New | One-way Receive Port or Request Response Receive Port.
The same action can be performed in the Actions pane on the right when Receive Ports is selected.
In most routing scenarios, One-Way Receive Ports are used, and the use of Request-Response Receive Ports should be limited to flows where BizTalk exposes services, where an actual response message is required, or the consumer of the service needs to know if certain events have taken place before closing the connection to BizTalk. Read more about best practice later in this chapter in the Implementing messaging patterns section.
Next, we need to give a name to the Port, as shown in the following screenshot:

One way of making sure that only messages from known partners enter BizTalk is by using the Authentication feature available on Receive Ports, as seen in the following screenshot:
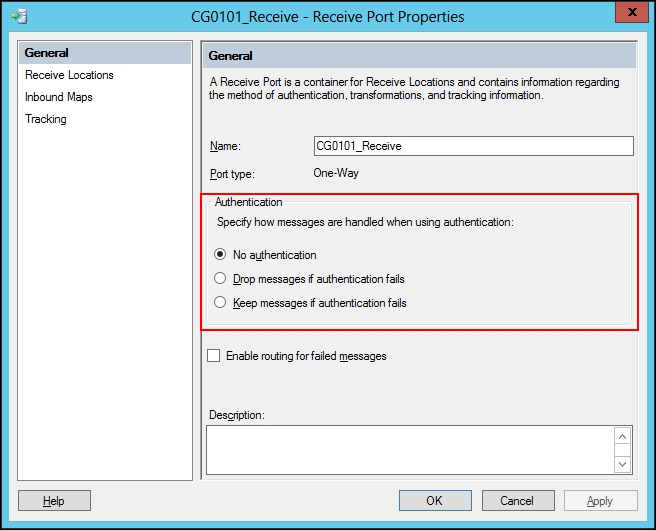
When using Receive Ports, we can set up filters so that only messages from known parties are allowed to pass through to the MessageBox. This will only work if messages are signed and we have the public certificates of the sending parties in store or if the Windows user who submitted the message can be located. There are three Authentication properties on each Receive Port:
|
Type |
Description |
|---|---|
|
No authentication (Default) |
All messages will be let through to the |
|
Drop messages if authentication fails |
If the party resolver does not match a valid sender from the message signature, the message will be thrown away and not submitted to the |
|
Keep messages if authentication fails |
If the party resolver does not match a valid sender from the message signature, the message will be suspended inside the |
As mentioned earlier, a Receive Port with no Receive Locations doesn't have any function. No messages can be received through that Port. So, for each Receive Port, at least one Receive Location should be created and configured.
The reason for having multiple Receive Locations inside one Receive Port is to have the ability to receive different messages from different locations and having BizTalk treat them as if they were received from the same place and/or had the same message type.
To make a new Receive Location, you can create it from within an already created Receive Port, as you can see in the following screenshot:
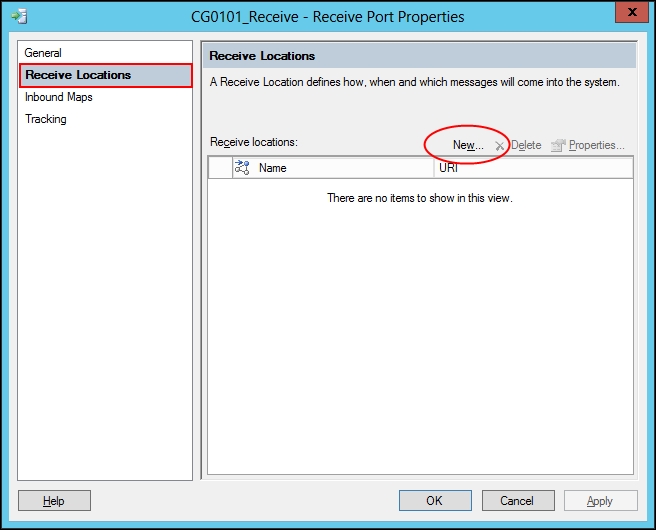
Another option is to right-click on the Receive Locations folder in the Application and choose New | One-Way Receive Location or Request-Response Receive Location. As for Receive Location types, only One-Way Receive Locations can be added to a One-Way Receive Port, and only Request-Response Locations to a Request-Response Port.
If a Receive Location is created directly, the console will prompt for a parent Receive Port before we can configure the location, since all locations must be a part of one specific Port.
Choose the appropriate Receive Port; click on OK, and the Receive Location configuration will appear.
Just as Receive Ports, Receive Locations need to be supplied with a name. Also, a type (Adapter) needs to be selected and configured, a Receive Handler (Host) needs to be selected, and finally, a Pipeline needs to be chosen. Read more about Pipelines in Chapter 2, Developing BizTalk Artifacts – Creating Schemas and Pipelines.
Each Receive Location can be scheduled to only operate at certain times.
On the Schedule page inside the Receive Location, Start date, Stop date, and Service Window can be applied, as shown in the following screenshot:
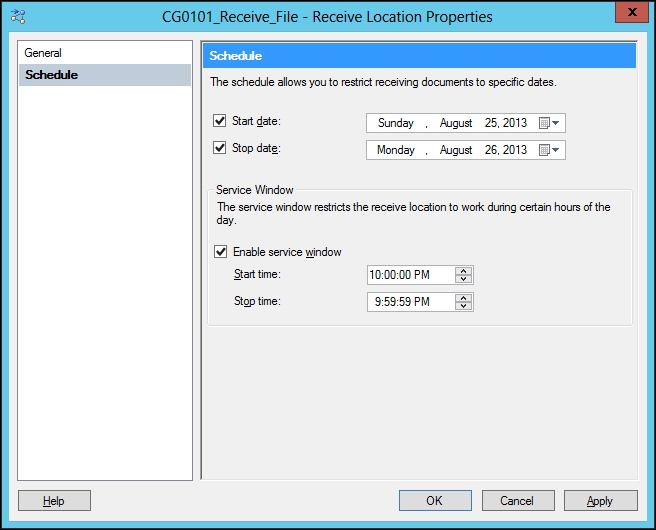
As seen in the previous screenshot, each of the three parameters can be enabled or disabled, and each enabled time period will limit the time the Receive Location is enabled for receiving messages.
A Receive Location can have two different states, enabled or disabled. If the location is enabled, it will receive any available messages; if disabled, no messages will be received.
Enabling a Receive Location can be done by right-clicking on it inside the BizTalk Administration Console and choosing enable. It can also be done through code script or PowerShell.
The state of a Receive Location is merely a flag inside the Receive Location table in the Management database of the BizTalk Group. It has nothing to do with whether or not the Host Instances (Windows Services) are running. Therefore, a Receive Location will only pick up messages if it is enabled, and at least one instance of the Host type it is using is running.
If errors occur in a Receive Location (for example, access denied in a file folder, logon failure to a database, and so on) when trying to pick up messages, the Host Instance will start to write warning entries in the Event Log. At some point, the error threshold (this differs for different Adapters) might be reached and the Receive Location will become disabled. If a Receive Location becomes disabled, it will not start itself again automatically, but instead it will write an error message in the Event Log on the BizTalk Server where the final unsuccessful try occurred, and therefore monitoring the Event Logs on all BizTalk Servers is critical. A disabled Receive Location results in no messages being received by BizTalk.
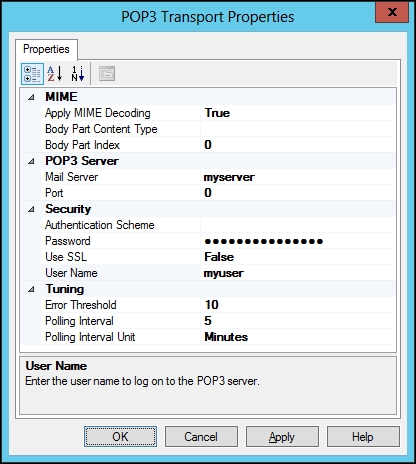
Let's say that we were polling mails from a mail server by using the POP3 Receive Adapter. The following screenshot shows the Error Threshold attribute for the POP3 Adapter:
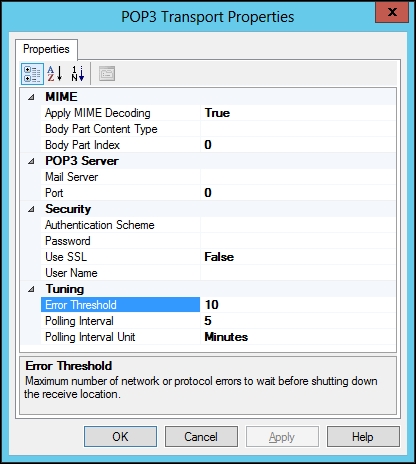
When setting up the Adapter, we are asked for the values of Polling Interval and Error Threshold. If set to 5 and 10, as seen in the preceding screenshot, the following consequences would occur if the Receive Location started failing:
BizTalk will poll mails every five minutes. At some point, the mail server becomes unavailable and the process of logging on and retrieving mails starts failing.
The first time BizTalk unsuccessfully tries to access the mail server, it will write a warning in the Event Log stating that it wasn't able to connect to the mail server and that it will try again later.
The second try will be five minutes later and unless the mail server becomes available again, this will go on for an additional seven times.
When the last retry occurs, BizTalk will no longer retry and therefore it will stop the retrying scenario by disabling the Receive Location, writing an error to the Event Log stating that the number of retries were reached, and leave it to the administrators to fix the problem and enable the Receive Location again.
When configuring the various Receive Locations, we need to find a balance between how many retries (error threshold) we want. If we have an unstable environment, such as an FTP Server, residing somewhere outside our control with multiple unscheduled service windows and general unavailability, it might be tempting to increase the error threshold to 9,000 or similar. This way we can have long periods of unavailability, and when the FTP Server eventually comes back online, we don't risk the Receive Location having shut down.
This might not be the best of approaches, since it is likely that the people monitoring BizTalk will only look at errors and not warnings in the Event Log, so nobody will notice that we are not polling data from the source if something more critical happens (such as our password expiring). In that case, we will not be notified until all 9,000 attempts fail and the Receive Location, after possibly months, eventually shuts down.
Receive Port Maps are applied to a message after the message leaves the Pipeline; at which point all messages should be in the format of XML. This is important, since Maps can only take XML as input and also because a Map will always output XML.
Maps can only be applied if the Pipeline has discovered the message type of the incoming message (this will happen automatically unless the PassThruReceive Pipeline or some other custom Pipeline with no Disassemble stage is used). For more information on Pipelines, see Chapter 2, Developing BizTalk Artifacts – Creating Schemas and Pipelines. If the message type is not known by the time the message leaves the Pipeline, no Map will be applied, even if a Map matching the message is present on the Port.
The matching of a Map works as follows:
If the message type was discovered and promoted by the Receiving Pipeline, BizTalk will look for a Map with a source type matching the message type. If such a Map is found, it will be executed and the source message will be mapped using that Map.
It is also worth mentioning that after a Map has been executed on a Receive Port, an XML Disassemble Pipeline Component is executed against the output XML. This is why we can promote properties on the destination Schema of a Map executed on the Receive Port and still have the properties promoted before the message is submitted to the MessageBox. Also, not more than one Map will be executed even if a map-chain exists. The following example will explain this:
On a Receive Port (PortA), we have applied three different Maps:
MessageA_to_MessageU
MessageB_to_MessageU
MessageU_to MessageI
If we receive Message A (and the message type is discovered in the Pipeline), the message will be transformed to Message U. But after that, the message exits the Port, no additional Map discovery will be done, so even though we may want Message A to be transformed first into message U and then into message I, this will not happen. The same goes for Message B, and only if we submit a message U will the Map (MessageU_to_MessageI) be applied.
Maps are applied on Receive Ports by selecting Properties on the Port and then selecting Inbound Maps, as shown in the following screenshot:
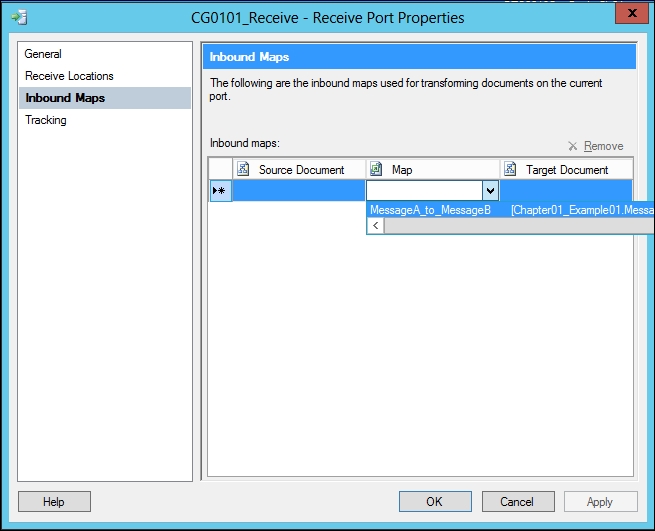
Under the Map section, use the drop-down list, then all Maps deployed in the Application (or Applications that are being referenced) should appear. Choose the Map(s) to be applied on the Receive Port; remember that multiple Maps can be selected.
Unlike Receive Ports, Send Ports do not operate with locations. Each Send Port will point to a specific location, database, application, service, and so on, somewhere outside of BizTalk. Just as the Receive Location, a Send Port uses one Pipeline and one Adapter so that the desired message format and Protocol is used for transporting the message to the target destination.
In order to create a new One-Way Send Port, click on Send Ports inside the desired Application and choose New | Static One-Way Send Port.
When creating a new Send Port, at least three properties need to be selected and, in some cases, configured.
First, we need to supply the Send Port with a name. A type (Adapter) also needs to be selected and configured. Next, we can choose a Send Handler (Host) if we don't want to use the default Host. Finally, if the default Pipeline is not adequate, a Pipeline must be chosen and configured.
In Transport Advanced Options, several common parameters can be configured in the Send Port.
The transport options consist of three parameters:
|
Retry count |
The number of tries the Send Port should try to resend the message on failure before giving up and suspending the message in the |
|
Retry interval |
The number of minutes to wait between the retries in case of failure |
|
Priority |
The priority given to the Send Port subscription (1 being the highest and 10 the lowest); the higher the priority, the faster the Send Port will get messages it has subscribed to from the Host Queue |
Retry on a Send Port is a bit different from Receive Locations. First of all, the behavior is per message and the Port will never disable itself after any number of retries has been exhausted, but rather suspend the message.
What the Send Port does is try to send each message it receives the number of times specified in the Retry count parameter, with an interval specified in the Retry interval parameter. When the number of retries has been exhausted, the message will be suspended and an error will be written to the Event Log. (Just as the Receive Location, the first failure(s) results in warnings in the Event Log; only the final try, that also causes the suspension of the message, will result in an error).
Each Send Port created can have a scheduled service window in which messages will be sent through the Port. The setup is done under Transport Advanced Options, which is shown in the following screenshot:

Similar to Receive Locations, certain operation periods can be set up on a Send Port. We can specify a period within the day, where messages should be sent through the Port. At all other times, all messages going to the Port will be queued up inside BizTalk, and when the Operation Window opens, all the queued-up messages will be sent.
The term service window might be a bit confusing. Normally, a service window is a time period where maintenance is going on, and therefore a period where no messages should be sent to the system. However, in this case, the service window is the time where messages are actually sent through the Send Port.
Each Send Port can have a backup transport configured, where an alternate Adapter and/or address can be selected so that if the primary target has exceeded its retry counts, the Send Port will try to send the message to an secondary location.
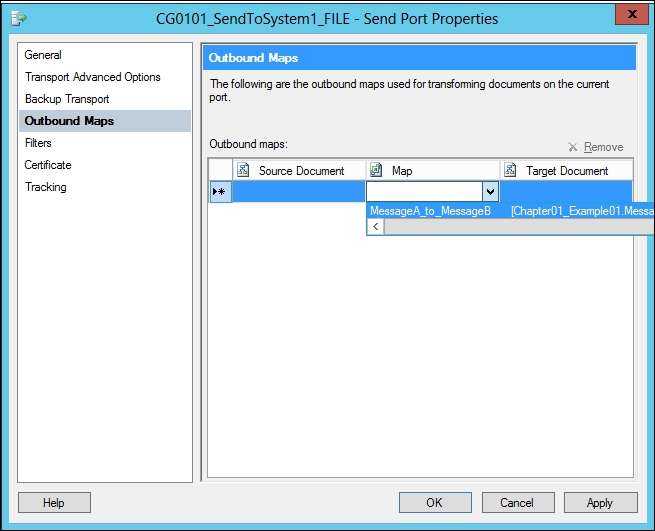
Just as Receive Ports, multiple Maps can be applied to the Send Ports in order to transform the messages being sent from the MessageBox to the target format requested by the target system or the format required for the Pipeline to proceed. Also, multiple Maps may be applied to the Send Port, but only one of them will be used, and only if the message type is known by BizTalk at the time the message is sent from the MessageBox to the Send Port.
To apply Maps to Send Ports, open Send Port properties and click on Outbound Maps, as shown in the following screenshot:
Inside the Filters page, it is possible to set up subscriptions for the Send Port. The filters can be a combination of several Boolean expressions and include a combination of promoted properties, operators, and values. Only promoted properties deployed through Property Schemas in the BizTalk Server Group will be selectable in a filter.
The following screenshot shows how to set up a subscription on a Send Port:
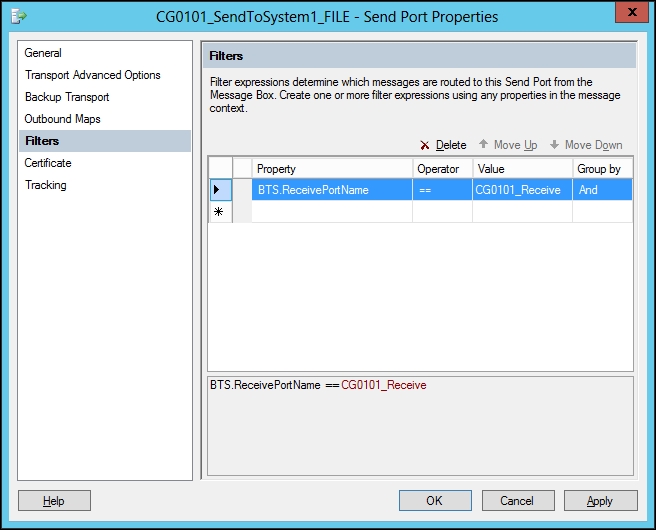
The example in the previous screenshot will subscribe to all messages that come from the Receive Port CG0101_Receive.
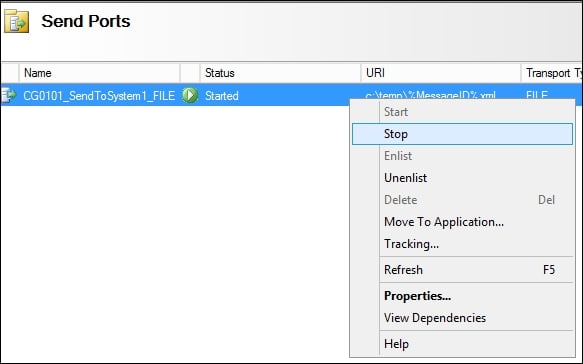
A Send Port can have the following states:
Started: The Send Port will be getting messages that match its subscriptions and send them to the target system, if it is not outside the service window.
Stopped: The Send Port will be getting messages that match its subscriptions, but the messages will reside in a Send Port queue inside the
MessageBoxand not be sent through the Send Port until it is started.Unenlisted: The Send Port does not subscribe to any messages and no messages will be sent through the Port. The Port will not be able to get messages that are already received in the
MessageBoxlater on. This behavior is similar to the instance of the Port not being created all together.
Port states can be changed by right-clicking on the Port inside the Administration Console, as shown in the following screenshot:
Tip
Note that if we right-click on an Unenlisted Port, the state will be named Enlist and not Stop in the menu.
The Stopped state will queue up all messages for the Send Port, and when the Port is started again, all messages will be sent immediately through the Send Port (if no service window is configured). This might not always be what is desired, especially not if the Port was stopped due to some configuration error in BizTalk or on the target system, resulting in messages failing upon arrival at the target. In that case, sending 100 messages all at once, when we think the problem has been resolved, might not be the best approach.
If we just want to send one of the 100 messages currently lying in the MessageBox waiting for the Port to be started, we can go to the Group Hub window, find the 100 suspended messages, and resume just one of them while the Port is still in the Stopped state. This will force the one message to be sent through the Send Port even though the state is still set to Stopped; on acceptance that the problem is gone, we can then start the Port and the last 99 messages (or more if more messages have arrived in the MessageBox) will be sent automatically through the Port.
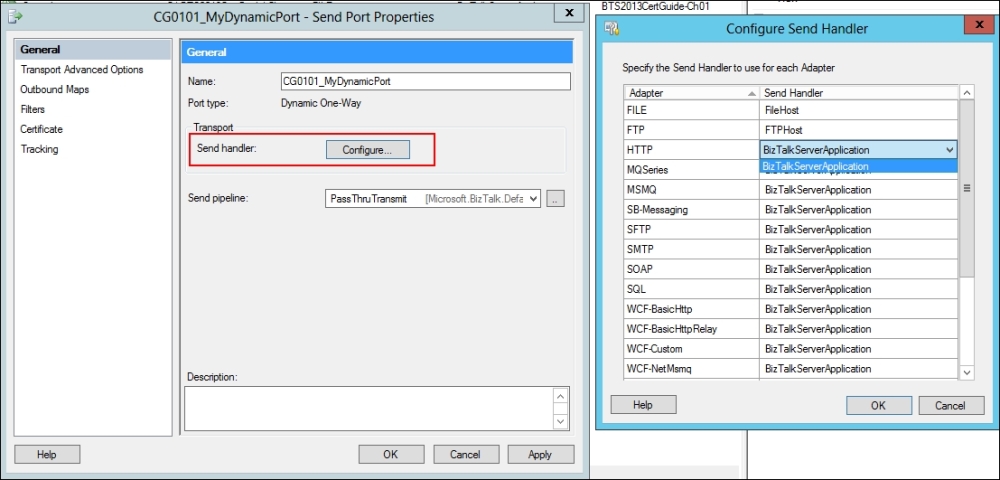
Dynamic Send Ports differ from Static Ports as their Adapter and/or address is not configured and hardcoded on the Port. Both protocol (Adapter) and address can be set from inside BizTalk (from either Orchestrations or Pipeline components), and therefore, the Port can send messages to different locations using different protocols (SMTP, FTP, and so on).
They are often used for SMTP because an SMTP Send Port often requires sending mails to different addresses that might be located somewhere in the message. This is not possible with a static Send Port, which will always point to the same address (as well as all other static Ports using any type of Adapters). So, to solve this problem, Dynamic Ports can be used.
In BizTalk Server 2013, a new Handler configuration has become available. It is now possible to choose individual Handlers (Host) for each Adapter type, so even though the actual Adapter is not known at configuration time, potential Handlers can still be chosen, as shown in the following screenshot:
Dynamic Ports are usually combined with Orchestrations and will be discussed further in Chapter 4, Developing BizTalk Artifacts – Creating Orchestrations.
Send Port Groups are logical subscription containers, where one or more Send Port can join the subscription of the group. A Send Port can be a part of multiple Send Port Groups, and also have its own local subscription, and can therefore have multiple subscriptions.
Send Port Groups are created by right-clicking on the Send Port Group folder inside an Application and choosing New | Send Port Group. You are then presented with the following screen:
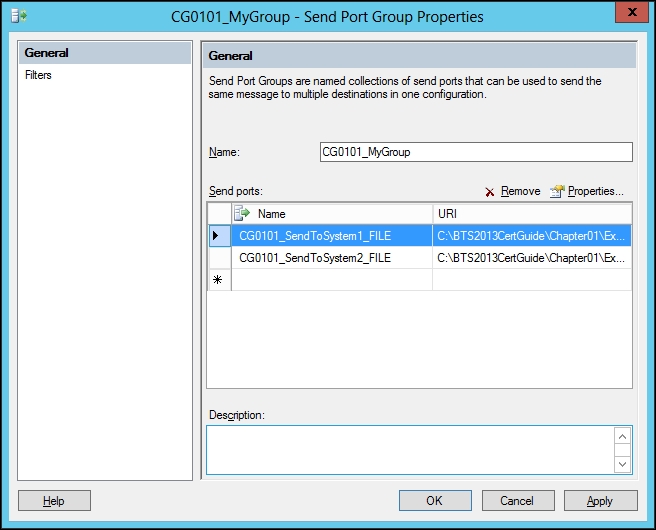
Inside the Send Port Group configuration, we can configure Filter and Send Ports that should be a part of the group subscription.
It is possible to enable routing for failed messages on both Receive and Send Ports. What this will do is, in case of an error occurring in the Port (could be either the Pipeline throwing an error, mapping failure, or a Send Port that is not able to send to the target system), the message will have all the normal Context Properties unpromoted (written) and instead have some error-specific Context Properties promoted (all in the ErrorReport namespace).
The examples of Error Context Properties are ErrorReport.ErrorType and ErrorReport.ReceivePortName.
A Send Port or Orchestration can then subscribe to these error properties and deal with the errors in some way.
To set up failed message routing on a Receive Port, go to the properties of the Port, on the General tab, and enable the Enable routing for failed messages checkbox.
To set up failed message routing on a Send Port, go to the properties of the port and on the Transport Advanced Options page, enable the Enable routing for failed messages checkbox.
See more about Failed Message Routing in Chapter 5, Testing, Debugging, and Exception Handling.
Ordered delivery might not come as easy as one might think in BizTalk. Only a few Receive Adapters are able to provide true ordered delivery out of the box.
For example, we receive files during the day from a file drop location. Our ERP system has requested that it receives all files in the same order as they were submitted to the file folder, because receiving data in the wrong order could potentially cause inconsistent data.
Let's think of BizTalk as a post office. If one customer has asked the mailman to deliver today's letter in exactly the same way he received the letters in the mailbox on the street, the mailman immediately faces a problem. He can give the customer the letters in the same order that he got the letters out of the mailbox, but that is not necessarily the same order that they were put into the mailbox. The same is true for BizTalk. We are able to send messages through a Send Port or to an Orchestration in the same order as they were submitted to the MessageBox, but that order might not be the same order that the original submitter intended.
Let's consider the file drop example. The FILE Adapter, just as many other Adapters, might not submit the messages received in the same order as one might intend/expect. The FILE Adapter doesn't look at timestamps, file sizes, or even filenames when choosing which file to process first. There could also be more than one Host Instance receiving batches of files at the same time from the same folder and submitting them in the same MessageBox. In other words, if BizTalk is started and two files are present at a certain file location, we have no way of knowing if the oldest file is taken first, and therefore have no certain way of making a total first in first out (FIFO) scenario using the FILE Receive Adapter. In fact, this is true for most of the BizTalk Receive Adapters, and out of the box, only the message queue Adapters (MSMQ, MQSeries, and WCF-NetMsmq) support true ordered delivery. Some database Adapters and WCF Service Adapters can be set up to implement ordered delivery, but only with certain limitations such as only one Host Instance.
On the receive side, it is based on the different protocols (Adapters) if ordered delivery is supported or not. For the very few Adapters that do support it (mainly MQ), it can usually be enabled on the Receive Adapter.
Each Send Port can be set up to use ordered delivery. Setting a Send Port to ordered delivery means that all messages will be sent through that Port in the same order as they were received in the MessageBox. If messages are not received in the MessageBox in the order intended, which was discussed before, using ordered delivery on a Send Port might not have the desired result.
Using ordered delivery on a Send Port has some serious performance impacts, since only one thread can submit messages through the Port, and each message has to wait for the message ahead to complete before it can be processed. This can be both an advantage and a disadvantage. The disadvantage is obvious; BizTalk will perform slower when using ordered delivery.
In some cases, however, this might turn into an advantage. If, for instance, a Send Port calls a service that cannot handle multiple calls, we might experience a lot of messages going into a retry or even fail state, because the amount of messages being sent to the service is exceeding the amount of messages the service can handle. In this case, it could make sense to introduce ordered delivery to the Send Port, not because we necessarily need the messages to be sent in a certain order, but merely because this will result in BizTalk sending only one message at a time.
To set up ordered delivery on a Send Port, go to the properties of a Send Port (either by double-clicking on Send Port or right-clicking and choosing Properties).
Go to the Transport Advanced Options page and enable Ordered delivery, as shown in the following screenshot:

When enabling ordered delivery, an additional setting, Stop sending subsequent messages on current message failure, will become active. This means that if 10 messages are currently queued up to be sent through the Sent Port (message 1 to 10), and message 3 fails, the rest of the messages (4 to 10) will get suspended together with message 3. If true ordered delivery is required, this option should be enabled, simply because if it is not, the solution is not 100 percent ordered delivery. On the other hand, if ordered delivery is nice to have, but not vital for the solution, or we are simply using ordered delivery to slow down the Send Port, then the option should be disabled.
When choosing an Adapter on both Receive Locations and Send Ports, the Adapters need to be configured. To do this, choose the Configure button, as shown in the following screenshot:
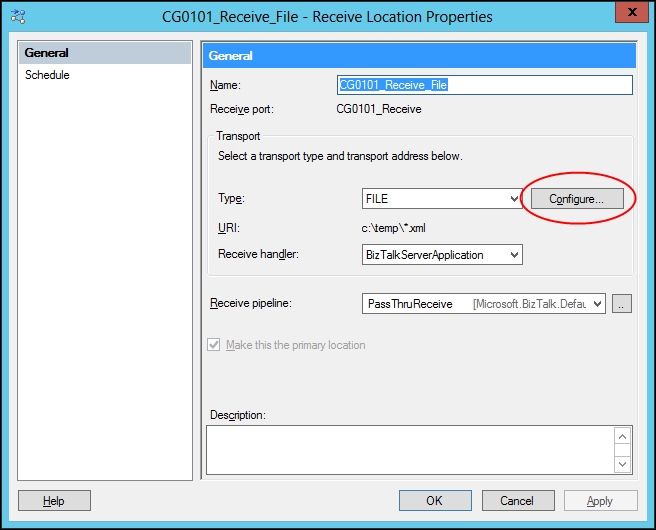
What will appear next depends on which type of Adapter was chosen. In this chapter, we will look at some of the core Adapters and how they are configured.
The HTTP section will discuss the use of the HTTP Adapter in both receive and send scenarios.
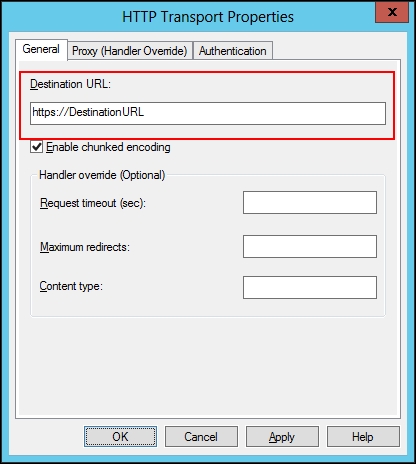
When configuring the HTTP Send Adapter, the URL (Destination URL) of the target HTTP site needs to be configured. The following screenshot shows the basic configuration, and the Destination URL being configured:
Setting up BizTalk to receive HTTP requires more work than sending HTTP. To be able to receive HTTP, we need to use the local Internet information Services (IIS) and have it receive the actual message for us by using an Isolated Host.
First, we need to add BTSHttpReceive.dll. This file is found in the %Program Files%\Microsoft BizTalk Server 2013\HttpReceive64 folder (HttpReceive folder if not using a 64-bit IIS). This DLL needs to be added as an extension inside the IIS. Open the IIS Manager by navigating to Start | Administrative Tools | Internet Information Services(IIS) Manager, click on the computer name and double-click on Handler Mappings. In the action pane on the right-hand side of the window, choose Add Script Map. The following screenshot shows the Add Script Map window:
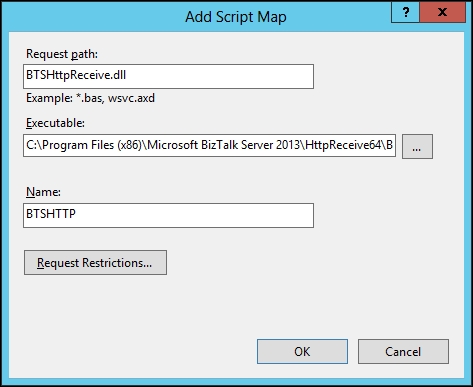
In the Request path field, type BTSHttpReceive.dll. In the Executable field, choose the BTSHttpReceive.dll file from within program files and give the mapping a proper name. Now click on OK.
Click on Yes in the Add Script Map dialog.
Now, we need to perform the following steps for creating a Virtual Directory containing BTSHttpReceive.dll, as mentioned earlier:
Right-click on the Default Web Site folder and select Add Virtual Directory.
Set the Alias property to the name we want the callers of our HTTP service to use in the URL (
http://servername/Alias/BTSHTTPReceive.dll).Under Physical Path, choose the folder where the
BTSHTTPReceive.dllfile is located (underProgram Files) and click on OK.
Next, we need to set up an HTTP Receive Location. The HTTP flow we are receiving in BizTalk can be both One-Way or Request-Response (refer to the Implementing messaging patterns section).
When configuring the HTTP Receive Adapter, we need to specify the Virtual Directory and the DLL extension, as shown in the following screenshot:
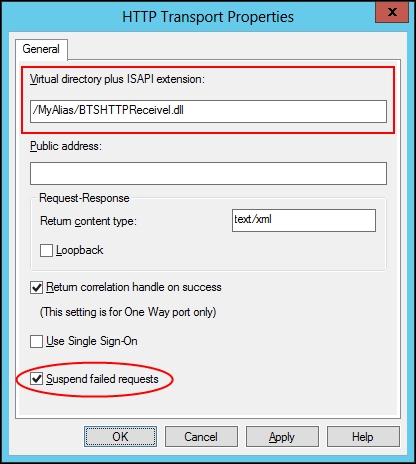
In most cases, the Suspend failed requests option should also be enabled. What this option does is gives BizTalk the responsibility of processing the message as soon as it has been submitted. If this option is not enabled (default), the caller will get an error back if the message could not be processed correctly (the Pipeline fails, no subscribers were found, and so on). This could be a valid setup, but in most situations it would make more sense to have the HTTP Receive Adapter handle errors the same way as a FILE Adapter, by taking responsibility for the message as soon as it is submitted, and not bother the caller with any problems inside BizTalk, but rather suspend the message and deal with the problems internally and let the caller believe that everything processed as expected. This is, of course, only the case of one-way HTTP calls.
The POP3 Adapter is used to receive e-mails. The Adapter is a receive-only Adapter because sending something through POP3 doesn't make any sense. The send equivalent of POP3 is usually SMTP, which we will look at in the next section.
Note
Under certain conditions, the POP3 Adapter will not run under a multiserver setup, and in these cases, the use of clustering Hosts might be needed. Read more about this at http://msdn.microsoft.com/en-us/library/gg634567.aspx.
The following screenshot shows the configuration of the POP3 Receive Adapter:
We need to set up Mail Server (from which the messages can be retrieved), User Name, Password, and Body Part Index.
The Body Part Index attribute is used to choose what part of the mail will be considered as the actual message inside BizTalk. 0 is the message body, 1 is the first attachment, 2 is the second attachment, and so on.
Note
Note that if Body Part Content Type is set to a specific content type, the algorithm for choosing which part of the mail to use is a bit more complex. For further information, visit http://msdn.microsoft.com/en-us/library/aa560251(v=bts.80).aspx.
The SMTP Adapter is used for sending e-mails.
To set up the SMTP Adapter, it is often a good idea to configure the general server credentials inside the STMP Send Handler (refer to the Managing Adapter Handlers section).
The following screenshot shows the configuration screen of the SMTP Send Handler Adapter:
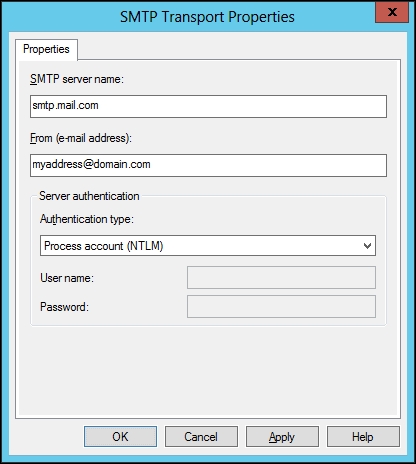
On the Send Handler, the SMTP Server name and From (e-mail address) can be configured since they will likely be the same for all SMTP Send Ports. These parameters can be overwritten on a single Send Port, if required.
When configuring the actual SMTP Adapter on a Send Port, perform the following steps:
In the General tab, type the desired e-mail address in the To: field. Also, give a subject to the e-mail and, if needed, specify a CC address.

In the Compose tab, choose either the BizTalk message body part option as the e-mail body or the Text option for standard text.
Choose Attach only body part to have the actual message as an attachment.
Use the Handler Override options if the SMTP Server setup in the Adapter handler should be overwritten.
The FTP Adapter can be used for both receiving and sending messages in BizTalk. On the receive side, only single Host Instance server set up is allowed.
When configuring the FTP Adapter, there are some basic features that apply to both sending and receiving, as shown in the following screenshot:
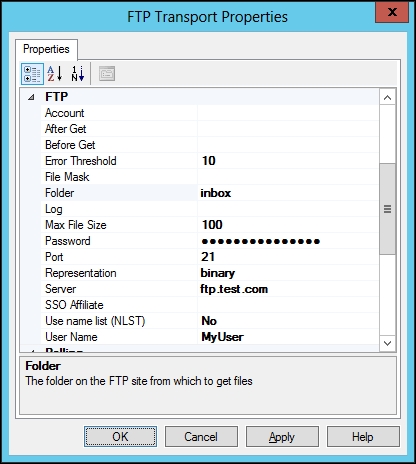
For all FTP configurations, at least the following four parameters should be configured:
When using basic configuration, the FTP Server will delete the files when they are processed so that the same files are not processed more than once.
However, this might not always be the desired functionality since we might not be allowed to delete the files. The server could be holding files that are not just for us, but published for many subscribers.
In order to overcome this issue, new polling features have been introduced in BizTalk Server 2010, and are still available in 2013, which are shown in the following screenshot:
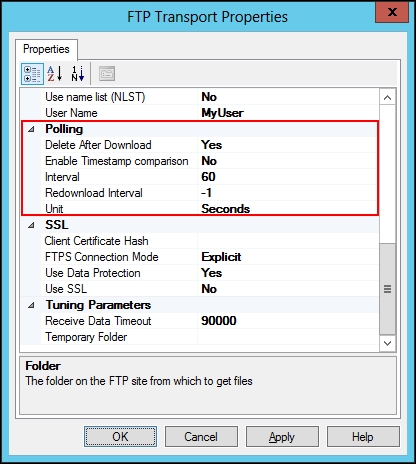
It is now possible to change the Delete After Download attribute on the FTP Receive Adapter from Yes to No. By doing this, BizTalk will keep track of which files have already been downloaded, and the same files will not be downloaded again even though they are still on the FTP Server. If existing files are edited and overwritten on the FTP Server, and we want a new copy when changes happen to the files, we should also set the Enable Timestamp comparison attribute to Yes. By doing this, we will not only get new files once, but also a fresh copy of any file that has been overwritten on the FTP Server.
The interval (60 seconds in the previous example) should also be taken into consideration when setting up the receive FTP. This is an indication of how often BizTalk will look in the FTP folder for new messages. If set too often, we might experience too much network traffic and problems with the FTP Server. On the other hand, if not set often enough, we might experience that messages submitted for BizTalk takes too long to process because they are not polled by BizTalk often enough.
The FTP protocol does not have any proper lock mechanism. So if a large file is being written to the folder where BizTalk is polling from, BizTalk will start downloading the file as soon as the file is visible, and not necessarily when the file is complete. This problem needs to be addressed by the systems uploading the files to BizTalk in the FTP folders by creating the files with a temporarily extension (filename.xml.tmp) and then removing the .tmp after the file is completed. In that case, we also need to set up the File Mask property on the FTP receive to look for files with the xml extension (*.xml).
Another way of dealing with the problem of files being downloaded by BizTalk before the file is fully written, is having the submitter upload the file to a temporary folder, and then moving it to the correct folder where BizTalk is polling from when the file is completed.
When sending FTP, it is basically the core configuration that is needed (server, user name, and so on). However, there are two other properties that are often relevant to take into consideration. These properties are shown in the following screenshot:

First, we will take a look at Target File Name. This is used to specify the name that BizTalk will give to the file written to the FTP Server. The default is %MessageID%.xml, where %MessageID% will be replaced with an internal GUID unique for each message so that no two files uploaded to an FTP Server from BizTalk will ever have the same name. The use of hardcoded name (such as Order.xml) is not recommended, as this will cause a failure on the send side if BizTalk tries to upload File with the same name twice and the first file has not been processed by the destination party yet. Depending on the FTP Server it might also result in the files just being overwritten. However, there is a property called Append if exists that can be set to Yes. This is seldom used and will only work for Flat Files and not for XML, since the latter requires one root element.
It is also possible to use %SourceFileName% as a file mask in Target File Name. This will give the file the same name as it had when submitted to BizTalk by either a file or FTP. Again, we need to take into consideration whether or not two files could end up with the same name, and therefore, cause the FTP Send Adapter to fail. Also, this will only work if all files sent through the FTP Adapter were in fact received into BizTalk by either the FILE or FTP Adapter (refer to the Implementing messaging patterns section).
Another property that might be useful when sending FTP is Temporary Folder. This enables the Adapter to upload the file to another folder, rather than to the one specified in the Folder property, and move the file to the correct folder when upload has completed. As we discussed with the receive FTP Adapter, this might be useful because FTP doesn't have any proper locking mechanism.
The FILE Adapter is one of the most used Adapters, both for testing/demo purposes and for communicating with several legacy systems where the only protocol supported is exporting and importing files.
Configuring the Receive FILE Adapter requires a path to the folder where BizTalk should pick up files (Receive folder) as well as a File mask, specifying which type of files and/or filenames should be received. This folder can either be local or located on a file server somewhere on the network. Using local folders is not recommended when working with multiserver environments since that would cause BizTalk to have more than one file entry-point. How many BizTalk Servers a BizTalk Group contains should be transparent to the surrounding environments.
When using a file server, be aware that using mapped drive letters in Receive folder might not work as intended (Z:\Inbox), since it will use the mapped drives of the user running the Host Instance and not necessarily the mapped drives seen by the user configuring the Port. Therefore, UNC paths are recommended (\\ServerName\Path\Inbox). The following screenshot shows the general configuration properties for a Receive FILE Adapter:
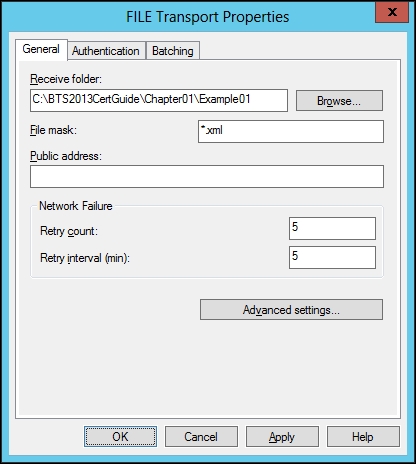
The Receive folder can only point to a single folder. It is not possible to have the same Receive Location probing in more than one folder. This limitation also includes subfolders.
When working on NTFS file systems, the FILE Adapter will work using .NET File System Events, so every time a file is submitted, BizTalk will be notified almost immediately and will start processing the file (except if service windows are implemented on the Receive Location).
When using the FILE Adapter on the send side, the configuration looks similar to the following screenshot:
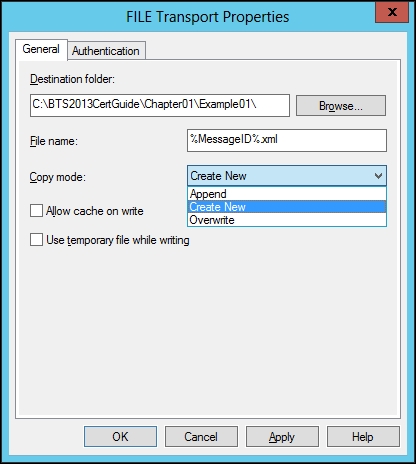
When sending files using the FILE Adapter, we need to specify the Destination folder and the File name. The default filename is %MessageID%.xml, which will give the filename a unique GUID to make sure no two files are given the same name.
Just as the FTP Adapter, %SourceFileName% can also be used on the FILE Adapter, but again we should use it with caution, since it will only work if the original message was received through either an FTP or FILE Adapter.
It is also possible to configure how the FILE Adapter should write the file to folder using the Copy mode option. The following are the three possible modes:
Append: This will append the message into an existing file, if the file is already present. It is usually used for Flat Files (comma delimited, positional text files) and not for XML.
Create New (default): This setting is the most commonly used setting. It will create, or try to create, a new file each time a message is sent to the Port. When using this setting, it is recommended that the filename is unique, which can be done by using the
%MessageID%macro.Overwrite: This will overwrite any existing files that have the same name as the file currently being written to a file folder. This is often used when dealing with daily inventory reports and so on, where the old data is obsolete as soon as new data is present.
If no credentials are specified in the FILE Adapter configuration, it will be the user running the Host Instance, which needs to have the correct amount of rights to the folder it is receiving from or sending to. If the user does not have the sufficient amount of credentials, we can supply another username and password for the FILE Adapter to use, as shown in the following screenshot:
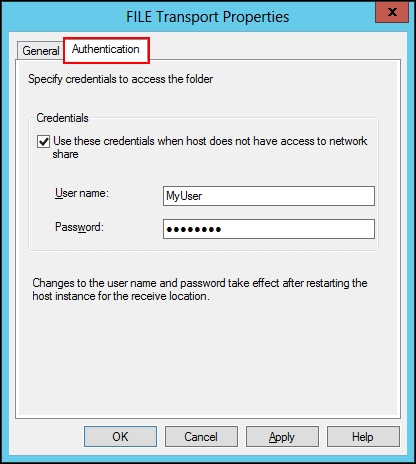
Click on the Authentication tab and specify a username and password. Now, this user will be used instead of the Host Instance User. This can be done for both receiving and sending files.
The following is a walk-through of a routing sample in BizTalk. The sample is done by using the FILE Adapter only, and coding is not done. The next chapter will introduce us to how to create various BizTalk artifacts inside Visual Studio, but for now, let's look at an example showing how BizTalk routes messages.
The setup is as follows:
The first step is to create a Receive Port with two different Receive Locations. We should be able to pick up messages at two different file locations:
C:\BTS2013CertGuide\Chapter01\Example01-Messaging\FileDrop\PartnerA\InboxC:\BTS2013CertGuide\Chapter01\Example01-Messaging\FileDrop\PartnerB\Inbox
We should be able to send messages to two different systems (file locations):
C:\BTS2013CertGuide\Chapter01\Example01-Messaging\FileDrop\SystemI\OutboxC:\BTS2013CertGuide\Chapter01\Example01-Messaging\FileDrop\SystemII\Outbox
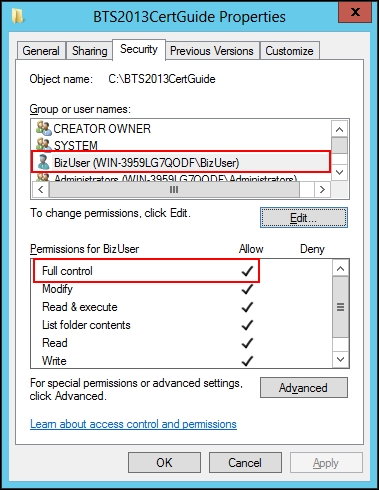
Make sure that the BizTalk Host user has sufficient permissions for the folders. Give the user Full control permissions on folder C:\BTS2013CertGuide\Chapter01\Example01-Messaging\FileDrop, as shown in the following screenshot:
Tip
The user and/or group doesn't need Full control. It is sufficient to grant the Delete subfolders and files permission found under advanced permissions, along with read and write permissions.
Next, we need to create an Application called BTS2013CertGuide-Ch01. To do this, we need to perform the following steps:
Now, we need to create a Receive Port inside our new Application and add two File Receive Locations, one for each Partner (A and B). In order to do this, carry out the following steps:
In Application BTS2013CertGuide-Ch01, right-click on Receive Ports and choose New | One-way Receive Port.
Name the Receive Port as CG0101_Receive and click on OK.
Right-click on Receive Locations and choose New | One-Way Receive Location.
Select Receive Port CG0101_Receive and click on OK.
Name the location CG0101_ReceiveFromPartnerA_FILE, choose FILE in Transport Type (Adapter), and click on Configure, as shown in the following screenshot:

Configure the FILE Adapter, as shown in the following screenshot, and click on OK (the Receive Folder path is
C:\BTS2013CertGuide\Chapter01\Example01-Messaging\FileDrop\PartnerA\Inbox):
Click on OK again.
Make another Receive Location from steps 3 to 7. Name it PartnerB instead of PartnerA and choose PartnerB file folder instead of PartnerA.
In the Administration Console, our Receive Locations should now look similar to the following screenshot:

Now, we need to see that everything is running as intended by testing the solution. In order to start testing, perform the following steps:
Create a small text file, fill it with a few characters, and copy the file into each inbox folder of both PartnerA and PartnerB. The files must consist of at least one character, since the FILE Adapter will throw away empty messages as they do not make sense in a BizTalk perspective. Do not give the files a name containing the word "Copy".
Verify that the BizTalk Host Instance executing the Receive Locations is running.
Right-click on each Receive Location and choose Enable.
Check the Event Viewer and verify that no BizTalk Server errors have been written to Windows Logs/Application when enabling the Receive Locations. If errors are present, examine them, since they are most likely caused by the BizTalk Host user not having sufficient permission in the folders (refer to the Creating folders and Applications section).
Go to FileDrop\PartnerA\Inbox. Copy and paste the file in the same folder so that a copy is inserted, and confirm that BizTalk deletes the file. It might be quick, so watch closely!
If the file is deleted by BizTalk, our PartnerA locations are working. Do the same test PartnerB.
Now, let's examine what happened to the messages we submitted to BizTalk.
Upon opening Event Viewer again, you should find four errors (two for each message submitted).
Open the last error submitted in Event Viewer, it should look something similar to the following screenshot:

What BizTalk is telling us here is that even though the receive processing of the messages was successful, the messages could not be routed because there were no subscribers. In other words, neither Send Ports nor Orchestrations were created with a subscription matching the Context of the messages.
Now, we will examine the Context of one of the messages that failed to be routed:
Go to Group Hub by clicking on the BizTalk Group folder in the Administration Console, then press F5 to refresh the dashboard showing in the right pane.
We should now see four suspended items:

Click on the Resumable link.

Tip
The Non-resumable instances are primarily there for debugging purposes. They show the Context as it appeared after Port processing, whereas the Resumable instances show the message and the Context as it appeared before Port processing.
In this example, the promoted properties are the same for both instances, and we can therefore use the Resumable instance. If properties had been added during Pipeline processing and/or mapping, we would need to examine the Non-resumable instance.
Also, note that the Non-resumable instance will disappear by itself if the Resumable instance is resumed successfully.
Double-click on one of the suspended items.

Choose the Messages tab, and double-click on the message.

Choose Context, and click on Type twice so that the promoted properties are shown on top.
Examine the five promoted properties. These are the only properties we can use for subscription for now. The best candidate for subscription might be the ReceivePortName with the value of CG0101_Receive.
Now, we will perform the following steps for creating a Send Port that subscribes to all messages where ReceivePortName has the value of CG0101_Receive in its Context:
Create a new Send Port by right-clicking on the Send Port folder and navigating to New | Static One-Way Send Port.
Fill in Name and Type. Click on Configure.
Fill in the Destination folder path (
C:\BTS2013CertGuide\Chapter01\Example01-Messaging\FileDrop\SystemI\Outbox) and the File name, as shown in the following screenshot, and click on OK:
Choose the Filters page. Select BTS.ReceivePortName in the Property drop-down list. Leave Operator as == and type the Receive Port name in the Value textbox.

Click on OK.
Start the Send Port by right-clicking on it and choosing Start.
Submit a message from either Partner A or Partner B.
Go back to Group Hub, choose the two resumable suspended items, and right-click and choose Resume Instances. Click on Yes, and then click on OK.
Verify that the two additional files are now in the
System Ifolder.
System II also needs a copy of all messages received by the Receive Port. So instead of making two Send Ports with identical filters, we will make a Send Port Group with the subscription for the Receive Port name, and then add both Send Ports to the group.
Create a new Send Port for System II following the same steps we did when creating the first Send Port, with SystemII in its name instead of SystemI. Also, use the
SystemII outboxfolder instead. Don't give the new Send Port any filter.Start the Send Port.
Create a new Send Port Group by right-clicking on the Send Port Group folder and choosing New | Send Port Group….

Give the group a name, as shown in the preceding screenshot, and add the two Send Ports to the group.
Give the group a filter with the Receive Port name, just as we did with the first Send Port.
Click on OK.
Right-click on the group and start it.
Submit a message from one of the partners.
Notice how System II got one message, but System I got two. This is because a Send Port inside a Send Port Group will have two subscriptions both its own subscription and the Group subscription. If both of them are met, the Port will receive the same message twice.
Go to the System I Send Port and remove the subscription inside the Filter page by pressing Delete. Click on OK.
When working with BizTalk, the design considerations are very important. A bad design might result in poor performance, difficulty in changing the solution if the surrounding environment changes, and redundant code.
One of the design patterns we should always try to meet (unless there is a good reason for doing otherwise) is the use of canonical messages inside BizTalk.
If BizTalk receives a message of type A and that message needs to be sent to another system and transformed to type B, we should make up our own internal message type instead of transforming directly from A to B. We do this, not by looking at the structure of either type A or B, but rather by making a type of the message that is independent of both types (type I).
This will require two transformations (Maps), one from type A to type I, and another from type I to type B.
We should also make sure that only canonical/internal messages hit the MessageBox, so Map A to I should be applied on the Receive Port, and Map I to B on the Send Port.
This pattern has the following advantages:
If we receive messages from various partners/systems (type A1, A2, A3, and so on) and we map all of these different structures to a canonical type on the receive side, then the target system (type B) could change structure or format and we would only have to change the solution in one place, the transformation from the canonical type to B.
If more subscribers are interested in the message, and we make transformations directly from Message Type A to all of the desired formats of the subscribers, and we start receiving the messages in other formats, we would again need to make transformations from the new format to each of the subscribers instead of just transforming the new format to the internal format.
This is also the case when working with Orchestrations. Try not to use the Adapter or trading partner-specific Schemas inside the Orchestrations. Use internal versions of the messages instead. Use these internal versions inside the Orchestrations and then map from and to the internal Schemas in the Receive and Send Ports. By doing this, we don't have to recompile (let alone recode) an Orchestration if a Message Type on a Send or Receive Port is changed, or if the Adapter on a Send Port changes. The structure of the XML sent and received from the old and new messages would be different, but if we are only dealing with internal messages in our Orchestrations, only the Maps on the Send and Receive Ports would need to be changed.
Another pattern we should try to implement, for most solutions, is the use of singular messages inside BizTalk. If we receive batches, such as several messages inside the same file, we should debatch them into individual items on the receive side of BizTalk (the Receive Pipeline).
The rule of thumb is that the solution should act the same way if we receive one large file containing 10 orders, as it should if we receive 10 orders in 10 files (one in each file).
BizTalk cannot handle the items individually if they are kept as a batch through BizTalk Server. If we receive orders, and some subscribers are only interested in orders containing a specific customer number, we would have no means (at least not with normal content-based routing) of subscribing to just those messages if all of them were kept inside a batch message.
There are other cases where keeping multiple items inside a batch and not debatching them makes sense. If a solution picks up a large batch of products, because full inventory is done once a day, and all subscribers are interested in seeing these products as a whole inventory report, we should not try to debatch them. Also, note that although BizTalk comes with great debatching functionality on the receive side, there is no automatic way of batching these items again if some subscribers need the inventory report as it was received and others need them individually. In this case, we would need to keep the batch inside BizTalk and then do some extra code (possibly using Orchestrations) to make debatched copies.
In other words, a debatched message is not easily assembled again with the same items in the same order.
We often have a decision whether to use a One-Way or Request-Response flow. The following table describes some of the scenarios where it makes sense to use one over the other:
|
Direction |
Type |
Usage |
|---|---|---|
|
Receive |
Request-Response |
Used only if the caller submitting messages to BizTalk needs an answer back, such as |
|
Receive |
One-Way |
Used for cases other than the ones described in Request-Response |
|
Send |
Request-Response |
Used if BizTalk calls a system and needs an answer back from that system |
|
Send |
One-Way |
Used in all other cases |
It is important to not use Request-Response when only One-Way is needed. If calling a Web Service on a Send Port, it does not provide us with more reliability if we use a Request-Response port, instead of a One-Way port. The One-Way Port will, just as in a Request-Response scenario, wait for the service to finish and acknowledge that everything went well until the message is removed from the MessageBox. Also, using Request-Response when not needed, will give us less performance and less flexibility, because a Request-Response message submitted to the MessageBox can only have one subscriber.
When designing a BizTalk Solution, we should try, whenever possible, not to make it so that code and/or logic is dependent on messages being received or sent using specific Adapters.
It might seem like a good idea to send files to an FTP Server using the %SourceFileName% macro in the
Target File Name property, because we want to give the target server the same filename as the file had when we received it either by FILE or FTP. If this is a requirement, then this is, of course, how the solution should be made. However, try always to focus on the idea that the solution should also work if we changed the Adapter. If we start receiving messages from both a file folder and an Oracle database tomorrow, the %SourceFileName% logic on our Send Ports will fail to work for the messages received from Oracle, simply because no original filename exists.
On the send side, people also tend to hardcode specific Adapter properties inside Orchestrations, which results in situations where changing the Adapter type requires us to change and recompile the Orchestrations.
HWLC Motors is sending XML orders to a file server at our place using FTP and BizTalk picks up the messages using a FILE Adapter through a Receive Port named ReceiveOrders. The files are currently being sent through a Send Port (Send Port A) using an SMTP Adapter and by using the Filter
BTS.ReceivePortName == ReceiveOrders. You realize that three other Send Ports also want to subscribe to these messages and want to do this with the least amount of effort. What should you do (choose all that apply)?Create three new Receive Ports.
Create three new Send Ports with no filter.
Create three new Send Ports with the Filter of
BTS.ReceivePortName == ReceiveOrders.Create a Send Port Group and set the Filter of the Group to
BTS.ReceivePortName == ReceiveOrders.Assign the three Receive Ports to the Send Port Group.
Assign the three Send Ports to the Send Port Group.
We receive XML from several trading partners through Receive Port RP1. At times, the XML is not well formed, the XMLReceive Pipelines throw errors, and the messages are suspended. Our partner coordinator Brian has requested that the invalid XML be sent to him in an e-mail, instead of being suspended in BizTalk. How would you achieve this (choose all that apply)?
Set up e-mail alerting on the server if errors occur in the Event Viewer with BizTalk Server as the source.
Create a Send Port SP1 using the SMTP Adapter and target it to Brian's e-mail address. Set up a filter on the Send Port in the ErrorReport.ReceivePortName == RP1 format.
Enable routing for failed messages on the Send Port SP1.
Create a Send Port SP1 using the SMTP Adapter and target it to Brian's e-mail address. Set up a filter on the Send Port in the BTS.ReceivePortName == RP1 format.
HWLC has several Send Ports that point to different internal systems, and many of the message types flowing processed by BizTalk have multiple Send Ports as subscribers. One of the Send Ports targets the company's ERP system. The Adapter used is an HTTP Adapter. The ERP administrator wants to take the system offline for the next 24 hours and no messages should be sent to the system during that time. They do, however, want all messages processed during those 24 hours once they are back online. How should we accomplish this without impacting on the other subscribers?
Disable all Receive Locations so that no messages are received in BizTalk for the next 24 hours.
Stop the ERP Send Port and start it again when the system comes back online.
Unenlist the ERP Send Port and start it again when the system comes back online.
Stop all in-process BizTalk Services.
You receive messages of type A from a Partner through a Receive Port and send it directly to your CRM system by using a Send Port. You want to transform the message to type C before it enters the
MessageBox. What should you do (choose all correct answers)?Apply a Map (A to C) to the Receive Port.
Apply two Maps to the Receive Port (A to B) and (B to C).
Apply a Map (A to C) to the Send Port.
Apply two Maps to the Receive Port (A to B) and (B to C).
You are receiving messages from customers sending e-mails with one attachment through an Exchange Server. You want BizTalk to process the mail body as the message. How should you approach this?
Use the FTP Adapter to receive messages from the Exchange Server.
Use the FILE Adapter to receive messages from the Exchange Server.
Use the POP3 Adapter to receive messages from the Exchange Server, set the Body Part Index attribute to 0.
Use the POP3 Adapter to receive messages from the Exchange Server, set the Body Part Index attribute to 1.
This chapter has dealt with some of the basics of BizTalk Server 2013, looking at the subscription engine, Ports, and Adapters. You should now have a basic knowledge of how BizTalk works and how to navigate through the BizTalk Server Administration Console. Next, we will look at XML, Schemas, Pipelines, and start using Visual Studio for BizTalk.
