Download code from GitHub
Setting Up Visual Studio for Mac
Since Xamarin made its appearance several years ago, developers have been delighted with being able to create native mobile applications that can target different OS platforms, as well as having the option of developing apps using either the C# or F# programming languages, enabling developers to distribute their app ideas to either the iOS, Android, or Windows platforms.
As you progress through this book, you'll learn how to apply best practices and design principles when developing cross-platform mobile applications using the Xamarin.Forms platform, to allow developers to build cross-platform user interface layouts that can be shared across the Android, iOS, and Windows mobile platforms.
Since each of these apps can be written using a single programming language, it makes sense to write a single codebase that would compile and build into separate apps for each of these different platforms.
This chapter will begin by showing you how to download and install the Visual Studio for Mac IDE, as well as the Xamarin components for both the iOS and Android platforms. You'll explore some of the features contained in the Visual Studio for Mac IDE and then gain an understanding of the Xamarin mobile platform.
You'll learn how to create your very first cross-platform Xamarin.Forms application for both the iOS and Android platforms, create the user interface using XAML, and create some C# code that will communicate with the XAML code.
To end this chapter, you'll learn how to set Breakpoints and define conditional Breakpoints in your code to pause execution, before moving on to learning how to use the built-in debugging tools to debug your application and launch it in the iOS simulator.
This chapter will cover the following points:
- Downloading and installing the Visual Studio for Mac IDE and the Xamarin Platform SDKs
- Exploring the Visual Studio for Mac IDE
- Understanding the Xamarin mobile platform
- Creating a new Xamarin.Forms project for both iOS and Android
- Setting Breakpoints and defining conditional Breakpoints in your code
- Using the Visual Studio for Mac built-in debugger
Downloading and installing Visual Studio for Mac
In this section, we will take a look at how to download and install Microsoft Visual Studio for Mac as well as the Xamarin Platform SDKs for both the iOS and Android platforms.
Installing Visual Studio for Mac and Xamarin
Before we can begin developing applications for the Xamarin platform, we will need to download Visual Studio for Mac. Simply follow these steps:
- Open your browser and type in https://www.visualstudio.com/.
- Next, hover your mouse cursor over the Download for Mac button and click on the Community 2017 for Mac menu option to proceed:

- Next, once the Visual Studio for Mac installer has been downloaded, double-click on it to display Visual Studio for Mac – Installation.
- Then, click on the Continue button to proceed to the next step in the wizard, which can be seen in the following screenshot:

- Next, ensure that the checkboxes for Android, iOS, and macOS, as well as .NET Core, have been selected under the Platforms group and ensure that the checkbox for Xamarin Workbooks & Inspector has been selected under the Tools group, which can be seen in the following screenshot:

- Next, click on the Install and Update button to proceed to the next step in the wizard and begin installing the Visual Studio for Mac IDE along with the Xamarin platform SDK and tools, which can be seen in the following screenshot:

- Finally, Visual Studio for Mac - installation will proceed to download and begin installing the Microsoft Visual Studio for Mac IDE, as well as downloading the components for the platforms that you have selected.
Now that you have installed the Microsoft Visual Studio for Mac IDE and the Xamarin Platform SDK, as well as the tools for both the iOS and Android platforms, our next step is to explore some of the features of the Visual Studio for Mac IDE, which we will be covering in the next section.
Exploring the Microsoft Visual Studio for Mac IDE
In this section, we'll take some time and explore the Visual Studio for Mac IDE and learn how to configure its visual appearance, how to set font styles, and how to go about configuring and including additional .NET runtime versions. Lastly, you'll learn how to define the Android and iOS SDK locations.
To begin exploring the Visual Studio for Mac IDE, simply follow these steps:
- From the Visual Studio Community menu, choose the Preferences… menu option, or alternatively press the command + , key combination that can be seen in the following screenshot:

- Once you have clicked on the Preferences... button, you will be presented with the following screen:
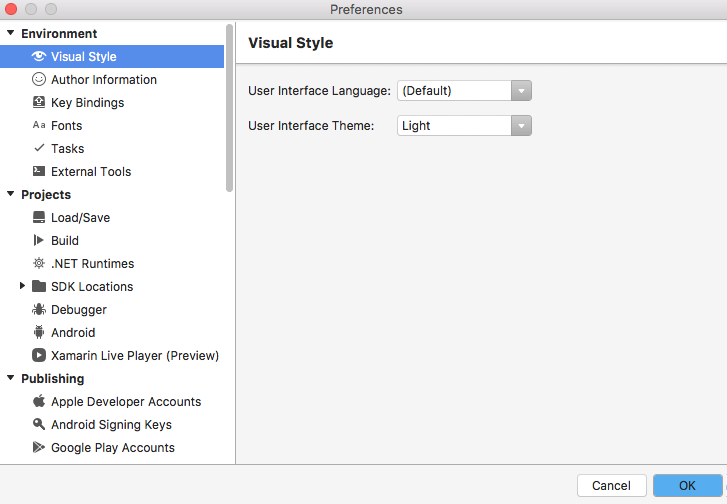
As you can see in the preceding screenshot, you have the ability to configure environment settings, such as Visual Style, Fonts, .NET Runtimes, SDK Locations, and Tasks, as well as your Google Play Accounts and Apple Developer Accounts.
Configuring and including additional .NET Runtimes
The Visual Studio for Mac IDE Preferences pane provides you with the ability to configure and include additional .NET Runtimes that you would like to compile your application against.
The default runtime that has been set will contain the word (Default) at the end, which signifies that this is the default .NET Runtime that will be used for building and running applications when none has been specified. Refer to the following screenshot:

From this screen, you have the ability to add new or remove existing .NET Runtimes that you would like to test your applications with, by using the Add or Remove buttons. In the next section, we will look at how to define your Android and iOS SDK locations.
Defining your Android and iOS SDK locations
The Visual Studio for Mac IDE Preferences pane allows you to define both your Android and iOS SDK locations that you can compile your application against:
- When configuring the SDK Locations for the iOS platform, this will initially default to the current location where the Xcode.app application is located. This is typically found in the Applications folder and will contain the latest iOS platform SDK that has been installed for your version of Xcode:

- In order to specify a different location for where Xcode.app is located, click on the Browse… button, which can be seen in the preceding screenshot. Alternatively, you can specify it for the Android platform by selecting the Android node in the SDK Locations section.
- In this section, you can specify the Android SDK Location and Android NDK Location, as well as the Java SDK (JDK) Location:

- You can also install additional SDK Platforms and Tools for the Android platform that you would like to build your application against, or remove those platforms and system images that you no longer wish to target; this can be seen in the following screenshot:

Now that you have explored some of the features contained in the Visual Studio for Mac IDE, our next step is to take a look at, and understand a bit more about, the Xamarin mobile platform, which we will be covering in the next section.
Understanding the Xamarin mobile platform
The Xamarin platform is essentially a framework that enables developers to develop cross-platform mobile applications, using either the C# or F# programming languages, as well as a runtime that runs on the Android, iOS, and Windows platforms, giving you an app that looks, feels, and behaves completely native.
In this section, we will gain an understanding of what the Xamarin mobile platform is and the benefits of using Xamarin to develop your iOS, Android, and Windows apps.
Benefits of developing apps using the Xamarin mobile platform
When you use the Xamarin platform to build your mobile apps, you'll have access to all of the features available in the native SDK and you can even use your existing APIs, so that these can be shared across each of the different mobile platforms for iOS, Android, and Windows.
That said, anything you can do in Objective-C, Swift, or Java can be done in C# or F#, with Xamarin and Visual Studio for Mac.
Developing native apps using the Xamarin approach
When considering developing native iOS, Android, or Windows apps, most developers would either choose to use Objective-C, Swift, or Java. However, there are more ways to build performant and user-friendly mobile apps and Xamarin is one of them. Let's take a look at the benefits of developing native apps using Xamarin.
The Xamarin platform uses a single programming language, C# or F#, which can be used to create apps for the iOS, Android, and Windows platforms, as well as providing you with the flexibility of writing C# code so that you can design your user interfaces specifically for each platform.
The C# programming language is a mature language that is strongly typed to prevent code from producing unexpected behavior. Since C# is one of the .NET framework languages, it can be used with a number of useful .NET features, such as Lambdas, LINQ, and asynchronous programming. The C# source code that you write is then compiled into a native app for each platform.
Technically speaking, Xamarin uses C# and native libraries wrapped in the .NET layer for cross-platform app development. Such applications are often compared to native ones for both iOS and Android mobile development platforms in terms of performance and user experience:

As you can see from the preceding screenshot, this shows each platform for the Xamarin.iOS, Xamarin.Android, and Windows platforms, each containing their own platform-specific UI code layer and a common Shared C# Backend containing the business logic, which can be shared across all platforms.
Developing apps using the Xamarin.Forms approach
Developing iOS, Android, or Windows apps using the Xamarin.Forms approach is very different from developing apps using the native approach. Let's take a look at the benefits of developing apps using the Xamarin.Forms approach.
The Xamarin.Forms approach allows you to build your user interfaces, which can then be shared across each of the different mobile development platforms using 100% percent shared C# or F# code.
Using the Xamarin.Forms approach means that your applications will have access to over 40 user interface controls and layouts, which are then mapped to each of the native controls specific to the platform at runtime:

As you can see from the preceding screenshot, each platform for the Xamarin.iOS, Xamarin.Android, and Windows platforms shares common user interface code, which will be rendered differently on each platform, as well as a common Shared C# Backend containing the business logic that can be shared across all platforms.
Now that you have a good understanding of developing Xamarin apps using the native approach versus developing apps using the Xamarin.Forms approach, we can start to build our first app, which we will be covering in the next section.
Creating a Xamarin project for both iOS and Android
In this section, we will take a look at how to create a Xamarin.Forms solution for the first time. We will begin by developing the basic structure for our application, as well as creating and designing the user interface files using XAML, and then creating the C# code to display planetary information.
Before we can proceed, we need to create our PlanetaryApp project. It is very simple to create this using Visual Studio for Mac. Simply follow these steps:
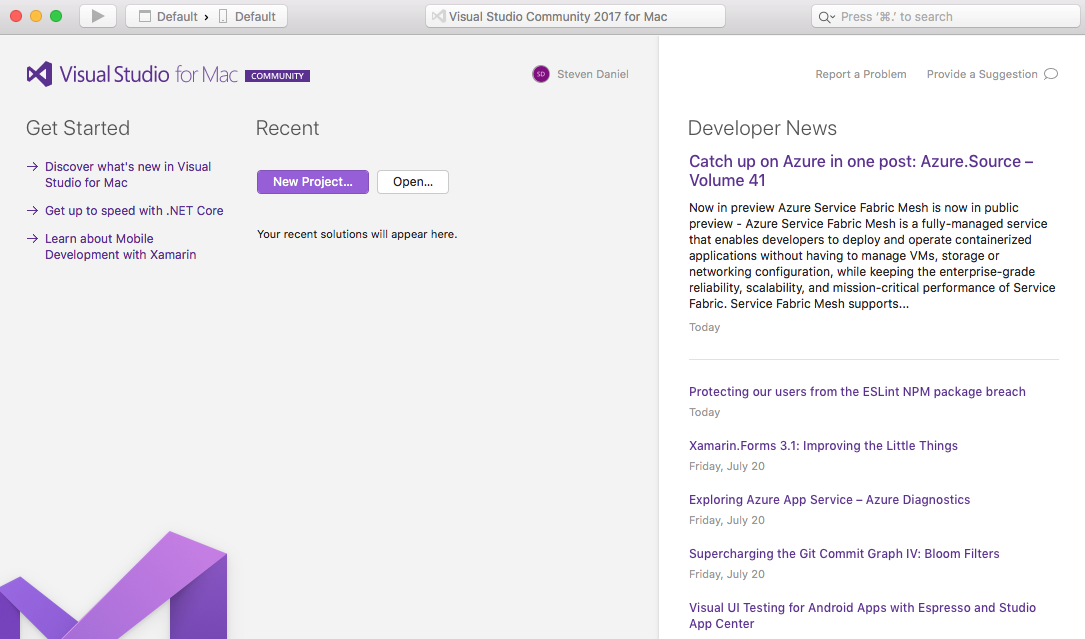
- Firstly, launch the Visual Studio application; depending on your version of Visual Studio installed, you'll be presented with the following screen:
- Next, choose the New Project… option, or alternatively choose File|New Solution..., or simply press Shift + command + N.
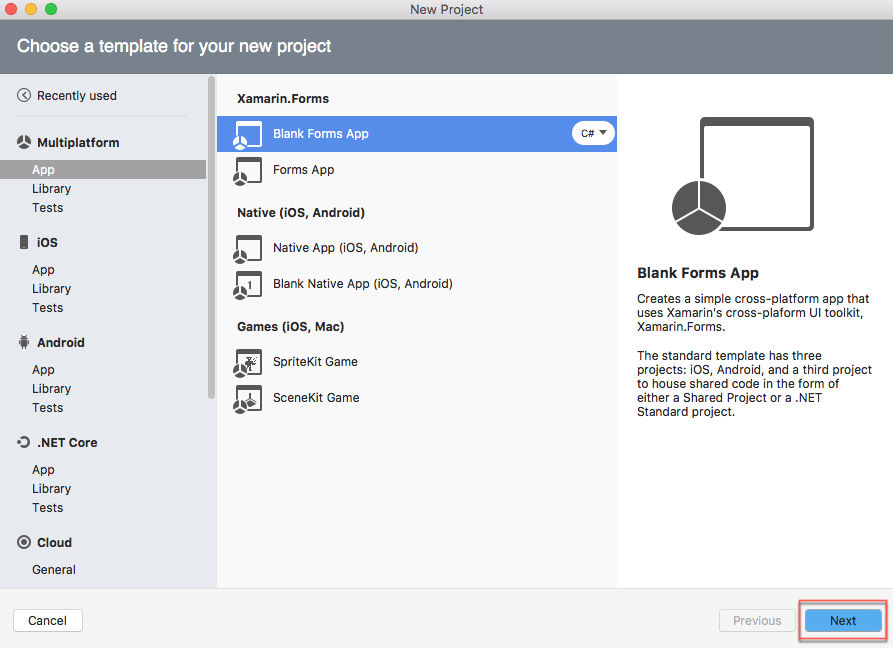
- Then, choose the Blank Forms App option, which is located under the Multiplatform|App section, and ensure that you have selected C# as the programming language to use.
- Next, click on the Next button to proceed to the next step in the wizard:
- Next, enter PlanetaryApp to use as the name for your app in the App Name field and then specify a name for the Organization Identifier field.
- Then, ensure that both the Android and iOS checkboxes have been selected for the Target Platforms field and ensure that the Use .NET Standard option has been selected in the Shared Code section, as shown in the following screenshot:
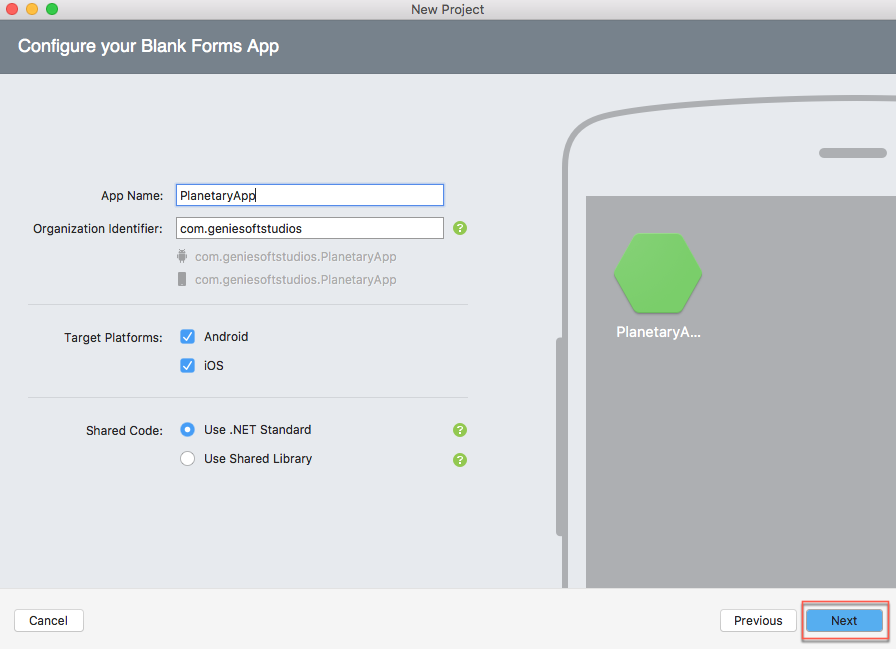
The Organization Identifier option for your app needs to be unique. Xamarin recommends that you use the reverse domain style (for example, com.domainName.appName).
- Then, click on the Next button to proceed to the next step in the wizard:
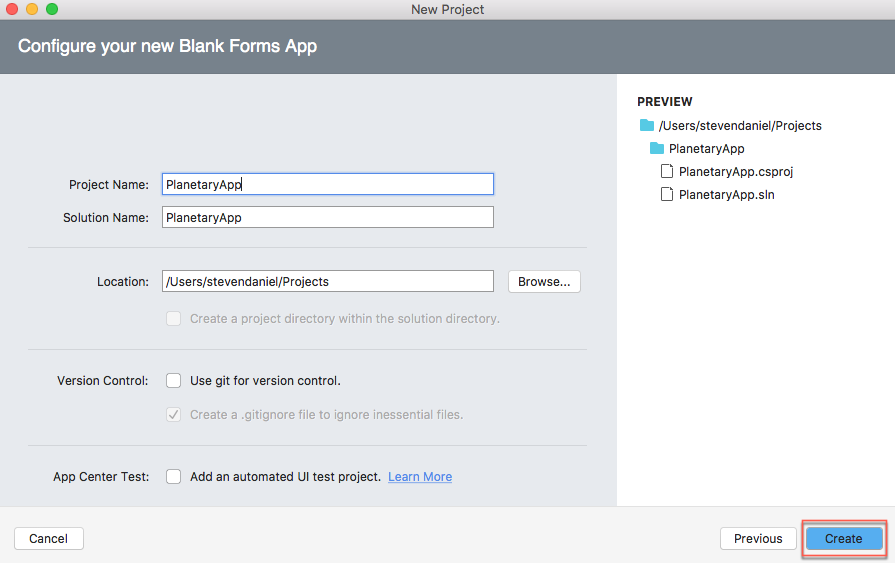
- Finally, click on the Create button to save your project at the specified location.
Once your project has been created, you will be presented with the Visual Studio Community 2017 for Mac development environment, containing several project files that the template has created, as shown in the following screenshot:
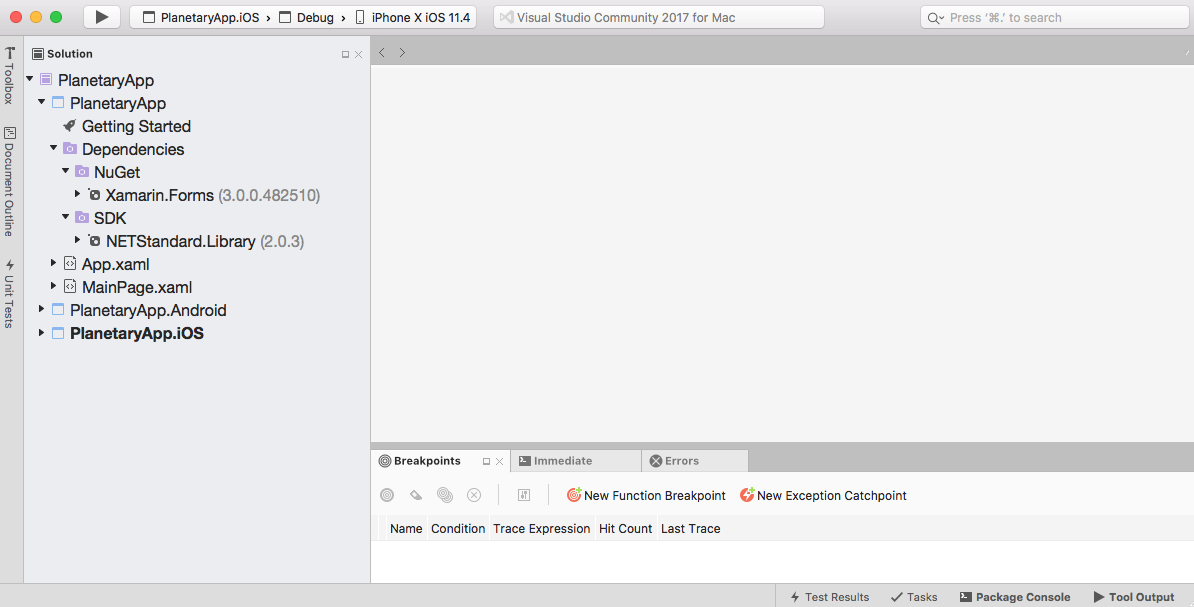
As you can see from the preceding screenshot, the PlanetaryApp solution has been divided into three main areas. The following table provides a brief description of what each area is used for:
|
Project details |
Description |
|
PlanetaryApp |
This is the .NET Standard (Shared Library) project that will be responsible for acting as the main architectural layer for the PlanetaryApp solution. This project contains all of the business logic, data objects, Xamarin.Forms ContentPages, Views, and other non-platform-specific code. Any code that you create in this project can be shared across multiple platform-specific projects. |
|
PlanetaryApp.Android |
This is an Android-specific project that contains all of the code and assets required to build and deploy the Android app contained in the solution. By default, this project contains a reference to the PlanetaryApp (.NET Standard Shared Library). |
|
PlanetaryApp.iOS |
This project is an iOS-specific project that contains all of the code and assets required to build and deploy the iOS app contained in the solution. By default, this project contains a reference to the PlanetaryApp (.NET Standard Shared Library). |
One thing you will notice is that our solution contains a file called App.xaml.cs, which is part of the .NET Standard (Shared Library). The App.xaml.cs file contains a class named App that inherits from the Xamarin.Forms.Application class hierarchy, as can be seen in the following code snippet:
 //
 //  App.xaml.cs
 //  Main class that gets called whenever our PlanetaryApp is started
 //
 //  Created by Steven F. Daniel on 17/02/2018.
 //  Copyright © 2018 GENIESOFT STUDIOS. All rights reserved.
 //
 using Xamarin.Forms;

 namespace PlanetaryApp
 {
     public partial class App : Application
     {
         public App()
         {
             InitializeComponent();

             MainPage = new MainPage();
         }

         protected override void OnStart()
         {
             // Handle when your app starts
         }

         protected override void OnSleep()
         {
             // Handle when your app sleeps
         }

         protected override void OnResume()
         {
             // Handle when your app resumes
         }
     }
 }
The App constructor method sets up the MainPage property to a new instance of the ContentPage that will simply display some default text as created by the project wizard. Throughout this chapter, we will be building the initial user interface using XAML and then populating a list of planet names in the control elements contained in the XAML.
Creating the user interface for our Planetary app using XAML
In this section, we will begin defining the user interface for our MainPage using XAML. This page will be used to display a list of planet names, as well as information relating to the distance the planet is from the sun. There are a number of ways you can go about presenting this information, but for the purpose of this app, we will be using a ListView to present this information.
Let's start by creating the user interface for our MainPage by performing the following steps:
- Open the MainPage.xaml file, which is located as part of the PlanetaryApp group, ensure that it is displayed in the code editor, and enter the following code snippet:
     <?xml version="1.0" encoding="utf-8"?>
     <ContentPage xmlns="http://xamarin.com/schemas/2014/forms"
                  xmlns:x="http://schemsas.microsoft.com/winfx/2009/xaml"
                  xmlns:local="clr-namespace:PlanetaryApp" x:Class="PlanetaryApp.MainPage">
         <ListView x:Name="planetsListView" RowHeight="80" HasUnevenRows="True">
             <ListView.ItemTemplate>
                 <DataTemplate>
                     <TextCell Text="{Binding Name}" TextColor="Black"
                               Detail="{Binding Distance}" DetailColor="Red" />
                 </DataTemplate>
             </ListView.ItemTemplate>
         </ListView>
     </ContentPage>
Let's take a look at what we covered in the preceding code snippet:
- We started by defining a ListView and specified the RowHeight to be used for each of the rows that will be allocated and displayed, as well as providing our ListView control with a name, planetsListView.
- Next, we defined the ItemTemplate property of our ListView control, which will be used to display the data items, and then defined a DataTemplate that will be used to handle displaying data from a collection of objects in our ListView.
- Finally, we used the TextCell control and then set the Text property to bind to our name property, and we set the Detail property to bind our distance property, then set the Textcolor and DetailColor properties of our TextCell control.
Displaying a list of planet names using C#
In this section, we will begin by creating the C# code that will be used to communicate with our PlanetaryApp user interface XAML for our MainPage. We will start by adding code in the MainPage code-behind file.
Let's take a look at how we can achieve this:
- Open the MainPage.xaml.cs code-behind file, ensure that it is displayed in the code editor, and enter in the following code snippet:
      //
      //  PlanetaryAppPage.xaml.cs
      //  Displays Planetary Information in a Listview control from an array
      //
      //  Created by Steven F. Daniel on 17/02/2018.
      //  Copyright © 2018 GENIESOFT STUDIOS. All rights reserved.
      //
      using System.Collections.ObjectModel;
      using Xamarin.Forms;

      namespace PlanetaryApp
      {
           public partial class MainPage : ContentPage
           {
                public class Planet
                {
                    public string Name { get; set; }
                    public string Distance { get; set; }
                }

                public PlanetaryAppPage()
                {
                     InitializeComponent();

                     // Create and populate a List of Planetary names
                     var planets = new ObservableCollection<Planet>() {
                     new Planet
                     {
                         Name = "Mercury",
                         Distance = "Distance from Earth: 77 million kilometers"
                     },
                     new Planet
                     {
                         Name = "Venus",
                         Distance = "Distance from Earth: 261 million kilometers"
                     },
                     new Planet
                     {
                         Name = "Earth",
                         Distance = "Distance from Sun: 149.6 million kilometers"
                     },
                     new Planet
                     {
                         Name = "Mars",
                         Distance = "Distance from Earth: 54.6 million kilometers"
                     },
                     new Planet
                     {
                         Name = "Jupiter",
                         Distance = "Distance from Earth: 588 million kilometers"
                     },
                     new Planet
                     {
                         Name = "Saturn",
                         Distance = "Distance from Earth: 1.2 billion kilometers"
                     },
                     new Planet
                     {
                         Name = "Uranus",
                         Distance = "Distance from Earth: 2.6 billion kilometers"
                     },
                     new Planet
                     {
                         Name = "Neptune",
                         Distance = "Distance from Earth: 4.3 billon kilometers"
                     }};

                     // Set the PlanetList Item to our ListView to display the items
                     planetsListView.ItemsSource = planets;
                }
           }
      }
Let's take a look at what we covered in the preceding code snippet:
- We created a subclass called Planets in the MainPage ContentPage, containing two getters and setters for Name and Distance
- Next, we declared an ObservableCollection called planets, which essentially is a collection that allows any code that has been declared outside the collection to be aware of any changes that occur
- We then initialized our objects for Name and Distance, before finally setting the planets collection to the ItemSource property of the planetsListView property that is contained in the MainPage.xaml file
Now that you have created the user interface and the necessary C# code to populate the ListView contained in our MainPage XAML, our next step is to compile, build, and run the PlanetaryApp in the iOS simulator.
Launching the Planetary app using the iOS simulator
In this section, we will take a look at how to compile and run our PlanetaryApp. You have the option of choosing to run your application using an actual device, or choosing from a list of simulators available for an iOS device.
Let's begin by performing the following steps:
- Ensure that you have chosen the PlanetaryApp.iOS project from the drop-down menu.
- Next, choose your preferred device from the list of available iOS simulators.
- Then, select the Run|Start Without Debugging menu option, as shown in the following screenshot:

- Alternatively, you can also build and run the PlanetaryApp by pressing command + Enter.
When the compilation is complete, the iOS simulator will appear automatically and the PlanetaryApp application will be displayed, as shown in the following screenshot:

As you can see from the preceding screenshot, this currently displays a list of static planetary entries that are displayed in our ListView control contained in our XAML. Congratulations, you have successfully built your first Xamarin.Forms application, as well as the user interface using XAML for the PlanetaryApp ContentPage used by our app!
Using and setting Breakpoints in your code
In this section, we will learn how we can use the Visual Studio for Mac IDE to set Breakpoints in our PlanetaryApp solution. We'll learn how to create conditional Breakpoints that can be used to perform a specific action.
Next, we will learn how we can utilize the Breakpoints Pad to view all Breakpoints that have been set in a solution. Finally, we will learn how we can use the Visual Studio for Mac debugger to step through our code and display the contents of variables in the Immediate window.
Setting a Breakpoint in your Planetary App solution
Breakpoints are a good way for you to pause execution at a particular point in the code contained in your project solution, so that you can debug your code or check the contents of a variable.
To set a breakpoint, simply follow the steps outlined here:
- Locate MainPage.xaml.cs in the .NET Standard (Shared Library) and ensure that the MainPage.xaml.cs file is displayed in the code editor window
- To set a Breakpoint, simply click to the left of the line number at the place in your code that you need to troubleshoot, as you can see in the following screenshot:

As you can see from the preceding screenshot, whenever you set a breakpoint in your code, you will notice that the line will turn red, but this can be overridden in the Visual Studio for Mac Preferences pane.
Using the Breakpoints Pad to view Breakpoints that have been set
Whenever you set Breakpoints in your code, rather than navigating through each of your individual code files in your project solution, you can quickly see all of these in one place by viewing them using the Breakpoints Pad.
To view all of the Breakpoints that have been set in your project, follow the steps outlined here:
- Ensure that the MainPage.xaml.cs file is displayed in the code editor window and choose the View|Debug Pads|Breakpoints menu option:

- You will then see all Breakpoints that have been set in your PlanetaryApp project solution, including the ones that have been set in your subprojects, as can be seen in the following screenshot:

As you can see in the preceding screenshot, you will see all Breakpoints that have been set in your .NET Standard (Shared Library) project, and even the ones that have been set in your PlanetaryApp.iOS, PlanetaryApp.Android and PlanetaryApp.UWP subproject solutions.
Creating conditional Breakpoints to perform an action
In the previous section, we learned about Breakpoints and how you can set these in the code to pause execution whenever your code hits one of them. We also learned how to use the Breakpoints Pad to view all Breakpoints that have been set in your project solution.
Aside from setting Breakpoints, you can also set Conditional Breakpoints that will pause execution based upon whether a condition has been met, which we will covering in this section.
To create a conditional Breakpoint in your project, follow the steps outlined here:
- Ensure that the MainPage.xaml.cs file is displayed in the code editor window.
- Next, right-click in the sidebar to bring up the pop-up menu and choose the New Breakpoint… menu option:

This will then display the Create a Breakpoint dialog where you can specify properties for certain actions, which can be seen in the following screenshot:

As you can see in the preceding screenshot, you will see that you can specify either a Breakpoint Action or When to Take Action, as well as setting Additional Conditions whenever a certain condition happens.
Using the Visual Studio for Mac built-in debugger
In this section, we will learn about the Visual Studio for Mac built-in debugger and how we can use this debugging tool to step through our code and debug our PlanetaryApp. You'll also learn how to work with and use the Immediate window to print out the contents of your code variables.
Overview of the Visual Studio for Mac debugger
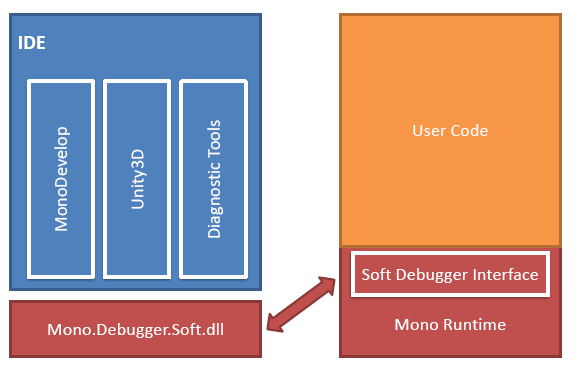
Visual Studio for Mac includes a built-in native debugger that provides debugging support for your iOS, Android, UWP, and Mac applications. The Visual Studio for Mac IDE uses the Mono Soft Debugger, which is a new debugging framework that has been implemented directly into the Mono Framework runtime.
Having this integrated directly into the Mono Framework runtime allows Visual Studio for Mac to debug your managed C# code across each of the different platforms, which can be seen in the following screenshot:
For more information on the Mono Soft Debugger, refer to http://www.mono-project.com/docs/advanced/runtime/docs/soft-debugger.
Using the debugger to step through your code
To start debugging any application, you will need to ensure that your configuration has been set to Debug, as can be seen in the following screenshot:
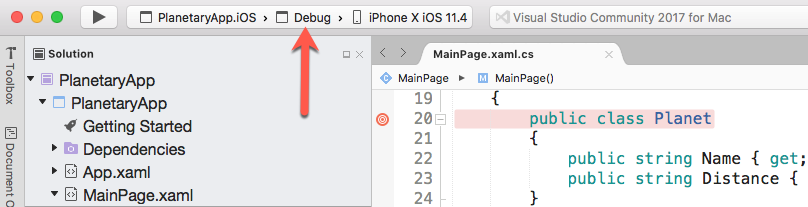
Setting this configuration provides you with a set of helpful tools that support debugging, such as Breakpoints, visualizing the contents of your variables, and viewing the call stack.
Once you have set the configuration for your project solution to Debug, you will need to ensure that you have set the target device or your iOS simulated device that you would like to use, which can be seen in the preceding screenshot.
To start debugging your application, follow these steps:
- Ensure that the MainPage.xaml.cs file is displayed in the code editor window.
- Next, deploy your application by pressing the Play button, or alternatively pressing command + Enter:
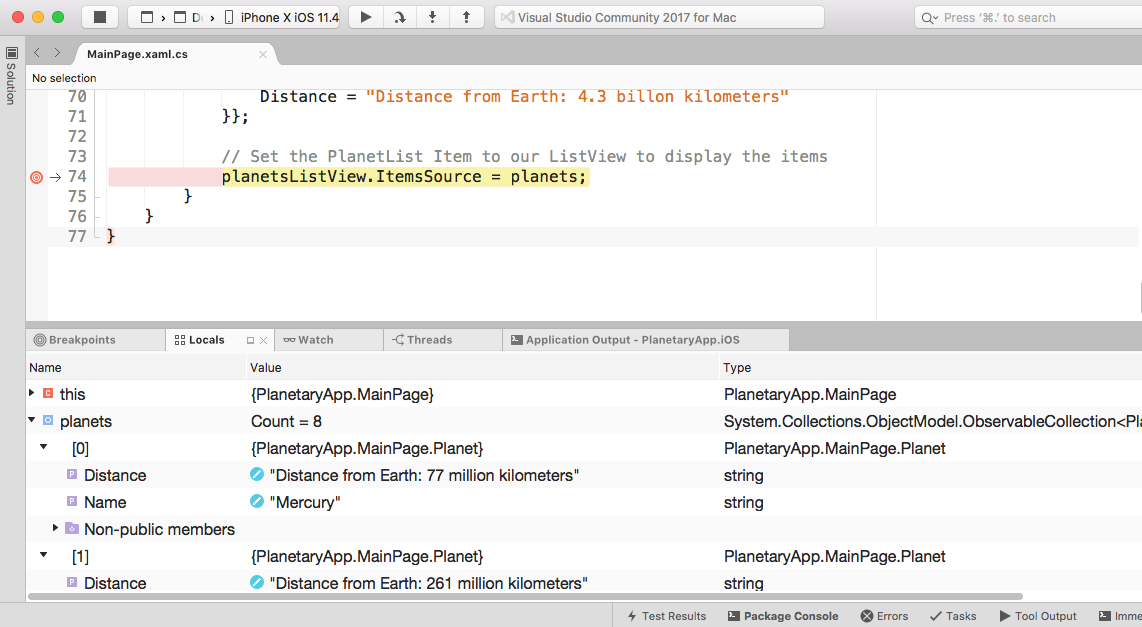
Whenever you hit a Breakpoint, your code will pause and the line will be highlighted in yellow, as can be seen in the preceding screenshot:

You will notice that the debugging tools will appear in the Visual Studio for Mac IDE and consist of four buttons that allow you to run and step through your code.
The following table provides a list of each of the debugging tool buttons, as well as a brief description:
|
Debugging button |
Description |
|
Play |
When this button is pressed, it will begin executing the code until the next breakpoint is reached. |
|
Step Over |
When this button is pressed, it will execute the next line of code. If the next line is a function call, the Step Over button will execute the code contained in the function, and will then stop at the next line of code after the function call. |
|
Step Into |
When this button is pressed, it will execute the next line of code, and if it is determined that the next line is a function call, the Step Into button will stop at the first line of the function. This will allow you to continue line-by-line debugging of the function. Alternatively, if the next line is not a function, it will behave in the same way as the Step Over button. |
|
Step Out |
When this button is pressed, it will return to the line where the current function was called. |
Now that you have an overview of the Visual Studio for Mac built-in debugger and how you can use the debugger to step through your code by using each of the four buttons, our next step is to take a look at how we can use the Immediate window to print the contents of your code variables, which we will be covering in the next section.
Using the Immediate window to print code variable contents
You can also use the Visual Studio for Mac built-in debugger to investigate and analyze the content of your code variables whenever a Breakpoint is reached. In this section, we will learn how to use the Immediate window to analyze the content of code variables.
To display the Immediate window, follow the steps outlined here:
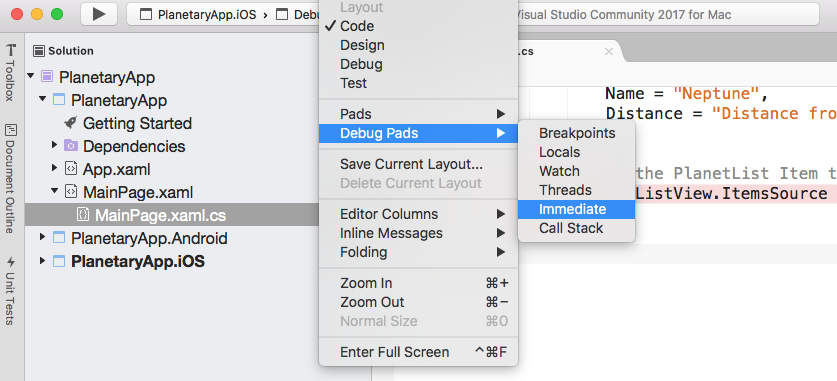
- Ensure that the MainPage.xaml.cs file is displayed in the code editor window and choose the View|Debug Pads|Immediate menu option:
- You will then see the Immediate window displayed, as can be seen in the following screenshot:
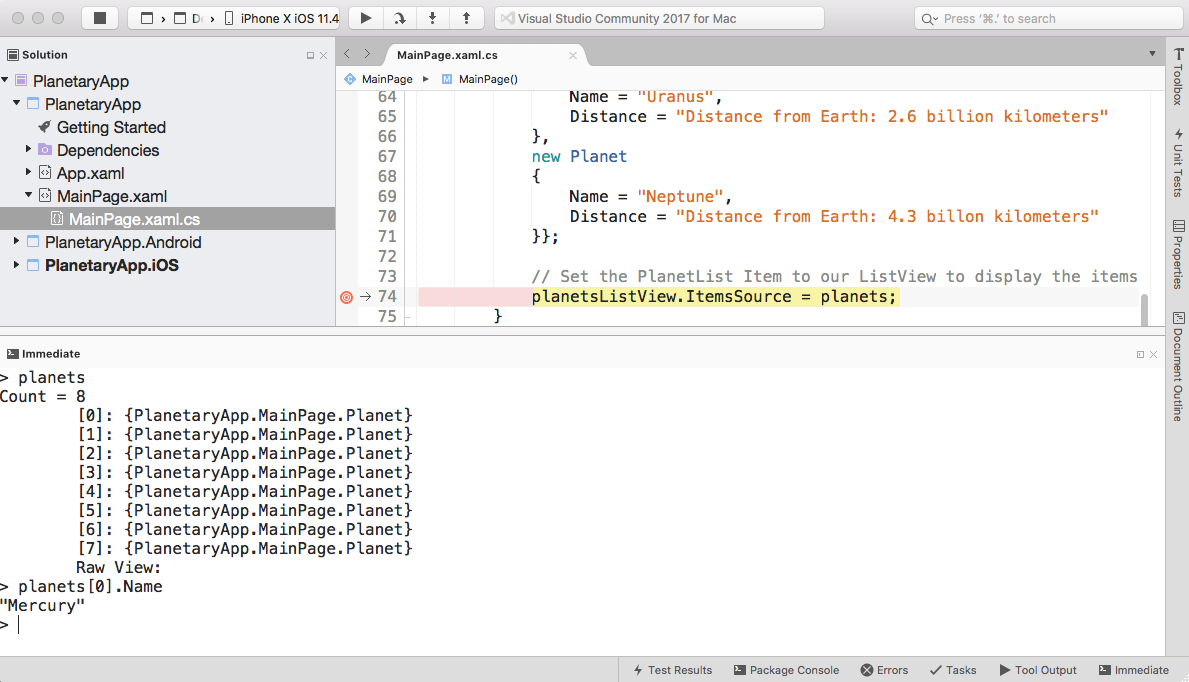
As you can see in the preceding screenshot, you can see the contents of the planets variable by simply typing the name of the variable in the Immediate window. Since our planets variable is a collection, you can reference properties of the collection. Also, in the Immediate window you can change the contents of any item in the collection.
Summary
In this chapter, we learned how to download and install the Visual Studio for Mac IDE, along with the Xamarin Platform SDKs. We then explored the Visual Studio for Mac IDE environment and how we can use the Preferences pane to customize the look and feel of the Visual Studio for Mac IDE. Next, we looked at how to configure and include additional .NET Runtimes, as well as how to go about defining your Android and iOS SDK locations. We also learned about the Xamarin mobile platform and the benefits of developing native versus Xamarin.Forms apps using it.
We then learned how to create a cross-platform Xamarin project for both iOS and Android platforms, create the user interface using the XAML syntax, then write the C# code that will be used to communicate with the XAML to populate the ListView control with planet names, before launching this in the iOS simulator.
Next, we learned how to set Breakpoints, as well as create conditional Breakpoints in your code; we learned how to use the Breakpoints Pad to view all existing Breakpoints that have been set in your PlanetaryApp solution.
Finally, we learned about the built-in debugger in the Visual Studio for Mac IDE, and how you can step through your code and use the Immediate window to print the contents of your variables. In the next chapter, you will learn how to build a Photo Library app using Xamarin.Android and C#.