


 Download code from GitHub
Configuring Products
You can't have an online store without something to sell. Before we can sell something, we have to add products to our store. But before we do that, we have to know the different kinds of products you can add to your store.
We're going to look at three types of products that are included in the free WooCommerce plugin. We're also going to look at the Product Bundles (https://www.woocommerce.com/products/product-bundles/) and Subscriptions (https://woocommerce.com/products/woocommerce-subscriptions/) that are available through premium extensions on the WooCommerce website . Each of these types of products will have unique features, and choosing how you want to display your products in your store is an important decision.
In this chapter, we're going to look into the following:
- Simple products
- Variable products
- Digital products
- Product bundles
- Subscriptions
All of these product types build on each other. So, before you jump ahead and look into variable products, make sure to look at the section on simple products. By the end of this chapter, you should know what types of products you want to offer in your store as well as the technical information you need to configure them correctly.
Exploring the WordPress editor
Before we start adding products to our store, I want to point out one thing about the interface we're going to be using. This is the modern interface for editing posts and pages as of WordPress 5.0:

It's very clean and it uses the new block editor that comes with WordPress 5.0 called Gutenberg.
Simple products
The easiest type of product to create is unsurprisingly called a simple product. It's important to know how to create a simple product because everything else is based on it. So, you'll want to know exactly how to manipulate a simple product.
A good example of a simple product would be anything that comes in one format, such as a coffee cup, ring, or backpack. You can add a new product through your WordPress admin under Products | Add New.
We're going to look into a few different aspects of simple products:
- Required and optional fields—to add useful data to the product page
- Taxonomies (categories and tags)—to make it easy for users to browse through our store
- Images—to instantly communicate what our product looks like
- Description fields—to describe your products.
Product data fields
The only required field for a product is the Product name (also known as the title). If you add the product name to a product and publish it, you'll see an empty page:

You can also add a price to the product. It can be 0 or any positive value. And as soon as you add a price, users can add it to their cart.
Optional fields
When you take a look at the add product screen, it might not be clear where you add all of the information about your products. You'll need to scroll down to see the Product data panel.
This controls the majority of the settings for your product, including the following:
- Product type (simple, variable, grouped, and so on)
- Downloadable and/or virtual
- Price
- Shipping dimensions
- Linked products
For now, leave the product type set to Simple product. Leave Virtual and Downloadable unchecked—we'll look at those later in this chapter.
Under the Product data panel, set a Regular price and a Sale price:

After setting a price, you will likely want to look into the inventory and stock settings. These track how much product you actually have in stock and they make sure that users can only check out while you have items in stock—a very handy tool for a store owner.
Inventory and stock
If you manage stock for your product, you can have WooCommerce track the quantities. Under Product data | Inventory, you can enter something for the following:
- Enter a value for SKU (Stock Keeping Unit), which is an ID for a product.
- Check Manage stock.
- Once Manage stock is checked, you can enter the Stock quantity.
I'm a big fan of setting the Low stock threshold, which will email you when your product is low in stock so you have enough time to order or produce more products.
Shipping
The Shipping tab in the Product data panel is important for two reasons:
- It's what your store uses to calculate live shipping rates.
- It's displayed to the customer on the frontend.
While images can be helpful to show the size and scale of products, nothing beats having dimensions listed on the product page. Consider the following example:
A friend of mine was looking to purchase a new refrigerator and did weeks of research. She found a great model and almost pressed the purchase button when she realized she had no idea of the size. She ended up purchasing a refrigerator from a different company and the original company lost out on $1,000+ sale because they didn't list their dimensions. So, don't forget to list dimensions!
There are two sets of shipping fields you'll want to fill in:
- Weight
- Dimensions (Length, Width, and Height)

You'll need both of these for shipping quotes and they'll automatically appear on the frontend in an additional tab beneath the Add to cart button:

Once you get your shipping taken care of, it's important to make sure users can browse through your store and find your product. That's what taxonomies are for.
Understanding taxonomies
In addition to the Product data tab, you will likely want to organize your product with categories and tags. In WordPress, these are commonly known as taxonomies (https://developer.wordpress.org/themes/basics/categories-tags-custom-taxonomies/).
You can find taxonomies (Product categories and Product tags) in the sidebar:

You typically add one product category and as many product tags as you want to your product. We'll get into maximizing categorization and how to best use categories and tags to help your visitors to navigate your store in the next chapter.
Once you add taxonomies and make your product easy to discover, we need to make sure that there's an image for your product. The image will tell users immediately what they're looking at and whether they should click for more details, so it's incredibly important.
Images
One thing you'll definitely want to look into are images for your product page. Images can instantly communicate what would take 1,000 words. And you can quite easily include dozens of images that engaged users will scroll through.
There are tons of articles on how valuable images can be to your store. Having multiple high-quality images that really show your product in detail and in context (for example, earrings shown on an ear) is crucial to your ability to sell online.
In WooCommerce, you can add as many images as you want using Product image and Product gallery in the sidebar:

The product image is the main image for the product and can be seen on the product page, in the cart, and on the shop page or any category pages.
The product gallery shows up on the product detail page. Users can see thumbnails, click to zoom in, and scroll through them with their arrow keys:

Let's see how to rename images for Search Engine Optimization (SEO) in the following section.
SEO tip for image filenames
We're going to cover SEO later in this book but there is one thing you can do now to prepare your site for better optimization. As you're uploading images to your site, make sure the image filenames make sense.
Filenames such as IMG1234.jpg don't tell search engines anything. If you can rename your image filenames to something that provides context to search engines, this will give you a small SEO boost, as in these examples:
- black-coffee-cup.jpg
- rainbox-umbrella.jpg
- 48-inch-{brand-name}-tv.jpg
We'll continue to optimize our products later in this book, but naming your images before you upload them will save you a ton of time.
Long and short descriptions
In addition to all of the product data, there's the main content area, which is known as the long description:

And there's a panel beneath the product data for the Product short description:

Both of these appear on the product page. The short description is a 1-2 sentence description of the product and appears above the fold on most themes and browsers.
The long description is where you put every detail you can. Most users won't read this but users who do will want to see complete information. Feel free to add paragraphs of content. Break it up with bold phrases and bullet points. You can even add images and headings.
A fully configured simple product
Once you've filled out all of the fields, publish your product and take a look at the resulting product page. The little pieces of information make a really compelling product page:

Now that we've looked into the settings for a simple product, let's take what we've learned, change a couple of fields, and give users a few choices on the product page.
Variable products
Simple products such as coffee cups and umbrellas are great, but many products have some variation. Posters come in multiple sizes, phone cases come in multiple colours, and clothes come in sizes and colours. For these types of products, we have variable products (https://docs.woocommerce.com/document/variable-product/).
We're going to build on what we learned in the last section and we're going to look into a few concepts specific to variations:
- Attributes: These describe our products, for example, size or colour.
- Variations: These are options our users select, for example, a small t-shirt.
- Images for variation: These are uploaded differently than simple products.
- Multi-attribute products: These are for configuring multiple attributes in the backend (for example, size and colour).
- Troubleshooting variations: This is for what to do when something isn't working.
The first thing we have to do is select Variable product at the top of the Product data panel:
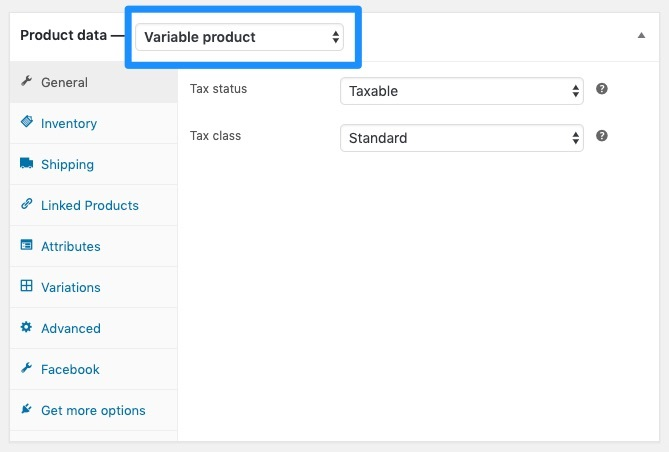
In many ways, variable products are configured exactly like simple products but the information in the backend is slightly rearranged.
Attributes
To be able to select what you want in a product, WooCommerce has to know what the options are. These options are called attributes and they can be found in Product data | Attributes:

There are two types of attributes:
- Custom product attribute
- Global attribute
Functionally speaking, they're almost identical. The biggest difference is that global attributes can be reused between products where custom product attributes have to be created for each product, which means a lot less typing on your end.
Another difference is that global product attributes can be used for filtering. So, if you have filters on the shop page to help users to navigate your products, you can filter by specific attributes and this can only be done with global product attributes. If you have a product with unique attributes that no other product will have, then it's convenient to use the custom product attributes:
- Let's add a global product attribute under Products | Attributes.
- Add a Name for the attribute. The attribute is the name of the categorization, for example, colours, sizes, and cuts—not red, small, or v-neck:

- Then, click on Configure terms. This will let you configure individual values.
- Now, go ahead and add your values, for example, Red, Blue, and Green:

Now, let's take a look at variations for the products.
Variations
Now that we've added attributes, we can use them to create variations. To do so, follow these steps:
- Refresh your edit product page. Then, go to Product data | Attributes.
- Select your attribute from the drop-down menu and click Add.
- You can select your values. If you have clothes that generally come in small, medium, large, and extra large, you might have a particular item that only comes in small and medium. In that case, just select small and medium:

- Make sure you check Used for variations.
- Click Save attributes.
- Click on the Variations tab in the Product data panel. From here, you can add individual variations. In the drop-down menu, select Add variation:

Editing individual variations
Once you have a variation, you can click into it and see per-variation settings. Fields such as Regular price ($), Sale price ($), SKU, inventory, and images are all very easy to customize via variation:

When you're done with each variation, make sure to click Save changes, and when you're done editing the product, click Update.
I've gone ahead and created two variations. Here's what they look like on the frontend:

And here's the same product once we've selected a different option from the drop-down menu:

Let's get started with variations in the next section.
Images for variations
Before we move forward, I want to highlight one aspect that's a little confusing about variations. You can have variations, each with their own unique product image. To do this, follow these steps:
- In the backend under Variations, you can select an image:

- Then, select that variation via drop-down menus; you'll see the image replace the main product image.
This is one of the most useful application variations as you can show people what they're going to get with each variation.
Multi-attribute variations
Some products have multiple attributes. A good example is clothing that could come in different colours and sizes.
You follow the preceding steps in the Attributes and Variations sections, except instead of adding one attribute, you add multiple attributes and make sure they're all used for variations.
With clothing that has a different image for each colour, we can create a variation for each colour and for the size, we can set Any Size:

When a user selects the size and colour, the main image will be replaced and users can add the item to their cart.
Troubleshooting variations
If you ever notice that you don't see the Add to cart button on the frontend after selecting options in drop-down menus, there's very likely something going on wrong with your site.
Since the variations functionality uses JavaScript, it's often a JavaScript error that's preventing product variations from working correctly. It's very likely an error in your theme or one of your plugins.
Using a test site, disable all of your plugins and switch to a default theme and you should see the issue go away. Then, switch your theme back on and see whether the issue persists. If it doesn't appear, turn on your plugins one by one until you see the issue. Then, you know which plugin is responsible and you can reach out to the developer for support.
Digital products
Many store owners sell physical products such as shirts and mugs. But you can also sell downloadable files and virtual products such as memberships. For this, WooCommerce lets you modify a product and give it additional settings.
Digital products aren't a separate type of product (such as simple or variable)—they're a modifier: something you can add on to your simple or variable product. And the new fields will appear in slightly different places depending on the type of product. I'll be showing a simple product with digital fields. If you want to create a variable product with digital fields, the settings will be almost identical but under the Variation settings instead of the General tab.
Digital products
Before we change settings, we need to define terms. WooCommerce uses specific terms with specific meanings. You can make a product virtual and/or downloadable:

Let's see what these options mean:
- Virtual means the product has no physical presence. Therefore, it won't be shipped and the shipping tab will disappear. And if an order contains exclusively virtual products, the customer will skip the shipping section of the checkout.
- Downloadable means the product has downloadable files. There will be additional fields for the downloads. And the customer will automatically be emailed these files after payment is complete.
Downloadable but not virtual
Something I get asked all the time is: Can a product be downloadable but not virtual?
Yes! That's exactly why these are two different settings. A good example would be ordering both a physical CD or DVD, which will be shipped, and an immediate download. In that case, you need to deliver files (downloadable) and you need shipping details (not virtual).
Other good examples would be the following:
- Installation instructions
- FAQs
- Bonus content
Configuring virtual and downloadable products
Configuring a virtual product couldn't be easier. Just check the Virtual setting at the top of the Product data panel.
Downloadable products are a little more work than virtual. Let's start by checking the Downloadable setting at the top of the Product data panel.
Under the General tab of the Product data panel, you'll see a few new fields:

You can add as many files as you want. Give each one a name and link to the file or upload a file.
Are downloadable files safe?
Some store owners worry about uploading files to their site. WooCommerce uses a few different technologies to prevent users from pirating your files (https://docs.woocommerce.com/document/digital-downloadable-product-handling/).
In addition, any files you upload will be hidden from search engines.
For the most part, it isn't worth a ton of effort to prevent piracy. If a user really wants to pirate your content, they'll find a way to do so. But you can always limit downloads and add an expiry time.
One way to protect PDF is with PDF stamping (https://woocommerce.com/products/woocommerce-pdf-watermark/). This embeds personal user information in the PDF (in very small, hard-to-notice print). This way, you have some idea of who shared the original document. This PDF stamping product is a premium plugin, but there are also free solutions on the market.
Large downloadable files
Most web servers have enough space to host files such as desktop wallpapers, PDFs, and images. But if you have a lot of files or if you have large files, then you'll want to find a host for these files. This will speed up your site and could reduce your hosting costs.
Amazon S3 is one of the best tools for sharing static assets such as PDFs, images, and media files. And there's a fairly inexpensive plugin from WooCommerce called Amazon S3 Storage that integrates Amazon S3 with your store (https://woocommerce.com/products/amazon-s3-storage/).
You can also link to Dropbox or any other file storage program you want, although those methods are slightly less secure.
Accessing downloads
Once a user has purchased a downloadable product, they'll see a link to download the file(s) on the Order received page:

And they'll also see the information in an email from WooCommerce as well as under My Account on your site. So, there are multiple places where the user can find their downloads.
PayPal and downloads
If you're using PayPal Standard (included in WooCommerce) for payment, there's a slight delay with the PayPal IPN and customers won't see their downloads until payment is confirmed.
Exploring Product Bundles
One of the best ways to sell more, or help your clients to sell more, is to bundle your products. In WooCommerce, there's a freeway that's built-in and an extension that makes it a much easier process. We'll look at both.
Grouped products
In addition to simple products and variable products, you can also make a Grouped product:
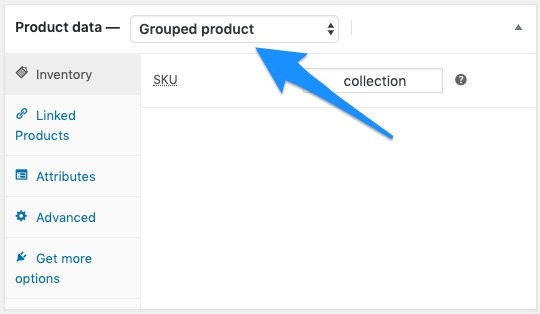
A grouped product is a collection of products that a user can select from one page. A good example of this would be products on a special sale.
When you make a product a grouped product, this will remove the General and Shipping tabs.
To add products to a grouped product, go to the Linked Products tab and notice the new Grouped products field. This field autocompletes previously created products:
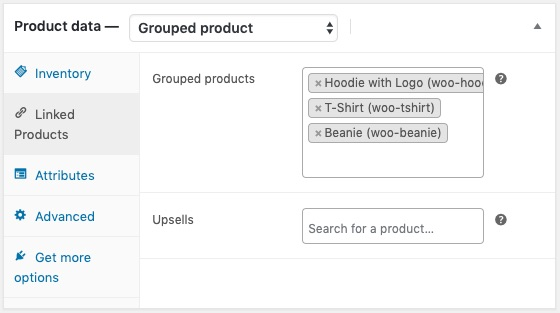
Add a few to your grouped product and then take a look at the frontend. It can be seen in the following screenshot:
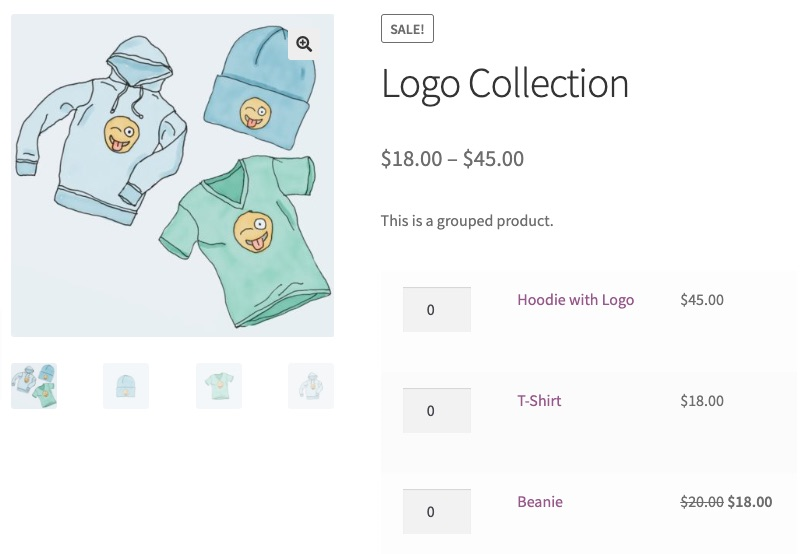
Grouped products are fine for a brand new store but most stores will want something a bit more robust—something that lets you bundle products into one package instead of an à la carte system where you are really just highlighting products.
Product Bundles
WooCommerce offers an extension called Product Bundles (https://woocommerce.com/products/product-bundles/), which lets you create a group of your existing products and you sell them as a group.
Once you install the extension, you'll see a new option in the drop-down menu on the edit product page. Select Bundled Products and you'll see a new tab appear in the Product data panel:
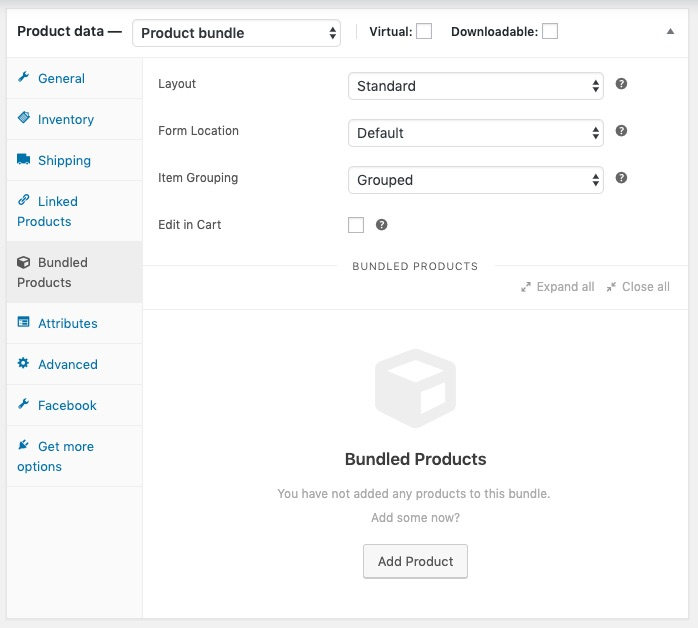
On this tab, there are several new settings:
- Layout
- Form Location
- Item Grouping
- Edit in Cart
And at the bottom, you can add products to the bundle. The one setting you might want to change is the Layout field. This will change how the bundled products appear on the product page. All of the options are useful but for our store, I'm going to select Grid.
Click Add Product and use the auto-suggest field to add a product to your bundle. Once you add a product to the bundle, you'll see options just for that product:
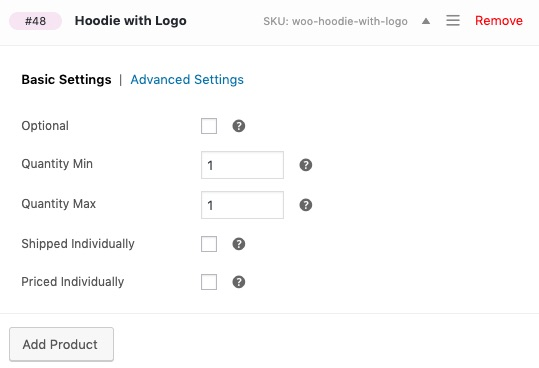
The defaults for this plugin are pretty smart and you don't have to make any changes.
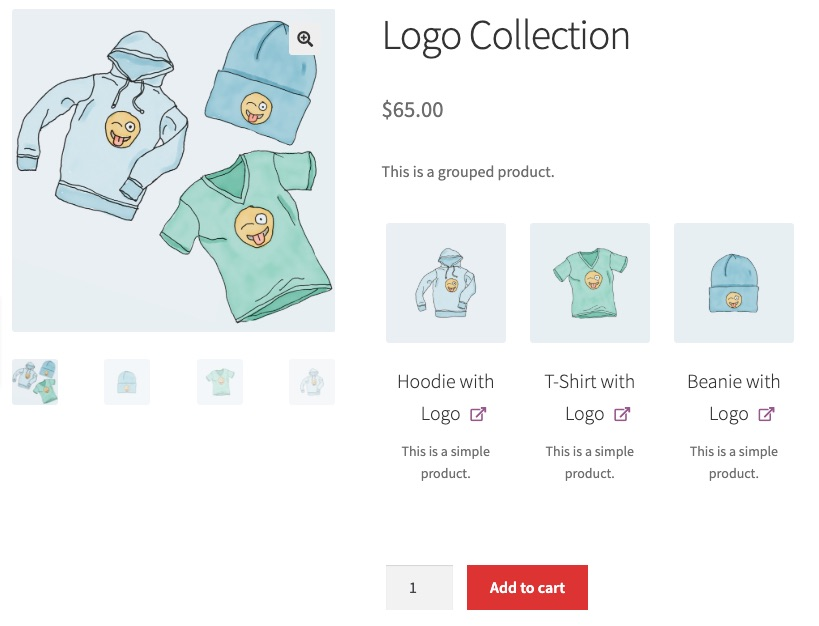
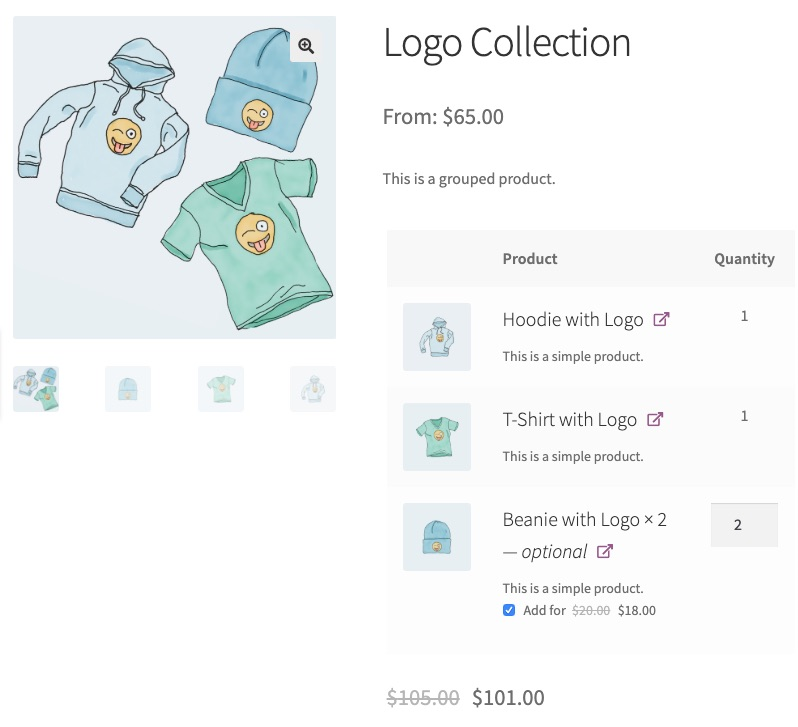
In my case, I want to sell a bundle of three products together. I'll add the rest of the products, add a price under the General tab, and then view the frontend:
In the next section, we will learn about configurable bundles.
Configurable bundles
I like simple bundles but you can also give users options. You can let them customize the number of items in the bundle with minimums and maximums.
Let's say we want to have a bundle where we offer a t-shirt and hoodie and we let users buy a beanie if they want.
We can change the minimum quantity of the beanie to 0 and the maximum quantities to 5. Then, we can enable the Optional and Priced Individually checkboxes:
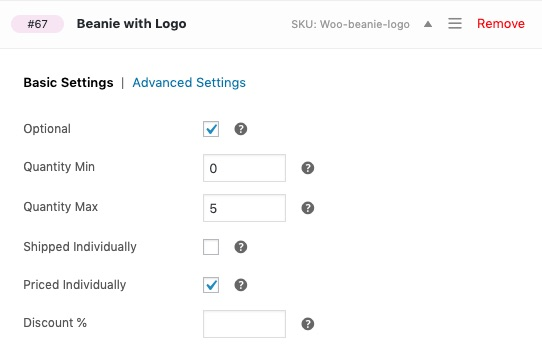
When we check Priced Individually, a new Discount field appears. You can use this to provide a discount on this product for being in the bundle.
This will work great but we can do more for the appearance. On the Bundles tab, change the Layout field to Tabular and now we can see it's a bit easier to edit quantities:
Let's learn about product kits in the next section.
Product kits
Most stores will use bundles at some point, which is why I wanted to show off the Product Bundles feature. I wanted to mention product kitting, which is where you select an item from bucket 1, an item from bucket 2, and an item from bucket 3 and put them all together.
This can be achieved with WooCommerce with an extension called Composite Products (https://woocommerce.com/products/composite-products/). But since a relatively small number of stores have products like that, I don't want to use valuable page space and instead, I recommend you refer to the official product page and documentation.
Subscriptions
The cost to get a new customer (acquisition cost) is pretty high. Many e-commerce stores only make a tiny profit on the first transaction because you often spend money attracting that customer with ads, tradeshows, and so on. That's why lots of store owners love recurring payments, where customers pay every week, month, or year.
WooCommerce Subscriptions (https://woocommerce.com/products/woocommerce-subscriptions/) is one of the most powerful subscription products on the market with all sorts of advanced features, such as the following:
- Pausing subscriptions
- Prorating subscriptions
- Synchronized payments
Creating a subscription product
To create a subscription product, you first have to purchase and install the WooCommerce Subscriptions extension. Once you do, you'll see a new option on the edit product page.
Select Simple subscription although you can also choose Variable subscription, which is very similar to variable products. When you select a subscription product, you'll see new fields:

As you can see, there are a ton of options. You can select the following:
- How often you want to bill people (weekly, bi-weekly, monthly, yearly, twice annually, and so on)
- When the subscription should expire—if ever
- Whether there's a free trial or conversely whether there's a signup fee
- Of course, a price
When you take a look at the frontend, the interface has totally changed to show all of our options to the visitor:

Let's see how to add a recurring payment option for the users in the following section.
Adding a recurring payment option to a product
If you've been to Amazon.com or other big online retailers, they will often offer a "subscribe and save" option for one-off purchases.
This lets users buy a product one time or if it is something they buy regularly, they can subscribe and save some money—and the retailer has consistent sales coming in.
And you can do this with your WooCommerce store with All Products for WooCommerce Subscriptions (https://woocommerce.com/products/all-products-for-woocommerce-subscriptions/), which is another paid extension by WooCommerce. You can turn any product into a subscription, as shown in the following screenshot:

Let's get started with subscription settings in the following section.
Subscription settings
Subscriptions are complex and have their own settings page. Under WooCommerce | Settings | Subscriptions, you can find a ton of settings.
Manual versus automatic renewals
If you live in the US, Canada, or Europe, you should have access to modern gateways that save credit card numbers for you and give you a token so you can charge credit cards.
That's all subscriptions need to automatically charge someone's card. But if you live outside of those areas, or if you are having a hard time finding the right payment gateway, you might not be able to get credit card tokens and bill someone on a recurring basis automatically. In that case, there's a feature called Manual Renewals that you can enable:

Users who have manual renewals will receive an email and will have to click a link and pay for an order every month. It's much more work for the end-user and is only designed for stores that can't get access to modern payment gateways.
If you have a modern gateway, there's a very good chance you don't want to turn on this feature.
Subscription switching
If you have a bunch of related subscriptions, you might want to enable subscription switching. For example, let's say every month, you deliver a 24-pack of soda. If the subscriber starts to overflow with soda rather than cancel, give them a smaller soda pack and a smaller discount so they stay subscribed and can upgrade in future months:

I'm a big fan of enabling subscription switching between variations, but you can also enable them between a group of subscription products.
Synchronization
Some subscription stores do everything on a schedule. As an example, I subscribe to The Simple Jar. They deliver food weekly on a Monday.
They get all orders on Thursday, prep them on Sunday, and deliver on Monday morning. For businesses like this, for example, monthly loot boxes, that have a particular schedule, synchronizing subscriptions is hugely helpful. Customers can subscribe whenever and they'll get the next shipment and their payment will be postponed until the next billing cycle.
Check the Align Subscription Renewal Day checkbox and then follow the instructions under Learn More to enable this feature.
Retrying failed payments
Lastly, there's one other feature that's worth mentioning. Credit card numbers change and payments fail. Subscriptions have a feature that (under some conditions) will retry failed payments (https://docs.woocommerce.com/document/subscriptions/failed-payment-retry/). This gives credit cardholders time to pay off their balance.
Once you start getting the occasionally failed payment, ask your audience if this is something they'd want, and if so, you can enable it in your settings:

These are some of the settings every store owner and manager needs to know for WooCommerce. You should be able to create most product types and do so in such a way that customers are excited to see and purchase your product.
Summary
Listing products on your site is the first major hurdle for new store owners. Now that we know the pros and cons as well as the technical requirements of simple products, variable products, bundles, and subscriptions as well as how to add downloadable files to each of them, we can start adding them to our site.
Once we've added products to our store, we've turned our site from a brochure site to an online catalog. That's halfway to a full online store.
Now that you know how and why to add different types of products to your store, we can look into how to present these products to users so they can find the right product and add them to their cart in the next chapter.


![WordPress Academy: Learn WordPress step by step [Video]](https://static.packt-cdn.com/products/9781839210150/cover/9781839210150-original.png)
