Home Data Mastering Vim

Mastering Vim

By Ruslan Osipov
books-svg-icon Book
eBook $39.99 $27.98
Print $48.99
Subscription $15.99 $10 p/m for three months
$10 p/m for first 3 months. $15.99 p/m after that. Cancel Anytime!
What do you get with a Packt Subscription?
This book & 7000+ ebooks & video courses on 1000+ technologies
60+ curated reading lists for various learning paths
50+ new titles added every month on new and emerging tech
Early Access to eBooks as they are being written
Personalised content suggestions
Customised display settings for better reading experience
50+ new titles added every month on new and emerging tech
Playlists, Notes and Bookmarks to easily manage your learning
Mobile App with offline access
What do you get with a Packt Subscription?
This book & 6500+ ebooks & video courses on 1000+ technologies
60+ curated reading lists for various learning paths
50+ new titles added every month on new and emerging tech
Early Access to eBooks as they are being written
Personalised content suggestions
Customised display settings for better reading experience
50+ new titles added every month on new and emerging tech
Playlists, Notes and Bookmarks to easily manage your learning
Mobile App with offline access
What do you get with eBook + Subscription?
Download this book in EPUB and PDF formats, plus a monthly download credit
This book & 6500+ ebooks & video courses on 1000+ technologies
60+ curated reading lists for various learning paths
50+ new titles added every month on new and emerging tech
Early Access to eBooks as they are being written
Personalised content suggestions
Customised display settings for better reading experience
50+ new titles added every month on new and emerging tech
Playlists, Notes and Bookmarks to easily manage your learning
Mobile App with offline access
What do you get with a Packt Subscription?
This book & 6500+ ebooks & video courses on 1000+ technologies
60+ curated reading lists for various learning paths
50+ new titles added every month on new and emerging tech
Early Access to eBooks as they are being written
Personalised content suggestions
Customised display settings for better reading experience
50+ new titles added every month on new and emerging tech
Playlists, Notes and Bookmarks to easily manage your learning
Mobile App with offline access
What do you get with eBook?
Download this book in EPUB and PDF formats
Access this title in our online reader
DRM FREE - Read whenever, wherever and however you want
Online reader with customised display settings for better reading experience
What do you get with video?
Download this video in MP4 format
Access this title in our online reader
DRM FREE - Watch whenever, wherever and however you want
Online reader with customised display settings for better learning experience
What do you get with video?
Stream this video
Access this title in our online reader
DRM FREE - Watch whenever, wherever and however you want
Online reader with customised display settings for better learning experience
What do you get with Audiobook?
Download a zip folder consisting of audio files (in MP3 Format) along with supplementary PDF
What do you get with Exam Trainer?
Flashcards, Mock exams, Exam Tips, Practice Questions
Access these resources with our interactive certification platform
Mobile compatible-Practice whenever, wherever, however you want
BUY NOW $10 p/m for first 3 months. $15.99 p/m after that. Cancel Anytime!
eBook $39.99 $27.98
Print $48.99
Subscription $15.99 $10 p/m for three months
What do you get with a Packt Subscription?
This book & 7000+ ebooks & video courses on 1000+ technologies
60+ curated reading lists for various learning paths
50+ new titles added every month on new and emerging tech
Early Access to eBooks as they are being written
Personalised content suggestions
Customised display settings for better reading experience
50+ new titles added every month on new and emerging tech
Playlists, Notes and Bookmarks to easily manage your learning
Mobile App with offline access
What do you get with a Packt Subscription?
This book & 6500+ ebooks & video courses on 1000+ technologies
60+ curated reading lists for various learning paths
50+ new titles added every month on new and emerging tech
Early Access to eBooks as they are being written
Personalised content suggestions
Customised display settings for better reading experience
50+ new titles added every month on new and emerging tech
Playlists, Notes and Bookmarks to easily manage your learning
Mobile App with offline access
What do you get with eBook + Subscription?
Download this book in EPUB and PDF formats, plus a monthly download credit
This book & 6500+ ebooks & video courses on 1000+ technologies
60+ curated reading lists for various learning paths
50+ new titles added every month on new and emerging tech
Early Access to eBooks as they are being written
Personalised content suggestions
Customised display settings for better reading experience
50+ new titles added every month on new and emerging tech
Playlists, Notes and Bookmarks to easily manage your learning
Mobile App with offline access
What do you get with a Packt Subscription?
This book & 6500+ ebooks & video courses on 1000+ technologies
60+ curated reading lists for various learning paths
50+ new titles added every month on new and emerging tech
Early Access to eBooks as they are being written
Personalised content suggestions
Customised display settings for better reading experience
50+ new titles added every month on new and emerging tech
Playlists, Notes and Bookmarks to easily manage your learning
Mobile App with offline access
What do you get with eBook?
Download this book in EPUB and PDF formats
Access this title in our online reader
DRM FREE - Read whenever, wherever and however you want
Online reader with customised display settings for better reading experience
What do you get with video?
Download this video in MP4 format
Access this title in our online reader
DRM FREE - Watch whenever, wherever and however you want
Online reader with customised display settings for better learning experience
What do you get with video?
Stream this video
Access this title in our online reader
DRM FREE - Watch whenever, wherever and however you want
Online reader with customised display settings for better learning experience
What do you get with Audiobook?
Download a zip folder consisting of audio files (in MP3 Format) along with supplementary PDF
What do you get with Exam Trainer?
Flashcards, Mock exams, Exam Tips, Practice Questions
Access these resources with our interactive certification platform
Mobile compatible-Practice whenever, wherever, however you want
  1. Free Chapter
    Getting Started
About this book
Vim is a ubiquitous text editor that can be used for all programming languages. It has an extensive plugin system and integrates with many tools. Vim offers an extensible and customizable development environment for programmers, making it one of the most popular text editors in the world. Mastering Vim begins with explaining how the Vim editor will help you build applications efficiently. With the fundamentals of Vim, you will be taken through the Vim philosophy. As you make your way through the chapters, you will learn about advanced movement, text operations, and how Vim can be used as a Python (or any other language for that matter) IDE. The book will then cover essential tasks, such as refactoring, debugging, building, testing, and working with a version control system, as well as plugin configuration and management. In the concluding chapters, you will be introduced to additional mindset guidelines, learn to personalize your Vim experience, and go above and beyond with Vimscript. By the end of this book, you will be sufficiently confident to make Vim (or its fork, Neovim) your first choice when writing applications in Python and other programming languages.
Publication date:
November 2018
Publisher
Packt
Pages
330
ISBN
9781789341096


Getting Started

Welcome to Mastering Vim, a book which will teach you to get good with Vim, its plugins, and its ideological successors!

This chapter will establish a foundation for working with Vim. Every tool is built with a particular usage philosophy in mind, and Vim is not an exception. Vim introduces a different way of working with text compared to what most people are used to these days. This chapter focuses on highlighting these differences and establishing a set of healthy editing habits. It will let you approach Vim in a Vim-friendly frame of mind and will ensure you're using the right tools for the job. To make examples concrete, we will be using Vim to create a small Python application throughout this chapter.

The following topics will be covered in this chapter:

  • Modal versus modeless interfaces, and why is Vim different from other editors
  • Installing and updating Vim
  • The gVim - the graphical user interface for Vim
  • Configuring Vim for working with Python and editing your .vimrc file
  • Common file operations: opening, modifying, saving, and closing files
  • Moving around: navigating with arrow keys, hjkl, by words, paragraphs, and so on

  • Making simple edits to files and combining editing commands with movement commands
  • Persistent undo history
  • Navigating the built-in Vim manual


Technical requirements

Throughout this chapter we will be writing a basic Python application. You don't have to download any code to follow along with this chapter as we'll be creating files from scratch. However, if you ever get lost and need more guidance, you can view the resulting code on GitHub:

https://github.com/PacktPublishing/Mastering-Vim/tree/master/Chapter01

We will be using Vim to primarily write Python code throughout this book, and it is assumed that the reader is somewhat familiar with the language. Examples assume you're using Python 3 syntax.

If you must live in the past, you can convert Python 3 examples to Python 2 code by changing the print() command syntax. Change all of print('Woof!') to print 'Woof!' to make the code run in Python 2.
We will also be creating and modifying Vim configuration, which is stored in a .vimrc file. The resulting .vimrc file is available from the previously mentioned GitHub link.
 

Let’s start a conversation (about modal interfaces)

If you’ve ever edited text before, you are most likely to be familiar with modeless interfaces. It’s the default option chosen by modern mainstream text editors, and that’s how many of us learned to work with text.

The term modeless refers to the fact that the each interface element has only one function. Each button press results in a letter showing up on screen, or some other action being performed. Each key (or a combination of keys) always does the same thing: the application always operates in a single mode.

But it’s not the only way.

Welcome to the modal interface, where each trigger performs a different action based on context. The most common example of a modal interface that we encounter today is a smartphone. Each time we work in different applications or open different menus, a tap on the screen performs a different function.

It’s similar when it comes to text editors. Vim is a modal editor, meaning that a single button press might result in different actions, depending on context. Are you in insert mode (a mode for entering text)? Then hitting o would put the letter o on the screen. But as soon as you switch into a different mode, the letter o will change its function to adding a new line below the cursor.

Working with Vim is like having a conversation with your editor. You tell Vim to delete the next three words by pressing d3w (delete 3 words), and you ask Vim to change text inside quotes by pressing ci" (change inside " [quotes]).

You may hear very frequently that Vim is faster than other editors, but it’s not necessarily the point of Vim. Vim lets you stay in the flow when working with text. You don’t have to break the pace to reach for your mouse, you don’t have to hit a single key exactly 17 times to get to a particular spot on the page. You don’t have to drag your mouse millimeter by millimeter to ensure you capture the right set of words to copy and paste.

When working with a modeless editor, workflow is filled with interruptions.

Working with modal editors, and Vim in particular, is like having a conversation with your editor. You ask the editor to perform actions ("delete three words", "change inside quotes") in a consistent language. With Vim, editing becomes a much more deliberate exercise.


Installation

Vim is available on every platform, and comes installed on Linux and Mac OS (however, you may want to upgrade Vim to a more recent version). Find your system in the following paragraphs, and skim through the instructions to set up.

Setting up on Linux

Linux machines come with Vim installed, which is great news! However, it might be rather out of date, and Vim 8 introduces some much-needed optimizations. Pull up your Command Prompt, and run the following code:

$ git clone https://github.com/vim/vim.git
$ cd vim/src
$ make
$ sudo make install

If you're running into issues as you're installing Vim, you might be missing some dependencies. If you're using a Debian-based distribution, the following command should add common missing dependencies : $ sudo apt-get install make build-essential libncurses5-
$ sudo apt-get install make build-essential libncurses5-dev
libncursesw5-dev --fix-missing

This will make sure you’re on the latest major and minor patch of Vim. If you don’t care for being on the cutting edge, you can also update Vim using a package manager of your choice. Different Linux distributions use different package managers; the following list includes some common ones:

Distribution Command to install the latest version of Vim
Debian-based (Debian, Ubuntu, Mint)

$ sudo apt-get update

$ sudo apt-get install vim-gtk

CentOs (and Fedora prior to Fedora 22)

$sudo yum check-update

$sudo yum install vim-enhanced

Fedora 22+

$sudo dnf check-update

$sudo dnf install vim-enhanced

Arch

$sudo pacman -Syu

$sudo pacman -S gvim

FreeBSD

$sudo pkg update

$sudo pkg install vim

You can see in the preceding table that Vim uses package names for different repositories. Packages like vim-gtk on Debian-based distributions or vim-enhanced on CentOS come with more features enabled (like GUI support for instance).

Do keep in mind that package manager repositories tend to lag behind from anywhere between a few months to a few years.

That’s it, you’re now ready to dive into the world of Vim! You can start the editor by typing the following command:

$ vim

On modern systems, you can also start Vim by invoking vi. However, it's not always the case: on older systems the two are different binaries. Vi is Vim’s predecessor (Vim stands for Vi improved). Today, it’s merely an alias pointing to Vim. There are no reasons to use Vi over Vim, unless, for some reason, you're unable to install the latter.

Setting up on MacOS

MacOS comes prepackaged with Vim, but the version can be outdated. There are a few ways to install a fresh version of Vim, and this book will cover two. First, you can install Vim using Homebrew, a package manager for MacOS. You'll have to install Homebrew first, though. Second, you can download a .dmg image of MacVim. This experience would be more familiar because Mac users are used to the visual interface.

Since this book covers interactions with the Command line, I recommend taking the Homebrew route. But you're welcome to go forward with installing the image if interacting with the Command line does not interest you.

Using Homebrew

Homebrew is a third-party package manager for MacOS which makes it easy to install and keep packages up to date. Instructions on how to install Homebrew are available on https://brew.sh, and, as of the moment of writing this book, consist of a single line executed in the following Command line:

$ /usr/bin/ruby -e "$(curl -fsSL https://raw.githubusercontent.com/Homebrew/install/master/install)"

The following screenshot shows the list of operations you will then see Homebrew perform during installation:

Hit Enter to continue.

If you don't have XCode installed (which is often a prerequisite for any kind of development-related activity on Mac), you'll get an XCode installation pop-up. We won't be using XCode directly, and you can install it with default settings.

This should take a while to run, but you'll have Homebrew installed by the end: a fantastic tool you can use to install a lot more than Vim! You'll see Installation successful! in bold font once the installation is complete.

Let's install a new version of Vim now using the following command:

$ brew install vim

Homebrew will install all the necessary dependencies too, so you won't have to worry about a thing, as can be seen in the following screenshot:

If you already have Homebrew installed, and you have installed Vim in the past, the preceding command will produce an error. You may want to make sure you have the last version of Vim, though, so run the following command:

$ brew upgrade vim

You should now be ready to enjoy Vim; let's try opening it with the following command:

$ vim

Welcome to Vim:

Downloading a .dmg image

Navigate to https://github.com/macvim-dev/macvim/releases/latest and download MacVim.dmg.

Open MacVim.dmg, and then drag the Vim icon into the Applications directory, as can be seen in the following screenshot:

Depending on the security settings of your Mac, you might be greeted by an error when navigating to the Applications folder and trying to open the MacVim app, as demonstrated in the following screenshot:

Open your Applications folder, find MacVim, right click the icon and select Open. The following prompt will pop up:

Now hit Open, and MacVim can be opened as usual from now on. Give it a shot:

Setting up on Windows

Windows provides two primary routes for using Vim: setting up Cygwin and providing a more Unix-like command-line experience, or installing gVim—a graphical version of Vim (which supports working with cmd.exe on Windows). I recommend installing both and picking your favorite: gVim feels slightly more at home on Windows (and it is easier to install), while Cygwin might feel more at home if you're used to the Unix shell.

Unix-like experience with Cygwin

Cygwin is a Unix-like environment and a command-line interface for Windows. It aims to bring powerful Unix shell and supporting tools to a Windows machine.

Installing Cygwin

To begin the installation process, navigate to https://cygwin.com/install.html and download either setup-x86_64.exe or setup-x86.exe depending on the version of Windows you're using (64 bit or 32 bit respectively).

If you're not sure whether your system is 32 bit or 64 bit, you can open Control Panel | System and Security | System, and look at System type. For example, my Windows machine shows System type: 64-bit Operating System, x64-based processor.
Open the executable file, and you will be greeted by the following Cygwin installation window:

Hit Next > a few times, proceeding with the default settings:

  • Download source: Install from Internet
  • Root directory: C:\cygwin64 (or a recommended default)
  • Install for: all users
  • Local package directory: C:\Downloads (or a recommended default)
  • Internet connection: Use System Proxy Settings
  • Download site: http://cygwin.mirror.constant.com (or any available option)

After this, you will be greeted with the Select Packages screen. Here, we want to select the vim, gvim, and vim-doc packages. The easiest way to do this is to type vim in a search box, expand the All |Editors category, and click on the arrow-looking icons next to the desired packages, as demonstrated in the following screenshot:

The preceding screenshot shows version 8.0.1567-1. This is the only version available at the moment of writing this book, November 2018. The primary difference is the absence of the :terminal command (see Chapter 5, Build, Test, and Execute) in Vim 8.0 vs 8.1.

You may want to install curl from under the Net category, and git from under the Devel category, as we'll be using both in chapter 3. It might also be helpful to install dos2unix from under the Utils category, which is a utility used for converting Windows-style line endings to Linux-style line endings (something you might run into once in a while).

Hit Next > two more times to proceed, which will begin the installation. Installation will take some time, and now would be a great moment to prematurely congratulate yourself with some coffee!

You might get a few post-install script errors, which you can safely dismiss (unless you see any errors related to Vim—then Google is your friend: search for an error text and try to find a solution).

Hit Next > a few more times, proceeding with the defaults:

  • Create icon on Desktop
  • Add icon to Start Menu

Congratulations, you now have Cygwin installed with Vim!

If you ever need to install additional packages in Cygwin, just rerun the installer while selecting the packages you want.

Using Cygwin

Open Cygwin, the program will be called Cygwin64 Terminal or Cygwin Terminal, depending on the version of your system, as can be seen in the following screenshot:

Open it! You will see the following prompt, familiar to Linux users:

Cygwin supports all of the Unix-style commands we will be using in this book. This book will also say if any commands need to be changed to work with Cygwin. But for now, let's open Vim and proceed onto the next chapter! Type vim and hit Enter to start Vim, as demonstrated in the following screenshot:

Cygwin is a way to get a Linux-like shell experience on Windows, meaning you'll have to follow Linux specific instructions throughout this book if you decide to use Cygwin.

You'll also want to be careful with Windows-style line endings vs Linux-style line endings, as Windows and Linux treat line endings differently. If you run into an odd issue with Vim complaining about ^M characters its unable to recognize, run the dos2unix utility on the offending file to resolve the issue.

Visual Vim with gVim

In this section you can read more about the graphical version of Vim in Vanilla Vim vs GVim. As it always is with Windows, the process is slightly more visual. Navigate to www.vim.org/download.php#pc in your browser and download an executable installer. At the moment of writing this book, November 2018, the binary is called gvim81.exe, where 81 stands for version 8.1.

Open the executable and follow the prompts on the screen, as demonstrated by the following screenshot:

Let's go ahead and hit Yes, then I Agree until we arrive at the Installation Options screen. We're happy with most of the default options gVim has to offer, except that you might want to enable Create .bat files for command line use. This option will make the vim command work in Windows Command Prompt. Some examples in this book rely on having a Command Prompt, so enabling this option would help you follow along.

Here's a screenshot of the Installation Options screen with the proper boxes checked off:

Hit Next >. You'll want to continue with the following settings:

  • Select the type of install: Typical, (after Create .bat files for command line use is enabled, type of install value changes to Custom automatically).
  • Do not remap keys for Windows behavior
  • Right button has a popup menu, left button starts visual mode
  • Destination Folder: C:\Program Files (x86)\Vim (or a recommended default)

Once you're done, hit Install and then Close, as demonstrated in the following screenshot:

Say No to the request to see the README file (who needs a manual, huh?) as seen in the following command:

You will now have a few icons pop on your desktop, the most interesting one being gVim 8.1 as shown in the following screenshot:

Start it, and you're ready to proceed! Happy Vimming!

Verifying and troubleshooting the installation

Regardless of the platform you used to install Vim, it's good to make sure that, with Vim, all the right features enabled. On a command line, run the following command:

$ vim --version

You will see the following output, with a set of features having a + and a - in front of them:

In the preceding screenshot, you can see that my Vim was actually compiled with Python 2 support (+python) instead of Python 3 support (-python3). To correct the issue, I'd have to either recompile Vim with +python3 enabled or find a package which distributes a compiled version of Vim with +python3 enabled.

For a list of all features Vim can have enabled, see :help feature-list.

For instance, if we wanted to recompile Vim 8.1 with Python 3 support on Linux, we would do the following:

$ git clone https://github.com/vim/vim.git
$ cd vim/src
$ ./configure --with-features=huge --enable-python3interp
$ make
$ sudo make install
We're passing the --with-features=huge flag in order to compile Vim with most features enabled. However, --with-features=huge does not install language bindings, so we need to explicitly enable Python 3.

In general, if your Vim is not behaving like other Vim installations (including behavior described in this book), you might be missing a feature.

Depending on your system and features you require, the process might be slightly or vastly different. A quick web search along the lines of Installing Vim <version> with +<feature> on <operating system> should help.


Vanilla Vim vs gVim

Using instructions given before, you’ve installed two flavors of Vim: command-line Vim, and gVim. This is how gVim looks on Windows:

The gVim hooks up a graphical user interface (GUI) to Vim, has better mouse support, and adds more context menus. It also supports a wider range of color than many terminal emulators, and provides some quality of life features you’d expect from a modern GUI.

You can launch gVim by running gVim 8.1 executable on Windows, or on Linux and Mac OS by invoking the following command:

$ gvim

Windows users might favor gVim.

This book focuses on increasing the effectiveness of one’s text editing skills, so we will shy away from navigating multiple menus in gVim, as these are rather intuitive, and take the user out of the flow.

Hence, we will focus on a non-graphical version of Vim, but everything that’s applicable to Vim also applies to gVim. The two share configuration, and you can swap between the two as you go. Overall, gVim is slightly more newbie friendly, but it doesn’t matter which one you choose to use for the purpose of this book.

Try both!


Configuring Vim with your .vimrc

Vim reads configuration from a .vimrc file. Vim works out of the box, but there are certain options which make working with code a lot easier.

In Unix-like systems, files starting with a period . are hidden. To see them, run ls -a in a Command line.

In Linux and MacOS, .vimrc is located in your user directory (the full path would be /home/<username>/.vimrc). You can also find out your user directory by opening a Command Prompt and running the following command:

$ echo $HOME

Windows does not allow periods in file names, so the file is named _vimrc. It's usually located in C:\Users\<username>\_vimrc, but you can also locate it by opening the Windows Command Prompt and running the following command:

$ echo %USERPROFILE%
If you run into problems, open Vim and type in :echo $MYVIMRC followed by Enter. It should display where Vim is reading the .vimrc from.

Find the proper location for your OS, and place the prepared configuration file there. You can download the .vimrc used for this chapter from GitHub at https://github.com/PacktPublishing/Mastering-Vim/tree/master/Chapter01. The following code shows the contents of a .vimrc file used in this chapter:

syntax on                  " Enable syntax highlighting.
filetype plugin indent on " Enable file type based indentation.

set autoindent " Respect indentation when starting a new line.
set expandtab " Expand tabs to spaces. Essential in Python.
set tabstop=4 " Number of spaces tab is counted for.
set shiftwidth=4 " Number of spaces to use for autoindent.

set backspace=2 " Fix backspace behavior on most terminals.

colorscheme murphy " Change a colorscheme.

Lines starting with a double quote " are comments and are ignored by Vim. These settings bring in some sensible defaults, like syntax highlighting and consistent indentation. They also fix one of the common sticking points in a bare-bones Vim installation—inconsistent backspace key behavior across different environments.

When working with Vim configuration, you can try things out before adding them to your .vimrc file To do that, type : followed by a command, for example, :set autoindent (press Enter to execute). If you ever want to know the value of a setting, add ? at the end of the command: for example, :set tabstop? will tell you the current tabstop value.

I've also changed the colorscheme to make screenshots look better in print, but you don't have to.

Vim 8 comes prepackaged with the following color themes: blue, darkblue, default, delek, desert, elflord, evening, industry, koehler, morning, murhpy, pablo, peachpuff, ron, shine, slate, torte, zellner. You can try out a color theme by typing :colorscheme <name> and hitting Enter, and you can cycle through the available color scheme names by typing :colorscheme followed by a space and by hitting Tab multiple times. You can read more about configuring Vim and color schemes in chapter 7, Making Vim Your Own.


Common operations (or how to exit Vim)

We will now focus on interacting with Vim without the use of a mouse or navigational menus. Programming is a focus intensive task on its own. Hunting through context menus is nobody's idea of a good time, and keeping our hands on the home row of your keyboard helps trim constant switching between a keyboard and a mouse.

Opening files

First, start your favorite Command Prompt (Terminal in Linux and macOS, Cygwin in Windows). We'll be working on a very basic Python application. For simplicity's sake, let's make a simple square root calculator. Run the following command:

$ vim animal_farm.py
If you're using gVim—you can open a file by going into a File menu and choosing Open. Sometimes graphical interface is exactly what you need!

This opens a file named animal_farm.py. If the file existed, you'd see its contents here, but since it doesn't, we're greeted by an empty screen, as shown in the following example:

You can tell that the file doesn't exist by the [New File] text next to a file name in the status line at the bottom of the screen. Woohoo! You've just opened your first file with Vim!

Vim's status line often contains a lot of useful information. That's the primary way for Vim to communicate with a user, so do keep an eye out for messages in the status line!

If you already have Vim open—you can load a file by typing the following, and hitting Enter:

:e animal_farm.py

You have just executed your first Vim command! Pressing colon character : enters a command-line mode, which lets you enter a line of text which Vim will interpret as a command. Commands are terminated by hitting the Enter key, which allows you to perform various complex operations, as well as accessing your system's Command line. Command :e stands for edit.

Vim help often refers to the Enter key as a <CR>, which stands for carriage return.

Changing text

By default you're in Vim's normal mode, meaning that every key press corresponds to a particular command. Hit i on your keyboard to enter an insert mode. This will display -- INSERT -- in a status line (at the bottom), (and, if you're using gVim, it will change the cursor from a block to a vertical line), as can be seen in the following example:

The insert mode behaves just like any other modeless editor. Normally, we wouldn't spend a lot of time in insert mode except for adding new text.

You've already encountered three of Vim's modes: command-line mode, normal mode, and insert mode. This book will cover more modes, see Chapter 3, Follow the Leader – Plugin Management for details and explanation.

Let's create our Python application by typing in the following code. We'll be navigating this little snippet throughout this chapter:

To get back to normal mode in Vim, hit Esc on your keyboard. You'll see that -- INSERT -- has disappeared from the status line. Now, Vim is ready to take commands from you again!

The preceding code is not showing Python best practices and is provided to illustrate some of Vim's capabilities.

Saving and closing files

Let's save our file! Execute the following command:

:w
Don't forget to hit Enter at the end of a command to execute it.

:w stands for write.

The write command can also be followed by a filename, making it possible to write to a different file, other than the one that is open (:w animal_farm_2.py). To change the current open file to a new one when saving, use :saveas command: :saveas animal_farm_2.py.

Let's exit Vim and check if the file was indeed created. :q stands for quit. You can also combine write and quit commands to write and exit by executing :wq.

:q

If you made changes to a file and want to exit Vim without saving the changes, you'll have to use :q! to force Vim to quit. Exclamation mark at the end of the command forces its execution.

Many commands in Vim have shorter and longer versions. For instance, :e, :w, and :q are short versions of :edit, :write, and :quit. In the Vim manual, the optional part of the command is often annotated in square brackets ([]). For example, :w[rite] or :e[dit].

Now that we're back in our system's Command line, let's check the contents of a current directory, as seen in the following code:

$ ls
$ python3 animal_farm.py
$ python3 animal_farm.py cat dog sheep
In Unix, ls lists contents of a current directory. python3 animal_farm.py executes the script using a Python 3 interpreter, and python3 animal_farm.py cat dog sheep passes three arguments (cat, dog, sheep) to our script.

The following screenshot shows what the three preceding commands should output:

A word about swap files

By default, Vim keeps track of the changes you make to files in swap files. The swap files are created as you edit the files, and are used to recover the contents of your files in case either Vim, your SSH session, or your machine crashes. If you don't exit Vim cleanly, you'll be greeted by the following screen:

You can either hit r to recover the swap file contents, or d to delete the swap file and dismiss the changes. If you decide to recover the swap file, you can prevent the same message from showing up next time you open the file in Vim by reopening a file and running :e, and pressing d to delete the swap file.

By default, Vim creates files like <filename>.swp and .<filename>.swp in the same directory as the original file. If you don't like your file system being littered by swap files, you can change this behavior by telling Vim to place all the swap files in a single directory. To do so, add the following to your .vimrc:

set directory=$HOME/.vim/swap//
If you're on Windows, you should use set directory=%USERDATA%\.vim\swap// (note the direction of the last two slashes).

You can also choose to disable the swap files completely by adding set noswapfile to your .vimrc.


Moving around: talk to your editor

Vim allows you to navigate content a lot more efficiently than most conventional editors. Let's start with the basics.

You can move your cursor around character by character by using arrow keys or letters h, j, k, and l. This is the least efficient and the most precise way to move:

Key Alternative key Action
h Left arrow Move cursor left
j Down arrow Move cursor down
k Up arrow Move cursor up
l Right arrow Move cursor right

The following diagram is a visual representation which might be a little easier on the eyes:

Vi (Vim's predecessor) was created on an old ADM-3A terminal, which didn't have arrow keys. Keys h, j, k, and l were used as arrows.


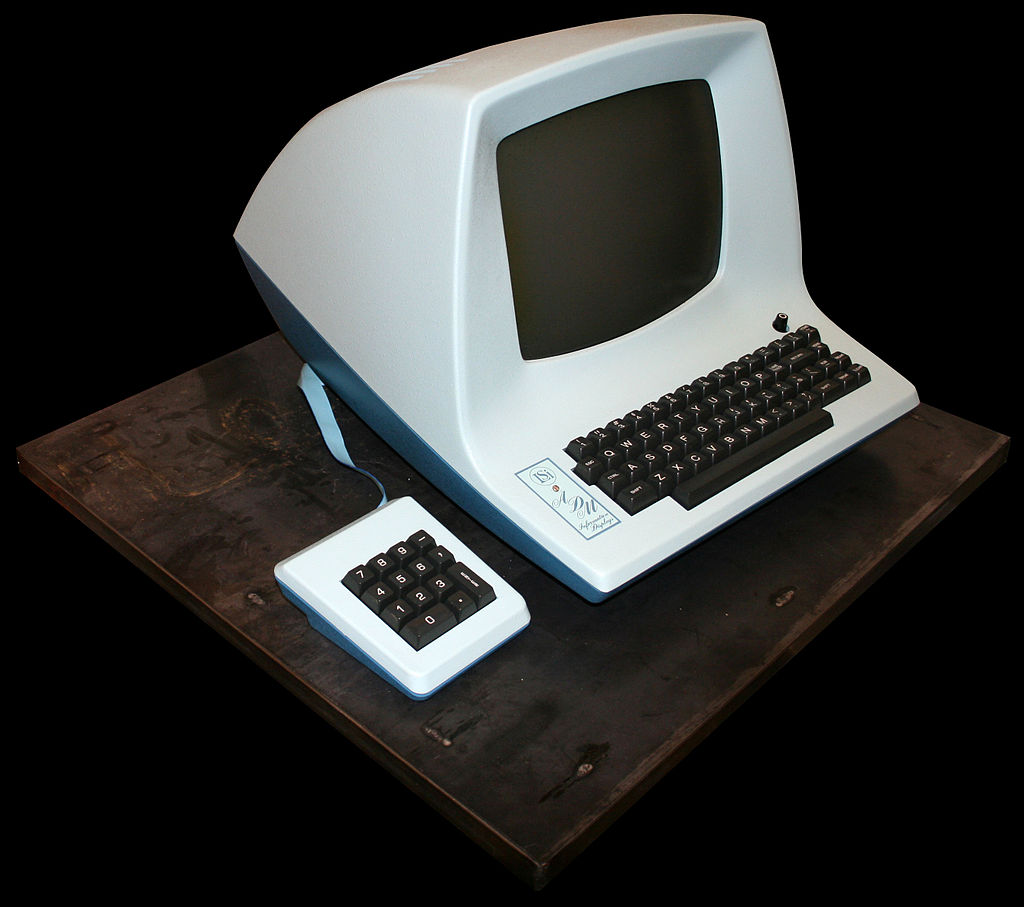
Image by Chris Jacobs, Wikipedia (CC BY-SA 3.0)

Try it! There's a lot of value to getting used to hjkl for movement: your hands stay on the home row of your keyboard. This way you don't have to move your hands and it helps you stay in the flow. Furthermore, many applications treat hjkl as arrow keys—you'd be surprised how many tools respond to these.

Now you might be inclined to hit directional keys multiple times to get to a desired position, but there's a better way! You can prefix every command by a number, which would repeat the command that number of times. For example, hitting 5j will move the cursor five lines down, while hitting 14l will move the cursor 14 characters to the left. This works with most commands you encounter in this book.

Calculating the exact number of characters you would like to move is pretty hard (and nobody wants to do it), so there's a way to move by words. Use w to move to the beginning of the next word, and use e to get to the end of the closest word. To move backwards to the beginning of the word, hit b.

You can also capitalize these letters to treat everything but a white space as a word! This allows you to differentiate between the kind of things you'd like to traverse.

Vim has two kinds of word objects: referred to as lowercase "word" and uppercase "WORD". In Vim world, word is a sequence of letters, digits, and underscores separated by white space. WORD is a sequence of any non-blank characters separated by white space.

Let's take the following line of code from our example:

Notice the cursor position, it's hovering over the first character of add_animal.

Hitting w will move the cursor to beginning of the word add_animal, while hitting W will take you to the beginning of animal. Capitalized W, E, and B will treat any characters bundled together and separated by a space as their own words. This can be seen in the following table:

Key Action
w Move forward by word
e Move forward until the end of the word
W Move forward by WORD
E Move forward until the end of the WORD
b Move backwards to the beginning of the word
B Move backwards to the beginning of the WORD

The following screenshot shows more examples of how each command behaves:

Key Initial cursor position Resulting cursor position
w
e
b
W
E
B

Combine the movements shown with the directional movements you learned earlier to move in fewer keystrokes!

It's also really useful to move in paragraphs. Everything separated by at least two new lines is considered a paragraph, which also means each code block is a paragraph, as can be seen in the following example:

The functions add_animal and main are two separate paragraphs. Use a closing curly brace } to move forward, and an opening curly brace { to move backwards as detailed in the following table:

Command Action
{ Move back by one paragraph
} Move forward by one paragraph

Don't forget to combine these two with numbers if you need to move by more than one paragraph.

There are more ways to move around, but these are the most important basics. We'll be covering more complex ways to navigate in chapter 2, Advanced Editing and Navigation.


Making simple edits in insert mode

When working with Vim, you usually want to spend as little time as possible in the insert mode (unless you're writing and not editing). Since most text operations involve editing, we'll focus on that.

You've already learned to enter the insert mode by pressing i. There are more ways to get to the insert mode. Often times you will want to change some piece of text for another one, and there's a command just for that c. The change command allows you to remove a portion of text and immediately enter an insert mode. Change is a compound command, meaning that it needs to be followed by a command which tells Vim what needs to be changed. You can combine it with any of the movement commands you've learned before. Here are some examples:

Command Before After
cw
c3e (comma counts as a word)
cb
c4l
cW
As an odd exception, cw behaves like ce. This is a leftover from Vi, Vim's predecessor.

As you learn more complex movements commands, you can combine these with a change for quick and seamless editing. We'll also be covering a few plugins which will supercharge a change command to allow for even more powerful editing, like changing text within braces, or replacing the type of quotes on the go.

All of these examples follow the <command> <number> <movement or a text object> structure. You can put a number before or after the <command>.

For example, if you wish to change farm = add_animal(farm, animal) to farm = add_animal(farm, creature), you can execute the following set of commands:

Contents of the line Action
Start with a cursor in the beginning of the line
Hit 3W to move the cursor three WORDs forward to the beginning of animal
Press cw to delete the word animal and enter the insert mode
Type creature

Hit the Esc key to return to NORMAL mode

Sometimes we just want to cut things, without putting anything instead, and d does just that. It stands for delete. It behaves similarly to c, except that the behavior of w and e is more standard, as can be seen in the following example:

Command Before After
dw
d3e (comma counts as a word)
db
d4l
dW

There are also two more nifty shortcuts which allow you to change or delete a whole line:

Command What it does
cc Clears the whole line and enters insert mode. Preserves current indentation level, which is useful when coding.
dd Deletes an entire line.

For example, look at the following piece:

By hitting dd you will completely remove a line, as demonstrated in the following example:

Hitting cc will clear the line and enter insert mode with the proper indent, as shown in the following example:

If you run into difficulties picking the right movement commands, you can also use the visual mode to select text you want to modify. Hit v to enter the visual mode and use the usual movement commands to adjust the selection. Run the desired command (like c to change or d to delete) once you're satisfied with the selection.
 

Persistent undo and repeat

Like any editor, Vim keeps track of every operation. Press u to undo a last operation, and Ctrl + r to redo it.

To learn more about Vim's undo tree (Vim's undo history is not linear!) and how to navigate it, see chapter 4, Advanced Workflows.

Vim also allows you to persist undo history between sessions, which is great if you want to undo (or remember) something you've done a few days ago!

You can enable persistent undo by adding the following line to your .vimrc:

set undofile

However, this will litter your system with an undo file for each file you're editing. You can consolidate the undo files in a single directory, as seen in the following example:

" Set up persistent undo across all files.
set undofile
if !isdirectory(expand("$HOME/.vim/undodir"))
call mkdir(expand("$HOME/.vim/undodir"), "p")
endif
set undodir=$HOME/.vim/undodir

If you're using Windows, replace the directories with %USERPROFILE%\vimfiles\undodir (and you'll be making changes to _vimrc instead of .vimrc).

Now, you'll be able to undo and redo your changes across sessions.


Read the Vim manual using :help

The best learning tool Vim can offer is certainly a :help command, as can be seen in the following screenshot:

It's an enormous collection of resources and tutorials which comes installed with Vim. Scroll through using the Page Up and Page Down keys (bonus point for using Ctrl + b and Ctrl + f respectively), there is a lot of useful information there.

Whenever you are stuck, or want to learn more about a particular command, try searching it using :help (you can shorten it to :h). Let's try searching for a cc command we've learned :

:h cc

Help tells us the way the command works, as well as how different options and settings affect the command (for instance autoindent setting preserves the indentation).

:help is a command which navigates a set of help files. As you look through the help files, you'll notice that certain words are highlighted in color. These are tags, and can be searched for using the :help command. Unfortunately, not every tag name is intuitive. For instance, if we wanted to learn how to search for a string in Vim, we could try using the following:

:h search

However, it looks like this command takes us to the entry on expression evaluation, which is not exactly what we were looking for, as demonstrated by the following screenshot:

To find the right entry, type in :h search (don't hit Enter yet) followed by Ctrl + d. This will give you a list of help tags containing the substring search. One of the options shown is search-commands which is what we'd be looking for. Complete your command in the following way to get to the entry we were looking for:

:h search-commands

The following display shows the right help entry for search:

Speaking of search functionality, you can search inside help pages (or any file open in Vim) using /search term to search forward from the cursor or ?search term to search backward. See Chapter 2 , Advanced Editing and Navigation, to learn more about how to perform search operations.

Don't forget to use Vim's help system any time you have questions or want to better understand the way Vim behaves.


Summary

The original Vi was developed to work through remote terminals, when bandwidth and speed were limited. These limitations guided Vi towards establishing an efficient and deliberate editing process, which is what's at the core of Vim—Vi Improved today.

In this chapter, you've learned how to install and update Vim and it's graphical counterpart—GVim, on every major platform (in more ways than you will ever need).

You've learned to configure your Vim through tinkering with .vimrc, which is something you will often go back to as you customize the editor for your own needs.

You've picked up the basics of working with files, moving around Vim, and making changes. Vim's concept of text objects (letters, words, paragraphs) and composite commands (like d2w - delete 2 words) empower precise text operations.

And if there's one thing you could take away from this chapter, it would be :help. Vim's internal help system is incredibly detailed, and it can answer most, if not every, question you might have, as long as you know what you're looking for.

In the next chapter, we'll be looking into getting more out of Vim. You'll learn how to navigate files and get better at editing text.

About the Author
  • Ruslan Osipov

    Ruslan Osipov is a software engineer at Google, an avid traveler, and a part-time blogger. He is a self-taught engineer. He started publishing personal Vim notes in 2012, and became increasingly interested in the intricacies of the editor and its applications in optimizing development workflows.

    Browse publications by this author
Latest Reviews (4 reviews total)
Best book about Vim I have read.
Great book! I have only covered the first two chapters and learned so much really useful stuff.
I'm actually still going through this book. As an experienced vim user, since 2000, I'm very pleased with the wealth of information on vim in this book. I'm really getting excited about vimscript.
Mastering Vim
Unlock this book and the full library FREE for 7 days
Start now