Greetings and welcome to this comprehensive and detailed exploration of Unity 5 that examines carefully how we take a game project from conception to completion. Here, we'll pay special attention to the best-practice workflows, design elegance, and technical excellence. The project to be created will be a first-person cinematic shooter game, for desktop computers and mobile devices, inspired by Typing of the Dead (https://en.wikipedia.org/wiki/The_Typing_of_the_Dead). Our game will be called Dead Keys (from here-on, abbreviated DK). In DK, the player continually confronts evil flesh-eating zombies, and the only way to eliminate them safely is to complete a set of typing exercises, using either the physical keyboard or a virtual keyboard. Each zombie, when they appear, may attack the player and is associated with a single word or phrase chosen randomly from a dictionary. The chosen phrase is presented clearly as a GUI label above the zombie's head. In response, the player must type the matching word in correct and full words, letter by letter, to eliminate the zombie. If the player completes the word or phrase without error, the zombie is destroyed. If the player makes a mistake, such as pressing the wrong letter in the wrong order, then they must repeat the typing sequence from the beginning.
This challenge may initially sound simple for the player, but longer words and phrases naturally give zombies a longer life span and greater opportunities for attacking. The player inevitably has limited health and will die if their health falls below 0. The objective of the player, therefore, is to defeat all zombies and reach the end of the level.

Dead Keys, the game to be created
Creating the word-shooter project involves many technical challenges, both 3D and 2D, and together, these make extensive use of Unity and its expansive feature set. For this reason, it's worth spending some time exploring what you'll see in this book and why. This book is a Mastering title, namely Mastering Unity 5, and the word Mastering carries important expectations about excellence and complexity. These expectations vary significantly across people, because people hold different ideas about what mastery truly means. Some think mastery is about learning one specific skill and becoming very good at it, such as mastery in scripting, lighting, or animation. These are, of course, legitimate understandings of mastery. However, others see mastery more holistically, and this view is no less legitimate. It's the idea that mastery consists in cultivating a general, overarching knowledge of many different skills and disciplines, but in a special way by seeing a relationship between them and seeing them as complementary parts that work together to produce sophisticated and masterful results. This is a second and equally legitimate understanding of the term, and it's the one that forms the foundation for this book.
This book is about using Unity generally as a holistic tool-seeing its many features come together, as one unit, from level editing and scripting to lighting, design, and animation. For this reason, our journey will inevitably lead us to many areas of development-not just coding. Thus, if you're seeking a book solely about coding, then check out Packt's title on Mastering Unity Scripting. In any case, this book, being about mastery, will not focus on fundamental concepts and basic operations. It assumes already that you can build basic levels using the level editor and can create basic materials and some basic script files using C#. Though this book may at times include some extra, basic information as a refresher and also to add context, it won't enter into detailed explanations about basic concepts, which are covered amply in other titles. Entry level titles from Packt include Unity 5.x By Example, Learning C# by Developing Games with Unity 5.x, and Unity Animation Essentials. This book, however, assumes you have a basic literacy in Unity and want to push your skills to the next level, developing a masterful hand in building Unity games, across the board.
So, with that said, let's jump in and make our game!
To build games professionally and maximize productivity, always develop from a clear design, whether on paper or in digital form. Ensure that the design is stated and expressed in a way that's intelligible to others, and not just to yourself. It's easy for anybody to jump excitedly into Unity without a design plan, assuming you know your own mind best of all, and then to find yourself wandering aimlessly from option to option without any direction. Without a clear plan, your project quickly descends into drift and chaos. Thus, first produce a coherent game design document (GDD) for a general audience of game designers who may not be familiar with the technicalities of development. In that document, you will get clarity about some very important points before using development software, making assets, or building levels. These points, and a description, are listed in the following sections, along with examples that apply to the project we'll be developing.
Note
A GDD is a written document created by designers detailing (through words, diagrams, and pictures) a clear outline of a complete game. More information on GDD can be found online at https://en.wikipedia.org/wiki/Game_design_document.

Target Platforms
The Target Platform specifies the device, or range of devices, on which your game runs natively, such as Windows, Mac, Android, iOS, and so on. This is the full range of hardware on which a potential gamer can play your game. The Target Platforms for DK include Windows, Mac, Android, and iOS.
Reaching decisions about which platforms to support is an important logistical and technical as well as political matter. Ideally, a developer wants to support as many platforms as possible, making their game available to the largest customer base. However, whatever the ideals may be, supporting every platform is almost never feasible, and so, practical choices have to be made. Each supported platform involves considerable time, effort, and money of the developer, even though Unity makes multi-platform support easier by doing a lot of low-level work for you. Developing for multiple platforms normally means creating meshes, textures, and audio files of varying sizes and detail levels as well as adapting user interfaces to different screen layouts and aspect ratios, and also being sensitive to the hardware specifics of each platform.
Platform support also influences core game mechanics; for example, touch-screen games behave and feel radically different from keyboard-based games and motion controls behave differently from mouse-based controls. Thus, a platform always constrains and limits the field of possibilities as to what can be achieved, not just technically, but also for content. App Store submission guidelines place strict requirements upon permissible content, language, and representations in games and allowed in-app purchases and access to external, user-created content.
The upshot is that Target Platforms should, for the most part, always be chosen in advance. That decision will heavily influence core game mechanics and how the design is implemented in a playable way. Sometimes, the decision to defer support for a particular platform can, and should, be made for technical or economic reasons. However, when such a decision is made, be aware that it can heavily increase development time further along the cycle, as reasonable adjustment and redevelopment may be needed to properly support the nuances of the platform.

Deciding on an Intended Audience
The intended audience is like a personality profile. It defines in summary who you're making the game for. Using some stereotyping, it specifies who is supposed to play your game: casual gamers, action gamers, or hardcore gamers; children or adults; English speakers or non-English speakers; or someone else. This decision is important especially for establishing the suitability of the game content and characters and difficulty of gameplay. Suitability is not just a matter of hiding nudity, violence, and profanity from younger gamers. It's about engaging your audience with relevant content: issues and stories, ideas that are resonant with them and encourage them to keep playing. Similarly, difficulty is not simply about making games easier for younger gamers. It's about balancing rewards and punishments and timings to match audience expectations, whatever their age.
As with Target Platform, you should have a target audience in mind when designing your game. This matters especially for keeping focused when including new ideas in your game. Coming up with fun ideas is great, but will they actually work for your audience in this case? If your target audience lacks sufficient focus, then some problems such as the following will emerge:
Your game will feel conceptually messy (a jumble of disconnected ideas)
You'll struggle to answer how your game is fun or interesting
You'll keep making big and important changes to the design during its development
For these reasons, and more, narrow your target audience as precisely as possible, as early as possible.
For Dead Keys, the target audience will be over 15 years of age and Shoot 'Em Up fans who also enjoy quirky gameplay that deviates from the mainstream. A secondary audience may include casual gamers who enjoy time-critical word games.
Genre is primarily about the game content: what type of game is it? Is it RPG, first-person shooter, adventure, or any other type? Genres can be even narrower than this, such as fantasy MMORPG and cyberpunk, competitive, deathmatch and first-person-shooter. Sometimes, you'll want the genre to be very specific, and other times you'll not, depending on your aims. Be specific when building a game in the truest and most genuine spirit of a traditional, well-established genre. The idea in this case is to do a good job at a tried and tested formula. In contrast, avoid too narrow of a definition when seeking to innovate and push boundaries. Feel free to combine existing genres in new ways or, if you really want a challenge, to invent a completely new genre.
Innovation can be fun and interesting, but it's also risky. It's easy to think your latest idea is clever and compelling, but always try it out on other people to assess their reactions and learn to take constructive criticism from an early stage. Ask them to play what you've made or to play a prototype based on the design. However, avoid relying too heavily on document-based designs when assessing fun and playability, as the experience of playing is radically different from reading and the thoughts it generates.
For Dead Keys, the genre will be a cinematic first-person zombie-typer! Here, our genre takes the existing and well-established first-person shooter tradition, but (in an effort to innovate) replaces the defining element of shooting with typing.
The term game mode, might mean many things, but in this case, we'll focus on the difference between single-player and multi-player game modes. Dead Keys will be single player, but there's nothing intrinsic about its design that indicates it is for a single player only. It could be adapted to both local co-op multiplayer and Internet-based multiplayer (using the Unity networking features). More information on Unity network, for the interested reader, can be found online at https://docs.unity3d.com/Manual/UNet.html.
It's important to decide on this technical question very early in development, as it heavily impacts how the game is constructed and the features it supports.
Every game (except for experimental and experiential games) need an objective for the player; something they must strive to do, not just within specific levels, but across the game overall. This objective is important not just for the player (to make the game fun), but also for the developer to decide how challenge, diversity, and interest can be added to the mix. Before starting development, have a clearly stated and identified objective in mind.
Challenges are introduced primarily as obstacles to the objective, and bonuses are things that facilitate the objective-that make it possible and easier to achieve. For Dead Keys, the primary objective is to survive and reach the level end. Zombies threaten that objective by attacking and damaging the player, and bonuses exist along the way to make things more interesting.
Note
I highly recommend that you use project management and team collaboration tools to chart, document, and time-track tasks within your project. Also, you can do this for free; some online tools for this include Trello (https://trello.com), Bitrix24 (https://www.bitrix24.com), Basecamp (https://basecamp.com), Freedcamp (https://freedcamp.com), Unfuddle TEN (https://unfuddle.com), Bitbucket (https://bitbucket.org), Microsoft Visual Studio Team Services (https://www.visualstudio.com/en-us/products/visual-studio-team-services-vs.aspx), and Concord Contract Management (http://www.concordnow.com).
When you've reached a clear decision on the initial concept and design, you're ready to prototype! This means building a Unity project demonstrating the core mechanic and game rules in action as a playable sample. After this, you typically refine the design more, and repeat prototyping until arriving at an artifact you want to pursue. From here, the art team must produce assets (meshes and textures) based on the concept art, the game design, and photographic references. When producing meshes and textures for Unity, some important guidelines should be followed to achieve optimal graphical performance in-game. This is about structuring and building assets in a smart way so that they export cleanly and easily from their originating software and can then be imported with minimal fuss, performing as best as they can at runtime. Let's take a look at some of these guidelines for meshes and textures.
A good mesh topology consists in all polygons having only three or four sides in the model (not more). Additionally, Edge Loops should flow in an ordered, regular way along the contours of the model, defining its shape and form.
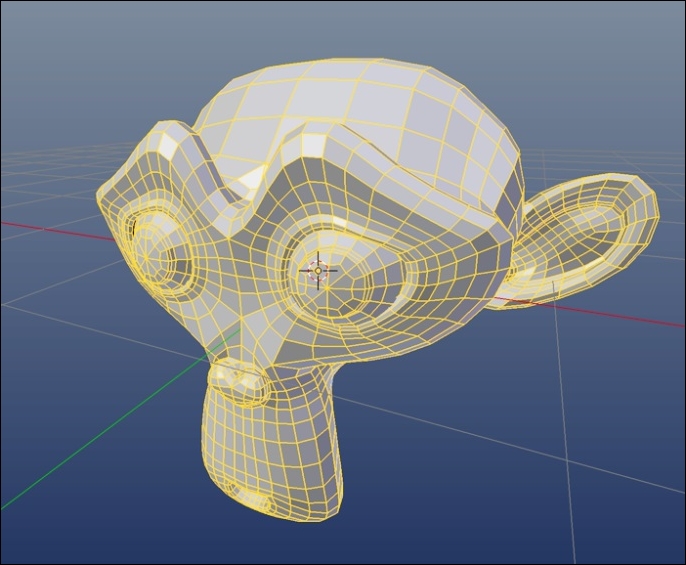
Clean topology
Unity automatically converts, on import, any NGons (polygons with more than four sides) into triangles, if the mesh has any. However, it's better to build meshes without NGons as opposed to relying on Unity's automated methods. Not only does this cultivate good habits at the modeling phase, but it avoids any automatic and unpredictable retopology of the mesh, which affects how it's shaded and animated.
Every polygon in a mesh entails a rendering performance hit insofar as a GPU needs time to process and render each polygon. Consequently, it's sensible to minimize the number of a polygons in a mesh, even though modern graphics hardware is adept at working with many polygons. It's a good practice to minimize polygons wherever possible and to the degree that it doesn't detract from your central artistic vision and style.
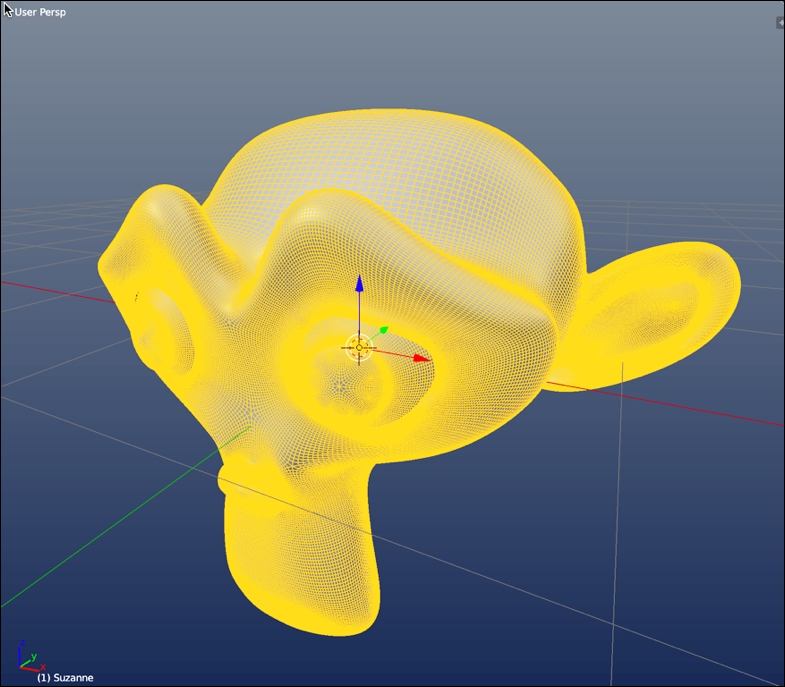
High-poly meshes! (try reducing polygons where possible)
There are many techniques available to reduce polygon counts. Most 3D applications (such as 3ds Max, Maya, and Blender) offer automated tools that decimate polygons in a mesh while retaining its basic shape and outline. However, these methods frequently make a mess of topology, leaving you with faces and edge loops leading in all directions. Even so, this can still be useful for reducing polygons in static meshes (meshes that never animate), such as statues, houses, or chairs. However, it's typically bad for animated meshes where topology is especially important.
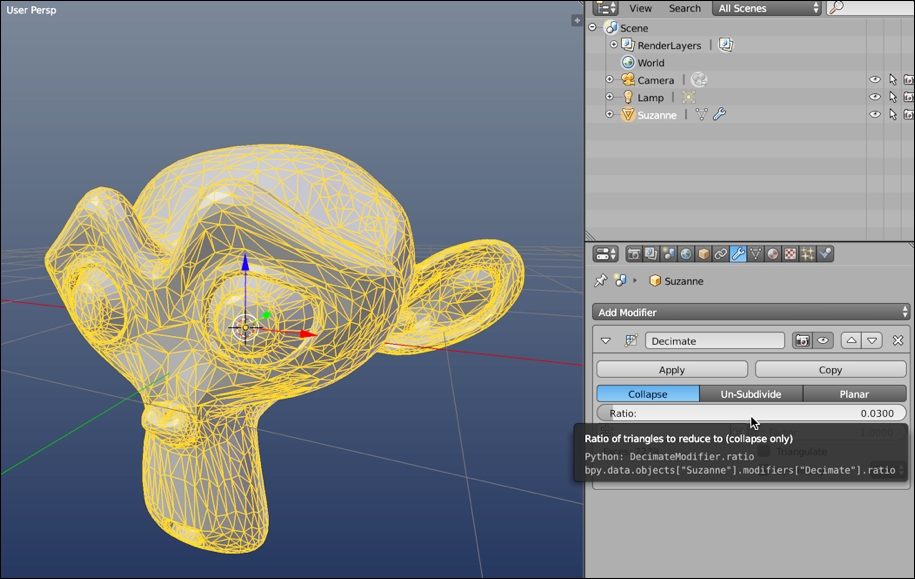
Reducing mesh polygons with automated methods can produce messy topology!
Note
If you want to know the total vertex and face count of a mesh, you can use your 3D software statistics. Blender, Maya, 3ds Max, and most 3D software let you see vertex and face counts of selected meshes directly from the viewport. However, this information should only be considered a rough guide! This is because after importing a mesh into Unity, the vertex count frequently turns out higher than expected! There are many reasons for this, which is explained in more depth online at http://docs.unity3d.com/Manual/OptimizingGraphicsPerformance.html.
In short, use the Unity vertex count as the final word on the actual vertex count of your mesh. To view the vertex count for an imported mesh in Unity, click on the right-arrow on the mesh thumbnail in the Project panel. This shows the internal mesh asset. Select this asset, and then view the vertex count from the preview pane in the Inspector object.
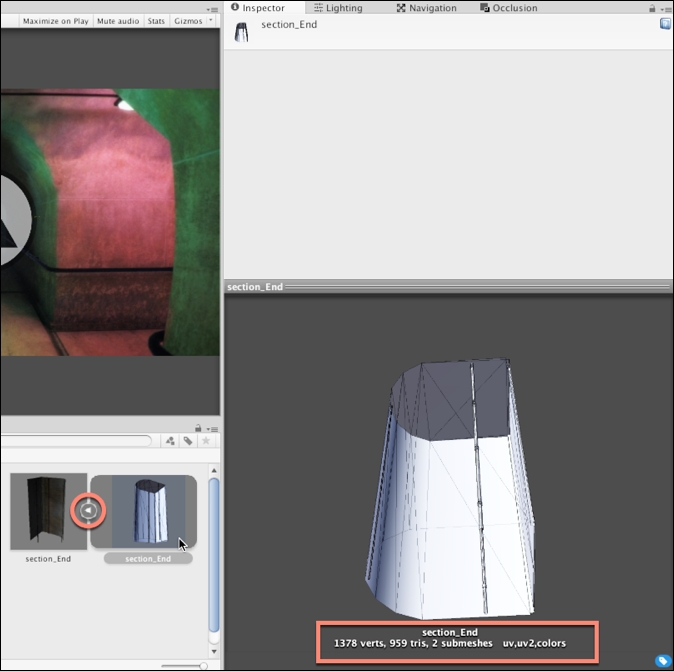
Viewing the vertex and face count for meshes in Unity
As mentioned, try keeping meshes as low-poly as possible. Low-poly meshes are, however, of lower quality than higher-resolution meshes. They have fewer polygons and thereby hold fewer details. Yet, this need not be problematic. Techniques exist for simulating detail in low-poly meshes, making them appear at a higher resolution than they really are. Normal Mapping is one example of this. Normal Maps are special textures that define the orientation and roughness of a mesh surface across its polygons and how those polygons interact with lighting. In short, a Normal Map specifies how lighting interacts over a mesh and ultimately effects how the mesh is shaded. This influences how we perceive the details. You can produce Normal Maps in many ways, for example, typically using 3D modeling software. By producing two mesh versions (namely, a high-poly version containing all the needed details, and a low-poly version to receive the details), you can bake normal information from the high-poly mesh to the low-poly mesh via a texture file. This approach (known as Normal Map Baking) can lead to stunningly accurate and believable results, as follows:
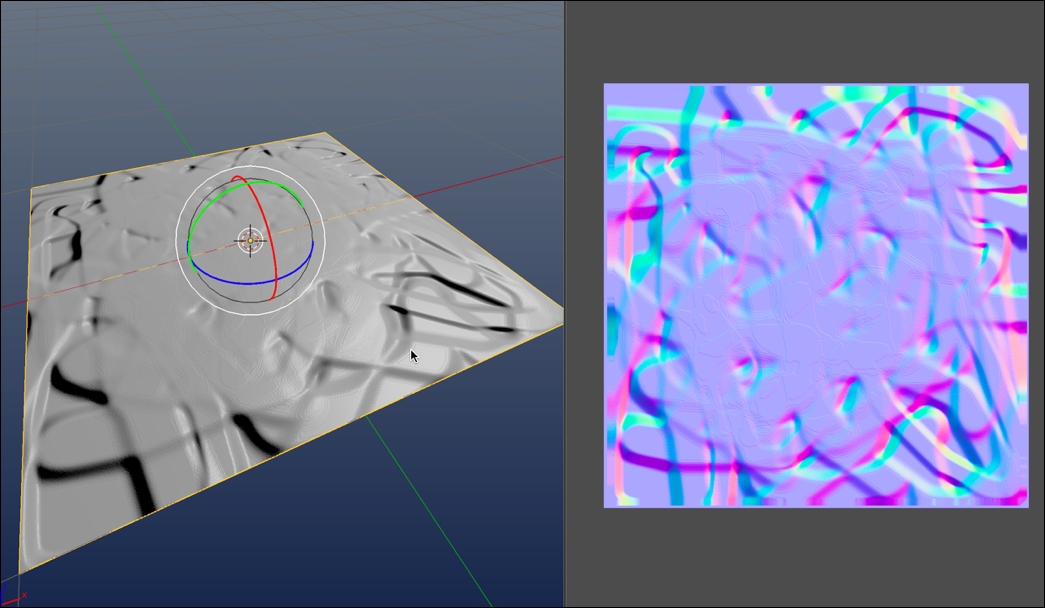
Simulating high-poly detail with Normal Maps
However, if you don't have any Normal Maps for an imported mesh, Unity can generate them from a standard, diffuse texture, via the Import Settings. This may not produce the most believable and physically accurate results, like Normal Map Baking, but it's useful to quickly and easily generate displacement details, enhancing the mood and realism of a scene. To create a Normal Map from a diffuse texture, first select the imported texture from the Project panel and duplicate it-make sure that the original version is not invalidated or affected. Then, from the object Inspector, change the Texture Type (for the duplicate texture) from Texture to Normal map. This changes how Unity understands and works with the texture:
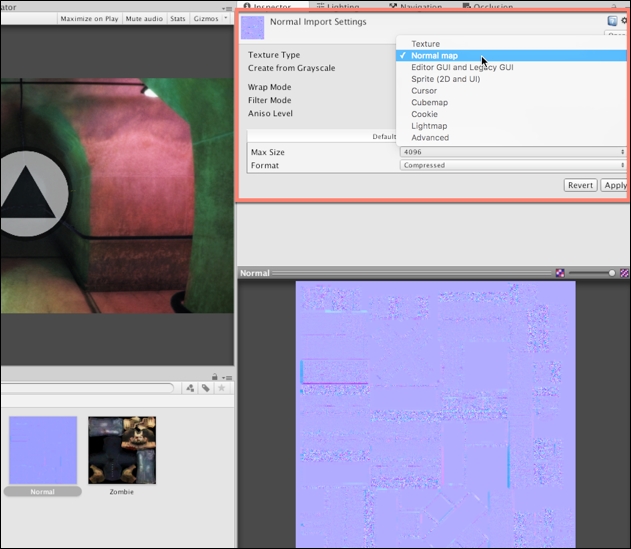
Configuring texture as a Normal map
Specifying Normal Map for a texture configures Unity to use and work with that texture in a specialized, optimized way for generating bump details on your model. However, when creating a Normal Map from a diffuse texture, you'll also need to enable the Create from Grayscale checkbox. When enabled, Unity generates a Normal Map from a grayscale version of the diffuse texture, using the Bumpiness and Filtering settings, as follows:
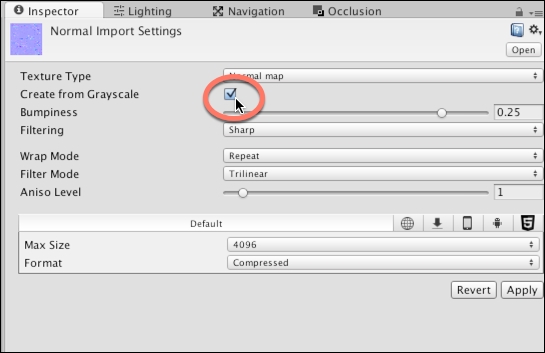
Enable Create from Grayscale for Normal maps
With Create from Grayscale enabled, you can use the Bumpiness slider to intensify and weaken the bump effect and the Filtering setting to control the roughness or smoothness of the bump. When you've adjusted the settings as needed, confirm the changes and preview the result by pressing the Apply button from the Inspector object:
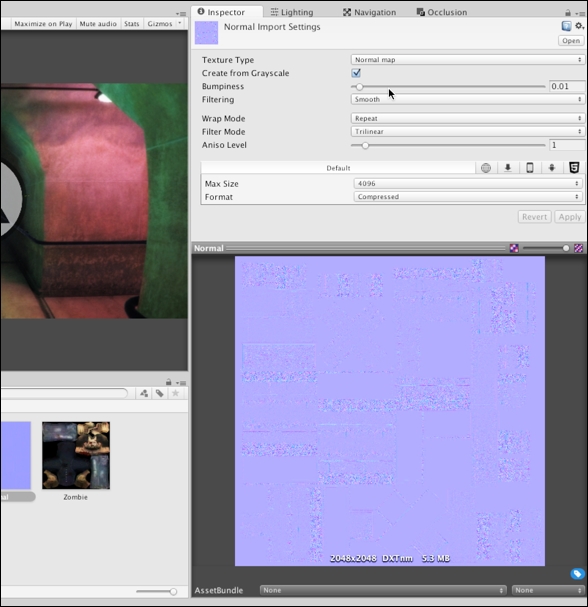
Customizing an imported Normal Map
Seams are edge cuts inserted into a mesh during UV mapping to help it unfold, flattening out into a 2D space for the purpose of texture assignment. This process is achieved in 3D modeling software, but the cuts it makes are highly important for properly unfolding a model and getting it to look as intended inside Unity. An edge is classified as a seam in UV space when it has only one neighboring face, as opposed to two. Essentially, the seams determine how a mesh's UVs are cut apart into separate UV shells or UV islands, which are arranged into a final UV layout. This layout maps a texture onto the mesh surface, as follows:
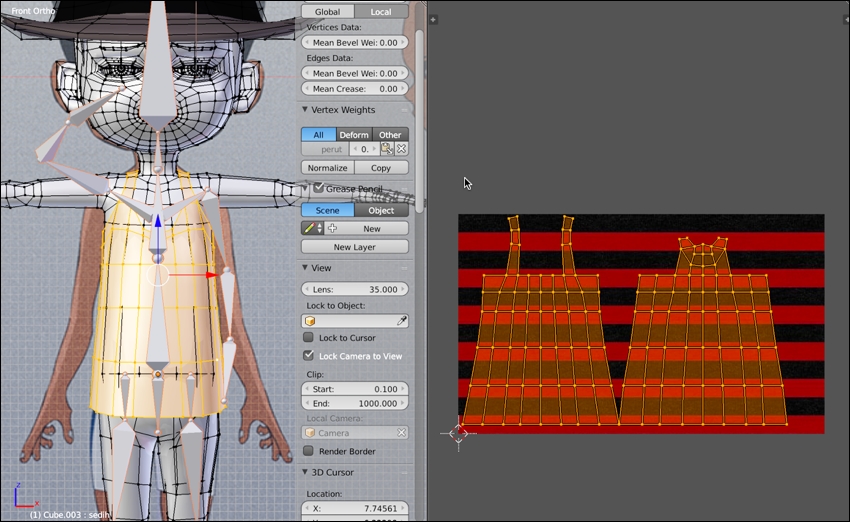
Creating a UV layout
Always minimize UV seams where feasible by joining together disparate edges, shells, or islands, forming larger units. This is not something you do in Unity, but in your 3D modeling software. Even so, by doing this, you potentially reduce the vertex count and complexity of your mesh. This leads to improved runtime performance in Unity. This is because Unity must duplicate all vertices along the seams to accommodate the rendering standards for most real-time graphics hardware. Thus, wherever there are seams, there will be a doubling up of vertices, as shown here:
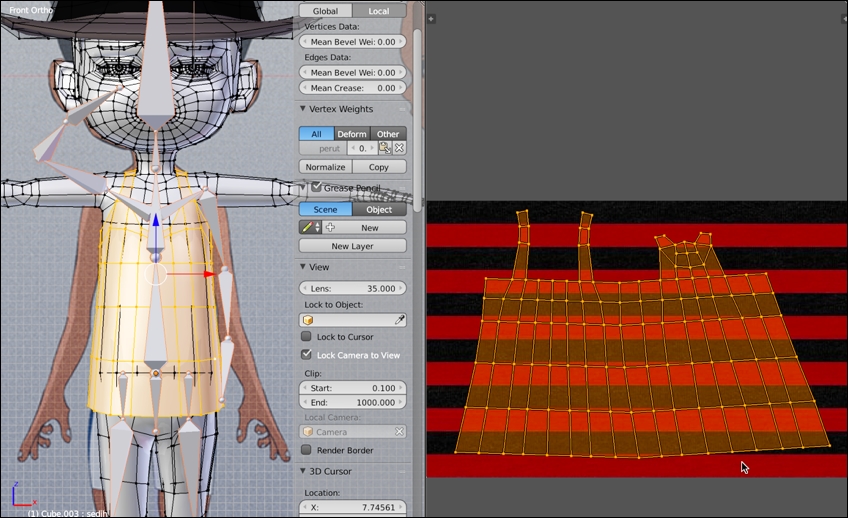
Binding together edges and islands to reduce UV seams
Unity officially supports many mesh import formats, including .ma, .mb, .max, .blend, and others. Details and comparisons of these are found online at http://docs.unity3d.com/Manual/3D-formats.html. Unity divides mesh formats into two main groups: exported and proprietary. The exported formats include .fbx and .dae. These are meshes exported manually from 3D modeling software into an independent data-interchange format, which is industry recognized. It's feature limited, but widely supported. The proprietary formats, in contrast, are application-specific formats that support a wider range of features but at the cost of compatibility. In short, you should almost always use the exported FBX file format. This is the most widely supported, used and tested format within the Unity community and supports imported meshes of all types, both static and animated. It gives the best results. If you choose a proprietary format, you'll frequently end up importing additional 3D objects that you'll never use in your game, and your Unity project is automatically tied to the 3D software itself. That is, you'll need a fully licensed copy of your 3D software on every machine for which you intend to open your Unity project; this is annoying.
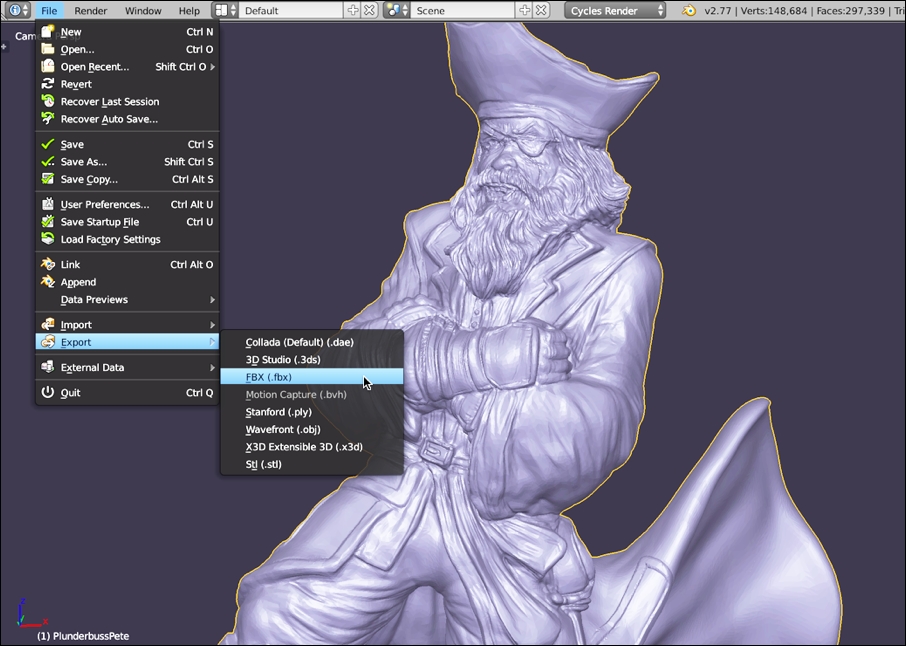
Exporting meshes to an FBX file, works best with Unity
Unity measures 3D space using the metric system, and 1 world unit is understood, by the physics system, to mean 1 meter. Unity is configured to work with models from most 3D applications using their default settings. However, sometimes, your models will appear too big or small when imported. This usually happens when your world units are not configured to metric in your 3D modeling software. The details of how to change units varies for each software, such as Blender, Maya, or 3ds Max. Each program allows unit customization from the Preferences menu.
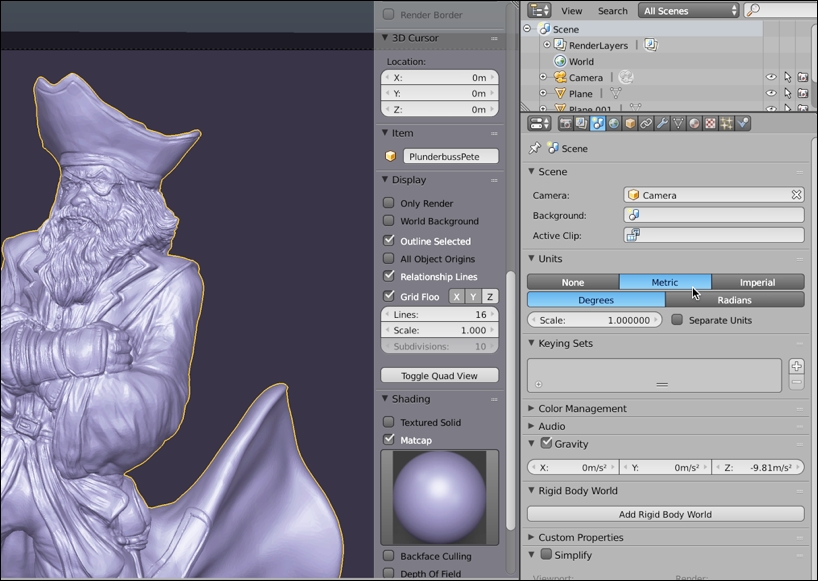
Configuring 3D software to Metric units
Always save your textures in lossless formats, such as PNG, TGA, or PSD. Avoid lossy formats such as JPG, even though they're typically smaller in file size. JPG might be ideal for website images or for sending holiday snaps to your friends and family; but, for creating video game textures, they are problematic-they lose quality exponentially with each successive save operation. By using lossless formats and by removing JPG from every step of your workflow (including intermediary steps), your textures can remain crisp and sharp:
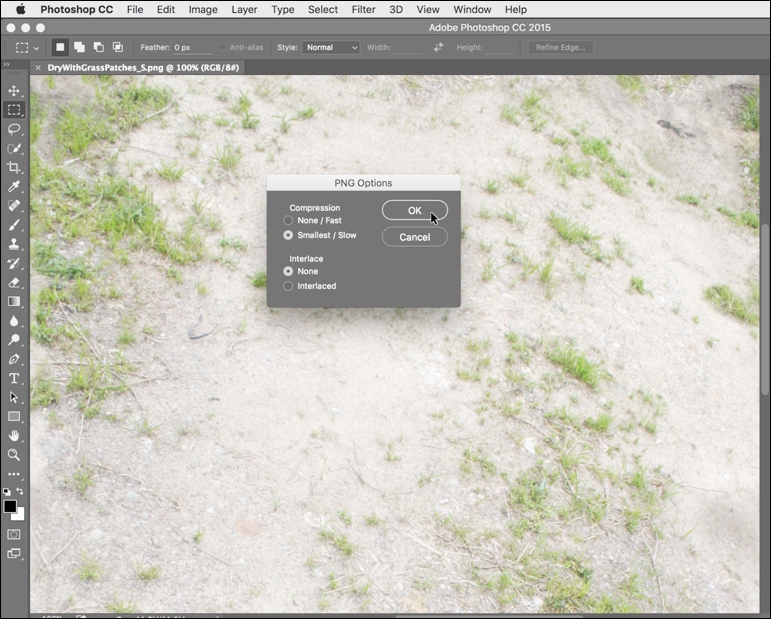
Saving textures to PNG files
If your textures are for 3D models and meshes (not sprites or GUI elements), then make their dimensions power-2 size for best results. The textures needn't be square (equal in width and height), but each dimension should be from a range of power-2 sizes. Valid sizes include 32, 64, 128, 256, 512, 1024, 2048, 4096, and 8192. Sizing textures to a power-2 dimension helps Unity scale textures up and down, as well as copy pixels between textures as needed, across the widest range of graphical hardware.
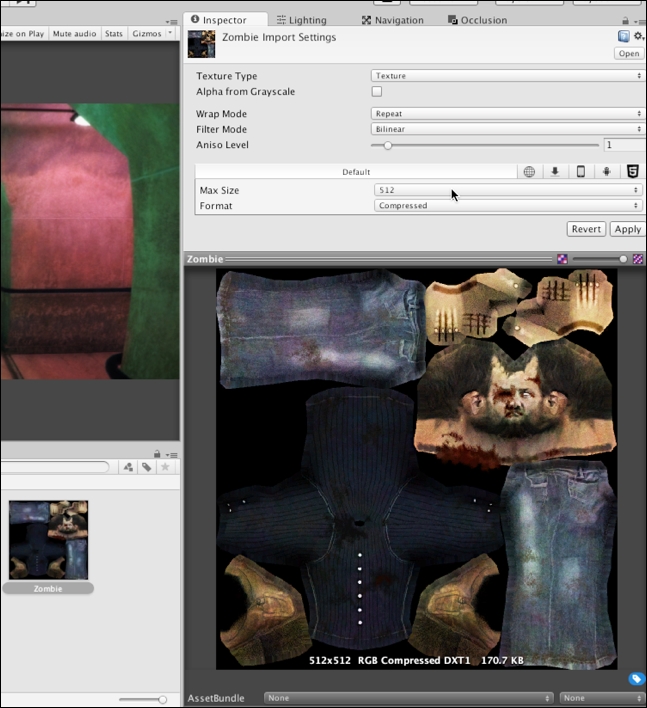
Creating textures at power-2 sizes
When creating textures, it's always best to design for the largest possible power-2 size you'll need (as opposed to the largest possible size allowed), and then to downscale wherever appropriate to smaller power-2 sizes for older hardware and weaker systems, such as mobile devices. For each imported texture, you can use the Unity platform tabs from the Inspector object to specify an appropriate maximum size for each texture on a specific platform: one for desktop systems, one for Android, one for iOS, and so on. This caps the maximum size allowed for the selected target on a per-platform basis. This value should be the smallest size that is compatible with your artistic intentions and intended quality.
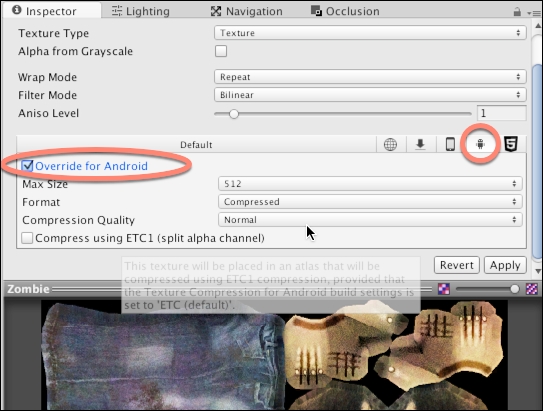
Overriding texture sizes for other platforms
Alpha textures are textures with transparency. When applied to 3D models, they make areas of the model transparent, allowing objects behind it to show through. Alpha textures can be either TGA files with dedicated alpha channels or PNG files with transparent pixels. In either case, alpha textures can render with artifacts in Unity if they're not created and imported correctly.
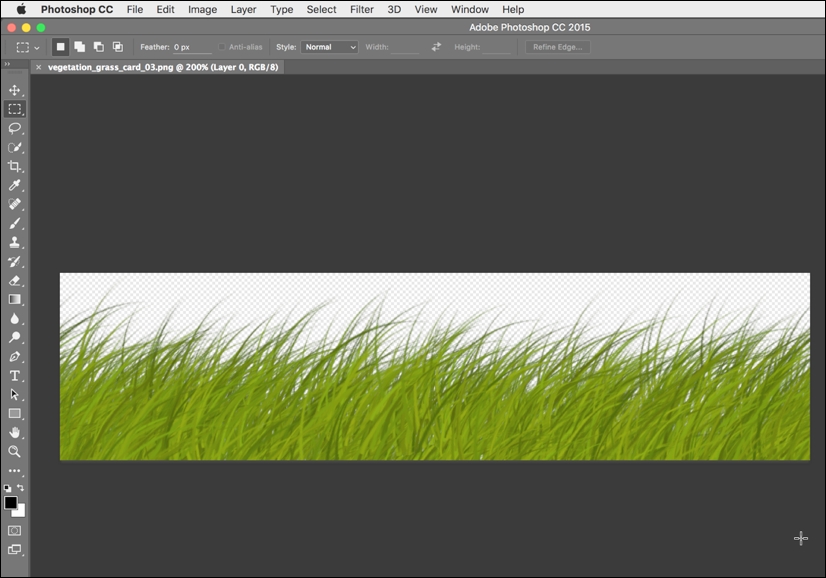
Creating alpha textures
If you need to use alpha textures, ensure that you check out the official Unity documentation on how to export them for optimal results from http://docs.unity3d.com/Manual/HOWTO-alphamaps.html.
The previous section explored some general tips on preparing assets for Unity, with optimal performance in mind. These tips are general insofar as they apply for almost all asset types in almost all cases, including Dead Keys. Let's now focus on creating our project, DK, a first-person zombie-typer game. This game relies on many assets, from meshes and textures to animation and sound. Here, we'll import and configure many core assets, considering optimization issues and asset-related subjects. We don't need to import all assets right now; we can and often will import more later in development, integrating them into our existing asset library. This section assumes you've already created a new Unity project. From here on, we can begin our work.
To prepare, let's create a basic folder structure in the Project panel to contain all imported assets in a systematic and organized way. The names I've used are self-descriptive and optional. The named folders are animation, audio, audiomixers, Materials, meshes, music, prefabs, Resources, scenes, scripts, and textures. Feel free to add more, or change the names, if it suits your purposes.

Organizing the Project folder
The textures folder will contain all textures to be used by the project. Most importantly, this includes textures for the NPCs zombie characters (hands, arms, legs, and so on) and the modular environment set. In Dead Keys, the environment will be a dark industrial interior, full of dark and moody corridors and cross-sections. This environment will really be composed from many smaller, modular pieces (such as corner sections and straight sections) that are fitted together, used and reused, like building blocks to form larger environment complexes. Each of the pieces in the modular set maps in UV space to the same texture (a Texture Atlas), meaning that the entire environment is actually mapped completely by one texture. Let's quickly take a look at that texture:

Environment Atlas Texture
All textures for the project are included in the book companion files, in the ProjectAssets/Textures folder. These should be imported into a Unity project, simply by dragging and dropping them together into the Project panel. Using this method, you can import multiple texture files as a single batch, as follows:

Importing textures into the project
By default, Unity incorrectly configures Normal Map textures as regular textures. It doesn't distinguish the texture type based on image content. Consequently, after importing Normal Maps, you should configure each one properly. Select the Normal map from the Project panel, and choose Normal map from the Texture Type dropdown in the object Inspector; afterwards, click on Apply to accept the change:

Importing and configuring Normal maps
Since every mesh in the modular environment set maps to the same texture space (corners, straight sections, turns, and so on), we'll need to make some minor tweaks to the Atlas Texture settings, for best results. First, select the Atlas Texture in the Project panel (DiffuseComposite.png) and change the Texture Type to Advanced, from the Inspector object; this offers us greater control over texture settings:

Accessing advanced texture properties
To minimize any texture seams, breaks, and artifacts in the environment texture wherever two mesh pieces meet in the scene, change the texture Wrap Mode from Repeat to Clamp. Clamp mode ensures that edge pixels of a UV island are stretched continuously across the mesh, as opposed to repeated, if needed. This is a useful technique for reducing any seams or artifacts for meshes that map to a Texture Atlas.
In addition, remove the check mark from the Generate Mip Maps option. When activated, this useful optimization shows progressively lower quality textures for a mesh as it moves further from the camera. This helps optimize the render performance at runtime. However, for Texture Atlases, this can be problematic, as Unity's texture resizing causes artifacts and seams at the edges of UV islands wherever two mesh modules meet. This produces pixel bleeding and distortions in the textures.
Note
If you want to use Mip Maps with Atlas Textures without risk of artifacts, you can pre-generate your own Mip Map levels. That is, produce lower-quality textures that are calibrated specifically to work with your modular meshes. This may require manual testing and re-testing, until you arrive at textures that work for you. You can generate your own Mip Map levels for Unity by exporting a DDS texture from Photoshop. The DDS format lets you specify custom Mip Map levels directly in the image file. You can download the DDS plugin for Photoshop online at https://developer.nvidia.com/nvidia-texture-tools-adobe-photoshop.

Optimizing Atlas Textures
Finally, specify the maximum valid power-2 size for the Atlas Texture, which is 4096. The format can be Automatic Compressed. This will choose the best-available compression method for the desktop platform; then, click on Apply:

Applying changes to the Texture Atlas
In this chapter, we'll put aside most of the UI concerns. However, all GUI textures should be imported as the Sprite (2D and UI) texture type, with Mip Maps disabled. For UI textures, it's not necessary to follow the power-2 size rule (that is, pixel sizes of 2, 4, 8, 16, 32, 64, 128, 256, 512, 1024, 2048, 4096 and so on).

Importing UI textures
Ideally, you should import textures before meshes, as we've done here. This is because, on mesh import, Unity automatically creates materials and searches the project for all associated textures. On finding suitable textures, it assigns them to the materials before displaying the results on the mesh, even in the Project panel thumbnail previews. This makes for a smoother and easier experience. When you're ready to import meshes, just drag and drop them into the Project panel to the designated meshes folder. By doing this, Unity imports all meshes as a single batch. This project relies heavily on meshes, both animated character meshes for the NPC zombies and static environment meshes for the modular environment-as well as prop meshes and any meshes that you would want to include for your own creative flourish. These files (except your own meshes!) are included in the book's companion files.

Importing meshes (both environment and character meshes)
Let's now configure the modular environment meshes. Select all meshes for the environment, including section_Corner, section_Cross, section_Curve, section_End, section_Straight, and section_T. With the environment meshes selected, adjust the following settings:
Set the mesh Scale Factor to
1, creating a 1:1 ratio between the model, as it was made in the modeling software, to how the model appears in Unity.Disable Import BlendShapes. The environment meshes contain no blended shapes to import, and you can streamline to import and re-import process by disabling unnecessary options.
Disable Generate Colliders. In many cases, we'd have enabled this setting. However, Dead Keys is a first-person shooter with a fixed, AI controlled camera, as opposed to free roam movement. This leaves the player with no possibility of walking through walls or passing through floors.
Enable Generate Lightmap UVs. Enabling this option generates a second UV channel. Unity automatically unwraps your meshes and guarantees no UV island overlap. You can further tweak light map UV generation using the Hard Angle, Pack Margin, Angle Error, and Area Error settings. However, the default settings work well for most purposes. The Pack Margin can, and perhaps should, be increased if your light map Resolution is low, as we'll see in the next chapter. The angle and error settings should sometimes be increased or decreased to better accommodate light maps for organic and curved surfaces.

Configuring Environment Meshes
In addition to configuring the primary mesh properties, as we've seen, let's also switch to the Rig and Animations tab. From the Rig tab, specify None for the Animation Type field, as the meshes don't contain animation data.

Setting the Rig type for environment meshes
Next, switch to the Animations tab. From here, remove the check mark from Import Animation. The environment meshes have no animations to import; then, click on Apply:

Disabling Import Animation
Of course, Dead Keys is about completing typing exercises to destroy zombies. The zombie character for our project is based on the public domain zombie character, available from Blend Swap at http://www.blendswap.com/blends/view/76443. This character has been rigged and configured in Blender for easy import to Unity. Let's configure this character now. Select the Zombie mesh in the Project panel; and from the object Inspector, adjust the following settings:
Set the Mesh Scale Factor to 1, to retain its original size.
Enable Import BlendShapes, to allow for custom vertex animation.
Disable Generate Colliders, as collision detection is not needed.
Enable Swap UVs if the texture doesn't look correct on the zombie model from the preview panel. If an object has two or more UV channels (and they sometimes do), Unity occasionally selects the wrong channel by default.

Configuring a zombie NPC
Switch to the Animations tab, and disable the Import Animation checkbox. The character mesh should, and will, be animated-performing actions such as walking and attacking animations. However, the character mesh file itself contains no animation data. All character animations will be applied to the mesh from other files.

Disable Import Animation for the zombie NPC
That's great! Now, let's configure the character rig for Mecanim. This is about optimizing the underlying skeleton to allow the model to be animated. To do this, select the Rig tab from the Inspector object. For the Animation Type, choose Humanoid; and for Avatar Definition, choose Create From This Model. The Humanoid animation type instructs Unity to see the mesh as a standard bipedal human-a character with a head, torso, two arms, and two legs. This generic structure (as defined in the avatar) is mapped to the mesh bones and allows Animation Retargeting. Animation Retargeting is the ability to use and reuse character animations from other files and other models across any humanoid.

Configuring the zombie rig
After clicking on the Apply button for the zombie character, a check mark icon appears next to the Configure... button. For some character meshes, a X icon may appear instead. A check mark signifies that Unity has scanned through all bones in the mesh and successfully identified a humanoid rig, which can be mapped easily to the avatar. An X icon signifies a problem, which can be either minor or major. A minor case is where a humanoid character rig is imported, but differs in subtle and important ways from what Unity expects. This scenario is often fixed manually in Unity, using the Rig Configuration Window (available by clicking on Configure...). In contrast, the problem could be major; for example, the imported mesh may not be humanoid at all, or else it differs so dramatically from anything expected that a radical change and overhaul must be made to the character from within the content creation software.

Character rig successfully configured
Even when your character rig is imported successfully, you should still test it inside the Rig Configuration Editor. This acts as a sanity check and confirms that your rig is working as intended. To do this, click on the Configure... button from the Rig tab in the object Inspector; this displays the Rig Configuration Editor:

Using the Rig Configuration Editor to examine, test, and repair a skeleton avatar mapping
From the Rig Configuration Editor, you can see how imported bones map to the humanoid avatar definition. Bones highlighted in green are already mapped to the Avatar, as shown in the Inspector object. That is, imported bones turn green when Unity, after analysis, finds a match for them in the Avatar. The Avatar is simply a map or chart defined by Unity, namely, a collection of predetermined bones. The aim of the Rig Configuration Editor is to simply map the bones from the mesh to the avatar, allowing the mesh to be animated by any kind of humanoid animation.
For the zombie character, all bones will be successfully auto-mapped to the avatar. You can change this mapping, however, simply by dragging and dropping specific bones from the Hierarchy panel to the bone slots in the Inspector object.

Defining avatar mappings
Now, let's stress test our character mesh, checking its bone and avatar mapping and make sure that the character deforms as intended. To do this, switch to the Muscles & Settings tab from the Inspector object. When you do this, the character's pose changes immediately inside the viewport, which means it is ready for testing.

Testing bone mappings
From here, use the character pose sliders in the Inspector object to push the character into extreme poses, previewing its posture in the viewport. The idea is to preview how the character deforms and responds to extremes. The reason such testing is necessary at all is that although bipedal humanoids share a common skeletal structure, they differ widely in body types and heights-some being short and small, and some being large and tall.

Testing extreme poses
If you feel your character breaks, intersects, or distorts in extreme poses, you can configure the mesh deformation limits, specifying a minimum and maximum range. To do this, first expand the Per-Muscle Settings group for the limbs or bones that are problematic, as shown in the following screenshot:

Defining pose extremes
Then, you can drag and resize the minimum and maximum thumb-sliders to define the minimum and maximum deformation extents for that limb, and for all limbs where needed. These settings constrain the movement and rotation of limbs, preventing them from being pushed beyond their intended limits during animation. The best way to use this tool is to begin with your character in an extreme pose that causes a visible break, and then to refine the Per-Muscle Settings until the mesh is repaired.

Correcting pose breaks
When you're done making changes to the rig and pose, remember to click on the Apply or Done button from the Inspector object. The Done button simply applies the changes and then closes the Rig Configuration Editor.

Applying rig changes
The Dead Keys game features character animations for the zombies, namely walk, fight, and idle. These are included as FBX files. They can be imported into the Animations folder. The animations themselves are not intended for or targeted toward the zombies, but Mecanim's Humanoid Retargeting lets us reuse almost any character animations on any humanoid model. Let's now configure the animations. Select each animation, and switch to the Rig tab. Choose Humanoid for the Animation Type, and leave the Avatar Definition at Create From This Model.

Specifying a Humanoid animation type for animations
Now, move to the Animations tab. Enable the Loop Time checkbox, to enable animation looping for the clip. Then, click on Apply. We'll have good cause to return to the animation settings in later chapters, for further refinement, as we'll see.

Enabling animation Loop Time for repeating animation clips
Now, let's explore a common problem with loopable walk animations that have root motion encoded. Root motion refers to the highest-level transformation applied to an animated model. Most bone-based animation applies to lower-level bones in the bone hierarchy (such as arms, legs, and head), and this animation is always measured relative to the top-most parent.
However, when the root bone is animated, it affects a character's position and orientation in world space. This is known as root motion. One problem that sometimes happens with imported, loopable walk animations is a small deviation or offset away from the neutral starting point in its root motion. This causes a mesh to drift away from its starting orientation over time, especially when the animation is played on a loop. To see this issue in action, select the walk animation for the zombie character, and from the object Inspector, preview the animation carefully. As you do this, align your camera view in the preview window in front of the humanoid character and see how, gradually, his walk deviates slowly from the center line on which he begins. This shows that, over time, the character continually drifts. This problem will not just manifest in the preview window, but in-game too!

Previewing walk cycle issues
This problem happens as a result of walk-cycle inaccuracies in root motion. By previewing the Average Velocity field from the object Inspector, you'll see the X motion field is a nonzero value, meaning that offset occurs to the mesh in X. This explains the accumulative deviation in the walk, as the animation is repeated.

Exploring root motion problems
To fix this problem, enable the Bake Into Pose checkbox for the Root Transform Rotation section. This lets you override the Average Velocity field. Then, adjust the Offset field to compensate for the value of Average Velocity. The idea is to adjust Offset until the value of Average Velocity is reset to 0, indicating no offsetting. Then, click on Apply.

Correcting root motion
Let's import game audio-specifically, the music track. This should be dragged and dropped into the music folder (the music track narrow_corridors_short.ogg is included in the book's companion files). Music is an important audio asset that greatly impacts loading times, especially on mobile devices and legacy hardware. Music tracks often exceed one minute in duration, and they encode a lot of data. Consequently, additional configuration is usually needed for music tracks, to prevent them from burdening your games.

Importing audio files
Tip
Ideally, music should be in a WAV format, to prevent lossy compression when ported to other platforms. If WAV is not possible, then OGG is another valuable alternative. For more information on audio import settings, refer to the online Unity documentation at http://docs.unity3d.com/Manual/AudioFiles.html.
Now, select the imported music track in the Project panel. Disable the Preload Audio Data checkbox, and then change the Load Type to Steaming. This optimizes the music loading process. It means the music track will be loaded in segments during playback, as opposed to entirely in memory from the level beginning, and it will continually load, segment by segment. This prevents longer initial loading times.

Configuring music for streaming
As a final step, let's configure mesh materials for the modular environment. By default, these are created and configured automatically by Unity on importing your meshes to the Project panel. They'll usually be added to a materials subfolder, alongside your mesh. From here, drag and drop your materials to the higher-level materials folder in the project, organizing your materials together. Don't worry about moving your materials around for organization purposes, Unity will keep track of any references and links to objects.

Configuring materials
By default, the DiffuseBase material for the modular environment is configured as a standard shader material, with some degree of glossiness. This makes the environment look shinier and smoother than it should be. In addition, the material lacks a Normal Map and Ambient Occlusion map. To configure the material, select the DiffuseBase material, and set the Shader type to Standard (Specular setup):

Changing Shader type
Next, assign the DiffuseBase texture to the Albedo slot (the main diffuse texture), and complete the Normal Map and Ambient Occlusion fields by assigning the appropriate textures, as found in the textures folder:

Completing the environment material
This chapter considered many instrumental concepts for establishing a solid ground work for the Dead Keys project. On reaching this point, you now have a Unity project with most assets imported, ready to begin your development work. This will happen in the next chapter. The foundation so far includes imported environment modules, zombie meshes, textures, audio files, and more. In importing these assets, we considered many issues, such as optimal asset construction, import guidelines, and how to solve both common and less obvious problems that sometimes occur along the way. The fully prepared and configured project, ready to begin, can be found in this book's companion files, in the Chapter02/Start folder. This saves you from having to import all assets manually. In the next chapter, we'll focus in depth on level design and construction techniques, from skyboxes and lighting to emotion, mood, and atmosphere.




 Download code from GitHub


