Deploying Ubuntu Server
Ubuntu Server is an extremely powerful distribution for servers and network appliances. Whether you're setting up a high-end database or a small office file server, the flexible nature of Ubuntu Server will meet and surpass your needs. In this book, we'll walk through all the common use cases to help you get the most out of this exciting platform. In this chapter in particular, I'll guide you through the process of deploying Ubuntu Server on to your system. We'll start off with some discussion on best practices, and then we'll obtain the software and create our installation media. Next, I'll give you a step-by-step rundown of the entire installation procedure. By the end of this chapter, you'll have an Ubuntu Server installation of your own to use throughout the remainder of this book. I'll even show you the process of installing Ubuntu Server on a Raspberry Pi 3 for good measure.
In particular, we will cover:
- Setting up our lab
- Determining your server's role
- Deciding between 32- and 64-bit installations
- Obtaining Ubuntu Server installation media
- Creating a bootable Ubuntu Server flash drive
- Planning the partition layout
- Installing Ubuntu Server
- Installing Ubuntu Server on Raspberry Pi 3
Technical requirements
For this chapter (and all others) we will need either a physical computer or virtual machine with the following specs:
- One CPU core
- 512 MB RAM
- 10 GB hard disk (16 or more recommended)
Don't worry about the specifics for now; we will discuss these requirements further in this chapter.
Setting up our lab
The first thing for us to do is to set up our environment. For the purposes of this book, it really doesn't matter what kind of hardware you use, if you even use physical hardware at all (a virtual machine or cloud instance will suffice). If you have physical server hardware available to you, then by all means use it (though not everyone has the money or even the available space to set up a complete lab). Nowadays, processing power and memory is cheaper than it's ever been, and the typical home PC is capable of running several virtual machines. Even better, software such as VirtualBox is free, so even if you have no budget at all, there are definitely options available to you. Perhaps you already have a server or two in your rack at work just waiting to be deployed; in which case, this will be even more exciting and fun. In the case of VirtualBox, it can be downloaded from here: https://www.virtualbox.org.
While I always prefer physical hardware, virtual machines have one major advantage. Not only are they easy to create and destroy at will, they are perfect for testing new or proposed solutions because you can easily take a snapshot of a VM and restore it if an experiment blows up in your face. In my case, it's common for me to create a virtual machine of a Linux distribution, fully update it, and then take a snapshot before making any changes. That way, I always have a base version of the OS to fall back on if I muck it up. Testing software rollouts on virtual machines before graduating a solution to production is a good habit to get into anyway.
This book makes no assumptions regarding your environment, because the hardware you have access to differs from person to person. While the installation procedure for Ubuntu Server differs based on hardware (for example, perhaps your server isn't capable of booting from USB install media, forcing you to use a DVD), all other concepts contained throughout the book will be the same regardless.
With that said, once we run through the install procedure, feel free to install Ubuntu Server on as many devices or VMs as you can. Later on in our journey, we'll go through several examples of networking, including copying files from one server to another. If you have more than one installation, these exercises will be easier. You can set up multiple virtual machines, physical servers, or any combination of the two.
If you don't have access to a physical server, and your PC isn't powerful enough to handle virtual machines very well, consider setting up a Virtual Private Server (VPS) from providers such as Linode and DigitalOcean, which both have Ubuntu Server available as an option for a small monthly fee. See the following URLs for more information on two popular VPS providers:
- DigitalOcean: https://www.digitalocean.com
- Linode: https://www.linode.com
Cloud providers are great if you wish to get a server up and running quickly or if your goal is to set up a server to be available in the cloud. With that said, all you need to do is have Ubuntu Server installed on something (basically anything at all) and you're ready to follow along.
Determining your server's role
While at this point your goal is most likely to set up an Ubuntu Server installation for the purposes of following along with the concepts contained within this book, it's also important to understand how a typical server rollout is performed in the real world. Every server must have a purpose, also known as its role. This role could be that of a database server, web server, and so on. In a nutshell, the role is the value the server adds to you or your organization. Sometimes, servers may be implemented solely for the purpose of testing experimental code. And this is important too—having a test environment is a very common (and worthwhile) practice.
Once you understand the role your server plays within your organization, you can plan for its importance. Is the system mission critical? How would it affect your organization if for some reason this server malfunctioned? Depending on the answer to this question, you may only need to set up a single server for this task, or you may wish to plan for redundancy such that the server doesn't become a central point of failure. An example of this may be a DNS server, which would affect your colleague's ability to resolve local hostnames and access required resources. It may make sense to add a second DNS server to take over in the event that the primary server becomes unavailable for some reason.
Another item to consider is how confidential the data residing on a server is going to be for your environment. This directly relates to the installation procedure we're about to perform, because you will be asked whether or not you'd like to utilize encryption. The encryption that Ubuntu Server offers during installation is known as encryption at rest, which refers to the data stored within the storage volumes on that server. If your server is destined to store confidential data (accounting information, credit card numbers, employee or client records, and so on), you may want to consider making use of this option. Encrypting your hard disks is a really good idea to prevent miscreants with local access from stealing data. As long as the miscreant doesn't have your encryption key, they cannot steal this confidential information. However, it's worth mentioning that anyone with physical access can easily destroy data (encrypted or not), so definitely keep your server room locked!
At this point in the book, I'm definitely not asking you to create a detailed flow chart or anything like that, but instead to keep in mind some concepts that should always be part of the conversation when setting up a new server. It needs to have a reason to exist, it should be understood how critical and confidential the server's data will be, and the server should then be set up accordingly. Once you practice these concepts as well as the installation procedure, you can make up your own server roll-out plan to use within your organization going forward.
Deciding between 32- and 64-bit installations
Before we grab our installation media and get started, I thought I would write a bit about the diminishing availability of 32-bit installation media in the Linux world. When the first edition of this book was published, I wrote about the choice between 32- and 64-bit installations. Nowadays, whether to use 64-bit installation media is no longer much of an option, with various distributions of Linux dropping support for 32-bit downloads. In the case of Ubuntu Server 18.04, you are now only able to download 64-bit installation images as 32-bit downloads of Ubuntu Server have been removed.
This may seem like a polarizing decision on Canonicals' part, but it's really not as bad as it may seem. Not being able to download 32-bit installation images from Canonical doesn't mean that you can't run 32-bit software; it just means that your overall system will be running a 64-bit kernel. This is great, considering you'll benefit fully by being able to more efficiently utilize the RAM in your server.
In addition, 64-bit capable processors have been on the market for well over a decade. Even if you think your hardware may be too old to utilize 64-bit software, it will more than likely support it just fine. Consider this—several versions of the Pentium 4 processor support 64-bit software, and that processor has become ancient history in computer years. One scenario that may suffer due to the decision to decommission 32-bit media is installation on netbooks, but most people don't run server applications from such a device, so that doesn't affect us at all in terms of this book.
All in all, the decision to migrate away from 32-bit is a good move in the name of progress, and it shouldn't impact us at all when setting up new servers. However, I mentioned it here simply because I wanted to make you aware of it. If you are downloading a modern version of Ubuntu Server today, you're downloading the 64-bit version (and you probably won't notice a difference).
Obtaining Ubuntu Server installation media
It's time to get started! At this point, we'll need to get our hands on Ubuntu Server and then create bootable installation media to install it. How you do this largely depends on your hardware. Does your server have an optical drive? Is it able to boot from USB? Refer to the documentation for your server to find out. In most cases, it's a very good idea to create both a bootable DVD and USB media of Ubuntu Server while you're at it. That way, regardless of how your server boots, you'll have what you need.
Unfortunately, the differing age of servers within a typical data center introduces some unpredictability when it comes to how to boot installation media. When I first started with servers, it was commonplace for all servers to contain a 3.5-inch floppy disk drive, and some of the better ones even contained an optical drive. Nowadays, servers typically contain neither and only ship with an optical drive if you ask for one nicely while placing your order. If a server does have an optical drive, it typically will go unused for an extended period of time and become faulty without anyone knowing until the next time someone goes to use it. Some servers boot from USB, others don't. To continue, check the documentation for your hardware and plan accordingly. Your server's capabilities will determine which kind of media you'll need to create.
Regardless of whether we plan on creating a bootable USB or DVD, we only need to download a single file. Navigate to the following site in your web browser to get started:
https://www.ubuntu.com/download/server
From this page, we're going to download Ubuntu 18.04 LTS by clicking on the Download button. There may be other versions of Ubuntu Server listed on this page, such as 18.10 and 19.04, for example. However, we're only interested in the Long Term Support (LTS) release, due to the fact that it benefits from five years of support (non-LTS versions are only supported for nine months). Non-LTS releases are useful for testing future software versions, but when in doubt, stick with LTS. Once the download is completed, we'll end up with an ISO image we can use to create our bootable installation media.
If you're setting up a virtual machine, then the ISO file you download from the Ubuntu Downloads page will be all you need; you won't need to create a bootable DVD or flash drive. In that case, all you should need to do is create a VM, attach the ISO to the virtual optical drive, and boot it. From there, the installer should start, and you can proceed with the installation procedure outlined later in this chapter. Going over the process of booting an ISO image on a virtual machine differs from hypervisor to hypervisor, so detailing the process on each would be beyond the scope of this book. Thankfully, the process is usually straightforward and you can find the details within the documentation of your hypervisor or from performing a quick Google search. In most cases, the process is as simple as attaching the downloaded ISO image to the virtual machine, and then starting it up.
As I mentioned before, I recommend creating both a bootable USB and bootable DVD. This is due to the fact that you'll probably run into situations where you have a server that doesn't boot from USB, or perhaps your server doesn't have an optical drive and the USB flash drive is your only option. In addition, the Ubuntu Server boot media also makes great recovery media if for some reason you need to rescue a server. To create a bootable DVD, the process is typically just a matter of downloading the ISO file and then right-clicking on it. In the right-click menu of your operating system, you should have an option to burn to disc or some similar verbiage. This is true of Windows, as well as most graphical desktop environments of Linux when a disc burning application installed. If in doubt, Brasero is a good disc-burning utility to download for Linux, and other operating systems generally have this option built-in nowadays.
The exact procedure differs from system to system, mainly because there is a vast amount of software combinations at play here. For example, I've seen many Windows systems where the right-click option to burn a DVD was removed by an installed CD/DVD burning application. In that case, you'd have to first open your CD/DVD-burning application and find the option to create media from a downloaded ISO file. As much as I would love to outline the complete process here, no two Windows PCs typically ship with the same CD/DVD-burning application. The best rule of thumb is to try right-clicking on the file to see whether the option is there, and, if not, refer to the documentation for your application. Keep in mind that a data disc is not what you want, so make sure to look for the option to create media from an ISO image or your disc will be useless.
At this point, you should have an Ubuntu Server ISO image file downloaded. If you are planning on using a DVD to install Ubuntu, you should have that created as well. In the next section, I'll outline the process of creating a bootable flash drive that can be used to install.
Creating a bootable Ubuntu Server flash drive
The process of creating a bootable USB flash drive with which to install Ubuntu used to vary greatly between platforms. The steps were very different depending on whether your workstation or laptop was currently running Linux, Windows, or macOS. In the first edition, I outlined the process on all three major platforms. Thankfully, a much simpler method has come about since the publication of the first edition. Nowadays, I recommend the use of Etcher to create your bootable media. Etcher is fantastic in that it abstracts the method such that it is the same regardless of which OS you use, and it distills the process to its most simple form. Another feature I like is that Etcher is safe; it prevents you from destroying your current operating system in the process of mastering your bootable media. In the past, you'd use tools like the dd command on Linux to write an ISO file to a flash drive. However, if you set up the dd command incorrectly, you could effectively write the ISO file over your current operating system and wipe out everything. Etcher doesn't let you do that.
To get started, head on over to https://etcher.io, download the latest version of the application from their site, and open it up. The window will look similar to the following screenshot once it launches:
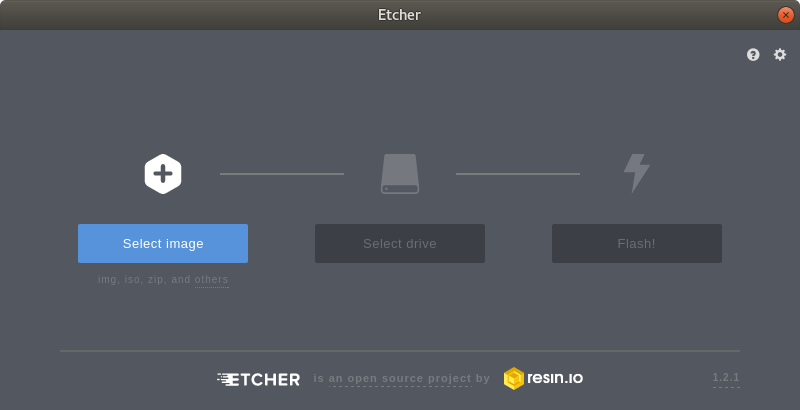
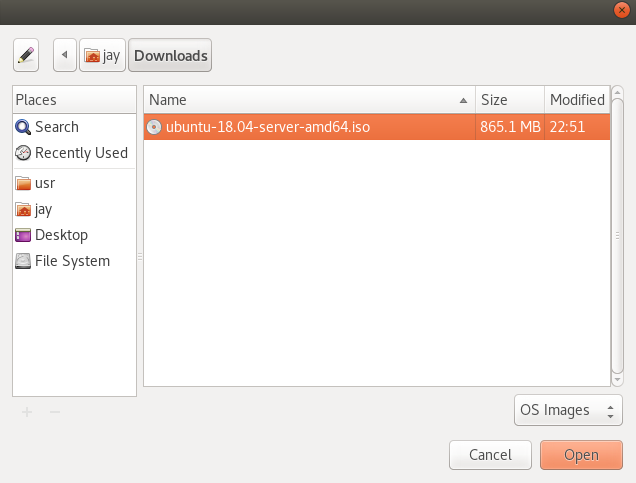
At this point, you'll click Select image, which will open up a new window that will allow you to select the ISO file you downloaded earlier. Once you select the ISO, click on Open:
If your flash drive is already inserted into the computer, Etcher should automatically detect it:
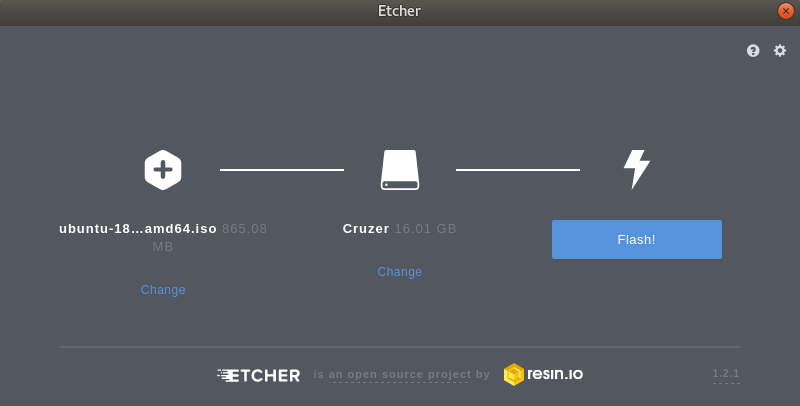
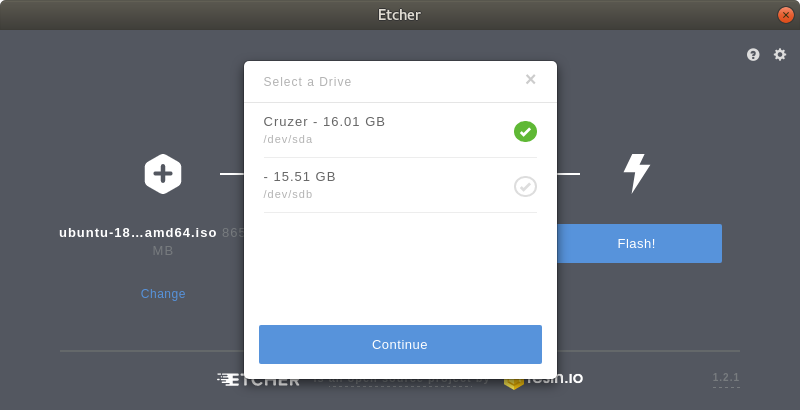
In the event you have more than one flash drive attached, or Etcher selects the wrong one, you can click Change and select the flash drive you wish to use:
Finally, you can click Flash! to get the process started. At this point, the flash drive will be converted into Ubuntu Server installation media that can then be used to start the installation process:
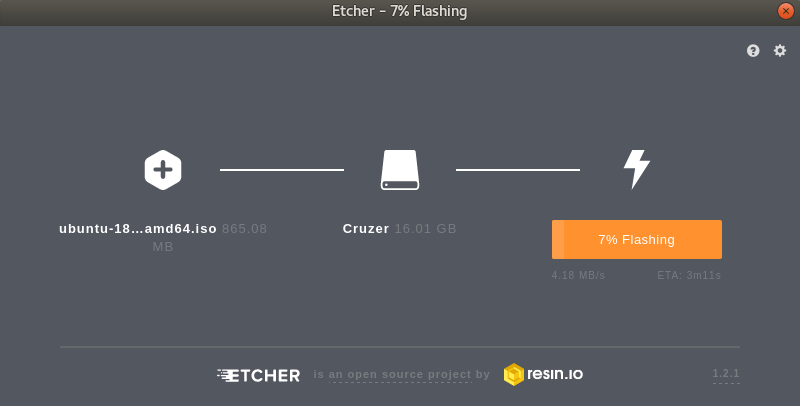
After a few minutes (the length of time varies depending on your hardware), the flashing process will complete, and you'll be able to continue and get some installations going. Before we get into that, though, we should have a quick discussion regarding partitioning.
Planning the partitioning layout
One of the many joys of utilizing Linux for server platforms is how flexible the partitioning is. Partitioning your disk allows you to divide up your hard disk to dedicate specific storage allocations to individual applications or purposes. For example, you can dedicate a partition for the files that are shared by your Apache web server so changes to other partitions won't affect it. You can even dedicate a partition for your network file shares—the possibilities are endless. Each partition is mounted (attached) to a specific directory, and any files sent to that directory are thereby sent to that separate partition. The names you create for the directories where your partitions are mounted are arbitrary; it really doesn't matter what you call them. The flexible nature of storage on Linux systems allows you to be creative with your partitioning as well as your directory naming.
Admittedly, we're probably getting ahead of ourselves here. After all, we're only just getting started and the point of this chapter is to help you set up a basic Ubuntu Server installation to serve as the foundation for the rest of the chapter. When going through the installation process, we'll accept the defaults anyway. However, the goal of this section is to give you examples of the options you have for consideration later. At some point, you may want to get creative and play around with the partition layout.
With custom partitioning, you're able to do some very clever things. For example, with the right configuration you're able to wipe and reload your distribution while preserving user data, logs, and more. This works because Ubuntu Server allows you to carve up your storage any way you want during installation. If you already have a partition with data on it, you can choose to leave it as is so you can carry it forward into a new install. You simply set the directory path where it's mounted to be the same as before, restore your configuration files, and your applications will continue working as if nothing happened.
One very common example of custom partitioning in the real world is separating the /home directory into its own partition. Since this is where users typically store their files, you can set up your server such that a reload of the distribution won't disturb their files. When they log in after a server refresh, all their files will be right where they left them. You could even place the files shared by your Apache web server on to their own partition and preserve those too. You can get very creative here.
Another reason to utilize separate partitions may be to simply create boundaries or restrictions. If you have an application running on your server that is prone to filling up large amounts of storage, you can point that application to its own partition, limited by size. An example of where this could be useful is an application's log files. Log files are the bane of any administrator when it comes to storage. While helpful if you're trying to figure out why something crashed, logs can fill up a hard disk if you're not careful. In my experience, I've seen servers come to a screeching halt due to log files filling up all the available free space on a server where everything was on a single partition. The only boundary the application had was the entirety of the disk.
While there are certainly better ways of handling excessive logging (log rotating, disk quotas, and so on), a separate partition also would have helped. If the application's log directory was on its own partition, it would be able to fill up that partition, but not the entire drive. A full log partition will certainly cause issues, but it wouldn't have been able to affect the entire server. As an administrator, it's up to you to weigh the pros and the cons and develop a partitioning scheme that will best serve the needs of your organization.
Success when maintaining a server is a matter of efficiently managing resources, users, and security—and a good partitioning scheme is certainly part of that. Sometimes it's just a matter of making things easier on yourself so that you have less work to do should you need to reload your operating system. For the sake of following along with this book, it really doesn't matter how you install or partition Ubuntu Server. The trick is simply to get it installed—you can always practice partitioning later. After all, part of learning is setting up a platform, figuring out how to break it in epic ways, and then fixing it up.
Here are some basic tips regarding partitioning:
- At minimum, a partition for the root filesystem (designated by a forward slash) is required.
- The /var directory contains most log files, and is a ripe candidate for separation.
- The /home directory stores all user files. Separating this into a separate partition can be beneficial.
- If you've used Linux before, you may be familiar with the concept of a swap partition. This is no longer necessary—a swap file will be created automatically in newer Ubuntu releases.
When we perform our installation in the next section, we'll choose the defaults for the partitioning scheme to get you started quickly. However, I recommend you come back to the installation process at some point in the future and experiment with it. You may come up with some clever ways to split up your storage. However, you don't have to—having everything in one partition is fine too, depending on your needs.
Installing Ubuntu Server
At this point, we should be ready to get an installation or two of Ubuntu Server going. In the steps that follow, I'll walk you through the process.
To get started, all you should need to do is insert the media into your server or device and follow the onscreen instructions to open the boot menu. The key you press at the beginning of the POST process differs from one machine to another, but it's quite often F10, F11, or F12. Refer to your documentation if you are unsure, though most computers and servers tell you which key to press at the beginning. You'll probably miss this window of opportunity the first few times, and that's fine—to this day I still seem to need to restart the machine once or twice to hit the key in time.
When you first boot from the Ubuntu Server install media, you'll see an icon near the bottom that looks like the following (it will go away after a few seconds):

This icon is your indication that you can press Enter here to select additional options, such as your language. If you don't press Enter within a few seconds, this will be bypassed and the default options (such as the English language) will be chosen automatically. If you do press Enter, you'll see the following screenshot:
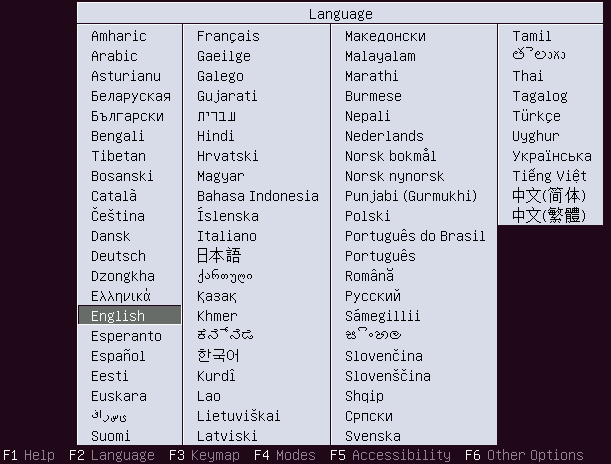
If your language is anything other than English, you'll be able to select that here. You can also press F6 to view additional options, which you would only explore in a situation in which your hardware wasn't working properly. Most people won't need to do this, however.
After choosing your language, you'll be brought to the installation menu. (If you didn't press Enter when the previously mentioned icon was on the screen, this screen will be bypassed and you won't see it). The installation menu will give you additional options. To start the installation process, press Enter to choose the first option (Install Ubuntu Server), though a few of the other options may be useful to you:
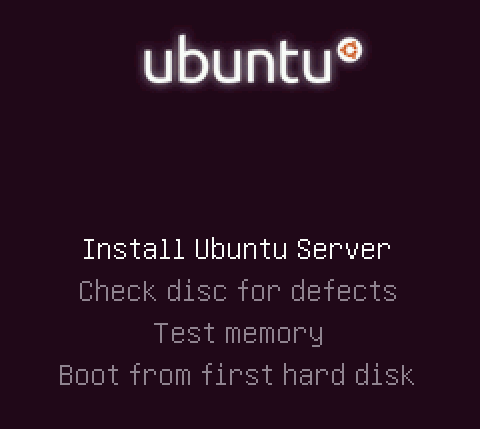
First, this menu also offers you an option to Check disc for defects. Although I'm sure you've done well in creating your media, all it takes is for a small corruption in the download and you would end up with invalid media. This is extremely rare—but it does happen from time to time. If you have the extra time, it may make sense to verify your media.
Second, this menu gives you the option to Test memory. This is an option I've found myself using far more often than I'd like to admit. Defective RAM on computers and servers is surprisingly common and can cause all kinds of strange things to happen. For one, defective RAM may cause your installation to fail. Worse, your installation could also succeed—and I say that's worse due to the fact you'd find out about problems later (after spending considerable time setting it up) rather than right away. While doing a memory test can add considerable time to the installation process, I definitely recommend it on physical servers, especially if the hardware is new and hasn't ever been tested at all. In fact, I make it a process to test the RAM of all my servers once or twice a year, so this media can be used as a memory tester any time you need one.
From this point forward, we will progress through the various screens to customize our installation. I'll guide you along the way.
To navigate the installer, you simply use the arrow keys to move up and down to select different options, and press Enter to confirm choices. The Esc key will allow you to exit from a sub-menu. The installer is pretty easy to navigate once you get the hang of it. Anyway, after you enter the actual installation process, the first screen will ask you to select a language. Go ahead and do so:

The next screen will allow you to choose your keyboard layout. If you use a keyboard other than an English (US) keyboard, you can select that here. Press down key to highlight Done and press Enter when you've finished:

At the next screen, you will have the option to install Ubuntu Server, or a MAAS region or rack controller. MAAS, or Metal as a Service, is beyond the scope of this book, but it offers some very interesting features, such as additional options for scaling and provisioning your servers. After you become proficient with Ubuntu Server, it may be worth learning later. I have included a link to the documentation for MAAS at the end of this chapter, should you desire to learn more about it. For now, choose the first option, Install Ubuntu:

Next, the installer will automatically try to configure your network connection via DHCP. This is often correct, so you shouldn't need to do anything here unless you have more than one network card and you'd like to use one other than the default. In my case, it defaulted to device enp0s3 (which is correct) but the interface name will be different depending on your hardware. If you do need to change this, you can select the defaulted interface name, press Enter, and select a different one. When you're finished, arrow down to done and press Enter:

The next screen will give you a chance to configure your server's disk. At this screen, if you want to implement a custom partitioning scheme, you can do that here. The option Manual will allow you to do just that. However, that is beyond the scope of this chapter as we're just trying to get an installation off the ground, so choose Use An Entire Disk to continue:

After selecting Use An Entire Disk, the next screen will allow you to choose a disk on which to install Ubuntu Server. In my case, I only have one disk, and you probably do as well. But if you have more than one, select the drive to be used as the main drive for the distribution. We can always configure any other drives you may have later. In fact, we will take a look at storage volumes in Chapter 3, Managing Storage Volumes. Simply press Enter after highlighting the appropriate disk:

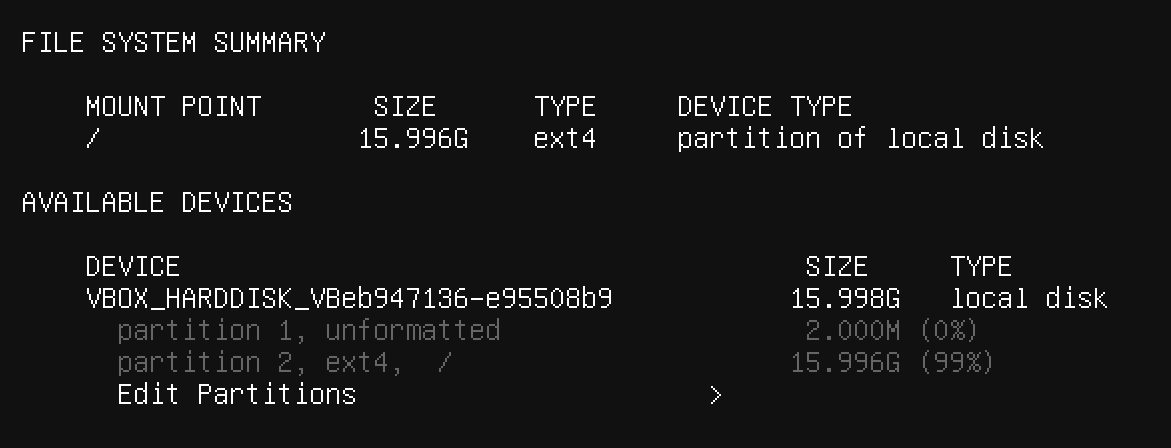
Next, the Ubuntu installer will give you an overview of the partitioning it will perform. The defaults are fine, so simply press Enter. You'll be asked to confirm one last time; when you are, arrow down to continue and press Enter:
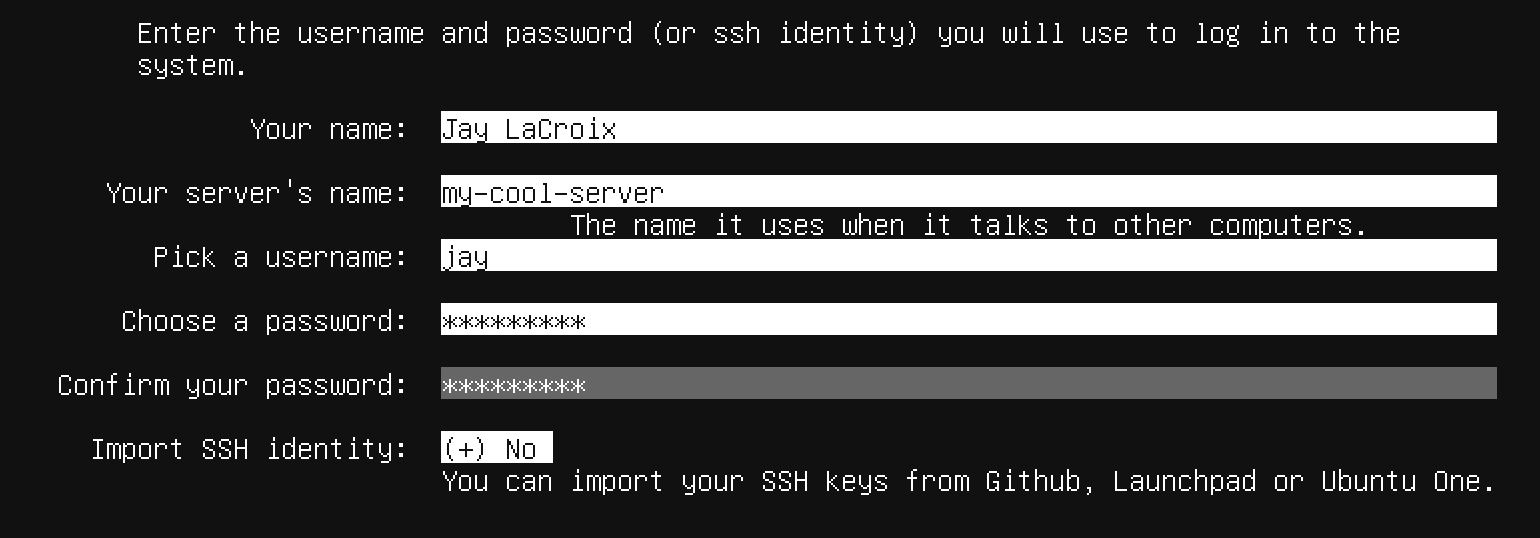
At the next screen, you'll fill out information relative to the default user account. Fill out your information on this screen, as I have in the sample screenshot. One important thing to keep in mind is that the user you create here will have administrative access. You can always create other users later on, but the user you create here will have special privileges. When finished, arrow down to done and press Enter:
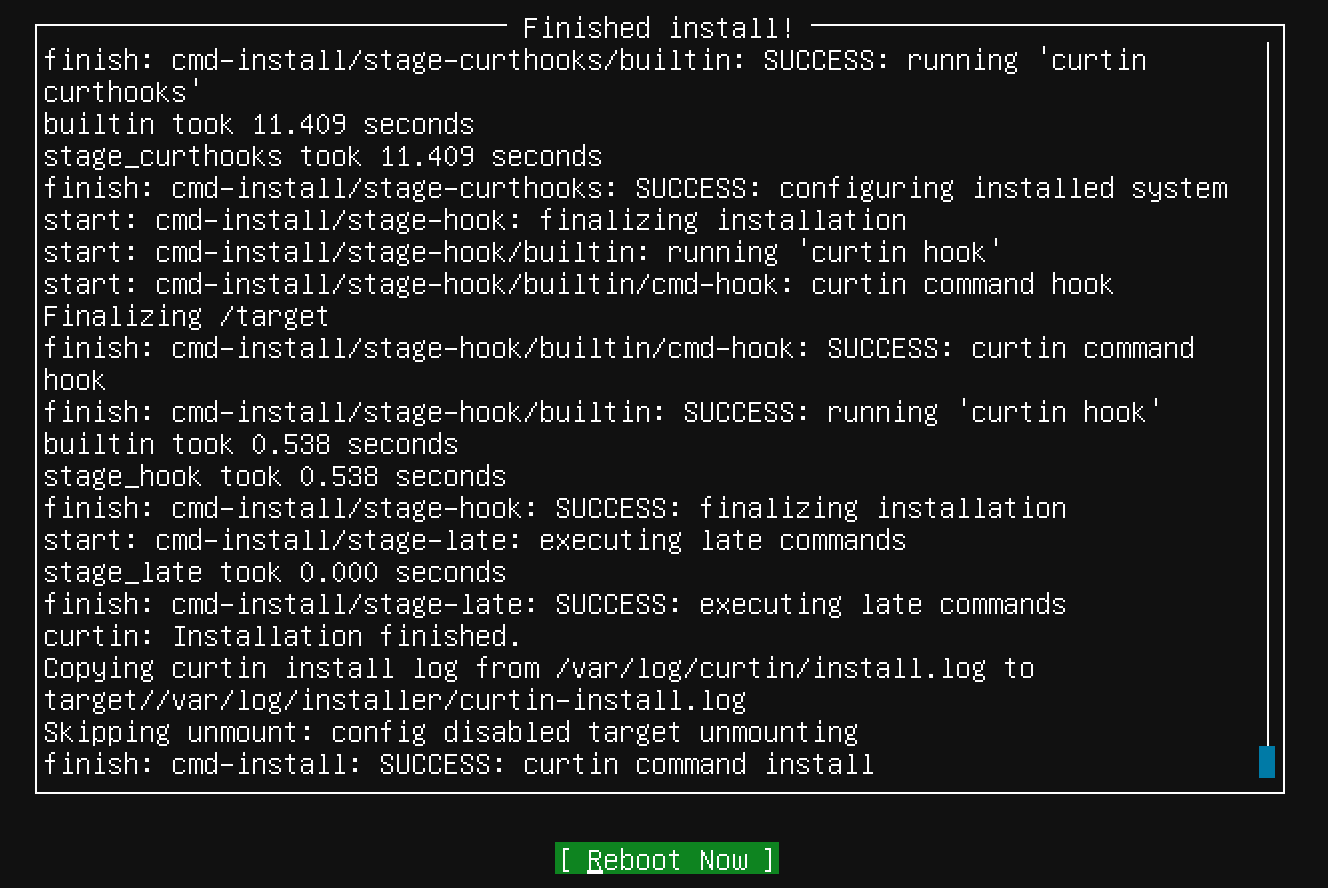
At this point, the installation will continue on, and may even be well on its way before you're finished filling out your user information. You'll see a screen similar to the following when everything is finished. Press Enter to reboot the server into the new installation:
At this point, your server will reboot and then Ubuntu Server should start right up. Congratulations! You now have your own Ubuntu Server installation!
Installing Ubuntu Server on Raspberry Pi 3
The Raspberry Pi 3 has become quite a valuable asset in the industry. These tiny computers, now with four cores and 1 GB of RAM, are extremely useful in running one-off tasks and even offering a great place to test code without disrupting existing infrastructure. In my lab, I have several Pis on my network, each one responsible for performing specific tasks or functions. It's a very useful platform.
Thankfully, Ubuntu Server is quite easy to install on a Raspberry Pi. In fact, it's installed in much the same way as Raspbian, which is the distribution most commonly used on the Pi. Ubuntu Server is available for Raspberry Pi models 2 and 3. All you'll need to do is download the SD card image and then write it directly to your microSD card (your SD card needs to be at least 4 GB). Once you've done that, you can boot the Pi and log in. The default username and password is ubuntu for both.
To get started, you'll first download the SD card image from here: https://wiki.ubuntu.com/ARM/RaspberryPi.
Then, check that it is compatible with your model of Raspberry Pi. The image will be in a compressed .xz format, which you'll need to extract with your operating system's decompressing utility (in Linux you can use the unxz command, which you get from the xz-utils package).
Next, we do the actual writing of the SD card. For this, we return to our old friend Etcher, which we used earlier in this chapter to master our USB media. Another feature of Etcher is that it allows us to master SD cards for the Raspberry Pi as well. Go ahead and open Etcher, and select the Ubuntu Server Pi image in much the same way as you selected the Ubuntu Server ISO file earlier. Next, make sure your SD card is inserted, and click Flash! and you should be good to go as soon as the process concludes. Once the process finishes, simply insert the SD card into your Pi and power it on. That's all there is to it!
Summary
In this chapter, we covered the installation process in great detail. As with most Linux distributions, Ubuntu Server is scalable and able to be installed on a variety of server types. Physical servers, virtual machines, and even the Raspberry Pi, have a version of Ubuntu Server available. The process of installation was covered step by step, and you should now have an Ubuntu Server of your own to configure as you wish. Also in this chapter, we covered partitioning, creating boot media, determining the role of your server, as well as some best practices.
In the next chapter, I'll show you how to manage users. You'll be able to create them, delete them, change them, and even manage password expiration and more. I'll also cover permissions so that you can determine what your users are allowed to do on your server. See you there!
Questions
In our first chapter, we covered the installation process that will serve as the foundation for the rest of the book. However, there were still some useful concepts that we'll want to remember. Take a look at the following questions and test your knowledge:
- Determining your server's _________ will help you plan for its use on your network.
- Ubuntu Server installation media is created from an ___ file, which you can download from the Ubuntu website.
- Name at least one provider for VPS solutions (if you can name more than one, even better).
- What type of encryption is used when encrypting your Ubuntu installation?
- What is an LTS release of Ubuntu? Why is it important?
- Which tool is useful for creating bootable USB flash drives and optical media for installation?
- At minimum, your Ubuntu Server installation requires a partition for ________ .
Further reading
At the end of some chapters, I will list resources you can use to explore additional concepts relative to the content of the chapter. While not required, you should definitely explore them as these resources will go over additional content that didn't fit the scope of the chapter but are still useful for expanding your knowledge even further:
- Ubuntu installation documentation: https://help.ubuntu.com/community/Installation
- Etcher user documentation: https://github.com/resin-io/etcher/blob/master/docs/USER-DOCUMENTATION.md
- MAAS documentation: https://docs.maas.io/2.1/en/


