


This chapter will guide us through installing Sublime Text on all the supported platforms. We will also cover advanced installation and basic navigation around Sublime. This chapter is aimed at new users, but we recommend you flip through it even if you are already familiar with Sublime Text.
In this chapter, we will cover the following topics:
Installing Sublime Text on OS X
Installing Sublime Text on Windows 32/64 bit
Installing Sublime Text on Linux 32/64 bit
Getting to know the Data and Packages directories
Running Sublime for the first time
Installing the Package Control ASAP
This chapter serves as a quick installation reference for users who are new to Sublime Text, and covers all supported operating systems. We will also cover advanced installation techniques such as adding Sublime to our Command Line Interface (CLI) and to Ubuntu's action bar. Please refer to the appropriate section depending on your operating system.
This section will explain how to install Sublime Text on OS X 10.7 or later, as required.
First go to
http://www.sublimetext.com/3 and click on the download link for OS X. A file called Sublime Text Build #.dmg will be downloaded. Open this file and we will see the following window:
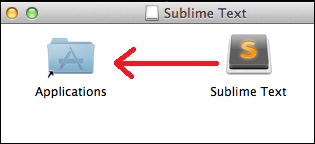
Simply drag the Sublime Text icon into the Applications folder and wait for the application to be copied.
We have just installed Sublime on our OS X! Is that all? No, we can also get the bleeding edge version from here: http://www.sublimetext.com/3dev. Bleeding edge versions are available for registered users only and are more susceptible to bugs.
Sublime Text ships with a CLI called subl, but this CLI isn't added to our environment by default. We want to be able to use it straight from our terminal, so we need to add a symbolic link called subl to the subl executable.
ln –s /Applications/Sublime\ Text.app/Contents/SharedSupport/bin/subl /usr/local/bin/subl
To see if it worked, type subl filename in the terminal where filename is the file you want to edit. Did it work? If not, then we need to add our folder that contains the new symlink to the environment. Run the following command:
open ~/.bash_profile
The first line of the file should start with export PATH=. It contains all the directories that will be looked into for executable binaries when we type a command in the terminal. Since we created a symlink to subl inside the /usr/local/bin directory, we will add it to the path by adding it to the directories:
export PATH=/usr/local/bin[…]
Now, run the following code before continuing:
source ~/.bash_profile
This will reload your .bash_profile with the newly added directory.
Sublime CLI should work now; try one of the following commands:
subl filename ("filename" is the filename to edit)
subl foldername ("foldername" is the folder to open)
subl . (to open the current directory)
That's it! We have Sublime Text with CLI running on our OS X!
This section will explain how to install Sublime Text on Windows 7/8, 32/64 bit. It is important to get the right version because the 64-bit version won't run on a 32-bit PC.
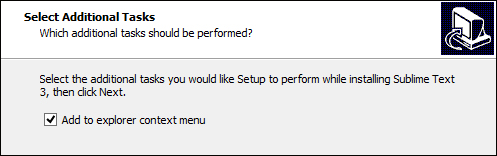
Go to http://www.sublimetext.com/3 and download the relevant file for 32-bit or 64-bit. A file called Sublime Text Build # Setup.exe will be downloaded. Open the file and you will be guided through the setup. Click on Next and choose setup location. Next, add Sublime to the explorer context by American English: should use "checking" Add to explorer context menu as shown in the following screenshot:
Then, finish the installation. We have just installed Sublime! Are we done? Not yet.
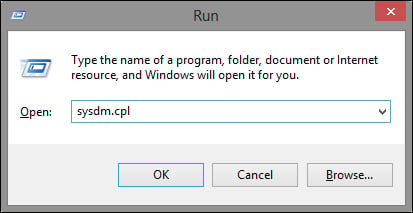
We want to add Sublime to our environment so we can use it straight from the command line. Open Run by pressing WinKey + R
and enter sysdm.cpl, as shown in the following screenshot:
Click on OK, the System Properties window should open. Now, go to the Advanced tab and click on the Environment Variables… button at the bottom-right corner. Environment variables should open, look for the Path variable in System variables, double-click it to open the Edit System Variable window, and add your Sublime installation path to the end of the Variable value field prefixed with a semicolon, as shown in the following screenshot:
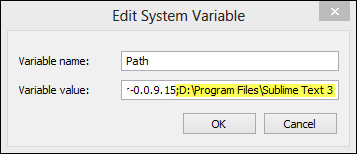
As we can see, my installation path is D:\Program Files\Sublime Text 3. Click on OK. Now we can run Sublime from the command line by typing sublime_text filename where filename is the file to edit. But the sublime_text command is too long to type every time we want to open a file with Sublime. Go to your installation directory and create a new file named subl.bat. Paste the following code into the file:
@echo off
start sublime_text.exe %*
The first line turns off the echo of the .bat file. This means that we won't see any output when we run the file. The second line will start the sublime_text executable with the given parameters.
Save the .bat file and open a new command line. We can now use the following commands in our command line:
subl filename ("filename" is the filename to edit)
subl foldername ("foldername" is the folder to open)
subl . (to open the current directory)
That's it; we have Sublime on our Windows PC!
This section will explain how to install Sublime Text on different Linux distributions.
This section will explain how to install Sublime Text on Ubuntu 32/64 bit.
There are a few different options for installing Sublime Text on your Ubuntu; we will use the Personal Package Archive (PPA) one. For this, we need to add the PPA that contains the Sublime Package. PPA is a software repository that contains packages that can be installed by Ubuntu's Launchpad.
To add the repository, run the following from the terminal:
sudo add-apt-repository ppa:webupd8team/sublime-text-3
sudo apt-get update
sudo apt-get install sublime-text-installer
To install Sublime Text 3 on our Ubuntu, we can now use the following commands:
subl filename ("filename" is the filename to edit)
subl foldername ("foldername" is the folder to open)
subl . (to open the current directory)
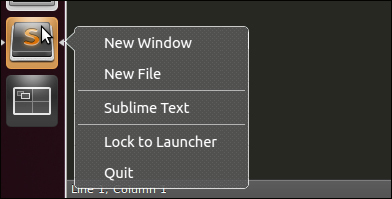
We can also see the Sublime icon on Ubuntu's action bar, which is typically on the left-hand side, as shown in the following screenshot:
Installing Sublime on a Linux other than Ubuntu takes a little longer, but we will do it as fast as possible! We start by going to http://www.sublimetext.com/3 and downloading the desired tarball for 32-bit or 64-bit.
After downloading, let's open our terminal and navigate to the Downloads folder:
cd ~/Downloads
The downloaded file is compressed using TAR. We will have to NTAR it first by running the following command:
tar xf sublime_text_3_build_3047_x64.tar.bz2
Move the extracted folder to /op:
sudo mv sublime_text_3 /opt/
We want to make a symbolic link so that we can run Sublime straight from the terminal:
sudo ln -s /opt/sublime_text_3/sublime_text /usr/bin/subl
Now, we have Sublime installed and can use the following commands to open the directory:
subl filename ("filename" is the filename to edit)
subl foldername ("foldername" is the folder to open)
subl . (to open the current directory)
Some distributions such as OpenSUSE, Ubuntu, or GNOME, use .desktop files. These files are for the desktop/action bar launch icons.
Let's add Sublime's .desktop file to the environment. It's good for us that Sublime comes with the file already and we don't need to write it. Just copy the file to the right location using the following command:
sudo cp /opt/sublime_text/sublime_text.desktop /usr/share/applications/
Your distribution may not provide /usr/share/applications, in which case you'll have to copy the file to ~/.local/share/applications.
After the successful installation of Sublime on our system, we can begin to understand what was actually being installed and how can we take advantage of it.
In this section I will use Windows shortcuts. So when I use Ctrl+?, it will be the same as using Command+? on a Mac.
From the official Sublime docs:
Nearly all of the interesting files for users live under the Data directory.
The location of the Data directory is platform-dependent:
Windows:
%APPDATA%\Sublime Text 3OS X:
~/Library/Application Support/Sublime Text 3Linux:
~/.config/sublime-text-3
We should see at least three directories inside the Data directory:
Installed Packages: This contains a copy of every
sublime-packageinstalled. It's used to restore packages.Local: This stores all the information about our current and previous session. This is used to restore Sublime to the stage we were in, when we last quit Sublime.
Packages: This contains all package folders that Sublime will load.
The following is written on the official Sublime docs:
"This is a key directory"
This directory contains all the resources for supported programming, markup languages, and custom plugins. We will refer to this folder as Packages.
Tip
We can also access the Packages directory from Sublime's main menu by navigating to Preferences | Browse Packages… on Windows or Linux, and by navigating to Sublime Text | Preferences | Browse Packages… on OS X.
This package is present at Packages/User and contains all custom plugins, snippets, macros, and user preferences. Let's make our first tweak!
Open Packages/User/Preferences.sublime-settings. We should see the following code:
{
   "font_size": 14,
   "ignored_packages":
   [
      "Vintage"
   ]
}
Try changing the font size and click on Save or Ctrl + S. Our font size has changed! We can also achieve this effect by pressing Ctrl + - to decrease the font size and Ctrl + + to increase the font size. In Linux or Windows, this can also be achieved by holding the Ctrl key while zooming in and out.
Almost every corner and pixel of Sublime Text can be tweaked, extended, or customized. All this customization is based on JSON, XML, Python, and Sublime files. A package is basically a folder that contains all resources that belong together, and it gives Sublime a new functionality or customization. This is all we need to know for now.
Open a random code project. We can do it by typing the following command:
subl projectfolder
In the preceding command, projectfolder is the path of the folder we wish to open. We can also open an empty Sublime window and drag the desired folder into it. The Sublime window is shown in the following screenshot:
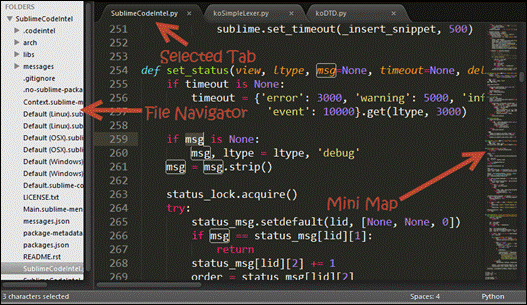
In the preceding screenshot, on the left-hand side we can see the File Navigator side bar that contains all the open folders in a hierarchy. At the top, we can see the tabs that are currently open, with the selected one highlighted. On the right-hand side, we can see the Mini Map. In Sublime 3, the Mini Map viewport that indicates the current position in the file has been removed. Let's bring it back!
Press Ctrl + O and open the user preferences, or go to Preferences | Settings-User. As you probably noticed, the file is written in the JSON format.
Tip
If you are not familiar with JSON, please go to http://en.wikipedia.org/wiki/JSON#Data_types.2C_syntax_and_example or http://JSON.org.
We need to add the following key value to the file:
"always_show_minimap_viewport": true,
Press Ctrl + S to save. Our file should now look like the following:
{
   "font_size": 14,
   "always_show_minimap_viewport": true,
   "ignored_packages":
   [
      "Vintage"
   ]
}
Because Sublime parses things as soon as they get saved, we should be able to see the Mini Map viewport immediately!
Let's go back to our file using Goto Anything (shown in the following screenshot), one of Sublime's best features, by pressing Ctrl + P:
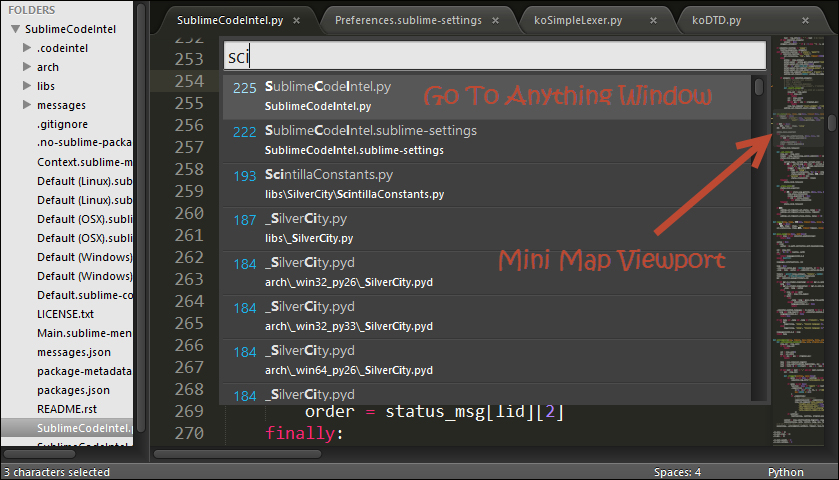
As you can see, the Go To window opens after indexing all files that are on the side bar. We can navigate by typing the file name, acronyms, extension, or prefix.
This search feature is called Fuzzy Text Search or Approximate string matching.
Press Esc to close the Go To window. We are going to use this a lot while developing a large project, so we should feel comfortable with it before moving on.
Try closing the current tab by pressing Ctrl + W. Now if no tab is left open, you can open a new one by pressing Ctrl + N, or even open a new window by pressing Ctrl + Shift + N.
To jump between open tabs in Windows or Linux, simply press Alt + # (where # is the sequential number of the tab from left to right), or press Command + # for OS X. In Windows or Linux, we can also go to the Next or Previous tab by pressing Ctrl + PageUp and Ctrl + PageDown respectively. The same can be done by pressing Option + Command + → or Option + Command + ← in OS X. Another nice navigation feature is the tab stack. To go forward in the stack, press Ctrl + Tab, and press Ctrl + Shift + Tab to go backwards. On OS X also, it's Control and not Command this time.
There are more nice Go To features such as Go To line by pressing Ctrl + G, and Go To matching bracket with Ctrl + M.
One of the most important features is the command palette where all the custom features or plugins can be accessed. Open the command palette by pressing Ctrl + Shift + P, or Command + Shift + P on OS X. We should see the following screenshot:
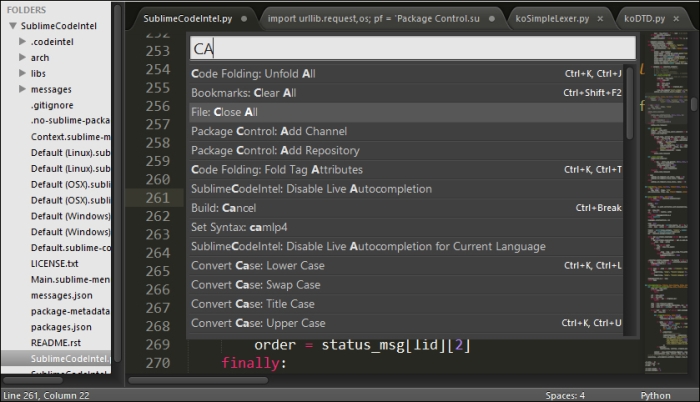
This window is using the same search algorithm that the Go To Anything window uses. We can see that I typed CA and I get the Close All command. Pressing Enter will close all open tabs. Don't worry, it will notify if a file we are trying to close has not been saved. We can see any keyboard shortcuts to the right of each command.
Sublime comes with an embedded Python interpreter. It's a useful tool to inspect the editor's settings, quickly test API calls while developing plugins, or just do simple math. To open the Python console, press Ctrl+` or go to View | Show Console from the main menu. The following screenshot shows a Python console:
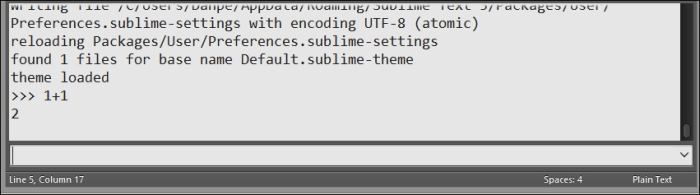
It's important to know that Sublime comes with its own Python interpreter on Windows and Linux, and it's separate from your system's Python installation. Modifying your system's version of python, such as replacing it with the MacPorts version, can cause problems with Sublime Text.
We learned that Sublime has Packages that help us customize our Sublime experience. But how can we find the packages that suit our needs? And how do we install different packages? That's why we have Package Control https://sublime.wbond.net/The Package Control is a non-official open source plugin that lets us navigate through thousands of mainly open source packages ready to install! There are some closed source (commercial) plugins available, such as Sublimemerge and SFTP.
Let's start by installing the Package Control plugin into Sublime. We do it by opening the console Ctrl + ` and copying the following code:
import urllib.request,os; pf = 'Package Control.sublime-package'; ipp = sublime.installed_packages_path(); urllib.request.install_opener( urllib.request.build_opener( urllib.request.ProxyHandler()) ); open(os.path.join(ipp, pf), 'wb').write(urllib.request.urlopen( 'http://sublime.wbond.net/' + pf.replace(' ','%20')).read()) Tip
If you are having trouble installing the Package Control ASAP using the preceding code, please visit http://sublime.wbond.net/installation.
This code will download the Package Control package and place it inside the Installed Packages directory. After it has finished installing, open the command palette and navigate to Package Control | Install Package. Then press Enter and you will notice Loading repositories [ = ] in the status bar.

After it finishes loading, a new window will open with all the packages available for instant installation!
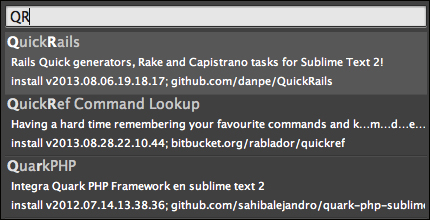
What we see in this screenshot is the package title, description, version, and the repository link. To install, simply press Enter and the new installed features will appear in the command palette.
By the end of this chapter we should have Sublime Text with Package Control installed on our system, and all the necessary shortcuts for Sublime commands in the CLI. We have also learned how to navigate the user interface and had a sneak peak of some of the cool features of Sublime.
In the next chapter, we are going to touch some code and learn more advanced techniques for navigating and code editing in Sublime.


