


When we look at the web applications platforms currently offered by host providers, we will see that the most prevalent is the PHP/MySQL combination.
Well supported by their respective home sites— http://www.php.net, and http://www.mysql.com —this duo has enabled developers to build a lot of ready-made open source web applications, and most importantly, enabled in-house developers to quickly put in place solid web solutions.
MySQL, which is mostly compliant with the SQL:2003 standard, is a database system well known for its speed, robustness, and a small connection overhead. This is important in a web context where pages must be served as quickly as possible.
PHP, usually installed as a module inside the web server, is a popular scripting language in which applications are written to communicate with MySQL (or other database systems) on the back end and browsers on the front end. Ironically, the acronym's significance has evolved along with the web evolution, from Personal Home Page to Professional Home Page to its current recursive definition— PHP: Hypertext Preprocessor. A blog posting about the successive name changes is available at http://blog.roshambo.org/how-the-php-acronym-was-reborn. PHP is available on millions of web domains and powers famous sites such as Facebook, Yahoo!, YouTube, and Wikipedia.
phpMyAdmin (official home page at http://www.phpmyadmin.net) is a web application written in PHP; it contains (like most web applications) XHTML, CSS, and JavaScript client code. This application provides a complete web interface for administering MySQL databases, and is widely recognized as the leading application in this field.
Being open source since its birth, it has enjoyed support from numerous developers and translators worldwide (being translated into 65 languages at the time of writing this book). The project is currently hosted at SourceForge.net and developed using their facilities by the phpMyAdmin team.
Host providers everywhere are showing their trust in phpMyAdmin by installing it on their servers. The popular cPanel (a website control application) contains phpMyAdmin. In addition, we can install our own copy of phpMyAdmin on our web server as long as our provider's server satisfies with the minimum requirements (refer to the System requirements section later in this chapter).
The goal of phpMyAdmin is to offer a complete web-based management of MySQL servers and data, and to keep up with MySQL and web standards evolution. While the product is always evolving, it supports all standard operations along with extra features.
The development team constantly fine-tunes the product based on the reported bugs and requested features, releasing new versions regularly.
phpMyAdmin offers features that cover basic MySQL database and table operations. It also has an internal system that maintains metadata to support advanced features. Finally, system administrators can manage users and privileges from phpMyAdmin. It is important to note that phpMyAdmin's choice of available operations depends on the rights the user has on a specific MySQL server.
Further information about phpMyAdmin is available on the home site's documentation page, located at http://www.phpmyadmin.net/home_page/docs.php. Moreover, the development team, helped by the community, maintains a wiki at http://wiki.phpmyadmin.net.
It's time to install the product and to configure it minimally for first-time use.
Our reason for installing phpMyAdmin could be one of the following:
Our host provider did not install a central copy
Our provider installed it but the version installed is not current
We are working directly on our enterprise's web server
Note that we can dispense with the phpMyAdmin installation step, if we choose instead to install one of the AMP products that usually include phpMyAdmin as part of their offering. Further details are available at http://en.wikipedia.org/wiki/List_of_AMP_packages.
Some host providers offer an integrated web panel where we can manage accounts, including MySQL accounts, and also a file manager that can be used to upload web content. Depending on this, the mechanism we use to transfer phpMyAdmin source files to our web space may vary. We will need some of the following specific information before starting the installation:
The web server's name or address. Here, we will assume it to be
www.mydomain.com.Our web server's account information (username, password). This information will be used either for FTP or SFTP transfer, SSH login, or web control panel login.
The MySQL server's name or IP address. If this information is not available, a good alternate choice is
localhost, which means that the MySQL server is located on the same machine as the web server. We will assume this to belocalhost.Our MySQL server's account information (username, password).
The up-to-date requirements for a specific phpMyAdmin version are always stated in the accompanying Documentation.html. For phpMyAdmin 3.4, the minimum PHP version required is PHP 5.2 with session support, the Standard PHP Library (SPL) and JSON support. Moreover, the web server must have access to a MySQL server (version 5.0 or later)—either locally or on a remote machine. It is strongly recommended that the PHP mcrypt extension be present for improved performance in cookie-authentication mode (more on this in Chapter 2). In fact, on a 64-bit server, this extension is required.
On the browser side, cookie support must be activated, irrespective of any authentication mode we use.
There are various files available in the Download section of http://www.phpmyadmin.net. There might be more than one version offered here and it is always a good idea to download the latest stable version. We only need to download one file, which works regardless of the platform (browser, web server, MySQL, or PHP version). For version 3.4, there are two groups of files—english and all-languages. If we need only the English interface, we can download a file whose name contains english, for example, phpMyAdmin-3.4.5-english.zip. On the other hand, if we have the need for at least one other language, choosing all-languages would be appropriate.
If we are using a server supporting only PHP 4—for which the PHP team has discontinued support since 31st December, 2007—the latest stable version of phpMyAdmin is not a good choice for download. We can use version 2.11.x, which is the latest branch that supports PHP 4, although the phpMyAdmin team has discontinued supporting this version too.
The files offered have various extensions: .zip, .tar.bz2, .tar.gz, .tar.xz, and .7z. Download a file having an extension for which you have the corresponding extractor. In the Windows world, .zip is the most universal file format, although it is bigger than .gz or .bz2 (common in the Linux/Unix world). The .7z extension denotes a 7-Zip file, which is a format that achieves a higher compression ratio than the other formats offered; an extractor is available at http://www.7-zip.org. In the following examples, we will assume that the chosen file was phpMyAdmin-3.4.5-all-languages.zip.
After clicking on the appropriate file, the nearest mirror site is chosen by SourceForge.net. The file will start to download, and we can save it on our computer.
The next step depends on the platform you are using. The following sections detail the procedures for some common platforms. You may proceed directly to the relevant section.
Using the Windows Explorer, we double-click on the phpMyAdmin-3.4.5-all-languages.zip file we just downloaded on the Windows client. A file extractor should start, showing us all the scripts and directories inside the main phpMyAdmin-3.4.5-all-languages directory.
Use whichever mechanism your file extractor offers to save all the files, including sub-directories, to some location on your workstation. Here, we have chosen C:\. Therefore, a C:\phpMyAdmin-3.4.5-all-languages directory has been created by the extractor.
Now, it's time to transfer the entire directory structure C:\phpMyAdmin-3.4.5-all-languages to the web server in our web space. We use our favorite SFTP or FTP software or the web control panel for the transfer.
The exact directory under which we transfer phpMyAdmin may vary. It could be our public_html directory or another directory where we usually transfer web documents to. For further instructions about the exact directory to be used or the best way to transfer the directory structure, we can consult our host provider's help desk.
After the transfer is complete, these files can be removed from our Windows machine as they are no longer needed.
Let us say we chose phpMyAdmin-3.4.5-all-languages.tar.gz and downloaded it directly to some directory on the Linux server. We move it to our web server's document root directory (for example, /var/www/html) or to one of its sub-directories (for example, /var/www/html/utilities). We then extract it with the following shell command or by using any graphical file extractor that our window manager offers:
tar -xzvf phpMyAdmin-3.4.5-all-languages.tar.gz
We must ensure that the permissions and ownership of the directory and files are appropriate for our web server. The web server user or group must be able to read them.
The procedure here is similar to that described in the Installation on a remote server using a Windows client section, except that the target directory will be under our DocumentRoot (for Apache) or our wwwroot (for IIS). Of course, we do not need to transfer anything after modifications are made to config.inc.php (described in the next section), as the directory is already on the web space.
Apache is usually run as a service. Hence, we have to ensure that the user under which the service is running has normal read privileges to access our newly created directory. The same principle applies to IIS, which uses the IUSR_machinename user. This user must have read access to the directory. You can adjust permissions in the Security/permissions tab of the directory's properties.
Here, we learn how to prepare and use the configuration file containing the parameters to connect to MySQL, and which can be customized as per our requirements.
Before configuring, we can rename the directory phpMyAdmin-3.4.5-all-languages to something like phpMyAdmin or something easier to remember. This way, we and our users can visit an easily remembered URL to start phpMyAdmin. On most servers, the directory part of URLs is case-sensitive so we should communicate the exact URL to our users. We can also use a symbolic link if our server supports this feature.
In the following examples, we will assume that the directory has been renamed to phpMyAdmin.
This file contains valid PHP code, defining the majority of the parameters (expressed by PHP variables) that we can change to tune phpMyAdmin to our own needs. There are also normal PHP comments in it, and we can comment our changes.
Tip
Be careful not to add any blank line at the beginning or end of the file; this would hamper the execution of phpMyAdmin.
Note that phpMyAdmin looks for this file in the first level directory—the same one where index.php is located.
A config.sample.inc.php file is included, which can be copied and renamed to config.inc.php to act as a starting point. However, it is recommended that you use the web-based setup script (explained in this chapter) instead, for a more comfortable configuration interface.
There is another file—layout.inc.php—containing some configuration information. As phpMyAdmin offers theme management, this file contains the theme-specific colors and settings. There is one layout.inc.php per theme, located in themes/<themename>, for example, themes/pmahomme. We will cover modifying some of those parameters in Chapter 4.
In its normal behavior, phpMyAdmin verifies that the permissions on this file do not allow everyone to modify it. This means that the file should not be writable by the world. Also, it displays a warning if the permissions are not correct. However, in some situations (for example a NTFS file system mounted on a non-Windows server), the permission detection fails. In these cases, you should set the following configuration parameter to false:
$cfg['CheckConfigurationPermissions'] = false;
The following sections explain various methods to add or change a parameter in config.inc.php.
phpMyAdmin maintains no user accounts of its own; rather, it uses MySQL's privilege system.
Tip
It might now be the time to browse http://dev.mysql.com/doc/refman/5.1/en/privilege-system.html, to learn the basics about MySQL's privilege system.
With the lack of a configuration file, phpMyAdmin displays the cookie-based login panel by default (more details on this in Chapter 2, which explains that with the default configuration, it's not possible to log in with an empty password):
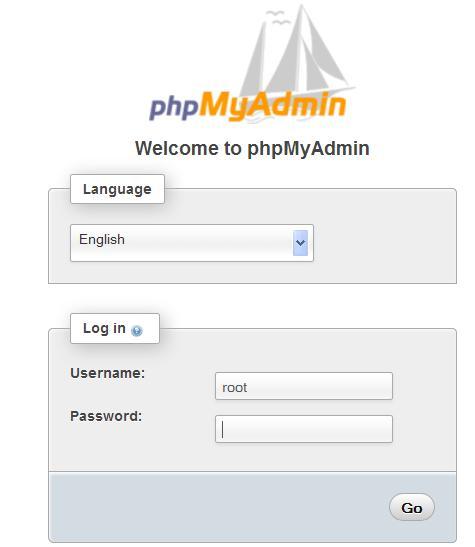
We can verify this fact by opening our browser and visiting http://www.mydomain.com/phpMyAdmin, and substituting the proper values for the domain part and the directory part.
If we are able to log in, it means that there is a MySQL server running on the same host as the web server (localhost), and we have just made a connection to it. However, not having created a configuration file means that we would not be able to manage other hosts through our installation of phpMyAdmin. Moreover, many advanced phpMyAdmin features (for example, query bookmarks, full-relational support, column transformation, and so on) would not be activated.
Note
The cookie-based authentication method uses Blowfish encryption for storing credentials in browser cookies. When no configuration file exists, a Blowfish secret key is generated and stored in session data, which can open the door to security issues. This is why the following warning message is displayed:
The configuration file now needs a secret passphrase (blowfish_secret)
At this point, we have the following choices:
Use phpMyAdmin without a configuration file
Use the web-based setup script to generate a
config.inc.phpfileCreate a
config.inc.phpfile manually
These two latter options are presented in the following sections. We should note that, even if we use the web-based setup script, we should familiarize ourselves with the config.inc.php file format as the setup script does not cover all the possible configuration options.
The web-based setup mechanism is strongly recommended in order to avoid syntax errors that could result from the manual creation of the configuration file. Also, as this file must respect PHP's syntax, it's common for new users to experience problems in this phase of the installation.
Note
A warning is in order here: The current version has only a limited number of translation languages for the setup interface.
To access the setup script, we must visit http://www.mydomain.com/phpMyAdmin/setup. On the initial execution, the following screenshot appears:
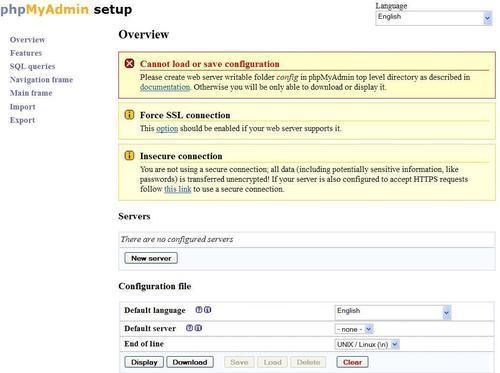
In most cases, the icons beside each parameter point to the respective phpMyAdmin official wiki and to the documentation, providing you with more information about this parameter and its possible values.
If Show hidden messages appears and we click on this link, messages that might have been shown earlier are revealed.
There are three warnings here. As taking care of the first message will require more manipulations, we will handle it in a moment. The second warning encourages you to use the ForceSSL option, which would automatically switch to HTTPS when using phpMyAdmin (not related to the setup phase).
Let us cover the third message— Insecure connection. This message appears if we are accessing the web server over HTTP—an insecure protocol. As we are possibly going to input confidential information, such as the user name and password in the setup phase, it's recommended that you communicate over HTTPS at least for this phase. HTTPS uses SSL (Secure Socket Layer) to encrypt the communication and make eavesdropping on the line impossible. If our web server supports HTTPS, we can simply follow the proposed link. It will restart the setup process, this time over HTTPS.
The first warning tells us that phpMyAdmin did not find a writable directory with the name config. This is normal as it was not present in the downloaded kit. Also, as the directory is not yet there, we observe that the Save, Load, and Delete buttons in the interface are grey. In this config directory, we can:
Save the working version of the configuration file during the setup process
Load a previously prepared
config.inc.phpfile
It's not absolutely necessary that we create this configuration directory, as we can download the config.inc.php file produced by the setup procedure to our client machine. We can then upload it to phpMyAdmin in the first-level directory through the same mechanism (say, FTP) that we used to upload phpMyAdmin. For this exercise, we will create this directory.
The principle here is that the web server must be able to write to this directory. There is more than one way to achieve this. Here is one that would work on a Linux server—adding read, write, and execute permissions for everyone on this directory.
cd phpMyAdmin
mkdir config
chmod 777 config
Having done that, we refresh the page in our browser and get a screen resembling the following screenshot:
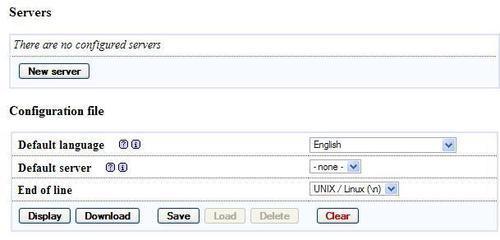
In the configuration dialog, a drop-down menu permits the user to choose the proper end-of-line format. We should pick up the format that corresponds to the platform (UNIX / Linux or Windows) on which we will open config.inc.php file with a text editor later.
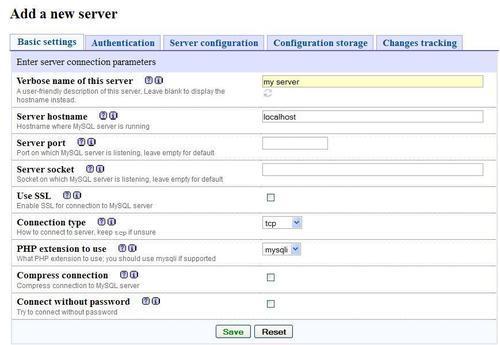
A single copy of phpMyAdmin can be used to manage many MySQL servers but for now we will define parameters describing our first MySQL server. We click on New server, and the server configuration panel is shown.
A complete explanation of these parameters can be found in the following sections of this chapter. For now, we notice that the setup process has detected that PHP supports the mysqli extension. Therefore, this is the one that is chosen by default. This extension is the programming library used by PHP to communicate with MySQL.
We assume that our MySQL server is located on localhost. Hence, we keep this value and all the proposed values intact, except for the following:
Basic settings | Verbose name of this server—we enter my server
Authentication | User for config auth —we remove root and leave it empty, as the default authentication type is
cookie, which ignores a username entered here
You can see that any parameter changed from its default value appears in a different color. Moreover, a small arrow becomes available, the purpose of which is to restore a field to its default value. Hence, you can feel free to experiment with changing parameters, knowing that you can easily revert to the proposed value. At this point, the Basic settings panel should resemble the following screenshot:
We then click Save and are brought back to the Overview panel. This save operation did not yet save anything to disk; changes were saved in memory. We are warned that a Blowfish secret key was generated. However, we don't have to remember it, as it's not keyed in during login process but is used internally. For the curious, you can switch to the Features panel and click on the Security tab to see which secret key was generated. Let us get back to the Overview panel. Now, our setup process knows about one MySQL server, and there are links that enable us to Edit or Delete these server settings as shown in the following screenshot:

We can have a look at the generated configuration lines by using the Display button; then we can analyze these parameters using the explanations given in the Description of some configuration parameters section later in this chapter.
At this point, this configuration is still just in memory, so we need to save it. This is done through the Save button on the Overview panel. It saves config.inc.php in the special config directory that we created previously. This is a directory strictly used for configuration purposes. If, for any reason, it was not possible to create this config directory, you just have to download the file by clicking on the Download button and upload it to the web server directory where phpMyAdmin is installed.
The last step is to copy config.inc.php from the config directory to the top-level directory—the one that contains index.php. By copying this file, it becomes owned by the user instead of the web server, ensuring that further modifications are possible. This copy can be done through FTP or through commands such as:
cd config
cp config.inc.php ..
As a security measure and until the configuration steps are not completed, it's recommended that you change the permission on the config directory, for example with the following command:
chmod ugo-rwx config
This is to block any unauthorized reading and writing in this directory.
Other configuration parameters can be set with these web-based setup pages. To do so, we would have to:
Enable read and write access to the
configdirectory.Copy the
config.inc.phpthere.Ensure that read and write access are provided to this file for the web server.
Start the web-based setup tool.
After the configuration steps are done, it's recommended to completely remove the config directory, as this directory is only used by the web-based setup script. phpMyAdmin displays the following warning on the home page (refer to Chapter 3) if it detects that this directory still exists:
Directory config, which is used by the setup script, still exists in your phpMyAdmin directory. You should remove it once phpMyAdmin has been configured.
You are invited to peruse the remaining menus to get a sense of the available configuration possibilities, either now or later when we cover a related subject.
In order to keep this book's text lighter, we will only refer to the parameters' textual values in the following chapters.
We can create this text file from scratch using our favorite text editor, or by using config.sample.inc.php as a starting point. The exact procedure depends upon which client operating system we are using. We can refer to the next section for further information.
The default values for all possible configuration parameters that can be located inside config.inc.php are defined in libraries/config.default.php. We can take a look at this file to see the syntax used as well as further comments about configuration. See the important note about this file in the Upgrading phpMyAdmin section of this chapter.
This file contains special characters (Unix-style end of lines). Hence, we must open it with a text editor that understands this format. If we use the wrong text editor, this file will be displayed with very long lines. The best choice is a standard PHP editor such as NetBeans or Zend Studio for Eclipse. Another choice would be WordPad, Metapad, or UltraEdit.
Every time the config.inc.php file is modified, it will have to be transferred again to our web space. This transfer is done through an FTP or an SFTP client. You have the option to use a standalone FTP/SFTP client such as FileZilla, or save directly through FTP/SFTP if your PHP editor supports this feature.
In this chapter and the next one, we will concentrate on the parameters that deal with connection and authentication. Other parameters will be discussed in the chapters where the corresponding features are explained.
The first parameter we will look at is $cfg['PmaAbsoluteUri'] = '';
Sometimes, phpMyAdmin needs to send an HTTP Location header and must know the absolute URI of its installation point. Using an absolute URI in this case is required by RFC 2616, section 14.30.
In most cases, we can leave this one empty as phpMyAdmin tries to auto-detect the correct value. If we browse a table later, then edit a row, and click on Save, we will receive an error message from our browser saying, for example, This document does not exist. This means that the absolute URI that phpMyAdmin built in order to reach the intended page was wrong, indicating that we must manually put the correct value in this parameter.
For example, we would change it to:
$cfg['PmaAbsoluteUri'] = 'http://www.mydomain.com/phpMyAdmin/';
The next section of the file contains server-specific configurations, each starting with the following code snippet:
$i++;
$cfg['Servers'][$i]['host'] = '';
If we examine only the normal server parameters (other parameters are covered in the Installing phpMyAdmin configuration storage section of this chapter), we see a section that resembles the following code block for each server:
$i++;
$cfg['Servers'][$i]['host']          = '';
$cfg['Servers'][$i]['port']          = '';
$cfg['Servers'][$i]['socket']        = '';
$cfg['Servers'][$i]['connect_type']  = 'tcp';
$cfg['Servers'][$i]['extension']     = 'mysqli';
$cfg['Servers'][$i]['compress']      = FALSE;
$cfg['Servers'][$i]['controluser']   = '';
$cfg['Servers'][$i]['controlpass']   = '';
$cfg['Servers'][$i]['auth_type']     = 'cookie';
$cfg['Servers'][$i]['user']          = '';
$cfg['Servers'][$i]['password']      = '';
$cfg['Servers'][$i]['only_db']       = '';
$cfg['Servers'][$i]['hide_db']       = '';
$cfg['Servers'][$i]['verbose']       = '';
In this section, we have to enter in $cfg['Servers'][$i]['host'], the hostname or IP address of the MySQL server, for example, mysql.mydomain.com or localhost. If this server is running on a non-standard port or socket, we fill in the correct values in $cfg['Servers'][$i]['port'] or $cfg['Servers'][$i]['socket']. See the connect_type, sockets, and port section for more details about sockets.
The displayed server name inside phpMyAdmin's interface will be the one entered in'host' unless we enter a non-blank value in the following parameter, for example:
$cfg['Servers'][$i]['verbose'] = 'Test server';
This feature can thus be used to display a different server hostname as seen by the users on the login panel and on the main page, although the real server name can be seen as part of the user definition (for example, root@localhost) on the main page.
The traditional-mechanism PHP uses to communicate with a MySQL server, as available in PHP before version 5, is the mysql extension. This extension is still available in PHP 5. However, a new extension called mysqli has been developed and should be preferred for PHP 5, due to its improved performance and its support of the full functionality of MySQL family 4.1.x. This extension is designed to work with MySQL version 4.1.3 and higher. As phpMyAdmin supports both extensions, we can choose either one for a particular server. We indicate the extension we want to use in $cfg['Servers'][$i]['extension']. The default value used is mysqli.
Both the mysql and mysqli extensions automatically use a socket to connect to MySQL if the server is on localhost. Consider the following configuration:
$cfg['Servers'][$i]['host']         = 'localhost';
$cfg['Servers'][$i]['port']         = '';
$cfg['Servers'][$i]['socket']       = '';
$cfg['Servers'][$i]['connect_type'] = 'tcp';
$cfg['Servers'][$i]['extension']    = 'mysql';
The default value for connect_type is tcp. However, the extension will use a socket because it concludes that this is more efficient as the host is localhost. So in this case, we can use tcp or socket as the connect_type. To force a real TCP connection, we can specify 127.0.0.1 instead of localhost in the host parameter. Because the socket parameter is empty, the extension will try the default socket. If this default socket, as defined in php.ini, does not correspond to the real socket assigned to the MySQL server, we have to put the socket name (for example, /tmp/mysql.sock) in $cfg['Servers'][$i]['socket'].
If the hostname is not localhost, a TCP connection will occur; in this case, on the special port 3307. However, leaving the port value empty would use the default 3306 port:
$cfg['Servers'][$i]['host']         = 'mysql.mydomain.com';
$cfg['Servers'][$i]['port']         = '3307';
$cfg['Servers'][$i]['socket']       = '';
$cfg['Servers'][$i]['connect_type'] = 'tcp';
$cfg['Servers'][$i]['extension']    = 'mysql';
The protocol used to communicate between PHP and MySQL allows a compressed mode. Using this mode provides better efficiency. To take advantage of this mode, simply specify:
$cfg['Servers'][$i]['compress'] = TRUE;
Another important parameter (which is not server-specific but applies to all server definitions) is $cfg['PersistentConnections']. For every server we connect to using the mysql extension, this parameter, when set to TRUE, instructs PHP to keep the connection to the MySQL server open. This speeds up the interaction between PHP and MySQL. However, it is set to FALSE by default in config.inc.php as persistent connections are often a cause of resource depletion on servers (you would find MySQL refusing new connections). For this reason, the option is not even available for the mysqli extension. Hence, setting it to TRUE here would have no effect if you are connecting with this extension.
Defining the control user has the following two purposes:
On a MySQL server running with
--skip-show-database, the control user permits the use of multi-user authentication even though servers running with this option are not commonly seen. This aspect is described in Chapter 2.On all versions of MySQL server, this user is necessary to be able to use the advanced features of phpMyAdmin.
For authentication purposes, controluser is a special user (the usual name we choose for it is pma) who has the rights to read some fields in the special mysql database (which contains all the user definitions). phpMyAdmin sends queries with this special controluser only for the specific needs of authentication, and not for normal operation. The commands to create the control user are available in phpMyAdmin's Documentation.html and may vary from one version to the other. This documentation contains the most current commands.
When our controluser is created in the MySQL server, we fill in the parameters as in the following example, replacing xxx with a suitably complex password:
$cfg['Servers'][$i]['controluser'] = 'pma';
$cfg['Servers'][$i]['controlpass'] = 'xxx';
Standard password guidelines apply here. Please refer to http://en.wikipedia.org/wiki/Password_strength for suggestions.
In addition to basic MySQL databases maintenance, phpMyAdmin offers advanced features that we will discover in the following chapters. These features require the installation of the phpMyAdmin configuration storage.
The configuration storage consists of a set of tables that are used behind the scene by phpMyAdmin. They hold metadata which contains information to support special features such as query bookmarks and data transformation. Moreover, for tables using a storage engine that does not support foreign keys, relations between tables are kept in this configuration storage. The metadata is generated and maintained by phpMyAdmin on the basis of our actions from the interface.
There are two possible places to store these tables:
As this storage does not exist by default and because the phpMyAdmin team wants to promote it, the interface displays the following notice message on the home page:

This message can be disabled with the following parameter (which, by default, is set to FALSE):
$cfg['PmaNoRelation_DisableWarning'] = TRUE;
The previous error message is displayed even if only a part of the configuration storage is lacking. Of course, on a fresh installation, all parts are lacking—our database has not yet heard of phpMyAdmin and needs to be outfitted with this configuration storage. Following the here link in the previous screenshot brings up a panel explaining that the pmadb, and the tables that are supposed to be a part of it, are either missing or undefined.
It's important to realize that the configuration storage will be functional only if the following two conditions are met:
Proper definitions are present in
config.inc.phpThe corresponding tables (and maybe the database) are created
To create the necessary structure that matches our current version of phpMyAdmin, a command file called create_tables.sql is available in the scripts sub-directory of the phpMyAdmin installation directory. However, we should not blindly execute it before understanding the possible choices—single-user installation or multi-user installation.
Even if we are entitled to only one database by the system administrator, we can still use all the advanced features of phpMyAdmin. In this setup, we will use our existing database to store the metadata tables.
We need to modify a local copy of the scripts/create_tables.sql file to populate our database with all the needed tables. They will have the prefix pma_ to make them easily recognizable. We need to remove the following lines:
CREATE DATABASE IF NOT EXISTS `phpmyadmin`
  DEFAULT CHARACTER SET utf8 COLLATE utf8_bin;
USE phpmyadmin;
This is done because we won't be using a phpmyadmin database but our own. Next, we should open our own database in phpMyAdmin. We are now ready to execute the script. There are two ways of doing this:
As we already have the script in our editor, we can just copy the lines and paste them in the query box of the SQL page. More details on this in Chapter 11.
Another way is to use the import technique shown in Chapter 7. We select the
create_tables.sqlscript that we just modified.
After the creation, the navigation panel shows us the special pma_ tables along with our normal tables.
It is now time to adjust all the configuration storage related parameters in config.inc.php. This can be done easily with the setup script as seen in this chapter, or by pasting the appropriate lines from the config.sample.inc.php file. The database is our own and the table names are the ones that have just been created:
$cfg['Servers'][$i]['pmadb']            = 'mydatabase';
$cfg['Servers'][$i]['bookmarktable']    = 'pma_bookmark';
$cfg['Servers'][$i]['relation']         = 'pma_relation';
$cfg['Servers'][$i]['table_info']       = 'pma_table_info';
$cfg['Servers'][$i]['table_coords']     = 'pma_table_coords';
$cfg['Servers'][$i]['pdf_pages']        = 'pma_pdf_pages';
$cfg['Servers'][$i]['column_info']      = 'pma_column_info';
$cfg['Servers'][$i]['history']          = 'pma_history';
$cfg['Servers'][$i]['tracking']         = 'pma_tracking';
$cfg['Servers'][$i]['designer_coords']  = 'pma_designer_coords';
$cfg['Servers'][$i]['userconfig']       = 'pma_userconfig';
Note
As table names are case sensitive, we must use the same names as the tables created by the installation script. We are free to change the table names (see the right-hand part of the configuration directives listed) provided we change them accordingly in the database.
The pmadb and each table have a specific function as listed next:
|
Function |
Description |
Explained in |
|---|---|---|
|
|
Defines the database where all tables are located |
This chapter |
|
|
Contains the query bookmarks | |
|
|
Defines inter-table relations, as used in many of the phpMyAdmin's features | |
|
|
Contains the display field | |
|
|
Contains the metadata necessary for drawing a schema of the relations in a PDF format | |
|
|
Used for column-commenting and MIME-based transformations | |
|
|
Contains SQL query history information | |
|
|
Contains the metadata and the actual SQL statements related to the tracked tables | |
|
|
Holds the coordinates used by the Designer feature | |
|
|
Holds the user's preferences |
Between each phpMyAdmin version, the infrastructure may be enhanced—the changes are explained in Documentation.html. This is why phpMyAdmin has various checks to ascertain the structure of the tables. If we know we are using the latest structure, $cfg['Servers'][$i]['verbose_check'] can be set to FALSE to avoid checks, thereby slightly increasing phpMyAdmin's speed.
In this setup, we will have a distinct database—pmadb—to store the metadata tables. Our control user will have specific rights to this database. Each user will work with his/her login name and password which will be used to access his/her databases. However, whenever phpMyAdmin itself accesses pmadb to obtain some metadata, it will use the control user's privileges.
Note
Setting a multi-user installation is possible only for a MySQL system administrator who has the privileges of assigning rights to another user (here, the pma user).
We first ensure that the control user pma has been created and that its definition in config.inc.php is appropriate. We then copy scripts/create_tables.sql to our local workstation and edit it. We replace the following lines:
-- GRANT SELECT, INSERT, DELETE, UPDATE ON `phpmyadmin`.* TO
--  'pma'@localhost;
with these, removing the comment characters (double-dash):
GRANT SELECT, INSERT, DELETE, UPDATE ON `phpmyadmin`.* TO
  'pma'@localhost;
We then execute this script by importing it (refer to Chapter 7). The net effect is to create the phpmyadmin database, assign proper rights to user pma, and populate the database with all the necessary tables.
The last step is to adjust all the parameters in config.inc.php that relate to relational features. Please refer to the Installing for a single user section, except for the database name in the pmadb parameter, which will be as shown in the following code snippet:
$cfg['Servers'][$i]['pmadb'] = 'phpmyadmin';
The installation is now complete. We will test the features in the coming sections and chapters. We can do a quick check by logging out of phpMyAdmin, then logging in and displaying the home page; the warning message should be gone.
Normally, upgrading is just a matter of installing the newer version into a separate directory and copying the previous version's config.inc.php to the new directory.
Note
An upgrade path or the first-installation path, which should not be taken, is to copy libraries/config.default.php to config.inc.php. This is because the default configuration file is version-specific, and is not guaranteed to work for the future versions.
New parameters appear from version to version. They are documented in Documentation.html and defined in libraries/config.default.php. If a configuration parameter is not present in config.inc.php, its value from libraries/config.default.php will be used. Therefore, we do not have to include it in config.inc.php if the default value suits us.
Special care must be taken to propagate the changes we might have made to the layout.inc.php files depending on the themes used. We will have to copy our custom themes sub-directories if we added our own themes to the structure.
This chapter covered the popularity of PHP/MySQL for web applications. The chapter also gave an overview of why phpMyAdmin is recognized as a leading application to interface MySQL from the web. It then discussed common reasons for installing phpMyAdmin, steps for downloading it from the main site, basic configuration, uploading phpMyAdmin to our web server, and upgrading.
Now that the basic installation has been done, the next chapter will deal with the configuration subject in depth, by exploring the authentication and security aspects.