


 Download code from GitHub
Setting Up a New Device
In this chapter, we will cover how you can gain access to the console and web interface of a fresh-out-of-the-box firewall appliance or a cleanly staged Virtual Machine (VM). You will learn how to license, update, and upgrade the firewall so that the latest features are available when you start building your security policy, and the latest signatures are always loaded onto the device to protect your users and infrastructure from malware and vulnerability exploits.
We are going to harden your management configuration to ensure a rigid security stance, and we will also look at the different types of network interface modes—aggregated interfaces and routing.
In this chapter, we’re going to cover the following main topics:
- Gaining access to the user interface
- Adding licenses and setting up dynamic updates
- Upgrading the firewall
- Hardening the management interface
- Understanding the interface types
By the end of this chapter you’ll be able to quickly set up a fresh firewall, register it, and upgrade it to a desirable level in a short amount of time. You’ll be able to apply best practices and leverage strong authentication for your administrative access, and you will be able to quickly identify which interface configuration will suit any given network topology that the firewall needs to be placed in.
Technical requirements
For this chapter, a basic understanding of network appliances is required as we will be looking at physically connecting to a device, configuring the management environment, and choosing the data plane interface’s deployment mode. Basic knowledge of standing up a virtual appliance in a virtual environment, including connecting it to virtual switches or virtual interfaces and providing it with network access on a hypervisor, is also required.
Gaining access to the user interface
If you are deploying your firewall on a cloud provider like Azure or AWS, take a look at Chapter 14, Cloud-Based Firewall Deployments.
When taking a new device out of the box or setting up a VM on a local hypervisor, such as VMware ESXi, Fusion, NSX, Hyper-V, KVM, and so on, one of the first things you may need to do is to connect a console cable to gain access to the Command-Line Interface (CLI).
Older models only come with an RJ45 console port, so for those you will need a standard DB9-to-RJ45 console cable, optionally patched through a serial-to-USB cable so a modern laptop is able to interface with the port. The pinout for the DB9 should be as follows:
1 - Empty - Data Carrier Detect (DCD)
2 - 3 - Receive Data (RXD)
3 - 6 - Transmit Data - (TXD)
4 - 7 - Data Terminal Ready (DTR)
5 - 4 - Ground (GND)
6 - 2 - Data Set Ready (DSR)
7 - 8 - Request To Send (RTS)
8 - 1 - Clear to Send - (CTS)
9 - Empty - Ringing Indicator (RI)
Luckily there are USB-to-RJ45 cables available as well that will save you the trouble of figuring out the correct pinouts.

Figure 2.1: RJ45-to-USB console cable
All but the very old models also come with a micro-USB port, which allows a console connection to be made using a standard USB-A-to-micro-USB cable, as in the following picture:
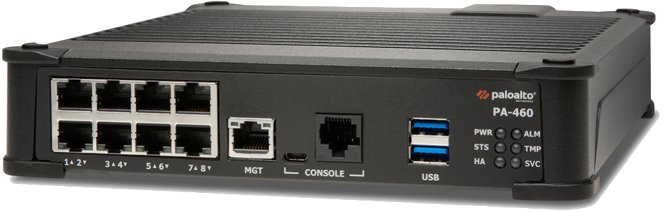
Figure 2.2: PA-460 RJ45 and the micro USB console ports
In all cases, you will need to find which COM or TTY port is being used on your computer’s operating system.
On a Windows machine, the first time you plug in the cable a driver may need to be installed. Once the installation has completed you need to find the virtual COM port number that has been assigned to the console cable. In most cases, you can determine this virtual COM port number by following these steps:
- Open the Device Manager.
- Click Start | Control Panel | Hardware and Sound | Device Manager (under “Devices and Printers”).
- In the Device Manager list, look in Ports and find the virtual COM port assigned to the USB port. This entry will look similar to “USB to Serial Port (COM#)” where COM# is the number to be used in the following step.
Once you’ve determined the appropriate COM#, you will need a terminal emulation client to connect to the console. You can use a free client for this, such as PuTTY from https://www.chiark.greenend.org.uk/~sgtatham/putty/latest.html.
Besides the COM port, you may need to provide more settings to be able to connect. If asked, use these settings:
Bits per second: 9600
Data Bits: 8
Parity: none
Stop bits: 1
Flow control: none
On macOS and Linux, a USB serial connection will usually create a new tty (TeleTYpewriter) entry in the /dev/ directory; a USB-to-DB9 dongle may create a Call-Up (CU) entry in the /dev/ directory.
Find the proper device by searching with either of these commands:
ls /dev/tty.*
ls /dev/cu.*
You will find /dev/cu.usbserialxxxxx or /dev/tty.usbmodemxxxxx, where xxxxx is the serial device name.
Once you determine the appropriate device, you can connect to the console port by using the screen command set to 9600 bits per second:
screen /dev/tty.usbmodemxxxxx 9600
Now, go ahead and connect the console cable or micro USB to your laptop and appliance. If you have a port free on your management network, go ahead and connect the firewall’s MGT port to the switch. If you don’t have a management connection available yet, you will need to connect your laptop directly to the MGT port for easier access once the IP is set up on the management interface. Lastly, plug in the power cable.
If the firewall is loaded in a VM or cloud entity, hit the Start button to boot up the virtual appliance.
Once you’ve logged on to the console, you will see the operating system boot up, and if the firewall is already connected to a DHCP-enabled management network, you will see something similar to the following, where the DHCP address is already listed for your convenience:

Figure 2.3: PA-VM post-boot DHCP information
If you missed this information, you can log on and use the following command to see the DHCP information:
admin@PA-220> show system info
hostname: PA-220
ip-address: 192.168.27.116
public-ip-address: unknown
netmask: 255.255.255.0
default-gateway: 192.168.27.1
ip-assignment: dhcp
If, for some reason, you have not received a DHCP address yet from your DHCP server, you can initiate a renew action from the CLI by using a > request dhcp client management-interface renew command.
Important note
The default username and password for a factory settings appliance or VM are as follows:
Username: admin
Password: admin
The first time you log on, you will be asked to change this default password.
If your network does not have a DHCP server, or you connected the firewall directly to your laptop, you will need to set an IP address manually. Copy and paste the following sheet into a text file and alter the <IP> entries with the appropriate IP for your management interface, the default gateway it will use to reach out to the internet, and the DNS servers it will use to resolve the domain names. Type the netmask in quad decimals, not in CIDR (slash notation subnet, such as /16 and /24):
configure
set deviceconfig system type static
set deviceconfig system ip-address <IP>
set deviceconfig system netmask <x.x.x.x>
set deviceconfig system default-gateway <IP>
set deviceconfig system dns-setting servers primary <IP>
set deviceconfig system dns-setting servers secondary <IP>
commit
You can chain set commands that belong in the same path and class so that you do not need to set each attribute in individual set commands; instead, you can add all the desired settings all at once. In the next example, I went into configuration mode, switched the management interface from DHCP to static configuration, and then combined all the configuration parameters for the management interface into one set command. Start by changing the default password to a new one, and then add the interface configuration:
admin@PA-220> set password
Enter old password :
Enter new password :
Confirm password   :
Password changed
admin@PA-220> configure
Entering configuration mode
[edit]
admin@PA-220# set deviceconfig system type static
[edit]                                                                                                            admin@PA-220# set deviceconfig system ip-address 192.168.27.5 netmask 255.255.255.0 default-gateway 192.168.27.1 dns-setting servers primary 1.1.1.1 secondary 1.0.0.1
[edit]                                                                                                            admin@PA-220# commit
Commit job 2 is in progress. Use Ctrl+C to return to command prompt
...........................................55%....75%.....98%.......................100%
Configuration committed successfully
[edit]
admin@PA-220#
You may need to log back in after running the commit statement as the admin password was changed.
Important note
The > prompt in username@hostname> indicates that you are in operational mode and can execute runtime commands. The # prompt in username@hostname# indicates that you are in configuration mode and can add configuration parameters.
Operational commands can be run from config mode by prefixing run to a command—for example, user@host# run show clock.
Once the commit job finishes, you will be able to connect to the web interface through https://<IP> or by using an SSH client, such as PuTTY or the ssh command in Linux or macOS.
You are now able to get onto a freshly started firewall and configure it, so we can move on to the next step and gain access to the web interface.
Connecting to the web interface and CLI
Now that your device has an IP address, you can connect to its web interface via any browser using https://<IP>.
You will be met with an unfriendly error message, as in the following screenshots. This is due to the web interface using a self-signed certificate that has not been validated by any authority. For now, this can be safely ignored:
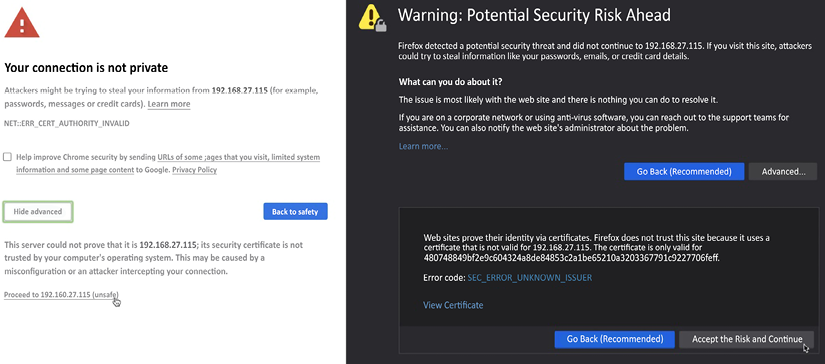
Figure 2.4: Certificate warnings in Chrome and Firefox
An SSH client will provide you with a slightly friendlier question:
tom$ ssh -l admin 192.168.27.115
The authenticity of host '192.168.27.115 (192.168.27.115)' can't be established.
RSA key fingerprint is SHA256:Qmre8VyePwwGlaDmm6JTYtjou42d1i/Ru6xZmmEk8Yc.
Are you sure you want to continue connecting (yes/no)?
The SSH connection will provide you with mostly the same user experience as the console connection, but SSH is more responsive and secure, and you can now access your device from anywhere on the management network.
The web interface provides you with a whole new user experience. When prompted for your username and password, input the default admin/admin combination or the username and password you created on the cloud provider.
Once you are logged in, the first screen you will see is the dashboard, which contains some general information about the health of your system, config changes, and which admins are logged on. The dashboard can be customized and additional widgets can be added from a list of prepared widgets, or widgets can be removed if they are not relevant.
For now, the General Information widget contains the most important information as you will need the serial number of the physical device, or the CPU ID and UUID on a virtual device, as shown in the screenshot below. The CPU ID and UUID will be needed to register and activate the VM while a physical device can be activated by its serial number:
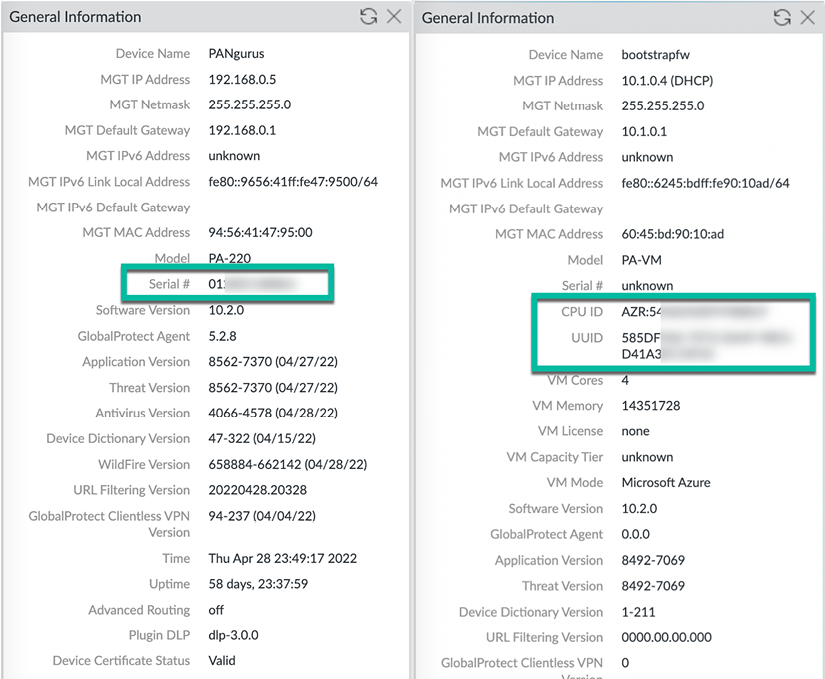
Figure 2.5: On the left is a PA-220 device, and on the right is a PA-VM device
Now that you have access to the web interface and are able to collect the system’s base information, we can go ahead and register the firewall and activate any of the feature licenses that were purchased. We will now have a look at how to perform the registration and licensing procedures.
Adding licenses and setting up dynamic updates
Before we can start adding licenses, the device needs to be registered. You will need to note down the device’s serial number or, if you do not have a support portal account, the sales order number to create a new account.
Open a new tab or browser and navigate to https://support.paloaltonetworks.com.
If you do not have an account yet, you will first need to create a new one so you gain access to the portal from where you will be able to manage all your devices, activate your licenses, download software packages and updates, and access support cases. If you already have a CSP (customer support portal) account, you can skip to Registering a new device.
Creating a new account
When creating a new account, you will be asked for an email address and whether you want to register using a serial number or an Authorization (auth) code, as in the following screenshot. The serial number is needed when registering a hardware appliance; the auth code is used when registering a VM device:
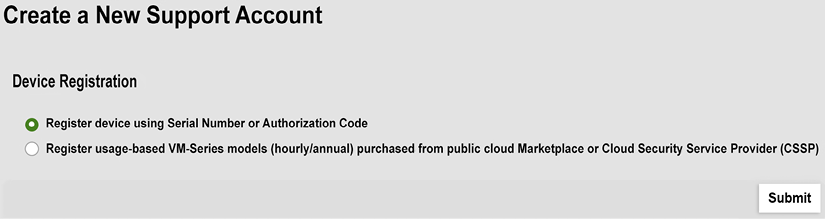
Figure 2.6: Serial or authorization code device registration
Alternatively, if you have set up a virtual appliance on one of the cloud providers, you can pick which provider your device is running on (such as Amazon Web Services, Azure, Google Cloud Platform, and so on).
You then need to provide some basic details, such as the address, the password, the device’s serial number, the auth code, and the sales order number or customer ID, if your company already has an account:
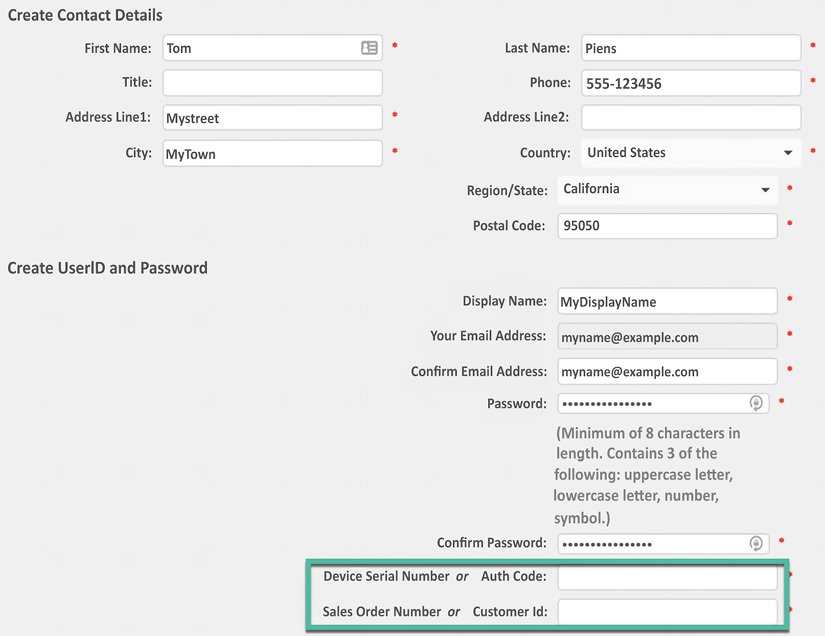
Figure 2.7: General information and device and sales order details
This account creation step will already register your first device; you can go ahead and register more devices in the following section.
Registering a new device
Ensure you are logged in to your account on the support portal and click on Register a Device from the home page:

Figure 2.8: Register a Device from the support portal home page
You will be presented with the option to register using a serial number or an auth code. The serial number is needed when registering a hardware appliance and the auth code is used when registering a VM device:

Figure 2.9: Serial or auth code device registration
Register device using Serial Number or Authorization Code will ask you for the serial number, a friendly device name, and a tag if you have several “pools” of devices in your account already. It will also request address details as to where the device will be deployed for RMA purposes.
If you deployed a cloud instance, you can choose to register usage-based VM series models. You’ll be asked for the serial number, CPUID, and UUID:
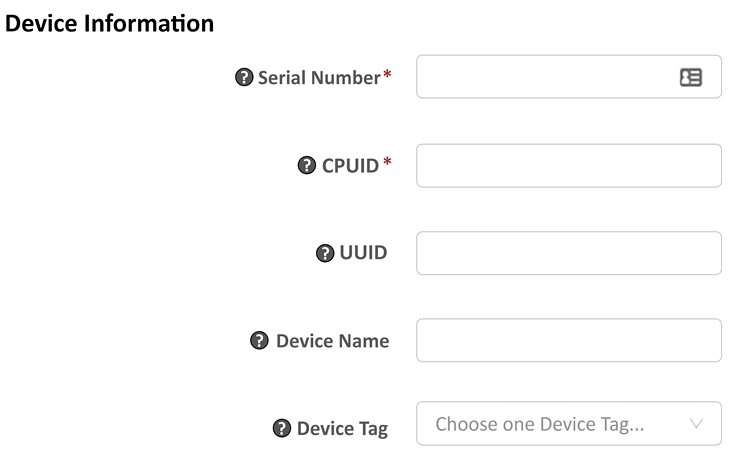
Figure 2.10: Adding a cloud instance to the assets
Now that the devices are registered, it is time to activate the feature and support licenses.
Activating licenses
Once the device is registered, you can add the licenses. You will have received one (a bundle) or several auth codes that you need to enter on the portal or via the Device | Licenses tab to activate the license and start using the feature on your device. There are multiple ways to activate licenses, which we’ll cover in the following sections, but let’s take a look at the different types of licenses first.
Some of the most common licenses include the following:
- Support: Platinum 4h (PLAT), Premium 24/7 (PREM), Standard 9/5 (STD), Partner-enabled 4h support (B4HR), or Regular Partner-enabled support (BND). Support licenses grant you access to a support organization, allow you to download software and app ID updates, and entitle you to replacement hardware if your firewall breaks.
- Threat Prevention (TP): Antivirus, anti-spyware, threat prevention, and daily updates.
- PAN-DB URL filtering (URL4) is the basic cloud-based URL category lookup license. This license will be phased out in favor of ADVURL.
- Advanced URL filtering (ADVURL) is the Machine Learning (ML)-enabled URL filtering license that adds an automated mechanism to analyze unknown URLs in real time.
- GlobalProtect (GP) enables mobile applications on Android, iOS, Win10 UWP, Chrome OS, and Linux. It enables Host Information Profile (HIP) checks and agentless VPNs. It also allows split tunneling based on host application or domain names.
- DNS security (DNS): Dynamic DNS signature lookups and blocking or “sinkholing” of malicious DNS requests.
- WildFire (WF): Live threat signature feed, real-time ML-enabled analysis, and cloud-based sandbox analysis.
- Decryption port mirroring: Allows decrypted sessions to be copied to a different device for additional IDS scanning via a dedicated “port mirror” interface.
- Internet of Things (IOT): Enables detection of IoT devices and generates rulebase adjustments to protect vulnerable IoT devices.
- Data Loss Prevention (DLP): ML-powered data loss prevention scanning.
More features are being added as Palo Alto Networks announces new products.
Activating licenses via the customer support portal
In the Customer Support Portal (CSP), you can find your registered devices under the Assets tab as a device. There’s a pencil icon that allows you to activate auth codes:

Figure 2.11: The Devices page in the CSP
You will notice there is already a software warranty support license active for a limited amount of time. This is a temporary support license that allows a Return Merchandise Authorization (RMA) to be started if your device arrives broken in the box. To add the actual support license and any feature licenses, click on the pencil icon in the Actions column you see in Figure 2.11. This will call the pop-over feature activation window:
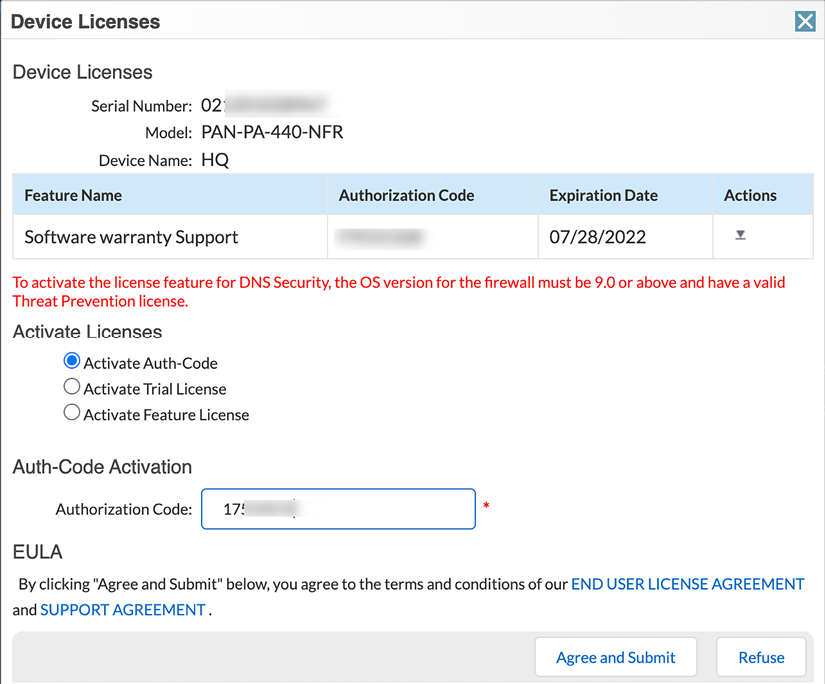
Figure 2.12: Adding auth codes to activate services
Once you’ve added all your licenses, the device should look something like this:
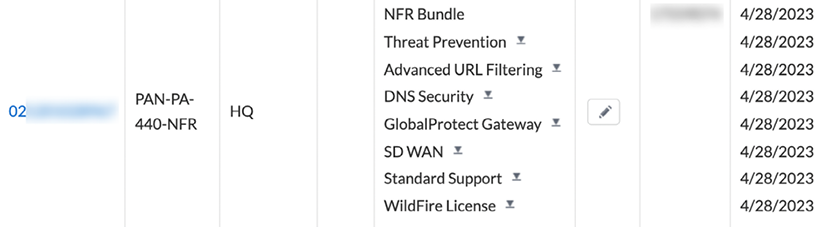
Figure 2.13: A fully licensed device
The little download icons next to each license allow you to download the license key file so that you can upload the key onto the firewall. This is required if you intend to run the firewall without an internet connection and want to be able to upload signature files and enforce security profiles.
Besides activating licenses via the support portal, they can also be activated directly from the firewall interface.
Activating licenses via the web interface
You can also activate licenses by navigating to Device | Licenses. This procedure requires that the management interface has an internet connection and is able to resolve internet domain names via DNS. If an internet connection is not available, see the previous section on how to download the license keys.
If you activated the licenses in the CSP and then proceeded to download the license key files, you can click on Manually upload license key.
If you activated the licenses on the CSP and want to fetch the licenses, click Retrieve license keys from license server. Make sure the firewall has been set up with a functional default gateway and DNS servers.
If you want to activate new licenses with an auth code, click on Activate feature using authorization code and you will see a popup where you can enter each auth code individually:

Figure 2.14: Activating a license using an auth code
With each added license, a section will be added containing the license information:
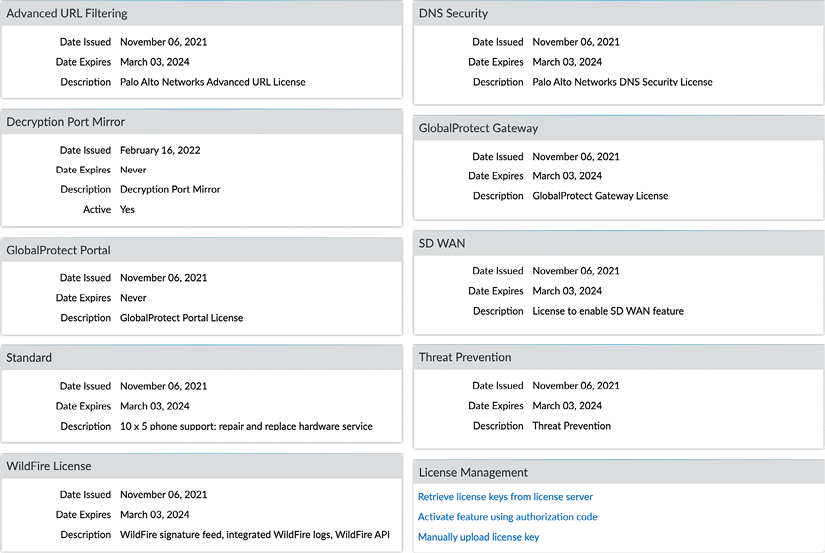
Figure 2.15: Active licenses on the device
To activate the support license, you may need to activate the auth key through the Support menu item:
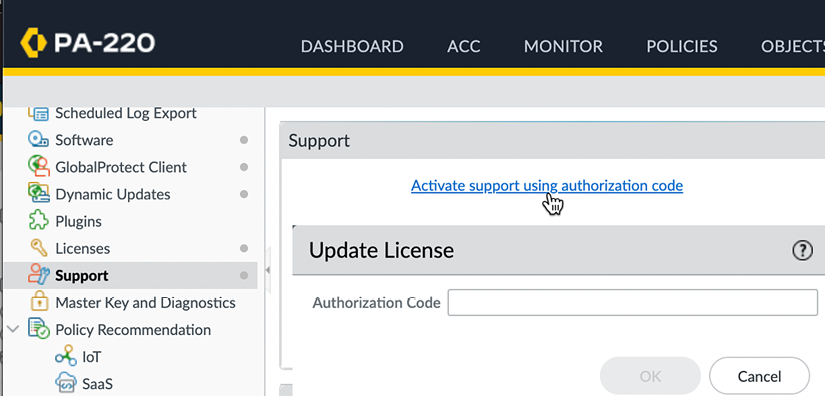
Figure 2.16: Activate support using an authorization code
Important note
The support license is more like a contract than a license required for a feature to work; a support person will take your call if something goes wrong, a replacement device will be sent if your unit is broken, and so on. This is the only license that does not need to be on the device necessarily before features start to function, i.e. all base functionality will work without the support license present.
After all licenses are activated on the device, the next step is to start downloading and scheduling updates to the different databases.
Downloading and scheduling dynamic updates
Now that all the licenses are active, you can set up dynamic updates and start downloading all the content packages.
Navigate to the Dynamic Updates menu under the Device tab, where you can manually download content packages and set up schedules and installation preferences. The first time you visit this menu, it may look a bit off as the available content has not been loaded onto the device yet. Click the Check Now button to connect to the updates server and fetch the available packages for your system, as shown:
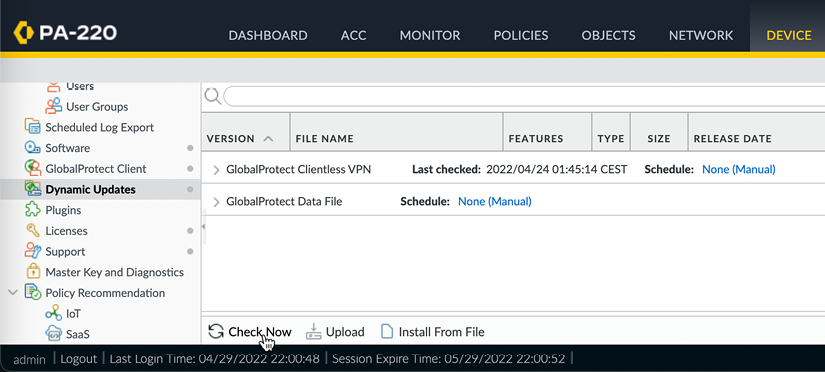
Figure 2.17: The initial Dynamic Updates view
Once the updates have been fetched, you may still notice that some antivirus packages are missing. This is because the device first needs to be brought up to date with all the app ID and content ID application and decoder updates before further packages can be loaded onto the system. Go ahead and download the latest Applications and Threats package:

Figure 2.18: Downloading the first Applications and Threats package
Important note
If no threat prevention license has been activated, there will only be an Applications package available for download.
Once the package has been downloaded, click Install. Once the installation has completed, click Check Now again, and the antivirus will become available. Go ahead and download and install the latest package of antivirus updates.
Important note
URL filtering and DNS security do not have update packages because URLs are looked up against the cloud service and then stored in the local cache.
You can now start building schedules by clicking on the blue None (Manual) option after Schedule:
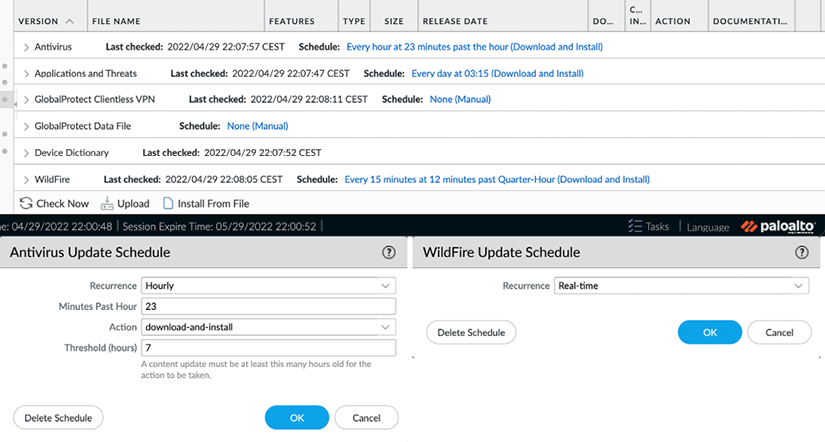
Figure 2.19: The antivirus and Wildfire schedules
The antivirus and WildFire schedules look very similar.
Recurrence tells the firewall how regularly it needs to check for updates. The update interval options for Antivirus are Weekly, Daily, Hourly, or Manual. The update interval options for WildFire are Real-time, Every minute, 15 minutes, 30 minutes, 1 hour, or Never. When Recurrence is set to any value higher than 1 minute, you can additionally set at which minute within the frame the actual check should take place. This helps prevent conflicting update connections to the update server in cases where the outgoing internet bandwidth is restricted. The action can be set to simply download or to download-and-install. If the action is set to download, manual installation is required.
Threshold is a feature that the antivirus update shares with Applications and Threats:
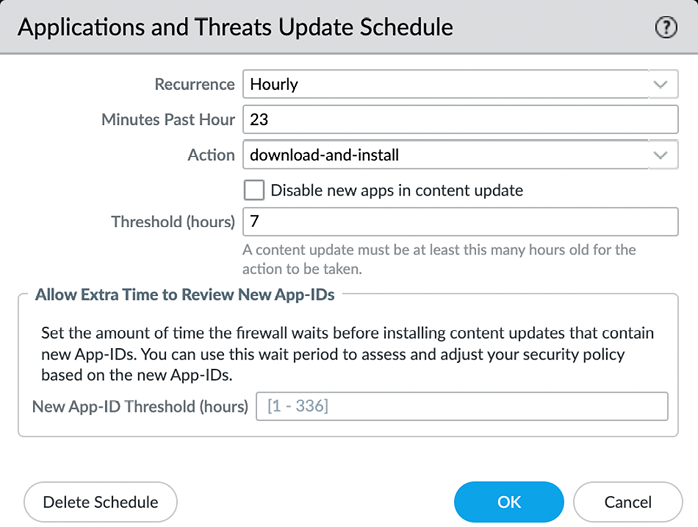
Figure 2.20: Antivirus and WildFire schedules
Threshold is a setting that delays the installation of a content package for a set amount of hours. At the time that this threshold expires, the firewall checks for a new update package. If a new package is found, the new package is downloaded and Threshold is reset for one more attempt. If yet another update package is found after the first reset, the schedule will reset until the next full occurrence. If no new packages are detected, the package will be installed as defined by Threshold.
The threshold delay is a mechanism to prevent installing faulty packages; if the vendor provides poorly crafted content, the delay is set in hours, which should allow other accounts to experience the flaws and report the content issue back to the support teams. So, the content is rolled back via the administrators or the vendor. This thresholding option correlates with a company’s tolerance for the risk of vendor errors and the balance of new and emerging threats to the organization.
PCNSE Tip:
According to Palo Alto Networks’ best practices, a security-first approach is to set the threshold between 6 to 12 hours; however, for a critical environment the threshold should be 24 hours.
The Application content package also has an option to completely disable all new app IDs or enable a separate threshold on the app IDs only. The reasoning here is that what is identified as web browsing today may change into a unique application after installing the Application content package tomorrow. If the security policy has been set up to only allow previously known applications, this could potentially cause issues with users who suddenly can’t access that specific application.
The Threshold setting allows you to schedule a review period to see whether any applications need to be accounted for in the security policy before they become active. If no action is needed, the applications will become active automatically. The Disable new apps in content update option will not activate any new applications until you manually review and activate all new applications.
Important note
At the time of writing, the release schedule for new applications is every third Thursday of each month. Regular threat package updates happen on Tuesdays, but urgent updates are sent out immediately.
The following section provides a quick set of recommendations for scheduling dynamic updates.
Dynamic updates cheat sheet
- Click on Check Now
- Download and install the latest
panupv2-all-contentsorpanupv2-all-appspackage:panupv2-all-contentincludes all app ID, spyware, and vulnerability updates. This package requires an active TP license to be installed successfully.panupv2-all-appsonly includes app ID updates and is used when a TP license is not active on the device.
- Click Check Now, which will make the antivirus packages visible
- Download and install the latest
panup-all-antiviruspackage - Set an Antivirus update schedule:
- Hourly recurrence
- 15 minutes after the hour
- Download and install
- 6 hour threshold
- If you have a WildFire subscription license, set a WildFire update schedule:
- Realtime (firewalls on high-latency internet links can be set to 1-minute or 15-minute update intervals)
- Set an Applications and Threats update schedule:
- Every 30 minutes.
- 7 minutes past the half-hour.
- Download and Install.
- 6 hour threshold.
- Allow extra time to review new App-IDs: Leave blank if new app IDs can be added immediately; set to 48 hour threshold (or more) if the security team wishes to review new applications before they are activated.
The settings in the previous section are considered best practices as they ensure dynamic updates are scheduled not to interfere with other scheduled tasks, like report generation. The threshold ensures an update is not applied until some time has passed by postponing the actual installation and then rechecking the available content package at the threshold time. If a new package is available due to an error or an urgent update, the new package is downloaded and the threshold timer refreshed. The process repeats once the threshold has been reached again and either the latest package is installed, or the update is postponed to the next scheduled occurrence. Not only do content packages need to be updated frequently, but new software versions are made available at regular times to address bugs, or introduce new features. Let’s now have a look at the steps needed to upgrade your firewall.
Upgrading the firewall
In this section, you will learn how to upgrade your firewall and what steps need to be taken to ensure a smooth process. We will review important information to keep in mind when preparing your maintenance window and providing for a contingency plan. In-depth upgrade procedures are provided in Chapter 8, Upgrading Firewalls and Panorama.
Understanding the partitions
Before we start the upgrade procedure, there’s an important bit of information you need to know. Like most Linux systems, the hard disk has been partitioned into specific segments. These segments serve a specific purpose.
A few important ones are as follows:
/is the root partition, which is where the operating system is installed/opt/pancfgis where the configuration files and dynamic update files are kept/opt/panrepois the repository for downloaded operating system (PAN-OS) images/opt/panlogsis the partition wherelogdatabaseis stored
The disk space usage can be viewed with the following command:
admin@PA-220> show system disk-space
Filesystem      Size  Used Avail Use% Mounted on
/dev/root       3.8G  1.7G  1.9G  48% /
none            2.0G   60K  2.0G   1% /dev
/dev/mmcblk0p5   12G  3.3G  7.5G  31% /opt/pancfg
/dev/mmcblk0p6  3.8G  2.2G  1.5G  59% /opt/panrepo
tmpfs           2.0G  247M  1.8G  13% /dev/shm
cgroup_root     2.0G     0  2.0G   0% /cgroup
/dev/mmcblk0p8  4.6G  3.5G  942M  79% /opt/panlogs
/dev/loop0      111M  5.6M  100M   6% /opt/panlogs/wildfire/tmpfile
tmpfs            12M     0   12M   0% /opt/pancfg/mgmt/lcaas/ssl/private
None
The cool thing about the / root partition is that it is actually one of two sysroot partitions. The system has actually been partitioned with two operating system-specific partitions, of which just one is mounted at a time. The upgrade procedure actually installs the new PAN-OS onto the inactive partition.
This allows inline upgrades without interrupting the active partition. Once the new operating system has been installed, the GRUB bootloader is configured to load the other sysroot partition at the next boot, causing the new PAN-OS to become active:
admin@PA-220> debug swm status
Partition         State             Version
--------------------------------------------
sysroot0          REVERTABLE        10.0.3
sysroot1          RUNNING-ACTIVE    10.0.9
maint             EMPTY             None
This mechanism also allows a smooth rollback in case an upgrade fails and it is decided you need to go back to the previous situation. You can trigger the > debug swm revert debug command to tell the bootloader to switch the toggle again to the previous sysroot partition and reboot the system via > request restart system, and after the device has rebooted, you are back on the previous PAN-OS with the pre-upgrade configuration loaded.
Upgrade considerations
When upgrading, you will need to map out where you are, where you need to go, and how you need to get there. Finding where you are can be achieved by looking at the dashboard’s General Information section and looking for the software version. Deciding where you need to go may require some research and consideration:
- Which features are required? Are there new features in a release you need, or are you running smoothly with the features you have?
- Is the code train “mature”? Is a new major release brand new, and do the new features weigh up against the risk of being an early adopter?
- Are there outstanding advisories that trump the required features? Was a critical vulnerability found that has not been addressed in the version you plan to go to?
- When is an upgrade required and when is it optional? Is there a direct need to upgrade due to a vulnerability or a bug, or are there features in a newer release that will be helpful?
These questions will help you determine which upgrades need to take place immediately and which ones can be planned ahead of time, possibly with a more relaxed testing process before deploying to the production environment or even postponed until a more mature maintenance release version is available.
Which features are required?
Determining which features are contained in each PAN-OS version requires the most research. You can open https://docs.paloaltonetworks.com and search Feature Guide, which will return all the new feature guides for the major PAN-OS versions.
Is the code train “mature”?
Maturity can be estimated by looking at the maintenance release version. All PAN-OS versions are made up of three numbers—PAN-OS X.Y.Z (for example, 9.0.5):
- X is the number of the major software release
- Y is the number of the feature version release
- Z is the number of the maintenance release
X will change when a new major software version is released containing new functionality and usually containing some changes in its expected behavior and possibly a new look and feel.
Each new software release is usually followed by a new feature version around 6 to 9 months after its release, mostly containing some new features. Maintenance release versions are released for all code trains anywhere between 5 and 9 weeks and mostly contain bug fixes.
There will occasionally be PAN-OS version names that end in -hx, which denotes a hotfix. This is a maintenance release that was published ahead of schedule and usually only contains one or a few critical hotfixes (for example, 9.0.2-h1).
A code train will reach a reliable maturity around the x.x.4 or x.x.5 maintenance release version when it is somewhat safe to assume most critical bugs have been found and addressed.
Check the release notes for any known issues so that you can appropriately prepare if there are any caveats: https://docs.paloaltonetworks.com/pan-os/9-1/pan-os-release-notes.html.
Are there outstanding advisories that trump the required features?
Advisories regarding which maintenance release versions to choose or avoid can be found at https://securityadvisories.paloaltonetworks.com/ and https://live.paloaltonetworks.com/t5/Customer-Resources/.
When is an upgrade required and when is it optional?
Each major version has a base image, usually the x.x.0 version, which contains all the vital parts of the PAN-OS image.
This allows the following maintenance versions to be smaller in size, containing only critical updates. The base image needs to be downloaded onto the system before a maintenance version can be installed. It is not required for the base image to be installed in order to be able to install the maintenance version when upgrading from a lower major version. It is also not required to install any intermediate maintenance versions unless the release notes explicitly mention that there is an issue that requires a step in between.
Say, for example, that your firewall is currently on PAN-OS 9.1.4 and you need to get to PAN-OS 10.0.5. You can download a PAN-OS 10.0.0 base image, followed by PAN-OS 10.0.5, and then directly install and reboot PAN-OS 10.0.5. Your system will be directly upgraded from 9.1.4 to 10.0.5.
If your firewall is currently on PAN-OS 9.0.10 and you want to go to PAN-OS 10.0.5, you do need to download, install, and reboot to a PAN-OS 9.1.0 base image before you can install PAN-OS 10.0.5.
Important note
In the latter case, it is recommended, but not mandatory, to download and install the preferred maintenance release (see the previous Customer Resources URL: https://live.paloaltonetworks.com/t5/Customer-Resources/) in the PAN-OS 9.1 code train to prevent running into bugs that could halt the upgrade process.
You will now have a good understanding of when and why you would need to upgrade and how to decide which version you need to upgrade to. In the following section, we’ll briefly go over the upgrade process via different methods; see Chapter 8, Upgrading Firewalls and Panorama, for a more thorough upgrade process.
Upgrading via the CLI
Via the CLI, commands can be quickly executed to perform tasks. When upgrading via the CLI you first need to retrieve the available software images that can be installed on your system. You won’t be able to download any images before the list is retrieved:
admin@PA-220> request system software check
Version            Size          Released on Downloaded
---------------------------------------------------------
10.1.4            353MB  2021/12/22 11:51:17       no
10.1.3            298MB  2021/10/26 18:51:50       yes
10.1.2            297MB  2021/08/16 14:51:59       no
10.1.1            280MB  2021/07/21 09:33:49       no
10.1.0            540MB  2021/06/02 08:15:33       yes
10.0.8            363MB  2021/10/21 22:42:18       no
10.0.8-h8         359MB  2021/12/20 12:23:36       no
Next, you can download the desired PAN-OS version:
admin@PA-220> request system software download version 10.1.4
Download job enqueued with jobid 31
You can track the download status with the following command:
admin@PA-220> show jobs id 31
Enqueued            Dequeued ID Type   Status Result Completed
--------------------------------------------------------------
2021/12/3117 23:24:15 23:24:15 31 Downld FIN    OK     23:25:31
Warnings:
Details:Successfully downloaded
Preloading into software manager
Successfully loaded into software manager
When the software is successfully downloaded, you can commence installing it onto the system. You will be prompted that a reboot is required to complete the installation and to confirm whether you are sure that you want to continue. Type Y to proceed with the installation:
admin@PA-220> request system software install version 10.1.4
Executing this command will install a new version of software. It will not take effect until system is restarted. Do you want to continue? (y or n)
Software install job enqueued with jobid 32. Run 'show jobs id 32' to monitor its status. Please reboot the device after the installation is done.
You can track the installation progress through the show jobs command:
admin@PA-220> show jobs id 32
Enqueued            Dequeued ID Type   Status Result Completed
--------------------------------------------------------------
2021/12/3117 23:35:28 23:35:28 32 SWInstall FIN OK     23:38:59
Warnings:
Details:Software installation successfully completed. Please reboot to switch to the new version.
To complete the installation, reboot the firewall. Type Y into the dialog if you are certain that you want to go ahead with the reboot. Rebooting will cause all sessions to be interrupted and no new sessions to be accepted until the firewall has completed the autocommit job:
admin@PA-200> request restart system
Executing this command will disconnect the current session. Do you want to continue? (y or n)
The autocommit job runs right after a reboot and serves to load the configuration onto the data plane. After a software upgrade, this process can take a while:
admin@PA-200> show jobs all
Enqueued            Dequeued ID Type   Status Result Completed
--------------------------------------------------------------
2021/12/31 23:44:27 1523:44:27 1  AutoCom FIN   OK      23:44:36
If you prefer to upgrade the firewall via the web interface, follow the procedure outlined in the next section.
Upgrading via the web interface
Software images can be downloaded and installed from the Device | Software menu. The first time you access this page, you will be presented with an error message because no repository has been loaded yet:
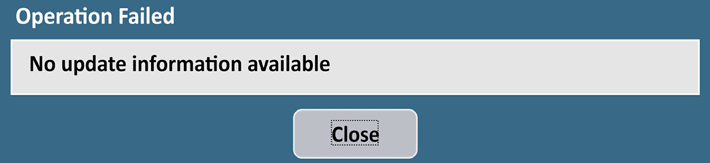
Figure 2.21: Error message on the first visit to the software page
You can ignore this warning; click Close and then click Check Now. Once the repository has loaded, you will see all the available software images:
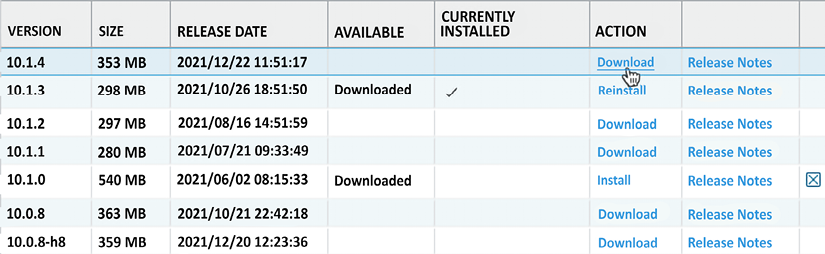
Figure 2.22: Software management page
Click the Download link next to the PAN-OS version you want to upgrade to and wait for the download dialog to complete.
Once the new PAN-OS package is downloaded, it will be listed as such on the Software page, as shown. Click the Install link next to the image to start the installation:
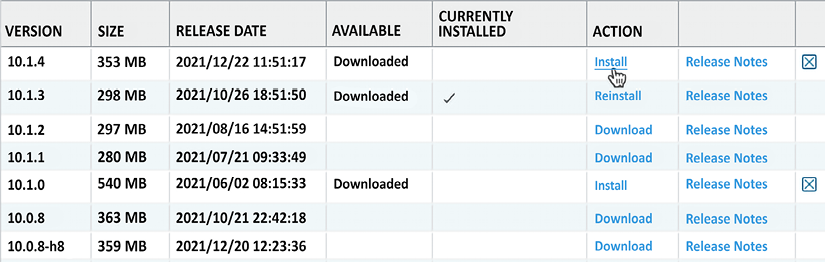
Figure 2.23: Image downloaded and ready to install
At the end of the installation, you will be prompted to reboot. You can skip the reboot if you want to postpone the actual upgrade to a later time. Otherwise, click Yes, as shown:
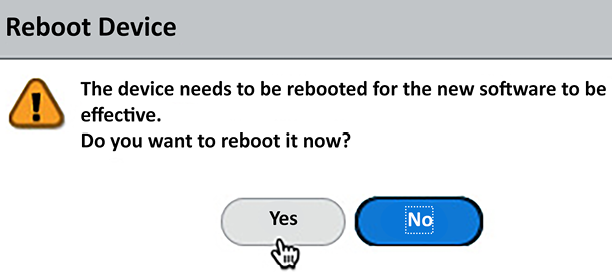
Figure 2.24: Post-installation reboot dialog
Below is an upgrade cheat sheet that will help you prepare and plan your upgrade.
Upgrade cheat sheet
The next steps outline a solid methodology to get to a stable PAN-OS version before placing the firewall in production:
- Go to https://live.paloaltonetworks.com/t5/Customer-Resources/ for release recommendations.
- In Device | Software, click on Check Now to load the latest list of available PAN-OS images.
- Download and install the recommended image of your current release.
- When the installation completes, a dialog window will ask if you want to reboot the device. Click Yes.
- Wait for the unit to boot up again and download the base image for the next major version.
- Download and install the recommended maintenance release for the next major version.
- When the dialog asks you to reboot the device, click Yes.
- Repeat steps
5through7until you’re on the version you need to reach.
Remember that for an HA cluster or panorama environment, you need to do the following:
- Disable preemption in the High Availability configuration before you start, and re-enable it after the upgrade is completed on both members
- Check both members for functionality before you start. The upgraded device will become non-functional until the lowest member has caught up (the cluster favors the lowest software member)
- Upgrade the panorama centralized management first
You have now made sure the firewall is fully set up for success by ensuring the content packages are automatically downloaded and installed, and the appropriate PAN-OS firmware has been installed. Next we will take a look at ensuring the management interface configuration is set up securely.
Hardening the management interface
It is paramount that the management interface is kept secure and access is limited to only those administrators that need access. It is recommended to place the physical management interface in an Out-of-Band (OoB) network, which limits exposure to the broader network. If access to the management server is needed from a different network, it is best to set up a dual-homes bastion host that mediates the connection, either by only allowing admins to log into it and use services from there, or having it set as a (transparent) proxy with a log of all sessions and limiting the source users and IP subnets as much as possible. Admin accounts also need to be set so they only have access to the sections of the configuration they need to access and use external authentication.
Limiting access via an access list
The management interface local access list can be edited by navigating to Device | Setup | Interfaces and clicking on the Management Interface:
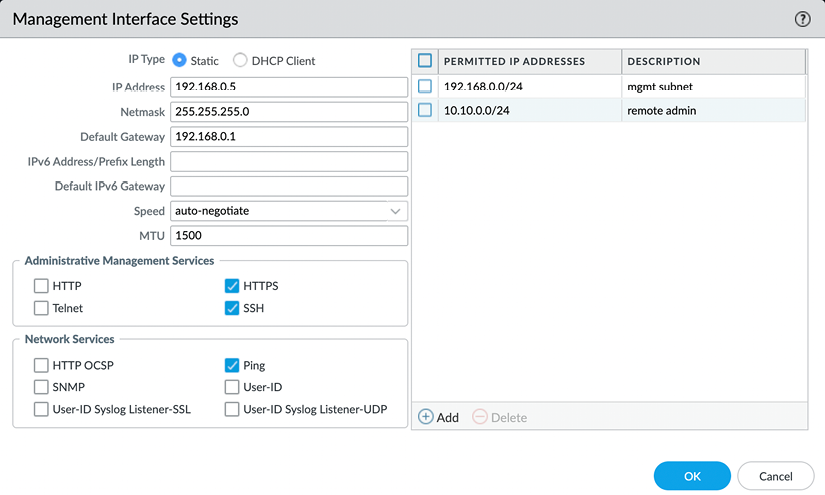
Figure 2.25: Management interface access list
The associated CLI configure mode command is as follows:
admin@PA-220>configure
admin@PA-220#set deviceconfig system permitted-ip 192.168.27.0/24 description "management net"
You can also attach an interface management profile (shown in the following screenshot) to an interface, which enables the selected services (SSH and HTTPS, usually) on the IP address of the assigned data plane interface. This is not recommended as it introduces significant risk if not implemented properly:
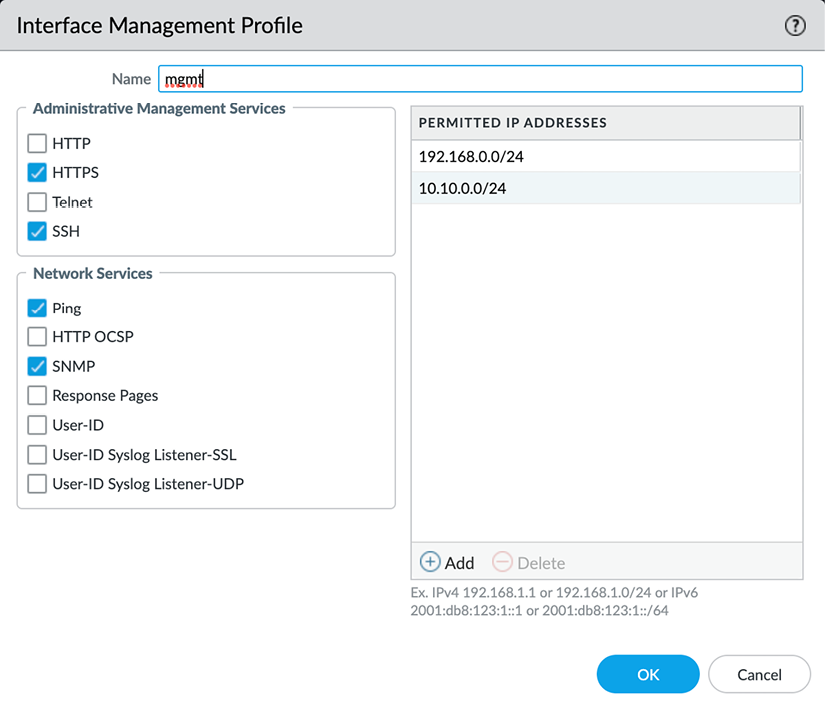
Figure 2.26: Interface Management Profile
If you must enable this profile, make sure it is on a sufficiently shielded interface, preferably a loopback interface, that has security policies associated with gaining access to the management services. As a secondary measure, also enable an access list on the profile.
These profiles can be configured in Network | Network Profiles | Interface Management Profile and then attached to an interface in Network | Interfaces under the Advanced tab of the selected interface:
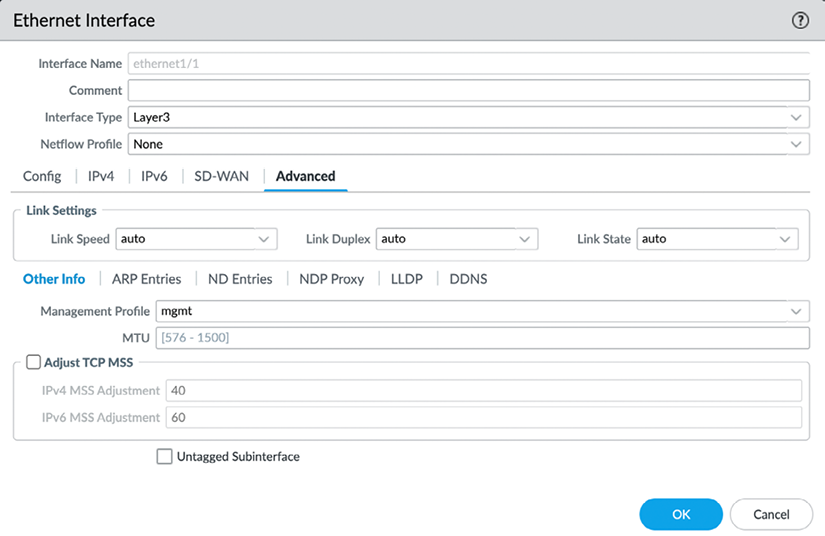
Figure 2.27: An interface management profile attached to an interface
The CLI command to create an interface management profile, set its services to HTTPS and SSH, and add an ACL is as follows:
# set network profiles interface-management-profile mgmt https yes ssh yes permitted-ip 10.15.15.37
The subsequent ACL items can be set via the following command:
# set network profiles interface-management-profile mgmt permitted-ip 192.168.0.5
Now that access to the management interface has been set, let’s look at access from the management interface.
Accessing internet resources from offline management
If the management interface does not have access to the internet, this can create interesting challenges as it will not be able to retrieve updates or perform cloud lookups. A workaround is to enable service routes that route specific applications, services, or protocols via the backplane onto a designated data plane interface, allowing the management plane to reach out to the internet while its physical interface does not have access outside of its management LAN.
Service routes can be configured from the Device | Setup | Services menu, where you can click on Service Route Configuration to get the following dialog:
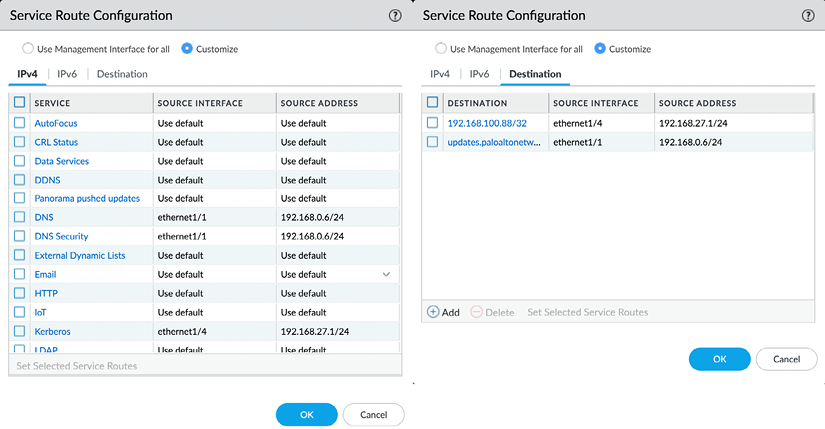
Figure 2.28: Service Route Configuration
Once you set the radio button from Use Management Interface for all to Customize, you will be able to select which source interface will be used for each service. From the Destination tab, you can also add specific IP addresses or entire subnets that need to be routed out of a specific interface. The routing table used by the target interface will be used to determine how the session is routed to the destination.
The associated CLI configuration command to set a service route is as follows:
#set deviceconfig system route service dns source interface ethernet1/8
If you want to see a full list of all the available services, hit the Tab key after typing service:
#set deviceconfig system route service <Tab>
  autofocus                    AutoFocus Cloud
  crl-status                   CRL servers
  ddns                         DDNS server(s)
  ...
This will enable access to resources that are normally not accessible through the management network. In the next section, we’ll prepare administrator accounts and provide access as needed.
Admin accounts
The “admin” account is probably one of the most abused accounts in internet history, so your next task is to get rid of it and replace it with named accounts. Instead of the default “admin” account, it is best to use named accounts so changes can be tracked by the user and personalized access can be granted easily.
When creating new administrator accounts there are two types of accounts available, dynamic and role-based, which you can select by setting the Administrator Type toggle:
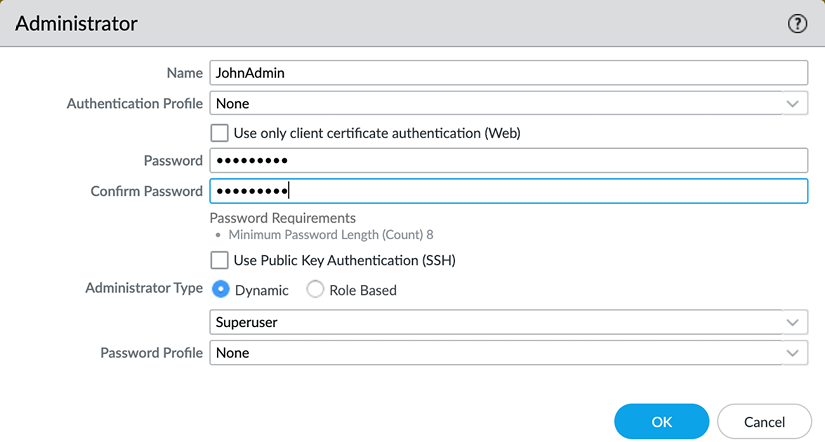
Figure 2.29: Creating a new admin account
First we’ll take a look at dynamic account profiles and their benefits.
Dynamic accounts
Dynamic accounts are comprised of superusers, who can do everything, and device administrators, who can do everything besides create new users or virtual systems. Virtual system-capable devices also have virtual system administrators, who are also device administrators and are restricted to one or several specific virtual systems. There are also read-only flavors of both that can view everything but not make changes.
Your first account will need to be a new superuser to replace the default admin account.
Role-based administrators
Once all the required superusers and device administrators are created, additional role-based administrators can be added for teams that only require limited functionality.
Role-based administrators can be customized down to individual menu items so that they can do anything or have read-only or no access.
The roles can be configured through the Device | Admin Roles menu:

Figure 2.30: Admin Role Profile
Set each topic to one of the following options by clicking the icon to cycle to the option you need:
- A red cross indicates that these administrators will not see the menu item
- A lock indicates that the admin will be able to see objects or menu items, but not make any changes
- A green checkmark indicates that the admin has full access to this menu item and can make changes to objects or configurations within it
In the XML API/REST API tabs, each role can be granted or denied access to certain API calls:
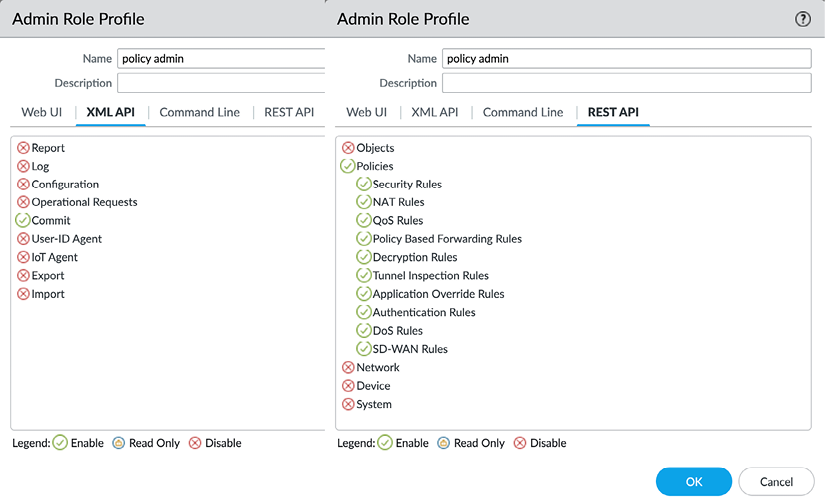
Figure 2.31: XML API/REST API
In the Command Line tab, each role can be granted a certain level of access or denied access altogether:

Figure 2.32: The Command Line permissions
Now that we can set up administrator accounts, we should also create a password security profile to prevent weak password discipline.
Password security
You will need to add a password profile by going to Device | Password Profiles to ensure that the password is changed on a regular basis:
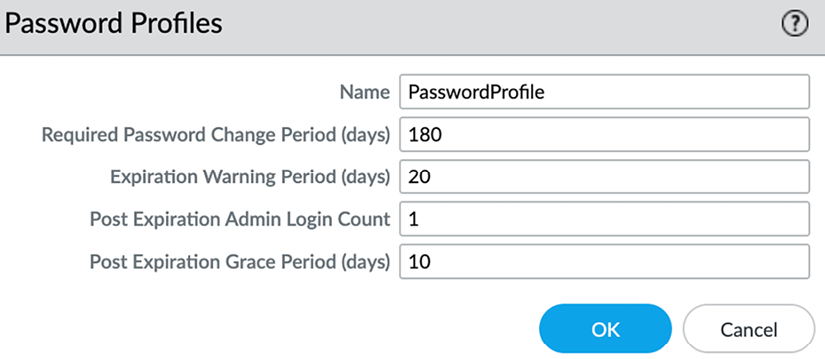
Figure 2.33: Password Profiles
These are the configurable settings in the Password Profile:
- The change period indicates how long a password is valid
- The expiration warning pops up a warning when an admin logs on if their password is about to expire
- The post-expiration login feature allows the admin to log on a certain number of times, even after their password has expired
- The post-expiration grace period indicates how long an admin will be able to log on after their account has expired before it is locked permanently and will require intervention from a different admin
Additionally, you should enforce a minimum password complexity for local accounts to ensure no weak passwords are used by administrators via Device | Setup | Management | Minimum Password Complexity:
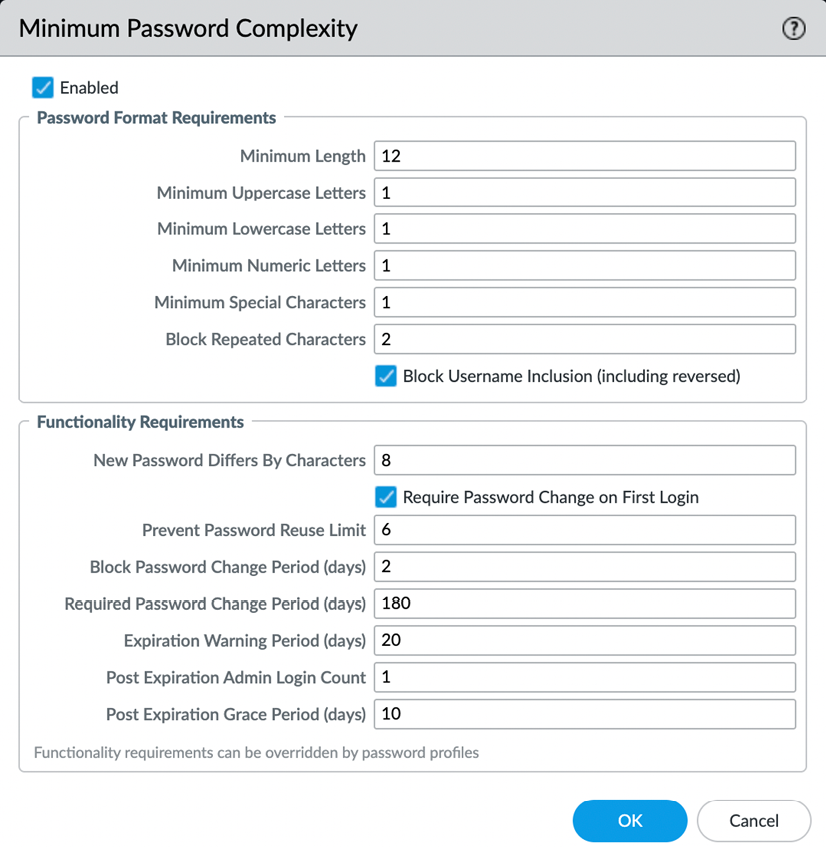
Figure 2.34: Minimum Password Complexity
NIST has an extensive guideline on authentication and life cycle management that can be found at https://pages.nist.gov/800-63-3/sp800-63b.html.
Let’s now look at the external authentication factors.
External authentication
It is best to use external authentication factors, such as Kerberos, LDAP, RADIUS, or SAML, to keep control over credentials in a centralized system, which enables admins to only change passwords once for multiple devices or to be locked out of all critical infrastructure at once if they leave the organization.
It is a good safeguard to keep one “break-glass” local account in case the management interface loses all access to the external authentication servers. This account should only be used in case of emergency and an alert should be sent when the account is used to log on. See Chapter 9, Logging and Reporting, on how to set up a profile that can send out an alert if the account is used.
You first need to create a server profile from the Device | Server Profiles menu. Each server type has its own configuration parameters. The following profiles are available:
- TACACS+ (Terminal Access Control Access Control System Plus) is an authentication protocol developed by Cisco that is still used in many environments for terminal access authentication.
- LDAP (Lightweight Directory Access Protocol) is probably one of the most commonly available protocols to authenticate against directory services and will work with Microsoft Active Directory, eDirectory, and custom LDAP servers.
- RADIUS (Remote Authentication Dial-In User Service) is an open standard authentication protocol that is widely used in remote access authentication.
- Kerberos is an authentication protocol that is mostly used for single sign-on and relies on a negotiation that does not require the exchange of passwords.
- SAML (Security Assertion Markup Language) uses an XML framework to exchange security information and is mostly used with cloud-based Identity Providers (IdPs). It integrates with Multi-Factor Authentication (MFA) very easily.
- Multi-factor profiles allow for several built-in MFA providers to be configured and added separately to an authentication profile.
Let’s take a look at each profile and how to set their basic configuration.
The TACACS+ server profile
TACACS+ requires you to choose between Password Authentication Protocol (PAP) and Challenge-Handshake Authentication Protocol (CHAP) and set the secret associated with connecting to the TACACS+ authentication server.
Optionally, you can set the profile so that it can only be used for administrator authentication, and set the profile to use a single session for all authentication events, rather than a new session per authentication event:
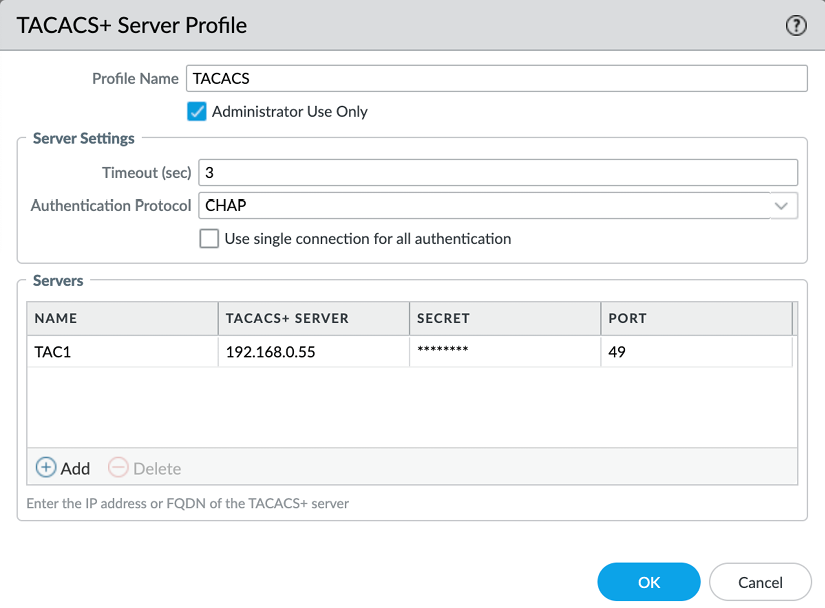
Figure 2.35: TACACS+ Server Profile
While TACACS+ is somewhat rare, LDAP authentication is very common.
The LDAP server profile
For an LDAP profile, you need to provide the type of the LDAP server, which can be active-directory, E-directory, sun, or other.
One thing to remember is that when you configure the server IPs and you have Require SSL/TLS secured connection enabled, the default port for LDAPS is 636, rather than 389.
You need to provide a Base DN value, which is the domain name (or the distinguished name) of the LDAP tree. The Bind DN field is for the user account that will be used to connect to the LDAP server and perform the request and its password. Bind DN can be fully qualified, as shown in the following screenshot, or be a User Principal Name (UPN) formatted as user@domain:
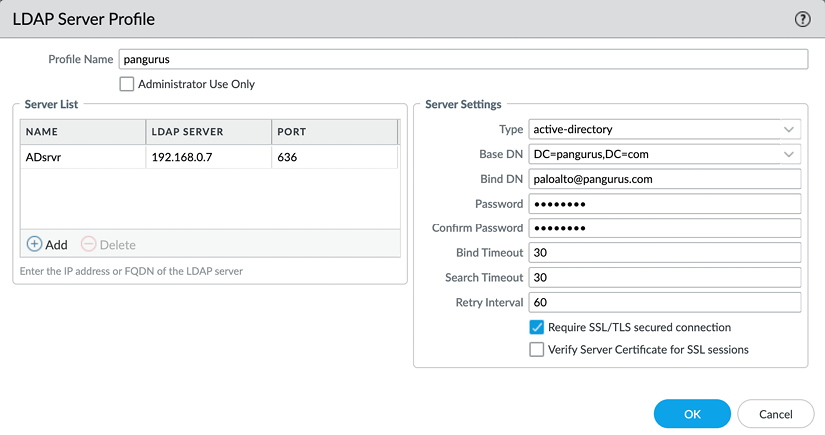
Figure 2.36: LDAP Server Profile
If your LDAP server has an externally signed certificate, enable Verify Server Certificate for SSL sessions to ensure the authenticity of your server. For the certificate check to work, the LDAP server root and intermediary certificates need to be in the device certificate store in Device | Certificate Management | Certificates | Device Certificates. The server name in the profile must match the Fully Qualified Domain Name (FQDN) certificate and Subject AltName attribute for this check to pass.
The RADIUS server profile
RADIUS is one of the most popular authentication methods and supports the following authentication protocols:
- PEAP-MSCHAPv2: Protected Extensible Authentication Protocol (PEAP) with Microsoft CHAP v2 provides improved security over PAP or CHAP by transmitting both the username and password in an encrypted tunnel.
- PEAP with Generic Token Card (GTC): PEAP with GTC enables the use of one-time tokens in an encrypted tunnel.
- EAP-TTLS with PAP: EAP with Tunneled Transport Layer Security (TTLS) and PAP is used to transport plain text credentials for PAP in an encrypted tunnel. EAP-TTLS uses certificates to secure the connection and should be the preferred protocol as it is the most secure.
- CHAP: Used if the RADIUS server does not support EAP or PAP or is not configured for it.
- PAP: Used if the RADIUS server does not support EAP or CHAP or is not configured for it.
Palo Alto Networks uses vendor code 25461.
Like the other profiles, RADIUS can be set so that it is only used for administrator authentication. The Allow users to change passwords after expiry option is limited to GlobalProtect users if the profile is also used to authenticate GlobalProtect inbound connections.
The Make Outer Identity Anonymous option ensures the admin username is not visible for anyone sniffing the authentication sessions if PEAP-MSCHAPv2, PEAP with GTC, or EAP-TTLS are used and the server supports this:
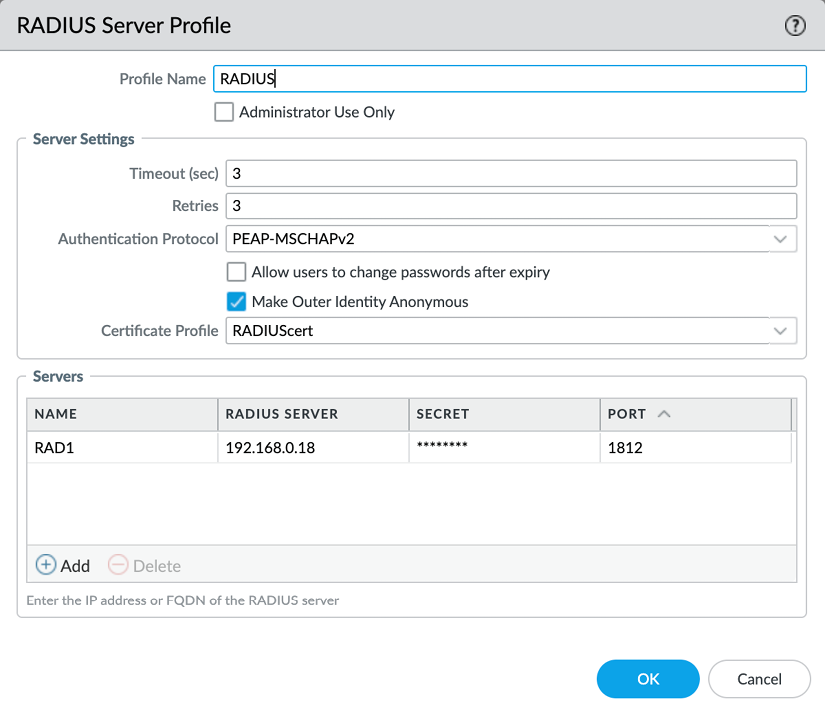
Figure 2.37: RADIUS Server Profile
The certificate verification for RADIUS server profiles requires a certificate profile that allows more checks to be performed than just having the root certificate in the trusted certificate store compared to TACACS+. Several mechanisms can be used to verify server validity and actions can be taken if particular conditions are met with the certificate check, such as opting to allow or block a session if the certificate is valid but has expired:
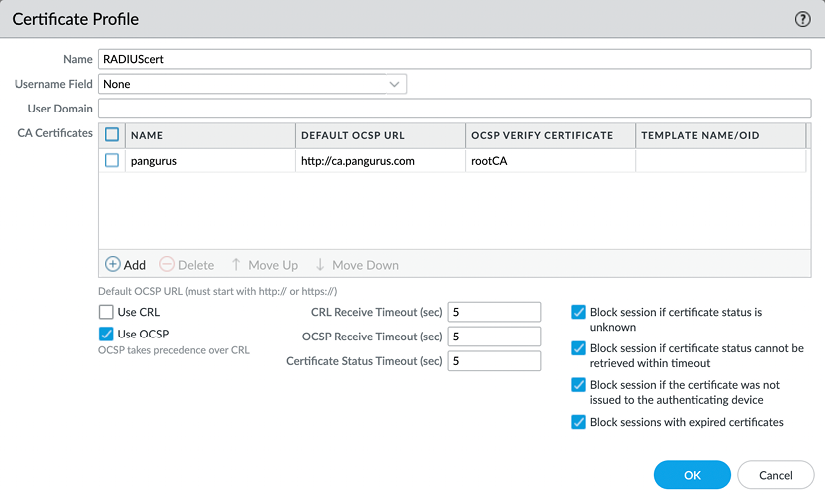
Figure 2.38: Certificate Profile
Next, we will have a look at the Kerberos server profile.
The Kerberos server profile
The Kerberos server profile is very simple to configure as it only requires an IP or FQDN and a port number, but it does require a few specific configuration settings:
- The firewall needs to have the domain set from Device | Setup | Management | General Settings
- The firewall is synced to an NTP server from Device | Setup | Services so that its clock is in sync with the local
ActiveDirectoryserver - Its DNS servers need to be set to internal DNS servers that are joined to the domain, rather than external DNS servers
With single sign-on adoption on the rise and many authentication services making a move to the cloud, the popularity of SAML authentication is also increasing.
The SAML server profile
The SAML profile enables authentication against an external Single Sign-On (SSO) provider (such as PingID and Okta).
Your Identity Provider (IdP) should provide you with the following:
- An identifier so that it can certify whether the authentication session originates from you
- The root and intermediary certificates, which you can load to Device | Certificate Management | Device Certificates to verify the identity of the SSO and Single Log-Out (SLO) sites
- An SSO URL
- An SLO URL
SAML HTTP binding provides an option to post, which sends a Base64-encoded HTML form to the IdP, or redirect, in which case the firewall will send Base64-encoded and URL-encoded SSO messages within the URL parameters.
You can sign SAML messages to the IdP with Certificate for Signing Requests, which can be configured in the authentication profile:
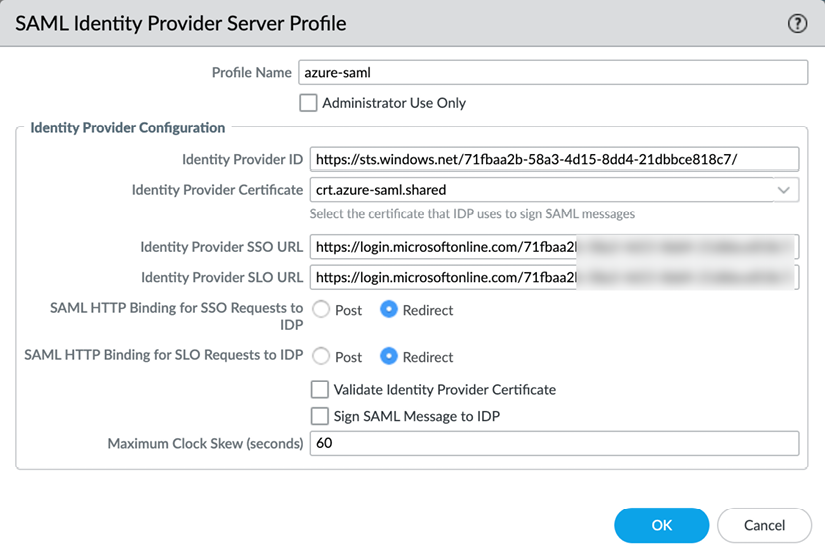
Figure 2.39: SAML Identity Provider Server Profile
It is highly recommended to add multi-factor authentication as regular passwords require good hygiene from each administrator and could be inadvertently shared, stolen, or guessed. If your regular authentication does not support integrating an additional factor like SMS, push messages, tokens, etc. you can add an MFA profile and add the extra profile to the authentication profile.
The multi-factor authentication profile
Currently, four MFA providers are available as standalone profiles: Duo, Okta, RSA, and PingID. To configure this profile, you will need some parameters from the provider.
Settings such as the API host may depend on your geolocation and keys and secrets will be unique identifiers to your account:
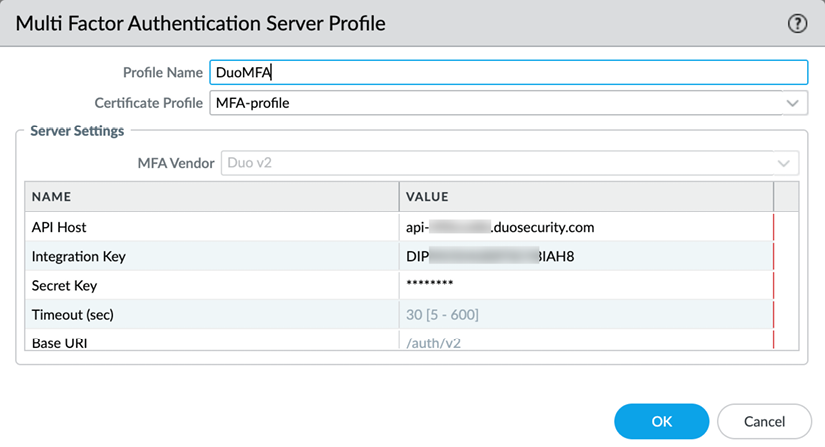
Figure 2.40: Multi Factor Authentication Server Profile
Once the appropriate server profiles have been set up, they need to be added to an authentication profile.
Authentication profile
Now that the appropriate server profile has been configured for your environment, we can go ahead and set up an authentication profile, which will set the stage for the administrators to sign in. Go to Device | Authentication Profile and create a new authentication profile.
The Authentication tab lets you choose the type of authentication you want to use for this profile; this will match the server profile you configured in one of the previous steps. You can then add additional parameters, such as setting sAMAccountName or userPrincipalName for LDAP. Username Modifier lets you control how the username that the end user enters is translated and sent to the authentication server. This allows you to simply forward what the user inputs or add the user domain in UPN format (user@domain) or traditional domain\user backslash format:
%USERINPUT%%USERDOMAIN%\%USERINPUT%%USERINPUT%@%USERDOMAIN%
This may be necessary in a multi-forest domain environment:
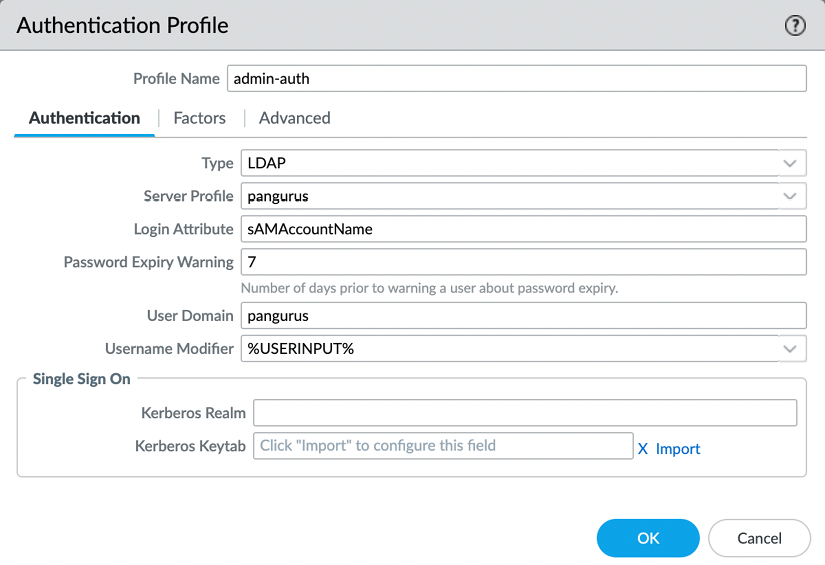
Figure 2.41: Authentication profile LDAP example
In the Factors tab, you can add a profile for an MFA policy that will trigger the secondary authentication once a user logs in:
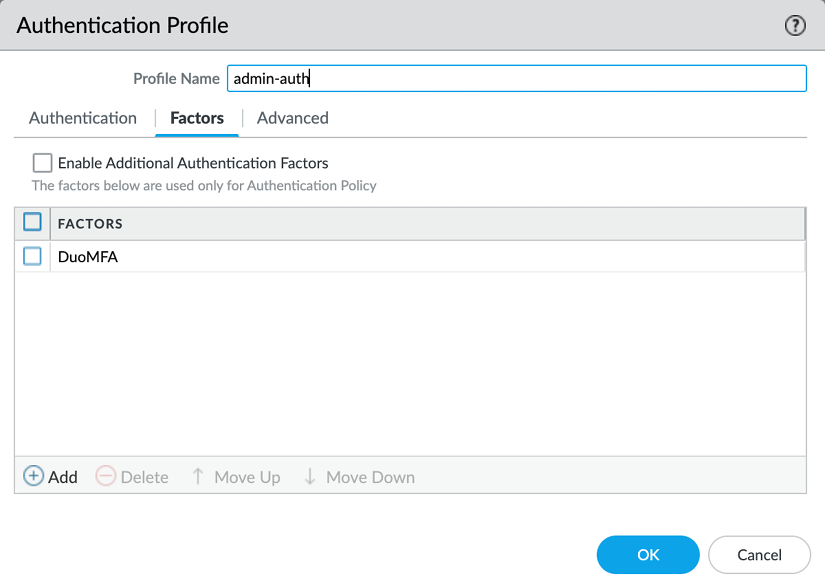
Figure 2.42: Authentication profile MFA
The Advanced tab creates a bit of a chicken-and-egg situation as it requires you to tell the firewall which usernames or user groups are allowed to attempt authentication, but the list of users is only populated after you have properly set up the User-ID. If you have not set up a User-ID group mapping yet, set the user to all until you can return and narrow down the list to the actual admin user groups or usernames.
For security purposes, you should configure a lockout policy that prevents logins for an amount of time after several failed attempts to log in:
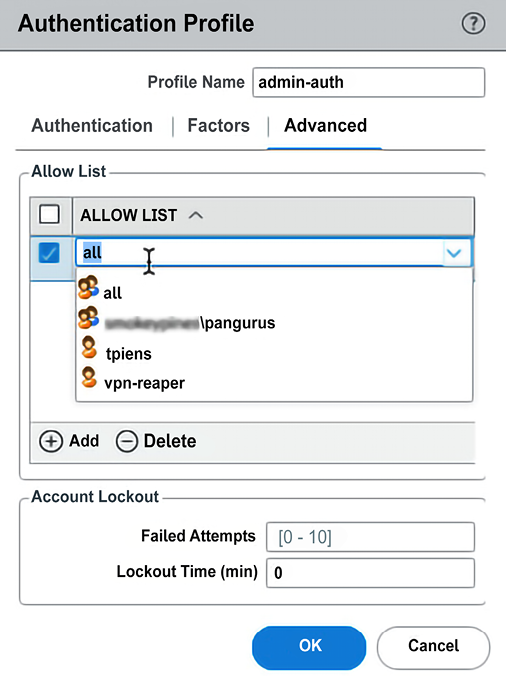
Figure 2.43: Authentication profile allowed users
When the profile is created, you can use it instead of a static password when creating administrator accounts.
This will replace the static password for the administrator with remote authentication:

Figure 2.44: Admin account with an authentication profile
With the topics we covered in this last section you are now able to set up admin accounts that are not only restricted to the access they need (complying with RBAC requirements) but can also leverage external authentication mechanisms and add MFA to strengthen administrator access and prevent unauthorized access. In the next section, we will learn about the different types of interfaces.
Understanding the interface types
When you open the Network | Interfaces menu, you will see an assortment of physical interfaces.
There are several different interface types that will cause an interface to behave in a specific way. We will first cover the four basic interface types and continue with the more specialist ones after:
- Virtual Wire (VWire)
- Layer 3
- Layer 2
- Tap
Let’s discuss them in more detail.
VWire
Just as the name suggests, VWire is intended to be a “bump in the wire.” VWire always consists of two physical interfaces—no more and no less. There is no low-level interference with VLAN tags and there are no routing options; packets are inspected in flow.
Using a VWire interface can be an easy way to “drop in a firewall” without needing to interfere with an existing routing or switching environment. It easily plugs in in front of an ISP router or can be placed in between a honeypot and the network to add a layer of detection.
Before you can create a VWire interface, you first need to set two interfaces to the Virtual Wire type and assign each of them a different zone:
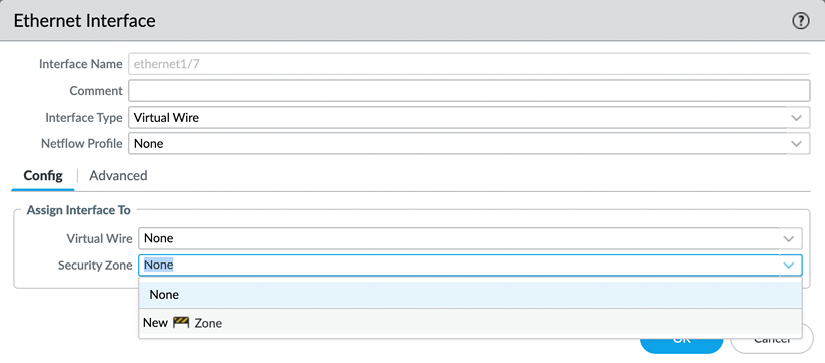
Figure 2.45: VWire interface
You can now connect both interfaces in a VWire profile by going to Network | Virtual Wires and creating a new VWire profile.
As illustrated in the following screenshot, you will need to select the two interfaces that you will form a VWire connection with. If the VWire interface is placed over a trunked link (one that contains the VLAN/802.1Q tags), you need to indicate which ones are allowed. If you want to allow all tags, set 0-4094. If you want to add single tags or ranges, you can add integers or ranges, separated by commas (for example, 5,15,30-70,100-110,4000). Multicast firewalling needs to be checked if you want to be able to block or otherwise apply security policies to multicast traffic. If unchecked, multicast is forwarded across VWire.
Link State Pass Through brings the opposite interface down if one side loses its connection. This ensures that both the client and server sides see the link go down and respond accordingly:

Figure 2.46: VWire configuration
Next, let’s look at the Layer 3 interface.
The Layer 3 interface
A Layer 3 interface is a routed interface. This means it has an IP address and can be used as a default gateway for clients on the inside connected to it or a next hop for a routing device. On the outside, it can communicate with ISP routers and forward traffic out to the internet.
In the Config tab of the interface, you need to assign a Virtual Router (VR) and a security zone. This zone will represent the subnet(s) connected to it when traffic needs to flow from one interface to another:
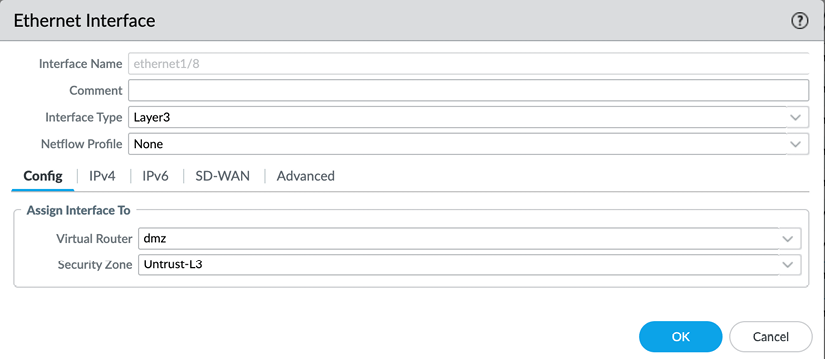
Figure 2.47: Layer 3 interface configuration
The IP configuration can be statically configured as an IP/subnet. If needed, multiple IP/subnets can be added to represent additional networks that are directly connected to the interface.
Remotely connected networks (located behind a router) can be configured in the VR field:
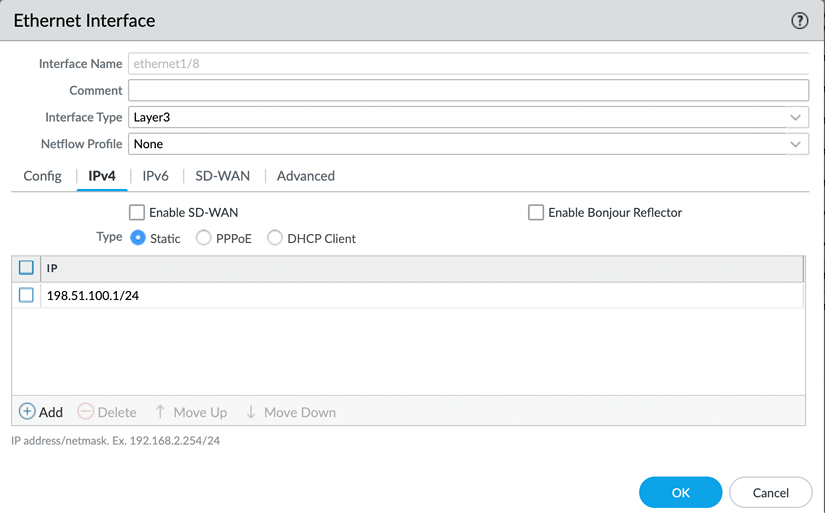
Figure 2.48: Layer 3 interface IP
A Layer 3 interface can also be set as a Point-to-Point Protocol over Ethernet (PPPoE) client if the upstream connection is provided by a broadband ISP over cable or DSL.
In the General tab, the ISP authentication username and password can be configured:

Figure 2.49: Layer 3 PPPoE
In the Advanced tab, you set the authentication protocol to PAP, CHAP, auto, or none. If the ISP has provided you with a static IP, you can configure it here and you can add an access concentrator and service string if the ISP requires them to be able to connect. If required, you can disable adding the default route received by the ISP to the routing table. Some ISPs require PPPoE clients to be in a passive state as they initiate the connection. You can enable this here:
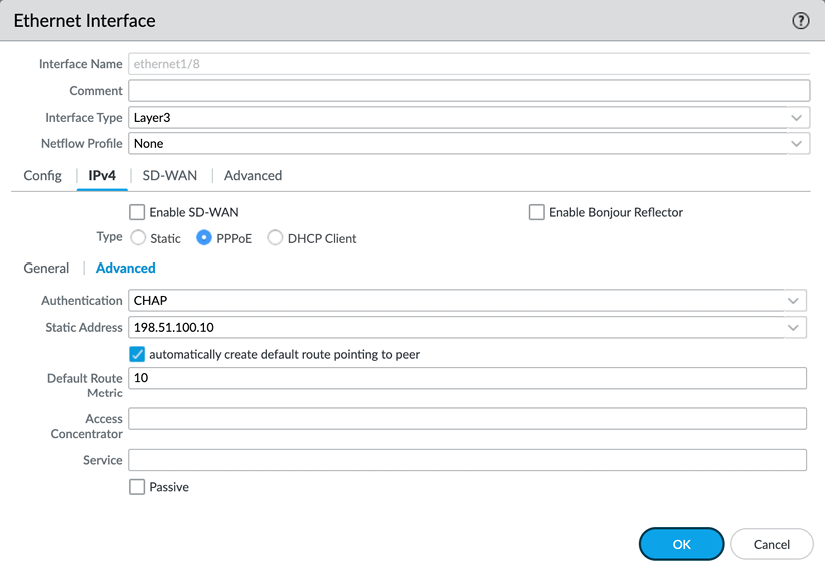
Figure 2.50: Layer 3 PPPoE advanced options
Once you’ve configured the interface and have committed the change, click on Show PPPoE Client Runtime Info to return information on the connection. From the CLI, you can issue the following command to see the same output:
admin@PA-220> show pppoe interface <interface>
For the Layer 3 subnets and IP addresses to be reachable across interfaces, they need to be added to a routing table; this is accomplished in the virtual router.
Virtual router
A VR is the routing element of the firewall, but, as the name suggests, it is not made up of a single engine, but rather a routing set that an interface is subscribed to. Each Layer 3, loopback, and VLAN interface needs to be associated with a VR, but multiple VRs can be used on a system. Not all interfaces need to be associated with the same VR. You can configure the default VR or add new VRs from the Network | Virtual Routers menu.
In the Router Settings tab of a VR, you can see and add interfaces associated with this VR, and adjust the administrative distances if needed. An administrative distance associates a priority with a routing protocol. By default, static routes have a higher priority (lower administrative distance) than OSPF (Open Shortest Path First), but you can change this priority if you want OSPF routes to have priority and only use static routes if OSPF becomes unavailable. Routes within the same routing protocol can be assigned a metric to give them a higher (lower metric) or lower (higher metric) priority. Routes with the same metric are prioritized based on the size of their subnet. A smaller subnet (for example, /32) will have priority over a larger subnet (for example, /16):

Figure 2.51: VR settings
In the Static Routes tab, you can add destination routes as needed. By default, the firewall loads all the connected (configured on a Layer 3, loopback, or VLAN interface) networks in the routing table; adding static routes makes remote networks available from a routing perspective.
One of the first routes you may need to configure is the “default route,” which allows clients to connect to the internet.
The destination for the default route is 0.0.0.0/0. A regular route could have a smaller subnet, such as 172.16.0.0/24.
The Interface option indicates what the egress interface will be. If the route is pointing to the internet, the interface will be the one where the ISP router is connected.
- IP Address: The IP of the upstream router to forward packets to.
- Next VR: Whether the packet needs to be handed over to a different VR on the same device.
- FQDN: If the upstream router has a dynamic IP, it could be useful to use an FQDN that is dynamically updated by a DNS record.
- Discard: Routes can be set to “black hole” certain subnets. This can be used to prevent any packets from reaching a connected out-of-band network, even if a security policy were to allow this.
- None: Routes may not have a next hop, such as packets routed into a VPN tunnel.
The Admin Distance and Metric settings can be changed for each route if necessary.
Route Table is used to add routes to regular unicast routing, multicast routing, or both.
You can, if you have redundancy available, use Path Monitoring to send a heartbeat ping over the route. If the ping fails a configured amount of times, the route will be disabled. The routing table will be re-evaluated for matching packets and the next best match will be used to route packets (that is, a route with a higher metric or larger subnet):
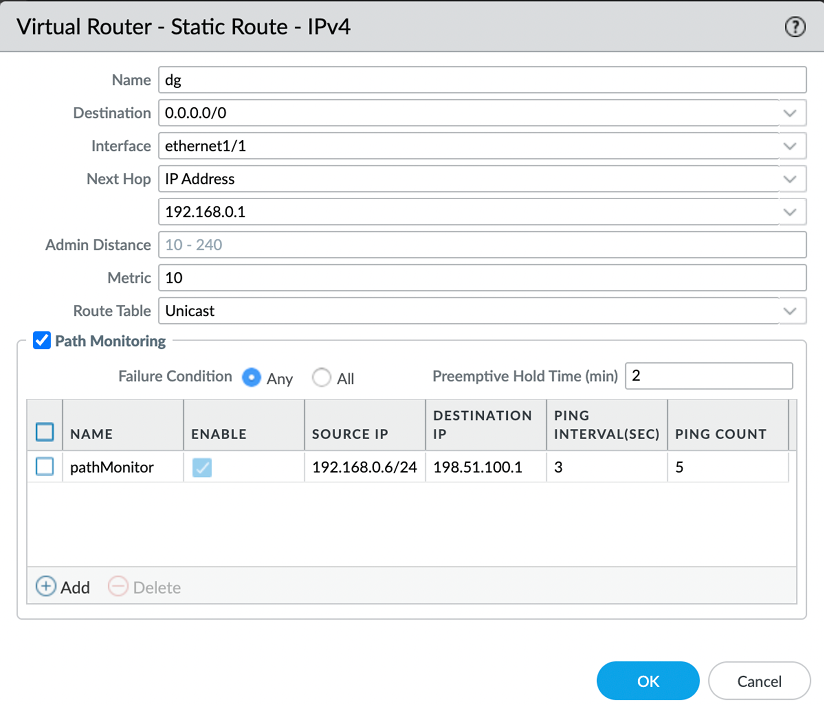
Figure 2.52: VR default route
Any subnets that are configured on a Layer 3 interface are added to the routing table as a connected network and do not need a static route to be added.
The Layer 2 interface and VLANs
Setting interfaces to the Layer 2 type enables the firewall to function in a similar way to placing a switch in the network. Each interface acts as the equivalent of an access port (if you need trunk functionality, refer to the Subinterfaces topic) on a switch, and you can add as many interfaces as you need.
Each interface should use a different zone so that a security policy can be leveraged to control traffic between the interfaces. Interfaces set to the same zone will, by default, exchange traffic without inspection and require a catch-all security policy to enable inspection.
To group the interfaces into a logical “switch,” you need to create a VLAN object by going to Networks | VLANs and adding the interfaces you previously set to Layer 2 and want to be connected:

Figure 2.53: VLAN group
The VLAN Interface option adds routing functionality to the group as a logical Layer 3 interface. This can be useful if you have an upstream ISP router or a different subnet connected to a Layer 3 interface that you need to interact with.
You can configure the VLAN Interface by going to Network | Interfaces | VLAN. Assign it to the VLAN group you created, fill in the Virtual Router field, and assign it a zone. This zone will represent Layer 2 interfaces when interacting with Layer 3 interfaces for security policies:
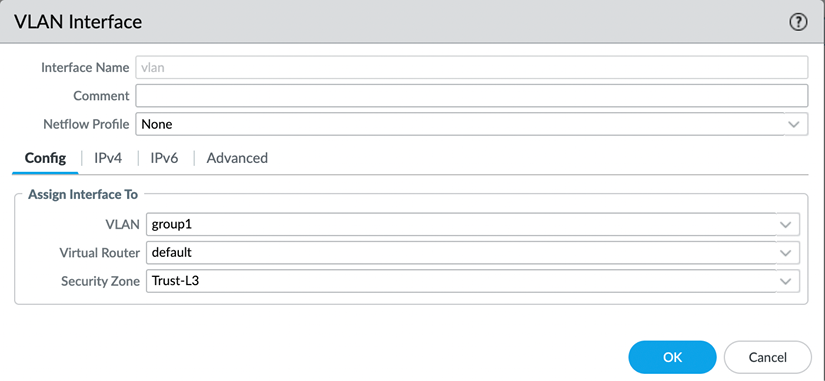
Figure 2.54: VLAN Interface configuration
You will also need to assign the VLAN interface an IP address that the clients on Layer 2 interfaces can use as a default gateway or routing next hop. Make sure it is in the same subnet as your clients on the Layer 2 interfaces:

Figure 2.55: VLAN Interface IP address
Besides Ethernet interfaces, there are also three different logical interfaces:
- Loopback
- Tunnel
- VLAN
We’ve covered VLAN interfaces and tunnel interfaces, so let’s now take a look at the Swiss army knife of interfaces, the loopback.
The loopback interface
A loopback interface is a logical Layer 3 interface that can serve many purposes. One common use case includes adding an additional public IP to its own interface so VPN configuration can be added to it. Another use case is to add a management profile to a loopback, and then leverage security rules to allow administrators to manage the firewall from exotic networks. It needs to be configured with an IP address (only a single IP per loopback interface is supported) and a security zone and it needs to be associated with a VR.
It can be set to a new IP address in the same subnet and zone as one of the Layer 3 interfaces, so services such as Management Profile, Captive Portal, and GlobalProtect can be hosted on a different IP than the main IP of the physical interface.
To add extra security, it can also be set to a different zone so that a matching security rule is needed for clients to be able to connect to the loopback interface:
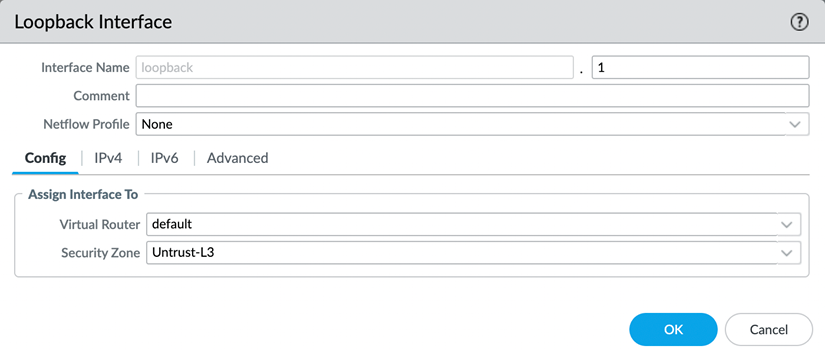
Figure 2.56: Loopback Interface
The number next to Interface Name is an identification number for the logical interface.
The tunnel interface
Tunnel interfaces are logical interfaces that serve as the ingress and egress point of tunneled traffic, both site-to-site VPN and GlobalProtect SSL and IPSec. The physical tunnel is terminated on a Layer 3 or loopback interface, but the packets that need to be encrypted should be routed to the tunnel interface:
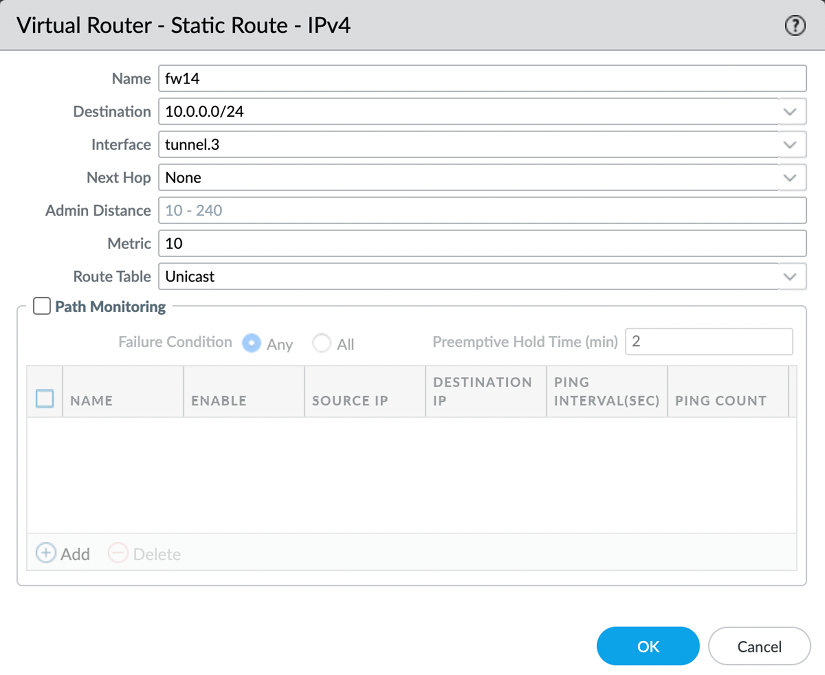
Figure 2.57: Static route for a VPN tunnel
This interface needs to be associated with a VR and a security zone, as you can see in the following screenshot:
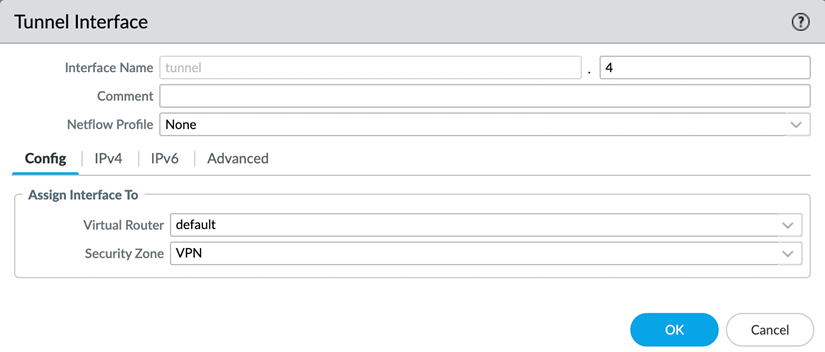
Figure 2.58: Tunnel Interface
The number next to Interface Name is an identification number for the logical interface.
Important note
For a strong security posture, set a separate zone for individual VPN connections, even for known locations. Treating each connection and remote network as an individual zone ensures adequate visibility and control. A remote office could be exposed to malware (think WannaCry) and infect other offices if the VPN tunnel is set to the same zone for all remote offices. The default intrazone security rule allows all sessions to run and does not apply scanning.
There are also several “special” interface types that provide a specific functionality; we’ll cover the special use case interfaces in the following sections.
When a switch uplink needs to contain multiple 802.1q VLAN tags, it can be configured as a trunk and, on the firewall, subinterfaces can be created to correspond to each VLAN tag.
Subinterfaces
All physical (that is, Layer 2, Layer 3, VWire, and Aggregate) interfaces can have subinterfaces. You can create these by selecting the desired physical interface and clicking on Add Subinterface at the bottom left of Network | Interfaces:

Figure 2.59: Creating a subinterface
A subinterface is used when the physical interface is connected to a trunked link containing VLAN (802.1Q) tagged packets. The physical interface is not able to interpret the tags, but subinterfaces are. For each VLAN carried by the trunk, you can create a subinterface to represent the virtual network coming from the switch. The advantage of using subinterfaces is that each VLAN can be associated with its own security zone.
The subinterface will mimic all the configuration specifics of its parent physical interface, but interface types cannot be different from the physical interface type (for example, a Layer 3 physical interface cannot host a Layer 2 subinterface).
HA interfaces
HA interfaces are required when setting up a cluster of two firewalls. Some chassis will have built-in dedicated HA interfaces, in which case you may not need to create any HA interfaces yourself. If no onboard HA interfaces are available, or additional interfaces are required to serve as backup HA links, data plane interfaces can be selected to fulfill this role and are connected to the HA peer.
AE interfaces
To increase available bandwidth above the physical limitations of the interfaces, interfaces can be bundled into an AE group using the 802.1AX protocol. Up to eight interfaces can be combined into a logical bundle.
A new group can be created by clicking on Add Aggregate Group under Network | Interfaces | Ethernet.
You first need to set the type to Layer 2, Layer 3, VWire, or HA, which will require the same configuration as the physical interface equivalent (that is, security zone, VR, or VLAN or VWire).
Additionally, you can configure the Link Aggregation Control Protocol (LACP) to improve interface failure detection. LACP enables link failure detection on the physical and data link layer, while the default protocol only detects physical link failure.
You can set whether the firewall is in Active or Passive mode. This configuration setting needs to be reviewed with the LACP peer (typically the switch) as only one peer can be configured as Active, but LACP will not work if both are set to Passive.
The transmission rate will have an impact on the responsiveness of link failure detection, but it will also have an overhead. Slow transmission means every 30 seconds, while fast transmission means every second.
Fast Failover will fail to an operational interface within 1 second when an interface goes down. Traditional failover happens after 3 seconds.
System Priority determines which peer determines port priorities.
Maximum Interfaces determines how many interfaces can be active at the same time within the aggregate group. This number should not exceed the number of physical interfaces you assign to the group, but can be leveraged to limit total available bandwidth while keeping hot interfaces in reserve in case of failure. (For example, if a total bandwidth of 4 gigabits is needed for an aggregate group, but you also do not want to exceed this bandwidth to preserve system resources, you can assign five or more interfaces to the aggregate group, and set Maximum Interfaces to 4. Only when an interface fails will another one be activated to pick up the work.) In a high-availability configuration where two firewalls form a cluster, LACP can be enabled on the passive peer so the link aggregation group is prenegotiated before the passive peer needs to assume an active role, which cuts down on the time needed to failover.
This is achieved by checking Enable in HA Passive State. The same system MAC can be used on both cluster members, but this may not be supported by the connected switches.
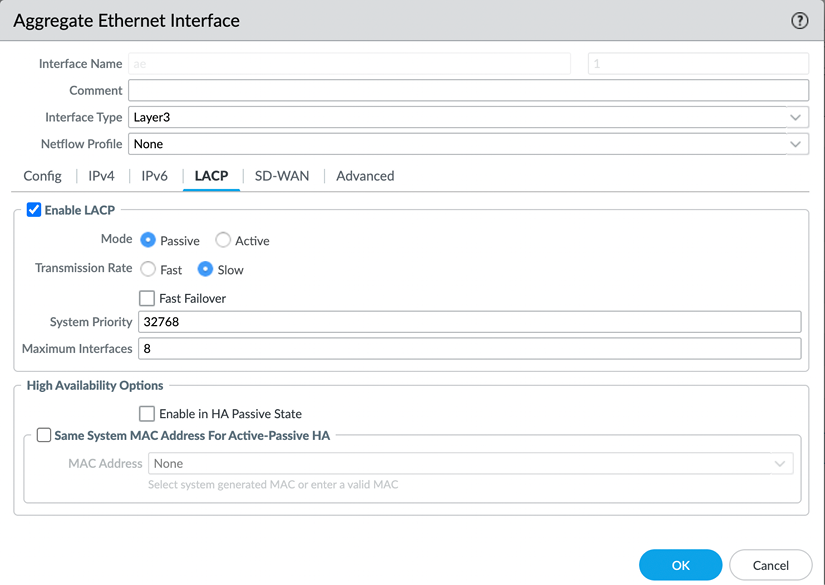
Figure 2.60: Link Aggregation Control Protocol
When the Aggregate Group is created, you can add the interfaces by setting the Interface Type to Aggregate Ethernet and selecting the desired Aggregate Group:
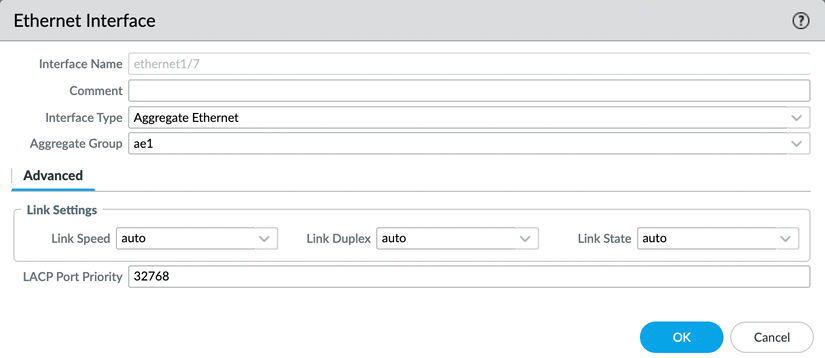
Figure 2.61: A physical interface in an aggregate group
In some cases, you may need to be able to connect to a port mirror on a switch and just listen without participating. For such instances, you can configure a tap interface.
Tap interfaces
Tap interfaces can be used as a passive sniffing port. If a different network device is set up with port mirroring, its egress port can be connected to the tap interface to intercept all packets and apply the app ID and content ID. As long as the tap interface is sent all packets of a session, it will be able to inspect the traffic as if it is flowing through the firewall. There are, however, a few limitations:
- As the firewall is not actively participating in the processing of packets, it cannot take action if it detects a threat; it can only report it.
- SSL decryption can only be applied to inbound connections if the server certificate can be loaded onto the firewall with its private key.
The tap interface only needs to be configured with a security zone:

Figure 2.62: The tap interface
To optimally benefit from the tap functionality, a security rule will need to be created that allows all operations, or a specific subset, if you want to limit the scope. The firewall will discard all packets in the background, but setting the security rule to drop would discard the packets before inspection:

Figure 2.63: The tap security rule
Similar to listening in on a port mirror, the firewall can send all unencrypted session data to a third-party DLP (Data Loss Prevention) or threat intelligence device. It can do so via a Decryption Port Mirror interface.
The Decryption Port Mirror interface
The Decryption Port Mirror interface allows the forwarding of decrypted packets to an external device for further inspection. This can be useful for data loss prevention, for example. The license can be activated for free via the support portal by browsing to https://support.paloaltonetworks.com and then going to Assets | Devices.
There, you can find your firewall and click the Actions button. If you choose to activate a feature license, you will be able to activate Decryption Port Mirror:

Figure 2.64: Activating a Decryption Port Mirror license
To activate the license on the firewall, follow these steps:
- From Device | Licenses, select Retrieve license keys from license server
- In Device | Setup | Content ID | Content-ID settings, enable Allow forwarding of decrypted content
- In Network | Interfaces | Ethernet, set an interface to the Decrypt Mirror type
- In Objects | Decryption | Decryption Profiles, open the decryption profile and add the interface to Decryption Mirroring
- In Policies | Decryption, create decryption rules that use the decryption profile
- Save the changes and connect the Decryption Port Mirror interface
With the information covered in the last sections you are now able to select the appropriate interface for each network design you may come across. VWire helps you add a firewall in an environment where you can’t interfere with existing routing, Layer 3 interfaces put the firewall in the middle of routing decisions, Layer 2 interfaces make the firewall act in a similar way a switch would, and subinterfaces can be added to all of these to account for VLAN tags. You are able to configure link aggregation and can leverage tunnel interfaces to set up IPSec tunnels.
Summary
In this chapter, you learned how to create a support account, register a new device, and add licenses. You are able to identify all the different support licenses and can select the appropriate subscription licenses to address your needs. You can now upgrade and update a device so that its firmware is up to date and the latest application and threat signatures are loaded to protect the network. You learned how to protect the management interface so that only legitimate users can connect, and you are able to assign different accesses and privileges to administrators. You are able to configure all the physical interfaces, like Layer 3 and VWire, and know when each is most appropriate. You can also leverage logical interfaces like tunnel interfaces and loopback interfaces when they are needed.
If you’re preparing for the PCNSE, you should take note that upgrading requires the base image to be downloaded before you can move forward to a maintenance release. The recommended threshold for dynamic updates is 6 to 12 hours (unless the device is located in a critical environment, where the threshold should be 24 hours) and you should be able to identify the difference between all the interface types.
In the next chapter, we will start building robust security policies and learn how to set a strong security posture for network traffic.
