


Manga Studio 5 is a great all-around drawing software. But it's primarily a comic creation software, and as such the Multiple Pages feature is its bread and butter. The Page Manager tab functions like a book, allowing you to see zoomed-out versions of all the pages in your comic at once, open them individually, drag-and-drop them to new locations, and add or delete pages from your story at will. It's the thumbnail view of your story—the digital equivalent of having your pages laid out on index cards and shuffling them around as you please. It's a CMC file that points to individual image files of your pages in one convenient location so that you no longer have to keep track of separate files, like in other graphics programs.
In this chapter we are going to learn the following:
Making a new story file
Creating and working with custom page templates
Saving custom page templates
Navigating the Story tab
Organizing pages
Viewing options
Easy text entry with the Story Editor mode
Changing font face and size
Let's get started!
In order to make a new story, navigate to File | New (or press Ctrl+N), or click on the new icon on your toolbar.

Once you've done that, the New dialog box will open. Make sure that the Manga draft settings(O) and Multiple pages checkboxes are selected. As you can see, we have quite a lot of options to play with here, so let's go over them.

The Preset drop-down menu has common paper sizes used in the production of comics. It also has some other sizes, such as postcard and common web resolution sizes. What size and dpi setting you use is up to you and the specifications of your book printer.
My rule is to always plan to print, even if you're just thinking of doing a webcomic and have no ambitions to do so when you first start off. You never know when you might have a huge hit on your hands and suddenly get thousands of people screaming for you to make books. Or you might just decide that you really want to see your work in print! Set up correctly from the start and you'll save yourself a lot of work—and headaches later.
Print resolution is at least 300 dpi. The higher you can go on the dpi though, the crisper your work will look when it's printed. Most of the preset sizes in Manga Studio are already set to 350 dpi. If your computer can handle going higher, to about 600 dpi or so, then it's suggested that you do so, especially if you will be printing your work in black and white. High resolution is great for black-and-white work and produces nice, crisp lines.
The standard size for a newspaper strip is 4 1/16 by 13 inches (34.29 cm x 11.43 cm). We're making the width and height slightly larger than our finished size because we want our active drawing area to be 4 1/16 by 13 inches, and we need to account for the binding size and default border.
Want to have a long strip down instead of across? Or set a regular page size to landscape format instead of portrait? Simply click on the arrows to the left of the Width and Height fields to flip them!

The Binding (finish) size is the final size of our page once the bleed is accounted for.
A bleed in printing is when the image goes off the page. In order to achieve this bleed, you must produce your artwork at a size larger than the final printed size, and draw to the edge of the canvas. When your work is printed, the excess at the edge will then be cut off, so don't put anything important near the bleed area!
Most printers require a bleed of at least one-eighth of an inch all the way around. So if you're going to be printing your comics in a 6 by 9 inch format, you will want to set your page size to 6.25 by 9.25 inches to compensate for the bleed. If you already have a printer in mind, be sure to get their printing specifications before you start drawing so that you can set your pages up correctly. It will save you time and a lot of headache in the end!
The Default border (inner) is the interior margin of the page. For most printers you should leave at least a quarter of an inch all the way around the edge inside which the important elements (such as text) stay, so that they're not cut off in the printing process.
The X offset and Y offset options for the basic frame will move the guides horizontally when the X offset value is adjusted and vertically for the Y offset value. Handy if you need a larger margin in the center of pages to account for a book's gutter, or if you wish to have a larger margin at the bottom or top of a page—say for text at the bottom or top with the comic title and author information.
Since we wanted our finished paper size to be 13 by 4 1/16 inches, under the Binding (finish) size field we're going to enter 13 and 4.06 inches (33.02 cm x 10.31 cm). The bleed will be an eighth of an inch on each side, so 16 should be close enough. Now, to achieve a bit of a gutter between the finished edges of our pages and the sides of our panels, set the basic frame to 12.5 by 3.75 inches (31.75 by 9.53 cm) and we have the dimensions of our drawing all set up. There are still a few more options on this screen to address though.
The Basic expression color option allows you to set the color mode for your entire file. It defaults to Color, but you can also select Monochrome and Gray from the drop-down menu. If you are creating a comic that will be in color, leave the setting on Color. For grayscale comics, use the Gray option. If you are creating a pure black-and-white comic, with no shades of gray included, then select the Monochrome option.
The Paper color option allows you to change the color of your base canvas. Since this can also be changed any time during the drawing process, I usually leave this white when I'm doing basic sketching, and then change it when I'm coloring. The drawing and coloring processes will be covered in Chapter 9, Putting It All Together! Drawing and Inking, and Chapter 10, Finishing Touches.
The Template checkbox allows you to pick a frame template material from the Materials library (covered more thoroughly in Chapter 5, Living in a Material World) to automatically place in your new file. There are many pre-set templates to choose from in Manga Studio 5. Checking this box will bring up the Template dialog box, where you can scroll through the options or do keywords search.
Up at the top of our dialog box, underneath the OK and Cancel buttons, there is a button for Register to preset. This will allow us to save the dimensions that we have just created and use them later on in other files. Click on the Register to preset button and then enter a descriptive name. We'll call our current settings Comic Strip—easy to remember and to the point.

You can choose what options will be saved in your preset. Resolution is automatically checked. You can also save the template, if you are using one. This is handy if you are creating a strip, or something that usually has the same number and layout of panels. Page settings will save anything under the Multiple pages options, which is very handy if you have a comic that is always the same number of pages per chapter or storyline. And of course the Default expression color option can also be saved, so that your saved preset will always be whichever option you selected.
Now, click on OK in the dialog box and our Comic Strip template will be saved in to the Preset drop-down menu for us to use at any time.

At the bottom of our New dialog box are the Multiple pages options. This allows us to create many page files all at once and be able to organize them. The Number of pages dropdown gives some common number of pages, but you can also enter a custom number simply by clicking in the box and typing a number. The Spread corresponding page(M) option makes it possible to create two-page spreads with our files.
Binding point is the option for what side of the finished book the spine will be located on. I'm an English speaker, so I click on the Left binding option. If your book will be bound with the spine on the right, click on Right binding.
The Start page indicates which side the first page will be on. In books that are bound on the left, this is usually the right-hand page (because the back of the cover is usually blank, or filled with an advertisement in the case of mainstream comics publishing in the U.S.).
The Save folder is the folder on your hard drive where this file will be stored. The Reference... button beneath it allows you to change the folder by browsing your hard drive. Click on Reference… and choose where you want to store your file. Then the Management folder text is the new folder that Manga Studio will create to store the image files. This can be a storyline name, an issue number, anything that you desire, so long as you know what it is. Let's name our Management folder Chapter One for these exercises. The Management file text under the Management folder name changes as we change the folder name, to show us how our file is going to be set up on our hard drive.

Now, click on the OK button to create your new file.
Once you click on OK and Manga Studio creates the pages, the Page Manager window will open. This window is the command center for our story file. We can see thumbnails of our pages, zoom in and out on them, and open pages to work on.
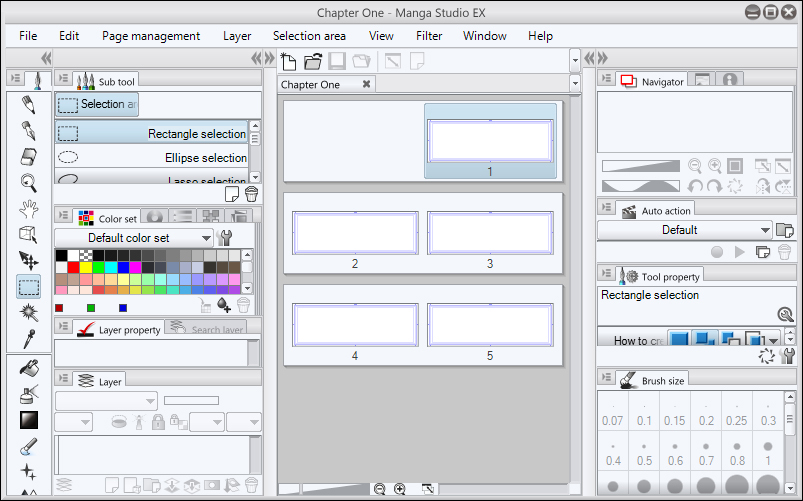
As you can see, in this view we can see thumbnails of all of our files in this story. This is great for a number of things, including being able to check the flow of your story. I often catch myself putting too many splash pages in a chapter of my comic, and I see that when I look over the pages in story mode. We can also rearrange pages in this tab.
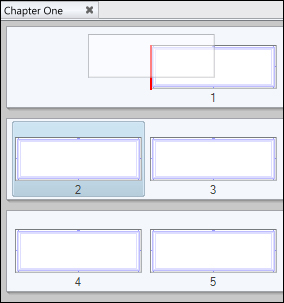
To rearrange the pages, simply left-click on a page and drag-and-drop it in its new position. A red line will appear where the page will be dropped so that you can be sure you have it in the spot where you want it.
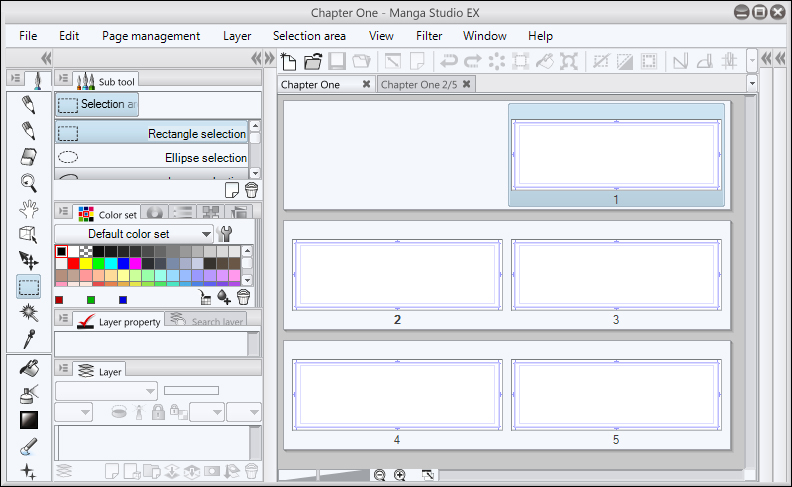
When you let go of the page in its new spot in the story, Manga Studio will need a moment to update all of the page information. Once that's done, you can continue working on your project.
At the bottom of your Manga Studio window, there are several options for zooming in and out of your page thumbnails. Three of these are the same options that are in your bottom toolbar when working on a canvas.

The first option is a slider that allows you to zoom in and out by dragging the light gray rectangle to the left or right. Click on it and drag to the right to zoom in. Dragging to the left will zoom back out on the thumbnails. If you're having trouble telling what pages in your story are what, you can zoom in to see them better, and then zoom out again to get a look at the visual flow of the entire chapter or a section of it all at once.
The next two icons in the lower bar are also for zooming in and out, but they do so by pre-set percentages. The right-most icon is the Fitting control, which can be toggled back and forth between the pages being laid out horizontally or vertically. Click on it and the pages will rearrange so that they're two across on the screen and fit inside the Manga Studio workspace.
Alright, now you know how to zoom in and out of your page thumbnails, so we can explore some of the other things you can do in the story mode of Manga Studio.
In the main menu bar of Manga Studio, click on the Story section and let's take a look at the options for navigating and changing our pages.

The first section of the menu options is incredibly useful if you're working on a longer comic project, say a full issue or a graphic novel. In our current project we have the first page selected, so the To first page and To previous page options are grayed out. On pages other than the first one, those options would be available, as would the other options in the menu that are not active on the first page.
As you can see, the first five options are for navigation. Say that you're on page 100 of your graphic novel and you need to go back to page 1, use the To first page option to get there quickly and without wasting time scrolling. You can also jump to the last page, to previous or next pages, or to a specific page. If you want to see page 32 of that 100 page story, just select the To specified page... option and enter the number of the page you want to jump to.
The second section of this menu allows us to add and otherwise change pages in our story. There are two options for adding pages. Add page (N) adds a page with the same settings as the pages already in the story file. Add page (detail)... will give us the same New options that we had when we made our comic strip template at the beginning of the chapter. Click on this now and add an A4-sized page from the drop-down menu to your story.

You can also use this as a shortcut to add more than one page to your file. Let's say that we wanted to take our file that now has 6 pages in it and make it 10 pages instead. Click on the Add page (detail)… option under Story Management. Make sure that the Comic Strip template is selected in the drop-down menu. Then, under the Multiple pages option, enter 4.

Click on OK, and Manga Studio adds four pages to the file, bringing our page count total to ten (one A4 size and nine Comic Strip size).

The next item in the menu is to import a page. Click on the Import page… option and navigate to a Manga Studio file, or an other graphic file on your computer and click on the Open button. Import page will bring the file in as a page on its own, so you can even take the previous images that you have drawn and compile them as individual pages, all in one file. Perhaps you need to include a previous scene in a chapter of your comic story as a flashback and you don't wish to redraw it. Import the pages and arrange them as needed and you're done!

Let's say we want to duplicate page 2 of our file. Click on it so that it is highlighted with a blue box. Then go to the Duplicate page option under Story and select it. Now we have a copy of page 2, which is our A4-sized page.
Finally in this section we have the Delete page option. Stay on the copy of Page 2 and use Delete page to get rid of it. Manga Studio will show you the following warning:

You won't have to worry about deleting a page that you don't actually want gone. Since our copy of page 2 is empty, we'll go ahead and click on OK. Our file is now back down to 11 pages, one of which is an imported page with an image on it and the other ten are blank.
For the next two options under the Story menu, we'll need to select two facing pages that are both the same size and resolution. Each box that Manga Studio separates your pages in indicates that the pages contained are facing. Page 1 has no facing page because it's the first one, so it's in a box by itself. Click on page 4 in your file (it's facing with page 5 and they are both the Comic Strip template) and choose the Change to spread option.

This combines the two pages together to form a two-page spread. Drawings and images can be added to both pages or to only the left or right page, as you can see in the previous screenshot.
The photo of the fence is on a layer beneath the folders for each side of the page, so it shows across them both. The pattern of the hearts is inside the left-page folder, so it only shows on the left side. The blue flowers, likewise, are in the right-page folder and so only show there.
Working on two-page spreads serves a few purposes. For one, two-page spreads can add drama to a comic. And for two, if you work in spreads you can save time by working on two pages at once instead of one at a time. This leads to less switching back and forth between pages, and therefore less wasted time, so you can draw more.
Don't want those pages to be joined in a spread anymore? Go back to the Chapter One tab so that you can see the page thumbnails. Then under Story Management, click on the Change to single page... menu item. A warning will appear as shown in the following screenshot:

It's similar to the warning that we get when we join pages together into spreads, and is letting us know that this operation can't be reversed by clicking on the undo button. Click on OK though and take a look at the pages that were once a spread.

The pages have separated and none of the graphics on them have been lost. Let's say that we realized later that we didn't want these to be single pages after all. We could turn them back in to a spread again by using the Change to spread… command again and the pages will be combined.
There may be times when you will need to add page numbers, story names, or chapter information to the margins of your comic pages. This might be for publishing purposes or submission to a publisher. Whatever the reason may be, no need to put in that information by hand on each page, because Manga Studio can do it for you.
Go to the Settings of story information… option under the Story menu and click on it. This will bring up a dialog box that you can fill in with any story information that you need or want displayed on your pages.
Let's fill this in so you can see how it works. For the Story name field, let's put in Mastering Manga Studio. If you want to put in a number of stories, you can check the next box and put in a number using the menu to the right of the textbox. Text entered in to the Subtitle box will show up with the Story name. Let's enter Chapter One as the subtitle. Put your name in the Author box.

The Page number option will toggle page numbers on and off. You can also choose where the number will be displayed and what the start number for the story will be. This is very handy if you're producing an ongoing comic and wish to keep track of total page count instead of having every file start over at page one.
The
Folio section of the Story information settings displays a page number just outside of the finished area, and inside of the bleed. The drop-down menu controls exactly where this is displayed, with options for the top and bottom of the page, and in the center, on the outside, or on the inside (which is the side of the page by the binding). If you want to add some other characters to the Page folio number, say on either side of the number, you can do so in the textboxes. Just to show how this works, let's put some ~ marks in either text box.
The Blind folio displays a page number in the inside of the page, near the binding.
Start number will change the starting number that is displayed, just like the Start number option in the Story Information section of this dialog box. Just below that are settings for the font and the size of the font, as well as the color. When you click on OK, something like the following screenshot should be displayed—it will differ according to what settings you have picked, but if you copied mine then it should look just like the following screenshot. Except with your name as the author, of course!

What if you accidentally set up your story file incorrectly and you set it for right binding instead of left? Not a problem because you can change it with the press of a button. One of the options in the Story menu is our Binding point/Start page option from the menu we created our file from in the beginning.
To change any of these settings, simply click on the radio button next to the correct option and click on OK.

Until now, we've been working with the Page Manager window open and set as a tab (where you can view all of your pages as thumbnails and rearrange them). If you don't like this setup, Manga Studio allows you to customize where the window will display.

First, open one or two of your current pages by double-clicking on them so they show up in their own tabs. Then close the Chapter One tab by clicking on the black dot to the right of the tab name. Now you should only have a tab or two with active pages in them.
You can tell that these are pages within a story file because in their tabs, they have their page number and the total page count. The currently showing page in my file is number 2 of 11 pages. Now navigate to Story | Page Manager Layout | Down. Once you have done that, select the Page Manager option under the Story menu.

In order to change the page manager window again, you must close the current one and then open it again with the new settings in place. Close the currently open window, switch the layout to Right, and then open the window again with the menu commands. Now the page thumbnails will show on the right side of the screen.
The last two menu items that we're going to talk about for this chapter are the Batch process and Batch export options. Learn how to use these and you're going to save yourself a ton of time on your story projects.
Let's take a look at Batch process first. Navigate to Story | Batch process and the dialog box will be opened. Batch process allows us to perform something from the main menu or the auto actions (which we will cover in more detail in Chapter 7, Ready! Set! Action!) on any, some, or all of your pages. So let's say that we've drawn all of our pages and now we're ready to export them so we can put them on our website. If we drew them at a dpi of 300 or more because we're planning to print later, then the first thing we'll need to do is change the resolution of each page to 72 dpi.

Using the arrows to the side of each menu option, you can expand and collapse each folder of operations. Under the Main menu, find and select Change image resolution. To the right of it, where we can pick what to execute, are several more settings. If we only wanted to apply this change to the currently highlighted page, we could choose that option. For right now we'll leave it as All pages, because we want all the pages in our story to have the resolution adjusted.
The second set of radio buttons is for what happens after the selected process is performed. The first option will close the opened page without saving (you will be prompted to save the page). The second will overwrite the existing file. The third will save the processed page with a different name and then close it.
The checkbox allows you to keep any opened pages open after the process has been completed.
Click on the OK button. A warning about the default border and crop marks being deleted may come up. Tell Manga Studio to proceed with the operation.
Now the program will open page 1 of our file and show the following window. Set Resolution to 72.


Now click on OK again. Because we left the Close without saving option in the Batch process window on, we will be asked if we want to save the current page before it's closed. Click on the Save button.
Now the program moves on to the next page. We can continue using the same settings that we used on page 1, or we can continue and see the setting dialog box again to select a different resolution setting. We can also skip the second page if we don't wish to process it at this time.
Checking the Not show this dialogue checkbox will finish the process without showing the previous box. If you chose to continue without seeing the setting dialog, then the process will continue, making each page into a 72 dpi file and then prompting if you'd like to save it or not.
Once that's complete, you can then batch export your files into a different format.
Navigate to Story | Batch export.

Use the Reference… button to browse to the folder where you want to store your exported images. Then select a file format from the drop-down menu. You can change the name of the files, and specify whether or not to export all the pages or just a range of pages. Click on OK. In the next window you will be asked to adjust your JPG settings. Set them how you like and then click on OK again.
Now if we go to the folder we specified in the Export folder box, we'll see that we have a JPG file for each of the 11 pages that we created in our story.

Now you know all that you need to about how to use the Story features of Manga Studio! You're ready to create your comics, sketchbooks, art books, or any other sort of books, because we have learnt about the following topics:
Creating a new story file
Making custom page templates and saving them
Reorganizing pages
Adding, deleting, importing, and duplicating pages
Editing story info and page numbers
Changing the layout of the Page Manager window
Batch processing and exporting
Now we're ready to get to some drawing. And to do that, we're going to want to know how to make our own tools to further customize Manga Studio and make it our own. That's just what we're going to be doing in the next chapter, so let's get to work!

