


 Download code from GitHub
Chapter 1: Installing Linux
The recent years have marked a significant rise in the adoption of Linux as the operating system of choice for both server and desktop computing platforms. From enterprise-grade servers and large-scale cloud infrastructures to individual workstations and small-factor home appliances, Linux has become an ever-present platform for a wide range of applications.
The prevalence of Linux, perhaps now more than ever, brings into the spotlight much-needed administration skills for a growing community of system administrators and developers. In this book, we take a practical approach to Linux administration essentials, with the modern-day system administrator, DevOps, or developer in mind.
In this first chapter, we'll guide you through the Linux installation process, either on physical hardware (bare metal) or using a Virtual Machine (VM). We'll take you further with a few case studies on choosing a Linux distribution based on functional requirements. Along the way, we introduce you to the Linux graphical user interface with some hands-on examples of configuring GNOME and KDE. Finally, we build a Linux workstation suitable for our daily computing needs.
Here are the topics we cover in this chapter:
- The Linux operating system
- Linux distributions
- Choosing the right Linux distribution
- Installing Linux - the basics
- The Windows Subsystem for Linux (WSL)
- Installing Linux graphical user interfaces
- Setting up and using the Linux workstation
Technical requirements
We will use the following platforms and technologies in this chapter:
- Linux distributions: Ubuntu Server, Ubuntu Desktop, CentOS
- Linux package managers: DEB, RPM
- VM hypervisors: Oracle VM VirtualBox, VMware Workstation
- VM host platforms: Windows, macOS X
- The Bash Command-Line Interface (CLI)
- GitHub (https://github.com/)
The Linux operating system
Linux is a relatively modern operating system created in 1991 by Linus Torvalds, a Finnish computer science student at the time, from Helsinki. Originally released as a free and open source platform prohibiting commercial redistribution, Linux eventually adopted the GNU General Public Licensing (GPL) model in 1992. This move played a significant role in its wide adoption by the developer community and commercial enterprises alike.
It is important to note that the Free Software Foundation community distinctly refers to Linux operating systems (or distributions) as GNU/Linux to emphasize the importance of GNU or free software.
Initially made for Intel x86 processor-based computer architectures, Linux has since been ported to a wide variety of platforms, becoming one of the most popular operating systems currently in use.
The genesis of Linux might be considered the open source alternative of its mighty predecessor, Unix. This system was a commercial-grade operating system developed at AT&T Bell Labs research center by Ken Thompson and Dennis Ritchie in 1969.
Linux distributions
A Linux operating system is typically referred to as a distribution. A Linux distribution, or distro, is the installation bundle (usually an ISO image) of an operating system that has a collection of tools, libraries, and additional software packages installed on top of the Linux kernel.
A kernel is the core interface between a computer's hardware and its processes, controlling the communication between the two and managing the underlying resources as efficiently as possible.
The software collection bundled with the Linux kernel usually consists of a bootloader, shell, package management system, graphical user interface, and various software utilities and applications.
The following diagram is a simplified illustration of a generic Linux distribution architecture:
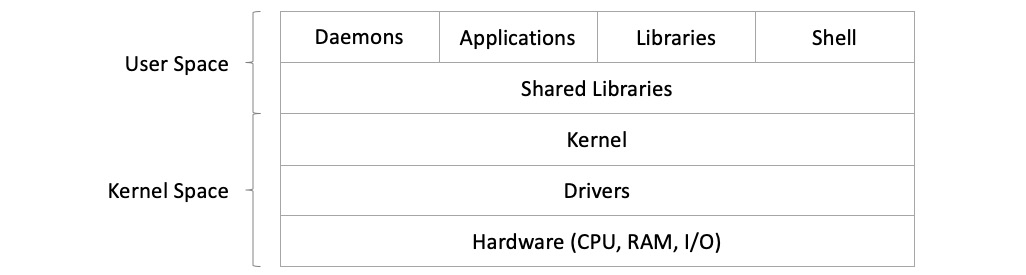
Figure 1.1 – Simplified view of a generic Linux architecture
There are hundreds of Linux distributions currently available. Among the most popular are Debian, Fedora, openSUSE, Arch Linux, and Slackware, with many other Linux distributions either based upon or derived from them. Some of these distros are divided into commercial and community-supported platforms.
One of the key differences between Linux distributions is the package management system they use and the related Linux package format. We'll get into more detail on this topic in later chapters. For now, the focus is on choosing the right Linux distribution based on our needs.
Choosing the right Linux distribution
There are many aspects involved in choosing a Linux distribution, based on various functional requirements. A comprehensive analysis would be far beyond the scope of this chapter. However, considering a few essential points may help with making the right decision:
- Platform: The choice between a server, a desktop, or an embedded platform is probably one of the top decisions in selecting a Linux distribution. Linux server platforms and embedded systems are usually configured with the core operating system services and essential components required for specific applications (such as networking, HTTP, FTP, SSH, and email), mainly for performance and optimization considerations. On the other hand, Linux desktop workstations are loaded (or pre-loaded) with a relatively large number of software packages, including a graphical user interface for a more user-friendly experience. Some Linux distributions come with server and desktop flavors (such as Ubuntu, Fedora, and openSUSE), but most distros have a minimal operating system, with further configuration needed (such as CentOS, and Debian). Usually, such distributions would be good candidates for Linux server platforms. There are also Linux distributions specifically designed for desktop use, such as elementary OS, Pop!_OS, or Deepin. For embedded systems, we have highly optimized Linux distros, such as Raspbian and OpenWRT, to accommodate small-form factor devices with limited hardware resources.
- Infrastructure: Today, we see a vast array of application and server platform deployments, ranging from hardware and local (on-premises) data centers to hypervisors, containers, and cloud infrastructures. Weighing a Linux distribution against any of these types of deployments should take into consideration the resources and costs involved. For example, a multi-CPU, large-memory, and generally high-footprint Linux instance may cost more to run in the cloud or a Virtual Private Server (VPS) hosting infrastructure. Lightweight Linux distributions take fewer resources and are easier to scale in environments with containerized workloads and services (for instance, with Kubernetes and Docker). Most Linux distributions now have their cloud images available for all major public cloud providers (for instance, Amazon AWS, Microsoft Azure, and Google Compute Engine). Docker container images for various Linux distributions are available for download on Docker Hub (https://hub.docker.com). Some Docker images are larger (heavier) than others. For example, the Ubuntu Server Docker image outweighs the Alpine Linux Docker image considerably, and this may tip the balance when choosing one distribution over the other. Also, to address the relatively new shift to containerized workflows and services, some Linux distributions offer a streamlined or more optimized version of their operating system to support the underlying application infrastructure. For example, Fedora features the Fedora CoreOS (for containerized workflows) and Fedora IoT (for Internet of Things ecosystems). CentOS has the Atomic project, as a lean CentOS for running Docker containers.
- Performance: Arguably, all Linux distributions can be tweaked to high-performance benchmarks in terms of CPU, GPU, memory, and storage. Performance should be regarded very closely with the platform and the application of choice. An email backend won't perform very well on a Raspberry Pi, while a media streaming server would do just fine (with some external storage attached). The configuration effort for tuning the performance should also be taken into consideration. CentOS, Debian, and Ubuntu all come with server and desktop versions reasonably optimized for their use. The server versions can be easily customized for a particular application or service by only limiting the software packages to those that are essential for the application. To further boost performance, some would go to the extent of recompiling a lightweight Linux distro (for instance, Gentoo) to benefit from compiler-level optimizations in the kernel for specific subsystems (for instance, the networking stack or user permissions). As with any other criteria, choosing a Linux distribution based on some application or platform performance is a balancing act, and most of the time, common Linux distros will perform exceptionally well.
- Security: When considering security, we have to keep in mind that a system is as secure as its weakest link. An insecure application or system component would put the entire system at risk. Therefore, the security of a Linux distribution should be scrutinized in close relation to the related application and platform environment. We can talk about desktop security for a Linux distro serving as a desktop workstation, for example, with the user browsing the internet, downloading media, installing various software packages, and running different applications. The safe handling of all these operations (against malware, viruses, and intrusions) would make for a good indicator of how secure a system can be. There are Linux distros that are highly specialized in application security and isolation, well suited for desktop use: Qubes OS, Kali Linux, Whonix, Tails, and Parrot Security OS. Some of these distributions are developed for penetration testing and security research.
On the other hand, we may consider the server security aspect of Linux server distributions. In this case, regular operating system updates with the latest repositories, packages, and components would go a long way to securing the system. Removing unused network-facing services and configuring stricter firewall rules are further steps of reducing the possible attack surface. Most Linux distributions are well equipped with the required tools and services to accommodate the preceding. Opting for a distro with frequent and stable upgrades or release cycles is generally the first prerequisite for a secure platform (for instance, Centos, RHEL, Ubuntu LTS, or SUSE Enterprise Linux).
- Reliability: Linux distributions with aggressive release cycles and a relatively large amount of new code added in each release are usually less stable. For such distros, it's essential to choose a stable version. Fedora, for example, has rapid releases, being one of the fastest progressing Linux platforms. Yet, we should not heed myths claiming that Fedora or other similar fast-evolving Linux distros are less reliable. Don't forget, one of the most reliable Linux distributions out there, Red Hat Enterprise Linux (RHEL), is derived from Fedora.
There's no magic formula for choosing a Linux distribution. In most cases, the choice of platform (server or desktop) combined with a couple of the data points mentioned previously and some personal preferences would decide a Linux distribution. With production-grade environments, most of the previously enumerated criteria become critical, and the available options for our Linux platform of choice would be reduced to a few industry-proven solutions. In the following section, we enumerate some of the most popular Linux distributions.
Common Linux distributions
This section summarizes the most popular and common Linux distributions at the time of this writing, with emphasis on their package manager. Most of these distros are free and open source platforms. Their commercial-grade variations, if any, are noted.
CentOS and RHEL
CentOS and its derivatives use RPM as their package manager. CentOS is based on the open source Fedora project. It is suited to both servers and workstations. RHEL is a commercial-grade version of CentOS, designed to be a stable platform with long-term support.
Debian
The package manager for Debian and most of its derivatives is Debian Package (DPKG). Debian is releasing at a much slower pace than other Linux distributions, such as Linux Mint or Ubuntu, for example, but it's relatively more stable.
Ubuntu
Ubuntu uses Advanced Package Tool (APT) and DKPG as package managers. Ubuntu is one of the most popular Linux distributions, releasing every 6 months, with more stable Long Term Support (LTS) releases every other year.
Linux Mint
Linux Mint uses APT as its package manager. Built on top of Ubuntu, Linux Mint is mostly suitable for desktop use, with a lower memory usage than Ubuntu (with the Cinnamon desktop environment, compared to Ubuntu's GNOME). There's also a version of Linux Mint built directly on top of Debian, called Linux Mint Debian Edition (LMDE).
openSUSE
openSUSE uses RPM, Yet another Setup Tool (YaST), and Zypper as package managers. openSUSE is a bleeding-edge Linux distribution, suited to both desktop and server environments. SUSE Linux Enterprise Server is the commercial-grade platform. openSUSE was regarded as one of the most user-friendly desktop Linux distributions before the days of Ubuntu.
Important note
In this book, our focus is mainly on two Linux distributions, widely used in both community and commercial deployments, Ubuntu and CentOS.
The following section presents some hands-on use cases, where, depending on specific functional requirements, we choose the right Linux distribution.
Linux distributions – a practical guide
The following use cases are inspired by real-world problems, taken mostly from the authors' own experience in the software engineering field. Each of these scenarios presents the challenge of choosing the right Linux distribution for the job.
Case study – development workstation
This case study is based on the following scenario made from the perspective of a software developer:
Functional requirements
The requirements suggest a relatively powerful day-to-day development platform, either as a PC/desktop or a laptop computer. The developer relies on local resources to deploy and test the code (for instance, Docker containers and VMs), perhaps frequently in an offline (airplane mode) environment if on the go.
System requirements
The system would be primarily using the Linux desktop environment and window manager, with frequent context switching between the Integrated Development Environment (IDE) and terminal windows. The required software packages for the IDE, Docker, hypervisor (VirtualBox), and tools should be readily available from open source or commercial vendors, ideally always being up to date and requiring minimal installation and customization effort.
Linux distribution
The choice here would be the Ubuntu Desktop Long Term Support (LTS) platform. Ubuntu LTS is relatively stable, runs on virtually any hardware platform, and it's mostly up to date with hardware drivers. Software packages for the required applications and tools are generally available and stable, with frequent updates. Ubuntu LTS is an enterprise-grade, cost-effective, and secure operating system suitable for organizations and home users alike.
Case study – secure web server
This case study is based on the following scenario made from the perspective of a DevOps engineer:
Functional requirements
When it comes to open source, secure, and enterprise-grade web servers, the top choices are usually NGINX, Apache HTTP Server, Node.js, Apache Tomcat, and Lighttpd. Without going into the details of choosing one web server over another, let's just assume we pick Apache HTTP Server. It has state-of-the-art SSL/TLS support, excellent performance, and is relatively easy to configure.
We deploy this web server in VPS environments, in local (on-premises) data centers, or the public cloud. The deployment form factor is either a VM or a Docker container. We are looking for a relatively low-footprint, enterprise-grade Linux platform.
Linux distribution
Our choice is CentOS. Most of the time, CentOS and Apache HTTP Server are a perfect match. CentOS is relatively lightweight, coming only with barebone server components and an operating system networking stack. It is widely available as a VPS deployment template in private and public cloud vendors. There is also CentOS Atomic Host, a Linux distribution designed to run Docker containers. Our Apache HTTP Server can run as a Docker container on top of CentOS Atomic, as we may horizontally scale to multiple web server instances.
Use case – personal blog
This case study is based on the following scenario made from the perspective of a software engineer and blogger:
Functional requirements
We are looking for a self-managed publicly hosted VPS solution. The related hosting cost is a sensitive matter. Also, the maintenance of the required software packages should be relatively easy. We foresee frequent updates, including the Linux platform itself.
Linux distribution
Our pick is Ubuntu Server LTS. As previously highlighted, Ubuntu is a robust, secure, and enterprise-class Linux distribution. The platform maintenance and administration efforts are not demanding. The required software packages – Node.js, Ghost, and MySQL – are easily available and are well maintained. Ubuntu Server has a relatively small footprint. We can run our required software stack for blogging well within the Ubuntu system requirements so that the hosting costs would be reasonable.
Use case – media server
This case study is based on the following scenario made from the perspective of a home theater aficionado:
Functional requirements
The critical system requirements of a media server are speed (for a high-quality and smooth streaming experience), security, and stability. The related software packages and streaming codecs are subject to frequent updates, so platform maintenance tasks and upgrades are quite frequent. The platform is hosted locally, on a PC desktop system, with plenty of memory and computing power in general. The media is being streamed from the NAS, over the in-house Local Area Network (LAN), where the content is available via a Network File System (NFS) share.
Linux distribution
Both Debian and Ubuntu would be excellent choices for a good media server platform. Debian's stable release is regarded as rock solid and very reliable by the Linux community, although it's somewhat outdated. Both feature advanced networking and security, but what may come as a decisive factor in choosing between the two is that Plex Media Server has an ARM-compatible package for Debian. The media server package for Ubuntu is only available for Intel/AMD platforms. If we owned a small-factor, ARM processor-based appliance, Debian would be our choice. Otherwise, Ubuntu LTS would serve our purpose just as well.
Installing Linux – the basics
This section serves as a quick guide for the basic installation of an arbitrary Linux distribution. For hands-on examples and specific guidelines, we use Ubuntu and CentOS. We also take a brief look at different environments hosting a Linux installation. There is an emerging trend of hybrid cloud infrastructures, with a mix of on-premises data center and public cloud deployments, where a Linux host can either be a bare-metal system, a hypervisor, a VM, or a Docker container.
In most of these cases, the same principles apply when performing a Linux installation. For Docker containerized Linux deployments, we reserve a separate chapter.
How to install Linux
Here are the essential steps usually required for a Linux installation.
Step 1 – download
We start by downloading our Linux distribution of choice. Most distributions are typically available in ISO format on the distribution's website. For example, we can download Ubuntu Desktop at https://ubuntu.com/download/desktop, or CentOS at https://www.centos.org/download/.
Using the ISO image, we can create the bootable media required for the Linux installation. We can also use the ISO image to install Linux in a VM (see the Linux in a VM section).
Step 2 – create a bootable media
If we install Linux on a PC desktop or workstation (bare-metal) system, the bootable Linux media is generally a CD/DVD or a USB device. With a DVD writeable optical drive at hand, we can simply burn a DVD with our Linux distribution ISO. But, as modern-day computers, especially laptops, rarely come equipped with a CD or a DVD unit of any kind, the more common choice for a bootable media is a USB drive.
There's also a third possibility of using a so-called PXE boot server. PXE (pronounced pixie) stands for Preboot eXecution Environment, which is a client-server environment where a PXE-enabled client (PC/BIOS) loads and boots a software package over a local or wide area network from a PXE-enabled server. PXE eliminates the need for physical boot devices (CD/DVD, USB) and reduces the installation overhead, especially for a large number of clients and operating systems. Probing the depths of PXE internals is beyond the scope of this chapter. A good starting point to learn more about PXE is https://en.wikipedia.org/wiki/Preboot_Execution_Environment.
A relatively straightforward way to produce a bootable USB drive with a Linux distribution of our choice is to use the open source tool UNetbootin (https://unetbootin.github.io). UNetbootin is a cross-platform utility, running on Windows, Linux, and macOS:
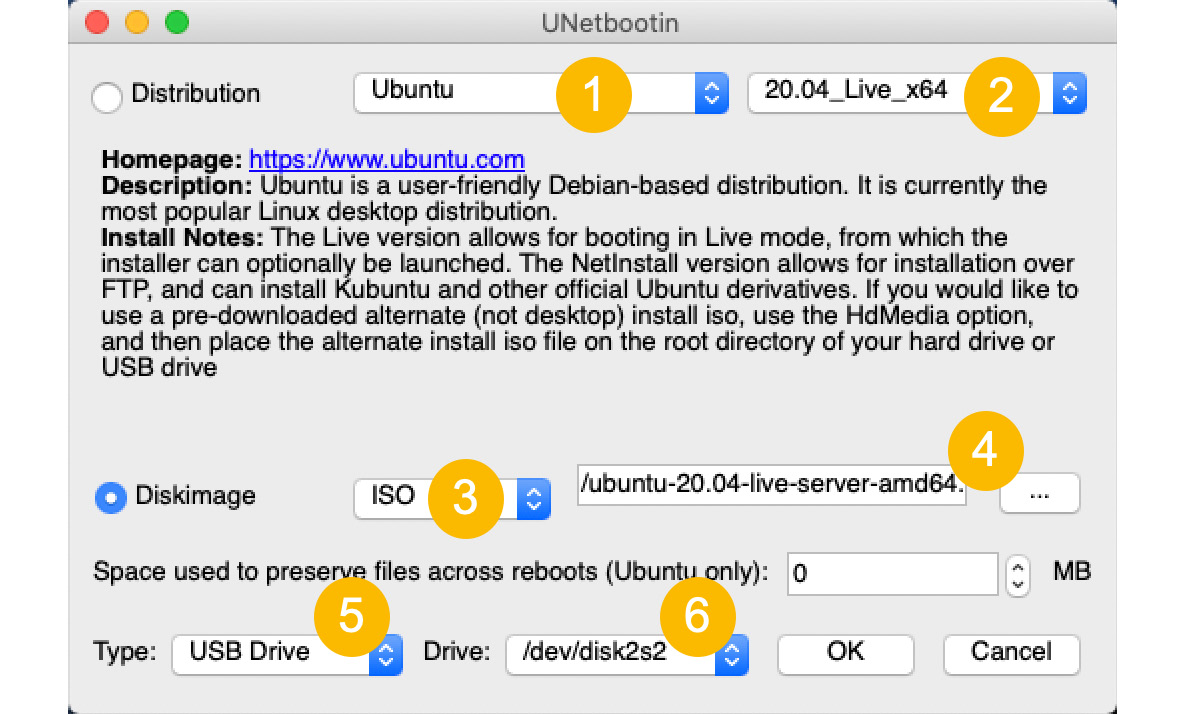
Figure 1.2 – Creating a bootable USB drive with UNetbootin
Here are the steps for creating a bootable USB drive with Ubuntu Desktop using UNetbootin. We assume the Ubuntu Desktop ISO image has been downloaded and UNetbootin is installed (in our case on macOS):
- Choose our Linux distribution (
Ubuntu). - Specify the version of our Linux distribution (
20.04). - Select the disk image type that matches our download (
ISO). - Browse to the location of our downloaded ISO image (
ubuntu-20.04-live-server-amd64.iso). - Specify the media format of our bootable drive (
USB). - Choose the filesystem mount of our USB drive (
/dev/disk2s2)
Now, let's look at how we can take the bootable media for a spin.
Step 3 – try it out in live mode
This step is optional.
Most Linux distributions have their ISO image available for download as live media. Once we have the bootable media created with our Linux distribution of choice, we can run a live environment of our Linux platform without actually installing it. In other words, we can evaluate and test the Linux distribution before deciding whether we want to install it. The live Linux operating system is loaded in the system memory (RAM) of our PC, without using any disk storage. We should make sure the PC has enough RAM to accommodate the minimum required memory of our Linux distribution.
We can run Linux in live mode in either of the following ways:
- Booting a PC/Mac workstation from our bootable media
- Launching a VM created with our Linux distribution ISO
When booting the PC from a bootable media, we need to make sure the boot order in the BIOS is set to read our drive with the highest priority. On a Mac, we need to press the Option key immediately after the reboot start up chime and select our USB drive to boot from.
Upon reboot, the first splash screen of our Linux distribution should provide the option of running in live mode, as seen in the following illustration for Ubuntu Desktop (Try Ubuntu):
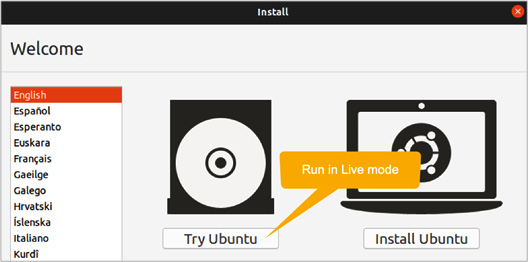
Figure 1.3 – Choosing live mode for Ubuntu
Next, let's take a look at the installation procedure of our Linux distro, using the bootable media.
Step 4 – perform the installation
We start the installation of our Linux distribution by booting the PC from the bootable media previously created. To ensure the system can boot from our drive (DVD or USB), we are sometimes required to change the boot order in the BIOS, especially if we boot from a USB drive. Most of the time, entering a system BIOS on a PC or laptop computer is done by pressing a Function key (or even the Delete key) immediately after powering on or restarting the machine. This key is usually mentioned at the bottom of the initial bootup screen.
In the following sections, we showcase the installation process of Ubuntu and CentOS using their ISO images. We choose the Desktop and Server versions for Ubuntu and highlight the main differences. CentOS comes in a single flavor, in essence, a server platform with an optional graphical user interface.
Linux in a VM
In each of the Linux installation sections, we also provide a brief guide on how to prepare a VM environment for the related Linux platform.
A VM is an isolated software abstraction of a physical machine. VMs are deployed on top of a hypervisor. A hypervisor provides the runtime provisioning and resource management of VMs. For the simple illustration of Linux VM installations, in this section, we limit ourselves to a couple of general-purpose hypervisors:
- Oracle VM VirtualBox (https://www.virtualbox.org)
- VMware Workstation (https://www.vmware.com/products/workstation-pro.html)
Both these hypervisors are cross-platform virtualization applications, and they run on Intel or AMD processor architectures on Windows, Linux, and macOS.
The difference between installing Linux on a VM compared to a physical machine is minor. The notable distinction is related to the VM sizing and configuration steps, making sure that the minimum system requirements of the Linux distribution are met.
Installing Ubuntu
In this section, we briefly illustrate the installation of Ubuntu Server LTS. If we plan to install Ubuntu in a VM, there are some preliminary steps required for provisioning the VM environment. Otherwise, we proceed directly to the Installation section.
VM provisioning
In the following steps, we will create a VM based on Ubuntu Server—using VMware Workstation on macOS:
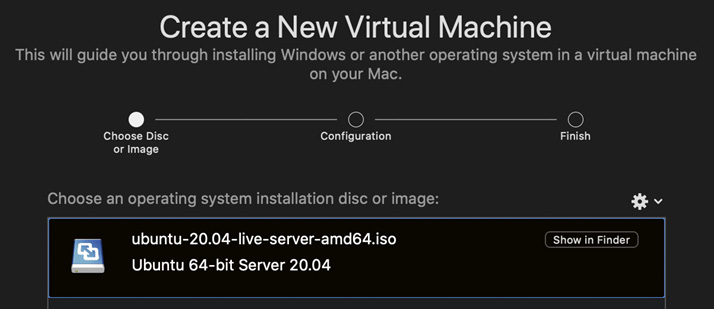
Figure 1.4 – Creating a new VM based on the Ubuntu ISO image
Let's look at the steps:
- We start by creating a new VM based on the Ubuntu Server ISO. For illustration purposes, we use VMware Workstation. Figure 1.4 shows the initial screen of creating a new VM for an Ubuntu Server instance.
- Following the VM deployment wizard, we get to the final step summarizing the VM provisioning information (Figure 1.5):

Figure 1.5 – Customizing the VM settings
- Sometimes the default VM sizing may have to be changed to accommodate the minimum system requirements of our Linux distribution. In our case, Ubuntu Server requires a minimum hard disk capacity of 25 GB. We can further customize the VM settings and increase the disk capacity, for example, to 30 GB (Figure 1.6):
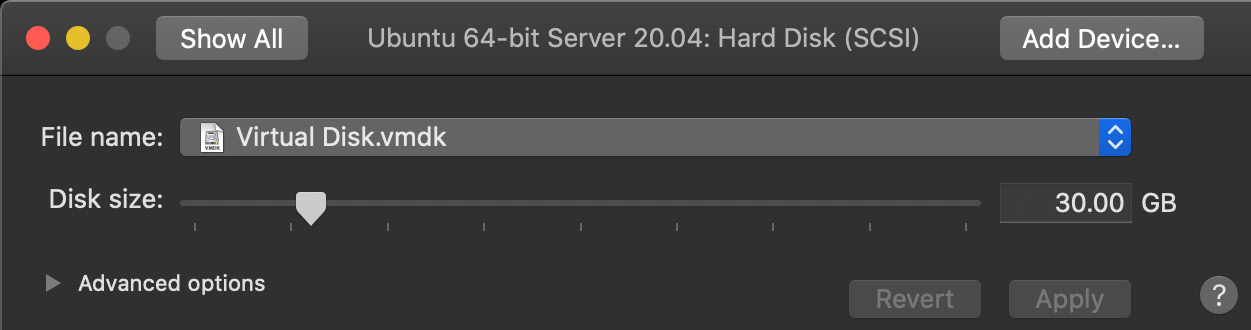
Figure 1.6 – Customizing the VM disk size
The remaining part of the Linux VM installation is identical to standard physical machine installation, shown in the following sections.
Installation
Here's the normal installation process for Ubuntu Server LTS, following the initial boot into setup mode:
- Make sure we choose Install Ubuntu in the initial setup screen (we assume that live mode has already been visited, according to Figure 1.3):
- The initial welcome screen prompts for the language of our choice (English), followed by the keyboard layout (English (US)):
- Next, we need to set up the server profile, which requires a display name (
Packt), a server name (neptune), a username (packt), and the password (Figure 1.7):
Figure 1.7 – Setting up the server profile
- The next screen is asking for the OpenSSH server package installation (Figure 1.8). OpenSSH enables secure remote access to our server. We choose to check (using [X]) the option for Install OpenSSH server. Optionally, we can import our existing SSH keys for passwordless authentication:

Figure 1.8 – Enabling the OpenSSH server
- An additional screen presents us with popular software packages (Snaps) that we may want to install (Figure 1.9). Among them, there are a few we'll be covering in later chapters (
microk8s,docker, andaws-cli):
Figure 1.9 – Enabling additional software packages
- If everything goes well, a few minutes later, we get the Installation complete! screen, prompting us to reboot.
After the system reboot, the login screen appears. We have completed the Ubuntu Server installation.
Next, let's take a look at a similar installation procedure, this time with the CentOS Linux distribution.
Installing CentOS
In this section, we briefly illustrate the installation of CentOS. If we plan to install CentOS in a VM, there are some preliminary steps required for provisioning the VM environment. Otherwise, we proceed directly with the Installation section.
VM provisioning
In the following steps, we show the setup of a CentOS VM using Oracle VM VirtualBox on macOS. The choice of VirtualBox over VMware Workstation (used in the previous section with Ubuntu Server) is simply for showcasing the use of an alternative hypervisor:
- The VirtualBox setup wizard guides us through the following configuration steps of our VM (we specify our choices as shown):
a) Hostname and operating system (jupiter, CentOS Red Hat, 64-bit)
b) Memory size (4 GB)
c) Hard disk size (30 GB)
d) Hard disk file type (VDI VirtualBox Disk Image)
e) Storage on the physical hard disk (dynamically allocated)
f) File location and size (path to .vdi file, 30 GB)
- After a few steps, we end up with a VirtualBox configuration window of our VM, similar to the following (Figure 1.10):

Figure 1.10 – VirtualBox VM configuration
- We can do further customization by choosing Settings in the VirtualBox Manager window of our VM. Next, we should point the IDE controller of our VM to the CentOS ISO image we want to install. We choose Settings | Storage | Optical Drive | IDE Secondary Master and click the disk icon. Here, we browse to the location of our CentOS image file. We want the VM to use the IDE Secondary Master ISO file, to boot from and install our operating system (Figure 1.11):
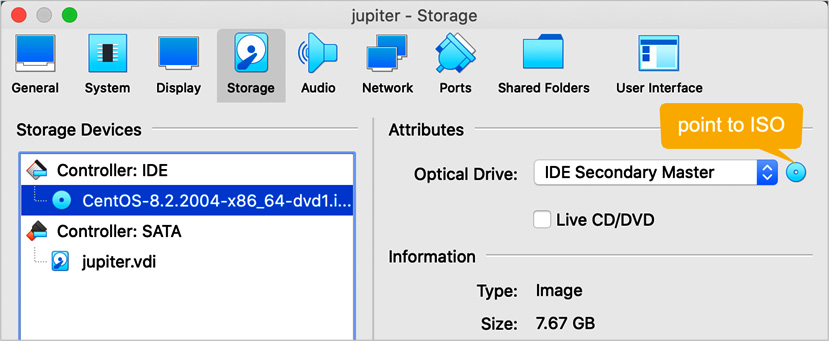
Figure 1.11 – Virtual Box VM storage settings
At this stage, starting the VM initiates the CentOS installation.
Installation
Here's the normal installation process for CentOS, following the initial boot into setup mode:
- First, we get the welcome screen with the choice of either installing or testing (in live mode) the CentOS Linux platform (Figure 1.12):

Figure 1.12 – The CentOS welcome screen
- In the next few steps of the installation process, we get to choose our options for the following:
a) Language support and localization (English, US)
b) Software selection (Server with GUI)
c) Device selection and storage configuration (Local media)
The following screenshot summarizes all this. The settings mostly reflect default values (Figure 1.13):

Figure 1.13 – The CentOS installation summary
- The final step of the CentOS installation is about configuring the local user accounts on our Linux platform (Figure 1.14):

Figure 1.14 – The CentOS user settings
- The user configuration screen prompts for a root password and a new user account. In our case, we create a user account (packt) with administrator privileges. This account has full administrative privileges over the system, yet it doesn't have root access. In later chapters, we'll show how to give superuser (sudo) privileges to our administrator account (Figure 1.15):

Figure 1.15 – Rebooting CentOS after installation
- Upon finishing the user configuration, we reboot the system, and this takes us to the CentOS login screen. We have completed the CentOS installation. We may have to remove the installation media or unmount the IDE interface on the VM before the reboot, to avoid circling back into setup mode again.
So far, we have learned how to perform a basic installation for two of the most common Linux distributions, Ubuntu and CentOS. Along the way, we created a bootable USB flash drive for our installation media, most commonly used for Linux PC platform installations. For both Linux distros, we briefly covered VM-specific Linux environments using the VMware Workstation and Oracle VM VirtualBox hypervisors.
In the following section, we'll learn how to install and run a Linux distribution on a Windows platform without the use of a standalone hypervisor.
The Windows Subsystem for Linux (WSL)
Software developers and system administrators often face a tough decision in choosing the appropriate hardware and operating system platform for the specific requirements of their work or environment. In the past, Windows professionals were frequently reminded that some standard development tools, frameworks, or server components were available at large on Linux or macOS platforms, while lacking native support on Windows. Windows Subsystem for Linux (WSL) attempts to close this gap.
WSL is a Windows 10 platform feature that provides a native GNU/Linux runtime along with the Windows desktop environment. WSL enables the seamless deployment and integration of select Linux distributions on top of the Windows kernel, without the need for a dedicated hypervisor. With WSL enabled, you can easily install and run Linux as a native Windows application.
Important note
Without WSL, we could only deploy and run a Linux distribution on a Windows platform by using a standalone hypervisor, such as Hyper-V, Oracle VM VirtualBox, or VMware Workstation. WSL eliminates the need for a dedicated hypervisor. At the time of writing, WSL is a Windows kernel extension with a hypervisor embedded.
In this section, we provide the steps required to enable WSL and run an Ubuntu distribution on Windows. The following commands are executed on a Windows machine (or VM) in a PowerShell CLI with administrator privileges:
- First, we need to enable the Windows Subsystem for Linux optional feature in Windows:
dism.exe /online /enable-feature /featurename:Microsoft-Windows-Subsystem-Linux /all /norestart
We should get the result shown in Figure 1.16:

Figure 1.16 – Enabling the WSL optional feature
- Next, we want to make sure WSL 2 is supported on our Windows platform. We need Windows 10, version 2004, build 19041 or higher.
WSL 2 uses hypervisor technology. We need to enable the Virtual Machine Platform optional feature for Windows:
dism.exe /online /enable-feature /featurename:VirtualMachinePlatform /all /norestart
The result should be similar to Figure 1.17:

Figure 1.17 – Enabling the VM platform optional feature
- At this point, we need to restart our Windows machine to complete the WSL installation and upgrade to WSL 2.
Important note
The Windows restart may feature an Update and Restart option. We need to make sure that the system gets updated upon restart.
- After the restart, we need to set WSL 2 as our default version:
wsl --set-default-version 2
This command may yield the message shown in Figure 1.18:

Figure 1.18 – Further update needed for WSL 2
- Just follow the instructions in the link to circumvent the problem. After proceeding with these steps, we have to rerun the preceding command. If successful, the command output is similar to Figure 1.19:

Figure 1.19 – Setting the default version to WSL 2
- With WSL 2 active, we are ready to install our Linux distribution of choice. Open the Microsoft Store and simply search for
Linux(Figure 1.20):
Figure 1.20 – Searching for Linux distro apps in the Microsoft Store
- We choose to install Ubuntu (Figure 1.21) and then follow the installation procedure driven by the Windows Store app. Ubuntu is installed just like any regular Windows application. When finished, we run Ubuntu by launching the application from the Windows Start menu:
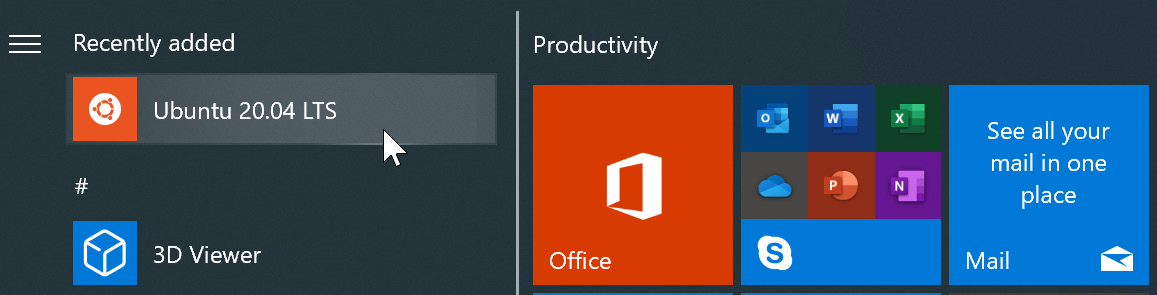
Figure 1.21 – Installing the Ubuntu app
After installation, Ubuntu runs as a traditional Windows desktop command-line application.
WSL enables a swift adoption of Linux for a growing number of Windows professionals. As shown in this section, WSL is relatively easy to configure, and with WSL, there's no need for a dedicated hypervisor to run a Linux instance.
Important note
WSL currently doesn't support a GUI-driven Linux runtime. With WSL, we are exclusively interacting via the CLI.
In the following section, we take a quick look at the Linux graphical user interface and two of the most prominent Linux desktop environments: GNOME and KDE.
Installing Linux graphical user interfaces
The Linux GUI is the desktop environment that allows users to interact with system-level components via windows, icons, menus, or other visual elements. For Linux users who look beyond the CLI, the choice of a Linux distribution may start with the desktop environment. Choosing a desktop environment is ultimately a matter of taste. And for some, the ultimate GUI represents the very extension of their eyes and hands at work.
Among the multitude of Linux desktop environments, there are two that stand out. Let's take a brief look at them.
GNOME
With its current GNOME 3 (or GNOME Shell) iteration, this GUI platform is one of the most common Linux desktop environments. Nowadays, almost every major Linux distribution comes with GNOME as the default GUI. The Linux open source community also created GNOME Extensions, which overcomes some of the infamous shortcomings of GNOME and extends the desktop functionality to suit a variety of needs. When it's not the default desktop environment (such as with Linux Mint's Cinnamon desktop), GNOME can easily be installed and adapted.
At the time of writing, the latest distributions of Ubuntu (20.04 LTS) and CentOS (8) have GNOME as their default GUI.
Installing the GNOME desktop
Let's look at a real-world scenario requiring the installation of the latest GNOME desktop.
Ubuntu Server administrator:
Let's look at how to install it on Ubuntu:
- We start by making sure the current package lists and installed software packages are up to date. The following command updates the local package repository metadata for all configured sources:
sudo apt-get update -y
Now, we can upgrade with this:
sudo apt-get upgrade -y
- To browse all the available
ubuntu-desktoppackages, run this:apt-cache search ubuntu-desktop
- We choose to install the
ubuntu-desktoppackage (the first option in the preceding list):sudo apt-get install ubuntu-desktop -y
- The command will take a few minutes to complete. When done, we need to check the status of the GNOME Display Manager (GDM) service and make sure it shows an
active (running)status:systemctl status gdm
The expected response should be similar to Figure 1.22:
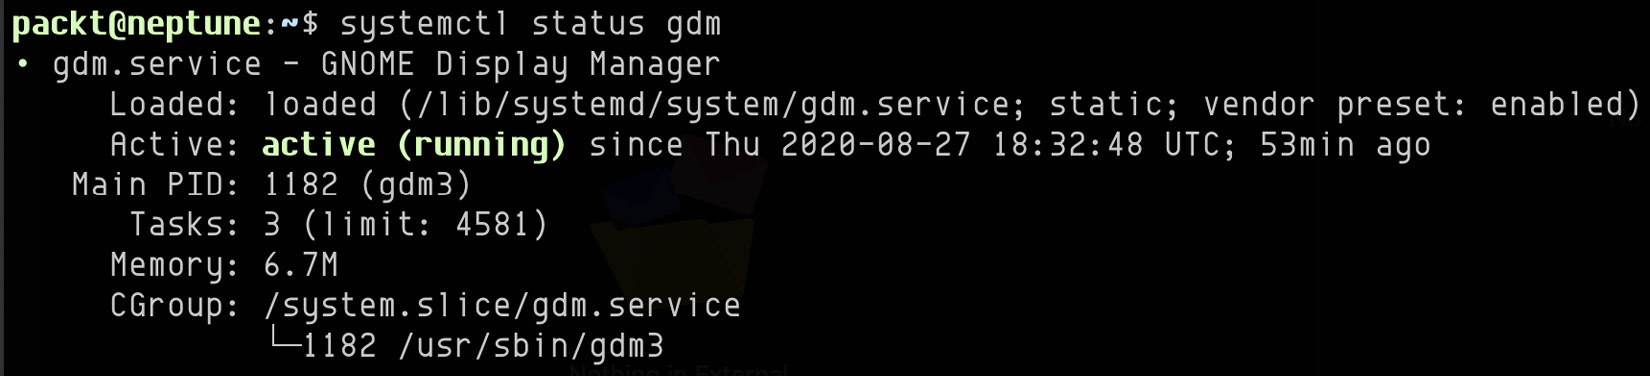
Figure 1.22 – Checking the status of GDM
The GNOME 3 desktop is now installed and active on Ubuntu Server (Figure 1.23):

Figure 1.23 – The Ubuntu GNOME desktop login screen
Next, let's take a look at the KDE desktop and a similar case study of enabling it on a Linux server platform.
KDE
Linux administrators usually look for a desktop environment that is relatively easy to use, lightweight, and efficient. KDE combines all of these attributes into a reliable and speedy desktop interface. Users familiar with Windows (up to version 7) would feel very much at home with KDE.
KDE has become a very robust desktop environment over the last few iterations, and versions of KDE have been released for almost every major Linux distribution.
If there's one ideal desktop for Linux administrators, KDE comes very close.
Installing the KDE desktop
In this section, we take a fresh CentOS 8 installation with the default GNOME desktop enabled and replace it with KDE.
CentOS 8 administrator:
When we click the cogwheel in the CentOS 8 login screen, we get a list of the currently installed display servers. The default is Standard, a GNOME implementation of the Wayland compositor protocol for Linux desktop management. Wayland also has a KDE implementation in its latest KDE Plasma iteration at the time of writing (Figure 1.24):

Figure 1.24 – The default CentOS 8 GNOME login screen
Let's add the KDE Plasma desktop to our CentOS 8 server:
- We log in to the CentOS 8 GUI and open the terminal, as suggested in the following illustration (Figure 1.25). Alternatively, we can simply SSH into the CentOS 8 server and run the commands in a similar CLI:

Figure 1.25 – Opening the terminal in CentOS
- The following commands have to be executed either as root or by a user account with sudoer privileges. Let's add our administrator user account (
packt) to thesudoersgroup. We need to switch to root to run the required command:su
- We get prompted for the root password (specified during the CentOS installation). See the Installing CentOS section for the related information. To add our
packtuser to thesudoersgroup, run this:usermod -aG wheel packt
- When the command finishes, switch to our newly minted
sudoeraccount:su - packt
- Verify that our
packtaccount does indeed have sudoer privileges:sudo whoami
The command should prompt for the
packtuser password and then yieldroot. - Next, proceed with the installation of the EPEL configuration files, enabling the related repositories:
sudo rpm -Uvh https://dl.fedoraproject.org/pub/epel/epel-release-latest-8.noarch.rpm
- Follow that by enabling the CentOS
PowerToolsrepository (needed by KDE). We usednf(Dandified YUM), a package manager CLI for RPM-based Linux distributions:sudo dnf -y config-manager --enable PowerTools
- Finally, we install the KDE Plasma desktop package group. The next command downloads a relatively large number of files (approximately 400 MB), and it may take a while:
sudo dnf -y group install kde-desktop
When the
kde-desktopinstallation completes successfully, the output ends with aComplete!message prompt. - Now that the KDE Plasma desktop has been installed, we can either reload the GNOME Desktop Manager (
gdm) to account for the changes or simply reboot:sudo systemctl reload gdm
- If we have a CentOS 8 VM environment, a reboot is recommended:
reboot
We are now able to log in to CentOS 8 using the KDE Plasma desktop. Clicking the cogwheel in the login window, we can see the Plasma desktop available (Figure 1.26):

Figure 1.26 – Choosing the KDE Plasma desktop
- Once we're logged in, we can customize the KDE Plasma desktop to our preference (Figure 1.27):

Figure 1.27 – Customizing the KDE Plasma desktop
In this section, we briefly looked at the Linux GUI and showcased the installation of the GNOME and KDE desktop environments on Ubuntu Server and CentOS, respectively. Next, we provide a quick guide on setting up a Linux workstation with some insight into various software packages and applications that could benefit our everyday work.
Setting up and using the Linux workstation
In this section, we will learn how to set up and use a Linux platform as our primary workstation for day-to-day work. We choose the Ubuntu Desktop LTS distribution, but any other modern-day Linux distribution would fit the bill. We aim to showcase some basic user operations and workflows for building and using a general-purpose Linux desktop.
As we did in the previous sections about installing a Linux distribution, we start with a brief installation guide of Ubuntu Desktop LTS.
Installing Ubuntu Desktop
If we plan to install Ubuntu Desktop on a VM, there are some preliminary steps required for provisioning the VM environment. Otherwise, we proceed directly with the Installation section.
VM provisioning
The VM provisioning procedure is very similar to the procedure described in the Installing Ubuntu section, with Ubuntu Server LTS.
We have to pay attention to the minimum system requirements of our Linux distribution and size the VM accordingly. In our case, Ubuntu Desktop requires a dual-core CPU, at least 4 GB RAM, and a minimum hard disk capacity of 25 GB. Since we plan to install a handful of additional software packages, we set the hard disk capacity to 60 GB (at least).
Installation
Ubuntu Desktop installation is relatively straightforward and requires very few user actions:
- As with the most modern Linux distributions, the very first choice we get is between trying out Ubuntu in live mode or simply proceeding with the installation. The related screen is similar to Figure 1.3.
- Beyond the welcome screen, there are a few more steps with the following configuration settings:
a) Keyboard layout
b) Installation type (normal versus minimal)
c) Localization and time zone
d) User configuration (account credentials) (Figure 1.28):

Figure 1.28 – Setting up the hostname and user credentials
- Past this point, the installation files are unpackaged and copied, while we are briefly introduced to the most attractive features of the Ubuntu platform.
After the installation completes, the system reboot takes us to the Ubuntu Desktop login screen. At this point, we have completed the Ubuntu Desktop installation.
Default software packages
The default Ubuntu Desktop installation gets us a handful of software packages and productivity tools, enough for our general-purpose, day-to-day work. Here are just a few examples:
- Calculator: Arithmetic, scientific, and financial calculations.
- Calendar: Access and manage your calendars.
- Disks: Manage drives and media.
- Files: Access and organize files.
- Firefox: Web browser.
- Image Viewer: Browse and rotate images.
- LibreOffice: Productivity suite – Calc (spreadsheet), Draw (graphics), Impress (presentation), and Writer (word processor).
- Logs: System logs.
- Remmina: Remote desktop connection.
- Rhythmbox: Organize and play music.
- Screenshot: Capture and save images of the screen or individual windows.
- Settings: GNOME desktop configuration utility.
- Shotwell: Organize photos.
- Thunderbird Mail: Send and receive mail.
- To Do: Manage personal tasks.
- Videos: Play movies.
To view all currently installed applications, we click on the Ubuntu Software icon in the taskbar and then on the Installed tab. We could choose to remove (uninstall) any of these applications if we wanted to save disk space (Figure 1.29):
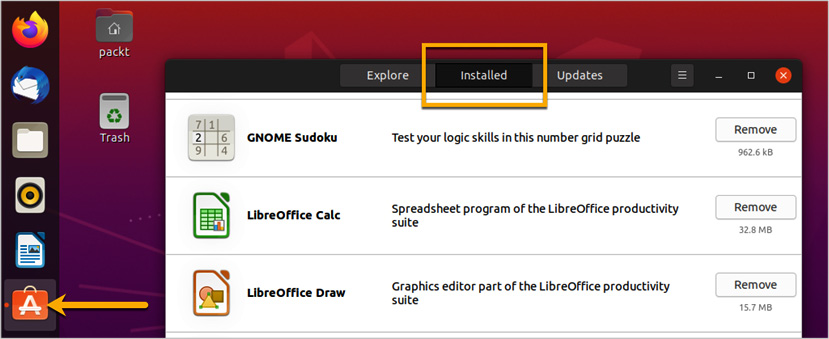
Figure 1.29 – Adding or removing Ubuntu applications
To browse or open any of these applications, click the grid icon (Show applications) at the bottom of the taskbar and then search for our application by beginning to type its name (Figure 1.30):
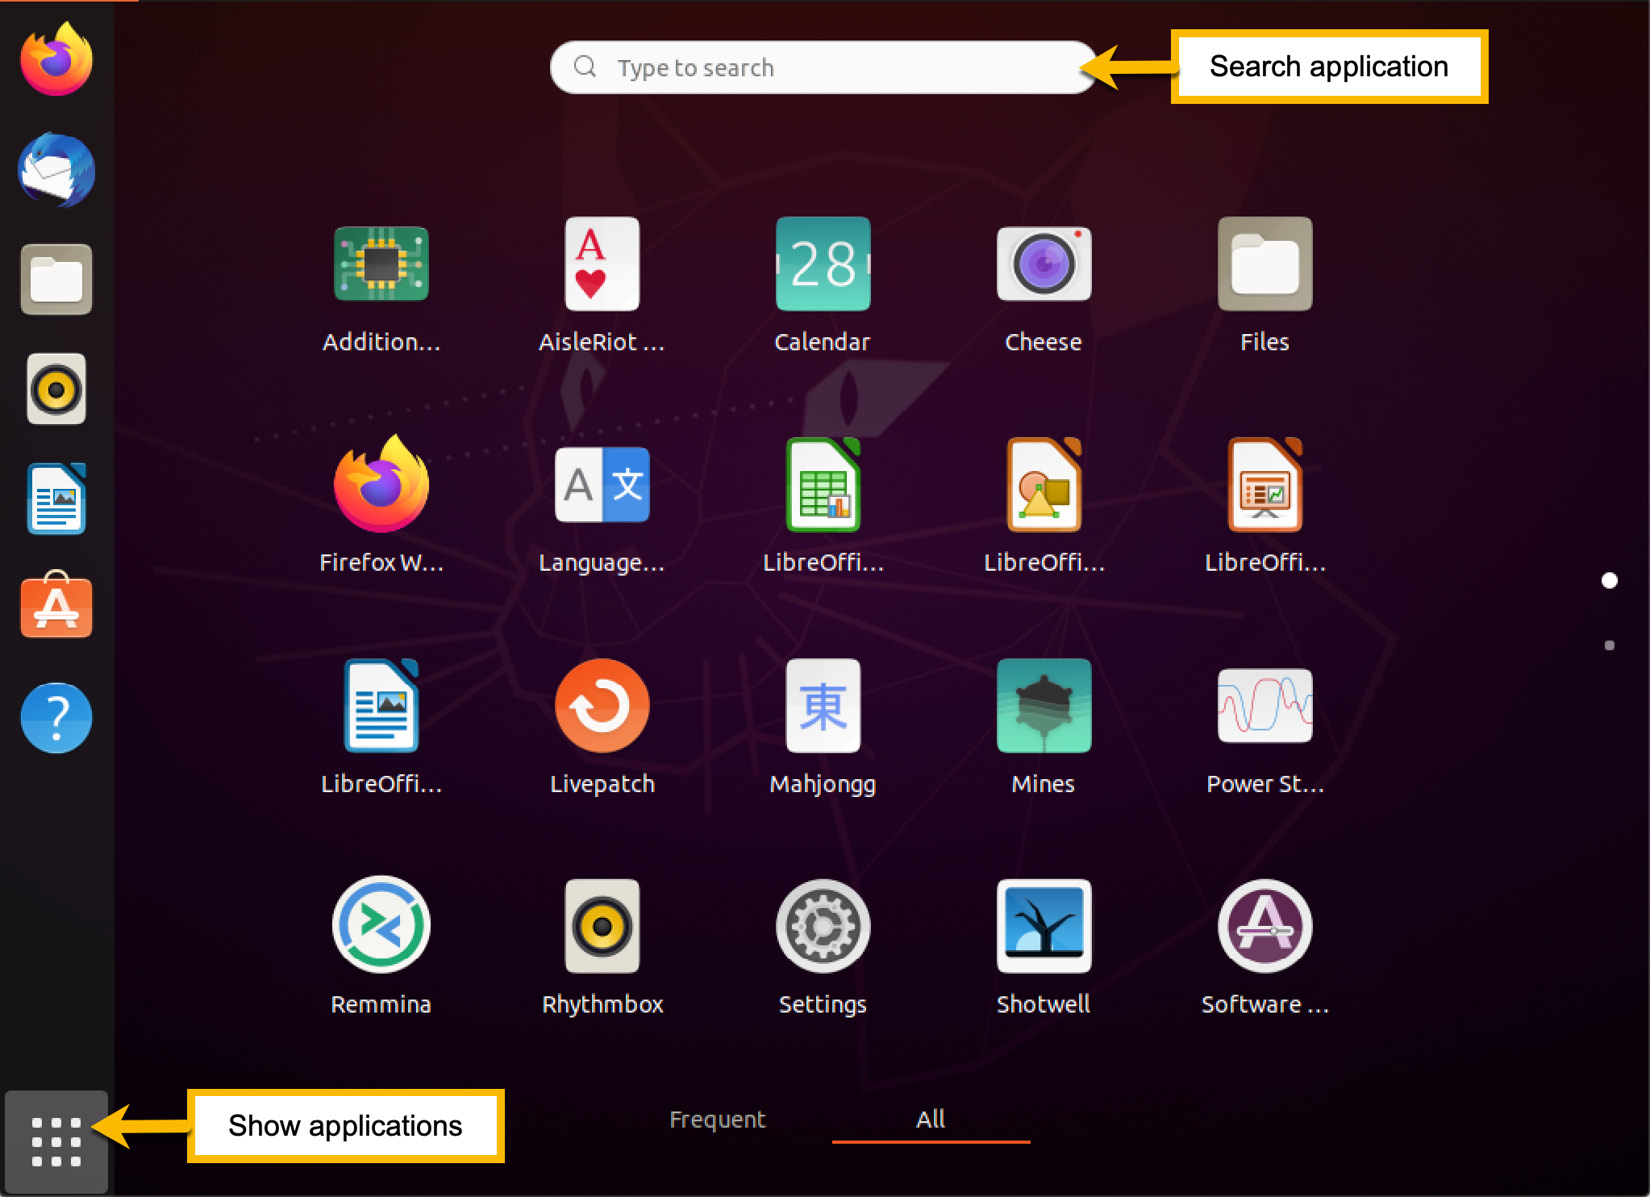
Figure 1.30 – Searching for installed applications
Next, let's take a look at how to install additional applications on our Ubuntu Linux workstation.
Additional software packages
A power user may need additional software, tools, or utilities beyond the ones provisioned with the default Ubuntu Desktop installation. To add new applications, we click on the Ubuntu Software icon in the taskbar, followed by Explore, and then on the search icon. In the example illustrated in the following figure, we look for Visual Studio Code, a powerful code editor.
In general, when we decide on a particular application we want to install, we select the application, and this opens up a window for installing the related Ubuntu software package. Once we have completed the installation, the application shows up in the Installed section, where we can later uninstall it, if we choose to do so (Figure 1.31):
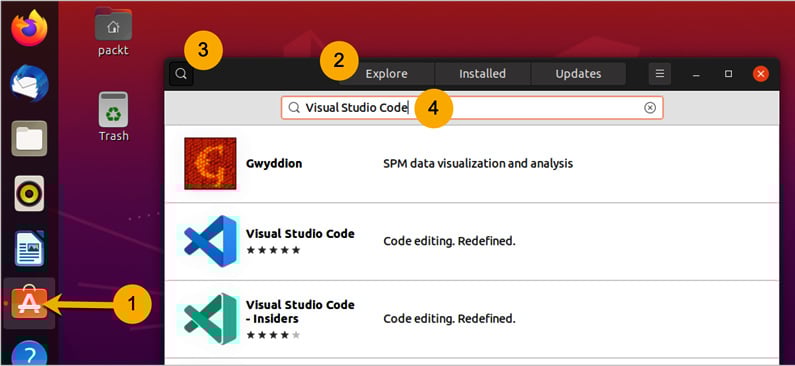
Figure 1.31 – Installing new applications
Different power users may look for a particular category of applications, tools, or utilities. Here are just a few of the most common types of productivity tools and applications used by the Linux user community. Some of them are readily available for download via the Ubuntu Software package management interface. Others can be downloaded from their related vendor websites.
Here are some commonly used applications for email and collaboration available for Ubuntu and other major Linux distributions:
- Hiri: Cross-platform email client, a real alternative to Microsoft Outlook.
- Thunderbird Mail: Send and receive emails (installed by default).
- Slack for Linux: Channel-based instant messaging platform.
- Teams for Linux: Instant messaging; unofficial Microsoft Teams client for Linux.
Image editing tools abound for Linux. Here are just a few:
- GIMP: Image manipulation program
- digiKam: Photo editing software
- KRITA: Free image editing and artistry
Most software development IDEs and tools are cross-platform these days. Ubuntu and many other Linux distros are not an exception in offering a vast array of such applications:
- Visual Studio Code: Code editing
- Sublime Text: Code editing, markup
- Atom: Highly customizable code editor
- Eclipse: Extensible tool platform and Java IDE
- IDEA Ultimate: Capable and ergonomic Java IDE for enterprise, web, and mobile development
- Terminator: Multiple terminals in one window
Virtualization and containerized workflows are in high demand now more than ever. All major hypervisors and container orchestration platforms are available for Linux as well:
- VirtualBox: VM manager by Oracle.
- VMware Workstation: VM manager by VMware.
- Docker Engine: Open source containerization platform.
- MicroK8s: Lightweight Kubernetes for workstations and appliances.
- Minikube: Run Kubernetes locally.
Small-factor Linux PCs and appliances are often the ideal platforms for media servers. These are the most common media server applications generally available for almost any Linux distribution:
In our highly collaborative world, screen capture and recording tools always come in handy. Here are just a few:
- Screenshot: Capture and save images of the screen or individual windows (installed by default).
- Kazam: Record a video or take a screenshot.
- OBS Studio: Live streaming and screen recording.
Some of these applications may require a CLI for installation. Other applications are available either as a software package installer in the Ubuntu Software management user interface or via the APT package manager CLI (apt-get).
As we have previously shown, installing an application via the Ubuntu Software management interface is straightforward. Next, we take a look at Ubuntu's APT package manager platform and CLI.
Managing software packages with APT
APT is the default package manager in Ubuntu, and it's a platform interface for installing and removing software packages. As a core system library of Ubuntu, APT is a collection of tools and CLI programs helping with package and repository management: apt, apt-cache, and apt-get.
Important note
APT and DPKG: In essence, APT is a shim (frontend) to DPKG – the package manager of Debian Linux distributions. The apt CLI invokes the dpkg CLI under the hood.
Let's look at a few examples of using the apt-get and dpkg CLI tools for installing and managing software packages.
Case study – installing Java (OpenJDK)
This scenario is from the perspective of a Java developer:
We assume an Ubuntu Desktop platform and OpenJDK version 14 for our case study.
Let's look at how to install OpenJDK (Java Development Kit):
- Before installing OpenJDK, let's make sure the current package lists and installed software packages are up to date. Start by updating the local package repository metadata for all configured sources:
sudo apt-get update -y
Next, proceed with the upgrade:
sudo apt-get upgrade -y
The preceding commands require superuser (sudo) privileges. We have to enter the password for our privileged (administrator) account. The
-yoption runs theapt-getcommand without requiring further user interaction. - Now, we are ready to install OpenJDK 14:
sudo apt-get install -y openjdk-14-jre-headless
- Let's make sure the OpenJDK environment is ready. Get the OpenJDK version:
java --version
This command should yield the following response for our freshly installed OpenJDK (Figure 1.32):

Figure 1.32 – Testing the OpenJDK installation
- We can verify the status of the OpenJDK installation with this:
dpkg --list openjdk-14-jre-headless
The preceding command yields a response similar to Figure 1.33:

Figure 1.33 – Querying the OpenJDK package using dpkg
Alternatively, we can use the
apt-cacheCLI to verify the status of the OpenJDK package:apt-cache policy openjdk-14-jre-headless
The output is similar to Figure 1.34:

Figure 1.34 – Querying the OpenJDK package using apt-cache
- To remove OpenJDK, run the following:
sudo apt-get remove openjdk-14-jre-headless
Or, you can use
dpkg:sudo dpkg --remove openjdk-14-jre-headless
To find out more about the dpkg CLI options, run dpkg --help. To get more information on the apt CLI tools, run man apt.
Case study – installing Plex Media Server
This scenario is from the perspective of a home theater enthusiast:
To install Plex Media Server (PMS) on Ubuntu, follow these steps:
- Make sure the current package lists and installed software packages are up to date. Start by updating the local package repository for all configured sources:
sudo apt-get update -y
Next, run the upgrade:
sudo apt-get upgrade -y
According to the vendor's website, there are specific prerequisites regarding enabling the related repository, which we don't detail here.
- The vendor also recommends the use of the
dpkgCLI for installing PMS; use the following command:sudo dpkg -i plexmediaserver_1.19.4.2935-79e214ead_amd64.deb
- We can verify the status of our
plexmediaserverinstallation with the following:dpkg --list plexmediaserver
The preceding command results in a response similar to Figure 1.35:

Figure 1.35 – Querying the PMS package using dpkg
- To remove the
plexmediaserverpackage, run this:sudo dpkg --remove plexmediaserver
To find out more about the dpkg CLI options, run dpkg --help.
Summary
In this chapter, we learned about Linux distributions, with a practical emphasis on choosing the right platform for our needs and performing the related installation procedures. Along the way, we showcased some hands-on, real-world scenarios that we thought are relevant for the topics covered, and to better capture the why or how of what we learned.
Throughout the chapter, the main emphasis has been on the Ubuntu and CentOS Linux distributions. In the spirit of the practical approach, we covered both physical and VM environments running Linux. We also took a short route through the Windows realm, where we touched upon WSL, a modern-day abstraction of Linux as a native Windows application.
We took the exercise of building a Linux workstation with some hands-on examples of how to customize the applications and tools we need for our everyday work.
With the skills learned in this chapter, we hope you'll have a better understanding of how to choose different flavors of Linux distros based on your needs. You've learned how to install and configure Linux on a variety of platforms: server, desktop, VM, and WSL. We also started exploring using the Linux command-line terminal for some of the tasks described in our case studies. You will use some of these skills throughout the rest of the book, but most importantly, you'll now be comfortable quickly deploying the Linux distribution of your choice and testing with it.
In today's increasingly rapid and agile development environments, Continuous Integration and Continuous Delivery (CI/CD) infrastructures make heavy use of Linux distros. Future chapters will introduce you to containerized workflows, and the knowledge gained in this chapter will help you with the design and deployment efforts of Linux containers.
Starting with the next chapter, we'll take a closer look at the various Linux subsystems, components, services, and applications. Chapter 2, The Linux Filesystem, will familiarize you with the Linux filesystem internals and related tools.
Questions
Here are a few questions and thought experiments that you may ponder, some based on the skills you have learned in this chapter, and others revealed in later parts of the book:
- My Linux workstation is running low on disk space. How do I uninstall or remove applications that I don't use anymore?
Hint: Software packages installed with GUI package management tools can be uninstalled from the same GUI (for instance, see Figure 1.36). Others can be removed using the package manager CLI tools (for instance,
apt,dpkg, andrpm). - If I had a relatively large number of Linux VM instances or distros deployed and running at the same time, how would I make it easier to manage them?
Hint: Use Vagrant, a tool for building and managing VM environments.
- How do I enable multiple GUI desktops (GNOME, KDE) for different users on the same Linux system?
Hint: In the Installing Linux graphical user interfaces section, we showcased the addition of KDE side by side with GNOME. Each user can log in with their GUI desktop of choice (see Figure 1.31).
- I'm looking for a robust email client and team collaboration solution for my Linux workstation.
Hint: The Additional software packages section may provide some guidance.
- Can I run multiple Linux instances in WSL?
Hint: Yes. Use
wsl --import. - How do I upgrade my Linux machine to a new version of the distro?
Hint: Create a bootable media of your new Linux distro and run the installer. Choose to upgrade when prompted. You may also use the command line. Check out the related CLI tools for your Linux distro (for instance,
do-release-upgradefor Ubuntu).