


Our journey begins with you, our hero, adventuring into the unknown in the hopes of starting and then finishing a role-playing game. We will discuss the history of role-playing games, the game features that we will develop throughout the book, and some considerations when evaluating the tools to help you develop your game. We will learn a brief history of game architecture, and how it relates to and differs from the architecture of LibGDX. Finally, we will look at the LibGDX project structure and run the default application so that we hit the ground running in the next chapter.
We will cover the following topics in this chapter:
Understanding the fundamentals of role-playing games
Technologies used when developing a role-playing game
Understanding the basics of a game architecture
Understanding the high-level component layout of LibGDX
Understanding the application lifecycle of LibGDX
Setting up your development environment
Understanding the build environment and project structure
Running the default demo project
A treatise on the history of role-playing games is beyond the scope of this book, but a short jaunt through the origins of role-playing games (RPGs) that led to the development of computer-based RPGs (CRPGs) over the years is necessary to fully explain the type of game that this book covers. This history is covered in much more detail in Neal Hallford's Swords & Circuitry: A Designer's Guide to Computer Role Playing Games.
In the early twentieth century, two unrelated parallel developments eventually converged into what we call RPGs today.
The first development was a set of simple rules written in 1913 by H.G. Wells in the form of a war game called Little Wars. This type of game overhauled complicated game systems at the time making this particular war game approachable by the masses. Little Wars included units such as infantry, cavalry, and even artillery that launched wooden projectiles. The rules included simplified mechanics for moving and firing within a set time.
The second development during this time was in the form of a series of novels, starting first with The Hobbit (1936) and continuing with The Lord of the Rings trilogy (1954) written by J. R. R. Tolkien. The influence of these classic books cannot be overstated as they established the "high fantasy" subgenre in literature, helping to propel fantasy as a distinct and commercial genre. These novels created a world with its own history, cultures, and traditions, at the center of which an epic battle between good and evil waged. Adventures across this world, Middle Earth, included elements of sacrifice and heroism, love and loss, beauty and terror.
Decades later, in the 1960s, Wells' Little Wars influence was still felt with ever-increasing complex wargaming experiences, including large-scale board games with hundreds of units. At this time, traditional wargaming revolved around real-world historical scenarios, but people started substituting the more traditional campaigns with recreations of the epic fictional battles from Tolkien's The Lord of the Rings novels. These players were without a system that defined rules for integrating magic or explaining the battle mechanics of flying dragons.
Chainmail was published in 1971 by Gary Gygax and Jeff Perren out of this need for a proper rule system for a fantasy-based wargaming experience. Chainmail had the first set of wargaming rules for magic spells and fantasy creatures. Years later, Gary Gygax and Dave Arneson collaborated and produced the first role-playing system, Dungeons & Dragons (D&D), published in 1974. From the late 1970s to early 1980s, the influence of Tolkien fiction and D&D seeped into the computer video game arena, and started the evolution of modern day CRPGs that began with the creation of text and graphic-based RPGs.
The first text-based adventure game was Colossal Cave Adventure (or Adventure for short) created by Will Crowther and Don Woods in 1976 with the first commercial release (renamed to The Original Adventure) in 1981. In Adventure, the player navigated an interactive story that included Tolkien-inspired monsters, mazes to explore, and puzzles to solve for treasure. The spirit of fantasy adventure in Adventure continued with Infocom's release of the Zork series as well as the catalyst for Roberta and Ken Williams in forming what would become Sierra Entertainment, and developing graphic adventure titles such as King's Quest, Space Quest, and Leisure Suit Larry.
The first graphic-based role-playing game, Akalabeth: World of Doom (Akalabeth) was created by Richard Garriott (known as Lord British) and published in 1980 with commercial success. The player assumed the role of the hero, traversing through dungeon labyrinths, collecting gold pieces, slaying monsters, and completing quests. The novel concepts at the time that set the standard for future CRPGs included first-person gameplay in dungeons, required food to survive, had a top-down overhead world view, and boasted procedurally generated dungeons.
Capitalizing on the success of Akalabeth, Garriott, after a year of development, published Ultima I: The First Age of Darkness (Ultima) in 1981. With the commercial success of Ultima, this game (and the series as a whole) became the defacto standard that defined graphic CRPGs for decades, with core features and gameplay found even in today's CRPGs. Aside from the features of its predecessor, such as dungeon crawling, turn-based combat, overhead world view, loot collection, and hunger management, Ultima also had new features including a character creation screen with point allocation for player statistics, and choice selections for race, class, and gender. Other features included proper leveling with experience points gained through combat, randomly appearing enemies, hit point regeneration, and a magic system managed with consumable one-time use items. Ultima even sported a first-person space shooter for part of the game!
Wizardry: Proving Grounds of the Mad Overlord (Wizardry) was another influential graphical CRPG published in 1981 and was developed by Andy Greenberg and Robert Woodhead. This dungeon crawler was the first party-oriented CRPG with up to six characters allowed for a party. Each character had three different alignments, four classes to choose from, and also an option for prestige classes that, after meeting certain requirements, would allow the character classes to be upgraded with hybrid abilities. An interesting feature was that upon a total party kill, the new party sent into the same dungeon could recover the bodies and belongings of the wiped party.
While the Ultima and Wizardry franchises satisfied the hunger of the home computer market in the United States, they also played a large part in the success of home console RPG development in Japan.
In 1986, Japanese company Enix published Dragon Quest (later renamed Dragon Warrior for the American audiences) as the first console-based RPG that in turn further fueled Japanese RPG (JRPG) development. Dragon Quest heavily drew on inspiration from Ultima and Wizardry, while at the same time making the game unique for Japanese audiences. Dragon Quest set the standard for the qualities that define a JRPG including greater emphasis on storytelling, emotional involvement of the player, and a streamlined interface. Dragon Quest was the game that set the bar for NPC interaction because a significant portion of time was spent gathering information for assorted places and events from the townspeople.
Inspired by Enix's commercially successful Dragon Quest, Final Fantasy received the green light at Square, and with a team lead by Hironobu Sakaguchi, it was published in 1987. Also heavily inspired by Ultima and Wizardry, Final Fantasy, which is one of the staples of JRPGs, became one of the most commercially successful JRPGs due to its mass appeal. The major features that set Final Fantasy apart from the rest include turn-based combat with characters engaged from a two-dimensional side view (up until that time, most combat featured a first-person perspective), and an epic story that spanned three continents.
The next evolutionary jump in the features for RPGS continued with the inclusion of three-dimensional environments, but for the purposes of this book, we will bring our adventure through the halls of computer role-playing history to an end. By understanding the historical precedent for CRPGs, you get a real perspective for the evolution of CRPGS and why certain design choices were made. Instead of working in a vacuum, we can learn from these genre-defining games, and begin to make more informed choices with regard to features instead of bolting on random elements.
In general, asking people to define what makes an RPG an RPG, will spark an endless debate without ever arriving at a satisfactory answer. For the sake of clarity, a role-playing game, at its core, can be defined as a system with rules where you primarily play a character in some setting with various goals depending on the story.
First, children's make believe, for instance, would be considered role playing, but without rules, it cannot be considered a role-playing game. Once rules are added though, we now have a system in place where people can role play, and this is considered a role-playing game, specifically live action role-playing (LARP).
The second example of a role-playing game is where players assume the roles of heroes playing out famous battles on a physical miniature battle field. This is considered tabletop role-playing, which is the natural extension of wargaming that began with Wells's Little Wars.
The third example of role-playing games would be the pen and paper systems that D&D started and set the ground work for Tolkien-inspired fantasy systems with magic and dragons.
Finally, the fourth example of role-playing games would be CRPGs that began their popularity with text-based versions such as Adventure, and their graphical counterparts, the Ultima and Wizardry series, with elements inspired from their pen and paper parents.
With these definitions properly framed, let's lay some ground work for the type of features that will define the core of a graphic CRPG. For the purposes of this book, I will outline the types of qualities and features that most people can agree make up an RPG, based on the precedent set from the most influential titles in the graphic CRPG realm. Most likely, there will be some features from your favorite games that will not be outlined in this book. This book is meant to give you a starting place to begin to build out your RPG title with a functional model demonstrating most standard features that have come to be expected in most RPGs.
In this book, we will be covering the following features:
Develop characters with statistical attributes. Since Ultima, players have come to expect some measurable ways to gauge their in-game character's progress. As the player overcomes challenges, there should be some mechanism in place for the player to augment their character, demonstrating mastery as they hone their skills. For simplicity, we will only have to select a few attributes, such as the strength attribute for determining weapon usage as well as attack damage bonuses, and intelligence for determining magic usage as well as spell damage bonuses. This attribute system will allow you to easily expand upon later. Other attributes will include hit-points (determines how much physical damage your character can take before dying), magic points (determines how much magic damage your character can inflict before running out), and experience points (at every level, there is a set amount of points your character needs to earn through combat and quests in order to progress to the next level).
Develop a leveling system where your character grows in power throughout the game, making earlier encounters much easier as the character levels up. This is an important distinction from more modern RPGs such as Oblivion (a leveling system where enemies level up and scale relative to your current level). For the purposes of this book, the leveling will be similar to a game such as Dragon Warrior where the character at level 10 will have no problem with a level 1 green slime.
Develop player movement, animation, physics, and collision detection. These are critical to the player's interaction with the game world via their game character. We will delve into the various libraries within LibGDX in order to create the best player experience.
Create interactive NPC characters with speech windows and immersion via dialog trees. This particular element will draw inspiration from Dragon Warrior for its interactions with townspeople, which plays a vital role in gathering information about different locations and quests.
Create interesting enemies with battle mechanics, spawn points, and AI pathfinding. An RPG experience would not be complete without rescuing a princess from the dark overlord, killing rats, or level grinding on wild pigs.
Interact with the world through travelling portals and transition between different areas in the map. As the player moves throughout our game world, they should seamlessly be able to travel from shop in the town, to the overworld map, and to a dark and dangerous cave.
Build inventory management systems for item pickup and equip. Resource management is an important component in any RPG, from collecting animal skins for the local shopkeeper, storing magic potions to replenish magic points, to collecting treasure after vanquishing an evil troll.
Develop save and load game profiles. Persistent profiles play an important role in allowing the player to experience the game at their convenience over the course of hundreds of potential quests.
Create scripted cutscenes to add an element of story and drama. This feature takes its inspiration from the Final Fantasy playbook in order to give the player an epic story that introduces them to the world of your imagination.
Develop a quest system to expand out the content of the game. This system will create goals for the player to accomplish for experience and gold, as they go out and explore the world.
Build inventory and heads up display (HUD) layouts with customizable skins and also build logic for updates to health and magic. Constructing this streamlined interface will give the player all the tools they need during gameplay in order to make the best decisions in and out of combat.
Create a shop store user interface (UI) with items and money transactions. The shop will demonstrate how to view, select, purchase, and sell items as part of the resource management part of the game using the in-game currency of gold coins.
Create special effects to give the game extra "juiciness" and polish, and help build atmosphere. These added effects will cover more advanced topics, but will add a nice polish to your final game.
Based upon the style of the RPG that this book is focused on, the following features will not be covered:
There will be no character creation screens beyond a character name and starting statistical attributes.
There will be no class selection screens.
The monster-leveling system in the game will be static in the sense that the monsters will not dynamically level and scale based upon the player's current level, but remain at their predetermined level from the outset.
There will be no party-based system for dealing with multiple characters or fighting multiple enemies.
There will be no multilinear game story with multiple endings. The game story will progress (with cutscenes) linearly as the player completes quests.
There will be no skill trees as we are not dealing with skills at all.
The combat will be turn-based, so there will be no real-time combat elements.
The worlds will be built with tile editors and set quests from the beginning, so there will be no procedural-based content generation for this RPG.
There will be no persistent online world with other players. This RPG will be a single player experience without networking support.
Understanding the different technologies available when creating a game can be frustrating, especially when you feel that committing to one set of tools is locking you into a solution. Sometimes, taking out the various engines or frameworks for a test drive leaves your hard drive littered with unfinished platformer game projects. Other times, when you search for help online, the only responses you get among the forums are the standard smug look at the source code answers. These experiences can be exhausting, especially without a plan. First, in order to properly evaluate any solution, we need to properly frame the project goals with certain, pointed questions.
One of the first questions you should ask yourself when evaluating a software solution for your game is one that gets overlooked: Are you interested in the final product (that is, a complete video game for a commercial release), or are you interested more in the implementation details of the game than the final end product?
If you are the latter, then you might consider developing a game engine in your favorite language to learn the core systems yourself, such as graphics, physics, artificial intelligence (AI), and file input and output (I/O). This book will not delve into the details of these different components. There are plenty of great books out there that will guide you through this process, such as Programming Game AI By Example by Mat Buckland and Game Engine Architecture by Jason Gregory.
If you are the former, then the rest of this section should help you make a better decision given the myriad software solutions available. On the one hand, the sheer amount of solutions for any aspiring indie developer or team opens many doors that were not available years before. On the other hand, it is very easy to get overwhelmed with all the options available.
The second question you should ask yourself is, based on the project scope and requirements, what are your target platforms? This question will drive not only the project schedule, but also have a huge impact on the programming language choice and in turn will determine the software solution for your game.
Years ago, this question used to be easy because there were only a limited amount of available systems with a high barrier of entry for all of them. Today, when creating a commercial game, there should at least be some consideration for all the available channels for distribution. This includes personal computers and laptops running Mac OSX or Windows, mobile devices that have most of the market share running iOS, Android, or Windows Phone, and even home console development including PS4 or Xbox One. Even with game frameworks and engines with cross-platform compilation, you will still need to factor testing for the various platforms into the schedule.
If you plan on adding a series of closed and open beta sessions to the project roadmap (a good idea to gauge the fun factor from user feedback as well as a first round of user bugs), there will be differences in how this process works across the various platforms and it needs to be accounted for in your plan. Once the details for target platforms have been ironed out, the choice of programming language should be much clearer. Hopefully, the language is one that you prefer, but if not, there needs to be additional time in the project schedule for training with the programming language.
The third question you should ask yourself after you have decided that you really want to develop a shippable commercial game, and decided on the target platforms, is whether you would prefer a game engine or a game framework for your solution? The primary motivation deals specifically with control and how this affects your workflow.
A game engine is typically a closed black-box solution (even though sometimes there are options for access to the source code) where you develop your game logic (in a language dictated by the engine) around the scaffolding of the engine, and in turn, the engine calls into your code during the game lifetime as the engine processes the main game loop.
A game framework, on the other hand, is a collection of libraries with exposed application program interfaces (APIs) into modules representing higher level abstractions of the core system components, such as graphics and file I/O. Developing with a game framework, in contrast to a game engine, gives control to you, as the owner of the main game loop, to call into the libraries as needed throughout your game lifetime. So, the question boils down to what kind of control you want for developing your game. The answer is not a straightforward one, but one that comes with tradeoffs for either solution.
The following table (Table 1) is just a small sampling of the solutions available today for game projects:
|
Name |
Engine/framework |
Primary target platforms |
Primary programming language |
|---|---|---|---|
|
Cocos2d |
Framework |
Windows, OS X, and Linux |
Objective-C |
|
LibGDX |
Framework |
Windows, OS X, Linux, iOS, Android, and HTML5 |
Java |
|
Source |
Engine |
Windows, OS X, Linux, iOS, Android, Xbox 360, and PlayStation 3 |
C++ |
|
Torque2D |
Engine |
Windows, OS X, Linux, iOS, Android, and HTML5 |
TorqueScript (proprietary scripting language with a C-like syntax) |
|
Unity |
Engine |
Windows, OS X, Linux, iOS, Android, Windows Phone, HTML5, Xbox, and PlayStation |
C# |
|
Unreal Engine |
Engine |
Windows, OS X, Linux, iOS, Android, Windows Phone, HTML5, Xbox, and PlayStation |
C++ |
Table 1
The fourth question you should ask yourself is: What is the actual budget for the development of my title? Table 1 is just a sampling of the options available for today's game development teams, and most of the options are very reasonably priced even for the indie developer bootstrapping their first commercial release (that is, free). There are much more exhaustive lists out there, but this should give you a feeling for the various programming languages, target platforms, and library support available.
With all the wonderful ideas and features for any commercial product, the Triple Constraint will rear its ugly head and quickly ground the project, demanding that you stay bound by time, cost, and quality. Any change to one attribute will affect the other two, constantly maintaining a balance for the project.
For example, if you sourced and received estimates for artwork at $5000, but you only budgeted say $100, this will significantly affect the quality (maybe you can just mash together some programmer stick figures) of the art, as well as time (even with stick figures, you will still need to draw them out, taking time away from development). Commercial titles, even with 2D pixel art, still need to be original and polished to really stand out. Stick figures might work as a gimmick to draw attention, but most audiences have more sophisticated expectations today, even with indie titles.
So, in summary, you really only have three courses when planning the budget:
Develop a game relatively quickly with great art and music, but at an expensive cost
Develop a game quickly with stick figures for art and recorded tracks of you singing, but live with the humiliation from friends and family
Design a fun game with unique and stylistic graphics and a haunting soundtrack with a team working for free, but know that this course of action will take a substantial amount of time
Answering these questions and evaluating the choices available should lead to a more straightforward and educated decision without getting lost in a sea of noise. Originally, I wanted to develop my own game engine from the ground up.
After asking myself the first question, I realized that for me, shipping a commercial game was more important than building a game engine from scratch. There are many mature game frameworks and engines available, and the curiosity of building something from scratch was simply outweighed by more battle-tested solutions supporting multiple target platforms, once I committed to a commercial project.
This leads into the next question about target platforms because I realized, once I started evaluating the different solutions, that the cross-platform ones would significantly reduce my time on the deployment end. The cross-platform solutions are nice because they abstract away platform specifics (and most of them optimize under the covers based on build target), freeing me up to develop my game for one platform without worrying about the scope of work involved in porting to the mobile platforms later.
The third question regarding the preference of a game engine or framework was a little clearer because I wanted control of the game loop. I didn't really want to deal with the training time or cost associated with the various engines, and I didn't want to deal with all the complexities that come with their specific ecosystems (or idiosyncrasies).
Finally, the fourth question regarding budget was straightforward because as an indie developer bootstrapping my way through this process, cost was a significant factor, as I had a specific budget for art, and not much more especially for game engine licensing or tool costs.
These decisions helped frame my choice to go with the LibGDX game framework for my commercial game project. LibGDX is developed with a heavy emphasis on performance, includes cross-platform support out of the box (Windows, OS X, Linux, iOS, Android, and HTML5), provides low-level bookkeeping APIs that free me up so that I focus on developing the gameplay, provides an engaged and responsive community (not one where the forums have tumbleweeds blowing through), has active maintenance (nightly builds instead of one zip from ten years ago), and is available for free without a prohibitive license.
With all the decisions that need to be made when first starting a commercial RPG game, this book aims to help you through the process by minimizing the constraints. First, the time constraint can be reduced with this book by guiding you through the process of creating an RPG from scratch using LibGDX.
By the end of this book, you will have a working base template that you can expand on and add content to in order to make the game uniquely yours with support for multiple target platforms. Also, time will be reduced during the development cycle by developing modular pieces, such as scripting support, which can easily offload the creation of dialogs, items, monsters, levels, and quests so that content can be created in parallel with development without affecting the build process.
Second, recommendations on great free offerings, such as LibGDX, will be made throughout this book keeping the overall project costs low. These recommendations can be used in the toolchain of your development environment to enable you to stay productive and give the biggest bang for your buck on the deployment end.
Third, quality can be maximized due to minimizing the time constraint and thereby allowing more time for collecting feedback on usability, beta testing, and overall quality assurance.
Hopefully, the case has been made for adding LibGDX to your commercial endeavor for your RPG game. We will now review some core features of LibGDX as we continue our adventure developing the RPG game.
In order to better understand the fundamentals of a typical game architecture at a high level, we can begin with a historical perspective with the first text-based adventure game Adventure.
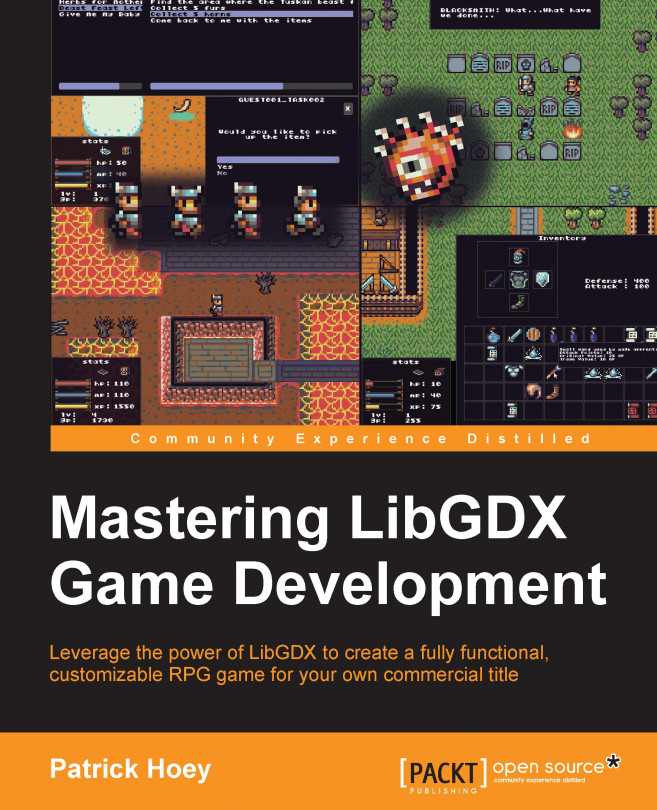
The following figure (Figure 1) describes the high-level game loop of Adventure type text-based games where the game would block all updates for its lifetime until it receives user-based text input on the command line:
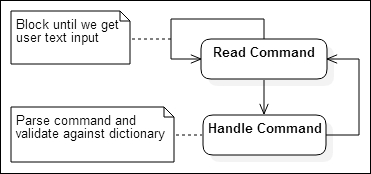
Figure 1
Once the text was read from the command line (carriage returns were typically an indication that the player was finished inputting text), the game would then parse the entire string, breaking up the sentence into its component parts. The most basic system would have a dictionary of actions, or verbs, that the player can do. Each of the words in the sentence would be compared against that player's action list. The same would be for objects, or nouns.
For example, if the player wanted to take the fresh water from a flask and pour it over the dirty floor, they would type in the following command:
> pour water
The game would process the user input string, break it up into word chunks, and compare against its verb and noun dictionaries (key-value mappings). We would end up with two lists. The action list would contain one valid action, POUR. The object list would contain one valid object, WATER.
POUR would be the primary action in this sentence with a rule similar to the following:
POUR [OBJECT 1] IS SUCCESSFUL
IF PLAYER HAS [OBJECT 1] IN INVENTORY
AND [OBJECT 1] IS POURABLE
There would also be some extra data regarding certain properties of objects in the game, such as whether an object is able to be carried in an inventory and whether it is pourable, wearable, or throwable. These could be in the form of a subset list of objects for each of the actions. For example, POUR would verify that WATER is in the list POURABLE, while something such as FOOD would not. These edge case checks with object attributes would prevent awkward word combinations as follows:
> pour food
Checking the words against action and object lists would also have the side-effect of throwing out extraneous words that make English sentences complete. For instance, in some text-based adventure games, the following two commands would work the same way:
> go into the building
> go building
This model is the basic concept behind a two-way communication subsystem that deals with NPC interaction, such as asking NPCs questions or viewing shop items. This will be discussed more in-depth when developing a dialog tree system.
The difficulty with a text-driven system is that because the syntax of the parser is so specific, and because of the complexities with equally valid variations of an English sentence, the player can lead down a rabbit hole of frustration, infamously referred to as guess-the-verb or guess-the-noun, where most of the player's time is spent trying to figure out why certain combinations of words do not work. One example of this problem is best demonstrated with a recent session I had with an online version of Adventure:
You are standing at the end of a road before a small brick
building. Around you is a forest. A small stream flows out
of the building and down a gully.

> look stream

I don't understand.
stream what?

> look at stream

I don't understand that!

> go into building

I don't understand that!

> go

Where?

> building

You are inside a building, a well house for a large spring.
There are some keys on the ground here.
There is a shiny brass lamp nearby.
There is tasty food here.
There is a bottle of water here.
Interestingly enough, when distilled down to its essence, this model is also how event-driven systems such as user interfaces work today.
The primary target platform for this book is Microsoft Windows, even though compiling for the other target platforms isn't much more effort. There are special considerations to keep in mind when running your game on mobile devices, such as graphic rendering performance, smaller screen real estate to work with for UIs, touch screen controls instead of using a keyboard and mouse, limited access and size constraints to external save game profiles, and smaller overall package size. Mobile device optimizations are topics that deserve their own chapters, but will be beyond the scope of this book.
The following figure (Figure 2) refers to an event loop, for instance, in how Windows processes its graphical user interface events. This figure can even be generalized across most platforms, including how Java processes its own event loop within the Java Virtual Machine (JVM):
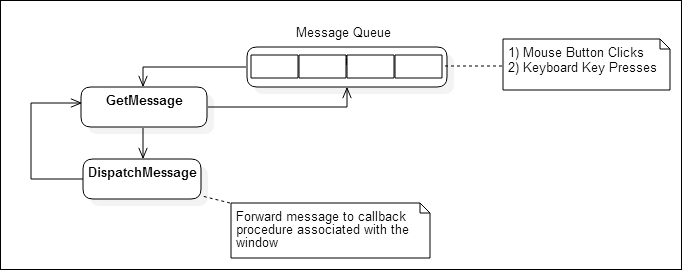
Figure 2
At a high level, a graphical user interface (GUI) application processes events from the event loop and only terminates when the application receives a quit message. The operating system (OS) will generate an event message based on such events as a mouse button click or keyboard key press and place the message in the message queue. The message queue is processed by the GUI application by processing the first element in the queue, on a first-in-first-out basis, with the newest event message at the end of the queue. The GUI application will then in turn check the message queue for a relevant message, process it if the event message is relevant to the window, and then dispatch the message. The message dispatch will forward the message to the registered callback procedure or message handler associated with that specific event. So, just like the loop for text-based adventure games we saw earlier, the event loop is really just a loop that runs indefinitely, responding to input type events.
The following figure (Figure 3) demonstrates at a high level how a graphics-based video game loop actually functions at its core:

Figure 3
Figure 3 demonstrates at a high level how a graphics-based video game loop actually functions at its core. As previously discussed, a text-based game loop and a GUI event loop share a common methodology of blocking, an interrupt-based approach used for waiting on user input. This model would not work for graphics-based games today because there is always something that needs to be updated every cycle in the loop even if the player is idle, such as AI (NPC movements), physics, or particle effects. Instead of waiting for user input, a game loop polls for events, processing all user input available at that time. Once processed, the loop will then step into the game objects that need to be updated based on the current state of the game world, such as enemies moving and resolving collisions. Once these updates are complete, the loop will then draw the graphics based on the update calculations done previously, rendering them to the screen (or back buffer) when ready to display. This loop then starts again for the next cycle in the game loop.
One cycle of the game loop, represented by Figure 3, is generally referred to as a frame. The logical question is how fast can we cycle through each frame in the game loop?
The term used to gauge how many cycles we can complete in a fixed amount of time, measured in frames per second (FPS), is called the frame rate. The more frames we are able to process per second, the better the perceived experience will be for the player. The game will feel more responsive, there will be better collision detection and enemy movement, and the graphics rendering will be much smoother. This is because we are polling user input, updating, and rendering much more frequently. The lower the frames per second, the more degraded the game experience will be for the player. The player movement will be jerky and not as responsive, there may be collisions that never get detected with objects appearing to go through each other, enemies may appear to teleport across the screen, and the graphics will appear to be very choppy. This is usually caused by polling much less frequently than what is needed. In modern games today, for example, a frame rate of 30 FPS is standard for a good gameplay experience.
There are two primary factors that affect the frame rate of a game:
The first factor is how fast the underlying target system can process each frame. This factor is influenced by the system's hardware such as the clock speed of the CPU, and whether there is a dedicated graphics processing unit (GPU) available to offload rendering. Another factor is the software of the target system, specifically how effective the OS is at parallelizing across multiple cores and how efficient the scheduler is.
The second factor is determined by how much logic there is to process every frame. Calculations for physics (used in collision detection or velocity updates) and rendering high-fidelity graphics for lots of game objects can affect the amount of work that needs to be accomplished every frame, leading to a frame taking longer to render. Therefore, fewer frames are completed every second.
Given the myriad platforms that the game can run on, these two factors will cause very different experiences based on the platform it's running on. On a mobile phone, the game may not have access to a dedicated GPU, and so the CPU becomes the bottleneck for calculating all the user input, physics, AI, and rendering causing the game to run at a low frame rate. On the flip side, if you have been developing your game on a mid-range system for the last two years, when you release your game, your game may run at a much higher frame rate on newer hardware than what you are accustomed to in your testing. This not only can cause bugs you didn't expect, but also high battery consumption on mobile devices and laptops or hot CPUs and GPUs.
The typical, brute force solution for dealing with these factors that affect the frame rate is to lock the frame rate so that the experience on the various platforms is a consistent one. This is not an optimal solution though, because if the refresh rate of the monitor is not synced with the locked frame rate, then you can get visual artifacts such as screen tearing. Screen tearing usually occurs because multiple frames get updated to the screen during draw calls before the monitor finishes its current refresh cycle.
LibGDX addresses the problem of varying frame rates depending on the device, by passing in a deltaTime value during each render call for a frame. This value represents the total time in seconds that the game took to render the last frame. By updating calculations using the deltaTime value, the gameplay elements should be synchronized running more consistently across the different devices, using this time-based approach instead of just locking the game to a specific frame rate.
We are now going to review the architecture behind LibGDX. As a quick note, the latest stable release of LibGDX that we are going to use throughout this book is version 1.5.5, which was built on 19 March, 2015.
The following figure (Figure 4) is a diagram illustrating the core interfaces of LibGDX. These are the highest level abstractions available that provide most of the functionality you will need when creating your game (including their associated module libraries):

Figure 4
These interfaces are implemented for each of the currently supported target platforms, allowing you to develop your game once, using these APIs and not having to worry about platform-specific issues. An overview of the functionality that each interface contains (once implemented for each supporting platform) is as follows:
Application.java: This interface becomes the entry point that the platform OS uses to load your game. Each implementation will be responsible for setting up a window, handling resize events, rendering to the surfaces, and managing the application during its lifetime. Specifically,Application.javawill provide the modules for dealing with graphics, audio, input and file I/O handling, as well as logging facilities, memory footprint information, and hooks for extension libraries.Graphics.java: This interface contains numerous helper methods for communicating with the platform's graphics processor, such as rendering to the screen and querying for available display modes such as graphics resolution and color depth. There are also convenience methods for generating pixmaps and textures. One interesting note is that for cross-platform support, the underlying graphics API (OpenGL ES 2.0 or OpenGL ES 3.0) is emulated for the desktop by mapping OpenGL ES functions to the desktop OpenGL functions.Audio.java: This interface contains numerous helper methods for creating and managing various audio resources. This interface helps to create sound effects, play music streams, and give direct access to the audio hardware for PCM audio input and output.Files.java: This interface contains numerous helper methods for accessing the platform's filesystem when managing game assets such as reading and writing files. This abstraction over the different types of file locations includes internal files (located in your game working directory) and external files (external storage such as an SD card).Input.java: This interface contains numerous helper methods to poll (or process events) for user input from not only standard input such as keyboard key presses and mouse button clicks, but also mobile device input such as touch screens and accelerometer updates. Other helper methods include handling vibrations, compass access, on-screen keyboard input, and cursor capture.Net.java: This interface contains numerous helper methods for performing certain network-related operations, such as managing HTTP/HTTPS GET and POST requests and creating TCP server/client socket connections.Preferences.java: This interface contains numerous helper methods for storing and accessing application game setting values as a lightweight setting storage mechanism.
The rest of the functionality that you will use for your game belongs to a host of core modules within the LibGDX framework:

Figure 5
The modules in the left column (audio, files, graphics, input, and net) in Figure 5 were already discussed previously in Figure 4. The other modules are as follows:
Maps: This module contains classes for dealing with different level map implementations, such as maps generated from Tiled (an XML-based format called TMX) and Tide. The convenience methods include handling the loading of the map and referenced assets, rendering the map, accessing properties, and selecting different layers.
Math: This module contains classes with convenient utility methods for dealing with various mathematical calculations such as trigonometry, linear algebra, and probability. These methods are also optimized to be fast. Other classes include geometric classes for dealing with shapes, areas, and volumes, collision detection tests such as intersection and overlap, and interpolation algorithms.
Assets: This module contains classes for managing the loading and storing of assets such as textures, bitmap fonts, particle effects, pixmaps, UI skins, tile maps, sounds, and music. These classes will also deal with different caching strategies to optimize the storage and use of your game assets.
Scenes: This module contains classes for building 2D scene graphs used in creating UIs such as game menus and HUD overlays. This module also provides classes for managing the laying out, drawing, and handling input for the different UIs.
Utils: This module is more of a catchall for various miscellaneous pieces of utility methods that don't quite fit anywhere else. This module supports reading and writing in XML and JSON (with serialization support), custom collections with primitive type support (which helps to avoid performance hits when autoboxing types), timers, and object pools.
There are other libraries that come with LibGDX, but typically maintained by third parties. These will fall under the extensions folder. The LibGDX extensions folder includes the following:
gdx-box2d: This is a physics engine for 2D rigid bodiesgdx-bullet: This is a real-time physics simulation librarygdx-controllers: This is for gamepad and joystick controller supportgdx-freetype: This generates bitmap fonts on the fly from one TrueType font (TTF) filegdx-jnigen: This allows C/C++ code to be written inline with Java source codegdx-setup: This is the UI project setup application used to manage LibGDX installs with the Gradle build systemgdx-tools: This is a miscellaneous collection of tools to aid in the development of your game, such as a particle effect editor, a texture packer application, and a bitmap font creator utility
With a better understanding of the core modules included with LibGDX, we can now look at the application lifecycle of a typical game written with LibGDX for the desktop illustrated by the following figure (Figure 6):

Figure 6
This diagram represents the cycle of your game loop, where one loop through the logic represents a frame. The following steps outline the various paths through the game loop in this figure:
The
LwjglApplicationclass will bootstrap itself with your starter class instance and the configuration that was passed into its constructor. TheLwjglApplicationconstructor will instantiate the various subsystem modules used in LibGDX, populating theGdx(com.badlogic.gdx) environment class with static instances of theApplication,Graphics,Audio,Input,Files, andNetmodules described previously in Figure 4. TheLwjglApplicationconstructor will then spawn a thread, which we will call the main loop, that will run until the game exits. This main loop thread represents the lifecycle of your game and the instantiation is referred to by the Game Start note for the initial node in the activity diagram. Now, we can move onto step 2.The next node in the diagram after the initial start is an action node designated as
create(). Thecreate()method is an interface method that you must implement when creating your game in order to hook into the lifecycle of LibGDX. During the start of the game loop thread,create()will be called only once. This is going to be where the initialization code for your game should be located, including preloading assets, instantiating game screens, and initializing the game subsystems. Now, we can move onto step 3.This step represents our first decision node in the loop that is checked at the beginning of every cycle through the game loop, or once per frame. The test is whether the game is still running or not and allows us to exit if the game state has changed to not running. As a side note, in order to guarantee that you properly exit your game, which allows the execution of cleanup code to happen in the correct order, it is recommended that you follow the LibGDX convention of exiting your game by using the following statement when quitting:
Gdx.app.exit();
This call into the static instance of the application object will set the running state of the game loop to false and subsequently move to the next step allowing the graceful exit of your game. So, if the game is running, then we can move to step 7. If the game is not running, then we can move to step 4.
The action node designated by
pause()in the activity diagram is one of the interface methods that must be implemented when you create your game. This method guarantees that proper handling of the game will be done, such as saving the current state of the game. After this finishes, we transition to the next step.The action node designated by
dispose()in the activity diagram is an interface method that guarantees proper cleanup of game resources still in use when the game is in the process of being destroyed and is the proper location to free those resources. For clarification, since this is a Java environment, all objects that implement theDisposableinterface (com.badlogic.gdx.utils) should call their appropriatedispose()method here. For example, adispose()method call for an unmanagedTextureobject, under the covers, will delete the texture from the static OpenGL instance and invalidate its handle. Now, we move onto step 6.After
dispose()has finished its work, the draw surface is destroyed along with any audio hardware handles still in use and then runsSystem.exit(). This step is referred to in the previous figure by the Game Stop note for the final node in the activity diagram.The next step in the diagram brings us to a decision node where the game loop figures out whether we are transitioning from a previous change in a draw surface state. When the game loop starts, the previous state of the draw surface is set to active as an initial placeholder and then the current draw surface is checked to see whether we are active. The active state for the draw surface, for the desktop, indicates whether the draw surface is in focus (not behind another window) or maximized. If it is determined that we have transitioned to a new state for the draw surface, then we move to the next decision node on step 8. If there is no transition to a new state, then we can continue onto step 11.
After it was determined that some change in the state has occurred since the last frame (the last cycle of the loop), the next step in the diagram of the game loop will determine whether we have transitioned from a previous state of focused to the current state of not focused, or vice versa. If the draw surface was focused in the last frame but now it is not, then we are minimized, so we will transition to the action node designated by
pause()in step 9. If the draw surface was not focused in the last frame, but now is focused, then we are maximized, so we will transition to the action node designated byresume()in step 10.During a cycle in the game loop, if the drawing surface state has changed from being maximized or in focus to being minimized or not focused, then
pause()will be called by the game loop. After this completes, we move onto step 11.During a cycle in the game loop, if the drawing surface state has changed from being minimized or not in focus to being maximized or in focus, then
resume()will be called by the game loop. The action node designated byresume()in the activity diagram is another interface method that must be implemented by your game. This method will guarantee proper handling from a previously paused state, such as reloading saved state information from disk. On Android-based devices, this would also be where you would reload unmanaged textures, but this is not a concern for the desktop. After this completes, we move onto step 11.The next node in the diagram represents a decision regarding whether or not the dimensions of the current draw surface have changed since the last frame update. If the dimensions have changed, then we move onto step 12. If the dimensions have not changed, then we move onto step 13.
The size of the draw surface has changed since the last frame update, and thus this will trigger a resize event. The action node designated by
resize()in the activity diagram is an interface method that must be implemented by your game. This method's parameter list represents the new dimensions, width and height in pixels, of the game screen. These dimensions are typically passed through to the screen or draw surface to be updated on the next render call. Once this step completes, we move onto step 13.This action node deals with getting state information from the input devices. This includes updating the
deltaTimeinterval for the current frame, updating the mouse cursor location and mouse button press events, and updating the keyboard key press events. After this step completes, we move onto step 14.This action node deals with processing the state information from the input devices. This primarily includes passing the mouse cursor location, mouse button presses, and keyboard key presses up to the input event handler class,
InputProcessor. Your game will usually instantiate this class and set it in the environment class,Gdx, so that you can access the input events every frame. When this step completes, we can move onto step 15.This action node deals with updating the audio resources for the current frame. For the desktop, this is primarily used to update the music since music will be playing across frames. When this step completes, we move onto step 16.
This decision node deals specifically with a test for whether we should render the draw surface or not. If we need to render (such as a game object's position has changed this frame, or the mouse cursor has moved), then we move onto step 17. Otherwise, if we do not need to render, then we have completed one cycle of this game loop and we will start back at step 3 for the next frame.
The action node designated by
render()in the activity diagram is an interface method that must be implemented by your game. This method will be the most important one in the lifecycle of your game. Commands to render your game scenes to the screen will live here, along with processing UI components, physics calculation updates, AI routines, and game object updates. Once this step completes and we have finished updating the current frame, we will go back to step 3 to start a new one.
In summary, in the preceding figure, the actions designated as create(), resize(), render(), pause(), resume(), and dispose()are all methods in the ApplicationListener interface, as shown in the following figure (Figure 7):

Figure 7
This figure is a class diagram that describes the method names and their corresponding signatures of the ApplicationListener interface that your game must implement. These methods represent hooks that the main game loop, in LibGDX, will call into based on certain system events triggered during the lifetime of your game.
A quick recap of the responsibilities that these interface methods represent is as follows:
create(): This is called at the start only once during the lifetime of the game. Typically, this is the proper place for initialization code (in preparation for the start of your game) to live.resize(int width, int height ): This is called every time the size of the game screen is changed. The parameters both represent the new width and height (in pixels) of the game screen.render(): This method is called every time the game screen needs to be rendered, such as a resize event or changes in the game screen. The commands to render your game scenes to the screen should live here.pause(): On the desktop, this method is called when the game screen is minimized, a key is pressed by the user, or when the game is exiting. Typically, this is a good location for saving the game state.resume(): On the desktop, this method is called when the game screen is maximized, from a previous state of being minimized.dispose(): This method is called when the game is being destroyed. This would be the appropriate place to clean up and free all resources still in use.
Historically, LibGDX started out as a small library for Android-based devices, which explains why LibGDX is event-driven in nature, since it is modeled after Android's lifecycle. There is no explicit main loop for our game, but for the purposes of defining the main loop, the render() method that you implement from the ApplicationListener interface will, for all intents and purposes, be the main body of your game.
Now that we have an overview of the packages and lifecycle of LibGDX, we can now generate a starter project that we will develop throughout the remainder of this book.
There are plenty of references available via online blog posts or other books that can walk you through every nuance in the development environment setup and so we will not go into in-depth detail here.
We will start by discussing the core dependencies that you will need in order to use LibGDX effectively. For clarity, we will only be concerned about the desktop platform, specifically targeted for Windows. The steps are as follows:
First, you will need to install the latest Java Development Kit (JDK), which includes tools for developing, debugging, and monitoring Java applications. At the time of this writing, I am using the minimum supported version of Java that works with LibGDX (version 1.5.5), which is JDK version 1.7. You can get the latest installer from Oracle's website at http://www.oracle.com/technetwork/java/javase/downloads/index.html.
After installing the JDK, you can make sure that the environment variable,
JAVA_HOME, is set by opening a Command Prompt window and typing the following in the command line:java –version
If everything is set correctly, you should see something like the following output:
java version "1.7.0_45"
Java(TM) SE Runtime Environment (build 1.7.0_45-b18)
Java HotSpot(TM) Client VM (build 24.45-b08, mixed mode, sharing)
Second, we will need to install and set up an integrated development environment (IDE) in order to develop with LibGDX. Out of the box, LibGDX generates the startup projects for the following IDEs:
IntelliJ IDEA: The community edition is free and can be found at http://www.jetbrains.com/idea/download/. I am using IDEA while writing this book and I am finding that it easily meets my requirements during the development of the BludBourne project.
Eclipse: This is a well-known, free, and actively maintained open source IDE. Eclipse can be found at http://www.eclipse.org/downloads/.
NetBeans: This is another free and actively maintained open source IDE. NetBeans can be found at http://netbeans.org/downloads/index.html.
Third, we will need to download and run the gdx-setup tool, which with a little configuration will generate our project files, platform-specific wrapper class, and our starter classes. You can download the
gdx-setup.jarfile by visiting http://libgdx.badlogicgames.com/download.html and then clicking on the Download Setup App option. Just as a side note, you may get a warning from your browser that the file is unsafe because this is a JAR file, but this is the correct file that is integrated with the new build system (which will be explained in the next section) for LibGDX.
Luckily, LibGDX has a relatively straightforward method for generating the startup classes that you will need so that you can get started. For every game that you create, you will use a tool for LibGDX (gdx-setup) that generates boilerplate code for each of the platform targets that you select, which wrap the main entry point for the game. These classes represent the only platform-specific code that will be created for a LibGDX-based game and interface with the backend modules mentioned earlier in the figure illustrating the core interfaces of LibGDX (Figure 4). For the purposes of this book, we will be focused primarily on the desktop, so we will only be concerned with generating one project targeted for Desktop:
In a Command Prompt window, navigate to where you downloaded the gdx-setup.jar file and run the following command:
java –jar gdx-setup.jar
You should see following UI (Figure 8) when you launch the gdx-setup tool:
Figure 8
The different settings for your LibGDX project setup are labeled for your convenience as follows:
Name (1): This is typically used for the customer facing name you wish to present for your game. The standard convention is lower case with hyphens representing spaces (for example,
bludbourne-game). This value is not really used by the build system for a desktop deployment target because the desktop target is a self-executable JAR file (or a runnable JAR file) and not a package. This value is used primarily for the mobile platforms, such as Android (substitutes for theapp_namevariable in theAndroidManifest.xmlfile) and iOS (substitutes for theapp.namevariable in theInfo.plist.xmlfile).Package (2): This will define the Java-based package name for your game. The naming convention is described in detail at http://docs.oracle.com/javase/tutorial/java/package/namingpkgs.html.
Generally, the package names start with a reversed Internet domain name and are written as all lower case to avoid conflict with class names (for example,
com.packtpub.libgdx.bludbourne).Game class (3): This is the name of your main class that will implement the
ApplicationListenerinterface that will hook into the LibGDX game lifecycle. This class name should also follow Java conventions, including being a noun and mixed case with the first letter of each internal word capitalized (for example,BludBourneGame).Destination (4): This will be the root directory (relative or absolute path) that the gdx-setup tool will output the generated project into (for example,
C:\BludBourne_Project).Android SDK (5): This will be the directory path where the Android SDK lives on your local system (for example,
C:\Program Files (x86)\Android\android-sdk). If the environment variableANDROID_HOMEis set, then its value will be used to populate this field. We should not be concerned with this property at this time. We will not be targeting Android with our project, so when you uncheck the Android dependency in the Sub Projects option, this box will become greyed out. You can always add this dependency back later though.LibGDX Version (6): At the time of writing this book, this is a hardcoded value that represents the version of LibGDX that the gdx-setup tool was built against. So, in general, if you run this gdx-setup tool with the latest
gdx-setup.jarfile, then you will get the latest release snapshot version of LibGDX. I believe this is a placeholder until a more dynamic method is implemented, which will then populate this drop-down list with more versions.Sub Projects (7): These represent the current deployment targets that LibGDX actively supports with its backend modules. Currently, LibGDX supports Desktop (Windows, Mac OS X, and Linux), Android, iOS, and HTML 5. For the purposes of this book, we only need to have the Desktop option checked.
Extensions (8): These represent third-party support libraries that fall under the LibGDX umbrella, but in general, are not part of the core libraries. These libraries usually are not part of the core because they are either maintained by third parties or have different release schedules. Currently, these extensions are as follows:
Freetype: This generates bitmap fonts on the fly from one TrueType font file
Tools: This is a miscellaneous collection of tools to aid in the development of your game, such as a particle effect editor, a texture packer application, and a bitmap font creator utility
Controllers: This is the gamepad and joystick controller support
Box2DLights: This is a dynamic lighting library for 2D games
For the purposes of this book, we only need to have the Tools option checked as we can always add other support packages later.
Show Third Party Extensions (9): When selected, a table dialog will pop up with a few more third-party libraries that are not part of the LibGDX core. These selections are parsed from an
extensions.xmlfile (found undercom/badlogic/gdx/setup/data). Currently, these extensions are as follows:Advanced (10): The following figure (Figure 9) represents a dialog box that includes a few miscellaneous options for project setup, such as creating IntelliJ IDEA projects, Eclipse projects, or overriding the default dependency repository. For the purposes of this book, we only need to select the IDEA (or Eclipse) project generation option here and click on Save when done:

Figure 9
Generate (11): When all the configuration options are correctly populated, execute the auto-creation process by pressing this button. Your output should look something like the following:
Generating app in C:\BludBourne
Executing 'C:\BludBourne/gradlew.bat clean --no-daemon idea'
To honour the JVM settings for this build a new JVM will be forked. Please consider using the daemon: http://gradle.org/docs/2.2/userguide/gradle_daemon.html.
Configuration on demand is an incubating feature.
:core:clean UP-TO-DATE
:desktop:clean UP-TO-DATE
:ideaModule
:ideaProject
:ideaWorkspace
:idea
:core:ideaModule
:core:idea
:desktop:ideaModule
:desktop:idea

BUILD SUCCESSFUL

Total time: 45.313 secs
Done!
To import in Eclipse: File -> Import -> General -> Exisiting Projects into Workspace
To import to Intellij IDEA: File -> Open -> YourProject.ipr
Tip
Downloading the example code
You can download the example code files for all Packt books you have purchased from your account at http://www.packtpub.com. If you purchased this book elsewhere, you can visit http://www.packtpub.com/support and register to have the files e-mailed directly to you. For the most current version, you can grab the latest snapshot from https://github.com/patrickhoey/BludBourne.
Once the gdx-setup tool is finished generating the project files for us, we can look at the general structure to get a better idea of the project layout. In order to understand why certain files are in the project and how third-party dependencies are handled, we will need an overview of Gradle, the dependency management and build system that LibGDX currently uses.
In the beginning, the only build tool available for Java projects was Make. Projects quickly became unmanageable as the requirements and dependencies exploded along with the popularity of the language. Around the year 2000, Ant came to the rescue with its control of the build process and its low learning curve with much more readable build scripts. As great as Ant's procedural programming methodology was for creating scripts, it proved difficult to maintain in part because the XML-based script files tended to grow in complexity and verbosity. In 2004, Maven came along to address the issues with Ant and improve upon it with its simplicity. Dependency management was Maven's goal with a design that regards all projects as having a specific structure, a set of supported task workflows, and the ability to download dependencies over the network.
Maven didn't come without its own host of problems, including the inability to correctly manage conflicts between different versions of the same library, and the difficulty for someone to create customized build scripts because the scripts didn't exactly fit Maven's rigid structure.
In 2012, Gradle came along and built upon the concepts of both Ant and Maven to get a build tool that represents the best of both systems. First, Gradle uses a domain specific language (DSL) based on Groovy instead of the XML-based build scripts. This removes a lot of the verbosity that we had with XML build scripts, leading to shorter and clearer scripts. Also, under the covers, Gradle creates a directed acyclic graph to determine the order in which tasks can run, removing the rigidity of Maven's lifecycle and the complexity of Ant's dependency with partial ordering.
What is one benefit of using Gradle with LibGDX? Well, before Gradle support was added, all the LibGDX source, release, and native JAR files would live as part of the project hierarchy. This was a problem because LibGDX essentially polluted the source control system, testing the patience of whoever had to update to a later version of LibGDX in order to get one bug fix. Gradle fixes these problems because now LibGDX and all its dependencies live outside your project. If you want to test your game build against a different version of LibGDX (or any of the other dependencies), it is as easy as changing the build version number in the build.gradle file in the root directory of your project. When you run the next build, Gradle will pull in the updated libraries that you specified from a central repository and then store them.
What if you missed a dependency when using the gdx-setup tool? All you need to do is add the dependency declarations to your build.gradle file in your project's root directory. The dependency declarations adhere to the following convention:
compile '<groupId>:<artifactId>:<version>:<classifier>'
You can search for third-party extension declarations at http://github.com/libgdx/libgdx/wiki/Dependency-management-with-Gradle. After updating your build.gradle file and rebuilding, you will now have the dependencies as part of your project.
On Windows, if we open up a Command Prompt in the target directory where the gdx-setup tool outputs our project, we can get a better idea of the project structure with the following command:
C:\BludBourne>tree /F /A
The output will be something similar to the following (numbers were added for an easier reference):
C:.
1)|   .gitignore
2)|   BludBourne.iml
3)|   BludBourne.ipr
4)|   BludBourne.iws
5)|   build.gradle
6)|   gradle.properties
7)|   gradlew
8)|   gradlew.bat
9)|   settings.gradle
|
+---core
10)|   |   build.gradle
11)|   |   core.iml
|   |
12)   +---assets
|   |       badlogic.jpg
|   |
|   \---src
|       \---com
|           \---packtpub
|               \---libgdx
|                   \---bludbourne
13)|                           BludBourne.java
|
+---desktop
14)|   |   build.gradle
15)|   |   desktop.iml
|   |
|   \---src
|       \---com
|           \---packtpub
|               \---libgdx
|                   \---bludbourne
|                       \---desktop
16)|                               DesktopLauncher.java
|
\---gradle
    \---wrapper
17)            gradle-wrapper.jar
18)            gradle-wrapper.properties
This project structure is the initial project generated with gdx-setup for the reference RPG for this book, called BludBourne, and is described as follows:
.gitignore(1): This is a convenience file used by the source control system, Git. Specifically, this file specifies the untracked (not under source control yet) files to ignore. These would include files such as build output and temporary files.BludBourne.iml(2): This file type is the project configuration information for modules stored as part of the IntelliJ IDEA project. For instance, the initial module will be a Java module that contains all the functionality to build Java projects.BludBourne.ipr(3): This file type is the core project information and setting for IntelliJ IDEA projects. This would include items such as project paths, compiler options, and Javadoc generation settings. This file is also the launch file type associated with IDEA.BludBourne.iws(4): This file type stores your personal workspace settings for IntelliJ IDEA projects. It is recommended that this file is not checked into your source control system.build.gradle(5): This is the primary Gradle build file. It defines all dependencies and plugins to use in your build environment.gradle.properties(6): These are settings used to configure your Java build environment. This would include items such as JVM memory settings and setting the Java home (path to JDK).gradlew(7): This file is the Gradle startup script for Unix-based systems.gradlew.bat(8): This file is the Gradle startup script for Windows. You can pass command-line operations as well, including the following commands to get information about projects:gradlew -q projects
And:
gradlew core:tasks
settings.gradle(9): This file defines all of the submodules for your project. These are the subprojects that you defined in gdx-setup, includingcore.core/build.gradle(10): This is a Gradle build file specific to this submodule. In general, you will not need to update these submodule configuration files.core/core.iml(11): This is a configuration file for modules stored as part of the IntelliJ IDEA project for this subproject. The information will include items such as paths to the LibGDX libraries.core/assets(12): This is the directory where you will store all of your game assets such as bitmaps, sprites, sound, music, and maps for the desktop.BludBourne.java(13): This is the starter class that is autogenerated for theBludBourneproject with the gdx-setup tool:package com.packtpub.libgdx.bludbourne; import com.badlogic.gdx.ApplicationAdapter; import com.badlogic.gdx.Gdx; import com.badlogic.gdx.graphics.GL20; import com.badlogic.gdx.graphics.Texture; import com.badlogic.gdx.graphics.g2d.SpriteBatch; public class BludBourne extends ApplicationAdapter { SpriteBatch batch; Texture img; @Override public void create () { batch = new SpriteBatch(); img = new Texture("badlogic.jpg"); } @Override public void render () { Gdx.gl.glClearColor(1, 0, 0, 1); Gdx.gl.glClear(GL20.GL_COLOR_BUFFER_BIT); batch.begin(); batch.draw(img, 0, 0); batch.end(); } }As we can see, the starter class
BludBourne.java(whose instance was passed to the backend constructorLwjglApplicationinDesktopLauncher.java) is a concrete implementation of theApplicationListenerinterface (or in this case inherits from the abstract base classApplicationAdapter, which in turn implements the interface with dummy stubs). This is also the location where your source files will live.desktop/build.gradle(14): This is a Gradle build file specific to this submodule. In general, you will not need to update these submodule configuration files.desktop/desktop.iml(15): This is a configuration file for modules stored as part of the IntelliJ IDEA project for this subproject. The information will include items such as paths to the LibGDX libraries.DesktopLauncher.java(16): This is the only platform-specific class for the desktop. Inside this class, we can see how our game fits into the beginning of the LibGDX framework lifecycle:package com.packtpub.libgdx.bludbourne.desktop; import com.badlogic.gdx.backends.lwjgl.LwjglApplication; import com.badlogic.gdx.backends.lwjgl.LwjglApplicationConfiguration; import com.packtpub.libgdx.bludbourne.BludBourne; public class DesktopLauncher { public static void main (String[] arg) { LwjglApplicationConfiguration config = new LwjglApplicationConfiguration(); new LwjglApplication(new BludBourne(), config); } }This autogenerated class implements the main entry point of our game and passes our starter class object,
BludBourne, to the platform's backend implementation of theApplicationinterface. The backend implementation of theApplicationinterface for the desktop isLwjglApplication, which is part of the LibGDX backend package for the desktop called LWJGL (com.badlogic.gdx.backends.lwjgl).LWJGL, an abbreviation for Lightweight Java Game Library, is a Java-based open source game development library for accessing hardware resources on the desktop. The driving philosophy is to expose underlying technology as a thin wrapper in order to keep the API simple. LWJGL enables cross-platform (Windows, Mac OS X, and Linux) access to popular native APIs such as OpenGL for graphics and OpenAL for audio. As a side note, Minecraft was originally developed using LWJGL.
gradle-wrapper.jar(17): This is the main binary for Gradle execution on the desktop that is included in the classpath in thegradlew.batfile.gradle-wrapper.properties(18): These properties define the version of Gradle to fetch and install.
I highly recommend that you take a look at a version control system (VCS) and if you have not used one in the past, take some time in ramping up with how to use one. Nothing is worse than to make one small tweak to your game in a late hour before a demo and all of the sudden, you find yourself with some game objects passing through each other and you have no idea what changed. VCS systems also help manage future content updates, such as patch releases and downloadable content (DLC) for your game. They help you to clearly identify where changes were made and what areas need to be tested, giving you better management over your deadlines by eliminating the guess work.
The role of version control systems is definitely a must in order to have an audit record of all changes made, and a mechanism to look at differences in the file versions to find these subtle bugs. Today, this doesn't even have to affect your budget for your game, as individual indie developers or small teams can usually use these VCS solutions for free.
The following are some VCS solutions available today:
Mercurial: This is a free, distributed source control management tool (http://mercurial.selenic.com/)
Perforce: This is a commercial, proprietary revision control system. Perforce is free for up to 20 users, 20 workspaces, and unlimited files (http://www.perforce.com/)
Subversion: This is a software versioning and revision control system distributed as free software under the Apache License (http://subversion.apache.org/)
Git: This is a free, distributed revision control system (http://git-scm.com/)
I have used many different types of VCS solutions throughout my career, ranging from legacy, bloated, expensive ones, to free ones with limited features. I have found Git to be easy to learn (once you ignore old source code repository models such as a central host server) and very fast. I personally recommend Git, and I will be using it for the BludBourne project. There is a host of information available on how to use Git, but I found the book Pro Git, by Scott Chacon and Ben Straub, most useful for quickly getting up to speed on Git (it is available for free at http://git-scm.com/book/en/v2).
You can use Git from the command line, but for my purposes, I prefer GUI clients so that I can see the differences between different check-ins and the history of particular files more clearly. There are many different types of GUI clients available; most are listed at http://git-scm.com/download/gui/linux. Some of them are as follows:
GitHub for Windows: This is free and can be found at http://windows.github.com/
SmartGit: This is $79 per user or free for non-commercial use
I have personally found SmartGit easy to use, fast, and actively maintained. For the BludBourne project, I will be using SmartGit as my Git client of choice.
I recommend that once you generate your project using the gdx-setup tool, you can create a Git repository at the root project directory and then commit those changes to your local master branch. This will allow you to make changes as you progress through this book, and not worry about breaking your project.
Now that we have an overview of the project structure, we can now run the project sample to make sure that your project is configured correctly, is building, and can run.
You can either double-click on the BludBourne.ipr file in the project root directory or launch your IDE and import the BludBourne project. In order to import with IDEA, execute the following steps:
Choose File | New | Project From Existing Sources. Choose the root directory of your project in the Select File or Directory to Import dialog. Click on OK.
In the Import Project dialog, select Create project from existing sources and click on Next.
On the next page of the wizard, give your project a name on the Import Project dialog. Click on Next.
If source files have been detected, make sure they are selected in the Import Project dialog. Click on Next.
Make sure the gradle-wrapper library is found at this stage with the Import Project dialog. Click on Next.
Make sure the module structure includes both the core and desktop modules in the Import Project dialog. Click on Next. You may get a popup dialog asking whether to overwrite or reuse the files. I would recommend the reuse option.
Select the proper Java project SDK in the next Import Project dialog. Click on Next.
On the last page of the wizard, click on Finish.
If you are running IDEA, and you committed the initial project to Git, you may see the following Gradle-based balloon notification when you start the IDE for the first time:
Unregistered VCS root detected
The directory C:\BludBourne is under Git, but is not registered in the Settings.
In order to resolve this, with the project open, go to File | Settings. Under the Settings dialog, select Version Control. Your project should be listed under Directory on the right panel, under Unregistered roots. Select your directory and click on the + button on the right. Select Apply and OK when finished.
If you are running IDEA, you may also see a Gradle-based balloon notification when you start the IDE for the first time:
Unlinked Gradle project?
       Import Gradle project, this will also enable Gradle Tool Window.
       Don't want to see the message for the project again: press here.
Click on the Import Gradle project link (in the balloon notification at the bottom). In the Import Project from Gradle dialog, make sure that your root project build.gradle is configured in the Gradle Project path. Also, make sure the Use default gradle wrapper (recommended) option is enabled. Change the Project format: option to .ipr (file based). Click on OK when finished.
If you are running IDEA, you may also come across this Gradle-based notification when starting the IDE with a clone of the BludBourne project repository:
Error:Unable to make the module: <module>, related gradle configuration was not found.
Please, re-import the Gradle project and try again.
In order to resolve this issue, go to View | Tool Windows | Gradle. Click on the refresh button in order to synchronize all linked projects.
In IDEA, select Build | Make Project. You should now have successfully built the startup project. We will now need to create a run target:
Select Run | Edit Configurations from the menu in IDEA.
Click on the + icon in the upper-left corner and choose Application.
You will be presented with the Run/Debug Configurations dialog.
You should give your run target a name, such as
Run.You will need to update the Main class: setting with DesktopLauncher.
You will also need to set the Working directory: path to
<project root>\core\assets. If you don't set this, you will get the following runtime error:Exception in thread "LWJGL Application" com.badlogic.gdx.utils.GdxRuntimeException: Couldn't load file: badlogic.jpg at com.badlogic.gdx.graphics.Pixmap.<init>(Pixmap.java:140) at com.badlogic.gdx.graphics.TextureData$Factory.loadFromFile(TextureData.java:98)
You will need to set the Use classpath of module option to Desktop since this is where the main entry point of your game lives.
Click on OK when finished.
Now, everything should be configured to finally run. From the menu, select Run | Run target. If all the dependencies are correct, with a proper Gradle build setup and project configuration, you should see the following screen (Figure 10):

Figure 10
http://en.wikipedia.org/wiki/Ultima_I:_The_First_Age_of_Darkness
Hallford N., and Hallford J. Swords & Circuitry: A Designer's Guide to Computer Role Playing Games. Roseville, CA: Prima Tech, 2001. Print.
Nystrom R. Game Programming Patterns. Genever Benning. 9780990582908. Web. 04 Apr. 2015.
This chapter gave some historical context for features that we will be developing throughout this book for your next RPG title. We also covered some business cases that help create a compelling narrative around how LibGDX can help meet your requirements when building your next RPG title. We also reviewed a high-level architecture of LibGDX, as well as how to successfully generate and run our starter project.
In the next chapter, we will develop the infrastructure to load tile maps and move our hero around in the game world.

