Download code from GitHub
Working with the several Software-as-a-Service (SaaS) offerings such as Office 365, Dynamics CRM or Visual Studio Online requires well-managed identities and an excellent basic structure in the Azure Active Directory (AD) that builds the heart of these solutions. You, as an administrator, need to provide a stable identity and access management platform to manage these services.
This chapter explains how to configure a suitable Azure AD tenant, which we use throughout the whole book to explore, understand, and configure the different features and functions in the field of identity and access management with Microsoft Azure. We start with the cloud-only components, followed in the next chapters by the hybrid identity and access management approach.
In this chapter, we go directly to the configuration and learn how to configure and manage users, groups, roles, and administrative units to provide a user and group-based application and self-service access, including the audit functionality. The chapter focuses on the following :
- Implementation scenario overview
- Implementing a solid Azure Active Directory
- Creating and managing users and groups
- Assigning roles and administrative units
- Protecting your administrative accounts
- Providing user and group-based application access
- Activating password reset
- Using standard security monitoring
- Integrating the Azure AD Join for Windows 10 clients
- Configuring a custom domain
- Configure Azure AD Domain Services
Now, we can introduce the implementation scenario.
After completing the next configuration tasks, you will see the rich functionality of Microsoft Azure in the field of identity and access management, starting with cloud identities. You can demonstrate the different capabilities in your own Microsoft Azure environment. The guidance will focus on the most essential feature sets to give you an idea about their capabilities. We will start to use the default directory, which we call domain.onmicrosoft.com for now, and will change it later to a custom domain name. Domain stands for your desired name like example.com , this is also used for the userPrincipalName of the users in this chapter, e.g. don.hall@doamin.onmicrosoft.com is represented in the chapter by my example domain called inovitcloudlabs. Be aware that this name will be visible in different applications, such as SharePoint Online and Skype for Business, to the end user. We recommend the company name without the company form, for instance, inovit GmbH would be inovit.onmicrosoft.com. Use a different name for your tests, so that the domain for a productive environment stays free. This configuration will be the base for all further scenarios in the book. For this reason, we use an Azure, Enterprise Mobility Suite, and Office 365 subscription to use all the available features.
The following figure shows the different main areas we will focus on in this chapter:

Chapter scenario overview
In the next section, we will start the configuration of the scenarios.
The first step we need to take is to get an Azure AD tenant. There are many ways to do this. You can start with an Azure subscription or use any other service from the Microsoft SaaS portfolio. The easiest way to get your solution to a working state is to start with an Office 365 trial subscription.
Open your browser and navigate to http://bit.ly/1RVpFXe. Subscribe to a free Office 365 Enterprise E5 plan:

Office 365 E5 trial request
Follow the registration process and define your user ID, such as admin@domain.onmicrosoft.com. We recommend using a nonpersonal ID, as shown in the next screenshot. Enter your new user ID and password. Your default directory will get the name you define behind the @:

First Global Administrator creation
Afterward, you need to prove your identity with a text message or a phone call and enter the received code. Next, you need to click Create my account. Keep in mind that the provisioning process takes a few minutes and should end with a success message.
After the successful creation of your brand new Azure AD with an associated Office 365 E5 plan, you should be able to log on with your administrative credentials and see the following screen:

Office 365 management portal
In the next step, we will assign an Enterprise Mobility Suite (EMS) E5 plan to the freshly created Azure AD tenant.
Click on the Admin icon on the right, and you should see your current assigned Subscriptions under the Billing tab:

Office 365 subscription management
Click Add subscriptions to add the EMS E5 trial plan to your Azure AD tenant:

EM+S E5 trial request
Choose the EMS E5 plan and click Start free trial and follow the subscription process. After a successful subscription process, you can see the assigned Office 365 E5 and the EMS E5 plan in your Azure AD tenant.
Now that we have created our Azure AD tenant, we need to subscribe for an Azure free trial subscription. This step is necessary to use Azure resources such as the Azure AD Domain Services or other functionality we will discuss in the next chapters.
You can also use the following ways to get an Azure subscription:
- Use an Azure subscription from scratch (https://account.azure.com/organization)
- Use an agreement-based Azure subscription
- Use an MSDN Azure subscription, as shown in the following figure:

Visual Studio subscription benefits
Let's go to configure your administrative workstation and your personal Azure AD tenant.
First of all, we need to set a functional administrative workstation to work through this guide. You need to have a Windows 10 Enterprise client machine in a work group configuration. We recommend using a freshly installed Windows 10 Enterprise virtual machine. We need a Windows 10 device to use the Azure AD Join later in the book. If you are not able to access the Volume Licensed or MSDN version, you can use the Enterprise Evaluation version at https://www.microsoft.com/en-gb/evalcenter/evaluate-windows-10-enterprise.
In the code section of this chapter, you will find the following cmdlets to install the needed administrative tools on your client machine, basically, the Azure AD, MSOnline and the Azure Resource Manager PowerShell modules:
- Install the Azure Active Directory PowerShell module:
Install-Module -Name AzureADPreview- Install the
MSOnlinePowerShell module:
Install-Module -Name MSOnline- Install the Azure Resource Manager PowerShell module:
Install-Module AzureRM- Connect to the
MSOnlineinterface with PowerShell:
Connect-MsolService
# Provide your global administrator credentials
# View your assigned subscriptions
Get-MsolAccountSku
# View all actual users
Get-MsolUser
- Create your first test user to prove the Azure AD administrative connection:
New-MsolUser -UserPrincipalName "jochen.nickel@inovitcloudlabs.onmicrosoft.com" -DisplayName "Jochen Nickel" -FirstName "Jochen" -LastName "Nickel" -UsageLocation "CH" -LicenseAssignment "inovitlabs:ENTERPRISEPREMIUM","inovitcloudlabs:EMSPREMIUM"

Get-MsolUser -UserPrincipalName jochen.nickel@inovitcloudlabs.onmicrosoft.com | fl- Connect directly to the Azure AD interface to compare the output and capabilities with the
MSOnlinePowerShell module:
Connect-AzureAD
Get-AzureADUser -all $true | where userprincipalname -eq jochen.nickel@inovitcloudlabs.onmicrosoft.com | fl
- Unpack the deployment package from the code package. The
C:\Configuration\HRExportsdirectory contains the needed HR import and group creation scripts to configure your Azure AD tenant with some test data:

Example script set
In the HRImportToAAD.ps1 script, the following important variables will be used:
$domain = Get-MsolDomain | where {$_.Name -notlike "*mail*"}
$dir = "C:\Configuration\HRExports"

# Also configure your PowerShell Execution Policy to RemoteSigned with the following cmdlet
# More information about this topic can be found under http://bit.ly/1EWLG03
Set-ExecutionPolicy -ExecutionPolicy RemoteSigned
The domain variable will contain the domain.onmicrosoft.com name of your Azure AD default directory. We use this directory and not a registered domain name for different steps. At the end of the chapter, we will change to a custom domain so that you can explore the needed tasks. As you can see, the dir variable contains the path to the scripts and the simple HR export file called NewHire.csv. The contoso.com domain in the file will be replaced with your domain name, stored in the domain variable.
The NewHire.csv file contains the following demo user set, which will be used in future configurations to demonstrate the different functionalities:
userPrincipalName,DisplayName,FirstName,LastName,password
Don.Hall@contoso.com,Don Hall,Don,Hall,Pass@word1
Ellen.Adams@contoso.com,Ellen Adams,Ellen,Adams,Pass@word1
Jeff.Simpson@contoso.com,Jeff Simpson,Jeff,Simpson,Pass@word1
Brian.Cox@contoso.com,Brian Cox,Brian,Cox,Pass@word1
Doris.Sutton@contoso.com,Doris Sutton,Doris,Sutton,Pass@word1
Petro.Mitchell@contoso.com,Petro Mitchell,Petro,Mitchell,Pass@word1
With the next step, we will assign an EMS E5 plan license to our global administrator, admin@domain.onmicrosoft.com. The Office 365 E5 was already assigned through the creation process. Later in the chapter, we will assign licenses through dynamic group membership, which is an Azure AD Premium P2 license feature:

License assignment operation
Click Assign and add the EMS E5 plan license to your global administrator. The expected result will be as follows:

Assigned license overview
We will get the correct message that we have no active subscription assigned to this user ID. Next, sign up for a Microsoft Azure subscription.
Most companies like to see how they can apply their corporate identity to Azure services. With a few easy steps, you can show the most important capabilities. To add custom branding, you need to use an Azure Active Directory Premium 1, Premium 2, Basic, or Office 365 license. With the following simple example, you can see what you can customize. You can provide the customizing in different languages to address your own or your customers' needs. These configuration tasks are always a good starting point in a demo or a proof of concept. You are free to use your pictures and designs for this setup:

Customized portal example
The first thing we are going to change is the Name of the directory in the properties section. Just enter your desired name. We used INOVITCLOUDLABS by inovit GmbH. You can also provide your own technical and privacy contacts and links on the login page:

Azure AD tenant properties
Click Customize Branding, and you will see the following options. So that you can prepare your pictures and brands, we summarized the help information provided in Microsoft TechNet:

Azure AD portal-customizing options
Next, you will see a configuration summary.
The following section provides you with several capabilities and summarizes the most important corporate identity features to customize your environment:
- Banner logo: Choose between the following options:
- Sign-in page text body: Choose between the following options:
- Appears at the bottom of the Azure AD sign-in page
- Unicode text only with a maximum length of 256 characters
- Use to communicate the phone number to your help desk or include a legal statement
- Recommendation—don't add links or HTML tags
- Sign-in page background image: Choose from the following options:
- Displayed on the side of the Azure AD sign-in page
- PNG or JPEG
- Recommended 1420 x 1200 with a supported file size of 300 KB (max. 500 KB)
- Keep the exciting part in the top-left corner (image gets resized and cropped)
- Username hint: Hint text that appears to users if they forget their username:
- Unicode, without links or code
- Maximum 64 characters
- Show option to remain signed in: Let your users remain signed in to Azure AD until explicitly signing out:

Login experience
Note
You are also able to do some extensive customization with the help of the following article https://docs.microsoft.com/en-us/azure/active-directory/fundamentals/customize-branding.
Your expected result should be this:

Portal-customizing effect
Now that we have provided an essential company branding, we can start to create and manage users and groups.
In the next steps, we connect to our Azure AD and generate the test users and groups.
Start the Azure AD PowerShell console and connect to Azure AD by executing the following cmdlets and scripts:
$msolcred = get-credential
# Enter your global administrator credentials
connect-msolservice -credential $msolcred
C:\Configuration\HRExports\HRImportToAAD.ps1
Note
Alternatively, you can also use connect-msolservice directly to connect without the use of a variable.
After starting the script, go directly to https://portal.azure.com with your admin@domain.onmicrosoft.com credentials. Select the users' section under your Azure AD. You should find the users from the HireUsers.csv file under the All users tab:

Azure AD portal user management
Open https://portal.office.com | Admin | Active Users, and you can see your users with active licenses in Office 365:

Office 365 user management
Let's create three example groups to represent the company organization with the following script:
C:\Configuration\HRExports\AddOrgGroups.ps1Now, you will see the created groups:

Azure AD group management
Test your configuration, open https://myapps.microsoft.com, and log in with the user Don.Hall@domain.onmicrosoft.com, and you should see Office 365 SharePoint, Outlook, and many applications in the access panel UI. Click Outlook, and you should be able to open the app without additional login information to access your mailbox:

User Inbox dialog
In the next steps, we provide an owner to our organizational groups.
To provide group management by the manager of a department, we will assign the following users as owners of their department groups:
Accounting:Brian.Cox@domain.onmicrosoft.com

Group - user assignment
Do the same for:
HR:Don.Hall@domain.onmicrosoft.comSales:Doris.Sutton@domain.onmicrosoft.com
Now that we have configured the owners, we will start to delegate management.
The default configuration of Azure AD allows an owner of a security or Office 365 group to manage the group members based on the data owner concept in the Azure AD Access Panel and the Azure portal.
Furthermore, you can limit this functionality, based on your needs:

Group options in Azure AD
Log in as Don.Hall@domain.onmicrosoft.com to https://myapps.microsoft.com. Click on the HR group and add Ellen.Adams@domain.onmicrosoft.com to the HR group:

Group view in Azure AD access panel UI
Review the Join policy under Edit details.
In the next section, we will configure the group self-service options.
Another request may be that users need to be able to create request-based security or Office 365 groups, for instance for projects or distribution groups. For this, they need the capability of an approval process. You can provide this functionality by activating the option under the group management general section. The feature set requires Azure Active Directory Premium:

Self-Service Group Management options
An Office 365 group includes a distribution list but also consists of these shared tools:
- Inbox for group email communication
- Calendar for scheduling group meetings and events
- Library for storing and working on group files and folders
- OneNote notebook for taking project and meeting notes
- Planning tool for organizing and assigning tasks and getting updates on project progress
- Guest access (set up by the administrator)
Note
Practical note: Use a different browser or the Private Browsing option for handling the different user sessions: one session on https://portal.azure.com as admin@domain.onmicrosoft.com (Admin) and another session as the explicit user (User) under https://myapps.microsoft.com.
Log in as Doris.Sutton@domain.onmicrosoft.com to https://myapps.microsoft.com and create the Sales Internal News group as an Office 365 group. Check that the Group policyshows This group is open to join for all users:

Azure AD access panel UI - group creation
Review the Join policy of your newly created group:

Group dialog - Azure AD access panel UI
In your Azure AD, under Groups, you will also find the newly created group:

Group overview - Azure AD access panel UI
Now, as the group owner, we change the group to request a managers' approval with the group policy setting:

Group editing dialog
Test the new configuration and log in as Don.Hall@domain.onmicrosoft.com to https://myapps.microsoft.com. Navigate to groups. Choose Sales Internal News:

Join group dialog
Join the Sales Internal News group and type a Business justification, click Request, and the process should be started.
Log in as Doris.Sutton@domain.onmicrosoft.com to https://myapps.microsoft.com.
Check your inbox. You should have received the join request mail and a notification, shown in the Access Panel UI.
Click on this request and approve it:

Group join - Notifications
Log in as Don.Hall@domain.onmicrosoft.com on https://myapps.microsoft.com.
Check your inbox, and you should have received a successful approval message:

Approval message - group membership
Check your group membership, and you should be a member of the Sales Internal News group:

Group management in Azure AD access panel UI
Next, we will configure dynamic group memberships.
In the next section, we will configure straightforward dynamic group memberships to use the department attribute to add users to their department group and build up a dynamic licensing assignment. Group-based licensing currently does not support groups that contain other groups (nested groups).
Note
An Azure AD Premium P1 license is needed for every user in a dynamic group. When enabling dynamic groups, current memberships will be lost. The usage location of a user needs to be set to assign a license.
As the admin@domain.onmicrosoft.com, choose the Accounting group, navigate to properties, and change the membership type to Dynamic User.
Create a simple rule, department Equals (-eq) Accounting:

Dynamic group membership rule configuration
Set the department attribute (profile section) on the accounting users Brian Cox and Jeff Simpson to Accounting:

Filling user attributes for dynamic group usage
The member should be added automatically. Check the group membership and verify the two new members:

Freshly calculated dynamic group membership
Next, we will provide an automatic licensing solution.
Create the following security group:
- Office 365 full feature licensing
Group description:Automatic Office 365 Full Feature LicensingMembership type:Dynamic UserDynamic query:userType -eq Member:

Group properties dialog
Under Licenses | Products, assign the Office 365 E5 plan. Don't choose any assignment options at the moment:

Group assignment options
Wait until the membership has updated and check the license assignment for Don.Hall@domain.onmicrosoft.com.
You will see that the user gets the license through a direct and group-based assignment:

License assignment overview
Note
This license solution is to give you a starter. You should remove the directly assigned licenses from all users that get licenses from group membership.
In the next section, we will configure role assignments to administrative units.
To delegate tasks, we use the creation of administrative units (AUs) and assign roles for specific tasks. In this configuration, we generate an HR [AU] , and we assign the manager of the HR department with the role to manage user accounts in this scope.
First of all, we need to connect to our Azure AD with the PowerShell cmdlet Connect-AzureAD for the admin@domain.onmicrosoft.com user.
Use the following cmdlets to create the HR [AU]:
New-AzureADAdministrativeUnit -Description "Human Resources Users" -DisplayName "HR"View the expected output:

Newly created administrative unit
Next, we will add the related users.
Next, we add the users of the HR department to the HR [AU]. Use the following cmdlets to do this:
$HRAU = Get-AzureADAdministrativeUnit -Filter "displayname eq 'HR'"
$initialDomain = (Get-AzureADDomain)[0].Name
$HRUser1 = Get-AzureADUser -Filter "UserPrincipalName eq 'don.hall@$InitialDomain'"
$HRUser2 = Get-AzureADUser -Filter "UserPrincipalName eq 'ellen.adams@$InitialDomain'"
Add-AzureADAdministrativeUnitMember -ObjectId $HRAU.ObjectId -RefObjectId $HRUser1.ObjectId
Add-AzureADAdministrativeUnitMember -ObjectId $HRAU.ObjectId -RefObjectId $HRUser2.ObjectId
Get-AzureADAdministrativeUnitMember -ObjectId $HRAU.ObjectId | Get-AzureADUser
The output of the preceding command is as follows:

Newly added users overview
Next, we will use the scoping options.
In the next step, we assign the user account administrator role. Verify available roles with the following cmdlet:
Get-AzureADDirectoryRoleTemplateNow, we enable the user account administrator role with the following cmdlet:
Enable-AzureADDirectoryRole -RoleTemplateId fe930be7-5e62-47db-91af-98c3a49a38b1Set variables and assign the user to the role:
$admins = Get-AzureADDirectoryRole
foreach($i in $admins) {
    if($i.DisplayName -eq "User Account Administrator") {
        $uaAdmin = $i
       }
    }

$HRUA = Get-AzureADUser -Filter "UserPrincipalName eq 'Don.Hall@$InitialDomain'"
$uaRoleMemberInfo = New-Object -TypeName Microsoft.Open.AzureAD.Model.RoleMemberInfo -Property @{ ObjectId = $HRUA.ObjectId }
Add-AzureADScopedRoleMembership -RoleObjectId $uaAdmin.ObjectId -ObjectId $HRAU.ObjectId -RoleMemberInfo $uaRoleMemberInfo
The output of the preceding command is as follows:

User Account Administrator assignment
Next, we will test our configuration.
Open a new PowerShell and connect with the Connect-MsolService command to the Azure AD, and log in with Don.Hall@domain.onmicrosoft.com credentials.
Modify a user account assigned to the HR administrative unit:
Set-MsolUser -UserPrincipalName ellen.adams@domain.onmicrosoft.com -Department HRVerify your modification:
Get-MsolUser -UserPrincipalName ellen.adams@domain.onmicrosoft.com | select DepartmentNext, we will protect an administrative account with the Privileged Identity Management (PIM) features of Azure AD Premium P2. We recommend using Azure MFA to protect your administrative accounts, if you don't want to invest in Azure AD Premium P2.
In this section, we will use Azure AD Premium P2 PIM to protect an administrative account in a quick intro.
Open https://portal.azure.com as admin@domain.onmicrosoft.com to start the configuration.
Click All Services and choose the Azure AD Privileged Identity Management.
Now, we need to Consent to PIM to use the service:

Privileged Identity Management - enablement
You will need to verify your identity and provide your preferred security verification option, as you can see in the following screenshot:

Azure MFA onboarding
Note
If you already use the Microsoft Authenticator App on your mobile device, you can also register the mobile app.
Finish the verification process and click Consent—proceed:

Consent to finish the initialization
Next, we sign up under Azure AD Roles, so that users can enable Azure AD roles. Click Sign up PIM for Azure AD Roles to activate the functionality:

Azure AD roles - PIM sign-up
Now that the feature is enabled, we can assign the roles to our users.
Click Assign eligibility to start the task:

Role assignment procedure
Click the Global Administrator Role, view the actual members, and add your test account to the role:

User assignment to a role
View the expected result:

New eligible user assigned to the role
Let's test our configuration by opening an InPrivate browser session; open https://portal.azure.com and log in with your own test account. Click All Services and choose Azure AD Privileged Identity Management. Choose My roles and activate the Global Administrator role for your account:

Role activation procedure
Next, you need to verify your identity. Follow the process, register, and verify your account. You need to complete the registration process just once:

Starting the verification process
After the registration and verification processes are finished, you can Activate your role:

Role activation
Provide a reason for your role activation. You will note that the role is limited for 1 hour and that you can define a custom activation time. Later in the book, we will configure different roles and features:

Activation options, such as Custom activation start time and Activation reason
Verify that your role is activated. You have successfully requested your Global Administrator role for the first time over Azure AD PIM. This is very useful so that high privileges are not permanently assigned to your account:

Active roles overview
We always recommend that you leave one Global Administrator permanently assigned, and that no Azure MFA is required to use the account. Use this account as a Breaking Glass account if the Azure AD PIM or MFA service is not available.
Next, we will configure user and group-based application access in Azure AD.
In this section, we configure a typical workplace, which a user can access under the Access Panel UI (https://myapps.microsoft.com). We assign applications to users and groups to see the different capabilities. The steps don't contain all single sign-on or provisioning options. We will discuss these feature sets later in specific chapters.
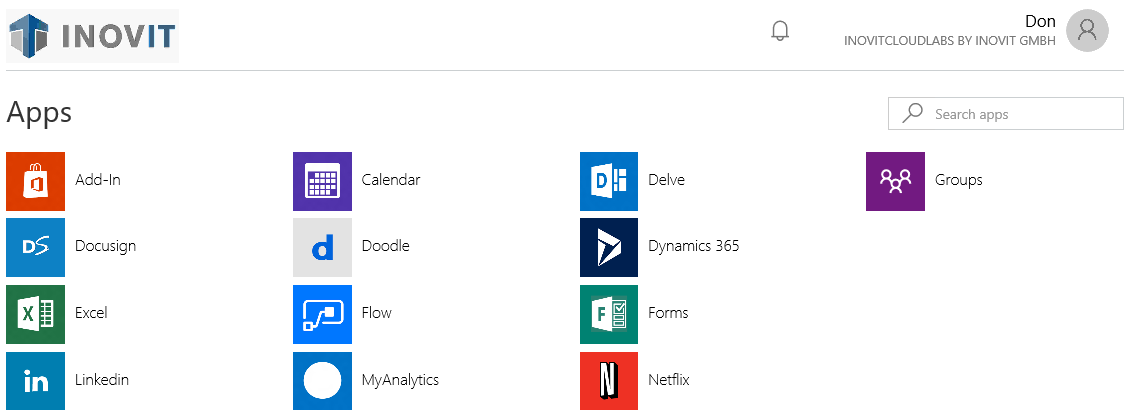
Log in to https://portal.azure.com with your Global Administrator credentials and add several applications from the application gallery under the Enterprise applications section. After adding the applications, we assign the accounts, which are to be provided access.
Build a list of applications like the following, and assign all groups to access the applications, except the one with user provisioning:

Azure AD application management
Test your newly configured workplace and log in as don.hall@domain.onmicrosoft.com to https://myapps.microsoft.com:
Azure AD access panel UI - application access
Also, test the user experience on Office 365 and log in as don.hall@domain.onmicrosoft.com to https://portal.office.com.
Next, we will assign applications to users.
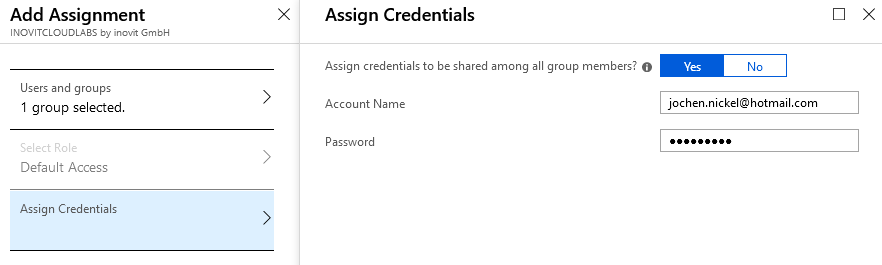
In the next step, we will assign the LinkedIn application to Don Hall, with the company credentials. Don Hall will not be able to see the credentials. So, if he leaves the company, the credentials are still protected.
Add the LinkedIn application from the application gallery and assign Don Hall to access this application:
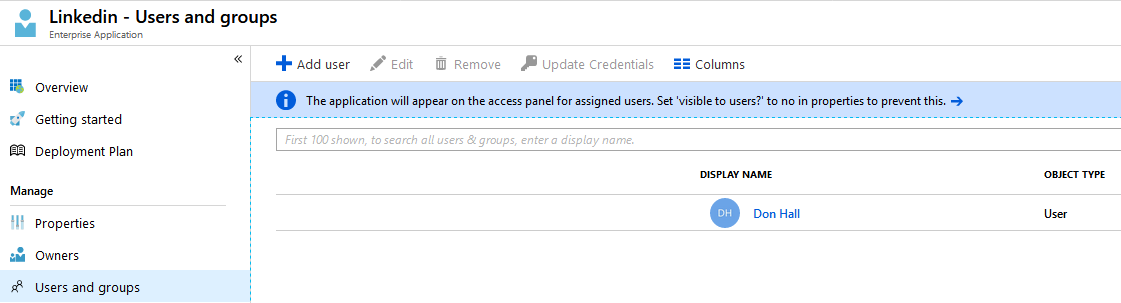
Application - Users and Groups assignment
Next, we provide valid LinkedIn credentials. If you don't have a LinkedIn account, register a demo one:
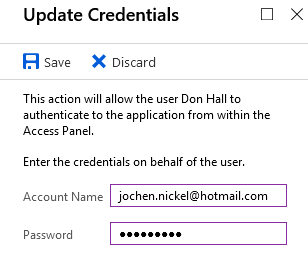
Azure AD Credentials store
The following options for working with credential sets are available:
Test this behavior with the user account, assign applications to groups, and define login information.
In the next steps, we do the same for groups, such as an HR group that uses these groups to get news from an individual Twitter channel:
Filling the Azure AD Credentials store for application access
Add the Twitter app from the application gallery. Assign the HR group and configure the credentials. Check the application at https://myapps.microsoft.com with a user of the HR group.
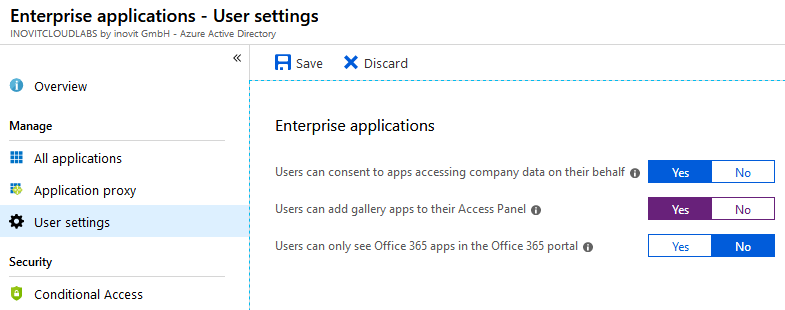
Now, we can configure the self-service application management.
In this section, we allow users to add their applications to their workplace under https://myapps.microsoft.com to enjoy the Single Sign-On feature. Under your Azure AD in the Configure section, navigate to Enterprise applications. Activate the function shown here:
Enterprise applications management options
Log in as Ellen.Adams@domain.onmicrosoft.com to https://myapps.microsoft.com. Click Get more applications and add MailChimp. After you add MailChimp, click Manage applications and choose MailChimp.
As admin@domain.onmicrosoft.com on https://manage.windowsazure.com, you can see the newly added application under the Enterprise applications section of your Azure AD.
Configure the application, add some users, and test it!
In this section, we configure the password reset capabilities of Azure AD to reduce support costs and 24/7 availability. We use no restrictions on the service and we require just one verification option to reset the password:

Password reset - Properties dialog to select the activation options
To verify the reset, we use several methods:

Password reset - authentication options
The next option we activate forces the user to register:

Password reset - Registration requirement and confirming choices
Next, we configure the related notifications.
In this section, we configure the notifications options so that the administrator will be notified if anomalous sign-ins or administrator password resets happen:
- Configure the
Notificationsas shown here:

Password reset - NotificationS options
- Users will be forced to register for a password reset, as shown in the following screenshot:

Registration enforcement
Now, we will test our newly configured feature and will see the registration scenario required for your verification options. Next, we will check the password reset.
Test the newly configured settings and log in as Don.Hall@domain.onmicrosoft.com to https://myapps.microsoft.com.
You will receive a message that you need to register for a password reset:

Authenticator app - setup procedure
Add your preferred method for Don Hall. You will receive an SMS text message, an email to your mailbox, or another of your defined response methods.
Log in as admin@domain.onmicrosoft.com to https://myapps.microsoft.com , and you will see the request for two verification options.
In the next steps, we will verify the functionality.
Open https://myapps.microsoft.com in your preferred browser and enter Don.Hall@domain.onmicrosoft.com. Click the Can't access your account? option or use the following link, https://passwordreset.microsoftonline.com, to start the password reset process. You will come into the verification process, and you need to follow the tasks. Finish the process and log in with the new password.
In this section, we will configure and simulate some typical events that get reported in the Azure AD Monitoring section.
First, we configure a Password protection feature, Custom smart lockout. We set the value to 10 incorrect logins:

Azure AD password protection features
You should receive the following message if you provide a wrong password 10 times:

Locked message dialog
You can see the activity under Monitoring | Sign-In:

Azure AD monitoring capabilities
You can also test Sign-ins from multiple geographies with simulation software such as CyberGhost (http://www.cyberghostvpn.com/en_us). Another option would be to use an Azure Virtual Machine.
Log in with an account between geographic regions that are far apart, such as Europe and Asia. This requires a remote machine from your location and in a different time zone, with logons as close together as possible:
- Log in to https://myapps.microsoft.com as
Don.Hall@domain.onmicrosoft.comfrom your local PC - Log in to https://myapps.microsoft.com as
Don.Hall@domain.onmicrosoft.comon a machine in a different time zone than your original PC
To configure users with an anomalous sign-in activity, you can use the Tor browser:
- Utilize an anonymous browsing tool such as Tor
- Download the secure Tor browser from https://www.torproject.org/download/download-easy.html.en
Open the Tor browser, go to https://myapps.microsoft.com, and log in as Don.Hall@domain.onmicrosoft.com. Your user account will be locked.
The following result is expected in security monitoring:

Security monitoring overview - Azure AD
Now that we have had a short journey through the security-monitoring options, we will integrate our Windows 10 client into Azure AD.
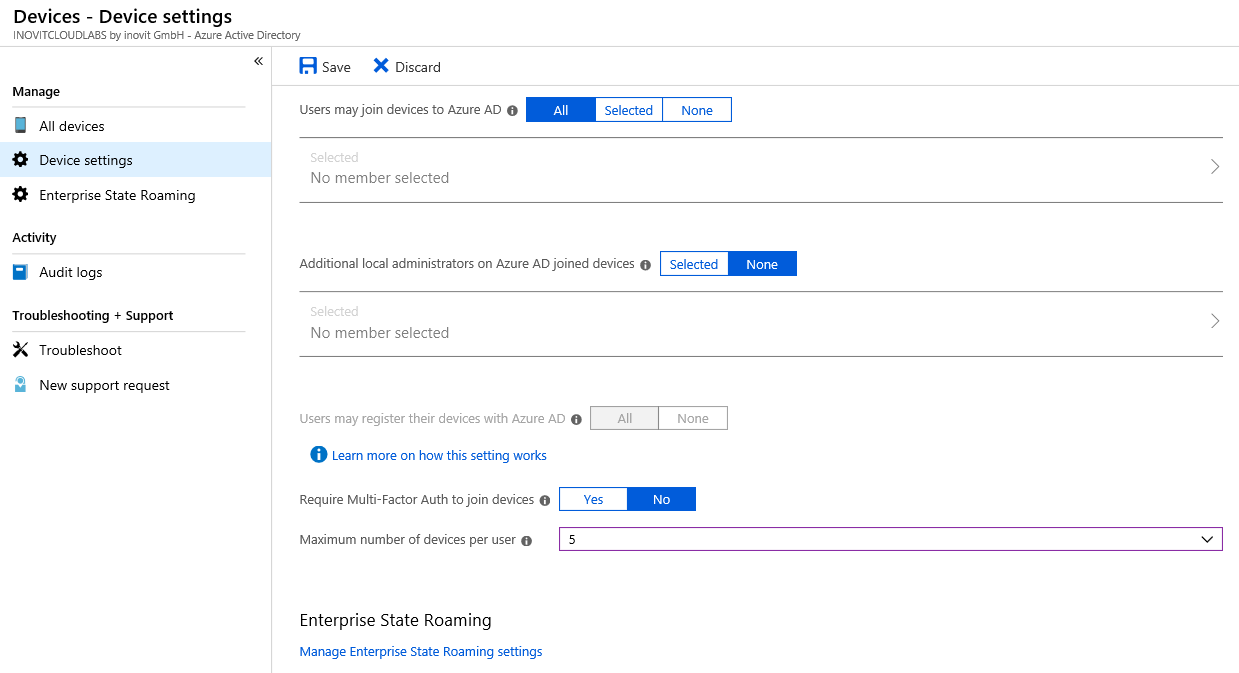
In this section, we will configure the Azure AD Join functionality and join our first Windows 10 client to Azure AD.
We configure a maximum of five devices per user and leave the other default values:
Azure AD - Device settings
In the next section, we will join our client to Azure AD.
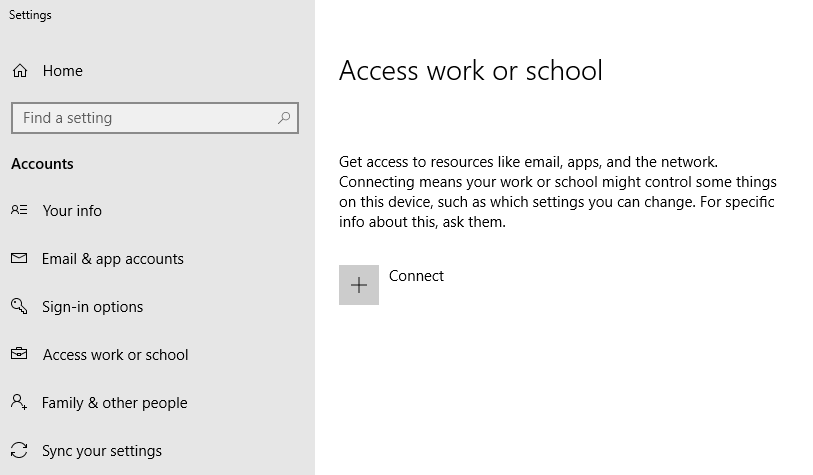
Log in to your freshly installed Windows 10 client machine and go to Settings. Choose Connect in the Access work or school section:
Azure AD Join process dialog
We sign in with don.hall@domain.onmicrosoft.com and join the Windows 10 client to Azure AD:
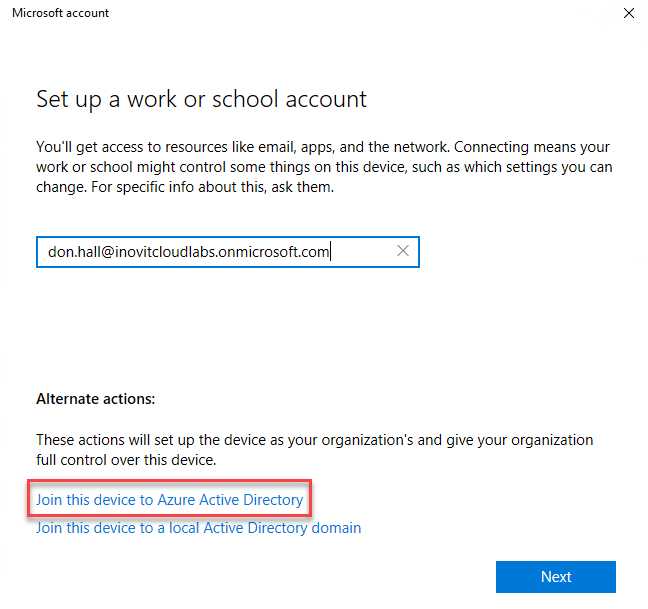
Join actions overview
Click through the Next sections and finish joining the client. Afterwards, we will check the new status. The expected result will be the connection to your Azure AD name:
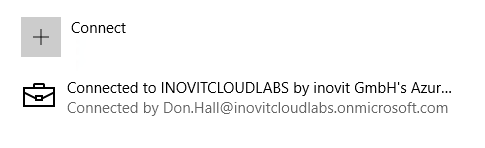
Azure AD joined client message
Afterward, we will verify the Azure AD Join process.
Log in to the Windows 10 client with the credentials of don.hall@domain.onmicrosoft.com and click through the security policy configuration. Click Enforce these policies. Click through the PIN setup and finish the process, then test the user experience:
- Open the mail application, and you will see that the system recognizes your user ID and
Single Sign-Onis provided. - Also, if you open https://myapps.microsoft.com, you will be directly logged in to the access panel UI:
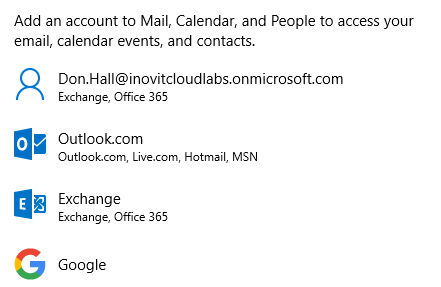
Different mail account options
After verifying the Azure AD Join, we will configure a custom domain. Be aware that you need to register a domain if you want to test the associated functionality.
Under the Azure Active Directory | Custom domain section, click Add custom domain and complete the verification process to prove that you are the owner of the domain:

Actual configured domains
Add the TXT entry shown to your DNS zone to verify the domain:

Domain verification options
Click the Verify button on your Azure portal, and after successful verification, the new DOMAIN NAME will appear under DOMAINS. Choose the Make primary option:

Custom domain overview and configuration options (Make primary or Download the Azure AD Connect tool)
Open https://portal.office.com to complete the domain setup process under the admin section:

Office 365 setup wizard
Choose the custom domain to be used for email addresses:

Sign-in and mail options
The last step we need to take is to set the new UserPrincipalNames to the existing users. We do this with a small example scripting solution:
- Connect to your Azure AD with your global administrator credentials:
Connect-AzureAD- Export the existing users to a CSV file with the following cmdlet:
Get-AzureADUser -All $True | Where { $_.UserPrincipalName.ToLower().EndsWith("onmicrosoft.com")} | Export-Csv C:\Office365Users.csv- Remove all accounts you don't want to modify and make the change with the following cmdlets:
$domain = "inovitlabs.ch"
Import-Csv 'C:\Office365Users.csv' | ForEach-Object {
$newupn = $_.UserPrincipalName.Split("@")[0] + "@" + $domain
 Write-Host "Changing UPN value from: "$_.UserPrincipalName" to: " $newupn -ForegroundColor Green
 Set-AzureADUser -ObjectId $_.UserPrincipalName -UserPrincipalName $newupn
}
- You should get a result similar to this:

Active users overview
The primary email will also be changed to the custom domain.
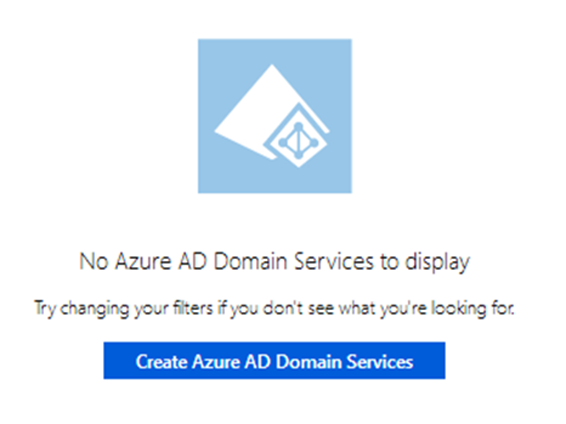
Next, we will configure the Azure AD Domain services to provide a transition scenario for a Kerberos-based application that is normally provided in on-premises infrastructure.
To integrate a legacy application based on Kerberos authentication in an Azure infrastructure as a service (IaaS) scenario, we configure Azure AD Domain Services. In this section, we configure the basic service and integrate an active example application:
Azure AD Domain Services creation
To start the configuration, we need to specify the DNS domain name, the Azure Subscription we want to use, and the name of the Resource group:
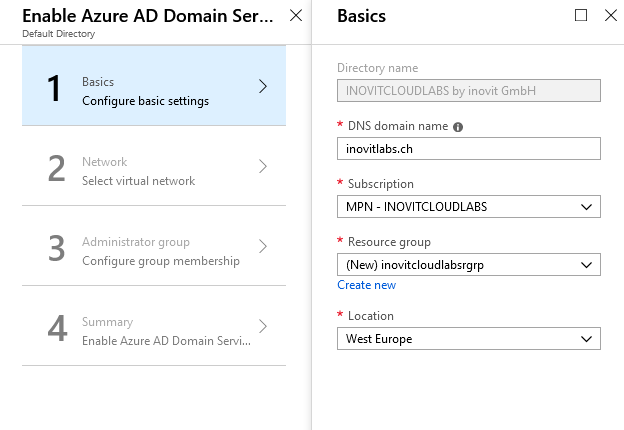
Azure AD Domain Services configuration
When enabling Azure AD Domain Services, you will need to specify which Azure virtual network to use. We use a range 192.168.x.x/20 to configure the network:
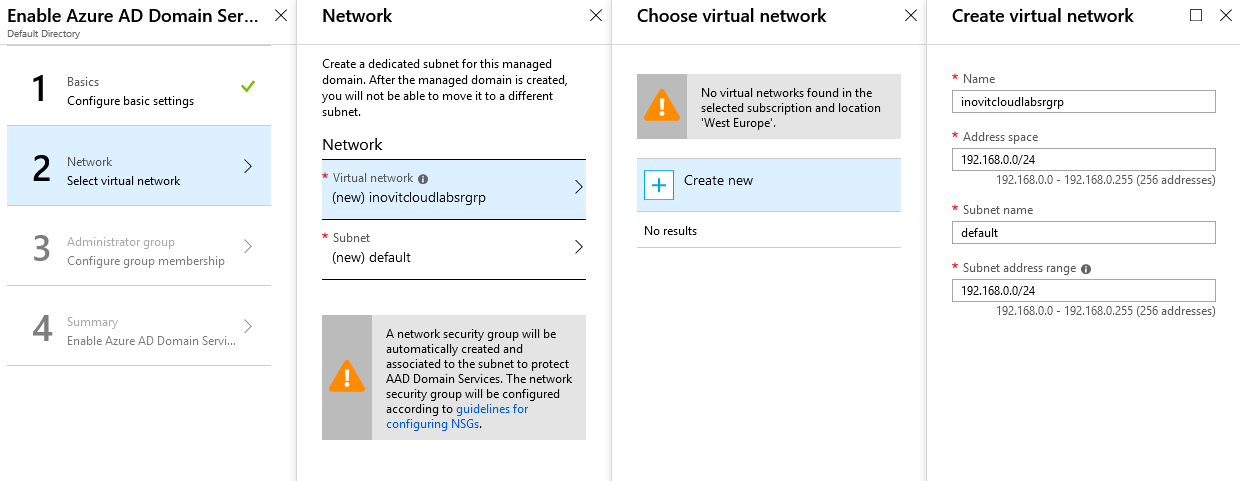
Virtual network configuration
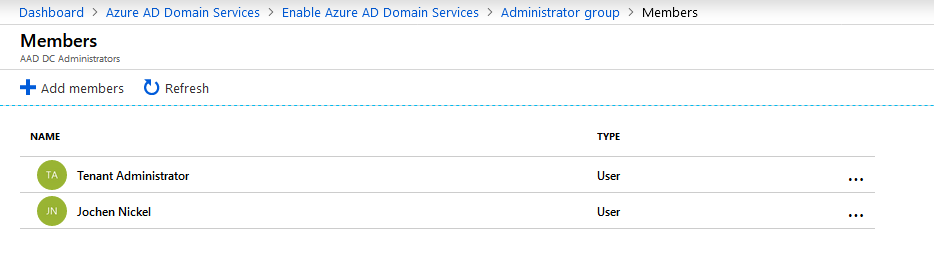
Add the admin account and your test user as a member of the Azure AD Domain ServicesAdministrator group:
Azure AD Domain Services Administrator group members
The summary should look like the following:
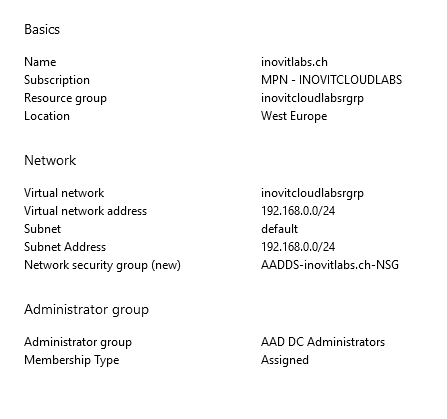
Configuration summary
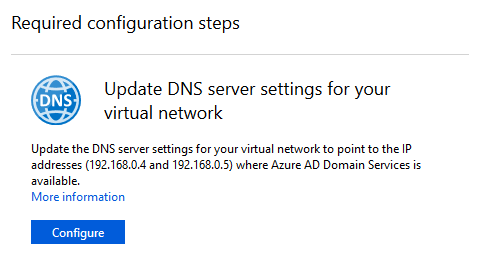
Next, you will be asked to update the DNS configuration to the addresses of your DNS servers provided by Azure AD Domain Services. In my case, these addresses were 192.168.0.4 and 192.168.0.5:
DNS configuration
The last important step that you need to complete to use the domain you have just created is to enable password synchronization:
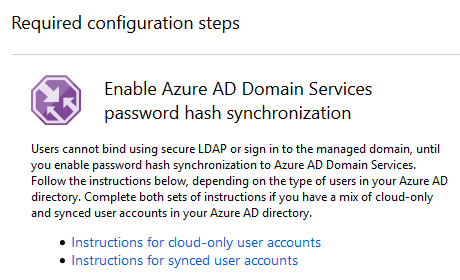
Instructions to synchronize users
By default, Azure AD does not store the credential hashes required for Kerberos authentication. You need to populate these credential hashes in Azure AD so that users can use them to authenticate against the domain. The process can be completed by changing the password of the user. You can use the accounts after 20 minutes in Azure AD Domain Services.
Note
You have two options: let passwords expire for all users or instruct these end users to change their passwords.
Users can use Azure AD's self-service password change mechanism from the Azure AD Access Panel page to change their passwords.
To test the Domain Services, we complete the following tasks:
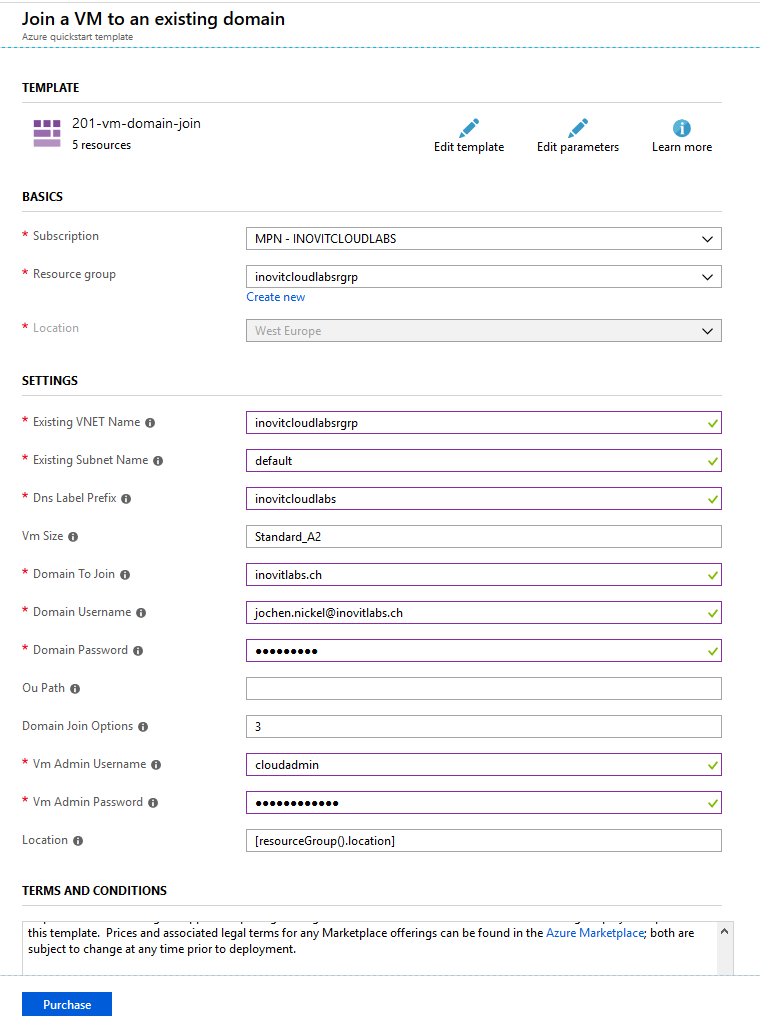
- Install a virtual Windows Server in your Azure IaaS environment by using a deployment template (https://docs.microsoft.com/en-us/azure/active-directory-domain-services/active-directory-ds-join-windows-vm-template):
VM deployment configuration
- Install the administrative tools for Active Directory and DNS on the newly joined server:
Install-WindowsFeature RSAT-ADDS,DNS-Server-Tools- Connect to
Active Directory Users and Computers(dsa.msc) and theGroup Policy Managementconsole to verify your configuration:
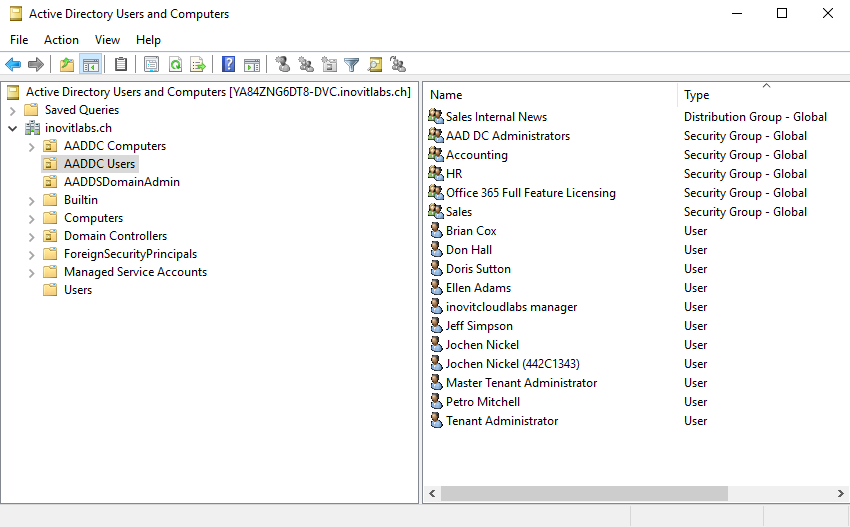
Azure AD Domain Services structure including synchronized objects
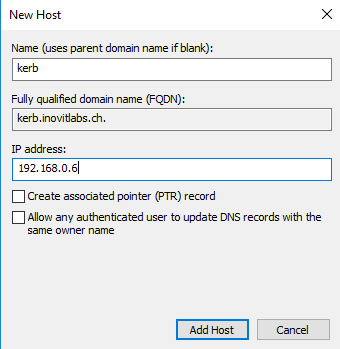
- Next, we need to create a
DNS HOST (A)record for our test application:
- Now, we can install a basic IIS configuration, used to handle the Kerberos part. For this, you need to install the IIS components, choose the Kerberos authentication feature, and activate it on the default website. Only
Windows Authenticationneeds to be activated:
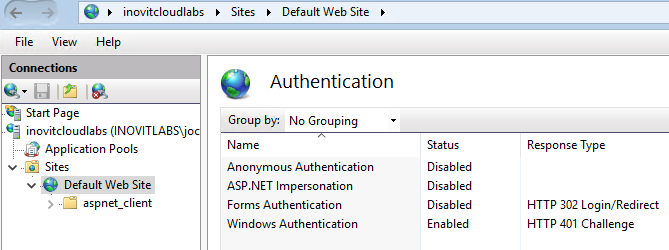
IIS Authentication configuration for Kerberos example application
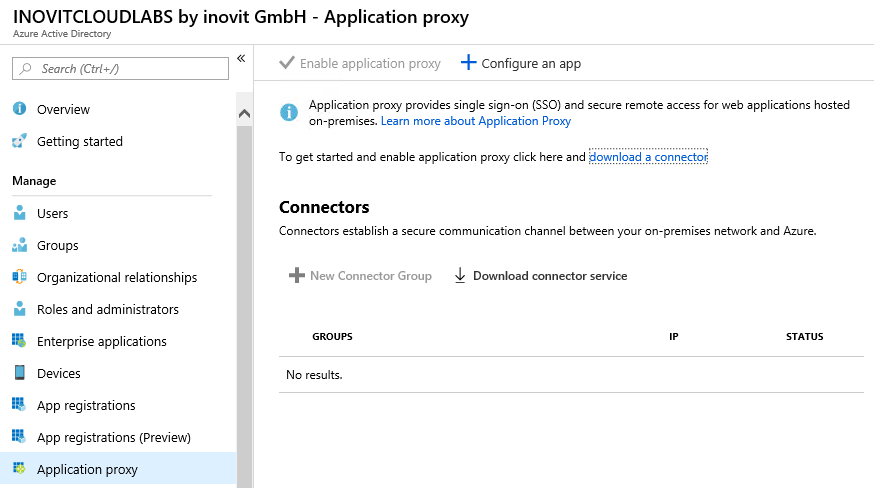
- Next, we will install and configure the Azure AD App Proxy connector to provide the application to your users. We use the following cmdlets to configure the needed, resource-based KCD feature:
# inovitcloudlabs represents the computer name
$ConnectorComputerAccount = Get-ADComputer -Identity inovitcloudlabs
Set-ADComputer inovitcloudlabs -PrincipalsAllowedToDelegateToAccount $ConnectorComputerAccount
setspn -S HTTP/kerb.inovitlabs.ch inovitlabs\inovitcloudlabs
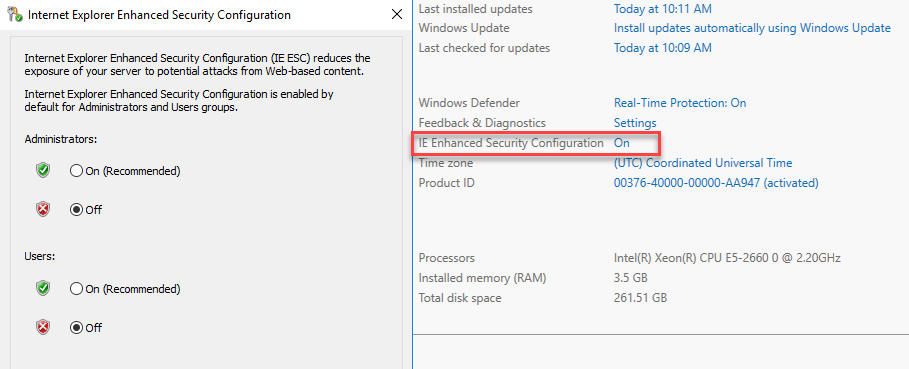
Server Manager IE Enhanced Security Configuration
- Next, we need to download the connector and install it on the server:
Application Proxy agent download and configuration
To configure the connector on the server, you need to provide a user with global administrator rights.
- After installing and configuring the connector, we will add our example app:
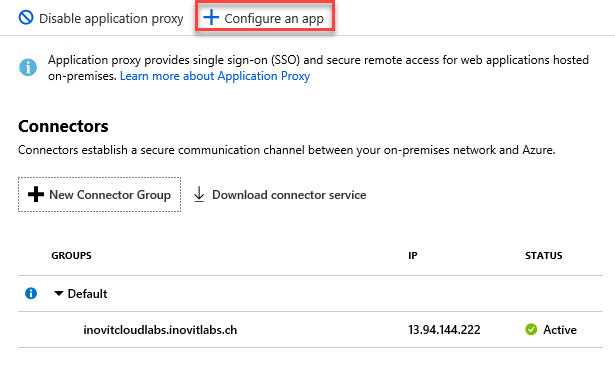
Azure AD App Proxy Connector group configuration options
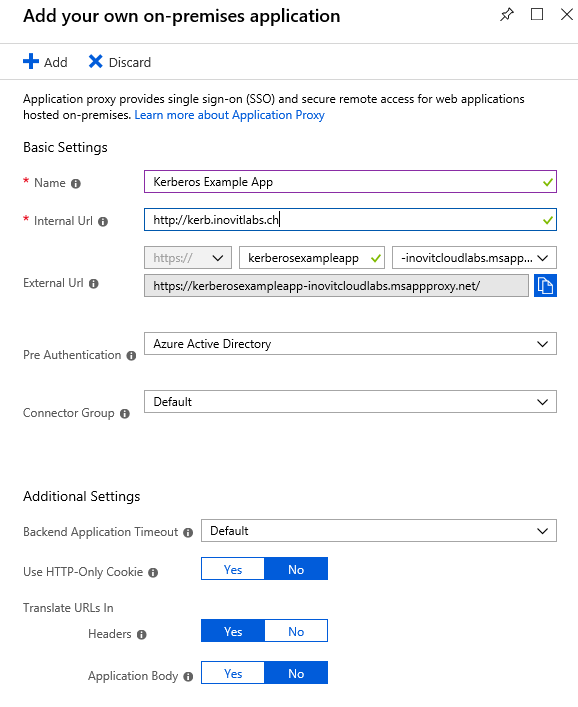
Kerberos example configuration
- Next, we configure the Integrated Windows Authentication
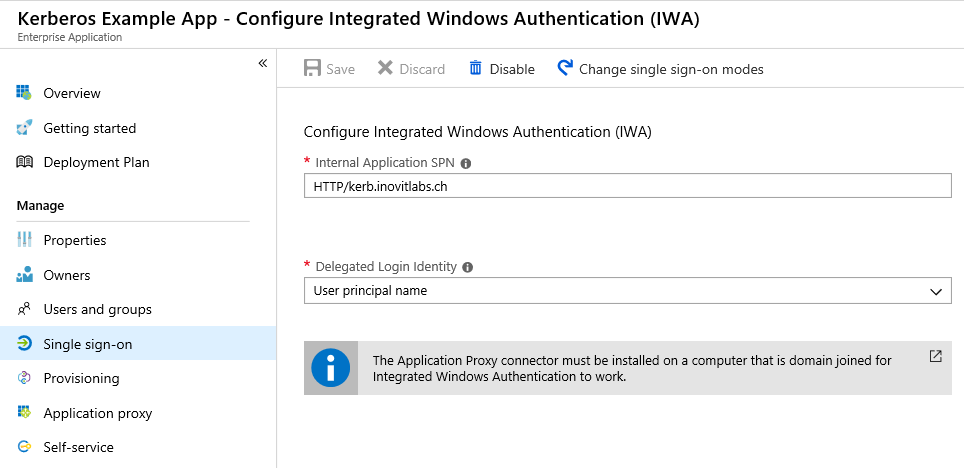
Application IWA configuration
Finally, we assign some users or groups and test the application at https://myapps.microsoft.com. As a result, you should see the IIS test page. We provided a sample Kerberos-based application to Azure AD Domain Services and used the Azure AD App Proxy functionality.
After working through this implementation scenario, you will be able to configure and manage a suitable Azure AD tenant for the most important tasks. You will also be able to integrate Windows 10 and Office 365 to build a productive workforce for your users without an on-premises infrastructure. Don't worry if you missed some functionality. This was just a warm-up.
In the next chapter, we will discuss the identity synchronization needed to start with your hybrid integration and to provide the correct identity synchronization scenario for your requirements.