Download code from GitHub
Python is a flexible language that gives programmers the freedom to structure their programming environment. However, a dangerous consequence of this freedom is the ability to not set up a new Python project right from the beginning in order to avoid problems down the road.
For example, you could be halfway through your project and realize that you deleted a file or piece of code five days ago that you need to use now. Consider another example where two of the packages that you wish to use require different versions of the same underlying package. Other than the tools introduced in this chapter, there will be a lot of extra work fixing problems that already have solutions. A little extra work in the beginning can save days of work in the future.
To this end, we will need to install three programs: Git, pip, and virtualenv.
To protect our project against human error, we will use a version control system called Git. Version control is a tool that records changes in files over time. This allows a programmer to see how the code has changed from previous revisions and even revert the code to the previous state. Version control systems also make collaboration easier than ever, as changes can be shared between many different programmers and merged into the current version of the project automatically, without copying and pasting hundreds of lines of code.
Simply put, version control is like backups for your code, only more powerful.
Installing Git is very simple. Simply go to http://www.git-scm.com/downloads and click on the Operating System (OS) that is being run. A program will begin to download that will walk you through the basic installation process.
Git was originally developed solely for Unix OSes (for example, Linux, Mac OS X). Consequently, using Git on Windows is not seamless. During the installation, the installer will ask whether you want to install Git alongside the normal Windows Command Prompt. Do not pick this option. Choose the default option that will install a new type of command line on your system named Bash, which is the same command line the Unix systems use. Bash is much more powerful than the default Windows command line, and this will be used in all the examples in this book.
Note
A good introduction to Bash for beginners is located at http://linuxcommand.org/learning_the_shell.php#contents.
Git is a very complex tool; only the basics that are needed for this book will be covered here.
Note
To learn more, refer to the Git documentation at http://www.git-scm.com/doc.
Git does not track your changes automatically. In order for Git to run properly, we have to give it the following information:
Which folders to track
When to save the state of the code
What to track and what not to
Before we can do anything, we tell Git to create a git instance in our directory. In your project directory, run the following in your terminal:
$ git init
Git will now start to track changes in our project. As git tracks our files, we can see the status of our tracked files, and any files that are not tracked, by typing the following command:
$ git status
Now we can save our first commit, which is a snapshot of your code at the time that you run the commit command.
# In Bash, comments are marked with a #, just like Python
# Add any files that have changes and you wish to save in this commit
$ git add main.py
# Commit the changes, add in your commit message with -m
$ git commit -m"Our first commit"
At any point in the future, we can return to this point in our project. Adding files to be committed is called staging files in Git. Remember to add stage files only if you are ready to commit them. Once the files are staged, any further changes will not be staged as well. For an example of more advanced Git usage, add any text to your main.py file with your text editor and then run the following:
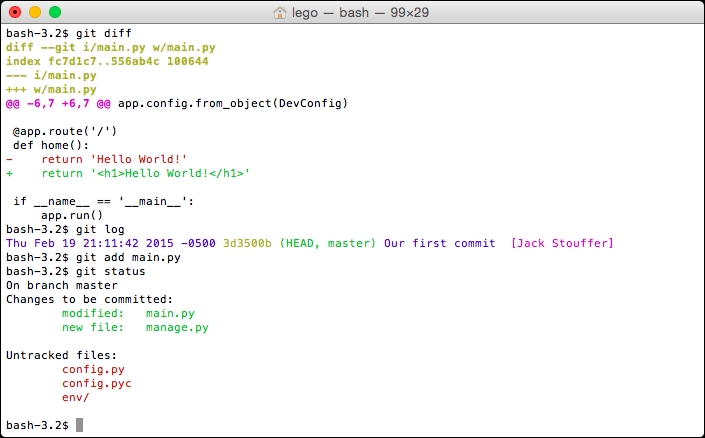
# To see the changes from the last commit
$ git diff
# To see the history of your changes
$ git log
# As an example, we will stage main.py
# and then remove any added files from the stage
$ git add main.py
$ git status
$ git reset HEAD main.py
# After any complicated changes, be sure to run status
# to make sure everything went well
$ git status
# lets delete the changes to main.py, reverting to its state at the last commit
# This can only be run on files that aren't staged
$ git checkout -- main.py
Your terminal should look something like this:
The Git system's checkout command is rather advanced for this simple introduction, but it is used to change the current status of the Git system's HEAD pointer—that is, the current location of our code in the history of our project. This will be shown in the next example.
Now, to see the code in a previous commit, first run this:
$ git log
Fri Jan 23 19:16:43 2015 -0500 f01d1e2 Our first commit  [Jack Stouffer]
The string of characters next to our commit message, f01d1e2, is called the hash of our commit. It is the unique identifier of that commit that we can use to return to the saved state. Now, to take the project back to that state, run this:
$ git checkout f01d1e2
Your Git project is now in a special state where any changes or commits will neither be saved nor affect any commits that were made after the one you checked out. This state is just for viewing old code. To return to the normal mode of Git, run this:
$ git checkout master
In Python, programmers can download libraries from other programmers that extend the functionality of the standard Python library. As you already know from using Flask, a lot of Python's power comes from its large amount of community-created libraries.
However, installing third-party libraries can be a huge pain to do correctly. Say there is a package X that you wish to install. Simple enough, download the Zip file and run setup.py, right? Not quite. Package X relies on package Y, which in turn relies on Z and Q. None of this information was listed on package X's website, but they are required to be installed for X to work at all. You then have to find all of the packages one by one and install them, in the hope that the packages you are installing don't require any extra packages themselves.
In order to automate this process, we use pip, the Python package manager.
If you are on Windows, and your installed Python the current version, you already have pip! If your Python installation is not the most recent, the easiest thing to do is to simply reinstall it. Download the Python Windows installer at https://www.python.org/downloads/.
In Windows, the variable that controls which programs are accessible from the command line is path. To modify your path to include Python and pip, we have to add C:\Python27 and C:\Python27\Tools. Edit the Windows path by opening the Windows menu, right-clicking on Computer and clicking on Properties. Under Advanced system settings, click Environment Variables.... Scroll down until you find Path, double-click it, and add ;C:\Python27;C:\Python27\Tools to the end.
To make sure you have modified your path correctly, close and reopen your terminal and type the following into the command line:
pip --help
Tip
Downloading the example code
You can download the example code files from your account at http://www.packtpub.com for all the Packt Publishing books you have purchased. If you purchased this book elsewhere, you can visit http://www.packtpub.com/support and register to have the files e-mailed directly to you.
pip should have printed its usage message as shown in the following screenshot:

Some Python installations of Linux do not come with pip, and Mac OS X installations don't come with pip by default. To install it, download the get-pip.py file from https://raw.githubusercontent.com/pypa/pip/master/contrib/get-pip.py.
Once you have downloaded it, run it with elevated privileges using the following:
$ sudo python get-pip.py
Then pip will be installed automatically.
To install a package with pip, follow this simple step:
$ pip install [package-name]
On Mac and Linux, because you are installing programs outside the user-owned folders, you might have to prepend sudo to the install commands. To install Flask, simply run this:
$ pip install flask
Then, all requirements of Flask will be installed for you.
If you want to remove a package that you are no longer using, run this:
$ pip uninstall [package-name]
If you wish to explore or find a package but don't know its exact name, you may use the search command:
$ pip search [search-term]
Now that we have a couple of packages installed, it is common courtesy in the Python community to create a list of packages that are required to run the project, so others can quickly install every thing required. This also has the added benefit that any new member of your project will be able to run your code quickly.
This list can be created with pip by running this:
$ pip freeze > requirements.txt
What exactly did this command do? pip freeze run by itself prints out a list of the installed packages and their versions as follows:
Flask==0.10.1
itsdangerous==0.24
Jinja2==2.7.3
MarkupSafe==0.23
Werkzeug==0.10.4
wheel==0.24.0
The > operator tells Bash to take everything printed by the last command and write it to this file. If you look into your project directory, you will see the new file named requirements.txt that contains the output of pip freeze.
To install all the packages from this file, a new project maintainer will have to run this:
$ pip install -r requirements.txt
This tells pip to read all the packages listed in requirements.txt and install them.
So you have installed all the packages you want for your new project. Great! But, what happens when we develop the second project some time later that will use newer versions of the same packages? What happens when a library that you wish to use depends on a library you installed for the first project, but it uses an older version? When newer versions of packages contain breaking changes, upgrading them will require extra development work on an older project that you may not be able to afford.
Thankfully, there is virtualenv, a tool that sandboxes your Python projects. The secret to virtualenv is tricking your computer into looking for and installing packages in the project directory rather than in the main Python directory, which allows you to keep them completely separate.
Now that we have pip, to install virtualenv just run this:
$ pip install virtualenv
Let's initialize virtualenv for our project as follows:
$ virtualenv env
The extra env tells virtualenv to store all the packages into a folder named env. virtualenv requires you to start it before it will sandbox your project:
$ source env/bin/activate
# Your prompt should now look like
(env) $
The source command tells Bash to run the script env/bin/activate in the context of the current directory. Let's reinstall Flask in our new sandbox as follows:
# you won't need sudo anymore
(env) $ pip install flask
# To return to the global Python
(env) $ deactivate
However, it goes against the best practices in Git to track what you don't own, so we should avoid tracking the changes in third-party packages. To ignore specific files in our project, the gitignore file is needed.
$ touch .gitignore
touch is the Bash command to create files, and the dot at the start of a file tells Bash to not list its existence unless specifically told to show hidden files. We will create the simple gitignore file for now:
env/
*.pyc
This tells Git to ignore the entire env directory and ignore all the files that end with .pyc (a compiled Python file). When used in this way, the * character is called a wildcard.
Finally, we can get to our first Flask project. In order to have a complex project at the end of the book, we will need a simple Flask project to start us off.
In the file named config.py, add the following:
class Config(object):
    pass

class ProdConfig(Config):
    pass

class DevConfig(Config):
    DEBUG = True
Now, in another file named main.py, add the following:
from flask import Flask
from config import DevConfig

app = Flask(__name__)
app.config.from_object(DevConfig)

@app.route('/')
def home():
    return '<h1>Hello World!</h1>'

if __name__ == '__main__':
    app.run()
For anyone who is familiar with the base Flask API, this program is very basic. It will just show Hello World! on the browser if we navigate to http://127.0.0.1:5000/. One point that may be unfamiliar to Flask users is config.from_object, rather than app.config['DEBUG']. We use from_object because in future, multiple configurations will be used, and manually changing every variable when we need to switch between configurations is tedious.
Remember to commit these changes in Git:
# The --all flag will tell git to stage all changes you have made
# including deletions and new files
$ git add --all
$ git commit -m "created the base application"
Note
Reminders will no longer be given on when to commit your changes to Git. It is up to readers to develop the habit of committing whenever you reach a stopping point. It is also assumed that you will be operating inside the virtual environment, so all command line prompts will not be prefixed with (env).
In order to make next chapters easier for the reader, we will use the first of many Flask extensions (packages that extend the functionality of Flask) named Flask Script. Flask Script allows programmers to create commands that act within the Application Context of Flask—that is, the state in Flask that allows modification of the Flask object. Flask Script comes with some default commands to run the server and a python shell in the Application Context. To install Flask Script with pip, run this:
$ pip install flask-script
We will cover more advanced usage of Flask Script in Chapter 10, Useful Flask Extensions; for now, let's start with a simple script named manage.py. First import Flask Script's objects and your app as follows:
from flask.ext.script import Manager, Server
from main import app
Then, pass your app to the Manager object, which will initialize Flask Script:
manager = Manager(app)
Now we add our commands. The server is the same as the normal development server run through main.py. The make_shell_context function will create a Python shell that can be run within the app context. The returned dictionary will tell Flask Script what to import by default:
manager.add_command("server", Server())

@manager.shell
def make_shell_context():
    return dict(app=app)
Note
Running the shell through manage.py will become necessary later on when the Flask extensions will only initialize when a Flask app is created. Running the default Python shell will cause these extensions to return errors.
Then, end the file with the Python standard way of running only if the user ran this file:
if __name__ == "__main__":
    manager.run()
You will now be able to run the development server with:
$ python manage.py server
Use the shell with:
$ python manage.py shell
# Lets check if our app imported correctly
>>> app
<Flask 'main'>