


The BeagleBone Black, with its low cost and amazing package of functionalities, provides an excellent set of core functionalities to build robotic projects. In this book, you'll build three robotics projects, each with a differing array of fascinating functionalities. Hopefully, these will inform and inspire you so that you'll feel comfortable creating your own dream projects in robotics.
But let's not get ahead of ourselves. In this book, I'm going to assume quite a bit of knowledge of not only the BeagleBone Black, but also programming in general and specifically Linux. If you're truly a beginner, you'll have to start with my other book on the BeagleBone Black, BeagleBone Robotic Projects, Packt Publishing. However, I'm not going to assume that you've read the other book, so this first chapter will lead you through, in an accelerated way, the steps you'll need to follow from unpacking to having a BeagleBone Black that is configured to be successful in building complex robotics projects. To understand this book, you'll also need a bit more knowledge of how to connect electronic devices. You'll use the General-Purpose Input/Output (GPIO) pins and even a soldering iron to build these robots.
In this chapter, you will learn about the following:
Installing an operating system
Installing a vision library and sound capabilities
Creating and recording sounds
Making your BeagleBone speak
Installing speech recognition
Improving accuracy of speech recognition
Adding additional hardware and software for a fully functional core system
So let's start with unpacking our BeagleBone Black. For this chapter, you'll need the following hardware:
A BeagleBone Black board
A BeagleBone Black USB power cable
A LAN cable
A USB sound device that has a plug for a microphone and a speaker
A microphone
A speaker
A USB Wi-Fi dongle (this is optional; needed if you want to communicate with the BeagleBone Black via a wireless LAN).
Let's unpack the single-board computer hardware device. Your BeagleBone Black will come in a box—in a static protection bag, with a USB cable that can power the unit from a USB connection. It should look somewhat like this:

The USB connection not only supplies power to the host computer, but also provides a simple, yet fairly limited, way to communicate with the board. You'll use this USB cable for power, but that's about it.
Note
You can also choose to power the BeagleBone Black using the 5 V barrel jack. One that works well is from Adafruit, available at https://www.adafruit.com/products/276.
If you've never worked with the BeagleBone Black before, the beagleboard.org site can lead you through the first few steps, from powering on to making sure your board is up and working, and to some initial communications with the board.
You must know that there are several versions of the board now. The latest, at the time of the writing of this book, is version C. The most significant change from Version B to Version C is that Version C has a 4 GB eMMC disk. Even this might be a bit small for your projects, and you're going to use an 8 GB to 16 GB micro SD card anyway, so either version should be fine.
The first thing you need to do is install a useful operating system into an 8 GB, 16 GB, or 32 GB micro SD card—just a little background for this. Initially, the default operating system on the internal memory was a version of Linux called Ångström. Version C is now shipped with a version of Debian. You're going to move to a different operating system called Ubuntu, a close relative of Debian, but with a larger feature set and community of support. It'll make the projects you are about to tackle much easier.
Now the BeagleBone Black is getting popular enough, so you can buy a micro SD card that already has Ubuntu installed. Nevertheless, you can easily download it and then install it on the card. If you're going to download a distribution, you'll need to make sure you're getting the latest version of Ubuntu.
Note
The easiest way to download is to go to one of the several sites that have an image you can put on your card. One is at www.armhf.com/boards/beaglebone-black/#saucy and another is at elinux.org/Beagleboard:Ubuntu_On_BeagleBone_Black.
Both of these sites come with instructions for building a card with the image on it. You'll need to use the username and password of the image you downloaded. Unfortunately, they are not the same for all images, but you should be able to easily find them in the same place where you found your image.
In this book, I'm going to assume that you'll be developing your code on an external computer while you create your projects. I'll primarily be using a Windows PC for development, but everything I'll be doing will also be available if you are using a Linux machine as the host computer. Whenever there are any significant differences between the two, I'll try to include details for both.
To do this development remotely, you'll need access to the BeagleBone Black via some type of LAN connection. To establish this connection, simply connect a LAN cable from a router or switch to the BeagleBone board, plug it into the LAN connector, and restart the BeagleBone.
Note
You can also use an FTDI console cable like the ones sold at https://www.adafruit.com/products/954, which are connected to the BeagleBone Black's J1 console UART pins.
Refer the following link for details about setup: http://elinux.org/Beagleboard:BeagleBone_Black_Accessories
You'll need to know the IP address of your BeagleBone Black. You can certainly get this by adding a display and keyboard to the device, logging in, and typing ifconfig in the prompt. However, if you want to do this without rounding up the additional hardware, then you can use an IP scan tool to scan for the address of the BeagleBone Black. I used a tool called
Advanced IP Scanner, but there are others available too. If you're using Linux as a host machine, you can try the nmap command in Linux. For example, you can type sudo nmap –PR –sP 192.168.1.0/24.
These will explore your network and then print the address where there are devices, the BeagleBone Black being one of those devices. Generally, there are two types of IP addresses that your board can be assigned: one is called static and the other is called dynamic.
In the static case, you will always be assigned the same address. In the dynamic case, the address might change each time the system boots, as it asks the system for an address, which it then uses for that session. Most systems are configured for the dynamic case. However, if your system isn't changing the address, you will most likely get the same address each time you power on and log in to the system.
Note
To learn more about DHCP, visit www.teracomtraining.com/tutorials/teracom-tutorial-dynamic-IP-addresses-and-DHCP.htm.
Once you have the address, you should create an SSH connection to the BeagleBone Black. An SSH terminal is a Secure Shell Hyperterminal connection, which simply means that you'll be able to access your board and type commands in the prompt, just like you have done without the Windows system. In order to do this, you need to have a terminal emulator on your remote computer. For Microsoft Windows, I would suggest you to use an application called PuTTY. It is free and does a very good job by allowing you to save your configuration, so you don't have to type it every time. You can go to www.putty.org for details on how to download and use PuTTY.
If you want to do this from a Linux machine, the process is even simpler. Open a terminal window and then type ssh ubuntu@157.201.194.187 –p 22. This will then bring you to the login screen of your BeagleBone Black.
SSH is an excellent way to communicate with your BeagleBone Black. However, you'll sometimes need a graphical look at your system. You can get this by installing a graphical interface on the BeagleBone Black and then using an application called VNC server.
First, let's install the Windows manager on your BeagleBone Black. Ubuntu generally comes with a very full-featured Windows system. However, it uses a good deal of memory and can interfere with the performance you might need later. So you should install a light Windows system at the top of your Ubuntu distribution. There are several choices, of which I like using Xfce. It is stable, seems to work well, and offers a fairly complete set of capabilities while not overwhelming your system resources. Before getting started, first type sudo apt-get update. This will update all the latest information about installation. To install the Windows manager, type sudo apt-get install xfce4. Again, the system will prompt you for your password and then start the installation. For large installations, the Linux system will ask you if you want to proceed. If you don't always want to type in y to this, you can use apt-get –y to automatically answer with a yes. This installation will take a significant amount of time as it has to install not only the Windows system, but also a number of packages the windowing system depends on.
Now that you have a graphical interface, you'll need to install a version of VNC server on your BeagleBone Black by typing sudo apt-get install tightvncserver in a terminal window on your BeagleBone Black. The
TightVNC server is an application that will allow you to remotely view your complete Windows system. Once you have it installed, you'll need to start the server by typing vncserver in a terminal window on the BeagleBone Black. You will then be prompted for a password. This can, and preferably should, be a different password than the password using which you access your BeagleBone Black. This will be the password your remote system will send to access the VNC server running on the board. Select a password and your VNC server will be running. You only need to set this password once. Besides, you don't need to set the password for the view-only capability.
You'll need a VNC viewer application for your remote computer. On my Windows system, I used an application called Real VNC. Go to www.realvnc.com for information on how to set up and use this application. You can now access all the capabilities of your system. However they might be slower if you are doing graphics-intensive data transfers. You'll see this as you work through your projects. VNC viewer is also available via Linux.
You now have a basic BeagleBone Black configuration, so you can add some additional core packages you'll be using in the projects.
The two packages that you'll add here are a core vision package called OpenCV and a core voice recognition package called pocketsphinx. It's up to you whether to use them or not, but allowing your robot to see, hear, and speak seems like it should be a part of any robotics project, so adding them now will make them easier to use later. Let's start with OpenCV.
First, when you created your SD card, you copied an image to your card. So now, your card thinks it is only the size of the image that you copied, no matter what size it really is. You'll need to reclaim this space.
To do this, you'll need to issue some fairly cryptic commands, but fortunately, you'll be able to use the defaults, so it will be straightforward. First, open a terminal window. The card I am using is an 8 GB card, so if your card is of a different size, don't be worried if you don't see the exact numbers as you see here. Fortunately, you'll be using default values throughout the process, so you won't need to know anything special about your card. To begin with, type sudo su and enter your password.
Then follow the following steps:
Type
ll /dev/mmcblk*and you should see something like this:
Now you are going to make changes to the
mmcblk0device. Typefdisk /dev/mmcblk0.Enter the
pcommand and you should see something like this:
You're now going to expand the second device,
/dev/mmcblk0p2. To do this, delete the partition and create a new partition. The information that exists on your SD card should, however, be preserved during this process. Enterdin the prompt and enter2for the second partition. Now enterpagain and you should see something like this:
You will now create a new partition using defaults so that the partition takes up the entire card. In the command prompt, type
n, thenp, then2, and then hit Enter through each choice that the programs request. Your device should now appear like this: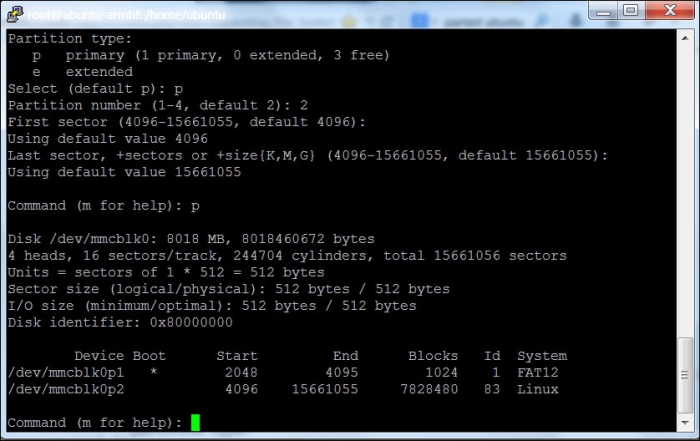
Notice that the second partition is now much larger than the original.
Type
wto commit your changes. Now you need to reboot, so typereboot.The final step will expand the filesystem. After the system reboots, type
sudo suand enter your password. Now typedf. You should see something like this:
It's the
/dev/mmcblk0p2device that you want to resize. Typeresize2fs /dev/mmcblk0p2and then enterdf. You should see the following:
Now that you have installed your operating system and expanded your storage device, your BeagleBone Black is ready to use.
Now you'll install OpenCV, an open source library of image processing and a web camera that provides access capabilities you'll use on these projects.
First, you'll need to download a set of libraries and the OpenCV itself. There are several possible steps; I'm going to suggest one that I followed to install it on my system. Once you have booted the system and opened a terminal window, type the following commands in the same order as they have been explained:
sudo apt-get install build-essential: You are going to need this library as it provides a set of essential build tools.sudo apt-get install libavformat-dev: This library provides a way to code and decode audio and video streams.sudo apt-get install libcv2.4 libcvaux2.4 libhighgui2.4: These are the basic OpenCV libraries. Note the number at the end of each of these library specifications; this will almost certainly change as new versions of OpenCV become available. If Version 2.4 does not work, go to opencv.org to find the latest version of OpenCV.sudo apt-get install python-opencv: This is the Python development kit for OpenCV. It is needed as you are going to use some Python code; it's the easiest language to use with this functionality.sudo apt-get install opencv-doc: This is the documentation for OpenCV, just in case you need it.sudo apt-get install libcv-dev: This provides a set of header files used to compile OpenCV.sudo apt-get install libcvaux-dev: This provides a translator for certain tool sets.sudo apt-get install libhighgui-dev: This provides a set of header files used to compile OpenCV, especially the GUI.cp -r /usr/share/doc/opencv-doc/examples: Execute this command in your home directory; this will copy all the examples to your home directory.
Now you're ready to try out the OpenCV library. I prefer to use Python when programming simple tasks, so I used the Python examples. If you prefer the C examples, feel free to explore. In order to use the Python examples, you'll need one more library. So type sudo apt-get install python-numpy as you will need this to manipulate the matrices that OpenCV uses to hold the images you will get from your webcam.
Now that you have those, you can try one of the Python examples. Change the current directory to that of the Python examples by typing cd /home/ubuntu/examples/python. In this directory, you will find a number of useful examples; you only need to look at the most basic example, called camera.py. You can try running this example, but you'll need to connect a USB web camera, reboot, bring up a VNC server connection, bring up a terminal window, and type python camera.py. You should see something like this:

In my case, the camera window eventually turned black and did not show the output from the camera. I realized that I needed to change the resolution of the image to one that is supported by the camera and OpenCV. To do this, you need to edit the camera.py file, adding two lines like this:

These two lines, cv.SetCaptureProperty(capture, 3, 360) and cv.SetCaptureProperty(capture, 4, 240), change the resolution of the captured image to 360 x 240 pixels. Now run camera.py and you should see this:

Your project can now see! You will use this capability to do a number of impressive tasks that will use this video input.
The second piece of open source infrastructure that you'll add now is the voice recognition software—pocketsphinx. To make it work, you'll need to purchase a USB sound card, as the BeagleBone Black does not have an audio in/out provision. You'll also need to purchase a microphone and speaker to attach to your USB sound card. Connect these, and reboot the system. You're now ready to install the software.
You can do this over the LAN connection via an SSH terminal window, so as soon as your board flashes that it has power (look out for the heartbeat LED), open up an SSH terminal window using PuTTY or some similar terminal emulator. Once the terminal window comes up, log in with your username and password. Now type cat /proc/asound/cards. You should see the following response:

Notice that the system thinks there are two possible audio devices. The first is the HDMI sound device and the second is your USB audio card. Now you can use the USB card to both create and record sound.
First, let's get some music going. This will let you know that your USB sound device is working. You'll need to first configure your system to look for your USB card and play and record some sounds from there as default. To do this, you'll need to add a couple of libraries to your system:
The first are some ALSA libraries. ALSA stands for Advanced Linux Sound Architecture, but all you really need to know is that it enables your sound system on the BeagleBone Black. First, install two libraries associated with ALSA by typing
sudo apt-get install alsa-base alsa-utils.Then also install the library include files by typing
sudo apt-get install libasound2-dev. This will install the basic capability that you need.Now you can use an application called alsamixer to control the volume of both the input and the output of your USB sound card. Type
sudo alsamixerin the prompt. You should see a screen like this:
Press F6, and select your USB sound device using the arrow keys. The screen should now appear like this:

You can use the arrow keys to set the volume for both the speakers and the mic. Make sure you use the M key to unmute the microphone.
Now make sure that your system knows about your USB sound device. In the prompt, type
sudo aplay –l. You should see the following:
Once you have added the libraries, add a file to your home directory by the name
.asoundrc. This will be read by your system and used to set your default configuration. Using your favorite editor, create the.asoundrcfile and insert the following in it:
The line to be added is
pcm.!default sysdefault:Device. This will tell the system to use our USB device as a default.Now that your system is ready, record some sound and play it. To do this, use the
arecordprogram. In the prompt, typearecord -d 5 -r 48000 test.wav. This will record 5 seconds of a sound at a 48,000 sample rate.Once you've typed the command, then either speak into the microphone or make some other recognizable sound. After 5 seconds, you should be able to play the sound.
Type
aplay test.wav, and you should hear the recording of your voice.
If you can't hear your recording, check alsamixer to make sure your speakers and microphone are both unmuted.
Now that you can get sounds both in and out of your BeagleBone Black, let's start doing something useful with this capability. Start by enabling Espeak, an open source application that provides you with a computer voice with a bit of personality. To get this functionality, download the Espeak library by typing sudo apt-get install espeak. You'll probably have to accept the additional size that the application requires, but this is fine based on your SD card size. This might take a bit of time to download, but the prompt will reappear when it is done.
Now let's see if your BeagleBone Black has a voice. Type the sudo espeak "hello" command. The speaker should emit a computer-voiced "hello." If it does not, make sure that the speaker is on and its volume is high enough to be heard. Now that you have a computer voice, you can customize it. Espeak offers a fairly complete set of customization features, including a large number of languages, voices, and other options.
Now your project can speak. Simply type espeak, followed by the text you want it to speak in quotes, and out comes your speech! If you want to read an entire text file, you can do that as well, using the –f option and then typing the name of the file. Try this by using your editor to create a text file called speak, then type this command: sudo espeak -f speak.txt.
Now that your projects can speak, you will want them to listen as well. This isn't nearly as simple as the speaking part, but thankfully you have some significant help. You will download a set of capabilities called pocketsphinx, and using these capabilities, you will provide your project with the ability to listen to your commands.
The first step is to download the pocketsphinx capability. Unfortunately, this is not as user friendly as the Espeak process, so follow the steps carefully. First, go to the Sphinx website, hosted by Carnegie Mellon University at http://cmusphinx.sourceforge.net/. This is an open source project that provides you with the speech recognition software you will need. With your smaller embedded system, you will be using the pocketsphinx version of this code. You will need to download two pieces of software, sphinxbase and pocketsphinx. Download these by selecting the Download section at the top of the page, and then find the latest version of both the packages. Download the .tar.gz versions of these and move them to the /usr/ubuntu directory of your BeagleBone Black. However, before you build these, you'll need another library.
This library is called bison. It's a general purpose, open source parser that will be used by pocketsphinx. To get this package, type sudo apt-get install bison.
If everything explained so far is installed and downloaded, you can build pocketsphinx as follows:
Start by unpacking and building the sphinxbase. Type
tar –xzvf sphinx-base-0.x.tar.gzwherexis the version number. This should unpack all the files from your archive into a directory calledsphinxbase-0.x. Now change to that directory.Now you will build the application. Start by issuing the
./configure --enable-fixedcommand. This will first check to make sure everything is ok with the system, then configure a build. When I first attempted this command, I got the following error:
This highlighted an interesting problem. The time and date on my BeagleBone Black was not set to the current time and date. If you need to set the current date and time, do that by issuing the
sudo date nnddhhmmyyyy.sscommand wherennis the month,ddis the day,hhis the hour,mmare the minutes,yyyyis the year, andssis the second. This will set the date to the desired date. Now you can reissue the./configure --enable-fixedcommand.You can also install python-dev using
sudo apt-get install python-devand Cython usingsudo apt-get install cython. Both of these will be useful later if you are going to use your pocketsphinx capability with Python as a coding language. You can also choose to installpkg-config, a utility that can sometimes help when you are trying to do complex compilations. Install it usingsudo apt-get install pkg-config.
Now you are ready to actually build the sphinxbase code base. This is a two-step process. First type make, and the system will build all the executable files. Then type sudo make install and it will install all the executables on the system.
Now make the second part of the system, the pocketsphinx code itself, as follows:
Go to the home directory and unarchive the code by typing
tar -xzvf pocketsphinx-0.x.tar.gz, wherexis the version number of pocketsphinx. The files should now be unarchived, and you can now build the code. Follow similar steps for these files, firstcdto thepocketSphinxdirectory, then type./configureto see if you're ready to build the files. Then typemake, wait for everything to build, then typesudo make install.Once you have completed the installation, you need to let the system know where your files are. To do this, edit the
/etc/ld.so.conffile as root. Add the last line to the file, so it should now look like this:
Type
sudo /sbin/ldconfigand the system will now be aware of your pocketsphinx libraries.Once everything is installed, you can try your speech recognition. Change your directory to the /
home/ubuntu//pocketsphinx-0.8/src/programsdirectory and try a demo program by typingsudo ./pocketsphinx_continuous. This program takes an input from the mic and turns it into a speech. After running the command, you'll get all kinds of information that won't have much meaning for you, and then get to this point:
Even though the warning message states that it can't find a mic or a capture element, it can find your mic element or a capture element. If you have set things up as previously described, you should be ready to give it a command. Say "hello" into the mic. When it senses that you have stopped speaking, it will process your speech, again giving us all kinds of interesting information that has no meaning for us, but should eventually showing this screen:

Notice the 000000001: hello line. It recognized your speech! You can try other words and phrases. The system is very sensitive, so it might also pick up background noise. You are also going to find out that it is not very accurate. There are two ways to make it more accurate. One is to train the system to understand your voice more accurately. I'm not going to detail that process here. It's a bit complex, and if you want to know more, feel free to go to the CMU pocketsphinx website at http://cmusphinx.sourceforge.net/.
The second way to improve accuracy is to limit the number of words that your system can use to determine what you are saying. The default has literally thousands of words that are possible, so if two words are close, it might choose the wrong word as opposed to the word you spoke. In order to make the system more accurate, you are going to restrict the words it has to choose from. You can do this by making your own grammar.
The first step is to create a file with the words or phrases you want the system to recognize. Then you use a web tool to create two files that the system will use to define your grammar:
Create a file called
grammar.txtand insert the following text in it:
Now you must use the CMU web browser tool to turn this file into two files that the system can use to define its dictionary. Open a web browser window and go to www.speech.cs.cmu.edu/tools/lmtool-new.html. If you click on the Choose File button, you can then find and select your file. It should look something like this:

Open the
grammer.txtfile and on the web page, select COMPILE KNOWLEDGE BASE. The following window should pop up:
Now you need to download the
.tgzfile, that is, the tool created. In this case, it's theTAR1565.tgzfile.Move it to the
/home/ubuntu/pocketsphinx-0.8/src/programsdirectory and unarchive it usingtar –xzvfand the filename.Now you can invoke the
pocketsphinx_continuousprogram to use this dictionary by typingsudo ./pocketsphinx_continuous -lm 1565.lm -dict 1565.dic.
It will now look up that directory as it tries to find matches to your commands.
Now that your system can both hear and speak, you would want to provide the capability to respond to your speech, and perhaps even execute some commands based on the speech input. Now you're going to configure the system to respond to your simple commands.
In order to respond, you're going to edit the continuous.c code in the /home/ubuntu/pocketsphinx-0.8/src/programs directory. You can create your own .c file, but this file is already set up in the makefile system, and will serve as an excellent starting spot. You will need to edit the continuous.c file. It's very long, and a bit complicated, but you should be specifically looking out for the following section in the code:

In this section of the code, the word has already been decoded, and is held in the hyp variable. You can add some code here to make your system do things based on the value associated with the word you have decoded. First, let's try adding the capability to respond to hello and goodbye, and see if you can get the program to stop. Make the following changes to the code:

Now you need to rebuild your code. Since the make system already knows how to build the pocketsphinx_continuous program, any time you make a change to the continuous.c file, it will rebuild the application. Simply type make. The file will compile and create a new version of pocketsphinx_continuous. To run your new version, type sudo ./pocketsphinx_continuous. Make sure you type ./ at the start of pocketsphinx_continuous. If you don't, the system has another version of pocketsphinx_continuous in the library and it will run that.
If everything is set correctly, saying hello should result in a response of hello from your BeagleBone Black. Saying goodbye should elicit a response of goodbye, as well as shutting down the program. Note that the system command can be used to actually run any program that you might run with a command line. You can now use this to have your program started and run other programs based on the voice commands.
The final step in making your BeagleBone Black really useful is to add a wireless LAN interface. This will allow you to control your robotic projects remotely without having a wired LAN cable. It is very straightforward, but there is one slight challenge. Adding a WLAN device might cause your BeagleBone Black to draw in more current than a USB power supply can provide, and your board will stop, that is, the blue light will no longer flash like a heartbeat.
To avoid this problem and provide additional capability to add more devices, you'll need to add a powered USB hub to your BeagleBone Black. This is a USB hub that is powered by an external power supply, not the BeagleBone.
Once you have this device connected to a power supply and to your BeagleBone Black, you can now connect your WLAN device. There are many different WLAN devices; you'll have to follow the instructions for your specific device. See elinux.org/Beagleboard:BeagleBoneBlack. Go to the WIFI Adapters section to see some devices that others have successfully used. I personally have had good luck with the Edimax device, and the instructions are very simple. To get this device connected, follow the instructions at groups.google.com/forum/#!topic/beaglebone/Q92uD9F1us8. Once you are connected via LAN, you can access the BeagleBone Black wirelessly via SSH and VNC viewer, controlling your robotic projects without limiting their movement.
This chapter has been a bit long and a bit involving, but if you've followed everything, you should have a solid system that you can now use as the basis of your robotic projects. Your first project will be a fairly simple tracked robot. You'll add the speed and direction control, and then some sensing, and finally some commands and controls to make your device autonomous. So let's get building!


