


 Download code from GitHub
Chapter 1: The System Architecture and Design of Ansible
This chapter provides a detailed exploration of the architecture and design of Ansible and how it goes about performing tasks on your behalf. We will cover the basic concepts of inventory parsing and how data is discovered. Then, we will proceed onto playbook parsing. We will take a walk through module preparation, transportation, and execution. Finally, we will detail variable types and find out where variables are located, their scope of use, and how precedence is determined when variables are defined in more than one location. All these things will be covered in order to lay the foundation for mastering Ansible!
In this chapter, we will cover the following topics:
- Ansible versions and configurations
- Inventory parsing and data sources
- Playbook parsing
- Execution strategies
- Module transport and execution
- Ansible collections
- Variable types and locations
- Magic variables
- Accessing external data
- Variable precedence (and interchanging this with variable priority ordering)
Technical requirements
To follow the examples presented in this chapter, you will need a Linux machine running Ansible 4.3 or later. Almost any flavor of Linux should do. For those who are interested in specifics, all the code presented in this chapter was tested on Ubuntu Server 20.04 LTS, unless stated otherwise, and on Ansible 4.3. The example code that accompanies this chapter can be downloaded from GitHub at https://github.com/PacktPublishing/Mastering-Ansible-Fourth-Edition/tree/main/Chapter01.
Check out the following video to view the Code in Action: https://bit.ly/3E37xpn.
Ansible versions and configurations
It is assumed that you have Ansible installed on your system. There are many documents out there that cover installing Ansible in a way that is appropriate to the operating system and version that you might be using. However, it is important to note that Ansible versions that are newer than 2.9.x feature some major changes from all of the earlier versions. For everyone reading this book who has had exposure to Ansible 2.9.x and earlier, Chapter 2, Migrating from Earlier Ansible Versions, explains the changes in detail, along with how to address them.
This book will assume the use of Ansible version 4.0.0 (or later), coupled with ansible-core 2.11.1 (or newer), both of which are required and are the latest and greatest releases at the time of writing. To discover the version in use on a system where Ansible is already installed, make use of the --version argument, that is, either ansible or ansible-playbook, as follows:
ansible-playbook --version
This command should give you an output that's similar to Figure 1.1; note that the screenshot was taken on Ansible 4.3, so you might see an updated version number corresponding to the version of your ansible-core package (for instance, for Ansible 4.3.0, this would be ansible-core 2.11.1, which is the version number that all of the commands will return):

Figure 1.1 – An example output showing the installed version of Ansible on a Linux system
Important note
Note that ansible is the executable for doing ad hoc one-task executions, and ansible-playbook is the executable that will process playbooks to orchestrate multiple tasks. We will cover the concepts of ad hoc tasks and playbooks later in the book.
The configuration for Ansible can exist in a few different locations, where the first file found will be used. The search involves the following:
ANSIBLE_CFG: This environment variable is used, provided that it is set.ansible.cfg: This is located in the current working directory.~/.ansible.cfg: This is located in the user's home directory./etc/ansible/ansible.cfg: The default central Ansible configuration file for the system.
Some installation methods could include placing a config file in one of these locations. Look around to check whether such a file exists and view what settings are in the file to get an idea of how the Ansible operation might be affected. This book assumes that there are no settings in the ansible.cfg file that can affect the default operation of Ansible.
Inventory parsing and data sources
In Ansible, nothing happens without an inventory. Even ad hoc actions performed on the localhost require an inventory – although that inventory might just consist of the localhost. The inventory is the most basic building block of Ansible architecture. When executing ansible or ansible-playbook, an inventory must be referenced. Inventories are files or directories that exist on the same system that runs ansible or ansible-playbook. The location of the inventory can be defined at runtime with the --inventory-file (-i) argument or by defining the path in an Ansible config file.
Inventories can be static or dynamic, or even a combination of both, and Ansible is not limited to a single inventory. The standard practice is to split inventories across logical boundaries, such as staging and production, allowing an engineer to run a set of plays against their staging environment for validation, and then follow with the exact plays run against the production inventory set.
Variable data, such as specific details a how to connect to a particular host in your inventory, can be included, along with an inventory in a variety of ways, and we'll explore the options available to you.
Static inventories
The static inventory is the most basic of all the inventory options. Typically, a static inventory will consist of a single file in ini format. Other formats are supported, including YAML, but you will find that ini is commonly used when most people start out with Ansible. Here is an example of a static inventory file describing a single host, mastery.example.name:
mastery.example.name
That is all there is to it. Simply list the names of the systems in your inventory. Of course, this does not take full advantage of all that an inventory has to offer. If every name were listed like this, all plays would have to reference specific hostnames, or the special built-in all group (which, as the name suggests, contains all hosts inside the inventory). This can be quite tedious when developing a playbook that operates across different environments within your infrastructure. At the very least, hosts should be arranged into groups.
A design pattern that works well is arranging your systems into groups based on expected functionality. At first, this might seem difficult if you have an environment where single systems can play many different roles, but that is perfectly fine. Systems in an inventory can exist in more than one group, and groups can even consist of other groups! Additionally, when listing groups and hosts, it is possible to list hosts without a group. These would have to be listed first before any other group is defined. Let's build on our previous example and expand our inventory with a few more hosts and groupings, as follows:
[web]
mastery.example.name

[dns]
backend.example.name

[database]
backend.example.name

[frontend:children]
web

[backend:children]
dns
database
Here, we have created a set of three groups with one system in each, and then two more groups, which logically group all three together. Yes, that's right: you can have groups of groups. The syntax used here is [groupname:children], which indicates to Ansible's inventory parser that this group, going by the name of groupname, is nothing more than a grouping of other groups.
The children, in this case, are the names of the other groups. This inventory now allows writing plays against specific hosts, low-level role-specific groups, or high-level logical groupings, or any combination thereof.
By utilizing generic group names, such as dns and database, Ansible plays can reference these generic groups rather than the explicit hosts within. An engineer can create one inventory file that fills in these groups with hosts from a preproduction staging environment, and another inventory file with the production versions of these groupings. The content of the playbook does not need to change when executing on either a staging or production environment because it refers to the generic group names that exist in both inventories. Simply refer to the correct inventory to execute it in the desired environment.
Inventory ordering
A new play-level keyword, order, was added to Ansible in version 2.4. Prior to this, Ansible processed the hosts in the order specified in the inventory file, and it continues to do so by default, even in newer versions. However, the following values can be set for the order keyword for a given play, resulting in the processing order of hosts, which is described as follows:
inventory: This is the default option. It simply means that Ansible proceeds as it always has, processing the hosts in the order that is specified in theinventoryfile.reverse_inventory: This results in the hosts being processed in the reverse order that is specified in theinventoryfile.sorted: The hosts are processed in alphabetical order by name.reverse_sorted: The hosts are processed in reverse alphabetical order.shuffle: The hosts are processed in a random order, with the order being randomized on each run.
In Ansible, the alphabetical sorting used is alternatively known as lexicographical. Put simply, this means that values are sorted as strings, with the strings being processed from left to right. Therefore, let's say that we have three hosts: mastery1, mastery11, and mastery2. In this list, mastery1 comes first as the character, as position 8 is a 1. Then comes mastery11, as the character at position 8 is still a 1, but now there is an additional character at position 9. Finally comes mastery2, as character 8 is a 2, and 2 comes after 1. This is important as, numerically, we know that 11 is greater than 2. However, in this list, mastery11 comes before mastery2. You can easily work around this by adding leading zeros to any numbers on your hostnames; for example, mastery01, mastery02, and mastery11 will be processed in the order they have been listed in this sentence, resolving the lexicographical issue described.
Inventory variable data
Inventories provide more than just system names and groupings. Data regarding the systems can be passed along as well. This data could include the following:
- Host-specific data to use in templates
- Group-specific data to use in task arguments or conditionals
- Behavioral parameters to tune how Ansible interacts with a system
Variables are a powerful construct within Ansible and can be used in a variety of ways, not just those described here. Nearly every single thing done in Ansible can include a variable reference. While Ansible can discover data about a system during the setup phase, not all of the data can be discovered. Defining data with the inventory expands this. Note that variable data can come from many different sources, and one source could override another. We will cover the order of variable precedence later in this chapter.
Let's improve upon our existing example inventory and add to it some variable data. We will add some host-specific data and group-specific data:
[web]
mastery.example.name ansible_host=192.168.10.25

[dns]
backend.example.name

[database]
backend.example.name

[frontend:children]
web

[backend:children]
dns
database

[web:vars]
http_port=88
proxy_timeout=5

[backend:vars]
ansible_port=314

[all:vars]
ansible_ssh_user=otto
In this example, we defined ansible_host for mastery.example.name to be the IP address of 192.168.10.25. The ansible_host variable is a behavioral inventory variable, which is intended to alter the way Ansible behaves when operating with this host. In this case, the variable instructs Ansible to connect to the system using the IP address provided, rather than performing a DNS lookup on the name using mastery.example.name. There are a number of other behavioral inventory variables that are listed at the end of this section, along with their intended use.
Our new inventory data also provides group-level variables for the web and backend groups. The web group defines http_port, which could be used in an NGINX configuration file, and proxy_timeout, which might be used to determine HAProxy behavior. The backend group makes use of another behavioral inventory parameter to instruct Ansible to connect to the hosts in this group using port 314 for SSH, rather than the default of 22.
Finally, a construct is introduced that provides variable data across all the hosts in the inventory by utilizing a built-in all group. Variables defined within this group will apply to every host in the inventory. In this particular example, we instruct Ansible to log in as the otto user when connecting to the systems. This is also a behavioral change, as the Ansible default behavior is to log in as a user with the same name as the user executing ansible or ansible-playbook on the control host.
Here is a list of behavior inventory variables and the behaviors they intend to modify:
ansible_host: This is the DNS name or the Docker container name that Ansible will initiate a connection to.ansible_port: This specifies the port number that Ansible will use to connect to the inventory host if it is not the default value of22.ansible_user: This specifies the username that Ansible will use to connect with the inventory host, regardless of the connection type.ansible_password: This is used to provide Ansible with the password for authentication to the inventory host in conjunction withansible_user. Use this for testing purposes only – you should always use a vault to store sensitive data such as passwords (please refer to Chapter 3, Protecting Your Secrets with Ansible).ansible_ssh_private_key_file: This is used to specify which SSH private key file will be used to connect to the inventory host if you are not using the default one orssh-agent.ansible_ssh_common_args: This defines SSH arguments to append to the default arguments forssh,sftp, andscp.ansible_sftp_extra_args: This is used to specify additional arguments that will be passed to thesftpbinary when called by Ansible.ansible_scp_extra_args: This is used to specify additional arguments that will be passed to thescpbinary when called by Ansible.ansible_ssh_extra_args: This is used to specify additional arguments that will be passed to thesshbinary when called by Ansible.ansible_ssh_pipelining: This setting uses a Boolean to define whether SSH pipelining should be used for this host.ansible_ssh_executable: This setting overrides the path to the SSH executable for this host.ansible_become: This defines whether privilege escalation (sudoor something else) should be used with this host.ansible_become_method: This is the method to use for privilege escalation and can be one ofsudo,su,pbrun,pfexec,doas,dzdo, orksu.ansible_become_user: This is the user to switch to through privilege escalation, typically root on Linux and Unix systems.ansible_become_password: This is the password to use for privilege escalation. Only use this for testing purposes; you should always use a vault to store sensitive data such as passwords (please refer to Chapter 3, Protecting Your Secrets with Ansible).ansible_become_exe: This is used to set the executable that was used for the chosen escalation method if you are not using the default one defined by the system.ansible_become_flags: This is used to set the flags passed to the chosen escalation executable if required.ansible_connection: This is the connection type of the host. Candidates arelocal,smart,ssh,paramiko,docker, orwinrm(we will look at this in more detail later in the book). The default setting issmartin any modern Ansible distribution (this detects whether theControlPersistSSH feature is supported and, if so, usessshas the connection type; otherwise, it falls back toparamiko).ansible_docker_extra_args: This is used to specify the extra argument that will be passed to a remote Docker daemon on a given inventory host.ansible_shell_type: This is used to determine the shell type on the inventory host(s) in question. It defaults to thesh-style syntax but can be set tocshorfishto work with systems that use these shells.ansible_shell_executable: This is used to determine the shell type on the inventory host(s) in question. It defaults to thesh-style syntax but can be set tocshorfishto work with systems that use these shells.ansible_python_interpreter: This is used to manually set the path to Python on a given host in the inventory. For example, some distributions of Linux have more than one Python version installed, and it is important to ensure that the correct one is set. For example, a host might have both/usr/bin/python27and/usr/bin/python3, and this is used to define which one will be used.ansible_*_interpreter: This is used for any other interpreted language that Ansible might depend upon (for example, Perl or Ruby). This replaces the interpreter binary with the one that is specified.
Dynamic inventories
A static inventory is great and can be enough for many situations. However, there are times when a statically written set of hosts is just too unwieldy to manage. Consider situations where inventory data already exists in a different system, such as LDAP, a cloud computing provider, or an in-house configuration management database (CMDB) (inventory, asset tracking, and data warehousing) system. It would be a waste of time and energy to duplicate that data and, in the modern world of on-demand infrastructure, that data would quickly grow stale or become disastrously incorrect.
Another example of when a dynamic inventory source might be desired is when your site grows beyond a single set of playbooks. Multiple playbook repositories can fall into the trap of holding multiple copies of the same inventory data, or complicated processes have to be created to reference a single copy of the data. An external inventory can easily be leveraged to access the common inventory data that is stored outside of the playbook repository to simplify the setup. Thankfully, Ansible is not limited to static inventory files.
A dynamic inventory source (or plugin) is an executable that Ansible will call at runtime to discover real-time inventory data. This executable can reach out to external data sources and return data, or it can just parse local data that already exists but might not be in the ini/yaml Ansible inventory format. While it is possible, and easy, to develop your own dynamic inventory source, which we will cover in a later chapter, Ansible provides an ever-growing number of example inventory plugins. This includes, but is not limited to, the following:
- OpenStack Nova
- Rackspace Public Cloud
- DigitalOcean
- Linode
- Amazon EC2
- Google Compute Engine
- Microsoft Azure
- Docker
- Vagrant
Many of these plugins require some level of configuration, such as user credentials for EC2 or an authentication endpoint for OpenStack Nova. Since it is not possible to configure additional arguments for Ansible to pass along to the inventory script, the configuration for the script must either be managed via an ini config file that is read from a known location or environment variables that are read from the shell environment used to execute ansible or ansible-playbook. Also, note that, sometimes, external libraries are required for these inventory scripts to function.
When ansible or ansible-playbook is directed at an executable file for an inventory source, Ansible will execute that script with a single argument, --list. This is so that Ansible can get a listing of the entire inventory in order to build up its internal objects to represent the data. Once that data is built up, Ansible will then execute the script with a different argument for every host in the data to discover variable data. The argument used in this execution is --host <hostname>, which will return any variable data that is specific to that host.
The number of inventory plugins is too numerous for us to go through each of them in detail in this book. However, similar processes are needed to set up and use just about all of them. So, to demonstrate the process, we will work through the use of the EC2 dynamic inventory.
Many of the dynamic inventory plugins are installed as part of the community.general collection, which is installed, by default, when you install Ansible 4.0.0. Nonetheless, the first part of working with any dynamic inventory plugin is finding out which collection the plugin is part of and, if required, installing that collection. The EC2 dynamic inventory plugin is installed as part of the amazon.aws collection. So, your first step will be to install this collection – you can do this with the following command:
ansible-galaxy collection install amazon.aws
If all goes well, you should see a similar output on your Terminal to that in Figure 1.2:
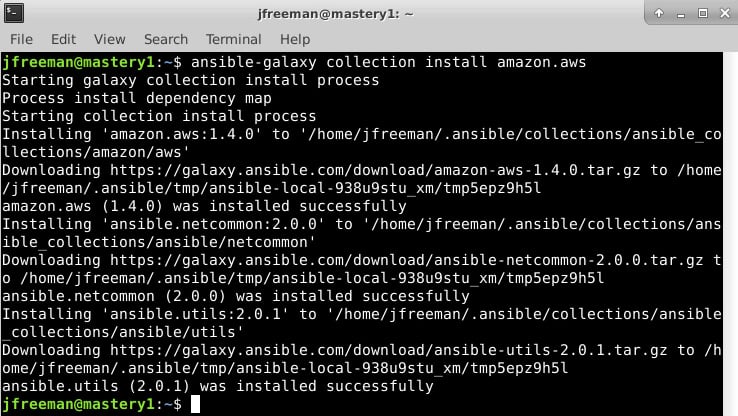
Figure 1.2 – The installation of the amazon.aws collection using ansible-galaxy
Whenever you install a new plugin or collection, it is always advisable to read the accompanying documentation as some of the dynamic inventory plugins require additional libraries or tools to function correctly. For example, if you refer to the documentation for the aws_ec2 plugin at https://docs.ansible.com/ansible/latest/collections/amazon/aws/aws_ec2_inventory.html, you will see that both the boto3 and botocore libraries are required for this plugin to operate. Installing this will depend on your operating system and Python environment. However, on Ubuntu Server 20.04 (and other Debian variants), it can be done with the following command:
sudo apt install python3-boto3 python3-botocore
Here's the output for the preceding command:
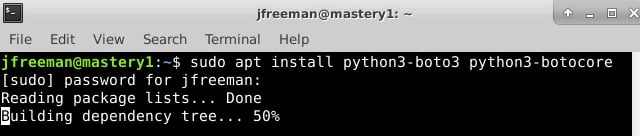
Figure 1.3 – Installing the Python dependencies for the EC2 dynamic inventory script
Now, looking at the documentation for the plugin (often, you can also find helpful hints by looking within the code and any accompanying configuration files), you will note that we need to provide our AWS credentials to this script in some manner. There are several possible ways in which to do this – one example is to use the awscli tool (if you have it installed) to define the configuration, and then reference this configuration profile from your inventory. For example, I configured my default AWS CLI profile using the following command:
aws configure
The output will appear similar to the following screenshot (the secure details have been redacted for obvious reasons!):
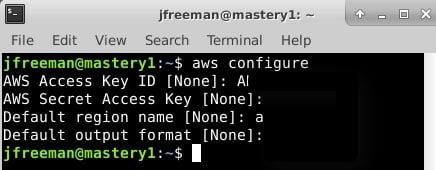
Figure 1.4 – Configuring AWS credentials using the AWS CLI utility
With this done, we can now create out inventory definition, telling Ansible which plugin to use, and passing the appropriate parameters to it. In our example here, we simply need to tell the plugin to use the default profile we created earlier. Create a file called mastery_aws_ec2.yml, which contains the following content:
---
plugin: amazon.aws.aws_ec2
boto_profile: default
Finally, we will test our new inventory plugin configuration by passing it to the ansible-inventory command with the –graph parameter:
ansible-inventory -i mastery_aws_ec2.yml –-graph
Assuming you have some instances running in AWS EC2, you will see a similar output to the following:
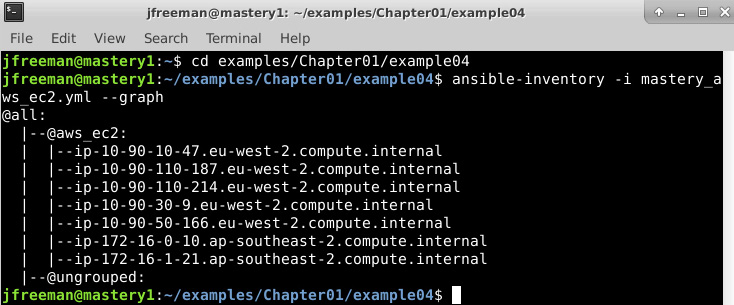
Figure 1.5 – An example output from the dynamic inventory plugin
Voila! We have a listing of our current AWS inventory, along with a glimpse into the automatic grouping performed by the plugin. If you want to delve further into the capabilities of the plugin and view, for example, all the inventory variables assigned to each host (which contain useful information, including instance type and sizing), try passing the–-list parameter to ansible-inventory instead of–-graph.
With the AWS inventory in place, you could use this right away to run a single task or the entire playbook against this dynamic inventory. For example, to use the ansible.builtin.ping module to check Ansible authentication and connectivity to all the hosts in the inventory, you could run the following command:
ansible -i mastery_aws_ec2.yml all -m ansible.builtin.ping
Of course, this is just one example. However, if you follow this process for other dynamic inventory providers, you should get them to work with ease.
In Chapter 10, Extending Ansible, we will develop our own custom inventory plugin to demonstrate how they operate.
Runtime inventory additions
Just like static inventory files, it is important to remember that Ansible will parse this data once, and only once, per the ansible or ansible-playbook execution. This is a fairly common stumbling point for users of cloud dynamic sources, where, frequently, a playbook will create a new cloud resource and then attempt to use it as if it were part of the inventory. This will fail, as the resource was not part of the inventory when the playbook launched. All is not lost, though! A special module is provided that allows a playbook to temporarily add an inventory to the in-memory inventory object, that is, the ansible.builtin.add_host module.
This module takes two options: name and groups. The name option should be obvious; it defines the hostname that Ansible will use when connecting to this particular system. The groups option is a comma-separated list of groups that you can add to this new system. Any other option passed to this module will become the host variable data for this host. For example, if we want to add a new system, name it newmastery.example.name, add it to the web group, and instruct Ansible to connect to it by way of IP address 192.168.10.30. This will create a task that resembles the following:
- name: add new node into runtime inventory
  ansible.builtin.add_host:
    name: newmastery.example.name
    groups: web
    ansible_host: 192.168.10.30
This new host will be available to use – either by way of the name provided or by way of the web group – for the rest of the ansible-playbook execution. However, once the execution has been completed, this host will not be available unless it has been added to the inventory source itself. Of course, if this were a new cloud resource that had been created, the next ansible or ansible-playbook execution that sourced a dynamic inventory from that cloud would pick up the new member.
Inventory limiting
As mentioned earlier, every execution of ansible or ansible-playbook will parse the entire inventory it has been provided with. This is even true when a limit has been applied. Put simply, a limit is applied at runtime by making use of the --limit runtime argument to ansible or ansible-playbook. This argument accepts a pattern, which is essentially a mask to apply to the inventory. The entire inventory is parsed, and at each play, the limit mask that is supplied restricts the play to only run against the pattern that has been specified.
Let's take our previous inventory example and demonstrate the behavior of Ansible with and without a limit. If you recall, we have a special group, all, that we can use to reference all of the hosts within an inventory. Let's assume that our inventory is written out in the current working directory, in a file named mastery-hosts, and we will construct a playbook to demonstrate the host on which Ansible is operating. Let's write this playbook out as mastery.yaml:
---
- name: limit example play
  hosts: all
  gather_facts: false

  tasks:
    - name: tell us which host we are on
      ansible.builtin.debug:
        var: inventory_hostname
The ansible.builtin.debug module is used to print out text or values of variables. We'll use this module a lot in this book to simulate the actual work being done on a host.
Now, let's execute this simple playbook without supplying a limit. For simplicity's sake, we will instruct Ansible to utilize a local connection method, which will execute locally rather than attempt to SSH to these nonexistent hosts. Run the following command:
ansible-playbook -i mastery-hosts -c local mastery.yaml
The output should appear similar to Figure 1.6:

Figure 1.6 – Running the simple playbook on an inventory without a limit applied
As you can see, both the backend.example.name and mastery.example.name hosts were operated on. Now, let's see what happens if we supply a limit, that is, to limit our run to the frontend systems only, by running the following command:
ansible-playbook -i mastery-hosts -c local mastery.yaml --limit frontend
This time around, the output should appear similar to Figure 1.7:
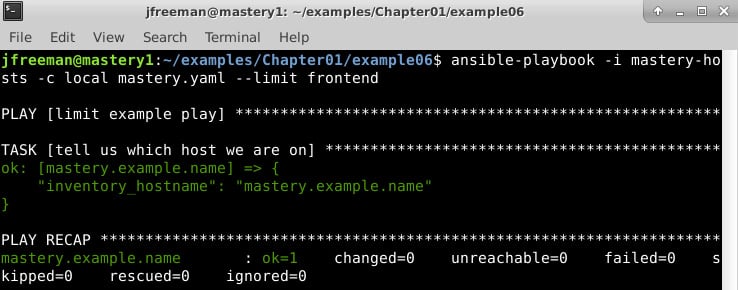
Figure 1.7 – Running the simple playbook on an inventory with a limit applied
Here, we can see that only mastery.example.name was operated on this time. While there are no visual clues that the entire inventory was parsed, if we dive into the Ansible code and examine the inventory object, we will indeed find all the hosts within. Additionally, we will see how the limit is applied every time the object is queried for items.
It is important to remember that regardless of the host's pattern used in a play, or the limit that is supplied at runtime, Ansible will still parse the entire inventory that is set during each run. In fact, we can prove this by attempting to access the host variable data for a system that would otherwise be masked by our limit. Let's expand our playbook slightly and attempt to access the ansible_port variable from backend.example.name:
---
- name: limit example play
  hosts: all
  gather_facts: false

  tasks:
    - name: tell us which host we are on
      ansible.builtin.debug:
        var: inventory_hostname

    - name: grab variable data from backend
      ansible.builtin.debug:
        var: hostvars['backend.example.name']['ansible_port']
We will still apply our limit by running the playbook with the same command we used in the previous run, which will restrict our operations to just mastery.example.name:
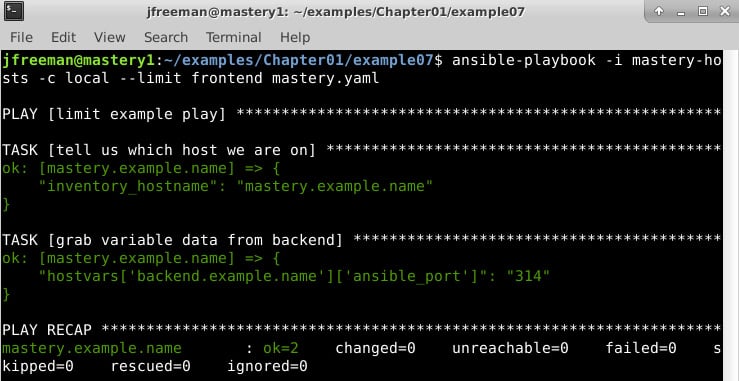
Figure 1.8 – Demonstrating that the entire inventory is parsed even with a limit applied
We have successfully accessed the host variable data (by way of group variables) for a system that was otherwise limited out. This is a key skill to understand, as it allows for more advanced scenarios, such as directing a task at a host that is otherwise limited out. Additionally, delegation can be used to manipulate a load balancer; this will put a system into maintenance mode while it is being upgraded without you having to include the load balancer system in your limit mask.
Playbook parsing
The whole purpose of an inventory source is to have systems to manipulate. The manipulation comes from playbooks (or, in the case of Ansible ad hoc execution, simple single-task plays). You should already have a basic understanding of playbook construction, so we won't spend a lot of time covering that; however, we will delve into some specifics of how a playbook is parsed. Specifically, we will cover the following:
- The order of operations
- Relative path assumptions
- Play behavior keys
- The host selection for plays and tasks
- Play and task names
The order of operations
Ansible is designed to be as easy as possible for humans to understand. The developers strive to strike the best balance of human comprehension and machine efficiency. To that end, nearly everything in Ansible can be assumed to be executed in a top-to-bottom order; that is, the operation listed at the top of a file will be accomplished before the operation listed at the bottom of a file. Having said that, there are a few caveats and even a few ways to influence the order of operations.
A playbook only has two main operations it can accomplish. It can either run a play, or it can include another playbook from somewhere on the filesystem. The order in which these are accomplished is simply the order in which they appear in the playbook file, from top to bottom. It is important to note that while the operations are executed in order, the entire playbook and any included playbooks are completely parsed before any executions. This means that any included playbook file has to exist at the time of the playbook parsing – they cannot be generated in an earlier operation. This is specific to playbook inclusions but not necessarily to task inclusions that might appear within a play, which will be covered in a later chapter.
Within a play, there are a few more operations. While a playbook is strictly ordered from top to bottom, a play has a more nuanced order of operations. Here is a list of the possible operations and the order in which they will occur:
- Variable loading
- Fact gathering
- The
pre_tasksexecution - Handlers notified from the
pre_tasksexecution - The roles execution
- The tasks execution
- Handlers notified from the roles or tasks execution
- The
post_tasksexecution - Handlers notified from the
post_tasksexecution
The following is an example play with most of these operations shown:
---
- hosts: localhost
  gather_facts: false

  vars:
    - a_var: derp

  pre_tasks:
    - name: pretask
      debug:
        msg: "a pre task"
      changed_when: true
      notify: say hi

  roles:
    - role: simple
      derp: newval

  tasks:
    - name: task
      debug:
        msg: "a task"
      changed_when: true
      notify: say hi

  post_tasks:
    - name: posttask
      debug:
        msg: "a post task"
      changed_when: true
      notify: say hi
  handlers:
    - name: say hi
      debug:
        msg: hi
Regardless of the order in which these blocks are listed in a play, the order detailed in the previous code block is the order in which they will be processed. Handlers (that is, the tasks that can be triggered by other tasks that result in a change) are a special case. There is a utility module, ansible.builtin.meta, that can be used to trigger handler processing at a specific point:
- ansible.builtin.meta: flush_handlers
This will instruct Ansible to process any pending handlers at that point before continuing with the next task or next block of actions within a play. Understanding the order and being able to influence the order with flush_handlers is another key skill to have when there is a need to orchestrate complicated actions; for instance, where things such as service restarts are very sensitive to order. Consider the initial rollout of a service.
The play will have tasks that modify config files and indicate that the service should be restarted when these files change. The play will also indicate that the service should be running. The first time this play happens, the config file will change, and the service will change from not running to running. Then, the handlers will trigger, which will cause the service to restart immediately. This can be disruptive to any consumers of the service. It is better to flush the handlers before a final task to ensure the service is running. This way, the restart will happen before the initial start, so the service will start up once and stay up.
Relative path assumptions
When Ansible parses a playbook, there are certain assumptions that can be made about the relative paths of items referenced by the statements in a playbook. In most cases, paths for things such as variable files to include, task files to include, playbook files to include, files to copy, templates to render, and scripts to execute are all relative to the directory where the file that is referencing them resides. Let's explore this with an example playbook and directory listing to demonstrate where the files are:
- The directory structure is as follows:
.
├── a_vars_file.yaml
├── mastery-hosts
├── relative.yaml
└── tasks
    ├── a.yaml
    └── b.yaml
- The content of
a_vars_file.yamlis as follows:--- something: "better than nothing"
- The content of
relative.yamlis as follows:--- - name: relative path play hosts: localhost gather_facts: false vars_files: - a_vars_file.yaml tasks: - name: who am I ansible.builtin.debug: msg: "I am mastery task" - name: var from file ansible.builtin.debug: var: something - ansible.builtin.include: tasks/a.yaml
- The content of
tasks/a.yamlis as follows:--- - name: where am I ansible.builtin.debug: msg: "I am task a" - ansible.builtin.include: b.yaml
- The content of
tasks/b.yamlis as follows:--- - name: who am I ansible.builtin.debug: msg: "I am task b"
The execution of the playbook is performed with the following command:
ansible-playbook -i mastery-hosts -c local relative.yaml
The output should be similar to Figure 1.9:

Figure 1.9 – The expected output from running a playbook utilizing relative paths
Here, we can clearly see the relative references to the paths and how they are relative to the file referencing them. When using roles, there are some additional relative path assumptions; however, we'll cover that, in detail, in a later chapter.
Play behavior directives
When Ansible parses a play, there are a few directives it looks for in order to define various behaviors for a play. These directives are written at the same level as the hosts: directive. Here is a list of descriptions for some of the more frequently used keys that can be defined in this section of the playbook:
any_errors_fatal: This Boolean directive is used to instruct Ansible to treat any failure as a fatal error to prevent any further tasks from being attempted. This changes the default, where Ansible will continue until all the tasks have been completed or all the hosts have failed.connection: This string directive defines which connection system to use for a given play. A common choice to make here islocal, which instructs Ansible to do all the operations locally but with the context of the system from the inventory.collections: This is a list of the collection namespaces used within the play to search for modules, plugins, and roles, and it can be used to prevent the need to enter Fully Qualified Collection Names (FQCNs) – we will learn more about this in Chapter 2, Migrating from Earlier Ansible Versions. Note that this value does not get inherited by role tasks, so you must set it separately in each role in themeta/main.ymlfile.gather_facts: This Boolean directive controls whether or not Ansible will perform the fact-gathering phase of the operation, where a special task will run on a host to uncover various facts about the system. Skipping fact gathering – when you are sure that you do not require any of the discovered data – can be a significant time-saver in a large environment.Max_fail_percentage: This number directive is similar toany_errors_fatal, but it is more fine-grained. It allows you to define what percentage of your hosts can fail before the whole operation is halted.no_log: This is a Boolean to control whether or not Ansible will log (to the screen and/or a configuredlogfile) the command given or the results received from a task. This is important if your task or return deals with secrets. This key can also be applied to a task directly.port: This is a number directive to define what SSH port (or any other remote connection plugin) you should use to connect unless this is already configured in the inventory data.remote_user: This is a string directive that defines which user to log in with on the remote system. The default setting is to connect as the same user thatansible-playbookwas started with.serial: This directive takes a number and controls how many systems Ansible will execute a task on before moving to the next task in a play. This is a drastic change from the normal order of operations, where a task is executed across every system in a play before moving to the next. This is very useful in rolling update scenarios, which we will discuss in later chapters.become: This is a Boolean directive that is used to configure whether privilege escalation (sudoor something else) should be used on the remote host to execute tasks. This key can also be defined at a task level. Related directives includebecome_user,become_method, andbecome_flags. These can be used to configure how the escalation will occur.strategy: This directive sets the execution strategy to be used for the play.
Many of these keys will be used in the example playbooks throughout this book.
For a full list of available play directives, please refer to the online documentation at https://docs.ansible.com/ansible/latest/reference_appendices/playbooks_keywords.html#play.
Execution strategies
With the release of Ansible 2.0, a new way to control play execution behavior was introduced: strategy. A strategy defines how Ansible coordinates each task across the set of hosts. Each strategy is a plugin, and three strategies come with Ansible: linear, debug, and free. The linear strategy, which is the default strategy, is how Ansible has always behaved. As a play is executed, all the hosts for a given play execute the first task.
Once they are all complete, Ansible moves to the next task. The serial directive can create batches of hosts to operate in this way, but the base strategy remains the same. All the targets for a given batch must complete a task before the next task is executed. The debug strategy makes use of the same linear mode of execution described earlier, except that here, tasks are run in an interactive debugging session rather than running to completion without any user intervention. This is especially valuable during the testing and development of complex and/or long-running automation code where you need to analyze the behavior of the Ansible code as it runs, rather than simply running it and hoping for the best!
The free strategy breaks from this traditional linear behavior. When using the free strategy, as soon as a host completes a task, Ansible will execute the next task for that host, without waiting for any other hosts to finish.
This will happen for every host in the set and for every task in the play. Each host will complete the tasks as fast as they can, thus minimizing the execution time of each specific host. While most playbooks will use the default linear strategy, there are situations where the free strategy would be advantageous; for example, when upgrading a service across a large set of hosts. If the play requires numerous tasks to perform the upgrade, which starts with shutting down the service, then it would be more important for each host to suffer as little downtime as possible.
Allowing each host to independently move through the play as fast as it can will ensure that each host is only down for as long as necessary. Without using the free strategy, the entire set will be down for as long as the slowest host in the set takes to complete the tasks.
As the free strategy does not coordinate task completion across hosts, it is not possible to depend on the data that is generated during a task on one host to be available for use in a later task on a different host. There is no guarantee that the first host will have completed the task that generates the data.
Execution strategies are implemented as a plugin and, as such, custom strategies can be developed to extend Ansible behavior by anyone who wishes to contribute to the project.
The host selection for plays and tasks
The first thing that most plays define (after a name, of course) is a host pattern for the play. This is the pattern used to select hosts out of the inventory object to run the tasks on. Generally, this is straightforward; a host pattern contains one or more blocks indicating a host, group, wildcard pattern, or regular expression (regex) to use for the selection. Blocks are separated by a colon, wildcards are just an asterisk, and regex patterns start with a tilde:
hostname:groupname:*.example:~(web|db)\.example\.com
Advanced usage can include group index selections or even ranges within a group:
webservers[0]:webservers[2:4]
Each block is treated as an inclusion block; that is, all the hosts found in the first pattern are added to all the hosts found in the next pattern, and so on. However, this can be manipulated with control characters to change their behavior. The use of an ampersand defines an inclusion-based selection (all the hosts that exist in both patterns).
The use of an exclamation point defines an exclusion-based selection (all the hosts that exist in the previous patterns but are NOT in the exclusion pattern):
webservers:&dbservers: Hosts must exist in both thewebserversanddbserversgroups.webservers:!dbservers: Hosts must exist in thewebserversgroup but not thedbserversgroup.
Once Ansible parses the patterns, it will then apply restrictions if there are any. Restrictions come in the form of limits or failed hosts. This result is stored for the duration of the play, and it is accessible via the play_hosts variable. As each task is executed, this data is consulted, and an additional restriction could be placed upon it to handle serial operations. As failures are encountered, be it a failure to connect or a failure to execute a task, the failed host is placed in a restriction list so that the host will be bypassed in the next task.
If, at any time, a host selection routine gets restricted down to zero hosts, the play execution will stop with an error. A caveat here is that if the play is configured to have a max_fail_precentage or any_errors_fatal parameter, then the playbook execution stops immediately after the task where this condition is met.
Play and task names
While not strictly necessary, it is a good practice to label your plays and tasks with names. These names will show up in the command-line output of ansible-playbook and will show up in the log file if the output of ansible-playbook is directed to log to a file. Task names also come in handy when you want to direct ansible-playbook to start at a specific task and to reference handlers.
There are two main points to consider when naming plays and tasks:
- The names of the plays and tasks should be unique.
- Beware of the kinds of variables that can be used in play and task names.
In general, naming plays and tasks uniquely is a best practice that will help to quickly identify where a problematic task could be residing in your hierarchy of playbooks, roles, task files, handlers, and more. When you first write a small monolithic playbook, they might not seem that important. However, as your use of and confidence in Ansible grows, you will quickly be glad that you named your tasks! Uniqueness is more important when notifying a handler or when starting at a specific task. When task names have duplicates, the behavior of Ansible could be non-deterministic, or at least non-obvious.
With uniqueness as a goal, many playbook authors will look to variables to satisfy this constraint. This strategy might work well, but authors need to be careful regarding the source of the variable data they are referencing. Variable data can come from a variety of locations (which we will cover later in this chapter), and the values assigned to variables can be defined a variety of times. For the sake of play and task names, it is important to remember that only variables for which the values can be determined at the playbook parse time will parse and render correctly. If the data of a referenced variable is discovered via a task or other operation, the variable string will be displayed as unparsed in the output. Let's take a look at an example playbook that utilizes variables for play and task names:
---
- name: play with a {{ var_name }}
  hosts: localhost
  gather_facts: false
  vars:
  - var_name: not-mastery
  tasks:
  - name: set a variable
    ansible.builtin.set_fact:
      task_var_name: "defined variable"
  - name: task with a {{ task_var_name }}
    ansible.builtin.debug:
      msg: "I am mastery task"
- name: second play with a {{ task_var_name }}
  hosts: localhost
  gather_facts: false
  tasks:
  - name: task with a {{ runtime_var_name }}
    ansible.builtin.debug:
      msg: "I am another mastery task"
At first glance, you might expect at least var_name and task_var_name to render correctly. We can clearly see task_var_name being defined before its use. However, armed with our knowledge that playbooks are parsed in their entirety before execution, we know better. Run the example playbook with the following command:
ansible-playbook -i mastery-hosts -c local names.yaml
The output should look something like Figure 1.10:

Figure 1.10 – A playbook run showing the effect of using variables in task names when they are not defined prior to execution
As you can see in Figure 1.10, the only variable name that is properly rendered is var_name, as it was defined as a static play variable.
Module transport and execution
Once a playbook is parsed and the hosts are determined, Ansible is ready to execute a task. Tasks are made up of a name (this optional, but nonetheless important, as mentioned previously), a module reference, module arguments, and task control directives. In Ansible 2.9 and earlier, modules were identified by a single unique name. However, in versions of Ansible such as 2.10 and later, the advent of collections (which we will discuss in more detail in the next chapter) meant that Ansible module names could now be non-unique. As a result, those of you with prior Ansible experience might have noticed that, in this book, we are using ansible.builtin.debug instead of debug, which we would have used in Ansible 2.9 and earlier. In some cases, you can still get away with using the short-form module names (such as debug); however, remember that the presence of a collection with its own module called debug might cause unexpected results. And, as such, the advice from Ansible in their official documentation is to start making friends with the long-form module names as soon as possible – these are officially called FQCNs. We will use them throughout this book and will explain all of this in more detail in the next chapter. In addition to this, a later chapter will cover task control directives in detail, so we will only concern ourselves with the module reference and arguments.
The module reference
Every task has a module reference. This tells Ansible which bit of work to carry out. Ansible has been designed to easily allow for custom modules to live alongside a playbook. These custom modules can be a whole new functionality, or they can replace modules shipped with Ansible itself. When Ansible parses a task and discovers the name of the module to use for a task, it looks in a series of locations in order to find the module requested. Where it looks also depends on where the task lives, for example, whether inside a role or not.
If a task is inside a role, Ansible will first look for the module within a directory tree named library within the role the task resides in. If the module is not found there, Ansible looks for a directory named library at the same level as the main playbook (the one referenced by the ansible-playbook execution). If the module is not found there, Ansible will finally look in the configured library path, which defaults to /usr/share/ansible/. This library path can be configured in an Ansible config file or by way of the ANSIBLE_LIBRARY environment variable.
In addition to the preceding paths (which have been established as valid module locations in Ansible almost since its inception), the advent of Ansible 2.10 and newer versions bring with them Collections. Collections are now one of the key ways in which modules can be organized and shared with others. For instance, in the earlier example where we looked at the Amazon EC2 dynamic inventory plugin, we installed a collection called amazon.aws. In that example, we only made use of the dynamic inventory plugin; however, installing the collection actually installed a whole set of modules for us to use to automate tasks on Amazon EC2. The collection would have been installed in ~/.ansible/collections/ansible_collections/amazon/aws if you ran the command provided in this book. If you look in there, you will find the modules in the plugins/modules subdirectory. Further collections that you install will be located in similar directories, which have been named after the collection that they were installed from.
This design, which enables modules to be bundled with collections, roles, and playbooks, allows for the addition of functionality or the reparation of problems quickly and easily.
Module arguments
Arguments to a module are not always required; the help output of a module will indicate which arguments are required and which are not. Module documentation can be accessed with the ansible-doc command, as follows (here, we will use the debug module, which we have already used as an example):
ansible-doc ansible.builtin.debug
Figure 1.11 shows the kind of output you can expect from this command:
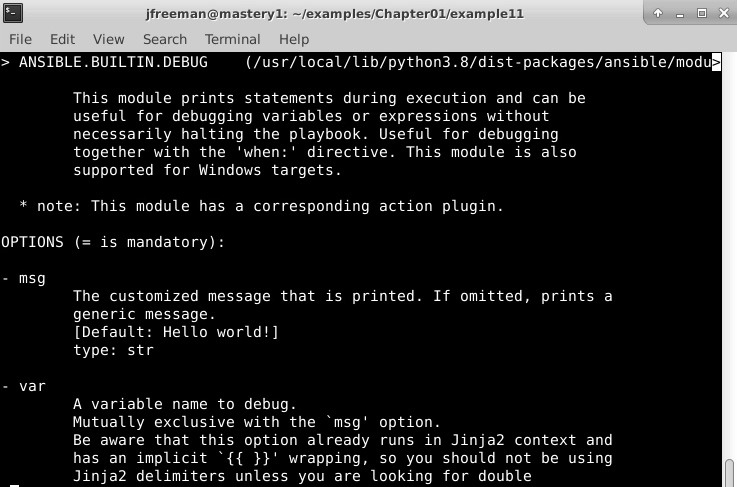
Figure 1.11 – An example of the output from the ansible-doc command run on the debug module
If you scroll through the output, you will find a wealth of useful information including example code, the outputs from the module, and the arguments (that is, options), as shown in Figure 1.11
Arguments can be templated with Jinja2, which will be parsed at module execution time, allowing for data discovered in a previous task to be used in later tasks; this is a very powerful design element.
Arguments can either be supplied in a key=value format or in a complex format that is more native to YAML. Here are two examples of arguments being passed to a module showcasing these two formats:
- name: add a keypair to nova
  openstack.cloudkeypair: cloud={{ cloud_name }} name=admin-key wait=yes

- name: add a keypair to nova
  openstack.cloud.keypair:
    cloud: "{{ cloud_name }}"
    name: admin-key
    wait: yes
In this example, both formats will lead to the same result; however, the complex format is required if you wish to pass complex arguments into a module. Some modules expect a list object or a hash of data to be passed in; the complex format allows for this. While both formats are acceptable for many tasks, the complex format is the format used for the majority of examples in this book as, despite its name, it is actually easier for humans to read.
Module blacklisting
Starting with Ansible 2.5, it is now possible for system administrators to blacklist Ansible modules that they do not wish to be available to playbook developers. This might be for security reasons, to maintain conformity or even to avoid the use of deprecated modules.
The location for the module blacklist is defined by the plugin_filters_cfg parameter found in the defaults section of the Ansible configuration file. By default, it is disabled, and the suggested default value is set to /etc/ansible/plugin_filters.yml.
The format for this file is, at present, very simple. It contains a version header to allow for the file format to be updated in the future and a list of modules to be filtered out. For example, if you were preparing for a transition to Ansible 4.0 and were currently on Ansible 2.7, you would note that the sf_account_manager module is to be completely removed in Ansible 4.0. As a result, you might wish to prevent users from making use of this by blacklisting it to prevent anyone from creating code that would break when Ansible 4.0 is rolled out (please refer to https://docs.ansible.com/ansible/devel/porting_guides/porting_guide_2.7.html). Therefore, to prevent anyone from using this internally, the plugin_filters.yml file should look like this:
---
filter_version:'1.0'
module_blacklist:
  # Deprecated – to be removed in 4.0
  - sf_account_manager
Although useful in helping to ensure high-quality Ansible code is maintained, this functionality is, at the time of writing, limited to modules. It cannot be extended to anything else, such as roles.
Module transport and execution
Once a module is found, Ansible has to execute it in some way. How the module is transported and executed depends on a few factors; however, the common process is to locate the module file on the local filesystem and read it into memory, and then add the arguments passed to the module. Then, the boilerplate module code from the Ansible core is added to the file object in memory. This collection is compressed, Base64-encoded, and then wrapped in a script. What happens next really depends on the connection method and runtime options (such as leaving the module code on the remote system for review).
The default connection method is smart, which most often resolves to the ssh connection method. With a default configuration, Ansible will open an SSH connection to the remote host, create a temporary directory, and close the connection. Ansible will then open another SSH connection in order to write out the wrapped ZIP file from memory (the result of local module files, task module arguments, and Ansible boilerplate code) into a file within the temporary directory that we just created and close the connection.
Finally, Ansible will open a third connection in order to execute the script and delete the temporary directory and all of its contents. The module results are captured from stdout in JSON format, which Ansible will parse and handle appropriately. If a task has an async control, Ansible will close the third connection before the module is complete and SSH back into the host to check the status of the task after a prescribed period until the module is complete or a prescribed timeout has been reached.
Task performance
The previous discussion regarding how Ansible connects to hosts results in three connections to the host for every task. In a small environment with a small number of tasks, this might not be a concern; however, as the task set grows and the environment size grows, the time required to create and tear down SSH connections increases. Thankfully, there are a couple of ways to mitigate this.
The first is an SSH feature, ControlPersist, which provides a mechanism that creates persistent sockets when first connecting to a remote host that can be reused in subsequent connections to bypass some of the handshaking required when creating a connection. This can drastically reduce the amount of time Ansible spends on opening new connections. Ansible automatically utilizes this feature if the host platform that runs Ansible supports it. To check whether your platform supports this feature, refer to the SSH man page for ControlPersist.
The second performance enhancement that can be utilized is an Ansible feature called pipelining. Pipelining is available to SSH-based connection methods and is configured in the Ansible configuration file within the ssh_connection section:
[ssh_connection]
pipelining=true
This setting changes how modules are transported. Instead of opening an SSH connection to create a directory, another to write out the composed module, and a third to execute and clean up, Ansible will instead open an SSH connection on the remote host. Then, over that live connection, Ansible will pipe in the zipped composed module code and script for execution. This reduces the connections from three to one, which can really add up. By default, pipelining is disabled to maintain compatibility with the many Linux distributions that have requiretty enabled in their sudoers configuration file.
Utilizing the combination of these two performance tweaks can keep your playbooks nice and fast even as you scale your environment. However, bear in mind that Ansible will only address as many hosts at once as the number of forks Ansible is configured to run. Forks are the number of processes Ansible will split off as a worker to communicate with remote hosts. The default is five forks, which will address up to five hosts at once. You can raise this number to address more hosts as your environment size grows by adjusting the forks= parameter in an Ansible configuration file or by using the --forks (-f) argument with ansible or ansible-playbook.
Variable types and location
Variables are a key component of the Ansible design. Variables allow for dynamic play content and reusable plays across different sets of an inventory. Anything beyond the most basic of Ansible use will utilize variables. Understanding the different variable types and where they can be located, as well as learning how to access external data or prompt users to populate variable data, is one of the keys to mastering Ansible.
Variable types
Before diving into the precedence of variables, first, we must understand the various types and subtypes of variables available to Ansible, their locations, and where they are valid for use.
The first major variable type is inventory variables. These are the variables that Ansible gets by way of the inventory. These can be defined as variables that are specific to host_vars, to individual hosts, or applicable to entire groups as group_vars. These variables can be written directly into the inventory file, delivered by the dynamic inventory plugin, or loaded from the host_vars/<host> or group_vars/<group> directories.
These types of variables can be used to define Ansible behavior when dealing with these hosts or site-specific data related to the applications that these hosts run. Whether a variable comes from host_vars or group_vars, it will be assigned to a host's hostvars, and it can be accessed from the playbooks and template files. Accessing a host's own variables can be done by simply referencing the name, such as {{ foobar }}, and accessing another host's variables can be accomplished by accessing hostvars; for example, to access the foobar variable for examplehost, you can use {{ hostvars['examplehost']['foobar'] }}. These variables have global scope.
The second major variable type is role variables. These are variables that are specific to a role and are utilized by the role tasks. However, it should be noted that once a role has been added to a playbook, its variables are generally accessible throughout the rest of the playbook, including from within other roles. In most simple playbooks, this won't matter, as the roles are typically run one at a time. But it is worth remembering this as the playbook structure becomes more complex; otherwise, unexpected behavior could result from variables being set within a different role!
These variables are often supplied as a role default, that is, they are meant to provide a default value for the variable but can easily be overridden when applying the role. When roles are referenced, it is possible to supply variable data at the same time, either by overriding role defaults or creating wholly new data. We'll cover roles in more depth in a later chapter. These variables apply to all hosts on which the role is executed and can be accessed directly, much like a host's own hostvars.
The third major variable type is play variables. These variables are defined in the control keys of a play, either directly by the vars key or sourced from external files via the vars_files key. Additionally, the play can interactively prompt the user for variable data using vars_prompt. These variables are to be used within the scope of the play and in any tasks or included tasks of the play. The variables apply to all hosts within the play and can be referenced as if they are hostvars.
The fourth variable type is task variables. Task variables are made from data that has been discovered while executing tasks or in the fact-gathering phase of a play. These variables are host-specific and are added to the host's hostvars, and they can be used as such, which also means they have a global scope after the point in which they were discovered or defined. Variables of this type can be discovered via gather_facts and fact modules (that is, modules that do not alter state but instead return data), populated from task return data via the register task key, or defined directly by a task making use of the set_fact or add_host modules. Data can also be interactively obtained from the operator using the prompt argument to the pause module and registering the result:
- name: get the operators name
  ansible.builtin.pause:
    prompt: "Please enter your name"
  register: opname
The extra variables, or the extra-vars type, are variables supplied on the command line when executing ansible-playbook via --extra-vars. Variable data can be supplied as a list of key=value pairs, a quoted piece of JSON data, or a reference to a YAML-formatted file with variable data defined within:
--extra-vars "foo=bar owner=fred"
--extra-vars '{"services":["nova-api","nova-conductor"]}'
--extra-vars @/path/to/data.yaml
Extra variables are considered global variables. They apply to every host and have scope throughout the entire playbook.
Magic variables
In addition to the previously listed variable types, Ansible offers a set of variables that deserve their own special mention – magic variables. These are variables that are always set when a playbook is run without them having to be explicitly created. Their names are always reserved and should not be used for other variables.
Magic variables are used to provide information about the current playbook run to the playbooks themselves and are extremely useful as Ansible environments become larger and more complex. For example, if one of your plays needs information about which groups the current host is in, the group_names magic variable returns a list of them. Similarly, if you need to configure the hostname for a service using Ansible, the inventory_hostname magic variable will return the current hostname as it is defined in the inventory. A simple example of this is as follows:
---
- name: demonstrate magic variables
  hosts: all
  gather_facts: false
  tasks:
    - name: tell us which host we are on
      ansible.builtin.debug:
        var: inventory_hostname
    - name: tell us which groups we are in
      ansible.builtin.debug:
        var: group_names
As with everything in the Ansible project, magic variables are well documented, and you can find a full list of them and what they contain in the official Ansible documentation at https://docs.ansible.com/ansible/latest/reference_appendices/special_variables.html. A practical example of the use of magic variables is this: imagine, for example, setting up the hostnames on a new set of Linux servers from a blank template. The inventory_hostname magic variable provides us with the hostname we need directly from the inventory, without the need for another source of data (or, for example, a connection to the CMDB). Similarly, accessing groups_names allows us to define which plays should be run on a given host within a single playbook – perhaps, for example, installing NGINX if the host is in the webservers group. In this way, Ansible code can be made more versatile and efficient; hence, these variables deserve a special mention.
Accessing external data
Data for role variables, play variables, and task variables can also come from external sources. Ansible provides a mechanism in which to access and evaluate data from the control machine (that is, the machine running ansible-playbook). The mechanism is called a lookup plugin, and a number of them come with Ansible. These plugins can be used to look up or access data by reading files, generate and locally store passwords on the Ansible host for later reuse, evaluate environment variables, pipe data in from executables or CSV files, access data in the Redis or etcd systems, render data from template files, query dnstxt records, and more. The syntax is as follows:
lookup('<plugin_name>', 'plugin_argument')
For example, to use the mastery value from etcd in an ansible.builtin.debug task, execute the following command:
- name: show data from etcd
  ansible.builtin.debug:
    msg: "{{ lookup('etcd', 'mastery') }}"
Lookups are evaluated when the task referencing them is executed, which allows for dynamic data discovery. To reuse a particular lookup in multiple tasks and reevaluate it each time, a playbook variable can be defined with a lookup value. Each time the playbook variable is referenced, the lookup will be executed, potentially providing different values over time.
Variable precedence
As you learned in the previous section, there are several major types of variables that can be defined in a myriad of locations. This leads to a very important question: what happens when the same variable name is used in multiple locations? Ansible has a precedence for loading variable data, and thus, it has an order and a definition to decide which variable will win. Variable value overriding is an advanced usage of Ansible, so it is important to fully understand the semantics before attempting such a scenario.
Precedence order
Ansible defines the following precedence order, with those closest to the top of the list winning. Note that this can change from release to release. In fact, it has changed quite significantly since Ansible 2.4 was released, so it is worth reviewing if you are upgrading from an older version of Ansible:
- Extra
vars(from the command line) always win. - The
ansible.builtin.includeparameters. - The role (and
ansible.builtin.include_role) parameters. - The variables defined with
ansible.builtin.set_facts, and those created with theregistertask directive. - The variables included in a play with
ansible.builtin.include_vars. - Task
vars(only for the specific task). - Block
vars(only for the tasks within the block). - Role
vars(defined inmain.ymlin thevarssubdirectory of the role). - Play
vars_files. - Play
vars_prompt. - Play
vars. - The host facts (and also the cached results of
ansible.builtin.set_facts). - The
host_varsplaybook. - The
host_varsinventory. - The inventory file (or script)-defined host
vars. - The
group_varsplaybook. - The
group_varsinventory. - The
group_vars/allplaybook. - The
group_vars/allinventory. - The inventory file (or script)-defined group
vars. - The role defaults.
- The command-line values (for example,
-u REMOTE_USER).
Ansible releases a porting guide with each release that details the changes you will need to make to your code in order for it to continue functioning as expected. It is important to review these as you upgrade your Ansible environment – the guides can be found at https://docs.ansible.com/ansible/devel/porting_guides/porting_guides.html.
Variable group priority ordering
The previous list of priority ordering is obviously helpful when writing Ansible playbooks, and, in most cases, it is apparent that variables should not clash. For example, a var task clearly wins over a var play, and all tasks and, indeed, plays are unique. Similarly, all hosts in the inventory will be unique; so again, there should be no clash of variables with the inventory either.
There is, however, one exception to this, that is, inventory groups. A one-to-many relationship exists between hosts and groups, and, as such, any given host can be a member of one or more groups. For example, let's suppose that the following code is our inventory file:
[frontend]
host1.example.com
host2.example.com
[web:children]
frontend
[web:vars]
http_port=80
secure=true
[proxy]
host1.example.com
[proxy:vars]
http_port=8080
thread_count=10
Here, we have two hypothetical frontend servers, host1.example.com and host2.example.com, in the frontend group. Both hosts are children of the web group, which means they are assigned the group variable http_port=80 from the inventory. host1.example.com is also a member of the proxy group, which has an identically named variable but a different assignment: http_port=8080.
Both of these variable assignments are at the group_vars inventory level, and so the order of precedence does not define a winner. So, what happens in this scenario?
The answer is, in fact, predictable and deterministic. The group_vars assignments are done in alphabetical order of the group names (as described in the Inventory ordering section), with the last loaded group overriding all preceding variable values that coincide.
This means that any competing variables from mastery2 will win over the other two groups. Those from the mastery11 group will then take precedence of those from the mastery1 group, so please be mindful of this when creating group names!
In our example, when the groups are processed in alphabetical order, web comes after proxy. Therefore, the group_vars assignments from web that coincide with those from any previously processed groups will win. Let's run the previous inventory file through this example playbook to take a look at the behavior:
---
- name: group variable priority ordering example play
  hosts: all
  gather_facts: false
  tasks:
    - name: show assigned group variables
      vars:
        msg: |
             http_port:{{ hostvars[inventory_hostname]['http_port'] }}
             thread_count:{{ hostvars[inventory_hostname]['thread_count'] | default("undefined") }}
             secure:{{ hostvars[inventory_hostname]['secure'] }}
       ansible.builtin.debug:
         msg: "{{ msg.split('\n') }}"
Let's try running the following command:
ansible-playbook -i priority-hosts -c local priorityordering.yaml
We should get the following output:

Figure 1.12 – A playbook run showing how variables can be overridden at the inventory group level
As expected, the value assigned to the http_port variable for both hosts in the inventory is 80. However, what if this behavior is not desired? Let's suppose that we want the value of http_port from the proxy group to take priority. It would be painful to have to rename the group and all associated references to it to change the alphanumerical sorting of the groups (although, this would work!). The good news is that Ansible 2.4 introduced the ansible_group_priority group variable, which can be used for just this eventuality. If not explicitly set, this variable defaults to 1, leaving the rest of the inventory file unchanged.
[proxy:vars]
http_port=8080
thread_count=10
ansible_group_priority=10
Now, when we run the same playbook using the same command as before, pay attention to how the value assigned to http_ort changes, while all variable names that were not coincidental behave exactly as before:

Figure 1.13 – The effect of the ansible_group_priority variable on coincidental group variables
As your inventory grows with your infrastructure, be sure to make use of this feature to gracefully handle any variable assignment collisions between your groups.
Merging hashes
In the previous section, we focused on the precedence with which variables will override each other. The default behavior of Ansible is that any overriding definition for a variable name will completely mask the previous definition of that variable. However, that behavior can be altered for one type of variable: the hash variable. A hash variable (or, in Python terms, a dictionary) is a dataset of keys and values. Values can be of different types for each key and can even be hashes themselves for complex data structures.
In some advanced scenarios, it is preferable to replace just one bit of a hash or add to an existing hash rather than replacing the hash altogether. To unlock this ability, a configuration change is necessary in the Ansible config file. The configuration entry is hash_behavior, which either takes the value replace or merge. A setting of merge will instruct Ansible to merge or blend the values of two hashes when presented with an override scenario rather than assume the default of replace, which will completely replace the old variable data with the new data.
Let's walk through an example of the two behaviors. We will start with a hash loaded with data and simulate a scenario where a different value for the hash is provided as a higher-priority variable.
This is the starting data:
hash_var:
  fred:
    home: Seattle
    transport: Bicycle
This is the new data loaded via include_vars:
hash_var:
  fred:
    transport: Bus
With the default behavior, the new value for hash_var will be as follows:
hash_var:
  fred:
    transport: Bus
However, if we enable the merge behavior, we will get the following result:
hash_var:
  fred:
    home: Seattle
    transport: Bus
There are even more nuances and undefined behaviors when using merge, and, as such, it is strongly recommended that you only use this setting if absolutely necessary – it is disabled by default for a good reason!
Summary
While the design of Ansible focuses on simplicity and ease of use, the architecture itself is very powerful. In this chapter, we covered the key design and architecture concepts of Ansible, such as versions and configurations, playbook parsing, module transport and execution, variable types and locations, and variable precedence.
You learned that playbooks contain variables and tasks. Tasks link bits of code called modules with arguments, which can be populated by variable data. These combinations are transported to selected hosts from the inventory sources provided. The fundamental understanding of these building blocks is the platform on which you can build a mastery of all things Ansible!
In the next chapter, you will learn, in detail, about the big new features in Ansible 4.3, especially the Ansible collections and FQCNs that we have touched on in this chapter.
Questions
- Why is an inventory important to Ansible?
a) It forms part of Ansible's configuration management database.
b) It is used to audit your servers.
c) It tells Ansible which servers to perform automation tasks on.
d) None of the above.
- When working with frequently changing infrastructures (such as public cloud deployments), Ansible users must manually update their inventory on a regular basis. Is this true or false?
a) True – this is the only way to do it.
b) False – dynamic inventories were invented for precisely this purpose.
- By default, Ansible processes hosts in an inventory in which order?
a) In alphabetical order
b) In lexicographical order
c) In random order
d) In the order in which they appear in the inventory
- By default, Ansible tasks in a simple playbook are executed in which order?
a) In the order in which they are written, but each task must be completed on all inventory hosts before the next is executed.
b) In the most optimal order.
c) In the order in which they are written but only on one inventory host at a time.
d) Something else.
- Which variable type takes the highest priority, overriding all other variable sources?
a) Inventory variables
b) Extra variables (from the command line)
c) Role defaults
d) Variables source via
vars_prompt - What is the name of the special Ansible variables that only exist at runtime?
a) Special variables
b) Runtime variables
c) Magic variables
d) User variables
- If you wanted to access external data from a playbook, what would you use?
a) A lookup plugin
b) A lookup module
c) A lookup executable
d) A lookup role
- What is Ansible's preferred default transport mechanism for most non-Windows hosts?
a) The REST API
b) RabbitMQ
c) RSH
d) SSH
- What can inventory variables be used to do?
a) Define unique data for each host or group of hosts in an inventory.
b) Declare your playbook variables.
c) Define connection parameters for your inventory hosts.
d) Both (a) and (c).
- How can you override the default Ansible configuration on your system?
a) By creating an Ansible configuration file in any location, and using the
ANSIBLE_CFGenvironment variable to specify this location.b) By creating a file called
ansible.cfgin the current working directory.c) By creating a file in your home directory called
~/.ansible.cfg.d) Any of the above.

