


Cloud computing has changed the way enterprise software is developed and deployed. Cloud computing is becoming the obvious choice for large scale software deployments because of the various cost benefits it offers. Cloud platforms eliminate the need for setting up costly hardware to host your applications. Your applications are hosted on a shared platform managed by specialists. You can focus on building your application and not really involved in managing the platform. Though there are modern software that make it easier to deploy a scalable cloud infrastructure, there are no single-click solutions available yet. This book focuses on two varieties of cloud deployments: IaaS (Infrastructure as a Service) and DBaaS (Database as a Service). We are going to explore Oracle Enterprise Manager Cloud Control 12c to implement these two flavors of Cloud Computing. Oracle's Enterprise Manager is an interesting tool because it combines the prowess of Oracle's Database (though you can configure other databases), Fusion Middleware, as well as virtualization technologies. Oracle Enterprise Manager has quickly established itself as an end-to-end cloud management system. Organizations like CERN have utilized Enterprise Manager to extend their existing Oracle Grid databases and WebLogic Server infrastructure into a scalable elastic cloud.
This book will cover these specific scenarios and we will assume that the reader is familiar with the common components involved in building the cloud platform. We assume that the reader knows the basics of networking, storage, and has a working knowledge of command-line tools. This book takes a hands-on tutorial approach and targets specific areas to achieve the most productive setup of Oracle Enterprise Manager.
This chapter focuses on making sure the basic setup is complete before we start with the complex scenarios of implementing IaaS and DBaaS.
Topics covered in this chapter:
Setting up Software Library
Discovering and adding targets
Creating a database instance for Enterprise Manager
Executing Prerequisite Kit Utility
Enterprise Manager is bundled with Software Library, a repository of a number of application software, VM images, and custom scripts used with Oracle Enterprise Manager. Software Library offers useful versioning and patching mechanisms to manage the software. We are going to cover the basic setup for Software Library.
Software Library can be accessed by navigating to Enterprise | Provisioning and Patching | Software Library.
Inside the Software Library page, you will find two types of software sources listed: Oracle-owned folders (tagged by a lock icon) and User-owned folders. Oracle-owned content is shipped with Enterprise Manager. On the other hand, user-owned folders, as the name suggests, are created by users to organize custom entities.
There are a few things that we need to configure before we can start using the Software Library. We will need to configure the storage repository and add an Upload File Storage Location. Make sure this location is on a host where OMS is already running. You can also configure a Referenced File Location, which is a read-only location.
We will discuss ways to configure storage location for the software library. This location is used to upload software library entities and artifacts.
The Select the OMS Agent Filesystem option and click on +Add. You will need to provide the following details:
Name: It is unique for the storage location (for example,
shared_fs).Host: This is the location where OMS is running. You can either manually enter the value of the host or search inside the dialog box.
Location: When you open the search dialog in the Location textbox, you will need to log in to the host machine. Once you are logged in, you can select the location where you want to create the agent filesystem.
This action triggers a metadata registration job which can be monitored for completion by refreshing the screen or clicking on Show Detailed Results.
You can also set up the storage location as an OMS shared filesystem location. This option sometimes comes in handy when you already have an OMS running.
Select OMS Shared Filesystem from the administration page.
Click on +Add and provide the name of the OMS's host where you want the upload location to be defined and specify the OMS's host address.
You can configure a storage location that can be used for referring to files from the Software Library entities.
Select Referenced File Location on the Library Administration page.
You can either add an HTTP location or an NFS location as referenced file location:

Enter a name for the referenced file location and an HTTP location path for the storage server that you want to be referenced in the Add HTTP Location dialog.
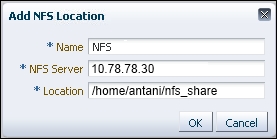
If you are adding an NFS location, select NFS from the storage type list and add the NFS server details. This value is typically an IP address or a fully qualified domain name for the NFS host (for example,
10.10.90.1ornfs_service_1.main_domain.domain).
Components of IaaS or DBaaS such as Oracle Database instances or Oracle WebLogic servers are called targets. The Enterprise Manager lets you monitor these targets inside a unified console, making it very easy to have a real-time view of the entire cloud implementation. Before we can start monitoring the targets, we need to install management agents on those targets. Targets can be either added manually or discovered automatically through a few additional steps. We will briefly look at both of these processes without going into much of the implementation details.
In automatic discovery, a management agent usually runs on the host. This agent scans for unmanaged hosts. When an unmanaged host is found, they can be converted to managed hosts. On managed hosts, targets can be searched and promoted to managed targets. Setting up automatic discovery using management agents is an involved process and requires proper set up of NMap binaries to allow a network scan. The network scan can be restricted to a specific IP range and eventually these network scanned targets are promoted to managed hosts. It is important to ensure we have the added necessary targets to Enterprise Manager before we start configuring them. To discover unmanaged hosts using network scan, navigate to Setup | Add Target | Configure Auto Discovery. Click on the Configure button to configure network scan settings. You can create a new network scan configuration or edit an existing one.
You can provide IP address ranges (for example, 10.0.0-255.1-250) in the scan table or provide specific hostnames. You can submit the scan once the settings are correctly configured. Once the hosts are discovered, you can go ahead and convert unmanaged hosts into managed hosts. For this, navigate to Setup | Add Target | Auto Discovery Results. You will find all discovered hosts under the Network-scanned Targets tab. From this table, select all the unmanaged hosts and click on the Promote button.
We will need to configure the underlying Oracle database instance to hold the Enterprise Manager data and artifacts before we can do anything useful with Enterprise Manager. While the Enterprise Manager installer can configure the database for you, we recommend you do it beforehand to make sure there are no errors in this very critical step.
Oracle provides pre-configured and tested sets of database templates. You can download these templates from http://www.oracle.com/technetwork/oem/enterprise-manager/downloads/db-templates-1959276.html. Please do make sure that you are downloading the correct version of the database template for your Operation System. After downloading this template, extract the template into the following location on your Oracle database host:
$<DB_HOME>/assistants/dbca/templates
For example,
D:\app\oracle\product\12.1.0\dbhome_1\assistants\dbca\templates (on Windows machines)
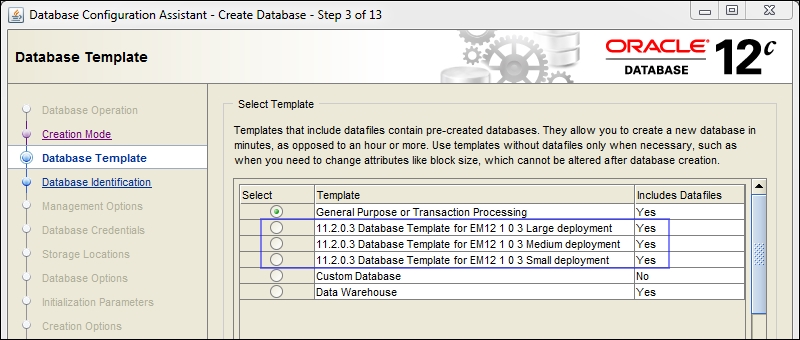
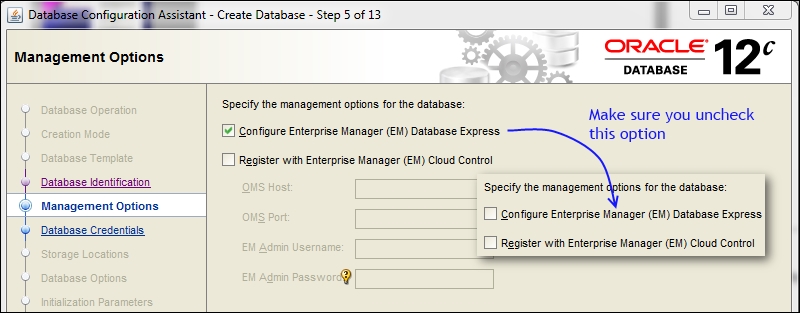
Create the database in Advanced mode by running Oracle Database Configuration Assistant from <DB_HOME>/bin/dbca. On the Database Template screen, select the template which is suitable for your deployment:
When you run Oracle Database Configuration Assistant, the option Configure Enterprise Manager (EM) Database Express is checked by default. Make sure you uncheck it:
One final step to verify all the necessary setup is done, is to run the Prerequisite Kit script. The nice thing about this tool is that it detects incorrect configuration problems and tries to fix them, if possible. When you install Enterprise Manager, the installation wizard runs this script as a part of the installation process, but we can run this script standalone to make sure all configurations are correct.
The Prerequisite Kit is available in the following location of the downloaded Enterprise Manager:
<download location of the script>/install/requisites/bin/emprereqkit (on Microsoft Windows, the namefilename is emprereqkit.bat)
Example: D:\OracleMS\install\requisites\bin (on Windows path)
To run this prerequisite script without taking any corrective actions, we can run it as follows:
<download location>/install/requisites/bin/emprereqkit -executionType <install/upgrade/postrequisite/plugindeploy> -prerequisiteXMLLoc <prerequisite_xml_location> -connectString <connection_string> -dbUser SYS -dbPassword <password_for_sys_account> -dbRole sysdba -reposUser SYSMAN -showPrereqs
For example on a Windows installation:
D:\OracleMS\install\requisites\bin\emprereqkit.bat
-executionType install
-prerequisiteXMLLoc $ORACLE_HOME/install/requisites/list/
-connectString "(DESCRIPTION=(ADDRESS_LIST=(ADDRESS=(PROTOCOL=TCP)(HOST=localhost)(PORT=1521)))(CONNECT_DATA=(SID=EnterpriseManager)))"
-dbUser SYS
-dbPassword mypwd
-dbRole sysdba
-reposUser SYSMAN
-showPrereqs
If you want to take corrective actions, you can use the flag --runCorrectiveActions in the script.
This was a whirlwind tour of Oracle Enterprise Manager Cloud Control. We could have only scratched the surface of all the setup required to get started, but that was the idea of this chapter. We have seen how to verify the most critical pieces of the setup so that we are equipped to move ahead and take a detailed look at more advanced use cases of building an Infrastructure as a Service, which will be the focus of our next chapter.