


In this chapter, we will cover the basic tasks related to installing Magento 2 on Apache and NGINX. You will learn the following recipes:
Installing Apache
Installing NGINX
Installing PHP-FPM
Installing HHVM
Installing MySQL
Installing Magento 2
Installing Magento 2 on Hypernode
Managing Magento 2 on Docker
This chapter explains how to install Magento 2 on a hosting environment. When installing a new Magento 2 instance, we can use either a Linux, Apache, MySQL, PHP (LAMP) or Linux, NGINX, MySQL, PHP (LEMP) setup. Currently, options such as MariaDB or HHVM are equivalent to MySQL or PHP. Only HHVM will be converted in this chapter.
We will install a clean Magento 2 setup on a hosted virtual private server (VPS) for more advanced users and an easy-to-use installation on Hypernode.
The recipes in this chapter will primarily focus on a basic setup of how to install Magento 2. However, in some situations, we will dive in deeper related to the subject.
While Magento requirements differ from Magento 1, we will be using the latest and finest version from PHP, HHVM, NGINX, Apache, Redis, MySQL, and Ubuntu.
Throughout the following recipes, we will install the latest Apache 2.4.x version on a Software as a Service (SaaS) platform hosted by DigitalOcean. The current Apache version supports HTTP/2. This recipe will show you how to do this.
Tip
HTTP/2 is an optimized version of the Hypertext Transfer Protocol (HTTP), also known as HTTP version 2 (HTTP/2). Some of the new features of HTTP/2 are a more efficient usage of network resources and network latency. HTTP/2 allows multiple concurrent connections over a single Transmission Control Protocol (TCP) connection at once, which optimizes TCP load. Merging CSS and JS is not necessary anymore. HTTP/2 service also provides the possibility to use server push, which allows a proactive push of resources to the client.
For this recipe, you will need to create an account at DigitalOcean https://www.digitalocean.com/. No other prerequisites are required.
For the purpose of this recipe, let's assume that we need to create an Apache hosting environment. The following steps will guide you through this:
The first step is creating an account at https://cloud.digitalocean.com/registrations. All the steps to create an account are straightforward. Confirm your mail and update your billing profile.
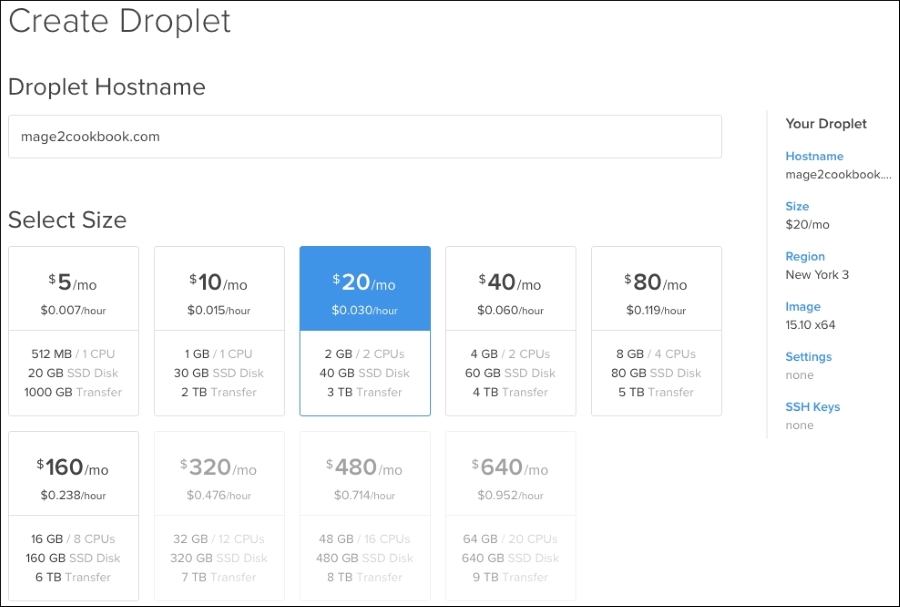
Start creating your first Droplet. Choose your hostname, and select your size (2GB CPU's or 40GB SSD Disk). Next, pick your region (DigitalOcean has many regions available worldwide). Select your image (we will use the latest Ubuntu). Select extra available settings such as Private Networking to run multiple servers including an Internet network or backup and IPv6 options. If you already have an SSH key, you can upload this:
The Droplet takes approximately 60 seconds to get created. You will get an e-mail right after including all the additional login details such as the hostname, IP address, username, and password.
Configure your domain name,
yourdomain.com, to the addressed IP address from the Droplet:yourdomain.com A 123.123.123.123 www CNAME yourdomain.comConnect your Droplet with SSH using your favorite SSH client (putty or terminal) and change your password:
sudo ssh yourdomain.comFirst, we will update your server to the latest updates available:
apt-get update && apt-get -y upgradeNext, we will install Apache 2 using a third-party package. Currently, Ubuntu doesn't include the latest Apache 2.4.x with HTTP/2 support. The third-party vendor that we will use is https://launchpad.net/~ondrej/+archive/ubuntu/apache2. Run the following command:
echo "deb http://ppa.launchpad.net/ondrej/apache2/ubuntu wily main" | sudo tee -a /etc/apt/sources.list.d/apache2.list
echo "deb-src http://ppa.launchpad.net/ondrej/apache2/ubuntu wily main" | sudo tee -a /etc/apt/sources.list.d/apache2.list
Before we can install Apache 2, we need to authorize the package by installing a signed key:
apt-key adv --keyserver keyserver.ubuntu.com --recv-keys 0x4F4EA0AAE5267A6CNow, we will update our Ubuntu system using the latest Apache2 packages:
apt-get update && apt-get -y install apache2Once every Apache 2 package is installed, we can check whether everything is in order by running the following command on the shell:
apache2 -vThe output of this command is as follows:
root@mage2cookbook:~# apache2 -v
Server version: Apache/2.4.17 (Ubuntu)
If you have followed steps 1 to 9, you will be able to see if the web server is running. Go to your favorite browser and search using your yourdomain.com.
Let's recap and find out what we did throughout this recipe. In steps 1 through 3, we create a clean hosting server setup using DigitalOcean. Next, we connect the Droplet IP to your domain name in DNS. After login via SSH, we are able to update the server and continue to the process of installing Apache 2 via a third-party repository. Depending on the Ubuntu setup, we need to change the version name, such as precise, trusty, wily, vivid, or xenial, to install the software.
In step 8, we submit a key that will validate the repository before we can start installing the Apache 2 software. In step 9, we use a simple command to update the repository and start installing.
Throughout the following recipes, we will install the latest NGINX 1.9.x version on a SaaS platform hosted by DigitalOcean. The current NGINX version supports HTTP/2. This recipe will show you how to do it.
For this recipe, you will need to create an account at DigitalOcean https://www.digitalocean.com/. No other prerequisites are required.
For the purpose of this recipe, let's assume that we need to create an NGINX hosting environment. The following steps will guide you through this:
Follow steps 1 until 6 in the previous recipe on how to install Apache.
Then, we will update our server to the latest updates available:
apt-get update && apt-get -y upgradeNext, we will install NGINX using the latest mainline version 1.9.x. Currently, Ubuntu doesn't include the latest NGINX 1.9.x mainline version. The latest change log can be viewed at http://nginx.org/en/CHANGES. Run the following command:
echo "deb http://nginx.org/packages/mainline/ubuntu/ wily nginx" | sudo tee -a /etc/apt/sources.list.d/nginx.list
echo "deb-src http://nginx.org/packages/mainline/ubuntu/ wily nginx" | sudo tee -a /etc/apt/sources.list.d/nginx.list
Before we can install NGINX, we need to authorize the package by installing a signed key:
wget http://nginx.org/keys/nginx_signing.key | apt-key add nginx_signing.keyNow, we will update our Ubuntu system using the latest NGINX packages:
apt-get update && apt-get -y install nginxOnce every NGINX package is installed, we can check whether everything is in order by running the following command on the shell:
nginx -vThe output of this command is as follows:
root@mage2cookbook:~# nginx -v
nginx version: nginx/1.9.6
If you have followed steps 1 to 6, you will be able to see if the web server is running. Go to your favorite browser and search using your yourdomain.com.
Let's recap and find out what we did throughout this recipe. In steps 1 through 5, we used the same Droplet to install NGINX. All steps are alike, but instead of installing Apache, we use NGINX instead. The only big difference is that it is an official NGINX repository.
The current market share of NGINX is around 15% worldwide compared to 50% of Apache on active sites. Over the last couple of years, NGINX has grown and is commonly used as a stable web server for Magento hosting:
http://news.netcraft.com/archives/2015/03/19/march-2015-web-server-survey.html
If you want to check whether NGINX is running fine, use one of the following commands:
service nginx status
netstat -anp | grep nginx
Throughout the following recipes, we will install the latest PHP 7.x version on Apache and NGINX. The current PHP-FastCGI Process Manager (PHP-FPM) will be installed through a third-party package. This recipe will show you how to do it.
Tip
PHP 7 is the latest version of the PHP stack. It's also known as PHP Next Generation (PHP NG) and PHP's answer to HHVM. Currently, it's two to three times faster than PHP 5.x.
The whole code base is rewritten and uses less memory. Lots of PHP functions are backward-compatible with the PHP 5.x code base, so upgrading to PHP 7 should be easy.
For this recipe, you will need a preinstalled Apache or NGINX setup. No other prerequisites are required.
For the purpose of this recipe, let's assume that we need to create an PHP-FPM hosting environment. The following steps will guide you through this:
First, we will start installing PHP-FPM on Apache; later, we will do the same with NGINX.
Next, we will install PHP 7 on Apache 2 using a third-party package. Currently, Ubuntu doesn't include the latest PHP 7 yet. The third-party vendor that we will use is https://launchpad.net/~ondrej/+archive/ubuntu/php.
Run the following command:
echo "deb http://ppa.launchpad.net/ondrej/php/ubuntu wily main" | sudo tee -a /etc/apt/sources.list.d/php.list
echo "deb-src http://ppa.launchpad.net/ondrej/php/ubuntu wily main" | sudo tee -a /etc/apt/sources.list.d/php.list
As we have already used the authorized Apache package from the same vendor, we are okay on the signed key. There is no need to install the key anymore.
Now, we will update our Ubuntu system using the latest PHP 7 packages:
apt-get update && apt-get -y install php7.0 php7.0-fpm php7.0-dev php7.0-mhash php7.0-mcrypt php7.0-curl php7.0-cli php7.0-mysql php7.0-gd php7.0-intl php7.0-xslOnce every PHP 7 package is installed, we can check whether everything is in order by running the following command on the shell:
php -vThe output of this command is as follows:
root@mage2cookbook:/etc/php# php -v
PHP 7.0.0 (cli) ( NTS )
Copyright (c) 1997-2015 The PHP Group
Zend Engine v3.0.0-dev, Copyright (c) 1998-2015 Zend Technologies
Now, we will configure PHP-PFM with Apache. Out of the box, Apache 2 comes with a module named mod_proxy, which we will use to connect Apache to PHP-FPM. We will be using PHP-FPM in TCP mode instead of the Unix socket. The main reason is that it's easy to configure and we can use it later with HHVM. The default port 9000 will be our connector. To enable mod_proxy, run the following command on the shell:
a2enmod proxy_fcgiBefore we can connect Apache to PHP-FPM, we need to give PHP-FPM instructions to listen to the correct internal port. Run the following command from the shell:
sed -i "s/listen =.*/listen = 127.0.0.1:9000/" /etc/php/7.0/fpm/pool.d/www.confYou can do this manually as well; edit the
www.conffile with your favorite editor in your PHP-FPM pool directory. Search forlisten = /var/run/php/php7.0-fpm.sockand change this tolisten = 127.0.0.1:9000.Restart your PHP-FPM process to use the altered changes. Run the following command from the shell:
service php7.0-fpm restartNext, we need to configure Apache using the currently set-up internal proxy_fcgi module. The default Apache Virtual Host configuration file is located at
/etc/apache2/sites-enabled/000-default.conf. Edit this file and add the following code just before the closing</VirtualHost>tag on one line without any breaks:ProxyPassMatch ^/(.*\.php(/.*)?)$ fcgi://127.0.0.1:9000/var/www/html/$1
The following code is for the new
000-default.conf:<VirtualHost *:80> ServerAdmin webmaster@localhost DocumentRoot /var/www/html <Directory /var/www/html> Options Indexes FollowSymLinks AllowOverride All Order allow,deny allow from all </Directory> ErrorLog ${APACHE_LOG_DIR}/error.log CustomLog ${APACHE_LOG_DIR}/access.log combined ProxyPassMatch ^/(.*\.php(/.*)?)$ fcgi://127.0.0.1:9000/var/www/html/$1 </VirtualHost>You can change
DocumentRoot /var/www/htmlto any given preferred directory. However, for the rest of the recipes, we will stay with the default.After saving the Apache configuration, we need to restart the web server. Run the following command from the shell:
service apache2 restartNow, we need to check whether Apache and PHP-FPM are working fine. Go to the
cd /var/www/htmldirectory and create the following file including content:echo "<?php phpinfo(); ?>" > phpinfo.phpIf you have followed steps 1 to 11, you will be able to see if PHP-FPM works with your web server. Go to your favorite browser and search using your
yourdomain.com/phpinfo.php.You should now see a phpinfo page like the following screenshot. Check on the second line for the Server API; this should be FPM/FastCGI.

If everything is working fine, we have completed the Apache PHP-FPM setup. Now let's do the same for the NGINX and PHP-FPM setup.
As we have already installed the PHP-FPM packages in steps 1 to 5, we now need to combine them with NGINX.
Before we continue, it is important to use either a clean DigitalOcean Droplet with NGINX running or you can disable the Apache server using the following command form the shell:
service apache2 stop && service nginx startNext, we need to configure NGINX. The default NGINX configuration file is located at
/etc/nginx/conf.d/default.conf. Remove the old configuration in this file and add the following code:server { listen 80; server_name yourdomain.com; root /var/www/html; index index.php index.html; access_log /var/log/nginx/access.log; error_log /var/log/nginx/error.log; location ~ \.php$ { fastcgi_index index.php; fastcgi_pass 127.0.0.1:9000; fastcgi_param SCRIPT_FILENAME $document_root$fastcgi_script_name; include fastcgi_params; } location ~ /\.ht { deny all; } }Save the new configuration using your favorite editor and restart your NGINX and PHP-PFM server using the following command on the shell:
service nginx restart && service php7.0-fpm restartA nice trick to test if your configuration is correct is as follows:
nginx –t
If you have followed steps 13 to 14, you will be able to see if PHP-FPM works with your web server. Go to your favorite browser and search using your yourdomain.com/phpinfo.php.
You should now see a phpinfo page similar to the one on the previous page during the Apache PHP-FPM setup. Check on the second line for the Server API; this should be FPM/FastCGI.
Tip
Downloading the example code
You can download the example code files for this book from your account at http://www.packtpub.com. If you purchased this book elsewhere, you can visit http://www.packtpub.com/support and register to have the files e-mailed directly to you.
You can download the code files by following these steps:
Log in or register to our website using your e-mail address and password.
Hover the mouse pointer on the SUPPORT tab at the top.
Click on Code Downloads & Errata.
Enter the name of the book in the Search box.
Select the book for which you're looking to download the code files.
Choose from the drop-down menu where you purchased this book from.
Click on Code Download.
Once the file is downloaded, please make sure that you unzip or extract the folder using the latest version of:
WinRAR / 7-Zip for Windows
Zipeg / iZip / UnRarX for Mac
7-Zip / PeaZip for Linux
Let's recap and find out what we did throughout this recipe. In steps 1 through 4, we first install PHP-FPM from a third-party repository. The main reason that we use this repository is that it is easy to use and well-supported. Current Ubuntu versions don't have the latest PHP 7 available yet. If you are comfortable installing PHP from source, you can do so.
All PHP modules listed in step 4 are mandatory for Magento 2 to work properly. In step 6, we explain why we use PHP-FPM running on port 9000. Setting up a TCP port is much easier when using multiple PHP backends, switching from Apache to NGINX, or PHP-FPM versus HHVM.
In step 7, we add an Apache module that acts as a proxy, so we are able to connect PHP-FPM to Apache.
In step 8, we changed the PHP-FPM pool to switch from Unix sockets to TCP. If you prefer sockets, you can do so.
In step 10, we add the ProxyPassMatch rule to our Apache configuration file, which will serve all incoming PHP requests to the PHP-FPM server. After saving and restarting the Apache server, we are able to test if everything works.
In step 13, we configure NGINX to work with PHP-PFM. Creating fastcgi_pass does the trick to connect to port 9000.
If you want to check whether PHP-FPM is running fine, use one of the following commands:
service php7.0-fpm status
netstat -anp | grep php-fpm
To check which server is running, check the headers by running the following command:
curl -I http://mage2cookbook.com/phpinfo.php
The output of this command will be as follows:
root@mage2cookbook:~# curl -I http://mage2cookbook.com/phpinfo.php
HTTP/1.1 200 OK
Server: nginx/1.9.6
Once we switch back to Apache we will see the following:
service nginx stop && service apache2 start
root@mage2cookbook:~# curl -I http://mage2cookbook.com/phpinfo.php
HTTP/1.1 200 OK
Server: Apache/2.4.17 (Ubuntu)
Throughout the following recipes, we will install the latest HHVM 3.9.x version on Apache and NGINX. HHVM has gained large popularity over the last couple of year and is well-known for its high performance on Magento. While Magento 1 was not supported by default, Magento 2 is. This recipe will show you how to do it.
Tip
HHVM (also known as the HipHop Virtual Machine) is a virtual machine for PHP developed by Facebook, with an associated just-in-time (JIT) compiler.
Deploying HHVM on a Magento 2 website should lead to performance improvements across your web shop.
For this recipe, you will need a preinstalled Apache or NGINX setup. No other prerequisites are required.
For the purpose of this recipe, let's assume that we need to create an HHVM hosting environment. The following steps will guide you through this:
First, we will start installing HHVM on Apache; later, we will do the same with NGINX.
Next, we will install HHVM on Apache2 using the official prebuilt package by Facebook. Run the following command on the shell:
echo "deb http://dl.hhvm.com/ubuntu wily main" | sudo tee -a /etc/apt/sources.list.d/hhvm.listBefore we can install HHVM, we need to authorize the package by installing a signed key:
apt-key adv --keyserver keyserver.ubuntu.com --recv-keys 0x5a16e7281be7a449Now we will update our Ubuntu system using the latest HHVM packages:
apt-get update && apt-get -y install hhvmOnce every HHVM package is installed, we can check whether everything is in order by running the following command on the shell:
hhvm --versionThe output of this command is as follows:
root@mage2cookbook:~# hhvm --version
HipHop VM 3.10.1 (rel)
Since the setup of PHP-FPM, we have started using the internal port 9000 to handle all traffic on PHP. Now we will use the same port for HHVM. Stop PHP-FPM as it is still running and start HHVM using the following command from the shell:
service php7.0-fpm stop && service hhvm startIf you need to run dedicated HipHop code such as Hack (the default HipHop programming language) in the future, you may want to change your Apache configuration. Restart your Apache and HHVM server:
ProxyPassMatch ^/(.+\.(hh|php)(/.*)?)$ fcgi://127.0.0.1:9000/var/www/html/$1Now, let's check whether HHVM and Apache are working. Create a PHP file called
hhvm.phpin the/var/www/htmldirectory:<?php if (defined('HHVM_VERSION')) { echo "HHVM"; } else { echo "PHP"; }If you have followed steps 1 to 8, you will be able to see if HHVM works with your web server. Go to your favorite browser and search using your
yourdomain.com/hhvm.php. You should now see a HHVM notice on your screen.In newer versions of HHVM, the default
phpinfo();tag works just fine on your screen. Go to your favorite browser and search using youryourdomain.com/phpinfo.php:
If everything is working fine, we have completed the Apache HHVM setup. Now let's do the same for the NGINX and HHVM setup.
As we have already installed the HHVM packages in steps 1 to 5, we now need to combine them with NGINX.
Before we continue, it is important to use either a clean DigitalOcean Droplet with NGINX running or you can disable the Apache server using the following command from the shell:
service apache2 stop && service nginx startThe following is the content of NGINX configuration file:
server {
  listen       80;
  server_name  yourdomain.com;

  root   /var/www/html;
  index  index.php index.html;

  access_log /var/log/nginx/access.log;
  error_log /var/log/nginx/error.log;

  location ~ \.(hh|php)$ {

    fastcgi_index index.php;
    fastcgi_pass 127.0.0.1:9000;
    fastcgi_param  SCRIPT_FILENAME  $document_root$fastcgi_script_name;
    include        fastcgi_params;
  }

  location ~ /\.ht {
    deny  all;
  }
}
In the preceding example, we altered the location for PHP and Hack support:
location ~ \.(hh|php)$ {You can now restart your NGINX and HHVM server to connect them using the follow command from the shell:
service nginx restart && service hhvm restartNow let's check whether HHVM and NGINX are working. Create a PHP file called
hhvm.phpor use the one in the previous Apache HHVM setup in the/var/www/htmldirectory:<?php if (defined('HHVM_VERSION')) { echo "HHVM"; } else { echo "PHP"; }
If you have followed steps 9 to 11, you will be able to see if HHVM works with your web server. Go to your favorite browser and search using your yourdomain.com/hhvm.php.
You should now see a HHVM notice on your screen, but you can also use yourdomain.com/phpinfo.php.
Let's recap and find out what we did throughout this recipe. In steps 1 through 4, we use the official HHVM repository and install the software. The installation process is similar to the PHP-FPM setup. The important difference between HHVM and PHP-FPM is that HHVM does not have additional modules to install.
In step 7, we change ProxyPassMatch a little bit, and add the .hh extension parameter only. By default, the .hh extension is used only when creating HipHop (Hack)-dedicated code.
In step 10, we do the same procedure for NGINX. The only thing that we change is the .hh extension in the location. As HHVM runs by default on port 9000, we do not change anything here.
If you want to check whether HHVM is running fine, use one of the following commands:
service hhvm status
netstat -anp | grep hhvm
To check which server is running, check the headers by running the following command:
curl -I http://mage2cookbook.com/hhvm.php
The output of this command is as follows:
root@mage2cookbook:~# curl -I http://mage2cookbook.com/hhvm.php
HTTP/1.1 200 OK
Server: nginx/1.9.6
X-Powered-By: HHVM/3.10.1
Once we switch back to Apache, we will see the following:
service nginx stop && service apache2 start
root@mage2cookbook:~# curl -I http://mage2cookbook.com/hhvm.php
HTTP/1.1 200 OK
Server: Apache/2.4.17 (Ubuntu)
X-Powered-By: HHVM/3.10.1
Throughout the following recipes, we will install the latest MySQL 5.7.x version on Apache and NGINX. The current MySQL version is a milestone in the open source world. Its new performance and scalability features will be a great benefit for every Magento website. This recipe will show you how to do it.
Tip
MySQL 5.7 is an extremely exciting new version of the world's most popular open source database, which is two times faster than MySQL 5.6 while also improving usability, manageability, and security.
For this recipe, you will need a preinstalled Apache or NGINX and PHP-FPM or HHVM setup. No other prerequisites are required.
Before we can install the latest MySQL version, we need to download the software in our local system. The official MySQL APT repository provides you with a simple and convenient way to install and update MySQL products. Always use the latest software package using apt-get.
We will now install MySQL using the official vendor package. Run the following command from your root or home directory:
wget http://dev.mysql.com/get/mysql-apt-config_0.5.3-1_all.debTo download the rest of the latest MySQL package, we first install the
mysql-apt-configpackage. Run the following command:dpkg -i mysql-apt-config_0.5.3-1_all.debDuring installation, it will ask which MySQL product you wish to configure. Select Server:

Next, it will ask which Server version you wish to receive. Select mysql-5.7:
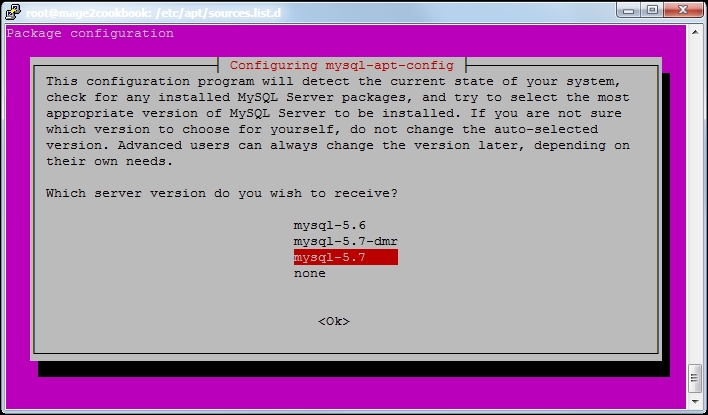
In the next screen, click on Apply:

Now, we will update our Ubuntu system using the latest MySQL packages:
apt-get update && apt-get -y install mysql-serverDuring installation, it will ask you several questions. The first one will be to choose a new password for the MySQL root user. Always make sure to create a new dedicated user only for a database; using
rootis just an example and not advised on production.Once every MySQL package is installed, we can check whether everything is in order by running the following command on the shell:
mysql --versionThe output of this command is as follows:
root@mage2cookbook:~# mysql --version
mysql  Ver 14.14 Distrib 5.7.9, for Linux (x86_64)
Let's recap and find out what we did throughout this recipe. In steps 1 through 3, we download the official MySQL package and use a graphical interface to install the latest version. The whole process is pretty straightforward. Remember to use a dedicated user that has all the privileges instead of the root user.
Throughout the following recipes, we will install Magento 2 on a preconfigured SaaS platform hosted by DigitalOcean. Installing Magento 2 differs a lot from the current Magento 1 version. An important change is the use of Composer. We will use Composer to install all the third-party modules and manage the core of Magento 2. This recipe will show you how to do it.
Tip
Composer is a dependency management tool for PHP. It allows you to declare the software libraries for your project. It will help you install or update them.
For this recipe, you will need a preinstalled Apache or NGINX, PHP or HHVM and MySQL setup. No other prerequisites are required.
For the purpose of this recipe, let's assume that we need to create a Magento 2 hosting environment. The following steps will guide you through this:
First, we will start installing Magento 2 on Apache; later, we will do the same with NGINX. Throughout this recipe, you can use PHP-FPM or HHVM. For now, we will focus only on PHP-FPM.
Installing Composer is pretty straightforward. For the rest of the recipes, we will be installing Composer in the
/usr/local/bindirectory. This way, we can use it system-wide. Run the following command on the shell in the/usr/local/bindirectory:curl -sS https://getcomposer.org/installer | phpIf you have not installed curl yet, you may need to run the following command on the shell:
apt-get -y install curlTo check whether Composer is working fine, run the following command:
mv composer.phar composer
./composer
You will get the following output:

While we will be using a search-friendly URL in Magento, we need to enable the Apache mod_rewrite module before we can continue. Run the following code on the shell:
a2enmod rewriteRestart your Apache server to complete the new configuration. Run the following code on the shell:
service apache2 restartIf you see the following output on your screen, everything is correct:
root@mage2cookbook:/var/www/html# a2enmod rewrite
Enabling module rewrite.
To activate the new configuration, you need to run:
service apache2 restart
Note
Installing Magento 2 can be done in several ways. First, we will be showing you how to install it using the latest version from the GitHub release branch. Download the complete package and unzip or untar the files in your
/var/www/htmldirectory.The URL for the latest releases is https://github.com/magento/magento2/releases.
Make sure that your
/var/www/htmlhas no files in it anymore. (Use therm *command to clean up.)Execute either of the following commands:
wget https://github.com/magento/magento2/archive/2.0.0.zip
wget https://github.com/magento/magento2/archive/2.0.0.tar.gz
While extracting your files, make sure to move or copy them in to the
/var/www/htmldirectory.Now let's set the ownership and permissions:
chown -R www-data:www-data /var/www/html
find . -type d -exec chmod 770 {} \; && find . -type f -exec chmod 660 {} \; && chmod u+x bin/magento
Now we use Composer to resolve all of our dependencies. Run the following command on the shell:
cd /var/www/html/ && composer installTip
If your installation is set up correctly, the installation will continue, using the correct PHP modules. However, if, in some way, your PHP installing is not correct, you may get the following error messages. Update your system and try again:
Your requirements could not be resolved to an installable set of packages.
Problem 1
- The requested PHP extension ext-gd * is missing from your system.Problem 2
- The requested PHP extension ext-curl * is missing from your system.Problem 3
- The requested PHP extension ext-intl * is missing from your system.During the installation process, you will get a notice to create a GitHub OAuth token. The download rate limit is pretty small. Copy the URL from your shell window in your browser, log in at GitHub, or create an account and token:

Copy the generated token in the command prompt of your current shell window and the token will be saved for future reference in
/root/.composer/auth.json. You can continue the rest of the installation.Next, we will be using the setup wizard to continue the rest of the installation. In Chapter 2, Magento 2 System Tools, we will be using the shell installation method. Go to your favorite browser and run the following URL:
http://mage2cookbook.com/setupAs a result, we will get the following screen:

Now click on Agree and Setup Magento.
Let's start analyzing the readiness of your setup. Click on the Next button:
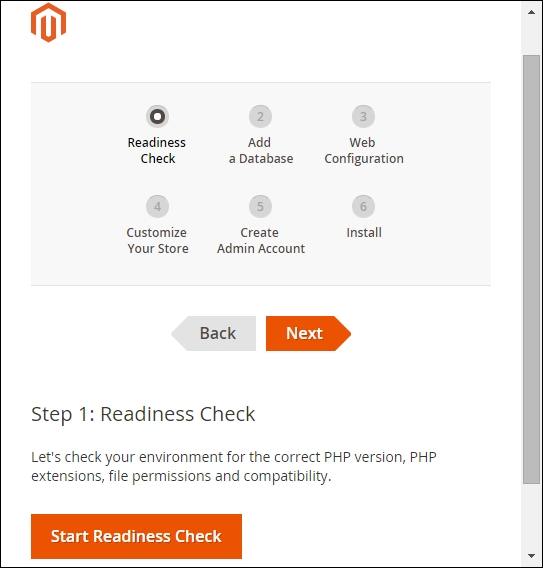
Magento 2 now will check your hosting setup for the correct PHP version, PHP modules, PHP settings, and file permissions, as shown in the following screenshot:

Continue the installation flow and commit your database credentials in the following screen:

In Step 3, we will set up our store address and administrator address. In Advanced Options, we are able to pick HTTPS, Apache rewrites, encryption key, and where to store the session key:

Step 4 gives you the opportunity to choose your time zone, currency, and language. In Magento 2, there is a brand new option to pick which modules need to be installed. You can easily select them by just clicking the checkbox, as shown in the following screenshot:

In Step 5, you can choose your username and password:

Now we are almost there; the final Step 6 will start installing our Magento 2 environment:
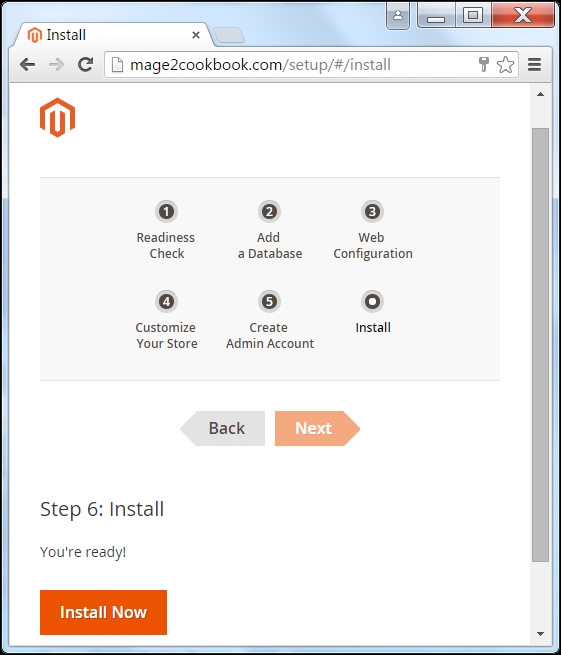
The installation step is really fast in Magento 2 and is done within a minute depending on your server. If you get an error in the console screen, such as a missing database, create one via the shell with the following command:
mysql –u root –p
create database magento;
Installation of Magento 2 can be seen in the following screenshot:

Congratulations, you have successfully installed Magento 2. You will be given administrative information on your login and store address.
For security reasons, you may want to alter the write permissions of your
/app/etcdirectory to only read permissions with the following command:chmod -R 440 /var/www/html/app/etcNow we will focus on the configuration of Magento 2 on NGINX. We don't need to reinstall Magento 2; we just need to alter the current NGINX setup with the appropriate setting.
Now, let's go to the NGINX configuration directory and update
default.confin/etc/nginx/conf.d.Open thedefault.conffile and change it with the following settings:upstream fastcgi_backend { server 127.0.0.1:9000; } server { listen 80; server_name yourdomain.com; set $MAGE_ROOT /var/www/html; set $MAGE_MODE developer; include /var/www/html/nginx.conf.sample; access_log /var/log/nginx/access.log; error_log /var/log/nginx/error.log; location ~ /\.ht { deny all; } }As you can see, we are now using an
upstreamandset $MAGEsetting and have removed thefastcgi_pass.However, the most important element is the Magento 2
nginx.conf.samplefile, which is in the root directory of your Magento 2 instance. For now, it is easy to include this directory but not advised on a production level. It's best that you copy this file to your NGINX configuration directory and store it there. Don't forget to change the following setting:include /var/www/html/nginx.conf.sample;
Save your configuration and run the following command to check whether your settings are correct. If not, change your configuration:
nginx -tIf your syntax is okay and the test is successful, then restart your NGINX server. Don't forget to stop your Apache server. Run the following command on the shell:
service apache2 stop && service nginx startTo check whether you are running NGINX, use the following command:
curl -I http://mage2cookbook.com/
root@mage2cookbook:~# curl -I http://mage2cookbook.com/HTTP/1.1 200 OKServer: nginx/1.9.6
Congratulations, you just finished the installation of Magento 2 on NGINX.
Let's recap and find out what we did throughout this recipe. In steps 1 and 2, we install Composer. Composer is our most important element before we can start installing Magento 2. As we are using Apache, we need to enable the mod_rewrite module, which is mandatory in Magento 2. Next, we download the latest Magento 2 version from GitHub and unzip the code in our directory.
In step 4, we check whether our setup is resolving all dependencies. Depending on the outcome, we need to install or enable the additional PHP modules.
In step 5, we create a GitHub token and store it in the auth.json file. We need this because the download rate limit is small when downloading additional software dependencies.
In step 6, we use the Magento 2 setup directory to install via the graphical user interface. All the remaining steps till 12 are self-explanatory.
In step 14, we switch from Apache to NGINX. The configuration file contains the following important elements: nginx.conf.sample, upstream fastcgi_backend, and $MAGE to finish our setup. The upstream parameter makes sure that all PHP requests are connected to PHP-FPM, the $MAGE variable connects the web directory, and include refers to the master configuration file.
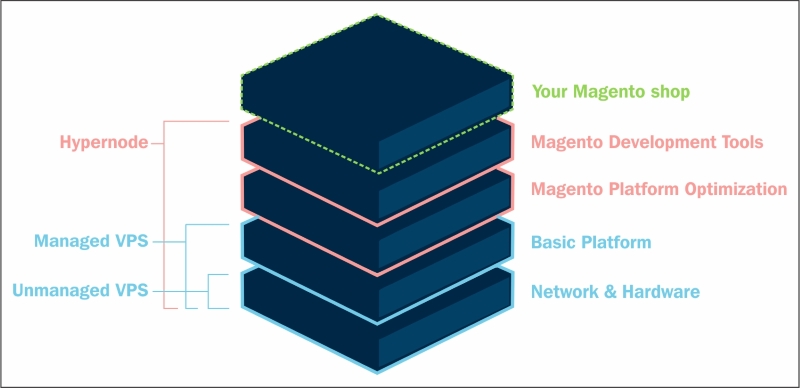
Throughout the following recipes, we will install Magento 2 on a fully managed platform hosted by Hypernode. Hypernode is an advanced platform for successful Magento shops.
Hypernode is a radically different approach to Magento hosting that actively improves your shop's performance. Its unique Magento platform is developed by Byte Internet, a Dutch hoster with eight years of experience in hosting Magento.
Hypernode has been developed in close consultation with Magento developers, with the objective of having Magento web shops perform to the best advantage and make its development several times easier. This recipe will show you how to do it.
Tip
With Hypernode, you will get your own fully managed isolated cloud server. This server has been fully configured for Magento 2. The best and latest software such as NGINX, HHVM, PHP-FPM, Redis, and MySQL are installed as a standard. In addition, they offer all the tools that you, as a Magento developer, would need in order to work comfortably: New Relic, Git, Vagrant, and Magento-specific tools such as ModMan, N98 Magerun, Sphinx Search, and much more.
The following image illustrates working of Hypernode which can be found at https://www.hypernode.com/:
For this recipe, you will need to create an account at Hypernode https://www.hypernode.com/. No other prerequisites are required.
For the purpose of this recipe, let's assume that we need to create a Magento 2 hosting environment on the Hypernode platform. The following steps will guide you through this:
First, we start by creating a user account for Hypernode.
There are two options to create a Hypernode.
The first option is a default clean Magento 2 setup using the link, https://auth.byte.nl/account/register/magento2, and committing your name, e-mail, company name, and so on. For the following steps, make sure to submit the correct cell number. You will get a text message to confirm that this account is valid and not spam. Now perform steps 2 through 9 to set up Magento 2 the easy way.
If you want to start using Magento 1 before switching to Magento 2, then follow all of the steps until step 11. To do so, use the link, https://auth.byte.nl/account/register/hypernode/, and commit your name, e-mail, company name, and so on. For the following steps, make sure to submit the correct cell number. You will get a text message to confirm that this account is valid and not spam.
Now, open up your mail account, and confirm the e-mail that you received from Byte Internet. Next, you will be prompted with a text message on your cell phone; commit the code to continue. Make sure to pick a password for the Hypernode control panel, which we will use later.
Next, commit your domain name, or any other name that will relate to this setup. The name will be used to create a subdomain on the Hypernode. The name could be called
yourdomain.hypernode.io.After submitting your domain name, creating the Hypernode will take between 20-30 minutes, or less. All current Hypernodes are created on the same hosting platform that we used before at DigitalOcean. The difference between this setup for Magento 2 is that it is a managed setup. So we don't need to configure PHP, MySQL, NGINX, and so on.
Now go to the Hypernode control panel to check the current status on the creation of the Hypernode. Go to https://service.byte.nl.
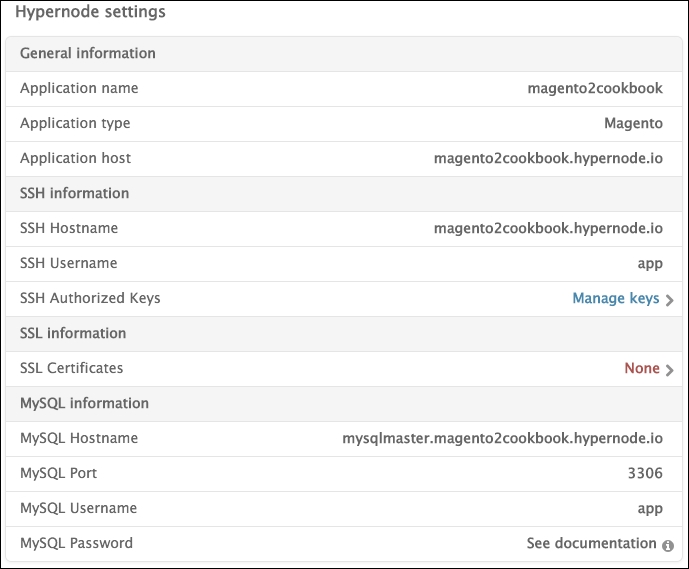
Click on your domain name and then click on Hypernode settings in the control panel. Here, you will find the current status and health of your setup:
Next, we need to set up an SSH key to log in via SSH. By default, this is the only way to log in. Go to https://service.byte.nl/sshkeymanager/ and submit your personal key or create a new pair. It will take less than 10 minutes to auto-submit this to your Hypernode.
Now you can log in to the Hypernode via the shell. The hostname is the same as your domain name, which we had set up in the beginning. The username is always
app. The example should look as follows:ssh app@yourdomain.hypernode.ioIf everything worked out fine, you should now have access to the Hypernode on
http://yourdomain.hypernode.io.By default, the current Hypernode setup has a Magento 1 preinstalled setup. We will now switch to Magento 2 using the following commands via the shell:
n98-magerun --root-dir=/data/web/public uninstall --installationFolder=/data/web/public –force

touch ~/nginx/magento2.flag
mkdir ~/magento2
cd ~/magento2

wget -qO- https://magento.mirror.hypernode.com/releases/magento2-latest.tar.gz | tar xfz –

echo "create database magento2" | mysql
chmod 755 bin/magento
cat ~/.my.cnf

bin/magento setup:install --db-host=[HOSTNAME]   --dbname=[DATABASE] --db-user=app   --db-password=[DATABASE_PASSWORD]   --admin-firstname=[YOURFIRSTNAME]   --admin-lastname=[YOURSURNAME] --admin-user=[ADMINNAME]   --admin-password=[ADMINPASSWORD]   --adminemail=[YOUR@EMAIL.COM]   --base-url=[YOUR.HYPERNODE.IO] --language=[en_US]   --timezone=[Europe/Berlin] --currency=[EUR]   --use-rewrites=1

rm -rf ~/public
mkdir ~/public
cd ~/magento2
ln -fs ../magento2/pub/* ../public
The detailed instructions can also be found on the Hypernode knowledge base, https://support.hypernode.com/knowledgebase/installing-magento-2-on-hypernode/. This also includes a small tutorial regarding a sample data setup.
Now open your browser and go to your domain name to check whether everything is working correctly.
Congratulations, you just finished configuring Magento 2 on Hypernode.
Let's recap and find out what we did throughout this recipe. In steps 1 through 4, we create a new Hypernode account at https://www.byte.nl/. These steps will create a new Byte customer that stores a reference to the Hypernode. The Hypernode is auto-created in the background on DigitalOcean. During the whole process, you will get multiple mails for validation and additional account information regarding the Hypernode logins.
In steps 5 through 11, we need to switch from the default Magento 1 preinstalled setup to Magento 2. All setups are self-explanatory and result in a clean Magento 2 setup located on a managed hosting platform and ready for production.
Hypernode provides you with a large set of tools useful for your Magento setup. Check your service panel for the latest tools and links available. Here is a small section of some useful links:
https://yourdomain.hypernode.io/phpmyadmin/
https://support.hypernode.com/knowledgebase_category/getting-started/
https://support.hypernode.com/knowledgebase/configure-redis/
https://support.hypernode.com/knowledgebase/varnish-on-hypernode/
Docker is a new way of packaging your application and building containers for every single process. It is very lightweight and easy to set up. Creating building blocks for Apache, NGINX, MySQL, PHP, HHVM, and Magento individually and running them together can save lots of time during development, testing, and production.
In this recipe, we will not cover the Docker fundamentals but learn how to run a Magento 2 Docker setup on your DigitalOcean Droplet using existing containers.
Before we can start using Magento 2 on Docker, we need to create a clean Droplet. Back up your current Droplet by creating a snapshot. Here are some easy steps to create a snapshot and start a new Droplet with Docker preinstalled:
Power off your current Droplet in the DigitalOcean control panel.
Select Take Snapshot and choose a name. (This may take some time depending on how big your current environment is.)

Select Rebuild Droplet, which is in the Destroy menu, choose Ubuntu docker (1.9.1 on 14.04), and press Rebuild from Image.
For the purpose of this recipe, let's assume that we need to create a Magento 2 Docker setup. The following steps will guide you through this:
Log in to your Docker Droplet. You can check your current Docker version with the following command:
docker -versionBefore we start pulling the Magento 2 Docker container, we first need to pull a MySQL container. Run the following command in your shell:
docker run -d --name mysql -p 3306:3306 -e MYSQL_ROOT_PASSWORD=admin mysql:5.6The Docker run command will automatically download a MySQL 5.6 container, which will run in the background once it's done.
Now we can check whether the MySQL container works. Run the
dockers imagescommand, and then check which images are available. If you want to log in to the container, run the following command:docker exec -it mysql bashYou can run any other command here, and then check whether MySQL is running. For example, run the
ps --auxcommand and you will see the process of MySQL.Now we start pulling the Magento 2 Docker container to our local machine. We are using a prebuilt Docker container hosted at the Docker hub (https://hub.docker.com/u/raybogman/).
Run the following command to install a clean Magento 2 setup:
docker run --rm --name magento2 -it -p 80:80 --link mysql:mysql -e MYSQL_USER=root -e MYSQL_PASSWORD=admin -e PUBLIC_HOST=
yourdomain.com raybogman/mage2cookbook-docker $*
Run the following command to install a Magento 2 setup including sample data:
docker run --rm --name magento2 -it -p 80:80 --link mysql:mysql -e MYSQL_USER=root -e MYSQL_PASSWORD=admin -e PUBLIC_HOST=yourdomain.com raybogman/mage2cookbook-sample-docker $*Change the
PUBLIC_HOSTsetting with your own IP or domain name. The SampleData version has all of its assets to create a preinstalled Magento 2 setup.Be patient now; this may take some time. The latest Magento 2 container is downloaded and executed on the fly. The final phase is the execution of Apache that will run in the foreground.
Now open your browser and, depending on your public IP or domain name, execute this.
Now we can check whether the Magento 2 container works. Run the
dockers imagescommand, and then check which images are available. If you want to log in to the container, run the following command:docker exec -it magento2 bashYou can run any other command here, and then check whether Apache 2 is running. For example, run the
ps --auxcommand and you will see the process of Apache 2. All Magento 2 files are located at/var/www/magento2.Congratulations, you have Magento 2 running using a Docker container. The login credentials are the Magento username (
admin), password (password123), and backend URL (http://yourdomain.com/admin).
Let's recap and find out what we did throughout this recipe. In steps 1 through 8, we create a Docker setup for Magento 2.
In steps 2 and 3, we set up a MySQL container that will be downloaded automatically and run in the background.
In step 4, we download the prebuilt Magento 2 Docker container and connect it to the MySQL container. The installation process can take some time; Magento needs to deploy the whole setup.
In step 7, you learn how to get shell access to the Magento container and maintain it.
To kill/shut down the current Magento 2 container, use the Ctrl + C command in the running shell.
This Magento 2 Docker container is designed only for demo purposes, and is there to run in the foreground and not as a daemon in the background.
Check out the source code of the Magento 2 Docker container on GitHub:
https://github.com/mage2cookbook.
Some basic commands to use Docker are as follows:
|
|
Docker running containers |
|
|
Docker local containers |
|
|
Access to running container shell |
|
|
Remove all running containers |
|
|
Remove all containers |


