


This chapter will walk us through the steps needed to set up Xcode as well as the development of the SimpleCalc App. SimpleCalc will allow us to take two numbers and perform addition, subtraction, multiplication, and division. This App is intentionally kept simple because we have many things to learn about how to develop Apps in this chapter.
In this chapter, we shall learn the following:
Installing the Xcode App
Creating a new Xcode project
Configuring an Xcode project
Creating an App Icon
Configuring an Xcode target
Creating a user interface
Implementing a Mac OS X App behavior
Building and running a Mac OS X program
Before we start to develop our first Mac OS X program, we need to locate the tools needed to create programs. There are several different choices for software development on Mac OS X and the tools that we will select depend on the programming environment that we want to use. Because we want to write our programs using the native Objective-C programming language and the Cocoa frameworks we are going to use Apple's free Integrated Development Environment (IDE), called Xcode.
The code in this book has been developed and tested with Xcode 4.3.
Tip
Cocoa frameworks
The Cocoa frameworks consist of libraries, Application Programming Interfaces (APIs), and runtimes that form the development layer for all of Mac OS X. By developing with Cocoa, we will be creating applications the same way Mac OS X itself is created. Our application will automatically inherit the behavior and appearances of Mac OS X. Using Cocoa with Xcode IDE is the best way to create native Mac applications.
For Mac OS X, Apple provides the Xcode IDE for free in the Mac OS X App store. We are going to install the Xcode IDE so that we can start making our first App. To do this, we need to follow these steps:
Access the Mac App store by clicking on the Apple menu and selecting App Store.
Search the App Store to locate the Xcode App.
Install the Xcode App from the App store.
Now that we have installed Xcode, we can start using it to write our own Mac OS X App. Let's get started:
To create a new Xcode project, launch the Xcode App and click the button titled Create a new Xcode project on the Welcome to Xcode window as shown in the following screenshot:

When Xcode asks us to select a template, select Application under Mac OS X and Cocoa Application as the template. Then, click on the Next button.
When we click the Next button, Xcode will ask us to select options for our new project. The options that we need to select are as follows:
Option
Value
Description
SimpleCalc
The product name will be the name of your App program file that shows up in the Mac OS X Finder.
com.yourdomain
com.yourdomain The company identifier needs to be unique and typically uses the reverse domain notation. It can be anything but you should use a company identifier that will not conflict with an existing company. If you don't have an Internet domain name you can acquire one new or you can use com.yourlastname.first name.
Your Initials
(For consistency, throughout this book we will use BTS but when you develop your own code you should use your own initials)
The class prefix is used to make sure any program classes that you create do not have the same name as any program classes that someone else may create.
Finally, there are some checkboxes at the bottom of the options screen. The only one that needs to be checked is the option titled Use Automatic Reference Counting. This setting permits Xcode to automatically manage the memory that our program uses and helps keep programing simple because we do not need to think about destroying objects that our program creates. This checkbox, along with the rest of our settings, is shown in the following screenshot:

Click on the Next button and Xcode will ask us where we want to save the new project that we are creating. While we can save projects anywhere that we like, a good place may be a new folder called
projectsin ourDocumentsfolder. Whatever we decide, when we have navigated to that folder, we need to click on the Create button as shown in the following screenshot: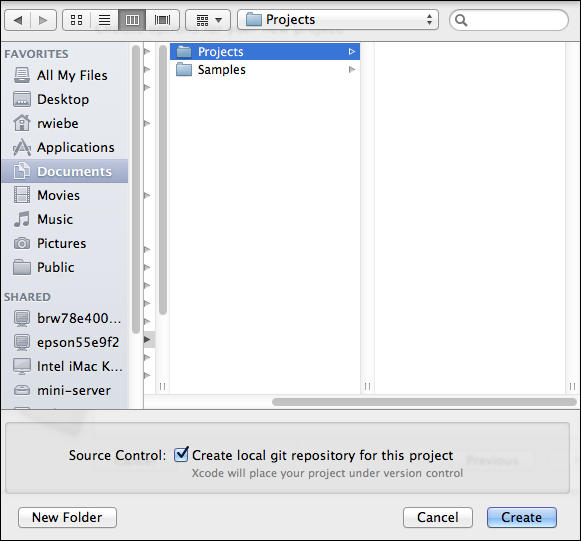
When we clicked on the Create button, Xcode created the new project from the template that we chose and displayed its main interface window.
Tip
Don't Panic
The main Xcode window can be quite overwhelming. The following screenshot shows the entire interface simply to give us an idea of its scope. We don't need to understand all of the sections or be intimidated by Xcode's main window. As we get deeper into programming, we will learn more about each part of the window.

As we progress in our App development and become more familiar with Xcode, we will become comfortable with the contents of this interface. Xcode's interface is very similar to iTunes. It contains the following:
A control area along the top where we can build and run ("play") or stop our App
A navigation area on the left where we can select different components of our project to inspect
An editing area in the center where we can modify different components that were selected in the navigation area
A utilities area on the right where we can inspect and change attributes of selected items
It is a good idea to take some time now to become familiar with the meaning of each of the little icons for the navigator section of the Xcode view, which appear across the top of the navigation area on the left-hand side of the window. The following table gives descriptions of these icons:
|
Icon |
Description |
|---|---|

|
Shows the project navigator, which lists all of the files in this project |

|
Shows the symbol navigator, which lists all of the symbols (method names, property names, and so on) in this project |

|
Shows the search navigator, which lists all of the search results for anything that we want to search for in the project |

|
Shows the issue navigator, which lists all of the issues (typically error or warning) |

|
Shows the debug navigator, which lists all of the App threads and symbols if a debug session is active |

|
Shows the breakpoint navigator, which lists all of the places we want the App to stop at so that we can inspect its state during an active debug session |

|
Shows the log navigator, which lists a log of the different activities that we have performed |
Xcode will sometimes change the selected navigator based on actions that we perform or events that occur. It is useful to know that we can always switch back to the navigator that we want to see by clicking on the appropriate icon.
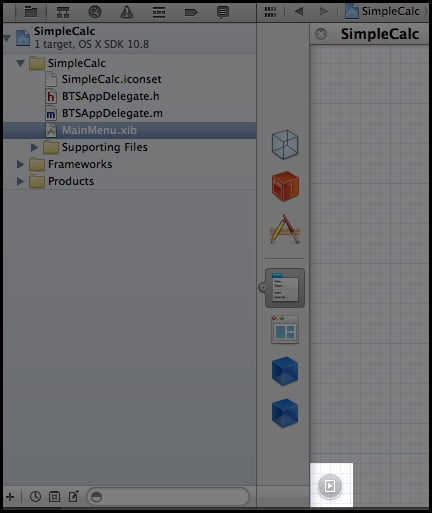
In Xcode, open the SimpleCalc project.
Click on the disclosure triangles beside each folder icon in the project navigator to reveal all of the items that Xcode created as shown in the following screenshot:

We don't, yet, need to understand everything that the Xcode template has done for us, but it is important to understand each of the main types of files in these folders. The file type is determined by the file extension (
.h,.m,.app, and so on).
We examined the contents of the Xcode project template and gained a better understanding of the different types of files that are needed to create a Mac OS X App. While it is not important, yet, to understand each of the different file types in detail, it is important to have an overview of all of the different components that are needed to create a Mac OS X App. As we develop our own Apps, we will acquire a much better understanding of these files and their contents.
Each file type is explained in the following table:
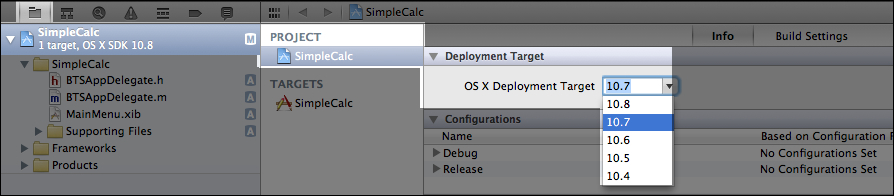
There are a lot of different things that we can configure in an Xcode project. As we create different projects, we will look at different aspects of what can be configured. For our SimpleCalc App, we are going to consider which the version of Mac OS X that we want the App to run which icon that we want the App to display.
By default, Xcode will configure our project to run only on the latest version of Mac OS X with the generic App Icon. Sometimes we may want our project to run on an earlier version of Mac OS X. For example, if we want to give our software to someone with an older computer or if we want to put our software in the Mac App store. This setting is called the Mac OS X deployment target.
We will always want to assign an icon to our App so that we can easily identify our App on the Mac desktop. This setting is called the App Icon.
To change the Mac OS X deployment target for our project we need to do the following:
In the project navigator, click the folder icon to show the project navigator.
In the project navigator, click on the very top item, just under the icons, named SimpleCalc.
Under PROJECT, click on SimpleCalc.
Under Deployment Target, click on the drop-down menu beside Mac OS X Deployment Target and select the oldest version of Mac OS X on which we want our App to run as shown in the following screenshot:
Change TARGETS setting for the Organization of the Project Document to our name or the name of our company as shown in the following screenshot:

Before we continue to configure our Xcode target, we need to take a small detour and create an App Icon. We are going to need our App Icon as part of the process of configuring an Xcode target.
The first thing we need to do is create the icon. We can do this in any image editing program, from Illustrator, to Photoshop, to Gimp. The program that we use does not matter. What matters is that the image has a transparent background and that the image size is 512 x 512 pixels. We need to export our image in PNG format and it may look like the following image, which has been created in Photoshop Elements:

Once we have the image that we want to use as our icon, we need to save it in a folder named
SimpleCalc.iconsetwith the nameicon_512x512.png.Note
The filename must be exact. If you name it anything other than
icon_512x512.pngthe icon will not be correctly updated and you will see a generic icon instead of your App Icon.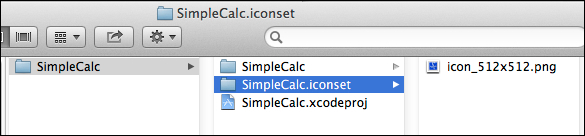
Once we have our PNG image saved in the
iconsetfolder, we simply drag that folder to the App Icon section of our project target and Xcode will automatically convert it to a suitable.icnsfile as shown in the following screenshot:
Because we have not provided all the required image sizes, Xcode will warn us that some image sizes are missing. For the purposes of our SimpleCalc App we can ignore these warnings but if we planned to deploy our App to the Mac OS X App Store we would create a PNG file for each required icon size and place it in our
iconsetfolder prior to dragging the folder in to the App Icon section of the Target as shown in the following screenshot:
When we set up the Deployment Target and App Icon, we made changes to our Xcode project. Xcode will use those changes and apply them to the App when we build it so that the App is ready to run on the versions of Mac OS X that we need and the Finder will display our unique icon to identify our App on the desktop.
Create your own 512 x 512 bitmapped image, save it in .png format, and put it in the iconset folder for the SimpleCalc App. You can use any image editing software that you like. You may want to create all of the required image sizes so that you don't get warnings from Xcode. The following screenshot shows the images of all required sizes present in the SimpleCals.iconset folder:

If you need a free bitmap editor take a look at Gimp for Mac OS X:
When we use an Xcode template to create an App, Xcode creates a project that will build a fully functional App. The App will display a menu bar, display a window, allow us to drag the window around and even present an About box when the About menu item is selected. An Xcode template is the perfect starting point for any App.
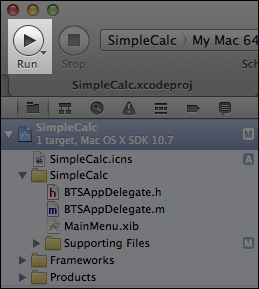
To run the SimpleCalc App that Xcode created from its template do the following steps:
In the main Xcode window, click on the Run button as shown in the following screenshot:
If we watch the Xcode status panel after clicking the Run button, we will (very briefly) see some messages that indicate Xcode is building our App as shown in the following screenshot:

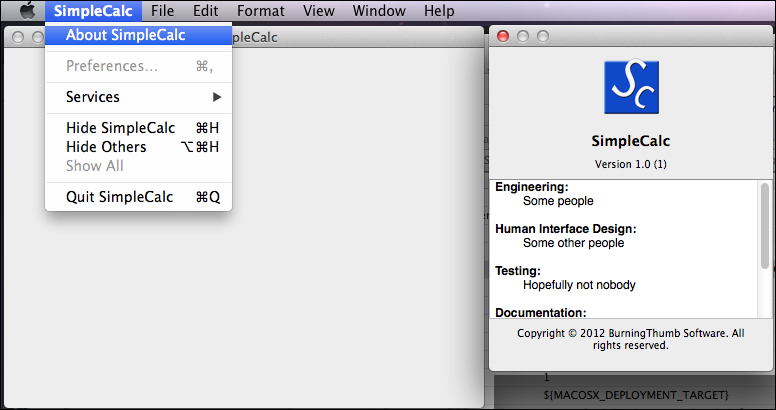
After the building of the App is complete, the SimpleCalc App will display its menu bar and main window. When the SimpleCalc App is running we can drag its main window around, click on its menus, display the About window, and quit the App by selecting Quit SimpleCalc from the App's menu as shown in the following screenshot:
When we create a project from an Xcode template, the resulting App needs to be customized to provide the interface that we want in our App. So as soon as we have created the basic project we need to make our interface changes.
Note
Because the sample program code used in this and the next section is both short and concise, the explanation of the code is included in the code as comments rather than using descriptive text surrounding the code. We can identify comments in the program code by looking for the // characters that start each line or the /* and */ characters that surround a block of comments in the code. We need to become comfortable with reading program code and distinguishing the comments in the code, from the code.
The way that we implement our features is to open the files created from the template and change their contents to include the new program code that implements the behaviors that we want to add.
Open the
SimpleCalcproject in Xcode.Click on the item named
BTSAppDelegate.hand add the highlighted new interface@propertydefinitions and the button action interface definition for the SimpleCalc App. Notice they are placed in the template code after thewindowproperty and before the@endstatement as shown in the following code snippet:@interface BTSAppDelegate : NSObject <NSApplicationDelegate> @property (assign) IBOutlet NSWindow *window; /* Create the user interface elements */ // Buttons @property (assign) IBOutlet NSButton *mAdd; @property (assign) IBOutlet NSButton *mSubtract; @property (assign) IBOutlet NSButton *mMutliply; @property (assign) IBOutlet NSButton *mDivide; // Text Fields @property (assign) IBOutlet NSTextField *mValue1; @property (assign) IBOutlet NSTextField *mValue2; @property (assign) IBOutlet NSTextField *mResult; /* Create the App interface for the buttons */ - (IBAction)myButtonAction:(id)sender; @end
Click on the item named BTSAppDelegate.m and add the highlighted new interface
@synthesizedefinitions and the button action implementation for the SimpleCalc App.Again notice the position of the code after the
@implementationkeyword and before the@endkeyword as shown in the following code snippet:@implementation BTSAppDelegate /* Create the user interface setter and getter functions */ // Buttons @synthesize mAdd; @synthesize mSubtract; @synthesize mMutliply; @synthesize mDivide; // Text Fields @synthesize mValue1; @synthesize mValue2; @synthesize mResult; - (void)applicationDidFinishLaunching:(NSNotification *)aNotification { // Insert code here to initialize your application } /* Create the App implementation for the buttons */ - (IBAction)myButtonAction:(id)sender; { // For now, just beep NSBeep(); } @end
Click on the item named MainMenu.xib.
Click the Show Document Outline button as shown in the following screenshot:
Click on the Window - SimpleCalc tab in Objects to display the App window as shown in the following screenshot:

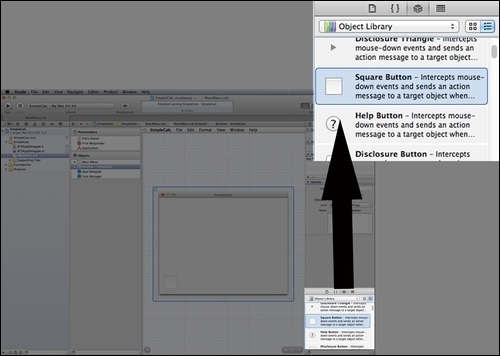
Locate the Object Library option and scroll to find the Square Button shape as shown in the following screenshot:
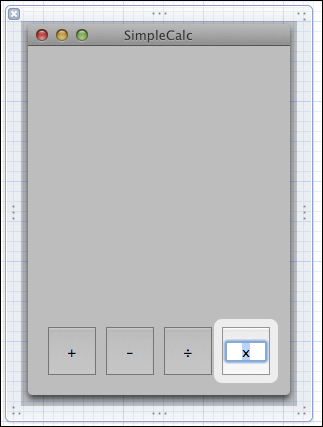
Click and drag a Square Button shape from the Object Library to the SimpleCalc window. Then drag three more buttons and place them beside the first button to form a row of buttons. Finally, resize the window so that it fits the four buttons as shown in the following screenshot:
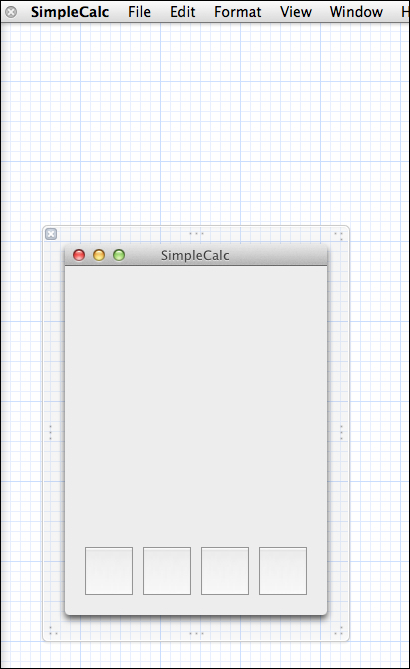
Double-click on the buttons one at a time and type the labels
+,-,÷,xrespectively.You will end up with something that looks like the following screenshot:
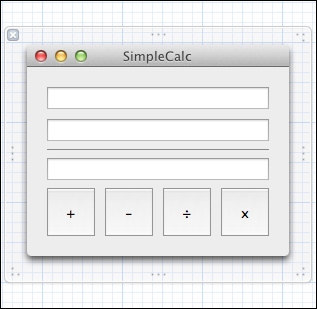
Locate the Object Library and scroll to find the Text Field option.
Drag two Text Field objects into the SimpleCalc window, and place them one below the other.
Locate the Object Library and scroll to find the Horizontal Line option.
Drag a Horizontal Line into the SimpleCalc window and position it below the two Text Field objects.
Locate the Text Field object in the Object Library and drag a third Text Field into the SimpleCalc window.
Click and drag to select all the Square Button objects and drag them up below the third Text Field.
Resize the SimpleCalc window to fit the Text Field and Square Button objects. After you are done, you will have something like the following screenshot:
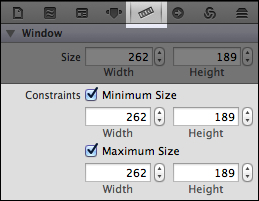
Because we don't want our calculator window to change size, we need to set constraints. Click on the SimpleCalc window to select it, select Show the size inspector in the inspector pane, and under Constraints, enable both the Minimum Size and Maximum Size options as shown in the following screenshot:
Right-click (or if you don't have a three-button mouse, hold down the Ctrl key and left click) on the + button and drag it to the App Delegate object as shown in the following screenshot:
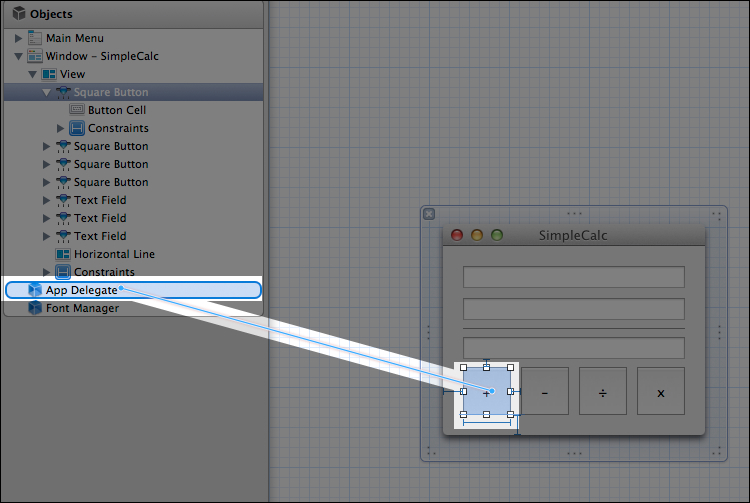
When the App Delegate object highlights, release the mouse button and select myButtonAction from the Received Actions selection pane as shown in the following screenshot:
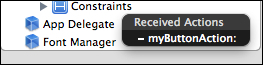
Repeat the process to connect the remaining three buttons to the – myButtonAction method.
Right-click (or if you don't have a three-button mouse, hold down the Ctrl key and left click) on the App Delegate object and drag until the first Text Field is highlighted as shown in the following screenshot:

Release the mouse button and select mValue1 from the Outlets selection pane as shown in the following screenshot:
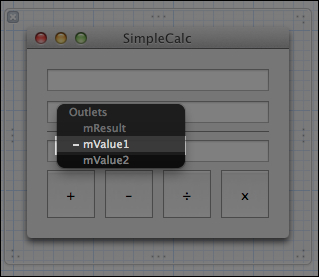
Repeat these steps to connect mValue2 to the second Text Field and mResult to the third Text Field.
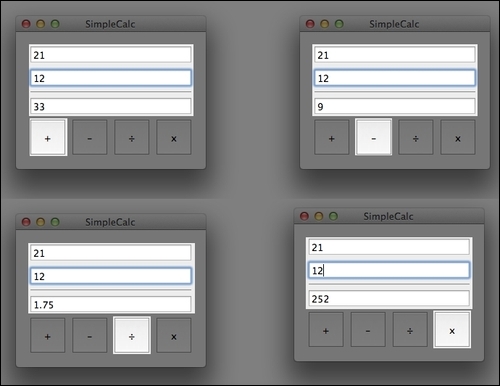
We created the interface for our SimpleCalc App and connected the interface to the program code for our App. We also connected the App Delegate object to the Text Fields in the interface. Now when we run SimpleCalc we see the new interface and when we click any of the buttons we hear a system beep.
The following steps will help us implement the SimpleCalc behavior:
Open the
SimpleCalcproject in Xcode.Click on the item named
BTSAppDelegate.mand add an implementation for themyButtonAction:method. The code that we need to add is as follows:/* Create the App implementation for the buttons */ - (IBAction)myButtonAction:(id)a_sender; { // For now, just beep // Comment out the beep, we don't need it // NSBeep(); // Get the button title (+, -, x, or ÷) to // determine which operation the App will // preform NSString *l_operation = [a_sender title]; // Get a double precision number from the // first text field double l_value1 = [mValue1 doubleValue]; // Get a double precision number from the // second text field double l_value2 = [mValue2 doubleValue]; // Create a double precision variable to // hold the result of l_value1 <op> l_value2 double l_result; // If the operation was addition, then // add the two values if ([@"+" isEqual: l_operation]) { l_result = l_value1 + l_value2; } // If the operation was subtraction, then // subtract the two values else if ([@"-" isEqual: l_operation]) { l_result = l_value1 - l_value2; } // If the operation was multiplication, then // multiply the two values else if ([@"x" isEqual: l_operation]) { l_result = l_value1 * l_value2; } // The operation must have been division, so // divide the first value by the second value else { l_result = l_value1 / l_value2; } // Set the result text field to the result [mResult setDoubleValue:l_result]; }Tip
Downloading the example code
You can download the example code files for all Packt books you have purchased from your account at http://www.packtpub.com . If you purchased this book elsewhere, you can visit http://www.packtpub.com/support and register to have the files e-mailed directly to you.
Let's learn how to build and install the SimpleCalc app:
Open the
SimpleCalcproject in Xcode.Under the Product menu, select Clean.
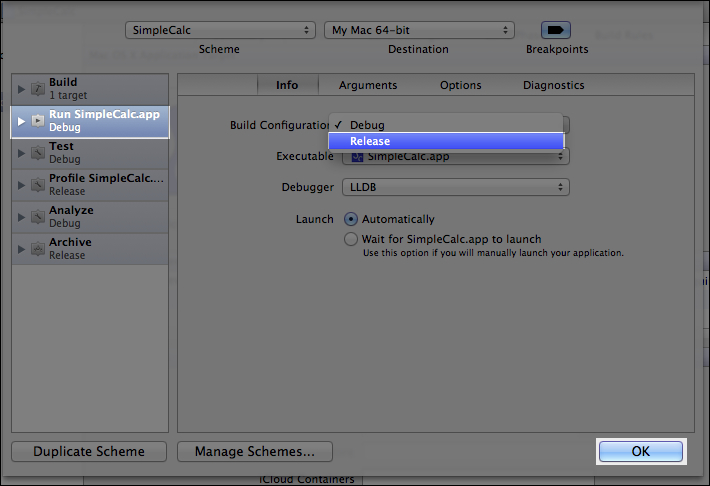
In the scheme editing panel, select Run SimpleCalc.app, click on the pop-up menu for Build Configuration and select Release. Then click on the OK button as shown in the following screenshot:
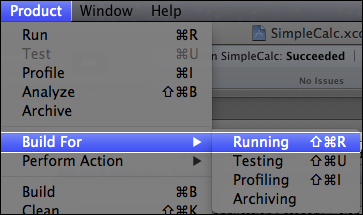
From the Product menu, select Build For and select Running as seen in the following screenshot:
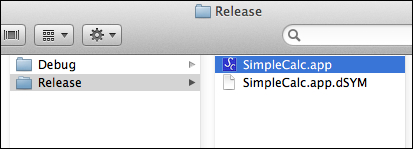
In the Project Navigator, right-click (or hold down the Ctrl key on the keyboard and left click if you don't have a three button mouse) on SimpleCalc.app and select Show in Finder as shown in the following screenshot:

In this chapter, we have covered everything that we need to know to develop Mac OS X Apps.
Specifically, we covered how to install the Xcode IDE from the Mac App store and how to create a new Xcode project from a template. We then identified the different types of files needed to create a Mac OS X App. Then we customized the Xcode template and created a new icon for our App. Finally we created the user interface and actions for our App so that we could build it for installation into the Applications folder.
Now that we've learned how to develop a basic Mac OS X App, we need to take a small diversion in our route to learn what to do when the unexpected happens and the debugger appears when least expected – which is the topic of the next chapter.

