


In this chapter, we will cover the following topics:
Controlling administrative rights with RBAC and custom cmdlets
Hardening Lync Servers
Hardening Lync databases
Enhancing conferencing security
Managing certificates for desk-phones authentication
Deploying a secure Lync Edge
Applying ethical walls for federation security
Using Application Request Routing to configure a reverse proxy for Lync Server 2013
There is a high level of security inherent in all the Lync Server features. Unified communications, from a customer's point of view, require a special level of privacy and control, and Lync is designed with mechanisms to answer to this need in a clear manner. Lync updates (both on the client and on the server side) have added to the software a flexibility in design, so that it is now possible, for example, to use certificate authentication or passive authentication for mobility scenarios, or to add a two-factor authentication (as we will see in Chapter 2, Lync 2013 Authentication). In this chapter, we are going to talk about some of the security aspects related to the infrastructure. Lync 2013 security has two different scopes, one related to the network where the servers are located, and one related to the services we make available to the external users. The recipes regarding Role-Based Access Control and servers and database hardening are more relevant to protect our deployment from threats that come from the corporate network, while the topics related to ethical walls, reverse proxy, and edge security are fundamental aspects when the communication extends to the Internet.
A fundamental document that you should read as a starting point is the Security Framework for Lync Server 2013 post (http://technet.microsoft.com/en-us/library/dn481316.aspx), which will give you a high-level overview of the security features inside Lync Server 2013.
Lync Server 2013 administration uses Role-Based Access Control (RBAC) to assign different levels of access privileges to the users, and to enable them to perform specific administrative tasks. The idea behind RBAC in Lync 2013 is that adding a user to a specific group not only defines the features and administrative tasks they are able to manage but also limits the cmdlets they are able to use in the Lync Management Shell. There are some built-in administrative roles, and we are able to add custom groups for more granular control. Another operation we are able to perform is adding authorized cmdlets to both kinds of groups, expanding the allowed tasks for a specific RBAC role.
In our example, we will use both of the previously mentioned customizations, creating a new customized user group, CsUserModifier, based on the default group CsViewOnlyAdministrator, and adding access to the Set-CsUser cmdlet (to modify properties for existing user accounts).
Create the
CSUserModifieruser group (with the scope as universal and type as security) in Active Directory.Open the Lync Server Management Shell and launch the following cmdlet:
New-CsAdminRole -Identity CsUserModifier -Template CsViewOnlyAdministrator
The cmdlet will clone the permissions of the
CsViewOnlyAdministratorgroup to the custom group.Launch the following cmdlet to verify the list of administrative tasks delegated to the new group:
Get-CsAdminRole CSUserModifier | Select-Object –ExpandProperty cmdlets | fl
The output will be similar to what is shown in the following screenshot:

Now, we are able to use the cmdlet customization, adding the
Set-CsUsercmdlet to the available tasks:Set-CsAdminRole -Identity CsUserModifier -Cmdlets @{add="Set-CsUser"}The same command, with an
@{removeparameter, can be used to remove some administrative tasks that were previously available from a group:Set-CsAdminRole -Identity CsUserModifier –Cmdlets @{remove="Get-CSVoiceRoutingPolicy","Get-CSVoiceTestConfiguration"}Verification of the previously mentioned cmdlet is done using the same process we used in step 2, to verify the list of delegated tasks.
The
New-CSAdminRolecmdlet supports the–Cmdletsswitch that we saw in step 5, so when defining a custom group role, we are able to add custom cmdlets. A command like the next one could achieve both role customization and cmdlet customization in a single step:New-CsAdminRole -Identity CSUserModifier -Template CsViewOnlyAdministrator -Cmdlets @{add="set-CsUser"}
As important as it is for security, RBAC has a severe limitation because it is effective only for users that are working with Lync administrative tools from a remote workstation (http://technet.microsoft.com/en-us/library/gg425917.aspx). The controls are not enforced for users who are working locally on the Lync Server (or using a remote PowerShell session). Physical security of our servers is an important topic, and we should address it with all the available solutions (smart card access, doors, cameras, strong passwords, lights-out servers with no physical keyboard or monitor available, and so on).
Talking about Lync Server 2013, we are interested in applying a defense-in-depth approach, using multiple defense layers against security threats. Various security solutions are applied to make bypassing of one of the layers more difficult. We are also able (at least) to buy time on the different layers before someone is able to access the next level of security. Our servers are the last layer before internal data and files of Lync are compromised. Hardening a Lync Server requires a series of steps, and we will see how to use the Security Configuration Wizard (SCW), a tool that makes it easier to fix some common misconfigurations and security flaws.
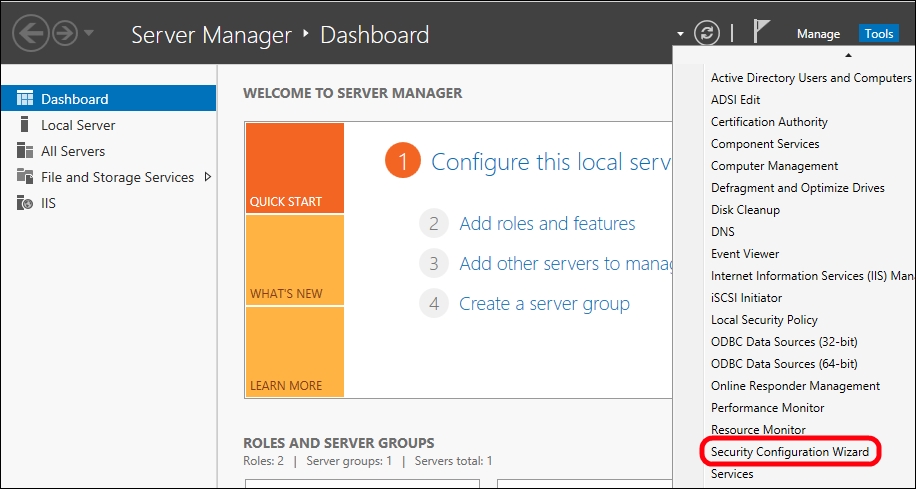
To increase the security of the operating system, we can use the SCW (if we are using Windows 2012 or Windows 2012 R2 SCW it is an integrated tool). In the previously mentioned OS, the Configuration Wizard is part of the Tools menu.
Note
While the following steps have been tested on a single installation Front End (Lync Server 2013 Standard Edition), we have to select the settings that best fit our specific security requirements, and verify them in a lab. Using SCW on a production environment without sufficient verification is a risky approach.
The Security Configuration Wizard option is accessible from the Tools menu in Server Manager, as we can see in the following screenshot:
In the first screen, we have to click on Next and then on Create a new security policy.
Select the name of the Lync Server that will act as a baseline (in our scenario, Madhatter).
We can select Next in the Role-Based Service configuration screen and again Next in the Select Server Roles screen until we arrive at Select client features. Flag all the options and select Next.
In the Select Administration and Other Options screen, select Background Intelligent Transfer Service BITs and Windows Audio.
In the Select Additional Services menu, flag all the services and click on Next.
Select Do not change the startup mode of the service and then select Next.
In the Confirm Service Change screen, accept the default value and select Next.
Flag the Skip this section in the Network Security screen (we have to leave the flag box clear if we want to use the Windows firewall too).
Click on Next in the Registry Settings screen (if we don't have a legacy operating system that needs to connect to the Lync Server).
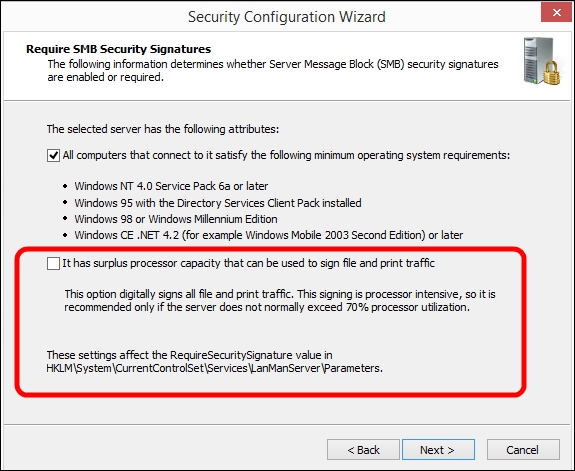
In the Require SMB Security Signatures screen, we can clear the second flag as shown in the following screenshot. If the server has enough unused processing resources, digital signature is a security option that we can consider:
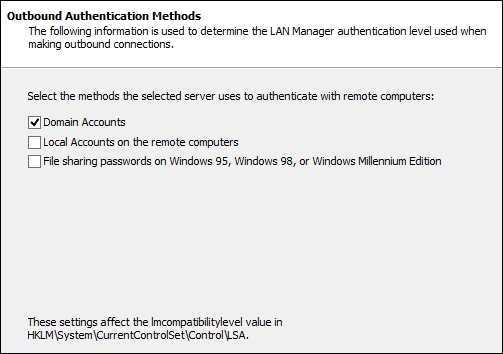
As we can see in the following screenshot, in the Outbound Authentication Methods screen, we can leave the default settings as is if we are not going to use local accounts to authenticate with other servers:
In the Outbound Authentication using Domain Accounts screen, we can leave the default settings as is and select Next with no changes also in Registry Settings Summary.
If we are not going to use auditing, we can select Skip this section in the Audit Policy screen, and then click on Next in the Save Security Policy screen.
Type a name for the policy (for example, LyncTemplate), optionally adding a description, and click on Next.
Select Apply Now, and then click on Next and Finish in the Completing the Security Configuration Wizard screen.
It is advisable to reboot the server in order to verify that the new settings have impacted the Lync Server startup phase.
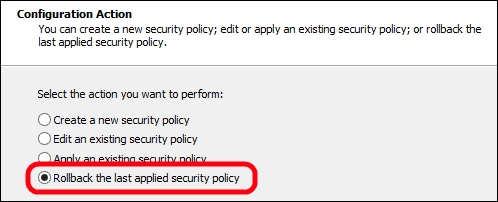
If any issue arises with the SCW, we are able to roll back to the previous configuration. If we don't have access to the local server, we can launch the SCW on another server and revert to the configuration remotely. The option is the one we can see in the following screenshot:
SCW can close TCP ports 8080 and 4443 on the Lync Front End. Running the Enable-CsComputer cmdlet, we are able to open again the required ports on the Windows Firewall. The same result can be obtained by using Lync Server Deployment Wizard or Bootstrapper.exe. For more details, see Re-activate server after Security Configuration Wizard closes ports in IIS (http://technet.microsoft.com/en-us/library/gg398851.aspx).
SCW can disable the RDP access. We are able to restore the feature with various solutions, for example, by selecting Remote Desktop from the Installed options list in the Select Administration and Other Options screen, as we can see in the following screenshot:

One of the obvious steps to enhance server security is the installation of an antivirus application. To avoid issues with Lync, we should follow the guidelines in this post Antivirus scanning exclusions for Lync Server 2013 post at http://technet.microsoft.com/en-us/library/dn440138.aspx.
Lync Server 2013 uses SQL Server as a repository for key information such as the Central Management Store (CMS), which contains our Lync topology. Lync Standard Edition uses a collocated SQL Server Express backend database that we are not able to move on a different server. Although this configuration reduces the number of machines required for the Lync Server setup, this also limits the options we have to protect our databases. The suggestions in the There's more... and See also sections are usable for both the Standard Edition and Enterprise Edition of Lync Server. The steps in the How to do it... section are applicable only to Lync Server 2013 Enterprise Edition, which has a configuration based on SQL Server that runs on a separate server (with cluster and mirroring supported as a continuity solution).
There are different ways to protect a SQL server, including security measures for the filesystem and best practices, which we will see after the How to do it… section. The steps we will see now are meant to make it more difficult to attack our SQL database from the network. SQL server uses a standard port (TCP 1433 ) for the default database instance, and TCP 1434 for the SQL Browser Service, which allows for connections to named instances of SQL Server that use dynamic ports. Using SQL Browser Service allows us to connect to a database without knowing what port each named instance is using. We will modify the default port for an instance, and disable the SQL Browser Service so that the only way for an attacker to find the TCP port used by our SQL instances is to perform port scanning (which is easier to detect).
Note
There is a TechNet post that talks about a similar solution, Deploying a SQL Server nonstandard port and alias in Lync Server 2013, at http://technet.microsoft.com/en-us/library/dn776290.aspx. However, if we have more than a single instance on the same SQL Server, it makes sense also to disable the SQL Browser Service. If the service is running, discovering its TCP port will also give information about the ports used by the various instances.
On the machine that hosts our SQL server, open SQL Server Configuration Manager and go to SQL Server Network Configuration. Select Protocol for "name of our SQL instance".
Right-click on TCP/IP and select Properties:

Click on the IP Addresses tab, select the various IP addresses available for our SQL server, and set TCP Dynamic Ports as empty. Set TCP Port to the port value we want to use:

Go to the start screen and type
Services. Open the services MMC and right-click on the SQL Server Browser service. Select Properties, and from the drop-down menu, set Startup Type as Disabled:
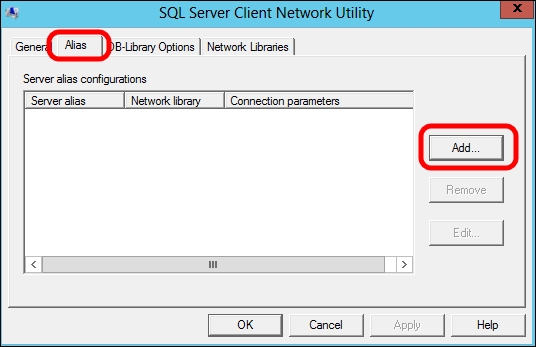
On one of the Lync Servers that require access to the database, go to the start screen and type
cliconfg.exe.Click on the Alias tab and select Add, as shown in the following screenshot:
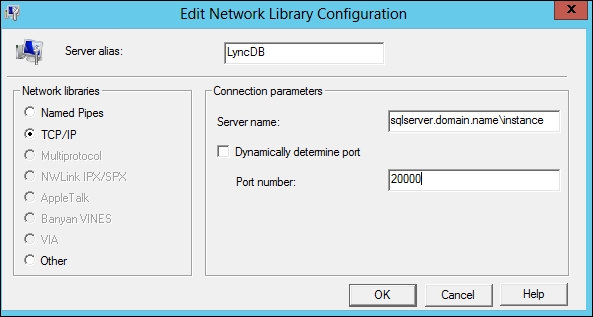
In the Server alias field, type a name for the SQL alias. In Network libraries, select TCP/IP. The Connection parameter option is the Fully Qualified Domain Name (FQDN) of the SQL server\name of the instance. If we have configured a static port for SQL, deselect Dynamically determine port and add the port number, as shown in the following screenshot:
Now, go to the start screen and type
regedit. Navigate toHKEY_LOCAL_MACHINE\SOFTWARE\Microsoft\MSSQLServer\Client\ConnectToand then right-click and select Export:
Now, we are able to use the
.regfile to import the same server alias settings on all the Lync Servers that require a connection to the database.
Customizing and limiting the TCP/IP service ports used by SQL server will make it easier to protect the database, especially when we are using a firewall to protect the server. The SQL Server Browser service answers to requests for SQL resources and redirects the caller to the port where SQL server is listening. If this service is disabled, an external attack will be more complex. Aliases will be used in the Lync Topology to connect our deployment to the databases that we have secured.
As we mentioned before, there are other ways to protect our database, for example, at the single file level, using a SQL server feature known as Transparent Data Encryption (TDE). TDE performs real-time encryption and decryption of the data and logfiles. It is supported in Lync Server 2013 as stated in the Lync Server 2013 supports TDE in SQL Server 2008 or a later version on a backend server post found at http://support.microsoft.com/kb/2912342.
On the TechNet wiki, there are a couple of interesting posts such as Database Engine Security Checklist: Enhance the Security of Database Engine Connections at http://social.technet.microsoft.com/wiki/contents/articles/1257.database-engine-security-checklist-enhance-the-security-of-database-engine-connections.aspx and Database Engine Security Checklist: Database Engine Security Configuration at http://social.technet.microsoft.com/wiki/contents/articles/1256.database-engine-security-checklist-database-engine-security-configuration.aspx full of hints to enhance SQL server security
The Microsoft site also contains documentation regarding SQL Server 2008 R2 Security Best Practices (http://download.microsoft.com/download/1/2/A/12ABE102-4427-4335-B989-5DA579A4D29D/SQL_Server_2008_R2_Security_Best_Practice_Whitepaper.docx) and SQL Server 2012 Security Best Practices (http://download.microsoft.com/download/8/F/A/8FABACD7-803E-40FC-ADF8-355E7D218F4C/SQL_Server_2012_Security_Best_Practice_Whitepaper_Apr2012.docx)
Conferencing, in Lync Server 2013, has the same default security configuration that we had in Lync Server 2010. Justin Morris, in a post dedicated to Lync Server 2010 conferencing (http://www.justin-morris.net/understanding-conference-security-in-lync-server-2010/), pointed out some of them, including the fact that every Lync user has a meeting URL and a conference ID that never changes by default, and that users invited to a meeting using a PSTN line have the ability to bypass the lobby. If we always use the same conference ID, people outside our company whom we have invited in the past could use it with malicious motivations, or different (unrelated) conferences with different people could merge if our time schedule is not perfect. We will list some steps to improve conferencing security, including a couple of cmdlets from the previously mentioned post.
We can start assessing the security configuration of conferencing for our Lync deployment using
Get-CsMeetingConfiguration.To disable the lobby bypass for PSTN users, use the following cmdlet:
Set-CsMeetingConfiguration -PstnCallersBypassLobby $false
To force users to schedule private meetings (with unique IDs), use the following cmdlet:
Set-CsMeetingConfiguration -AssignedConferenceTypeByDefault $false -EnableAssignedConferenceType $true
Then, we have to work on the conferencing policies. The default global policy allows almost any of the available conferencing features. I suggest that you clone it using
New-CsClonedPolicyfrom Pat Richard (http://www.ehloworld.com/2300). This script is useful to create a new user-conferencing policy called, for example,DefaultConferencing, which will have the same parameters we had in the global policy. The cmdlet we will use is the following one:.\New-CsClonedPolicy.ps1 -SourcePolicyName global -TargetPolicyName "DefaultConferencing" -PolicyType ConferencingPolicy
Restrict the global conferencing policy to match the minimal level of service we will grant to every Lync-enabled user.
To enhance conferencing security, we can also restrict the number of TCP ports involved in the client communication. Launch the
Get-CsConferencingConfigurationcmdlet to look at the applied configuration. IfClientMediaPortRangeEnabledisFalse, then the clients will use a port between ports1024and65535when involved in a communication session. We can use the following cmdlet to force port range (default will be starting from TCP port5350for all the kind of network traffic):Get-CsConferencingConfiguration | Set-CsConferencingConfiguration -ClientMediaPortRangeEnabled $True
As we said, the cmdlet shown in step 6 will use the same TCP port for all the network traffic involved in the clients' communication. We can refer to Chapter 11, Controlling Your Network – A Quick Drill into QoS and CAC to also implement Quality of Service (QoS) and Call Admission Control (CAC).
I suggest that you also read a second post from Justin Morris, which is related to the unique conference IDs, Why You Should and Shouldn't Configure Unique Conference IDs in Lync (http://www.justin-morris.net/why-you-should-and-shouldnt-configure-unique-conference-ids-in-lync/#sthash.W9h9mCzn.dpuf). This post examines the pros and cons of the solution outlined in the previous document in depth.
Lync Phone Edition uses digital certificates during the log-on phase to initialize the connection with the Lync Server. The next step for the logon with a desk phone will be to verify the user with a password (or PIN) authentication. In our deployment, we usually have certificates that come from more than one Certification Authority (CA), including internal and third-party CAs. The scenario becomes increasingly complex if we are going to use a CA for Exchange Server that is different from the one we used for our Lync Server certificate. Lync Phone Edition usually has a limited number of embedded root CA certificates that are already trusted. The list is available in the Trusted Authorities Cache paragraph in the TechNet post, Certificates for Lync Phone Edition found at http://technet.microsoft.com/en-us/library/gg398270(v=ocs.14).aspx. We have to work with the Certificate Provisioning Service to deploy additional root CA certificates.
We will use a Lync Standard Edition certificate issued from an internal CA as an example. Kevin Peters did a good job explaining the process for Lync Server 2010 at http://ocsguy.com/2012/05/19/lync-phone-edition-connection-to-microsoft-exchange-is-unavailable/. We have to follow the same steps for Lync Server 2013.
Open MMC, navigate to Add or Remove Snap-ins, and add Certificates.
Select Computer Account and go to Local Computer, and then click on Finish.
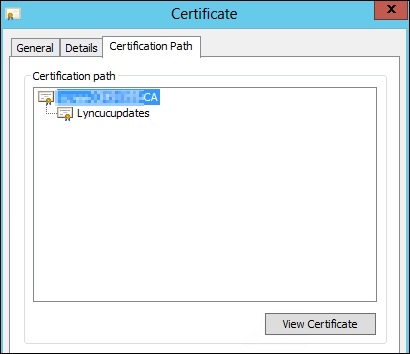
Navigate to Certificates (Local Computer) | Personal | Certificates and select the server certificate.
Go to Certification Path and select the root CA, as shown in the following screenshot:
Select the Details tab and go to Thumbprint. Copy the thumbprint value (Ctrl + C).
Paste the value in the notepad, remove the empty spaces, and copy the new value.
Launch the Lync Management Shell and type
$cert = New-CsWebTrustedCACertificate -Thumbprint "Thumbprint" -CAStore TrustedRootCA.The thumbprint is the value we copied at step 6. For example, consider the following:
$cert = New-CsWebTrustedCACertificate -Thumbprint "7a06f5b75287f17d4596118418b77004b4cd4d92" -CAStore TrustedRootCA
Set-CsWebServiceConfiguration -TrustedCACerts @{Add=$cert}Use the following cmdlet to verify that the thumbprint has been added to the
TrustedCACertsparameter:Get-CSWebServiceConfiguration
Repeat the preceding steps for all the intermediate and root CA required in our deployment.
The desk-phones configuration works on the parameters received from the Dynamic Host Configuration Protocol (DHCP) server. In particular, options 43 and 120 define the path to the Certificate Provisioning Service on the Lync Server. The steps in this recipe are also required to enable the desk phone to open the necessary URI.
Note
For a deep dive into desk-phone configuration, a blog post from Jeff Schertz is definitely a must read. The Configuring Lync Server for Phone Edition Devices post found at http://blog.schertz.name/2010/12/configuring-lync-server-for-phone-edition-devices/ contains a complete overview of the parameters required to make Lync desk phones work in a smooth manner.
Lync Edge is a role that makes Lync services available to external users and companies in a secure manner. A Lync Edge Server is not part of the internal domain, and in general, it is deployed in a Demilitarized Zone (DMZ) network with a series of limitations (for example, usually, the name resolution of the Lync Servers in the internal network is limited to local hosts file). The previously mentioned restrictions and other security features, however, are not enough to defend the server from some kind of Internet threats including Distributed Denial-of-Service (DDoS) and brute-force attacks. An extremely powerful instrument we have at our disposal to protect our Lync deployment is the Microsoft SIP Processing Language (MSPL). MSPL is a scripting language used specifically to filter and route SIP messages. Chris Norman, for example, has shared a really interesting MSPL script to block presence indicators with federated partner at http://voipnorm.blogspot.it/2013/01/mspl-script-blocking-federated-presence.html. The idea behind the script is to keep features we need running (such as IM), limiting the information we show to external users. The steps we will see (required to apply the previously mentioned solution) are the same every time we use an MSPL script.
Connect to a Lync Front End Server.
Open the Lync Server Management Shell and launch the following cmdlet to get a list of the existing server applications:
Get-CsServerApplication
Now, we can install the script (
BlockFederatedPresence.am).New-CsServerApplication -Identity "EdgeServe:cheshirecat.absoluteuc.corp/Simple" -Uri "http://sip.absoluteuc.org/BlockFederatedPresence" -ScriptName "C:\BlockFederatedPresence.am"-Enabled $true -Critical $false
The explanation of the preceding code is as follows:
The
Identityparameter indicates the Edge Server using the FQDN of the server. In our scenario, it is the Edge Servercheshirecat.absoluteuc.corp.Uri is a value we define in the
appUriparameter of the script (I customized the one in Chris Norman's script found athttp://sip.yourdomain.com/BlockFederatedPresence).ScriptName indicates the path to the
.amfile (in our scenario,C:\BlockFederatedPresence.am).Enabled
$trueor$falseis a switch to activate or deactivate the script.Critical
$trueor$falseis a switch to select whether Lync Server can start when our application does not start for any reason.
We have to restart the Lync services (
Stop-CsWindowsService|Start-CsWindowsService).
Rui Maximo wrote a post for Lync 2010 Edge Servers where he talks about DDOS to the Lync Edge Servers and points out how to use MSPL to handle this kind of threat Lync Server 2010: Security at the Edge at http://technet.microsoft.com/en-us/magazine/hh219285.aspx, Code4Lync at http://mohamedasakr.wordpress.com/, and Lync Development at http://blog.greenl.ee/ are two blogs, from Mohamed Sakr and Michael Greenlee, that have a lot of interesting posts dedicated to MSPL.
The Instant Messaging (IM) feature of Lync and the capability to communicate with external companies using Federation expose our Lync deployment to a series of threats and compliance issues. In many companies, it is required (for compliance or organizational motivation) that not all people inside all departments are able to use IM to talk to each other. Also, if our company uses federation, there is an increased risk of improper or unprofessional use of Lync features that involve external connections. Talking about IM, the first tool we have for the purpose of mitigating the previously mentioned risks is the Intelligent IM Filter that enables us to block files and URLs in IM conversations. We will see some examples to create additional controls on features.
To disable inline images (pictures added to IM conversations), we can use the two filters proposed by Graham Cropley (http://www.lyncexch.co.uk/love-lync-26th-sept-2013/).
To block
.jpgfiles, use the following:Set-CsFileTransferFilterConfiguration -Identity <Site / Global> -Extensions @{Add=".jpg"}To disable Rich Text Format, use the following:
Set-CsClientPolicy -Identity <policy> -DisableRTFIm $true
Before we go to the next step, it is useful to know a list of file extensions that are prohibited from our policies. The cmdlet to use is:
Get-CsFileTransferFilterConfiguration -Identity global | Select-Object –ExpandProperty Extensions
According to Chris Norman (http://voipnorm.blogspot.it/p/about.html), we have three filters that we can use to enhance the security for our Lync Edge Server (we can pair them with the steps in the Deploying a secure Lync Edge recipe). The following scripts could be used respectively to block URL style links, to block the transfer of files with common extensions, or to block the transfer of all files:
New-CsImFilterconfiguration -Identity EdgePoolIdentity -BlockFileExtension $True -Action Block -Enabled $True
New-CsFileTransferFilterConfiguration -Identity EdgePoolIdentity -BlockFileExtension $True -Action Block -Enabled $True
New-CsFileTransferFilterConfiguration -Identity EdgePoolIdentity -BlockFileExtension $True -Action BlockAll -Enabled $True
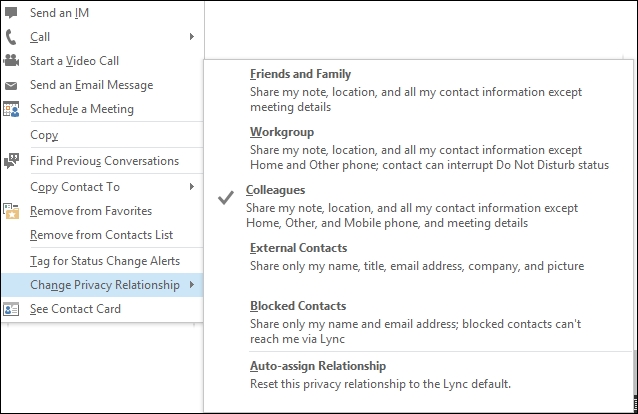
By default, Lync tries to establish what kind of relationships we have with a specific person, and grants different rights to that person. This is called Privacy Relationships, and it gives control to every single user to establish what kind of information they want to share with a specific contact, varying from a complete opening with Friends and Family to a total exclusion for Blocked Contacts. In the following screenshot, we are able to see the Change Privacy Relationship menu inside the Lync desktop client:
Tip
Downloading the example code
You can download the example code files from your account at http://www.packtpub.com for all the Packt Publishing books you have purchased. If you purchased this book elsewhere, you can visit http://www.packtpub.com/support and register to have the files e-mailed directly to you.
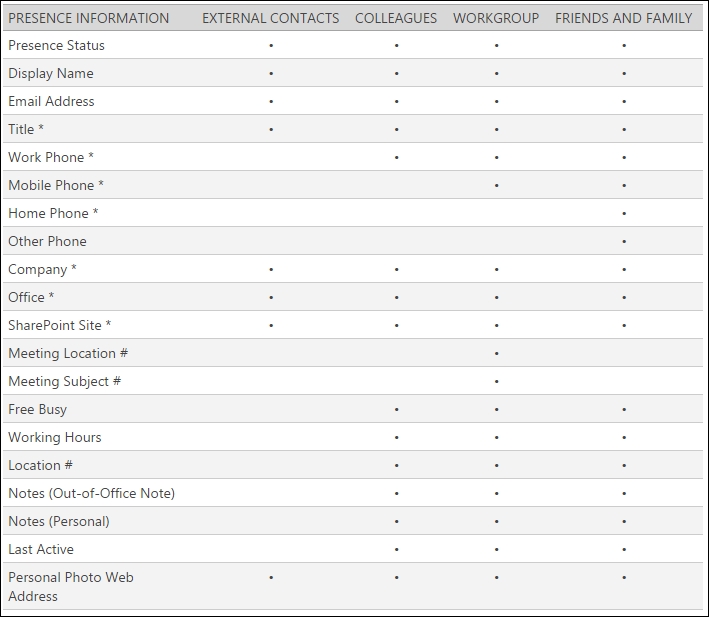
On the Microsoft Office pages (http://office.microsoft.com/en-us/communicator-help/control-access-to-your-presence-information-HA101850361.aspx), there is a handy table that shows the information available to contacts in the different privacy relationship groups. We can see a copy of it in the next screenshot:
This kind of solution manages the problem at the user level and leaves out many scenarios. For example, if we need to apply more granular control (like issuing a warning to users that are typing sensitive data such as credit card numbers), we have no out-of-the-box tool. Segregating different groups of our users (or having a stricter control over companies that are going to federate with us) is also a problem. In the previously mentioned scenarios, what we need is a so-called ethical wall, usually adopting a solution developed by a third-party provider.
A reverse proxy (a service that retrieves information on behalf of a client from servers usually located in a corporate network) is a required part of any Lync Server 2013 deployment that we want to make available to external users (as shown at http://technet.microsoft.com/en-us/library/gg398069.aspx). There are many reverse proxy solutions offered by vendors and a couple of free solutions available as part of the Windows OS. The first one is the Web Application Proxy (WAP) that is part of the Remote Access Server role in Windows Server 2012 R2. However, WAP is a relatively new technology, and there have been some issues related to using it as a reverse proxy solution for Lync Server 2013. The other solution is the IIS Application Request Routing (ARR) that enables a Windows server to act as a reverse proxy. We will talk about the setup required for the latter scenario.
The latest available version of IIS ARR is 3.0. A prerequirement for ARR 3.0 is to have IIS enabled on the server (we can use the default settings). ARR is available using the Microsoft Web Platform Installer (MWPI) at http://www.microsoft.com/web/gallery/install.aspx?appid=ARRv3_0. There is also a standalone version (ARR 3.0 standalone package) at http://www.microsoft.com/en-us/download/details.aspx?id=40813, which does not require the Web Platform Installer and could be a good solution for a server with a high level of segregation. We will use the first option (with MWPI). The FQDN of the server we are going to use is dormouse, the Lync 2013 Standard Edition Front End server is madhatter.absoluteuc.corp, and the AD DS server (that includes a certification authority) is alice.absoluteuc.corp. The frontend has a public name madhatter.absoluteuc.org, as shown in the following screenshot:

The configuration of a reverse proxy for Lync Server 2013 requires a digital certificate (usually issued from a public CA) that must include at least the Lync Pool FQDN and the Lync simple URLs for Lync (meet and dial-in). The admin simple URL is optional, and for internal use only (http://technet.microsoft.com/en-us/library/gg425874.aspx).
Note
The reverse proxy in Lync can also be used as a proxy also the simple URLs for Lync Web External (lyncwebext), Mobility (Lyncdiscover), Office Online external URL (which could be unique or shared with lyncwebext). If we enable it, we will also have the simple URL for webscheduler.
Some reference material on this topic is available in the See also section of this recipe. A reverse proxy is usually deployed in a Demilitarized Zone (DMZ) network and will require two different network interfaces (NICs), one behind the Internet-facing firewall (external NIC) and one behind the backend firewall, used to connect to our internal Lync deployment (internal NIC). The reverse proxy will be reachable from the Internet using a Network Address Translation (NAT), a process performed by the firewall that converts an internal network address into a different address that is public on the Internet.
Our reverse proxy will be located in a DMZ (that is a best practice). Usually, in a similar scenario, we have no access to a DNS server that is able to resolve the FQDNs of the internal domain (in our situation,
wonderland.lab), so we have to populate the localHOSTSfile on our server.Prepare the SSL digital certificate, starting from a CSR generated using IIS (http://technet.microsoft.com/en-us/library/cc732906(v=ws.10).aspx) or a third-party utility like the DigiCert Certificate Utility for Windows (https://www.digicert.com/util/) and follow the steps required by the selected CA.
Open the Internet Information Services (IIS) Manager and go to the server home screen. Select Server Certificates and select Import… to import the SSL certificate (in our example, it will be named
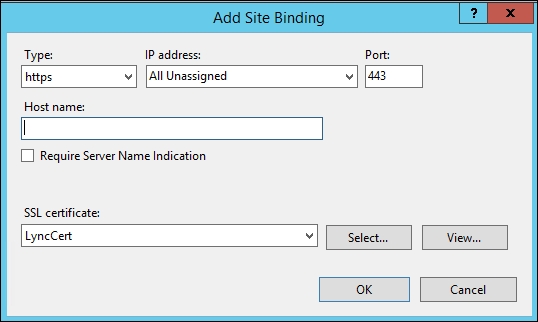
LyncCert).Open the Default Web Site page, and select Bindings….
Select Add, set Type HTTPS, and select the SSL certificate as shown in the following screenshot:
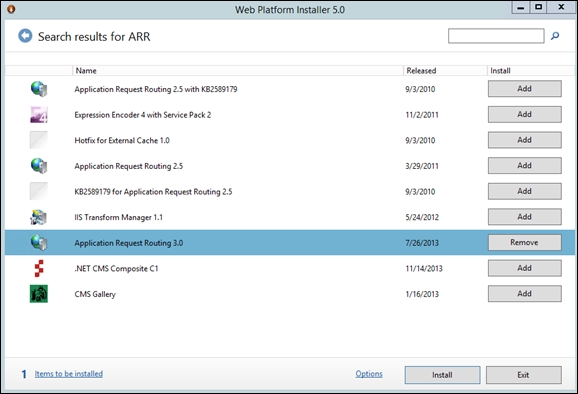
Launch the installer and select Application Request Routing 3.0, as shown in the following screenshot. The configuration will go on automatically.
Open the start screen, select Internet Information Server (IIS) Manager, and go to the Server Farms screen. Right-click and select Create Server Farm, as we can see in the following screenshot:

Type the FQDN of the service we are going to publish (for example,
madhatter.absoluteuc.org). Leave the online flag selected. Click on Next.Before we add the server, select the Advanced Settings… tab. On the ApplicationRequestRouting parameters, change the HTTP and HTTPS ports (for Lync Server 2013, they are
8080and4443, if we haven't customized them in the topology design). In the server name field, type the name of our internal server (or load balancer) and click on Add. The configuration is shown in the screen capture. The steps are shown in the following screenshot: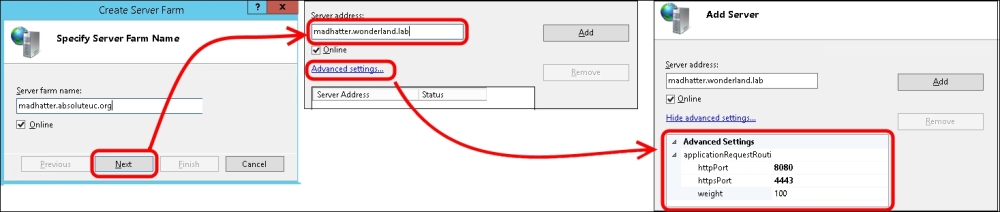
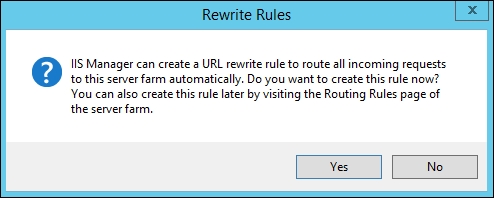
Select Finish. A notification like the one in the following screenshot will be shown. Select Yes.
Now, under the Server Farms menu, we will have lyncdiscover.absoluteuc.org. We have to select it and modify some of the options shown in the following screenshot:
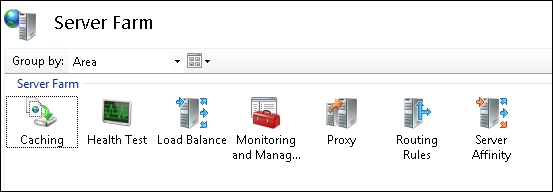
Go to the Caching options. Remove the flag from Enable disk cache. Select Apply.
Go to the Routing Rules options. Remove the flag from Enable SSL Offloading. Select Apply.
Go to the server's home screen and select URL rewrite. The previous wizard created two rewrite rules, one with HTTPS/SSL and one with plain HTTP. Remove the one we are not going to use and edit the other one to match our needs. In our example, we are going to publish madhatter.absoluteuc.org using HTTPS, so we will remove the HTTP rule and edit the SSL rewrite rule, as shown in the following screenshot:

The conditions to use are as follows:
input= {HTTPS}, Type=Matches the Pattern, Pattern=on input={HTTP_HOST}, type=Matches the pattern, Pattern=madhatter.*We also have a Test Pattern option to match the URL we are going to use with the rules. When we have done, we have to select Apply. The screen is shown in the following screenshot:

The previously mentioned steps have to be repeated for every URL we plan to publish.

The reverse proxy will receive requests on standard ports (TCP 80 for HTTP and TCP 443 for HTTPS) and redirect them to ports 8080 and 4443 of our Lync Server deployment. The "public" Lync 2013 site that is listening on these ports has rewrite rules to handle all the SIP domains we have deployed. For more information, see the Lync 2013 Internal and External Web Sites post at http://tsoorad.blogspot.it/2013/04/lync-2013-internal-and-external-web.html by John Weber.
To plan Lync certificates, the following are some useful resources:
TechNet post Request and Configure a Certificate for Your Reverse HTTP Proxy at http://technet.microsoft.com/en-us/library/gg429704.aspx
Lync 2013 Detailed Design Calculator at http://gallery.technet.microsoft.com/lync/Lync-2013-Standard-Edition-324bf0f1
Microsoft Lync Server 2013 Internal Certificate Planning and Deployment at http://lyncuc.blogspot.de/2014/04/internal-certificate-deployment-in-lync.html
