


What was your initial reaction when you discovered Lumion 3D and what you can do with it? Perhaps, it was an absolute astonishment since Lumion 3D is a remarkable software and at the same time, it is easy to use. Personally, I have been using Lumion since its first version and with each new version, Lumion's team doesn't stop surprising me with new tools and the ability to almost effortlessly produce artistic impressions, believable renders, and incredible videos in a very reasonable amount of time.
However, Lumion 3D has some limitations and is not a magical solution that will automatically create beautiful concepts and illustrations. Some will say that it takes only 15 minutes to make a a final product from a 3D model (not including the render time), but the truth is that if you want to create a professional output, there is the need for more time and attention to detail. One way you can optimize the time it takes to go from point A to point B is by improving your workflow and trying some techniques that are used in real projects and that can be easily included in your standard workflow.
This first chapter is designed to cover the most important topics and gives you a solid foundation that will help you start working with Lumion. We will cover the following topics in this chapter:
What it is possible to do with Lumion
Where to get a demo version
What do you need to work with Lumion
Different Lumion versions
Using additional models
Keeping the project organized
Using Lumion's layers
The importance of materials
Quick overview
The first few topics are aimed for those who are new to Lumion or don't know whether Lumion can meet their needs. For them, this initial section will work as an introduction. So, if you have some experience working with Lumion, feel free to jump to the section that most fits your need and before you skip this initial chapter, you may want to explore the last section called Quick overview of Lumion to check out the new interface and shortcuts in Lumion.
Lumion is targeted to produce visualizations and in most commercial projects this implies the use of a great deal of vegetation, a vast diversity of 3D models, a lighting system and materials, just to mention a few of the key aspects. Now, imagine having all of this information in real time. if you were to build a tree, not only will you see the materials, light, and shadows, but you can also move the camera around and see in real time how the tree looks like. As a plus, everything in Lumion is intuitive and user-friendly.
This creative independence and usability doesn't come without a fee because in order to provide this continuous feedback (real time), some corners need to be cut. This in turn affects how light is calculated and how materials are designed and react to light. Also, you need to keep a careful balance between 3D details and the amount of geometry used, as it is obligatory.
Note
Lumion is not an application for producing photo-realistic renders. However, the simplicity and time it takes to have a final product ready to show to the client compensates for this lack of photo-realistic touch. You can see this for yourself at http://lumion3d.com/showcase/.
So, what exactly is it possible for us to create with Lumion? Are we doomed to a low-quality product just because of some real-time technicalities? Let's have a look at the following render:

This image is a render taken from an example available in Lumion 5 and, hopefully, this can give you a good idea of not only Lumion's quality, but also the complexity that can be achieved in each scene. One thing that stands out in this render is the amount of 3D objects in the scene and you can take into consideration that individual trees along with the grass add loads of polygons to the scene. The truth is that Lumion can literally handle millions of polygons and this is useful not only for forest scenes such as the one we saw previously, but also for urban environments where we need a vast array of 3D models. Another key aspect that can be mentioned is the amount of 3D models available with Lumion (in particular, trees and plants), volumetric light, and mass placement that add life to a city scene with just a few clicks.
However, how do you know if Lumion is what you need for your company or for you pallet of tools?
Certainly, you are interested in trying Lumion to see whether it fits your needs, and the best solution to this is to try Lumion's free version. Great! A free version of Lumion! Nevertheless, I must warn you that although it's "free", this version is very and I repeat, very limited. You can use it to see how to import 3D models, check the 3D model's quality, and see how the material system work, but you will not have access to the most important and new features.
Note
You can request for the free Lumion version at http://lumion3d.com/free/.
This demo version can help you check whether the workstation or computer can run Lumion and meet the minimum requirements. After launching Lumion for the first time, a benchmark is used to check your workstation to check whether there is a necessity to upgrade a hardware component in order to run Lumion more smoothly. To work with Lumion, you need a powerful workstation and in particular, a good graphic card which is the key hardware component in this equation. Have a look at the following requirements taken from Lumion's website.
The recommended system specifications are:
A 64-bit Windows Vista, Windows 7 or Windows 8 OS
8GB RAM
NVidia GTX 680 / AMD Radeon HD 7970 or a faster version graphic card with at least 2GB dedicated memory
7.5GB of free disk space
Does this mean you are doomed if you don't meet all the requirements? Not exactly! You may struggle to work with some scenes, but you can lower the viewport's quality, which in turn gives you more room to work. You can also make good use of the layers to hide some models of the scene, which in turn leaves more resources available for you. Nevertheless, it is when you render the scene that you may feel the biggest impact of not meeting all the requirements. A scene that could be rendered in 30 minutes with a good graphic card can take you a couple of hours with a lower-range graphic card. However, there are a few more things you should know about to have the full picture of what is involved when working with Lumion.
Note
To find out which hardware will be best suited to working with Lumion, check out http://lumion3d.com/faq/#hardware.
An additional aspect you need to know is that Lumion wasn't designed with modeling and texturing in mind. Therefore, it is your responsibility to have a detailed 3D model and extra models if you don't like Lumion's optimized models. This means that all the modeling and texturing work needs to be done using an external software. If you are looking for something free, SketchUp is the best solution. Although, you can use Blender, which is a more complex and complete solution.
Note
You can find SketchUp at http://www.sketchup.com/products/sketchup-make and learn more about it at http://www.sketchup.com/learn.
On the other hand, if you like to know more about Blender, visit http://www.blender.org/download/.
You can learn more about it at http://www.blender.org/support/tutorials/.
What about other applications? Well, you need to export the 3D models into a format that Lumion can read and import. To give you an idea of what Lumion supports, have a look at the following list:
Autodesk RealDWG:
*.dxfAutodesk RealDWG:
*.dwgCOLLADA:
*.daeFBX:
*.fbx3ds Max:
*.max3ds:
*.3dsObj:
*.objSketchUp:
*.skpKMZ:
*kmz
Don't panic if you don't see your favorite application listed here, because it doesn't mean that Lumion is out of question. Most 3D applications can export the 3D model using the FBX or COLLADA file format. For example, I often use Revit for some projects and Lumion's team was kind enough to provide a free export for all users not only for Revit, but also for ArchiCAD.
Note
If you are using Revit, have a look at http://lumion3d.com/revit-to-lumion-bridge/.
You can visit http://lumion3d.com/archicad-tolumion-bridge/ if you are using ArchiCAD.
There are a few more things you need to know before jumping to Lumion's introduction.
Lumion is available in 4 versions. We already saw that there is a free version of Lumion with loads of limitations and that the only purpose is to test some of the Lumion's features. You also have an educational version and the paid versions: Lumion Pro and Lumion.
What is the difference between these two versions? To answer that have a look at the following list:
Output to real-time fly-through via Lumion Viewer
Output of background music/sound in MP4
Project files functionalities
Content available
From all the points listed, the one that will have the biggest impact is the lack of content. Lumion only has a third of what is available in Lumion Pro and for someone who started working with Lumion, this could be a problem.
Note
Do have a look at the full description of the differences between Lumion versions at http://lumion3d.com/products/.
The good thing with the models that are bundled with Lumion is the fact that these 3D models are optimized to have quality and at the same time, are not too heavy in terms of geometry (which in turn makes your viewport slow). However, there is one way you can tackle this issue if you choose the standard Lumion version.
If you opt for the simpler Lumion version, the lack of content doesn't mean your project has to be empty and will lack diversity. You just need to start building your own library and if necessary, optimize the 3D model.
Where can we find good 3D models? The following is a list of some places where you can find free and paid models:
Creative Crash: This model is available at http://www.creativecrash.com/marketplace/3d-models
Archive 3D: This can be downloaded from www.archive3d.net
Mr Cad: This can be obtained from www.mr-cad.com
3Delicious: This is available at www.3delicious.net
TurboSquid: This can be found at www.turbosquid.com
Resources Blogscopia: This can be downloaded from www.resources.blogscopia.com
SketchUp Warehouse: This can be downloaded from http://sketchup.google.com/3dwarehouse/?hl=e
Evermotion: This is available at http://www.evermotion.org/modelshop
As was mentioned before, some of these models will need to be cleaned and optimized in order to have a balance between detail and geometry. How can we do this you ask? One way is to manually clean the geometry, which can be very tedious and time-consuming. On the other hand, you could use Simplygon. They have a free version that will give you enough room to start cleaning geometry.
Note
Simplygon automatically reduces the polygon count of 3D meshes primarily to create optimized models for visualization. For more information, refer to https://www.simplygon.com/architecture-infrastructure.
After this quick introduction to what is involved in working with Lumion, we can start and prepare ourselves to launch Lumion. However, the preparation starts before we even launch Lumion. How?
From the CAD plans to the final image or animation clip, there is a lot of information that needs to be stored in an orderly way. You may prefer to work in a chaotic way, but it pays to be organized when using Lumion because similar to most applications, it uses links to files in order to work.
Lumion is not like 3ds Max or Maya where when you create a project, it automatically creates the list of folders to keep everything organized. This means that you will need to create some of these folders and keep the files inside those folders; otherwise, you could face some problems down the line. What would I recommend, you ask? Have a look at how the folders are organized in the following figure:

This is just an example of a way to organize the folders, but the significant bit is to keep it consistent. If you export the 3D model to a folder and save the textures in the same folder, this will prove useful later if there is a need to reload or reimport the 3D models.
There is an additional action you can take to keep your project organized and consequently, create a smooth workflow.
The layer's menu in Lumion is the simplest menu we can use but, initially, it may not be that easy to find. Firstly, it only appears when we have the Import and Objects menu selected and secondly, it is not that obvious as to where it is located. Do you see the black box with a number on the top left-hand side of Lumion's interface? That is the indication where the layers are, and once you move the mouse over this black box, the following options appear, as shown in the next screenshot:

The workflow for using layers in Lumion is as follows:
Select the layer by pressing the number and if necessary, rename the layer.
Then, place the 3D model(s) on the scene, so that the model is placed inside the selected layer.
What happens if you add a model to a wrong layer? Nothing simpler than following the next steps:
Select the 3D model(s). The easiest way to do this is to hold the Ctrl key and then click on and drag with the left mouse button to draw a selection rectangle around the 3D model(s). An alternative way to do this is to hold the Ctrl key and then click on each 3D model's pivot.
With the 3D model(s) selected, chose the correct layer and click on the Move selection to the layer button, as shown in the following image:

Make a good habit and practice in the way you use layers throughout the project. This not only makes your project more organized, but will also dramatically improve the speed of Lumion's viewport. How does it work? Well, every 3D model added to the scene means that Lumion needs to render that information in real time and that will decrease the speed of Lumion's viewport, which is measured in frames per second. The more frames per second (FPS) the more fluid working in Lumion will be, and you can see that information at the top-right corner of Lumion's interface.
So, how can the layers help us with this? During the process of building the 3D world in Lumion, we don't need to have all the 3D models on screen and in some situations, it is even better if we don't have them exposed. By using the layers to hide these 3D models, we not only reduce some visual noise, but we hide geometry, and hiding geometry means that Lumion has more resources available, which in turn makes the viewport much smoother.
One last thing that you need to understand before we start working with Lumion is why we need to use different materials on your models.
This is something fundamental that needs to be done in order to work with Lumion. In simple terms, Lumion does not recognize your geometry, but instead recognizes the materials assigned to each surface or face. To help you understand, let's have a look at the following image:

In the previous image, we have a 3D model that only has one material which, in this case, is the default material used by 3ds Max. So far so good, but watch what happens when we import the same model in Lumion and try to add a Lumion material. The image at the bottom-right corner shows the result of using only one material for the entire model—Lumion only recognizes "one big surface".
For that reason, you need to think ahead and identify which areas of your model need a specific material and you need to assign a different material for each section. As you can see in the following screenshot, it doesn't need to be something too fancy:

In this case, a simple colored material was applied to the different sections. For example, for the windows, we used a blue material; for the walls, a green material; and so on.
With all of these things in mind, you are now ready for a quick overview of Lumion and are ready to find out how it works. It is a crash course in two pages, but it will provide you with all you need to know to follow the rest of the book.
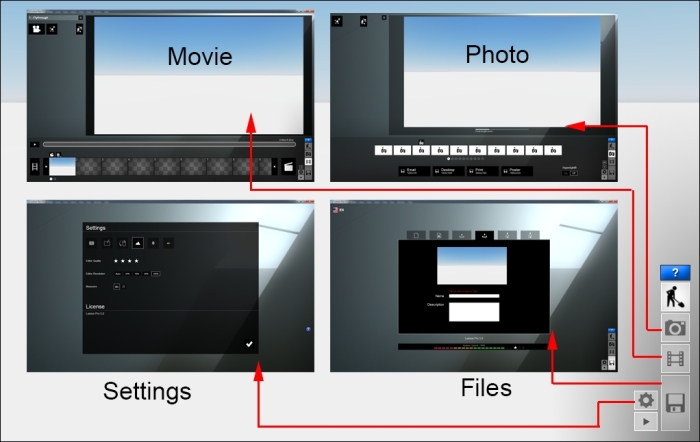
As mentioned before, when you launch Lumion for the very first time, a benchmark starts to evaluate your workstation. After that comes the Files menu that is composed of five tabs—New, Examples, Load scene, Save scene (this tab only appears after you open a scene), and Import full scene.
The New tab is where you start a new project and here you can find nine different scenes to help you start working with Lumion. Keep in mind that the difference between each scene is the settings used for landscaping, weather, and lighting, which means that you can pick any scene available and then create the other eight scenes easily. Let's click on the White scene to start working with Lumion and explore the interface to see where we can find the main menus.
Lumion tries to provide you with a friendly user interface and, initially, this may be confusing because you almost have no visual information and don't know where to find the menus. Lumion has four main menus that you can find on the left-hand side of the screen and when Lumion opens a new scene, the Import menu is the one that is opened by default. The other three menus only appear when you move the mouse close to the Import menu icon that you see on the screen. The following image shows you the toolbars that appear when you open each menu:
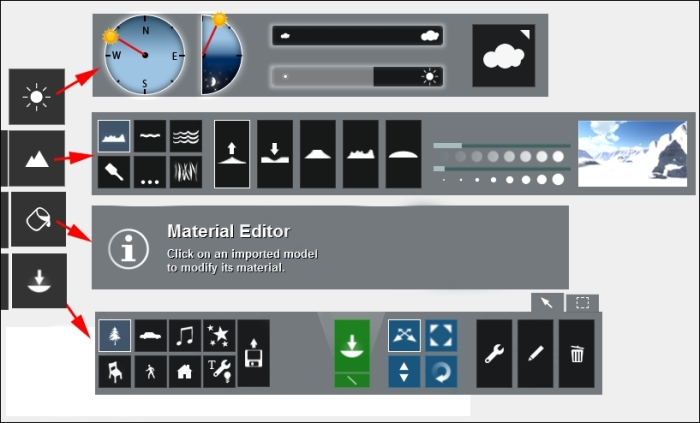
The next section that is essential is located on the right-hand side of the screen and here, you can see some small icons that give you access to different menus, as you can see in the following screenshot:
What essential information is missing here? How do you control the viewport and the camera? The easiest way to learn this is by having a look at the following screenshot:

This information is available when you work with Lumion; you just need to hover your mouse over the Help button and all of these tips will appear. However, there are some shortcuts you can use to control the camera, which are as follows:
All of these shortcuts and keys that are used to control the viewport while working in Lumion will be used later to control and tweak the cameras used for the animation clip and to render images.
This first chapter was quick but essential introduction to Lumion. You saw what it is that we can do with Lumion regarding quality and also saw the complexity of the scenes you can create by adding literally millions of geometrical shapes. You learned that although a Lumion standard version doesn't provide the myriad of 3D models than Lumion Pro has, there are many places where you can find good quality models that will need some geometry cleaning, which don't compromise Lumion's speed.
The final section of the chapter was dedicated to the topic of how to start working with Lumion, starting with the right foot forward by keeping the project organized using Lumion's layers, and finally, we identified the need to use different materials when modeling. Now, after the crash course on how to start working with Lumion, you are ready for the next chapter.
The next chapter will help you with the next stage of the workflow: importing and controlling models. This may look straightforward, but can present some challenges that require the best practices to keep a smooth workflow.


