


 Download code from GitHub
Chapter 2: Basics of React Native
We started by learning about why React Native and Galio form the best combination for us to start building our first cross-platform mobile application. After setting up our environment and configuring the necessary files, we created our first React Native project with Expo and we learned about the different ways we can test the app both physically and digitally.
I believe that learning about the whys before the hows helps build a better, more robust knowledge base. Having passed through the whys, it is now time to learn about how React Native works and how to use it to create our apps.
That is why we'll start this chapter by going through the file structure of our React Native project for us to understand how these files and folders are connected. We'll then go through the App.js file and explain how this works for us as the main entry point into our application.
Once we've learned about the file structure, it is time for us to learn about what JSX is and how to use it – the skeleton of any React application. We'll be comparing JSX to HTML a lot, so you'll have to know a bit of HTML beforehand. Rest easy if you don't know much about web development – we'll lay down some HTML concepts as well, but learning a bit about it on your own may help you a lot in the long run. Understanding the concept of JSX is where we'll deal with the concept of components, a concept we barely touched on in the first chapter. This should be completely understood by the end of this chapter.
Once we've understood the main concepts of JSX and how it is connected to React and React Native, we'll do our first component import. We'll learn what npm/yarn is and how to use it for importing and uploading components or libraries on the web. This is exciting as you'll see the importance of having a huge community backing a framework and how you can participate and make new friends.
It is now time to learn about the core components of React Native. We'll understand how and in which contexts they're useful while we discuss different ways of improving them or even changing them completely. The core components are the base components for all the components we'll find online. That means that almost every component inherits from the core ones, which makes them important to learn about and understand.
By the end of this chapter, you'll have learned how to build a component. You'll have also learned how to use it in our app or future apps and how to organize the files so that you'll never get lost searching for your components.
I believe that by the end of this chapter, you will be able to start building really simple apps that can serve as a stepping stone for building bigger, more complex projects. Understanding these concepts doesn't stop at reading this book – it goes further than that, and you'll see me always encouraging you to check out the official documentation of whatever project/framework we're using as the documentation should always be something a programmer should feel comfortable reading. Learning to read the documentation is a skill you'll develop in time by reading and being as interested as possible in the project you're passionate about.
This chapter will cover the following topics:
- Using
App.js– the main entry point - Understanding the concept of JSX
- Importing your first component
- Core components
- Understanding and creating a component
Technical requirements
You can check out this chapter's code by going to GitHub at https://github.com/PacktPublishing/Lightning-Fast-Mobile-App-Development-with-Galio. You'll find a folder called Chapter 02 that contains all the code we've written inside this chapter. To use that project, please follow the instructions in the README.md file.
Using App.js – the main entry point
As we know, React Native is an open source framework used for building iOS and Android applications. It uses React to describe the UI while accessing the platform's capabilities through the methods we have at our disposal.
Understanding our folder structure is important because we're not supposed to touch some of the files– at least at the beginning of our development. Let's take a look at our newly created project's structure.
Tip
Don't forget that you can use any text editor you want to; I'm only using VSCode because I like the way it looks and it has lots of plugins that I use, but that doesn't mean you can't open up the project with whatever text editor you feel comfortable with. Of course, that'll mean you won't be able to use the code. command as that's only used for VSCode.
First, let's open our Terminal and navigate to our folder. Now, if we write code. once we get to the folder, it will open Visual Studio Code.
Once our text editor has opened, we will see the following output in the project directory:
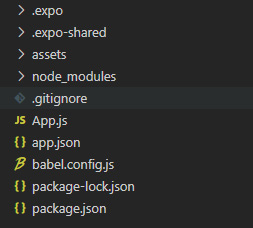
Figure 2.1 – Project directory once you open the text editor
As we can see, there are several folders and files here and they're all meant to help bundle the project once you finish your app. We'll look at each of these folders in the next few sections.
The .expo and .expo-shared folders
We'll start with the folders with a dot in front of them: .expo and .expo-shared. The dot is there to show a hidden file. That's a file you can't see directly while opening the file browser; you can only see it if you specifically choose to see it. Such files are hidden because you don't need to touch them. They're config files that are created when you first use the expo start command.
The assets folder
The next folder is the assets folder. Inside, you'll find several .png images, which are used by Expo for the splash screen – the screen that appears while the app is loading – and icons for the app to use when it's installed on a device.
The node_modules folder
Now, you'll see a folder called node_modules. If you open that folder, you'll be able to see lots and lots of folders. All these folders are packages and dependencies that we're using to make this app work. Everything that you're installing or bringing in from over the internet is going to go straight into this folder. This folder is going to get bigger and bigger, depending on how many external packages you'll be using for your app.
Once we get past these folders, we've got some files with some interesting features.
The files within
First, we can see .gitignore, which helps us save size when uploading on GitHub. If you open the file, you'll see there's already some text written in it. Everything you see in there will be ignored once you upload your project on GitHub. You'll find that .expo is there because those folders are only relevant for the programmer and they're not intended for sharing. You can edit this file by using any filename you don't want to move over to online or you don't intend on changing.
Important Note
GitHub is a platform that acts like an internet hosting company for open source software programs while also providing the programmer with version control using Git. Developers are using Git to track changes in their projects and coordinating with their teammates.
For now, we'll ignore App.js because we'll explain this file at the end of this section. So, let's go directly to the app.json file. This file acts like a config file for your app – basically, everything that's not code-related will be found there. Let's say, for example, we want to change the image of our splash screen. We don't have any way of doing that besides going into this file and editing the splash image's path. From here, you can change almost everything related to your application, such as the icon or its orientation. You'll see yourself going there quite a lot, configuring your app for the final release version.
We don't care about babel.config.js but I'm pretty sure you'd be curious about that one as well. Babel is a JavaScript compiler almost everyone is using to get access to the latest standards of JavaScript. It's not necessary to edit this file but if you want to learn more about compilers, I recommend searching for more information about Babel.
The last two files are package-lock.json and package.json. The first one always gets created when you're using npm to install dependencies in your project. I've already told you that we'll learn about npm in this chapter, but not right now. Right now, I want you to become familiar with all the files in the project directory. By creating your app via the command line, Expo automatically used npm to bring lots of files you'd use in your project over the internet. Those files are stored in the node_modules folder. You can find out more about all the direct dependencies that you're using in package.json.
Now that we've finally got to the end of all the files, we should start talking about App.js. So, let's open that file and take a look at it.
The App.js file
Upon opening the App.js file, you will see the following:
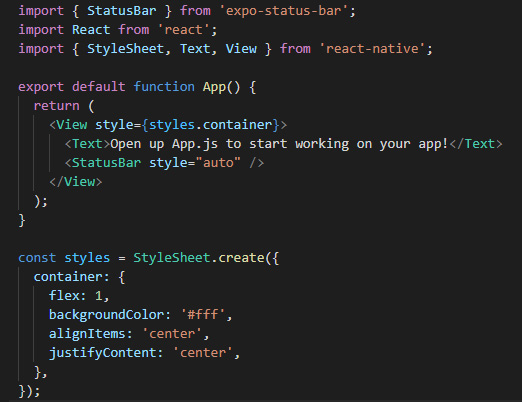
Figure 2.2 – Code in the App.js file
You can immediately see the Open up App.js to start working on your app! text. I'm pretty sure you remember but in the previous chapter, when we tested our app, this was the text that appeared on the center of the screen. This means that by changing the text, we should also see a change in our app.
We won't do that right now as our focus is understanding the files and code, and then changing it to our liking.
I'm pretty sure you connected the dots after seeing this file and realized that this is the entry point of our app. An entry point is the main file that connects all the files and starts the application. Our main function for using Expo is the App() function. Your entire application will be living inside that function.
The reason you saw the centered text when you opened the app was because the text is inside the App() function. Here, we'll start building our app. For that to happen, we must understand what JSX is and how to use it inside our app. I'm assuming you can already read a bit of JavaScript and you understand notions such as functions and objects; we won't be covering this topic in this book. We'll get to grips with JSX in the next section.
Understanding the concept of JSX
We've finally got here, we're now ready to look over JSX and learn how to use it inside our apps. React is heavily dependent on JSX as it's the main way of building the layout for our apps.
First, we'll take a look at a variable containing some JSX code:
const text = <Text>Hi, this is a message</Text>;
This weird-looking syntax looks kind of familiar, right? It looks like HTML. I'm pretty sure you have seen what HTML code looks like at least once. If you haven't, go ahead and open your favorite browser and go to something like https://reactnative.dev. Once you get there, right-click anywhere on the website and then left-click Inspect.
Once you've done that, you'll see lots and lots of HTML code. Randomly clicking on any of those HTML elements will take you to that specific element on the website. So, as you can see, HTML is a language that describes the way things should look, or more correctly, it semantically defines what each element is for the browser.
We don't use HTML with React/React Native, though. Instead, we use something called JavaScript XML (JSX).
JSX is an extension to JavaScript that allows us to write HTML elements in JavaScript. The thing is, React Native doesn't even use the HTML part of JSX. It just uses its syntax because it makes things easier to observe and read. It is also based on React, so it's kind of obvious that it is going to be pretty similar in terms of writing code.
I feel like just by reading the preceding JSX code, we can easily understand what's going on there. It's supposed to be a text with a message stating "Hi, this is a message."
We all know that "text" isn't the correct tag to be used in HTML because it doesn't exist. We are calling it text here because this is a React Native component.
Great! So, it's finally time to touch on components.
Discovering components
Components are – simply put – just JavaScript functions. So, we can write something like this:
function Element(props) {
     return <Text>Welcome to your first component</Text>;
}
This function is called a component because it returns a JSX element. We'll talk about props later, but they are really important because any component can receive a props argument inside their function.
Defining a component is easy but its usage is incredibly important. This allows us to create as many components as possible, and they can be as different as we like. This is because it clears our code out and makes things easier to organize.
Let's take a look at the code we've found in the App.js file. Try and observe the way the App() function looks. The only thing it does is return a big stack of JSX elements. In this case, we can even call this function a component and we could write it off as a JSX tag.
Expo is using this component to start your app, which means that your React Native application is just a big component that encapsulates all the other components you're going to write.
What I meant by using this component as a JSX tag is that if, for some reason, we'd like to take this component and use it in a different part of our app, we could easily just go to the file where we need it and write <App /> inside the stack. Then, everything that's inside the App() function will get rendered.
Let's try and use one of the already existent components in our only App.js file. We know <Text> is an already-defined component that's being used because we saw it work when we first tested our app.
You should already have the project and terminal open. Let's go ahead and write expo start in our terminal so that the server will start booting up.
A new window will open in your browser, just like in the previous chapter. Click Run on… and pick the simulator that you want to use (or use your physical device if that's easier for you). We've already discussed how to run the app, so if something seems a bit hard to understand, please go back to Chapter 1, Introduction to React Native and Galio, to refresh your memory.
Now that the app is alive and well on your device, we're seeing the basic screen we've already seen. Let's change it a bit by removing the text between the <Text> tags and replacing it with something else. Write your name in there; I'm going to do the same.
So, right now, we have the following line:
<Text>Open up App.js to start working on your app!</Text>
At this point, it should look something like this (but with your name instead of mine):
<Text>Alin Gheorghe</Text>
After doing that, go to the end of the line and press Enter. A new line will be created, so let's add something to make this starting app feel more like something personal, something that's ours.
We should add some more text describing our age and hometown. Your App() function should now look something like this:
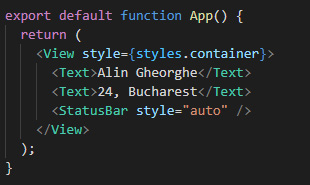
Figure 2.3 – Your recently modified code
Now, save the file you've modified (usually by hitting Ctrl + S or cmd + S) and you'll suddenly observe something cool. Once you've done this, the code automatically changed on your simulator/physical device.
This is so great, right? Usually, you'd have to restart the server, but we didn't have to do anything more than save the file we've been editing. This is called hot reload and is a great feature that comes packed with React Native.
Since we've added a new Text component inside our App function, you've probably guessed that we need to take this component from somewhere. You can't use a component without having it imported into your file first. So, let's learn how to do this.
Importing your first component
Now, it's time for us to learn more about importing components. Importing is great because we can grab components from anywhere and use them in our app. I mean it – you could grab a component from anywhere on the internet.
First, let's see how the Text component we've been using got into our App.js file.
If we look above the App() function, we will see that the first lines of code are all imports of different components. Let's take a look at those and see if they're that complicated:

Figure 2.4 – Imports displayed in the App.js file
It's pretty easy to read and to understand what exactly is going on here. Let's take the first line, for example. We're importing StatusBar from a package called expo-status-bar.
Why are we're doing that? In our App() function, you'll see that we've used a component called StatusBar.
For us to be able to use a specific component, we'll need to import it from a package or a defined path inside our project.
We can see an import from React but we can't find the React component anywhere inside our code; why is that? This is mostly because we need React to be able to use the React framework while creating all those components and writing JSX.
Underneath, we can see there are three different imports from a package called react-native. We can see StyleSheet, Text, and View. React Native comes packed with a lot of basic but really important implementations of native code for us to use in our React app.
We'll look at these core components in more detail in the next section, but you must understand the fact that those components were imported and then used inside our main function.
You can find packages online, so you could import them into your files easily by using npm. This is already installed with your Node.js configuration, so it's ready to use right now. We can search for packages on https://npmjs.com and easily install any of them with the npm i package-name command.
Right now, we'll focus on the components we received from react-native. We'll install more components in the following chapters but first, we need to learn how to use what we already have at our disposal and how we can build on top of that.
Let's start by importing some of the most important components and use them inside of our app. So, let's go to the third line in our App.js file. Between those brackets where we've imported StyleSheet, Text, and View, we'll add the Image, TextInput, and Button components.
Now, our line will look like this:
import { StyleSheet, Text, View, Image, TextInput, Button } from 'react-native';
Let's try to understand what the purpose of each component is and how we can use them inside our application.
Core components
We need to understand all the basic components before we can move on. This will help us realize how to mix them so that we can create even bigger and more complex components. This will also make things easier when we're planning our app. In Chapter 4, Your First Cross-Platform App, we'll create a functional app for us to be proud of and our friends to look up to. The following list shows the core components:
- View:
So, let's start by discussing the most important component in React Native: View. This component is the fundamental of all components. The
Viewcomponent is so important because you cannot build a UI without it. Acting like a container for other components, this is your best bet if you want to style something differently or arrange the layout in a specific way.Let's see a basic example:
<View>
      <Text>Hi! Welcome!</Text>
</View>
- Text:
We've already used this component and it's pretty straightforward. We can use this component to display text on the screen.
Let's see a basic example:
<Text>This is a text</Text>
- Image:
This is cool because it allows us to display an image and style it the way we want to..
Let's see a basic example:
<Image source={{uri: 'https://via.placeholder.com/300'}} /> - StyleSheet
We can find an example of how this component is used by looking at our
App.jsfile again. It creates a stylesheet similar to CSS but with fewer styling rules. It's really easy to use once you understand it, and we'll go further into styling once we get to our first practical challenge, where we'll create and style our very own first screen.Let's see a basic example:
const styles = StyleSheet.create({ logo: { backgroundColor: '#fff', } }); - TextInput
This is a component that was created for inputting text into the app using the keyboard. It is packed with all the necessary methods you'd want from an input, such as
onSubmitEditingandonFocus. Don't worry – we'll use all of these when we need them.Let's see a basic example:
<TextInput placeholder='email' />
- Button
This component renders a basic button that handles touches.
Let's see a basic example:
<Button title='Press me' />
I'm pretty sure you've noticed some of these components have another word inside their tags. For example, for our Image component, we have the word "source," which grabs the link we're giving to know what image to display. That word is called a prop, and we'll learn more about them in the next chapter.
Before moving on, let's use the examples we have here for Button and TextInput in our app. We're doing this for practice and to get used to what things look like on our devices once we use these components.
Let's go and write some code displaying our age and hometown underneath our Text component using the examples we have for TextInput and Button. Now, the main function will look like this:
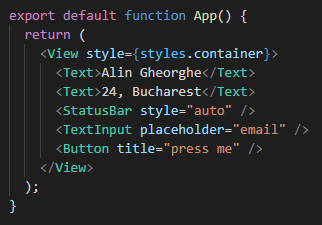
Figure 2.5 – Your new code after importing and using the new components
Now, let's hit refresh and look at our simulator/physical device. We'll see two new things: an input that, if pressed, opens a keyboard where you can write things, and a blue button with text written in uppercase.
We haven't used the Image component yet as it requires styling for it to work. It needs to be told what size the image should be. We'll look at styling in more detail in the next chapter.
At this point, we've talked about all these components in a bit more detail and explained what the purpose for each one is. These are all core components because they deal with hardware capabilities and they need native code to run. By native code, we mean code written in Swift or Java for iOS or Android. Developers are building and styling components that inherit from these.
Next, we'll learn how to create components and how to organize our files so that we'll never forget where to import from.
Understanding and creating your own component
We're getting closer to our goal: creating a cross-platform mobile app. For this to become a reality, we need to learn how to create components.
First, let's create a new folder in our project's main directory and call it components. Here, we'll create a new file named PersonalInformation.js.
This folder will serve as a safe space for all our components to live in, a place where we can always import our components, just like we'd normally do with any package we'd find online.
So, we've already talked about how components are created – they're JavaScript functions that return a bunch of JSX code. However, what I haven't told you is that these components are called functional components and that there are different types of components out there.
Let's build our first functional component by writing all the necessary code inside our newly created file. We'll create a component whose main purpose will be to display our already written personal information on the screen.
We'll begin by writing our necessary imports. So, for this component, we know we need a Text component. Let's go ahead and import that. Write the following at the beginning of your file:
import React from 'react';
import { Text } from 'react-native';
We've imported React because, as I mentioned earlier in this chapter, we need it if we want to create components and use JSX. Because that's the most important and basic import, we're going to place it at the beginning of our code. After that, we imported the Text component from React Native.
Creating the function
Let's continue and write our functional component now, just like we learned earlier:
function PersonalInformation(props) {
     return <Text>some text</Text>;
}
Earlier, we mentioned that we need it to display the same information we did previously (our name, age, and hometown) but I haven't written anything like that. That's because we've run into our first problem.
Let's say we try to write something like this:
function PersonalInformation(props) {
      return (
           <Text>Alin Gheorghe</Text>
           <Text>24, Bucharest</Text>
);
}
Here, we'll see a bunch of red lines underneath our code. That's because JSX doesn't allow two tags to be next to each other if they're not encapsulated in a bigger tag. This is where View comes in handy. So, let's import that as well. Our second line of code will now look like this:
import { Text, View } from 'react-native';
Because we now have the View component, we can write our function with it while encapsulating our Text components, like this:
function PersonalInformation(props) {
      return (
           <View>
                <Text>Alin Gheorghe</Text>
                <Text>24, Bucharest</Text>
           </View>
);
}
With that, we've successfully created our first component. But why did we write the same thing? We already had this information in our main App.js file. We're doing this to understand why components are so cool.
Exporting and importing our component
Before we move to the main file, we'll have to be able to import this. We can't do this before we export it. Makes sense, right? Let's go ahead and add the following line to the top of the file:
export default PersonalInformation;
Now, your code should look something like this:
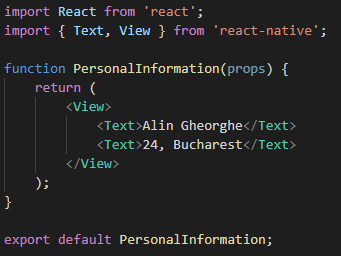
Figure 2.6 – The code we've written in our PersonalInformation.js file
If everything looks correct, save the file and move to App.js so that we can look at the most useful features of components: reusability and readability.
Now that we're in App.js, let's delete what we already have in our custom-made component – I'm talking about the Text components that are displaying our personal information. After deleting those, we can import our new component. Importing this should be easy if you've followed along so far – you just have to go underneath your last import and add another line. There, you'll import your component, like this:
import PersonalInformation from './components/PersonalInformation';
Now, let's use this component instead of the already removed Text components we had previously. This is as easy as writing <PersonalInformation />.
Now, your code should look like this:
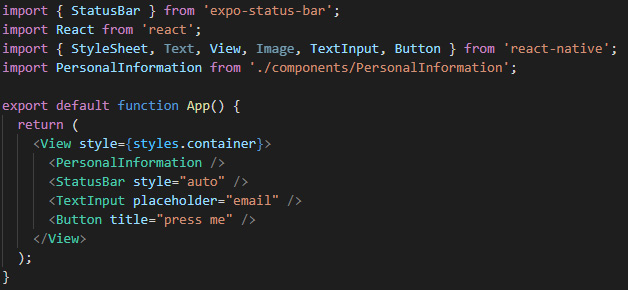
Figure 2.7 – Our code after all the modifications
Now, let's save and look at our app. As you can see, nothing has changed, but we've cleaned our code because we're only writing one line of code to get two lines of output, and that makes it a lot more natural to follow. It's a lot simpler to read because we instantly know that the Personal Information component will output personal information, and on top of that, it's really easy for us to find exactly what is of interest when we're looking for a specific part of our code.
So, if we want to go ahead and change something from our main screen – let's say we want to change our age because we're now 1 year older – you can easily see that your personal information is in a component called PersonalInformation that was imported from a folder called components. Now, all you have to do is go inside that folder, look for that specific file, and modify the text. That's easy to follow, right?
Let's create another one so that we can see how we can simplify and clean up this process even more.
Creating the Bio component
For now, let's remove the TextInput and Button components from App.js. We're not using those right now and they don't look like they have anything to do with our personal information.
After removing those from your main function, go inside our components folder and create a new file called Bio.js. This is pretty self-explanatory, but I feel like a profile should have a small biography at the top with just your name and age.
We already know that we want to import a Text component and create our functional component. I won't repeat the process of creating a new component; instead, I will write something personal inside the Text component.
Important Note
Don't forget that you don't need a View component now because we're only using a Text component here. The fact that we only have one JSX element means our component can easily return it without needing a parent component encapsulating it.
The new component should look like this:
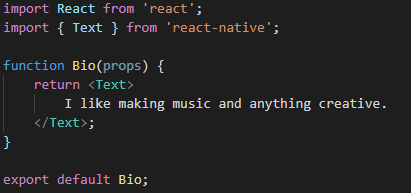
Figure 2.8 – Our new Bio component
Let's save and import it into our main file, App.js. As we did previously, we create a new line underneath our last import and write the following:
import Bio from './components/Bio';
Now, let's use it inside our app – I'm placing it underneath our <PersonalInformation /> component. Save and refresh. You should now be able to see your bio underneath your age and hometown on your device.
This is great, but are we going to keep on having a new line for each component? Imagine having 30 custom components. That's going to turn into a hellish nightmare to scroll past.
Creating the main file for our components
We can easily solve this by going into the PersonalInformation.js file and removing the default keyword from the last line of our file. Do the same thing with Bio.js. Your last line in both files should say something like this:
export Component;
Of course, instead of Component, you'll have the actual name of your function, which should be PersonalInformation or Bio.
Because we've done that, we can create a new file inside our components folder called index.js. We'll create a list of all of our components here, which will allow us to import these custom components from a single line.
Inside our newly created file, index.js, we'll import our components and then export them. This sounds easy and somehow redundant but this is useful as it's going to make things even clearer and easier to read and follow.
After writing everything in our index file, the code inside should look like this:
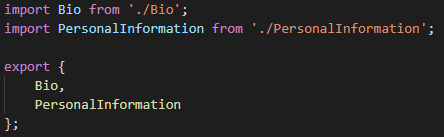
Figure 2.9 – The index.js file with all the code written inside it
Now that we have this file that stores all of our newly created custom components, let's go into our App.js file and rewrite our imports the way they should be written.
Refactoring our main code
Here, we must delete our first two custom component imports and write the following code:
import { PersonalInformation, Bio } from './components';
That's the only change we're making. Pretty easy, right? And it looks so much better and more organized.
Now, let's remove the unused components, such as Text and Image, and save our file. After making all these modifications, your App.js file will look like this:
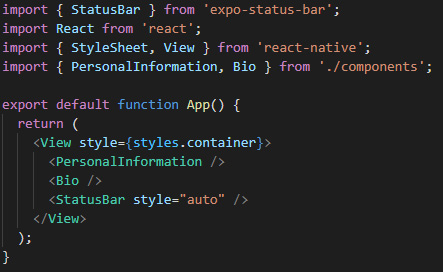
Figure 2.10 – Our final code for this chapter
Yay! We've finished creating two new components for our app while also organizing the code in such a manner that any programmer would be proud of us. I'm not a believer in homework but I do believe in the power of exercise. Now, it's your turn. Create as many components as you can think of. Don't stop at simple text-based components; try and use more of the core components React Native has at its disposal. Don't be afraid of getting something wrong – that is the best way to learn: trial and error.
Summary
In this chapter, we started learning about our Expo's basic file structure and how all those files are connected, how App.js is the main entry point into our application, and which function is getting called at startup. After that, we delved into the main concepts of JSX, explaining and comparing JSX to other markup languages and understanding that JSX is more of an extension of JavaScript.
We left the theory aside and started importing our first component while talking about npm and how we will use it in the future when creating more complex applications. We imported the core components of React Native and explained them all. Using them felt comfortable and pretty easy, so we figured, why not create a component? After we created a component, we learned more about file structure and how to index all of our components into a single file, which helped us clean our code even more.
In the next chapter, we'll study the correct mindset of a React/React Native developer and understand how to think in React. This is going to help us greatly because it will save us time when we're starting a new project. If the planning is correct from the start, we won't have any problems building the project.