


 Download code from GitHub
"Vue.js is a JavaScript framework for building astonishing web applications. Vue.js is a JavaScript library for creating web interfaces. Vue.js is a tool that leverages the use of MVVM architecture."
Simplified JavaScript Jargon suggests that Vue.js is a JavaScript library for creating user interfaces (Views) based on underlying data models ( http://jargon.js.org/_glossary/VUEJS.md ).
The official Vue.js website ( https://vuejs.org/ ) just some months ago stated that Vue.js were reactive components for modern web interfaces.

Now it states that Vue.js is a progressive JavaScript framework:

So what is Vue.js after all? Framework? Tool? Library? Should it be used for building full-stack web applications or just for adding some special functionality? Should I switch from my favorite framework to it? If yes, why? Can I use it alongside other tools in my project? What advantages it might bring?
In this chapter, we will try to find the answers to all these questions. We will slightly touch Vue.js and use it within some small and simple examples.
More specifically, we will do the following:
- Learn what Vue.js is, its important parts, and its history
- Learn what projects use Vue.js
- Build a simple shopping list using Vue.js and compare the implementation to the jQuery implementation of the same application
- Build a simple Pomodoro timer using Vue.js
- Enjoy a small and simple exercise
There will be lots of buzzwords, abbreviations, and other hipster combinations of letters in this book. Please do not be afraid of them. I can tell you more but, for the most part of things you need to do using Vue.js or any other framework, you do not need to know them all by heart! But, in any case, let us leave the thesaurus here so that you become confused with terminology at any point of the book, you can come back here and have a look:
- Application state: This is a global centralized state of the application. The data in this state is initialized when the application is started. This data can be accessed by any application's component; however, it cannot be changed easily by them. Each item of the state has an attached mutation that can be dispatched on special events occurring inside the application's components.
- Bootstrap: This is a project that provides a set of styles and JavaScript tools for developing a responsive and nice application without having to think a lot about CSS.
- Content Distribution Network (CDN): This is a special server whose aim is to deliver data to the users with high availability and high performance. People and companies who develop frameworks like to distribute them via CDNs because they allow them just to point out the CDN's URL in the installation instructions. Vue.js is hosted in npmcdn ( https://npmcdn.com/ ), which is a reliable and global network for the things that are published to the npm.
- Components: These are the pieces of the application with their own data and View that can be reused through the application, acting as a brick from which the house is being built.
- Cascading Style Sheets (CSS): This is a set of styles to apply to the HTML document to make it nice and beautiful.
- Declarative Views: These are the Views that provide a way of direct data binding between plain JavaScript data models and the representation.
- Directives: These are special HTML elements attributes in Vue.js that allow data binding in different ways.
- Document Object Model (DOM): This is a convention for representing nodes in markup languages such as HTML, XML, and XHTML. The nodes of the documents are organized into a DOM tree. When someone says interacting with DOM, it is just their fancy way of saying interacting with HTML elements.
- npm: This is a package manager for JavaScript and allows searching, installing, and managing JavaScript packages.
- Markdown: This is a human-friendly syntax that allows web writers to write their text without worrying about styles and HTML tags. Markdown files have a
.mdextension. - Model View ViewModel (MVVM): This is an architectural pattern whose central point is a ViewModel that acts as a bridge between the View and the data model, allowing the data flow between them.
- Model View Controller (MVC): This is an architectural pattern. It allows separating Views from Models and from the way that information flows from Views to Models, and vice versa.
- One-way data binding: This is the type of data binding where the changes in the data model are automatically propagated to the View layer, but not vice versa.
- Rapid prototyping: In the Web, this is a technique of easily and rapidly building the mockups of the user interface, including some basic user interaction.
- Reactivity: In the Web, this is actually the immediate propagation of any changes of data to the View layer.
- Two-way data binding: This is the type of data binding where the changes in the data model are automatically propagated to the View layer, and the changes that happen in the View layer are immediately reflected in the data model.
- User interface (UI): This is a set of visual components that allow the user to communicate with the application.
- Vuex: This is an architecture for Vue applications and allows simple management of the application state.
When, Evan You, Vue.js creator ( http://evanyou.me/ ), was working at Google Creative Labs on one of the projects, they needed to fast prototype a rather big UI interface. Writing a lot of repeated HTML was clearly time- and resource-consuming, and that's why Evan started looking for some already existing tool for this purpose. To his surprise, he discovered that there was no tool, library, or framework that could fit exactly into the purpose of rapid prototyping! At that time, Angular was widely used, React.js was just starting, and frameworks such as Backbone.js were used for large-scale applications with MVC architecture. For the kind of project that needed something really flexible and lightweight just for quick UI prototyping, neither of these complex frameworks were adequate.
When you realize that something cool does not exist and you are able to create it—just do it!
Note
Vue.js was born as a tool for rapid prototyping. Now it can be used to build complex scalable reactive web applications.
That was what Evan did. That is how he came to the idea of creating a library that would help in rapid prototyping by offering an easy and flexible way of reactive data binding and reusable components.
Like every good library, Vue.js has been growing and evolving, thus providing more features than it was promising from the beginning. Currently, it provides an easy way of attaching and creating plugins, writing and using mixins, and overall adding custom behavior. Vue can be used in such a flexible way and is so nonopinionated of the application structuring that it definitely can be considered as a framework capable of supporting the end-to-end building of complex web applications.
Vue.js allows you to simply bind your data models to the representation layer. It also allows you to easily reuse components throughout the application.
You don't need to create special models or collections and to register events object in there. You don't need to follow some special syntax. You don't need to install any of never-ending dependencies.
Your models are plain JavaScript objects. They are being bound to whatever you want in your Views (text, input text, classes, attributes, and so on), and it just works.
You can simply add the vue.js file into your project and use it. Alternatively, you can use vue-cli with Webpack and Browserify family, which not only bootstraps the whole project but also supports hot reloading and provides developer tools.
You can separate the View layer from styles and JavaScript logic or you can put it alltogether into the same Vue file and build your components' structure and logic in the same place. There is plugin support for all modern and commonly used IDEs.
You can use whatever preprocessors you want, and you can use ES2015. You can use it alongside your favorite framework you have been developing in, or you can use it itself. You can use it just to add a small functionality, or you can use the whole Vue ecosystem to build complex applications.
If you want to check how it compares to other frameworks, such as Angular or React, then please visit http://vuejs.org/guide/comparison.html .
If you want to check out all the amazing things about Vue.js, then you are more than welcome to visit https://github.com/vuejs/awesome-vue .
I don't know how but I can feel that your weekend is close and that you are starting to think about going shopping to buy the needed groceries for the next week. Unless you are a genius who is able to maintain the whole list in your head or you are a modest person who does not need so much, you probably make a shopping list before going shopping. Maybe you even use some app for that. Now, I ask you: why not use your own app? How do you feel about creating and designing it? Let's do that! Let's create our own shopping list application. Let's start by creating a rapid prototype for it. It's a really easy task—build an interactive prototype for the shopping list.
It should show the list and allow us to add and remove the items. Actually, it's very similar to a ToDo list. Let's start doing it using classic HTML + CSS + JS + jQuery approach. We will also use the Bootstrap framework ( http://getbootstrap.com/ ) to make things a little bit more beautiful without having to write extensive CSS code. (Yes, because our book is not about CSS and because making things with Bootstrap is so crazily easy!)
Probably, your code will end up looking as something like the following:
Here is the HTML code:
<div class="container">
  <h2>My Shopping List</h2>
  <div class="input-group">
    <input placeholder="add shopping list item"
      type="text" class="js-new-item form-control">
    <span class="input-group-btn">
      <button @click="addItem" class="js-add btn btn-default"
        type="button">Add!</button>
    </span>
  </div>
  <ul>
    <li>
      <div class="checkbox">
        <label>
          <input class="js-item" name="list"
            type="checkbox"> Carrot
        </label>
      </div>
    </li>
    <li>
      <div class="checkbox">
        <label>
          <input class="js-item" name="list" type="checkbox"> Book
        </label>
      </div>
    </li>
    <li class="removed">
      <div class="checkbox">
        <label>
          <input class="js-item" name="list" type="checkbox"
            checked> Gift for aunt's birthday
        </label>
      </div>
    </li>
  </ul>
</div>
Here is the CSS code:
.container {
  width: 40%;
  margin: 20px auto 0px auto;
}

.removed {
  color: gray;
}

.removed label {
  text-decoration: line-through;
}

ul li {
  list-style-type: none;
}
Here is the JavaScript/jQuery code:
$(document).ready(function () {
  /**
   * Add button click handler
   */
  function onAdd() {
    var $ul, li, $li, $label, $div, value;

    value = $('.js-new-item').val();
    //validate against empty values
    if (value === '') {
      return;
    }
    $ul = $('ul');
    $li = $('<li>').appendTo($ul);
    $div = $('<div>')
        .addClass('checkbox')
        .appendTo($li);
    $label = $('<label>').appendTo($div);
    $('<input>')
        .attr('type', 'checkbox')
        .addClass('item')
        .attr('name', 'list')
        .click(toggleRemoved)
        .appendTo($label);
    $label
        .append(value);
    $('.js-new-item').val('');
  }

  /**
   * Checkbox click handler -
   * toggles class removed on li parent element
   * @param ev
   */
  function toggleRemoved(ev) {
    var $el;

    $el = $(ev.currentTarget);
    $el.closest('li').toggleClass('removed');
  }

  $('.js-add').click(onAdd);
  $('.js-item').click(toggleRemoved);
});
Tip
Downloading the example code
Detailed steps to download the code bundle are mentioned in the
Preface of this book.
The code bundle for the book is also hosted on GitHub at https://github.com/PacktPublishing/Learning-Vue.js-2.
We also have other code bundles from our rich catalog of books and videos available at https://github.com/PacktPublishing/. Check them out!
If you open the page in a browser, you will probably see something like the following:
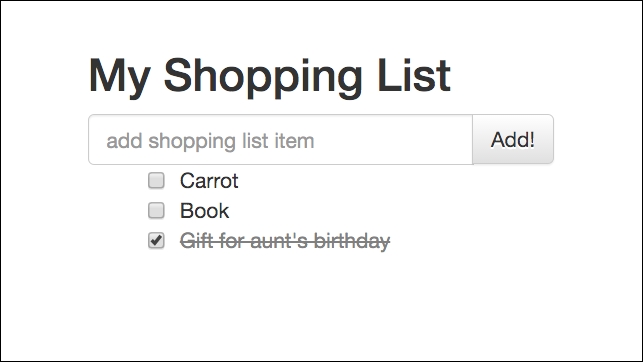
Shopping list implementation using the HTML + CSS + jQuery approach
Please have a look at JSFiddle at https://jsfiddle.net/chudaol/u5pcnLw9/2/ .
As you can see, it is a very basic piece of HTML code that contains an unordered list of elements, where each element is presented with a checkbox and a text—an input for the user text and the Add! button. Each time the Add! button is clicked, the content of the text input is transformed into a list entry and appended to the list. When the checkbox of any item is clicked, the state of an entry is toggled from to to buy (unchecked) to bought (checked).
Let's also add a feature that allows us to change the title of the list (it might become useful if we end up implementing multiple shopping lists in the application).
So, we will end up with some extra markup and some more jQuery event listeners and handlers:
<div class="container">
  <h2>My Shopping List</h2>
  <!-- ... -->
  <div class="footer">
    <hr/>
    <em>Change the title of your shopping list here</em>
    <input class="js-change-title" type="text"
      value="My Shopping List"/>
  </div>
</div>

//And javascript code:
function onChangeTitle() {
  $('h2').text($('.js-change-title').val());
}
$('.js-change-title').keyup(onChangeTitle);
Check JSFiddle at https://jsfiddle.net/chudaol/47u38fvh/3/ .
This was a very simple example. Let's try to implement it step-by-step using Vue.js. There are plenty of ways of including vue.js into your project, but in this chapter, we will include it just by adding the JavaScript Vue file from the CDN:
<script src="https://cdnjs.cloudflare.com/ajax/libs/vue/2.0.3/vue.js"> </script>
So, let's start by rendering a list of elements.
Create the HTML file and add the following markup:
<div id="app" class="container">
  <h2>{{ title }}</h2>
  <ul>
    <li>{{ items[0] }}</li>
    <li>{{ items[1] }}</li>
  </ul>
</div>
Now add the following JavaScript code:
var data = {
  items: ['Bananas', 'Apples'],
  title: 'My Shopping List'
};

new Vue({
  el: '#app',
  data: data
});
Open it in the browser. You will see that the list is rendered:
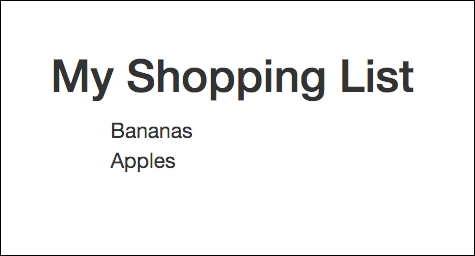
Shopping list implemented using Vue.js
Let's analyze this example. The Vue application code starts with the new Vue keyword. How do we bind the piece of markup to the application data? We pass to the Vue instance the DOM element that must be bound to it. Any other markup in the page will not be affected and will not recognize Vue's magic.
As you can see, our markup is wrapped into the #app element and is passed as a first argument in the map of Vue options. The data argument contains the objects that are being used inside the markup using double curly brackets ({{}}) . You will probably find this annotation very easy to understand if you are familiar with templating preprocessors (for example, handlebars; for more information, visit
http://handlebarsjs.com/
).
So what?—you're probably exclaiming. What are you going to teach me? How to use templating preprocessors? Thank you very much, but I would be better off having some beers and watching football.
Stop, dear reader, don't go, just grab your beer and let's continue our example. You'll see that it'll be lots of fun!
Let's see data binding in action. Open your browser's developer tools, find your JavaScript code, and add a breakpoint at the start of the script. Now analyze how the data objects look before and after the Vue application is initialized. You see, it changed a lot. Now the data object is prepared to the reactive data binding:
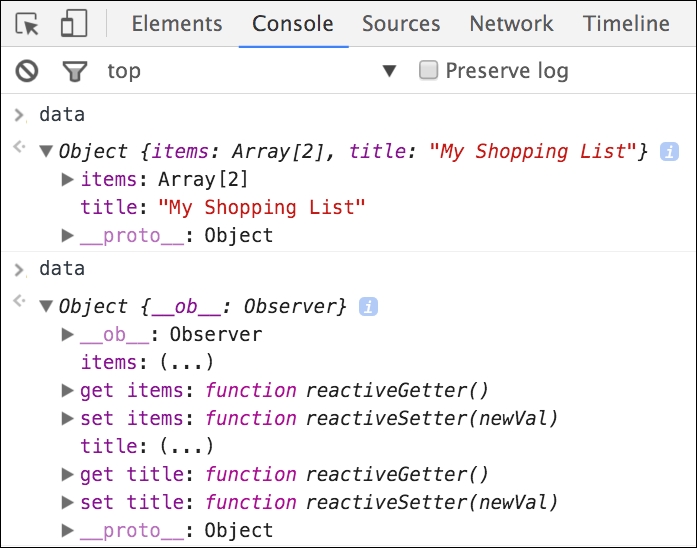
The data object before and after the Vue object initialization
Now if we change the title property of the data object from the developer tools console (we can do it because our data is a global object), it will be reflected automatically in the title on the page:
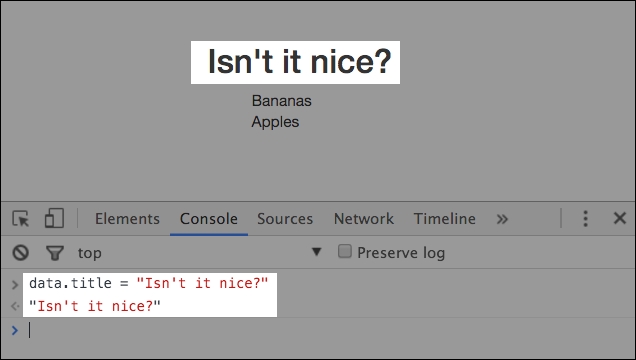
Data binding: changing object properties affects the View immediately
So, in our example, we were able to bring the data from the plain JavaScript data model to the page. We provided it a sort of a flight from the application code to the page. Don't you think that it would be nice if we could offer a two-way flight to our data?
Let's see now how we can achieve two-way data binding and how we can change the value of a data property from the page.
Copy the HTML markup for the title, change the input from the first jQuery example, and add the attribute v-model="title" to the input element.
Tip
Have you already heard about directives in Vue.js? Congratulations, you've just used one! Actually, the v-model attribute is a directive of Vue.js that provides two-way data binding. You can read more about it at the official Vue page:
http://vuejs.org/api/#v-model
.
Now, the HTML code for our shopping list application code looks like the following:
<div id="app" class="container">
  <h2>{{ title }}</h2>
  <ul>
    <li>{{ items[0] }}</li>
    <li>{{ items[1] }}</li>
  </ul>
  <div class="footer">
    <hr/>
    <em>Change the title of your shopping list here</em>
    <input v-model="title"/>
  </div>
</div>
And that's it!
Refresh the page now and modify the input. You'll see the title automatically being updated as you type:
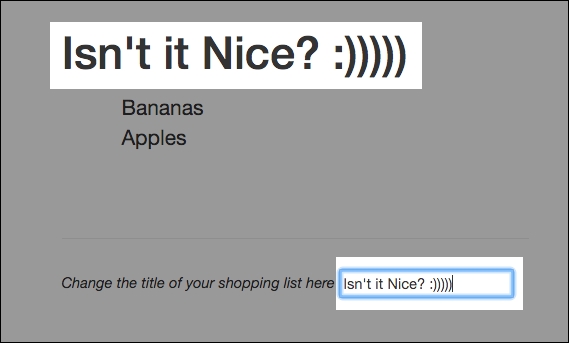
Data binding: changing the text bound to the model's property affects the text bound to the same property immediately
So, everything is nice; however, this example just grabs the two item elements and renders them as list items. We want it to render the list of items independently of the list size.
So, we need some mechanism to iterate through the items array and to render each item in our <ul> element.
Fortunately, Vue.js provides us with a nice directive for iterating through iterative JavaScript data structures. It is called v-for. We will use it in the list item <li> element. Modify the markup of the list so that it looks like the following:
  <ul>
    <li v-for="item in items">{{ item }}</li>
  </ul>
Note
You will learn other nice directives such as v-if, v-else, v-show, v-on, v-bind, and so on in this book, so keep reading.
Refresh the page and have a look. The page remains the same. Now, try to push an item into the array of items from the developer tools console. Try to pop them as well. You will not be surprised to see that the items array manipulations are immediately reflected on the page:

Data binding: changing an array affects lists based on it immediately
So, now we have a list of items that is rendered on a page with just one line of the markup. However, we still need these items to have a checkbox that allows us to check the already bought items or uncheck them when needed.
To achieve this behavior, let's slightly modify our items array by changing our string items and transforming them into the objects with two properties, text and checked (to reflect the state), and let's modify the markup to add a checkbox to each item.
So our JavaScript code for the data declaration will look like the following:
var data = {
  items: [{ text: 'Bananas', checked: true },
          { text: 'Apples',  checked: false }],
  title: 'My Shopping List',
  newItem: ''
};
And our list markup will look like this:
<ul>
  <li v-for="item in items" v-bind:class="{ 'removed':
    item.checked }">
    <div class="checkbox">
      <label>
        <input type="checkbox" v-model="item.checked"> {{
          item.text }}
      </label>
    </div>
  </li>
</ul>
Refresh the page and check that the checked property of the items checkbox, and the removed class of each list item, <li>, is bound to the checked Boolean state of the items. Play around and try to click checkboxes to see what happens. Isn't it nice that just with two directives we are able to propagate the state of the items and change the class of the corresponding <li> HTML element?
So now we just need a small addition to our code to be able to actually add shopping list items. To achieve that, we will add one more object to our data and call it newItem. We'll also add a small method that pushes new item to the items array. And we'll call this method from the markup page using the v:on directive used on the HTML input element that will be used for the new item and on the button used to click to add a new item.
So our JavaScript code will look like the following:
var data = {
  items: [{ text: 'Bananas', checked: true },
          { text: 'Apples', checked: false }],
  title: 'My Shopping List',
  newItem: ''
};
new Vue({
  el: '#app',
  data: data,
  methods: {
    addItem: function () {
      var text;

      text = this.newItem.trim();
      if (text) {
        this.items.push({
          text: text,
          checked: false
        });
        this.newItem = '';
      }
    }
  }
});
We added a new property to the data object called newItem. Then we added a new section called methods to our Vue initialization options object and added the addItem method to this section. All the data properties are accessible in the methods section via the this keyword. Thus, in this method, we just get this.newItem and push it into the this.items array. Now we must bind the call to this method to some user action. As it has already been mentioned, we will use the v-on directive and apply it to the enter keyup on the new item input and to the Add! button click.
So add the following markup before our list of items:
<div class="input-group">
  <input v-model="newItem" v-on:keyup.enter="addItem"
    placeholder="add shopping list item" type="text" class="form-
    control">
  <span class="input-group-btn">
    <button v-on:click="addItem" class="btn btn-default"
      type="button">Add!</button>
  </span>
</div>
Note
The v-on directive attaches an event listener to the elements. The shortcut is the @ sign. So, instead of writing v-on:keyup="addItem", you can write @keyup="addItem". You can read more about the v-on directive on the official documentation site at
http://vuejs.org/api/#v-on
.
Let's finalize. The whole code now looks like the following:
Here is the HTML code:
<div id="app" class="container">
  <h2>{{ title }}</h2>
  <div class="input-group">
    <input v-model="newItem" @keyup.enter="addItem"
      placeholder="add shopping list item" type="text"
      class="form-control">
  <span class="input-group-btn">
    <button @click="addItem" class="btn btn-default"
      type="button">Add!</button>
  </span>
  </div>
  <ul>
    <li v-for="item in items" :class="{ 'removed': item.checked
      }">
      <div class="checkbox">
        <label>
          <input type="checkbox" v-model="item.checked"> {{
            item.text }}
        </label>
      </div>
    </li>
  </ul>
  <div class="footer hidden">
    <hr/>
    <em>Change the title of your shopping list here</em>
    <input v-model="title"/>
  </div>
</div>
Here is the JavaScript code:
var data = {
  items: [{ text: 'Bananas', checked: true },
          { text: 'Apples', checked: false }],
  title: 'My Shopping List',
  newItem: ''
};

new Vue({
  el: '#app',
  data: data,
  methods: {
    addItem: function () {
      var text;

      text = this.newItem.trim();
      if (text) {
        this.items.push({
          text: text,
          checked: false
        });
        this.newItem = '';
      }
    }
  }
});
Here's a link to JSFiddle: https://jsfiddle.net/chudaol/vxfkxjzk/3/ .
I can feel now that you have seen how easy is to bind the properties of the model to the presentation layer and you are already starting to think about how it can be used in your existing project. But then you think: hell, no, I need to install some things, run npm install, change the project's structure, add directives, and change the code.
And here I can tell you: no! No installs, no npms, just grab the vue.js file, insert it into your HTML page, and use it. That's all, no structure changes, no architectural decisions, no discussions. Just use it. I will show you how we used it at EdEra (
https://www.ed-era.com
) to include a small "check yourself" functionality at the end of a GitBook chapter.
EdEra is a Ukraine-based online educational project whose aim is to transform the whole educational system into something modern, online, interactive, and fun. Actually, I am a co-founder and the chief technical officer of this young nice project, being responsible for the whole technical part of the thing. So, in EdEra, we have some online courses built on top of the open EdX platform ( https://open.edx.org/ ) and some interactive educational books built on top of the great GitBook framework ( http://www.gitbook.org ). Basically, GitBook is a platform based on top of the Node.js technology stack. It allows someone with basic knowledge of the markdown language and basic Git commands to write books and host them in the GitBook servers. EdEra's books can be found at http://ed-era.com/books (beware, they are all in Ukrainian).
Let's see what we have done in our books using Vue.js.
At some point, I decided to include a small quiz at the end of the chapter about personal pronouns in the book that teaches English. Thus, I've included the vue.js JavaScript file, edited the corresponding .md file, and included the following HTML code:
<div id="pronouns">
    <p><strong>Check yourself :)</strong></p>
    <textarea class="textarea" v-model="text" v-
      on:keyup="checkText">
        {{ text }}
    </textarea><i  v-bind:class="{ 'correct': correct,
      'incorrect': !correct }"></i>
</div>
Then I added a custom JavaScript file, where I've included the following code:
$(document).ready(function() {
  var initialText, correctText;

  initialText = 'Me is sad because he is more clever than I.';
  correctText = 'I am sad because he is more clever than me.';

  new Vue({
    el: '#pronouns',
    data: {
      text: initialText,
      correct: false
    },
    methods: {
      checkText: function () {
        var text;
        text = this.text.trim();
        this.correct = text === correctText;
      }
    }
  });
});
Note
You can check this code at this GitHub page:
https://github.com/chudaol/ed-era-book-english
.
Here's a code of a page written in markdown with inserted HTML:
https://github.com/chudaol/ed-era-book-english/blob/master/2/osobovi_zaimenniki.md
.
And here's a JavaScript code:
https://github.com/chudaol/ed-era-book-english/blob/master/custom/js/quiz-vue.js
.
You can even clone the repository and try it locally using gitbook-cli (
https://github.com/GitbookIO/gitbook/blob/master/docs/setup.md
).
Let's have a look at this code. You have probably already detected the parts that you have already seen and even tried:
- The
dataobject contains two properties:- The
stringproperty text - The
Booleanproperty correct
- The
- The
checkTextmethod just grabs thetextproperty, compares it with the correct text, and assigns the value to the correct value - The
v-ondirective calls thecheckTextmethod on keyup - The
v-binddirective binds the classcorrectto thecorrectproperty
Here is how the code looks in my IDE:
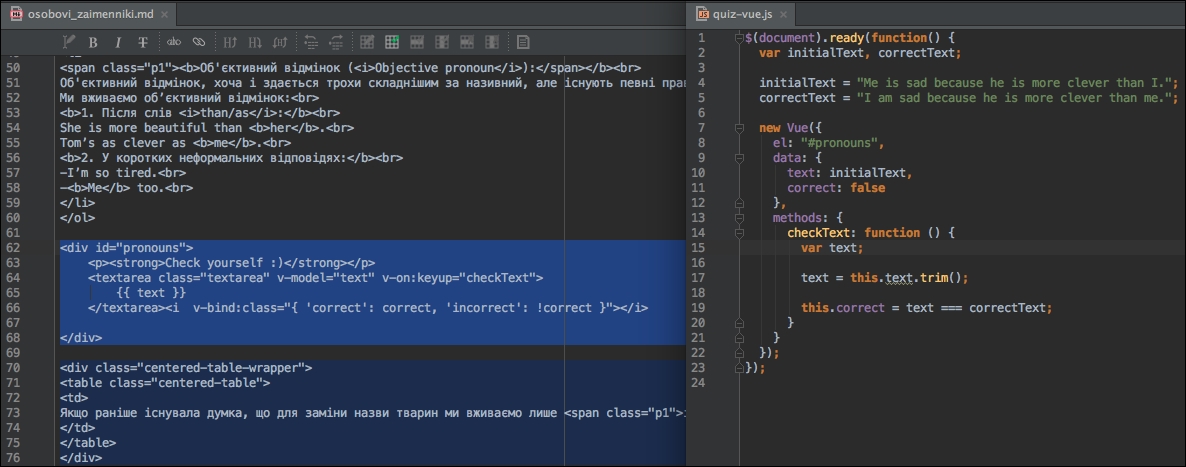
Using Vue in a markdown-driven project
And next is what it looks like in the browser:
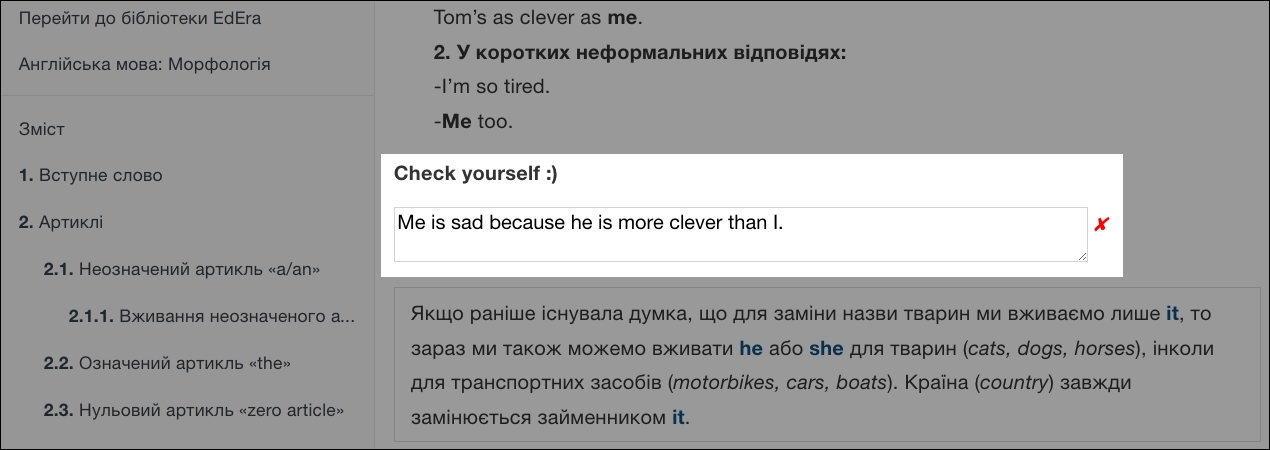
Vue.js in action inside the GitBook page
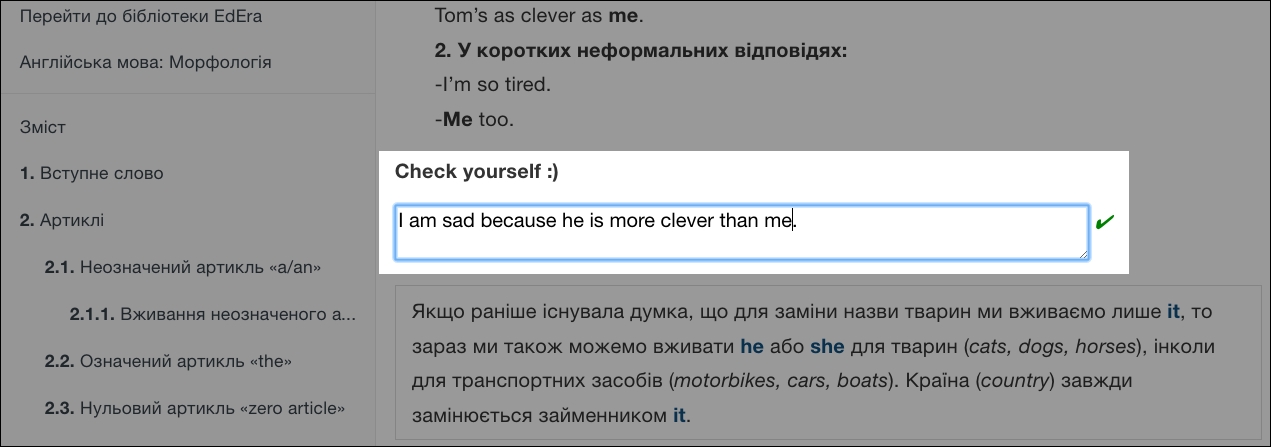
Vue.js in action inside the GitBook page
Check it out at http://english.ed-era.com/2/osobovi_zaimenniki.html .
Amazing, right? Pretty simple, pretty reactive!
At the time of writing, Vue.js 2.0 was announced ( https://vuejs.org/2016/04/27/announcing-2.0/ ). Check the following links in this regard:
The second version of Vue.js has some considerable differences comparing to its predecessor, starting from the way that data binding is being handled and moving to its API. It uses lightweight virtual DOM implementation for rendering, supports server-side rendering, and is faster and leaner.
At the time of writing, Vue 2.0 was in an early alpha stage. Do not worry, though. All the examples that we will cover in this book are based on the latest stable version of Vue 2.0 and are fully compatible with the both the versions.
Probably, at this time, you are wondering what projects are out there that are built on top of Vue.js, or use it as a part of their codebase. There are a lot of nice open source, experimental, and enterprise projects using it. The complete and constantly updated list of these projects can be found at https://github.com/vuejs/awesome-vue#projects-using-vuejs .
Let's have a look at some of them.
Grammarly ( https://www.grammarly.com/ ) is a service that helps you write English correctly. It has several apps, one of them is a simple Chrome extension that just checks any text input that you fill in. Another one is an online editor that you can use to check big chunks of text. This editor is built using Vue.js! The following is a screenshot of this text being edited in the online editor of Grammarly:

Grammarly: a project that is built on top of Vue.js
Optimizely ( https://www.optimizely.com/ ) is a service that helps you test, optimize, and personalize your websites. I've used the Packt site to create an Optimizely experiment and to check out Vue.js in action in this resource. It looks like the following:

Optimizely: a project that is built on top of Vue.js
Hovering around with the mouse gives us the possibility of opening a context menu that allows different manipulations with the page data, including the simplest one, text editing. Let's try this one:

Using Optimizely and watching Vue.js in action
The text box is opened. When I type in it, the text in the title is reactively changed. We saw and implemented it using Vue.js:

Using Optimizely and watching Vue.js in action
FilterBlend ( https://github.com/ilyashubin/FilterBlend ) is an open source playground for the CSS background-blend-mode and filter properties.
You can load your images and combine blending with filters.
If you want to give FilterBlend a try, you can install it locally:
- Clone the repository:
git clone https://github.com/ilyashubin/FilterBlend.git - Enter the
FilterBlenddirectory:cd FilterBlend - Install the dependencies:
npm install - Run the project:
gulp
Open your browser on localhost:8000 and play around. You can see that once you change something in the menu on the right, it is immediately propagated to the images on the left side. All this functionality is achieved using Vue.js. Check the code on GitHub.

FilterBlend: a project built on top of Vue.js
PushSilver ( https://pushsilver.com ) is a nice and simple service for busy people to create simple invoices. It allows creating invoices, sending and resending them to the clients, and keeping tracking of them. It was created by a developer doing freelance consultancy and being tired of having to create invoices each time for each small project. This tool works well and it was built using Vue.js:

PushSilver: invoice managing application built on top of Vue.js

PushSilver: invoice managing application built on top of Vue.js
This book, like most part of technical books, is organized in such a way that you do not need to read it from beginning to end. You can choose the parts that interest you the most and skip the rest.
This book is organized as follows:
- If you are reading this, there's no need to specify what is going on in the first chapter.
- Chapter 2, Fundamentals - Installing and Using, is pretty theoretical and will explain what's going on behind the scenes of Vue.js and its main parts. So, if you are not into theory and want to put your hands into coding, you are free to skip this part. In this part, we will also go through the installation and setup process.
- From the third to the eighth chapter, we'll explore the main features of Vue.js while building the application:
- In Chapter 3, Components - Understanding and Using, we will introduce Vue components and apply this knowledge to our application.
- In Chapter 4, Reactivity - Binding Data to Your Application, we will use all the data binding mechanisms provided by Vue.
- In Chapter 5, Vuex - Managing State in Your Application, we will introduce the Vuex state management system and explain how to use it in our applications.
- In Chapter 6, Plugins - Building Your House with Your Own Bricks, we will learn how to create and use plugins for Vue applications to enrich their functionality.
- In Chapter 7, Testing - Time to Test What We Have Done so Far!, we will cover and explore custom directives of Vue.js and create some in our application.
- In Chapter 8, Deploying - Time to Go Live!, we will learn how to test and deploy JavaScript application written in Vue.js.
- In Chapter 9, What Is Next?, we'll summarize what we've learned and see what we can do next.
At this point of time, I already know that you are so, so, so enthusiastic with this book that you want to read it to the end without stopping. But this is not right. We should manage our time and give us some time to work and some time to rest. Let's create a small application that implements a Pomodoro technique timer so that it can help us in our working time management.
Note
The Pomodoro technique is a time management technique named after the kitchen tomato timer (in fact, Pomodoro means tomato in Italian). This technique consists of breaking down the working time into small intervals separated by short breaks. Read more about the Pomodoro technique on the official site: http://pomodorotechnique.com/ .
Thus, our goal is very simple. We just have to create a very simple time counter that will decrement untill the end of the working interval and then restart and decrement till the end of the resting time and so on.
Let's do that!
We will introduce two Vue data variables, minute and second, which will be displayed on our page. The main method on each second will decrement second; it will decrement minute when second becomes 0; and when both minute and second variables come to 0, the application should toggle between working and resting interval:
Our JavaScript code will look like the following:
const POMODORO_STATES = {
  WORK: 'work',
  REST: 'rest'
};
const WORKING_TIME_LENGTH_IN_MINUTES = 25;
const RESTING_TIME_LENGTH_IN_MINUTES = 5;

new Vue({
  el: '#app',
  data: {
    minute: WORKING_TIME_LENGTH_IN_MINUTES,
    second: 0,
    pomodoroState: POMODORO_STATES.WORK,
    timestamp: 0
  },
  methods: {
    start: function () {
      this._tick();
      this.interval = setInterval(this._tick, 1000);
    },
    _tick: function () {
      //if second is not 0, just decrement second
      if (this.second !== 0) {
        this.second--;
        return;
      }
      //if second is 0 and minute is not 0,
      //decrement minute and set second to 59
      if (this.minute !== 0) {
        this.minute--;
        this.second = 59;
        return;
      }
      //if second is 0 and minute is 0,
      //toggle working/resting intervals
      this.pomodoroState = this.pomodoroState ===
      POMODORO_STATES.WORK ? POMODORO_STATES.REST :
      POMODORO_STATES.WORK;
      if (this.pomodoroState === POMODORO_STATES.WORK) {
        this.minute = WORKING_TIME_LENGTH_IN_MINUTES;
      } else {
        this.minute = RESTING_TIME_LENGTH_IN_MINUTES;
      }
    }
  }
});
In our HTML code, let's create two placeholders for minute and second, and a start button for our Pomodoro timer:
<div id="app" class="container">
  <h2>
    <span>Pomodoro</span>
    <button  @click="start()">
      <i class="glyphicon glyphicon-play"></i>
    </button>
  </h2>
  <div class="well">
    <div class="pomodoro-timer">
      <span>{{ minute }}</span>:<span>{{ second }}</span>
    </div>
  </div>
</div>
Again, we are using Bootstrap for the styling, so our Pomodoro timer looks like the following:

Countdown timer built with Vue.js
Our Pomodoro is nice, but it has some problems:
- First of all, we don't know which state is being toggled. We don't know if we should work or rest. Let's introduce a title that will change each time the Pomodoro state is changed.
- Another problem is inconsistent display of minutes and seconds numbers. For example, for 24 minutes and 5 seconds, we would like to see 24:05 and not 24:5. Let's fix it introducing computed values in our application data and displaying them instead of normal values.
- Yet another problem is that our start button can be clicked over and over again, which creates a timer each time it's clicked. Try to click it several times and see how crazy your timer goes. Let's fix it by introducing start, pause, and stop buttons, apply application states to them, and disable buttons to the state accordingly.
Let's start by fixing the first problem by creating computed property title and using it in our markup.
Note
Computed properties are the properties inside the data object that allow us to avoid blowing up the template with some extra logic. You can find more information about computed properties on the official documentation site:
http://vuejs.org/guide/computed.html
.
Add the computed section in the Vue options object and add the property title there:
data: {
  //...
},
computed: {
  title: function () {
    return this.pomodoroState === POMODORO_STATES.WORK ? 'Work!' :
    'Rest!'
  }
},
methods: {
//...
And now just use the following property as it was a normal Vue data property in your markup:
  <h2>
    <span>Pomodoro</span>
    <!--!>
  </h2>
  <h3>{{ title }}</h3>
  <div class="well">
And voilà! Now we have a title that changes each time the Pomodoro state is being toggled:

Automatic change of the title based on the state of the timer
Nice, isn't it?
Now let's apply the same logic for left padding our minute and second numbers. Let's add two computed properties, min and sec, in our computed section in the data options and apply the simple algorithm to pad the numbers with 0 on the left. Of course, we could use a famous left-pad project (
https://github.com/stevemao/left-pad
), but to keep things simple and not to break the whole Internet (
http://www.theregister.co.uk/2016/03/23/npm_left_pad_chaos/
), let's apply a simple logic of our own:
computed: {
  title: function () {
    return this.pomodoroState === POMODORO_STATES.WORK ? 'Work!' :
    'Rest!'
  },
  min: function () {
    if (this.minute < 10) {
      return '0' + this.minute;
    }

    return this.minute;
  },
  sec: function () {
    if (this.second < 10) {
      return '0' + this.second;
    }

    return this.second;
  }
}
And let's use these properties instead of minute and second in our HTML code:
   <div class="pomodoro-timer">
    <span>{{ min }}</span>:<span>{{ sec }}</span>
   </div>
Refresh a page and check how beautiful our numbers are now:

Left padding using computed properties in Vue.js
So, to fix the third problem, let's introduce three application states, started, paused, and stopped, and let's have three methods that would allow us to permute over these states. We already have the method that starts the application, so we just add the logic there to change the state to started. We also add two additional methods, pause and stop, which would pause the timer and change to the corresponding application state:
const POMODORO_STATES = {
  WORK: 'work',
  REST: 'rest'
};
const STATES = {
  STARTED: 'started',
  STOPPED: 'stopped',
  PAUSED: 'paused'
};
//<...>
new Vue({
  el: '#app',
  data: {
    state: STATES.STOPPED,
    //<...>
  },
  //<...>
  methods: {
    start: function () {
      this.state = STATES.STARTED;
      this._tick();
      this.interval = setInterval(this._tick, 1000);
    },
    pause: function () {
      this.state = STATES.PAUSED;
      clearInterval(this.interval);
    },
    stop: function () {
      this.state = STATES.STOPPED;
      clearInterval(this.interval);
      this.pomodoroState = POMODORO_STATES.WORK;
      this.minute = WORKING_TIME_LENGTH_IN_MINUTES;
      this.second = 0;
    },
    //<...>
  }
});
And, let's add two buttons to our HTML code and add the click listeners that call the corresponding methods:
    <button :disabled="state==='started'"
@click="start()">
      <i class="glyphicon glyphicon-play"></i>
    </button>
    <button :disabled="state!=='started'"
      @click="pause()">
      <i class="glyphicon glyphicon-pause"></i>
    </button>
    <button :disabled="state!=='started' && state !== 'paused'"
       @click="stop()">
      <i class="glyphicon glyphicon-stop"></i>
    </button>
Now our application looks nice and allows us to start, pause, and stop the timer:

Toggling start, stop, and pause buttons according to the application state
Check what the whole code looks like in JSFiddle at https://jsfiddle.net/chudaol/b6vmtzq1/1/.
After so much work and so many of new terms and knowledge, you certainly deserve a kitten! I also love kittens, so here you have a random kitten from the awesome site http://thecatapi.com/ :

At the end of this chapter, I would like to propose a small exercise. The Pomodoro timer that we built earlier in the chapters is, without any doubt, great, but it still lacks some nice features. A really nice thing that it could provide would be showing random kittens from http://thecatapi.com/ during resting time. Can you implement this? Of course you can! But please do not confuse resting with working time! I am almost sure that your project manager will not like it much if you stare at kittens instead of working.
The solution to this exercise can be found in Appendix, Solutions to Exercises.
I am very glad that you have reached this point, this means that you already know what Vue.js is, and if someone asks you whether it is a tool, a library, or a framework, you certainly will find an answer. You also know how to start an application using Vue.js and you know how to use Vue's features in an already existing project. You played around with some really nice projects that are written in Vue.js and you started developing some of your own! Now you do not just go shopping, now you go shopping with a shopping list created by you using Vue.js! Now you don't need to steal your tomato timer from the kitchen to use it as a Pomodoro timer while working; you can use your own digital Pomodoro timer made with Vue.js. And, last but not the least, now you can insert random kittens in your JavaScript application also using Vue.js.
In the next chapter, we will cover the behind the scenes of Vue, how and why does it work, and the architectural patterns it uses. Each of the concepts will be wrapped up with an example to demonstrate it. Then we will be ready to put our hands deep into the code and to improve our applications taking them to the state of awesomeness.


