Modern browsers are slowly getting more powerful features that can be accessed directly from JavaScript. You can easily add video and audio with the new HTML5 tags and create interactive components through the use of the HTML5 canvas. Together with HTML5, modern browsers also started supporting WebGL. With WebGL, you can directly make use of the processing resources of your graphics card and create high-performance 2D and 3D computer graphics. Programming WebGL directly from JavaScript to create and animate 3D scenes is a very complex and error-prone process. Three.js is a library that makes this a lot easier. The following list shows some of the things that Three.js makes easy:
Creating simple and complex 3D geometries
Animating and moving objects through a 3D scene
Applying textures and materials to your objects
Making use of different light sources to illuminate the scene
Loading objects from 3D-modeling software
Adding advanced postprocessing effects to your 3D scene
Working with your own custom shaders
Creating point clouds
With a couple of lines of JavaScript, you can create anything, from simple 3D models to photorealistic real-time scenes, as shown in the following screenshot (see it yourself by opening http://www.vill.ee/eye/ in your browser):

In this chapter, we'll directly dive into Three.js and create a couple of examples that show you how Three.js works, and which you can use to play around with. We won't dive into all the technical details yet; that's something you'll learn in the following chapters. In this chapter, we'll cover the following points:
Tools required to work with Three.js
Downloading the source code and examples used in this book
Creating your first Three.js scene
Improving the first scene with materials, lights, and animations
Introducing a couple of helper libraries for statistics and controlling the scene
We'll start this book with a short introduction to Three.js and then quickly move on to the first examples and code samples. Before we get started, let's quickly look at the most important browsers out there and their support for WebGL.
At the time of writing this, WebGL works with the following desktop browsers:
Basically, Three.js runs on any of the modern browsers except older versions of IE. So, if you want to use an older version of IE, you've got to take an additional step. For IE 10 and older, there is the iewebgl plugin, which you can get from https://github.com/iewebgl/iewebgl. This plugin is installed inside IE 10 and older versions and enables WebGL support for those browsers.
It is also possible to run Three.js on mobile devices; the support for WebGL and the performance you'll get will vary, but both are quickly improving:
|
Device |
Support |
|---|---|
|
Android |
The native browser for Android doesn't have WebGL support and is generally also lacking in support for modern HTML5 features. If you want to use WebGL on Android, you can use the latest Chrome, Firefox, or Opera mobile versions. |
|
IOS |
With IOS 8, there is also support for WebGL on IOS devices. IOS Safari version 8 has great WebGL support. |
|
Windows mobile |
Windows mobile supports WebGL since version 8.1. |
With WebGL, you can create interactive 3D visualizations that run very well on desktops and on mobile devices.
Tip
In this book, we'll focus mostly on the WebGL-based renderer provided by Three.js. There is, however, also a CSS 3D-based renderer, which provides an easy API to create CSS 3D-based 3D scenes. A big advantage of using a CSS 3D-based approach is that this standard is supported on almost all mobile and desktop browsers and allows you to render HTML elements in a 3D space. We'll show how to use the CSS 3D browser in Chapter 7, Particles, Sprites, and the Point Cloud.
In this first chapter, you'll directly create your first 3D scene and will be able to run this in any of the previously mentioned browsers. We won't introduce too many complex Three.js features yet, but at the end of this chapter, you'll have created the Three.js scene you can see in the following screenshot:

For this first scene, you'll learn about the basics of Three.js and also create your first animation. Before you start your work on this example, in the next couple of sections, we'll first look at the tools you need to easily work with Three.js and how you can download the examples shown in this book.
Three.js is a JavaScript library, so all you need to create Three.js WebGL applications is a text editor and one of the supported browsers to render the results. I would like to recommend two JavaScript editors, which I've started using exclusively over the last couple of years:
WebStorm: This editor from the JetBrains guides has great support for editing JavaScript. It supports code completion, automatic deployment, and JavaScript debugging directly from the editor. Besides this, WebStorm has excellent GitHub (and other version control systems) support. You can download a trial edition from http://www.jetbrains.com/webstorm/.
Notepad++: Notepad++ is a general-purpose editor that supports code highlighting for a wide range of programming languages. It can easily lay out and format JavaScript. Note that Notepad++ is only for Windows. You can download Notepad++ from http://notepad-plus-plus.org/.
Sublime Text Editor: Sublime is a great editor that has a very good support to edit JavaScript. Besides this, it provides many very helpful selections (such as multiple-line select) and edit options that, once you get used to them, provide a really good JavaScript-editing environment. Sublime can also be tested for free and can be downloaded from http://www.sublimetext.com/.
Even if you don't use any of these editors, there are a lot of editors available, open source and commercial, which you can use to edit JavaScript and create your Three.js projects. An interesting project you might want to look at is http://c9.io. This is a cloud-based JavaScript editor that can be connected to a GitHub account. This way, you can directly access all the source code and examples from this book and experiment with them.
Tip
Besides these text-based editors that you can use to edit and experiment with the sources from this book, Three.js currently also provides an online editor itself.
With this editor, which you can find at http://threejs.org/editor/, you can create Three.js scenes using a graphical approach.
I mentioned that most modern web browsers support WebGL and can be used to run Three.js examples. I usually run my code in Chrome. The reason is that most often, Chrome has the best support and performance for WebGL and it has a really great JavaScript debugger. With this debugger, which is shown in the following screenshot, you can quickly pinpoint problems, for instance, using breakpoints and console output. This is exemplified in the following screenshot. Throughout this book, I'll give you pointers on debugger usage and other debugging tips and tricks.

That's enough for an introduction to Three.js for now; let's get the source code and start with the first scene.
All the code for this book can be accessed from GitHub (https://github.com/). GitHub is an online Git-based repository that you can use to store, access, and version source code. There are a couple of ways that you can get the sources for yourself:
Clone the Git repository
Download and extract the archive
In the following two paragraphs, we'll explore these options in a bit more detail.
Git is an open source distributed version control system that I used to create and version all the examples in this book. For this, I used GitHub, a free, online Git repository. You can browse this repository by https://github.com/josdirksen/learning-threejs.
To get all the examples, you can clone this repository using the
git command-line tool. To do this, you first need to download a Git client for your operating system. For most modern operating systems, a client can be downloaded from http://git-scm.com, or you can use the one provided by GitHub itself (for Mac and Windows). After installing Git, you can use this to get a clone of this book's repository. Open a command prompt and go to the directory where you want to download the sources. In that directory, run the following command:
# git clone https://github.com/josdirksen/learning-threejs
This will start downloading all the examples, as shown in the following screenshot:

The learning-three.js directory will now contain all the examples that are used throughout this book.
If you don't want to use Git to download the sources directly from GitHub, you can also download an archive. Open https://github.com/josdirksen/learning-threejs in a browser and click on the Download ZIP button on the right-hand side, as follows:

Extract this to a directory of your choice, and you'll have all the examples available.
Now that you've downloaded or cloned the source code, let's do a quick check to see whether everything is working and make you familiar with the directory structure. The code and examples are organized per chapter. There are two different ways of viewing examples. You can either open the extracted or cloned folder in a browser directly and look at and run a specific example, or you can install a local web server. This first approach will work for most of the basic examples, but when we start loading external resources, such as models or texture images, just opening the HTML file isn't enough. In this case, we need a local web server to make sure the external resources are loaded correctly. In the following section, we explain a couple of different ways you can set up a simple local web server for testing. If you can't set up a local web server but use Chrome or Firefox, we also provide an explanation on how to disable certain security features so that you can even test without a local web server.
Setting up a local web server is very easy depending on what you've already got installed. In here, we list a couple of examples on how to do this. There are many different ways to do this depending on what you've already got installed on your system.
Most Unix/Linux/Mac systems already have Python installed. On those systems, you can very easily start a local web server:
 > python -m SimpleHTTPServer
 Serving HTTP on 0.0.0.0 port 8000 ...
Do this in the directory where you checked out / downloaded the source code.
If you've already done some work with Node.js, there is good chance you've got npm installed. With npm, you have two simple options to set up a quick local web server for testing. The first options uses the http-server module, as follows:
 > npm install -g http-server
 > http-server
Starting up http-server, serving ./ on port: 8080
Hit CTRL-C to stop the server
Alternatively, you can also use the simple-http-server option, as follows:
> npm install -g simple-http-server
> nserver
simple-http-server Now Serving: /Users/jos/git/Physijs at http://localhost:8000/
A disadvantage of this second approach, however, is that it doesn't automatically show directory listings, whereas the first approach does.
If you haven't got Python or npm installed, there is a simple, portable web server, named Mongoose, that you can use. First, download the binaries for your specific platform from https://code.google.com/p/mongoose/downloads/list. If you are using Windows, copy it to the directory containing the examples and double-click on the executable to start a web browser serving the directory it is started in.
For other operating systems, you must also copy the executable to the target directory, but instead of double-clicking on the executable, you have to launch it from the command line. In both cases, a local web server will be started on port 8080. The following screenshot encapsulates the discussion in this paragraph:

By just clicking on a chapter, we can show and access all the examples for that specific chapter. If I discuss an example in this book, I'll refer to the specific name and folder so that you can directly test and play around with the code.
If you use Chrome to run the examples, there is a way to disable some security settings so that you can use Chrome to view the examples without requiring a web server. To do this, you have to start Chrome in the following way:
For Windows, you call the following:
chrome.exe --disable-web-securityOn Linux, do the following:
google-chrome --disable-web-securityAnd on Mac OS, you disable the settings by starting Chrome like this:
open -a Google\ Chrome --args --disable-web-security
When you start Chrome this way, you can access all the examples directly from the local filesystem.
For Firefox users, we need to take a couple of different steps. Open Firefox and, in the URL bar, type about:config. This is what you'll see:

On this screen, click on the I'll be careful, I promise! button. This will show you all the available properties you can use to fine-tune Firefox. In the search box on this screen, type in security.fileuri.strict_origin_policy and change its value to false just as we did in the following screenshot:

At this point, you can also use Firefox to directly run the examples provided in this book.
Now that you've either got a web server installed, or disabled the necessary security settings, it is time to start creating our first Three.js scene.
The first thing we need to do is create an empty skeleton page that we can use as the base for all our examples, as follows:
<!DOCTYPE html>

<html>

  <head>
    <title>Example 01.01 - Basic skeleton</title>
    <script src="../libs/three.js"></script>
    <style>
      body{
        /* set margin to 0 and overflow to hidden, to use the complete page */

        margin: 0;
        overflow: hidden;
      }
    </style>
  </head>
  <body>

    <!-- Div which will hold the Output -->
    <div id="WebGL-output">
    </div>

    <!-- Javascript code that runs our Three.js examples -->
    <script>

      // once everything is loaded, we run our Three.js stuff.
      function init() {
        // here we'll put the Three.js stuff
      };
      window.onload = init;

    </script>
  </body>
</html>
Tip
Downloading the example code
You can download the example code files from your account at http://www.packtpub.com for all the Packt Publishing books you have purchased. If you purchased this book elsewhere, you can visit http://www.packtpub.com/support and register to have the files e-mailed directly to you.
As you can see from this listing, the skeleton is a very simple HTML page, with only a couple of elements. In the <head> element, we load the external JavaScript libraries that we'll use for the examples. For all the examples, we'll at least need to load the Three.js library, three.js. In the <head> element, we also add a couple of lines of CSS. These style elements remove any scrollbars when we create a full-page Three.js scene. In the <body> element of this page, you can see a single <div> element. When we write our Three.js code, we'll point the output of the Three.js renderer to that element. At the bottom of this page, you can already see a bit of JavaScript. By assigning the init function to the window.onload property, we make sure that this function gets called when the HTML document has finished loading. In the init function, we'll insert all the Three.js specific JavaScript.
Three.js comes in two versions:
Three.min.js: This is the library you'd normally use when deploying Three.js sites on the Internet. This is a minified version of Three.js, created using UglifyJS, which is a quarter size of the normal Three.js library. All the examples and code used in this book are based on Three.js r69, which was released in October 2014.
Three.js: This is the normal Three.js library. We use this library in our examples since it makes debugging much easier when you can read and understand the Three.js source code.
If we view this page in our browser, the results aren't very shocking. As you'd expect, all you see is an empty page.
In the next section, you'll learn how to add the first couple of 3D objects and render those to the <div> element we defined in our HTML skeleton.
In this step, you'll create your first scene and add a couple of objects and a camera. Our first example will contain the following objects:
|
Object |
Description |
|---|---|
|
|
This is a two-dimensional rectangle that serves as our ground area. In the second screenshot of this chapter, this is rendered as the gray rectangle in the middle of the scene. |
|
|
This is a three-dimensional cube, which we'll render in red. |
|
|
This is a three-dimensional sphere, which we'll render in blue. |
|
|
The camera determines what you'll see in the output. |
|
|
These are the x, y, and z axes. This is a helpful debugging tool to see where the objects are rendered in 3D space. The x axis is colored red, the y axis is colored green, and the z axis is colored blue. |
I'll first show you how this looks in code (the source with comments can be found in chapter-01/02-first-scene.html), and then I'll explain what's happening:
function init() {
  var scene = new THREE.Scene();
  var camera = new THREE.PerspectiveCamera(45, window.innerWidth /window.innerHeight, 0.1, 1000);

  var renderer = new THREE.WebGLRenderer();
  renderer.setClearColorHex(0xEEEEEE);
  renderer.setSize(window.innerWidth, window.innerHeight);

  var axes = new THREE.AxisHelper(20);
  scene.add(axes);

  var planeGeometry = new THREE.PlaneGeometry(60, 20, 1, 1);
  var planeMaterial = new THREE.MeshBasicMaterial({color: 0xcccccc});
  var plane = new THREE.Mesh(planeGeometry, planeMaterial);

  plane.rotation.x = -0.5 * Math.PI;
  plane.position.x = 15
  plane.position.y = 0
  plane.position.z = 0

  scene.add(plane);

  var cubeGeometry = new THREE.BoxGeometry(4, 4, 4)
  var cubeMaterial = new THREE.MeshBasicMaterial({color: 0xff0000, wireframe: true});
  var cube = new THREE.Mesh(cubeGeometry, cubeMaterial);

  cube.position.x = -4;
  cube.position.y = 3;
  cube.position.z = 0;

  scene.add(cube);

  var sphereGeometry = new THREE.SphereGeometry(4, 20, 20);
  var sphereMaterial = new THREE.MeshBasicMaterial({color: 0x7777ff, wireframe: true});
  var sphere = new THREE.Mesh(sphereGeometry, sphereMaterial);

  sphere.position.x = 20;
  sphere.position.y = 4;
  sphere.position.z = 2;

  scene.add(sphere);

  camera.position.x = -30;
  camera.position.y = 40;
  camera.position.z = 30;
  camera.lookAt(scene.position);

  document.getElementById("WebGL-output")
    .appendChild(renderer.domElement);
    renderer.render(scene, camera);
};
window.onload = init;
If we open this example in the browser, we see something that resembles what we're aiming at (see the screenshot at the beginning of this chapter), but it is still a long way off, as follows:

Before we start making this more beautiful, I'll first walk you through the code a step at a time so that you understand what the code does:
var scene = new THREE.Scene();
var camera = new THREE.PerspectiveCamera(45, window.innerWidth / window.innerHeight, 0.1, 1000);
var renderer = new THREE.WebGLRenderer();
renderer.setClearColorHex()
renderer.setClearColor(new THREE.Color(0xEEEEEE));
renderer.setSize(window.innerWidth, window.innerHeight);
At the top of the example, we define scene, camera, and renderer. The scene object is a container that is used to store and keep track of all the objects we want to render and all the lights we want to use. Without a THREE.Scene object, Three.js isn't able to render anything. More information on the THREE.Scene object can be found in the next chapter. The sphere and the cube we want to render will be added to scene later on in the example. In this first fragment, we also create a camera object. The camera object defines what we'll see when we render a scene. In Chapter 2, Basic Components That Make Up a Three.js Scene, you learn more about the arguments you can pass in to the camera object. Next we define renderer. The renderer object is responsible for calculating what the scene object will look like in the browser based on the camera object's angle. We create WebGLRenderer that uses your graphics card to render the scene in this example.
Tip
If you look through the source code and the documentation of Three.js (which you can find at http://threejs.org/), you'll notice that there are different renderers available besides the WebGL-based one. There is a canvas-based renderer and even an SVG-based one. Even though they work and can render simple scenes, I wouldn't recommend using them. They're very CPU-intensive and lack features such as good material support and shadows.
Here, we set the background color of renderer to almost white (new THREE.Color(0XEEEEEE)) with the setClearColor function and tell renderer how large the scene needs to be rendered using the setSize function.
So far, we've got a basic empty scene, a renderer, and a camera. There is, however, nothing yet to render. The following code adds the helper axes and the plane:
  var axes = new THREE.AxisHelper( 20 );
  scene.add(axes);

  var planeGeometry = new THREE.PlaneGeometry(60,20);
  var planeMaterial = new THREE.MeshBasicMaterial({color: 0xcccccc});
  var plane = new THREE.Mesh(planeGeometry,planeMaterial);

  plane.rotation.x=-0.5*Math.PI;
  plane.position.x=15
  plane.position.y=0
  plane.position.z=0
  scene.add(plane);
As you can see, we create an axes object and use the scene.add function to add these axes to our scene. Next, we create the plane. This is done in two steps. First, we define what the plane looks like using the new THREE.PlaneGeometry(60,20) code. In this case, it has a width of 60 and a height of 20. We also need to tell Three.js what this plane looks like (for example, its color and its transparency). In Three.js, we do this by creating a material object. For this first example, we'll create a basic material (THREE.MeshBasicMaterial) with the color 0xcccccc. Next, we combine these two into a Mesh object with the name plane. Before we add plane to the scene, we need to put it in the correct position; we do this by first rotating it 90 degrees around the x axis, and next, we define its position in the scene using the position properties. If you're already interested in the details of this, look at the 06-mesh-properties.html example from the code folder of Chapter 2, Basic Components That Make Up a Three.js Scene, which shows and explains rotation and positioning. We then need to do is add plane to scene, just like we did with axes.
The cube and sphere objects are added in the same manner, but with the wireframe property set to true, which tells Three.js to render a wireframe and not a solid object. Now, let's move on to the final part of this example:
  camera.position.x = -30;
  camera.position.y = 40;
  camera.position.z = 30;
  camera.lookAt(scene.position);

  document.getElementById("WebGL-output")
    .appendChild(renderer.domElement);
    renderer.render(scene, camera);
At this point, all the elements we want to render are added to the scene at the correct positions. I've already mentioned that the camera defines what will be rendered. In this piece of code, we position the camera using the x, y, and z position attributes to hover above our scene. To make sure the camera is looking at our objects, we use the lookAt function to point it at the center of our scene, which is located at position (0, 0, 0) by default. All that is left to do is append the output from the renderer to the <div> element of our HTML skeleton. We use standard JavaScript to select the correct output element and append it to our div element with the appendChild function. Finally, we tell renderer to render scene using the camera object provided.
In the next couple of sections, we'll make this scene more pretty by adding lights, shadows, more materials, and even animations.
Adding new materials and lights in Three.js is very simple and is done in pretty much the same way as we explained in the previous section. We start by adding a light source to the scene (for the complete source look at 03-materials-light.html), as follows:
  var spotLight = new THREE.SpotLight( 0xffffff );
  spotLight.position.set( -40, 60, -10 );
  scene.add( spotLight );
THREE.SpotLight illuminates our scene from its position (spotLight.position.set( -40, 60, -10 )). If we render the scene this time, however, you won't see any difference from the previous one. The reason is that different materials respond differently to light. The basic material we used in the previous example (THREE.MeshBasicMaterial) doesn't do anything with the light sources in the scene. They just render the object in the specified color. So, we have to change the materials for plane, sphere, and cube to the following:
var planeGeometry = new THREE.PlaneGeometry(60,20);
var planeMaterial = new THREE.MeshLambertMaterial({color: 0xffffff});
var plane = new THREE.Mesh(planeGeometry, planeMaterial);
...
var cubeGeometry = new THREE.BoxGeometry(4,4,4);
var cubeMaterial = new THREE.MeshLambertMaterial({color: 0xff0000});
var cube = new THREE.Mesh(cubeGeometry, cubeMaterial);
...
var sphereGeometry = new THREE.SphereGeometry(4,20,20);
var sphereMaterial = new THREE.MeshLambertMaterial({color: 0x7777ff});
var sphere = new THREE.Mesh(sphereGeometry, sphereMaterial);
In this piece of code, we changed the materials for our objects to MeshLambertMaterial. This material and MeshPhongMaterial are the materials Three.js provides that take light sources into account when rendered.
The result, shown in the following screenshot, however, still isn't what we're looking for:

We're getting there, and cube and sphere are looking a lot better. What is still missing, though, are the shadows.
Rendering shadows takes a lot of computing power, and for that reason, shadows are disabled by default in Three.js. Enabling them, though, is very easy. For shadows, we have to change the source in a couple of places, as follows:
renderer.setClearColor(new THREE.Color(0xEEEEEE, 1.0));
renderer.setSize(window.innerWidth, window.innerHeight);
renderer.shadowMapEnabled = true;
The first change we need to make is tell renderer that we want shadows. You do this by setting the shadowMapEnabled property to true. If you look at the result from this change, you won't notice anything different yet. That is because we need to explicitly define which objects cast shadows and which objects receive shadows. In our example, we want the sphere and the cube to cast shadows on the ground plane. You do this by setting the corresponding properties on those objects:
plane.receiveShadow = true;
...
cube.castShadow = true;
...
sphere.castShadow = true;
Now, there is just one more thing to do to get the shadows. We need to define which light sources in our scene will cause shadows. Not all the lights can cast shadows, and you'll learn more about that in the next chapter, but THREE.SpotLight, which we used in this example, can. We only need to set the correct property, as shown in the following line of code, and the shadows will finally be rendered:
spotLight.castShadow = true;
And with this, we get a scene complete with shadows from our light source, as follows:
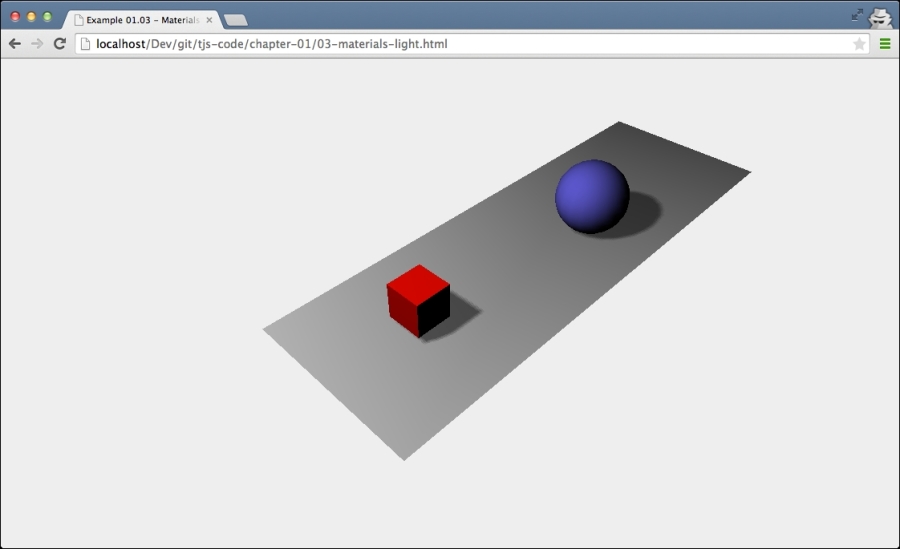
The last feature that we'll add to this first scene is some simple animation. In Chapter 9, Animations and Moving the Camera, you'll learn more advanced animation options.
If we want to animate the scene, the first thing that we need to do is find some way to re-render the scene at a specific interval. Before HTML5 and the related JavaScript APIs came along, the way to do this was using the setInterval(function,interval) function. With setInterval, we could specify a function that, for instance, would be called every 100 milliseconds. The problem with this function is that it doesn't take into account what is happening in the browser. If you were browsing another tab, this function would still be fired every couple of milliseconds. Besides that, setInterval isn't synchronized with the redrawing of the screen. This can lead to higher CPU usage and bad performance.
Modern browsers luckily have a solution for that with the requestAnimationFrame function. With requestAnimationFrame, you can specify a function that is called at an interval defined by the browser. You do any drawing you need to do in the supplied function, and the browser will make sure it is painted as smoothly and efficiently as possible. Using this is really simple (the complete source can be found in the 04-materials-light-animation.html file), you just create a function that handles the rendering:
function renderScene() {
  requestAnimationFrame(renderScene);
  renderer.render(scene, camera);
}
In this renderScene function, we call requestAnimationFrame again, to keep the animation going. The only thing we need to change in the code is that instead of calling renderer.render after we've created the complete scene, we call the renderScene function once to kick off the animation:
...
document.getElementById("WebGL-output")
  .appendChild(renderer.domElement);
renderScene();
If you run this, you won't see any changes yet compared to the previous example because we haven't animated anything yet. Before we add the animation, though, I want to introduce a small helper library that gives us information about the frame rate the animation is running at. This library, from the same author as Three.js, renders a small graph that shows us the frames per second we're getting for this animation.
To add these statistics, we first need to include the library in the <head> element of the HTML, as follows:
<script src="../libs/stats.js"></script>
And we add a <div> element that will be used as output for the statistics graph, as follows:
<div id="Stats-output"></div>
The only thing left to do is initialize the statistics and add them to this <div> element, as follows:
function initStats() {
  var stats = new Stats();
  stats.setMode(0);
  stats.domElement.style.position = 'absolute';
  stats.domElement.style.left = '0px';
  stats.domElement.style.top = '0px';
  document.getElementById("Stats-output")
    .appendChild( stats.domElement );
     return stats;
}
This function initializes the statistics. The interesting part is the setMode function. If we set it to 0, we'll measure frames per second (fps), and if we set this to 1, we can measure rendering time. For this example, we're interested in fps, so 0 it is. At the beginning of our init() function, we'll call this function, and we've got stats enabled, as follows:
function init(){

  var stats = initStats();
  ...
}
The only thing left to do is tell the stats object when we're in a new rendering cycle. We do this by adding a call to the stats.update function in our renderScene function, as follows.
function renderScene() {
  stats.update();
  ...
  requestAnimationFrame(renderScene);
  renderer.render(scene, camera);
}
If you run the code with these additions, you'll see the statistics in the upper-left corner, as shown in the following screenshot:

With requestAnimationFrame and the statistics configured, we've got a place to put our animation code. In this section, we'll expand the renderScene function with code that will rotate our red cube around all of its axes. Let's start by showing you the code:
function renderScene() {
  ...
  cube.rotation.x += 0.02;
  cube.rotation.y += 0.02;
  cube.rotation.z += 0.02;
  ...
  requestAnimationFrame(renderScene);
  renderer.render(scene, camera);
}
That looks simple, right? What we do is that we increase the rotation property of each of the axes with 0.02 every time the renderScene function is called, which shows up as a cube smoothly rotating around all if its axes. Bouncing the blue ball isn't much harder.
To bounce the ball, we once again add a couple of lines of code to our renderScene function, as follows:
  var step=0;
  function renderScene() {
    ...
    step+=0.04;
    sphere.position.x = 20+( 10*(Math.cos(step)));
    sphere.position.y = 2 +( 10*Math.abs(Math.sin(step)));
    ...
    requestAnimationFrame(renderScene);
    renderer.render(scene, camera);
  }
With the cube, we changed the rotation property; for the sphere, we're going to change its position property in the scene. We want the sphere to bounce from one point in the scene to another with a nice, smooth curve. This is shown in the following figure:

For this, we need to change its position on the x axis and its position on the y axis. The Math.cos and Math.sin functions help us in creating a smooth trajectory using the step variable. I won't go into the details of how this works here. For now, all you need to know is that step+=0.04 defines the speed of the bouncing sphere. In Chapter 8, Creating and Loading Advanced Meshes and Geometries, we'll look in much more detail how these functions can be used for animation, and I'll explain everything. Here's how the ball looks in the middle of a bounce:

Before wrapping up this chapter, I want to add one more element to our basic scene. When working with 3D scenes, animations, colors, and properties like that, it often requires a bit of experimenting to get the correct color or speed. It would be very easy if you could just have a simple GUI that allows you to change these kinds of properties on the fly. Luckily, there is!
A couple of employees from Google created a library called dat.GUI (you can find the documentation online at http://code.google.com/p/dat-gui/), which allows you to very easily create a simple user interface component that can change variables in your code. In this last part of this chapter, we'll use dat.GUI to add a user interface to our example that allows us to change the following:
Control the speed of the bouncing ball
Control the rotation of the cube
Just like we had to do for the statistics, we first add this library to the <head> element of our HTML page, as follows:
<script src="../libs/dat.gui.js"></script>
The next thing we need to configure is a JavaScript object that will hold the properties we want to change using dat.GUI. In the main part of our JavaScript code, we add the following JavaScript object, as follows:
var controls = new function() {
  this.rotationSpeed = 0.02;
  this.bouncingSpeed = 0.03;
}
In this JavaScript object, we define two properties—this.rotationSpeed and this.bouncingSpeed—and their default values. Next, we pass this object into a new dat.GUI object and define the range for these two properties, as follows:
var gui = new dat.GUI();
gui.add(controls, 'rotationSpeed', 0, 0.5);
gui.add(controls, 'bouncingSpeed', 0, 0.5);
The rotationSpeed and bouncingSpeed properties are both set to a range of 0 to 0.5. All we need to do now is make sure that in our renderScene loop, we reference these two properties directly so that when we make changes through the dat.GUI user interface, it immediately affects the rotation and bounce speed of our objects, as follows:
function renderScene() {
  ...
  cube.rotation.x += controls.rotationSpeed;
  cube.rotation.y += controls.rotationSpeed;
  cube.rotation.z += controls.rotationSpeed;
  step += controls.bouncingSpeed;
  sphere.position.x = 20 +(10 * (Math.cos(step)));
  sphere.position.y = 2 +(10 * Math.abs(Math.sin(step)));
  ...
}
Now, when you run this example (05-control-gui.html), you'll see a simple user interface that you can use to control the bouncing and rotation speeds. A screenshot of the bouncing ball and the rotating cube is shown here:

If you've looked at the examples in your browser, you might have noticed that when you change the size of your browser, the scene doesn't automatically scale. In the next section, we'll add this as a final feature for this chapter.
Changing the camera when the browser is resized can be done pretty simply. The first thing we need to do is register an event listener like this:
window.addEventListener('resize', onResize, false);Now, whenever the browser window is resized, the onResize function, which we'll specify next, is called. In this onResize function, we need to update the camera and renderer, as follows:
function onResize() {
  camera.aspect = window.innerWidth / window.innerHeight;
  camera.updateProjectionMatrix();
  renderer.setSize(window.innerWidth, window.innerHeight);
}
For the camera, we need to update the aspect property, which holds the aspect ratio of the screen, and for the renderer, we need to change its size. The final step is to move the variable definitions for camera, renderer, and scene outside of the init() function so that we can access them from different functions (like the onResize function), as follows:
var camera;
var scene;
var renderer;

function init() {
  ...
  scene = new THREE.Scene();
  camera = new THREE.PerspectiveCamera(45, window.innerWidth / window.innerHeight, 0.1, 1000);
  renderer = new THREE.WebGLRenderer();
  ...
}
To see this effect in action, open the 06-screen-size-change.html example and resize your browser window.
That's it for the first chapter. In this chapter, we showed you how to set up your development environment, how to get the code, and how to get started with the examples provided with this book. You further learned that to render a scene with Three.js, you first have to create a THREE.Scene object, add a camera, a light, and the objects that you want to render. We also showed you how you can expand this basic scene by adding shadows and animations. Lastly, we added a couple of helper libraries. We used dat.GUI, which allows you to quickly create control user interfaces, and we added stats.js, which provided feedback on the frame rate at which your scene is rendered.
In the next chapter, we'll expand on the example we created here. You'll learn more about the most important building blocks that you can use in Three.js.