Download code from GitHub
Quick Start with Java
Perhaps you've heard about Spring Boot? It's cultivated the most popular explosion in software development in years. Clocking millions of downloads per month, the community has exploded since its debut in 2013.
I hope you're ready for some fun, because we are going to take things to the next level as we use Spring Boot to build a social media platform. We'll explore its many valuable features, all the way from the tools designed to speed up development efforts to production-ready support as well as cloud-native features.
Despite some rapid fire demos you might have caught on YouTube, Spring Boot isn't just for quick demos. Built atop the de facto standard toolkit for Java, the Spring Framework, Spring Boot will help us build this social media platform with lightning speed and stability.
Also, this book will explore a new paradigm introduced in Spring Framework 5, reactive programming. In this day and age, as we build bigger systems, iterate faster, and host fleets of distributed microservices, it has become critical that we switch from a classic blocking programming style. As Josh Long would point out, this is nothing new. The network stacks of today's OSs are inherently asynchronous, but the JVM is not. Only in recent years have people realized the need to chop up tasks in a asynchronous, non-blocking fashion. However, the programming paradigm to handle potentially unlimited streams of data coming at fluctuating times requires a new programming model, which we will explore carefully alongside the power of Spring Boot itself.
In this chapter, we'll get a quick kick off with Spring Boot using the Java programming language. Maybe that makes you chuckle? People have been dissing Java for years as being slow, bulky, and not a good language for agile shops. In this chapter, we'll see how that is not the case.
In this chapter, we will cover the following topics:
- Creating a bare project using the Spring Initializr found at http://start.spring.io
- Exploring Spring Boot's management of third-party libraries
- Seeing how to run our app straight inside our Integrated Development Environment (IDE) with no standalone containers
- Using Spring Boot's property support to make external adjustments
- Packaging our app into a self-contained, runnable JAR file
- Deploying our app into the cloud
- Adding out-of-the-box production-grade support tools
Getting started
What is step one when we get underway with a project? We visit Stack Overflow and look for an example project to help us build our project!
Seriously, the amount of time spent adapting another project's build file, picking dependencies, and filling in other details adds up to a lot of wasted time.
No more.
At the Spring Initializr (https://start.spring.io), we can enter minimal details about our app, pick our favorite build system and the version of Spring Boot we wish to use, and then choose our dependencies off a menu. Click the Generate Project button, and we have a free-standing, ready-to-run application.
In this chapter, we'll take a quick test drive, and build a small web app. We can start by picking Gradle from the drop-down menu. Then select 2.0.0.M5 as the version of Spring Boot we wish to use.
Next, we need to pick our application's coordinates, as follows:
- Group - com.greglturnquist.learningspringboot
- Artifact - learning-spring-boot
Now comes the fun part. We pick the ingredients for our application, like picking off a delicious menu. If we start typing, say, Web, into the Dependencies box, we'll see several options appear. To see all the available options, click on the Switch to the full version link toward the bottom.
To build our social media platform, we need these few ingredients:
- Reactive Web (embedded Netty + Spring WebFlux)
- Reactive MongoDB (Spring Data MongoDB)
- Thymeleaf template engine
- Lombok (to simplify writing POJOs)
The following screenshot shows us picking these options:
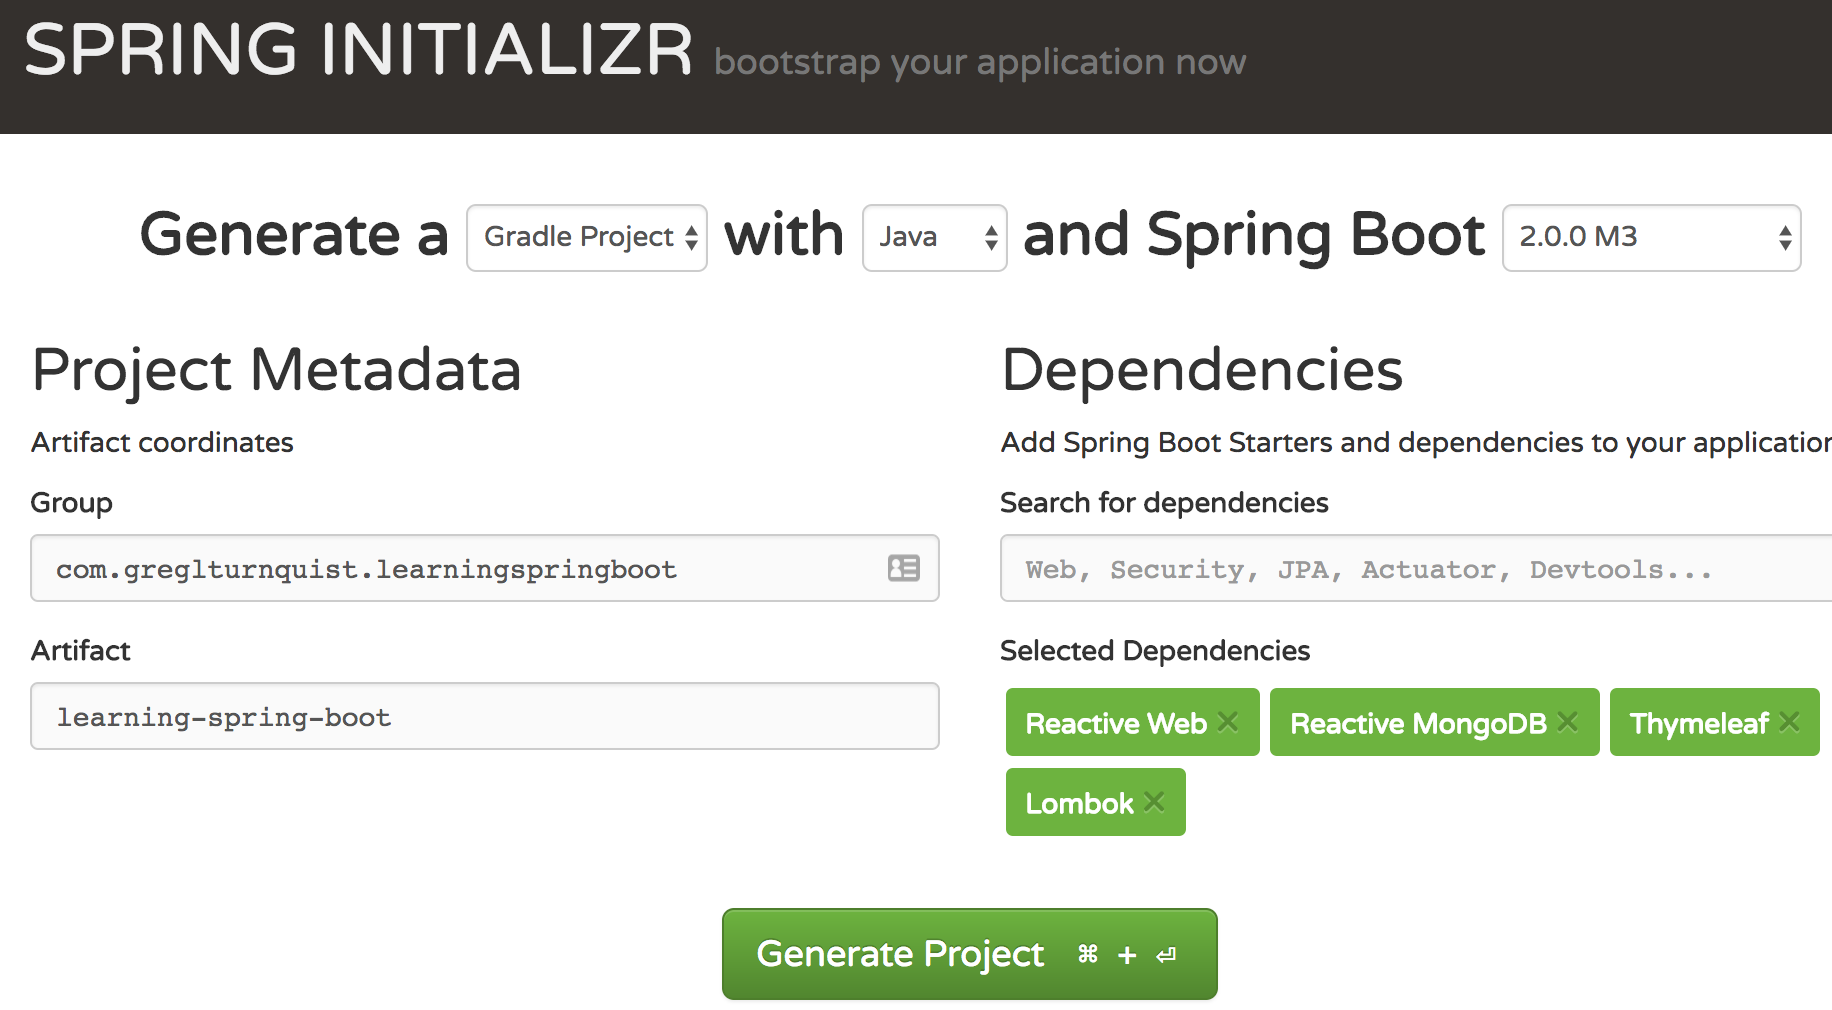
With these items selected, click on Generate Project.
Now, let's unpack that ZIP file, and see what we've got. You will find the following:
- A build.gradle build file
- A Gradle wrapper, so there's no need to install Gradle
- A LearningSpringBootApplication.java application class
- An application.properties file
- A LearningSpringBootApplicationTests.java test class
We built an empty Spring Boot project. Now what? Before we sink our teeth into writing code, let's take a peek at the build file. It's quite terse, but carries some key bits.
Let's take a look, starting from the top:
    buildscript {
      ext {
        springBootVersion = '2.0.0.M5'
      }
      repositories {
        mavenCentral()
        maven { url "https://repo.spring.io/snapshot" }
        maven { url "https://repo.spring.io/milestone" }
      }
      dependencies {
        classpath(
            "org.springframework.boot:spring-boot-gradle-
             plugin:${springBootVersion}")
      }
    }
This preceding build file contains the basis for our project:
- springBootVersion shows us we are using Spring Boot 2.0.0.M5
- The Maven repositories it will pull from are listed next (Maven central plus Spring's snapshot and milestone repositories)
- Finally, we see the spring-boot-gradle-plugin, a critical tool for any Spring Boot project
The first piece, the version of Spring Boot, is important. That's because Spring Boot comes with a curated list of 140 third-party library versions, extending well beyond the Spring portfolio and into some of the most commonly used libraries in the Java ecosystem. By simply changing the version of Spring Boot, we can upgrade all these libraries to newer versions known to work together. (See https://github.com/spring-projects/spring-boot/blob/master/spring-boot-project/spring-boot-dependencies/pom.xml for a complete list.)
The repositories aren't as critical, but it's important to add milestones and snapshots if fetching a library that hasn't been released to Maven central, or is hosted on some vendor's local repository. Thankfully, Spring Initializr does this for us based on the version of Spring Boot selected on the site.
Finally, we have spring-boot-gradle-plugin (and there is a corresponding spring-boot-maven-plugin for Maven users). This plugin is responsible for linking Spring Boot's curated list of versions with the libraries we select in the build file. That way, we don't have to specify the version number.
Additionally, this plugin hooks into the build phase and bundles our application into a runnable über JAR, also known as a shaded or fat JAR.
With an über JAR in hand, we only need put it on a thumb drive. We can carry it to another machine, to a hundred virtual machines in the cloud, our data center, or anywhere else. It runs anywhere we can find a JVM.
Peeking a little further down in build.gradle, we can see the plugins that are enabled by default:
    apply plugin: 'java'
    apply plugin: 'eclipse'
    apply plugin: 'org.springframework.boot'
    apply plugin: 'io.spring.dependency-management'
- The java plugin indicates the various tasks expected for a Java project
- The eclipse plugin helps generate project metadata for Eclipse users
- The org.springframework.boot plugin is where the actual spring-boot-gradle-plugin is activated
- The io.spring.dependency-management plugin supports Maven Bill of Materials (BOM) manifests, allowing usage of libraries that manage the sets of library versions in our Gradle build. (Because Maven supports this natively, there is no Maven equivalent plugin.)
This brings us to the final ingredient used to build our application--Dependencies.
Spring Boot starters
No application is complete without specifying dependencies. A valuable feature of Spring Boot is its virtual packages. These are published packages that don't contain any code, but simply list other dependencies instead.
The following code shows all the dependencies we selected on the Spring Initializr site:
    dependencies {
      compile('org.springframework.boot:spring-boot-starter-data-
       mongodb-reactive')
      compile('org.springframework.boot:spring-boot-starter-thymeleaf')
      compile('org.springframework.boot:spring-boot-starter-webflux')

      compile('org.projectlombok:lombok')
      compile('de.flapdoodle.embed:de.flapdoodle.embed.mongo')
      testCompile('org.springframework.boot:spring-boot-starter-test')
    }
You might have noticed that most of these packages are Spring Boot starters:
- spring-boot-starter-data-mongodb-reactive pulls in Spring Data MongoDB with the reactive bits enabled
- spring-boot-starter-thymeleaf pulls in the Thymeleaf template engine
- spring-boot-starter-webflux pulls in Spring WebFlux, Jackson JSON support, and embedded Netty
These starter packages allow us to quickly grab the bits we need to get up and running. Spring Boot starters have become so popular that many other third-party library developers are crafting their own.
In addition to starters, we have the following three extra libraries:
- Project Lombok (https://projectlombok.org) makes it dead simple to define POJOs without getting bogged down in getters, setters, and other details.
- Flapdoodle is an embedded MongoDB database that allows us to write tests, tinker with a solution, and get things moving before getting involved with an external database.
- spring-boot-starter-test pulls in Spring Boot Test, JSONPath, JUnit, AssertJ, Mockito, Hamcrest, JSONassert, and Spring Test, all within test scope.
The value of this last starter, spring-boot-starter-test, cannot be overstated. With a single line, the most powerful test utilities are at our fingertips, allowing us to write unit tests, slice tests, and full-blown our-app-inside-embedded-Netty tests. It's why this starter is included in all projects without checking a box on the Spring Initializr site.
Now, to get things off the ground, we need to shift focus to the tiny bit of code written for us by the Spring Initializr.
Running a Spring Boot application
The fabulous https://start.spring.io website created a tiny class, LearningSpringBootApplication, as shown here:
    package com.greglturnquist.learningspringboot;

    import org.springframework.boot.SpringApplication;
    import
     org.springframework.boot.autoconfigure.SpringBootApplication;

    @SpringBootApplication
    public class LearningSpringBootApplication {

      public static void main(String[] args) {
        SpringApplication.run(
          LearningSpringBootApplication.class, args);
      }
    }
This preceding tiny class is actually a fully operational web application!
- The @SpringBootApplication annotation tells Spring Boot, when launched, to scan recursively for Spring components inside this package and register them. It also tells Spring Boot to enable autoconfiguration, a process where beans are automatically created based on classpath settings, property settings, and other factors. We'll see more of this throughout the book. Finally, it indicates that this class itself can be a source for Spring bean definitions.
- It holds public static void main(), a simple method to run the application. There is no need to drop this code into an application server or servlet container. We can just run it straight up, inside our IDE. The amount of time saved by this feature, over the long haul, adds up fast.
- SpringApplication.run() points Spring Boot at the leap-off point--in this case, this very class. But it's possible to run other classes.
This little class is runnable. Right now! In fact, let's give it a shot:
      .   ____          _            __ _ _
    /\\ / ___'_ __ _ _(_)_ __  __ _ \ \ \ \
    ( ( )\___ | '_ | '_| | '_ \/ _` | \ \ \ \
    \\/  ___)| |_)| | | | | || (_| |  ) ) ) )
      '  |____| .__|_| |_|_| |_\__, | / / / /
    =========|_|==============|___/=/_/_/_/
    :: Spring Boot ::  (v2.0.0.M5)

    2017-08-02 15:34:22.374: Starting LearningSpringBootApplication
     on ret...
    2017-08-02 15:34:22.377: Running with Spring Boot
     v2.0.0.BUILD-SNAPSHO...
    2017-08-02 15:34:22.378: No active profile set, falling back
     to defaul...
    2017-08-02 15:34:22.433: Refreshing
     org.springframework.boot.web.react...
    2017-08-02 15:34:23.717: HV000184: ParameterMessageInterpolator
     has be...
    2017-08-02 15:34:23.815: HV000184: ParameterMessageInterpolator
     has be...
    2017-08-02 15:34:23.953: Cannot find template location:
     classpath:/tem...
    2017-08-02 15:34:24.094: Mapped URL path [/webjars/**] onto
     handler of...
    2017-08-02 15:34:24.094: Mapped URL path [/**] onto handler of
     type [c...
    2017-08-02 15:34:24.125: Looking for @ControllerAdvice:
     org.springfram...
    2017-08-02 15:34:24.501: note: noprealloc may hurt performance
     in many...
    2017-08-02 15:34:24.858: 2017-08-02T15:34:24.858-0500 I
     NETWORK  [init...
    2017-08-02 15:34:24.858: start
     de.flapdoodle.embed.mongo.config.Mongod...
    2017-08-02 15:34:24.908: Cluster created with settings
     {hosts=[localho...
    2017-08-02 15:34:24.908: Adding discovered server
     localhost:65485 to c...
    2017-08-02 15:34:25.007: 2017-08-02T15:34:25.006-0500 I
     NETWORK  [init...
    2017-08-02 15:34:25.038: Opened connection
     [connectionId{localValue:1,...
    2017-08-02 15:34:25.040: Monitor thread successfully
     connected to serv...
    2017-08-02 15:34:25.041: Discovered cluster type of STANDALONE
    2017-08-02 15:34:25.145: Cluster created with settings
     {hosts=[localho...
    2017-08-02 15:34:25.145: Adding discovered server
     localhost:65485 to c...
    2017-08-02 15:34:25.153: Opened connection
     [connectionId{localValue:2,...
    2017-08-02 15:34:25.153: Monitor thread successfully connected
     to serv...
    2017-08-02 15:34:25.153: Discovered cluster type of STANDALONE
    2017-08-02 15:34:25.486: Registering beans for JMX exposure
     on startup
    2017-08-02 15:34:25.556: Started HttpServer on
     /0:0:0:0:0:0:0:0:8080
    2017-08-02 15:34:25.558: Netty started on port(s): 8080
    2017-08-02 15:34:25.607: Started in 3.617 seconds (JVM
     running for 4.0...
Scrolling through the preceding output, we can see these several things:
- The banner at the top gives us a read-out of the version of Spring Boot. (By the way, you can create your own ASCII art banner by creating either banner.txt or banner.png and putting it in the src/main/resources/ folder.)
- Embedded Netty is initialized on port 8080, indicating that it's ready for web requests.
- It's slightly cut off, but there are signs that Flapdoodle, our embedded MongoDB data store, has come up.
- And the wonderful Started LearningSpringBootApplication in 3.617 seconds message can be seen too.
Spring Boot uses embedded Netty, so there's no need to install a container on our target machine. Non-web apps don't even require that. The JAR itself is the new container that allows us to stop thinking in terms of old-fashioned servlet containers. Instead, we think in terms of apps. All these factors add up to maximum flexibility in application deployment.
How does Spring Boot use embedded Netty among other things? As mentioned earlier, it has autoconfiguration, which means that it defines Spring beans based on different conditions. When Spring Boot sees Netty on the classpath, it creates an embedded Netty instance along with several beans to support it.
When it spots Spring WebFlux on the classpath, it creates view resolution engines, handler mappers, and a whole host of other beans needed to help us write a web application. This lets us focus writing routes, not doddling around configuring infrastructure.
With Flapdoodle on the classpath as well as the Reactive MongoDB drivers, it spins up an in-memory, embedded MongoDB data store and connects to it with its state-of-the-art drivers.
Spring Data MongoDB will cause Spring Boot to craft a MongoOperations bean along with everything else needed to start speaking Mongo Query Language and make it available if we ask for it, letting us focus on defining repositories.
At this stage, we have a running web application, albeit an empty one. There are no custom routes, and no means to handle data. But we can add some real fast.
Let's start by drafting a simple REST controller as follows:
    package com.greglturnquist.learningspringboot;

    import org.springframework.web.bind.annotation.GetMapping;
    import org.springframework.web.bind.annotation.RequestParam;
    import org.springframework.web.bind.annotation.RestController;

    @RestController
    public class HomeController {

      @GetMapping
      public String greeting(@RequestParam(required = false,
      defaultValue = "") String name) {
        return name.equals("") ? "Hey!" : "Hey, " + name + "!";
      }

    }
Let's examine this tiny REST controller in detail:
- The @RestController annotation indicates that we don't want to render views, but write the results straight into the response body instead.
- @GetMapping is Spring's shorthand annotation for @RequestMapping(method = RequestMethod.GET). In this case, it defaults the route to /.
- Our greeting() method has one argument--@RequestParam(required=false, defaultValue="") String name. It indicates that this value can be requested via an HTTP query (?name=Greg)--the query isn't required, and in case it's missing, it will supply an empty string.
- Finally, we return one of two messages depending on whether or not the name is an empty string, using Java's ternary operator.
If we relaunch LearningSpringBootApplication in our IDE, we'll see this new entry in the console:
    2017-08-02 15:40:00.741: Mapped "{[],methods=[GET]}" onto
     public java....
We can then ping our new route in the browser at http://localhost:8080 and http://localhost:8080?name=Greg. Try it out!
(By the way, it sure would be handy if the system could detect this change and relaunch automatically, right? Check out Chapter 5, Developer Tools for Spring Boot Apps to find out how.)
That's nice, but since we picked Spring Data MongoDB, how hard would it be to load some sample data and retrieve it from another route? (Spoiler alert--Not hard at all.)
We can start out by defining a simple Chapter entity to capture book details, as follows:
    package com.greglturnquist.learningspringboot;

    import lombok.Data;

    import org.springframework.data.annotation.Id;
    import org.springframework.data.mongodb.core.mapping.Document;

    @Data
    @Document
    public class Chapter {

      @Id
      private String id;
      private String name;

      public Chapter(String name) {
        this.name = name;
      }

    }
This preceding little POJO lets us look at the details about the chapter of a book as follows:
- The @Data annotation from Lombok generates getters, setters, a toString() method, an equals() method, a hashCode() method, and a constructor for all required (that is, final) fields
- The @Document annotation flags this class as suitable for storing in a MongoDB data store
- The id field is marked with Spring Data's @Id annotation, indicating this is the primary key of our Mongo document
- Spring Data MongoDB will, by default, create a collection named chapters with two fields, id and name
- Our field of interest is name, so let's create a constructor call to help insert some test data
To interact with this entity and its corresponding collection in MongoDB, we could dig in and start using the autoconfigured MongoOperations supplied by Spring Boot. But why do that when we can declare a repository-based solution?
To do this, we'll create an interface defining the operations we need. Check out this simple interface:
    package com.greglturnquist.learningspringboot;

    import org.springframework.data.repository
     .reactive.ReactiveCrudRepository;

    public interface ChapterRepository
     extends ReactiveCrudRepository<Chapter, String> {

    }
This last declarative interface creates a Spring Data repository as follows:
- ReactiveCrudRepository extends Repository, a Spring Data Commons marker interface that signals Spring Data to create a concrete implementation based on the reactive paradigm while also capturing domain information. It also comes with some predefined CRUD operations (save, delete, deleteById, deleteAll, findById, findAll, and more).
- It specifies the entity type (Chapter) and the type of the primary key (String).
- We could also add custom finders, but we'll save that for Chapter 3, Reactive Data Access with Spring Boot.
Spring Data MongoDB will automatically wire up a concrete implementation of this interface.
With Chapter and ChapterRepository defined, we can now preload the database, as shown in the following code:
    package com.greglturnquist.learningspringboot;

    import reactor.core.publisher.Flux;

    import org.springframework.boot.CommandLineRunner;
    import org.springframework.context.annotation.Bean;
    import org.springframework.context.annotation.Configuration;

    @Configuration
    public class LoadDatabase {

      @Bean
      CommandLineRunner init(ChapterRepository repository) {
        return args -> {
          Flux.just(
            new Chapter("Quick Start with Java"),
            new Chapter("Reactive Web with Spring Boot"),
            new Chapter("...and more!"))
            .flatMap(repository::save)
            .subscribe(System.out::println);
        };
      }

    }
This preceding class will be automatically scanned by Spring Boot and run in the following way:
- @Configuration marks this class as a source of beans.
- @Bean indicates that the return value of init() is a Spring Bean--in this case, a CommandLineRunner (utility class from Spring Boot).
- Spring Boot runs all CommandLineRunner beans after the entire application is up and running. This bean definition requests a copy of ChapterRepository.
- Using Java 8's ability to coerce the args → {} lambda function into CommandLineRunner, we are able to gather a set of Chapter data, save all of them and then print them out, preloading our data.
With all this in place, the only thing left is to write a REST controller to serve up the data!
    package com.greglturnquist.learningspringboot;

    import reactor.core.publisher.Flux;

    import org.springframework.web.bind.annotation.GetMapping;
    import org.springframework.web.bind.annotation.RestController;

    @RestController
    public class ChapterController {

      private final ChapterRepository repository;

      public ChapterController(ChapterRepository repository) {
        this.repository = repository;
      }

      @GetMapping("/chapters")
      public Flux<Chapter> listing() {
        return repository.findAll();
      }
    }
This preceding controller is able to serve up our data as follows:
- @RestController indicates that this is another REST controller.
- Constructor injection is used to automatically load it with a copy of ChapterRepository. With Spring, if there is only one constructor call, there is no need to include an @Autowired annotation.
- @GetMapping tells Spring that this is the place to route /chapters calls. In this case, it returns the results of the findAll() call found in ReactiveCrudRepository. Again, if you're curious what Flux<Chapter> is, we'll tackle that at the top of the next chapter. For now, think of it being like a Stream<Chapter>.
If we relaunch our application and visit http://localhost:8080/chapters, we can see our preloaded data served up as a nicely formatted JSON document, as seen in this screenshot:

This may not be very elaborate, but this small collection of classes has helped us quickly define a slice of functionality. And, if you'll notice, we spent zero effort configuring JSON converters, route handlers, embedded settings, or any other infrastructure.
Spring Boot is designed to let us focus on functional needs, not low-level plumbing.
Delving into Spring Boot's property support
We just got things off the ground with an operational application, but that isn't the only killer feature of Spring Boot.
Spring Boot comes with a fistful of prebuilt properties. In fact, just about every autoconfigured component has some property setting (http://docs.spring.io/spring-boot/docs/2.0.0.M5/reference/htmlsingle/#common-application-properties) allowing you to override just the parts you like.
Many of these autoconfigured beans will back off if Boot spots us creating our own. For example, when Spring Boot spots reactive MongoDB drivers on the classpath, it automatically creates a reactive MongoClient. However, if we define our own MongoClient bean, then Spring Boot will back off and accept ours.
This can lead to other components switching off. But sometimes, we don't need to swap out an entire bean. Instead, we may wish to merely tweak a single property of one of these autoconfigured beans.
Let's try to make some adjustments to src/main/resources/application.properties as follows:
    # Override the port Tomcat listens on
    server.port=9000

    # Customize log levels
    logging.level.com.greglturnquist=DEBUG
This preceding changes will cause Spring Boot to launch Netty on port 9000, as shown here:
2017-08-02 15:40:02.489: Netty started on port(s): 9000
It will also bump up the log level for package com.greglturnquist to DEBUG.
While it's handy to externalize configuration settings into property files, it wouldn't be a big advantage if they were only embeddable inside our app's JAR file.
That's why, Spring Boot comes with property override support. The following list shows all the locations from which we can override properties, the first being the highest priority:
- The @TestPropertySource annotation on test classes
- Command-line arguments
- The properties found inside SPRING_APPLICATION_JSON (inline JSON embedded in an env variable or system property)
- The ServletConfig init parameters
- The ServletContext init parameters
- The JNDI attributes from java:comp/env
- The Java System properties (System.getProperties())
- The OS environment variables
- A RandomValuePropertySource that only has properties in random.*
- Profile-specific properties outside the packaged JAR file (application-{profile}.properties and YAML variants)
- Profile-specific properties inside the packaged JAR file (application-{profile}.properties and YAML variants)
- Application properties outside the package JAR file (application.properties and YAML variants)
- Application properties inside the packaged JAR file (application.properties and YAML variants)
- The @PropertySource annotation on any @Configuration classes
- Default properties (specified using SpringApplication.setDefaultProperties)
For an example of the same overrides in YAML format as our application.properties file, we could put the following in application.yml in src/main/resources:
    server:
      port: 9000

    logging:
      level:
        com:
          greglturnquist: DEBUG
This would do the exact same thing that we already saw with application.properties. The only difference is the formatting.
What are the benefits of YAML over properties? If we need to override lots of settings, it avoids duplication of various keys.
Spring properties can also reference other properties, as shown in this fragment:
    app.name=MyApp
    app.description=${app.name} is a Spring Boot application
In this preceding example, the second property, app.description, references the first property, app.name.
This isn't the end of options with property overrides. It's just the beginning. Throughout this book, we'll expand on the options provided by Spring Boot's property support.
For now, let's focus on getting our app to production!
Bundling up the application as a runnable JAR file
We've hacked out a suitable application. Now it's time to take it to production. As Spring Developer Advocate Josh Long likes to say, production is the happiest place on earth.
The good ol' spring-boot-gradle-plugin has built-in hooks to handle that for us. By invoking Gradle's build task, it will insert itself into the build process, and create a JAR file.
$ ./gradlew clean build
:clean
:compileJava
:processResources
:classes
:findMainClass
:jar
:bootRepackage
:assemble
:compileTestJava
:processTestResources UP-TO-DATE
:testClasses
:test
... test output ...
:check
:build

BUILD SUCCESSFUL

Total time: 10.946 secs
If we peek at the output, we'll find the original JAR file (non-FAT) along with the rebundled one containing our application code as well as the third-party dependencies, as shown here:
$ ls build/libs
learning-spring-boot-0.0.1-SNAPSHOT.jar
learning-spring-boot-0.0.1-SNAPSHOT.jar.original
The über JAR is nicely loaded up with our custom code, all of our third-party dependencies, and a little Spring Boot code to allow us to run it. Why not try that out right here?
Let's type the following command:
$ java -jar build/libs/learning-spring-boot-0.0.1-SNAPSHOT.jar
We can expect the same output as before, which is as seen in this image:
      .   ____          _            __ _ _
    /\\ / ___'_ __ _ _(_)_ __  __ _ \ \ \ \
    ( ( )\___ | '_ | '_| | '_ \/ _` | \ \ \ \
    \\/  ___)| |_)| | | | | || (_| |  ) ) ) )
      '  |____| .__|_| |_|_| |_\__, | / / / /
    =========|_|==============|___/=/_/_/_/
    :: Spring Boot ::  (v2.0.0.M5)

    2017-09-19 20:41:20.036: Starting LearningSpringBootApplication
     on ret...
    ...
    ... the rest has been cut for space ...
By invoking the JAR using Java's -jar option, we can launch the application with nothing more than the JVM on our machine.
With our JAR file in hand, we can take our application anywhere. If we need to override any settings, we can do it without cracking it open and making alterations.
Suppose we alter our command slightly, like this:
$ SERVER_PORT=8000 java
 -jar build/libs/learning-spring-boot-0.0.1-SNAPSHOT.jar
We can now expect the results to be a little different, as seen in this image:
      .   ____          _            __ _ _
    /\\ / ___'_ __ _ _(_)_ __  __ _ \ \ \ \
    ( ( )\___ | '_ | '_| | '_ \/ _` | \ \ \ \
    \\/  ___)| |_)| | | | | || (_| |  ) ) ) )
      '  |____| .__|_| |_|_| |_\__, | / / / /
    =========|_|==============|___/=/_/_/_/
    :: Spring Boot ::  (v2.0.0.M5)

    ...
    2017-08-03 15:40:02.489: Netty started on port(s): 8000
    ...
From the command line, we override server.port using an alternative notation (SERVER_PORT) and run it on port 8000.
This lends us the ability to deploy it into the cloud.
Deploying to Cloud Foundry
Cloud-native applications are becoming the norm, as companies accelerate their rate of releasing to production (https://pivotal.io/cloud-native).
Many cloud platforms thrive under releasing self-contained applications. The open source Cloud Foundry platform, with its support for many technologies and runnable JAR files, is one of the most popular ones.
To get started, we need either a copy of Cloud Foundry installed in our data center, or an account at Pivotal Web Services (PWS), a Cloud Foundry hosting provider (https://run.pivotal.io/). Assuming we have a PWS account (pronounced p-dubs), let's install the tools and deploy our app.
On macOS X, we can type this:
$ brew tap cloudfoundry/tap
$ brew install cf-cli
=> Installing cf-cli from cloudfoundry/tap
==> Downloading
     https://cli.run.pivotal.io/stable?release=macosx64-bin...
==> Downloading from
     https://s3-us-west-1.amazonaws.com/cf-cli-release...
     ##################################################
     ####################...
==> Caveats
     Bash completion has been installed to:
     /usr/local/etc/bash_completion.d
==> Summary
     /usr/local/Cellar/cf-cli/6.32.0: 6 files, 16.7MB,
     built in 10 seco...
For Linux, we can fetch a tarball like this:
$ wget -O cf-linux.tgz "https://cli.run.pivotal.io/stable?
  release=linux64-binary&source=github"
$ tar xvfz cf-linux.tgz
$ chmod 755 ./cf
This preceding code will download and enable a Linux-based cf tool.
For more installation details, visit https://docs.run.pivotal.io/cf-cli/install-go-cli.html.
Using the cf tool, let's deploy our application. To kick things off, we need to log into PWS, as follows:
$ cf login
API endpoint: https://api.run.pivotal.io

Email> gturnquist@pivotal.io

Password>
Authenticating...
OK

Select an org (or press enter to skip):

... your organizations will be listed here ...

Org> 2
Targeted org FrameworksAndRuntimes

Select a space (or press enter to skip):

... your spaces will be listed here ...

Space> 1
Targeted space development

API endpoint:   https://api.run.pivotal.io (API version: 2.62.0)
User:           gturnquist@pivotal.io
Org:            FrameworksAndRuntimes
Space:          development
We are logged in and targeting a logical space inside an organization.
Time to deploy! We can do so with the cf push command. At a minimum, we specify the name of our application and the artifact with the -p option (and use a different name than learning-spring-boot, since it's been taken by this book!):
$ cf push learning-spring-boot -p build/libs/learning-spring-boot-
  0.0.1-SNAPSHOT.jar
Creating app learning-spring-boot in org FrameworksAndRuntimes
/ space development as gturnquist@pivotal.io...
OK

Creating route learning-spring-boot.cfapps.io...
OK

Binding learning-spring-boot.cfapps.io to learning-spring-boot...
OK

Uploading learning-spring-boot...
...
...
Staging complete
Uploading droplet, build artifacts cache...
Uploading build artifacts cache...
Uploading droplet...
Uploaded build artifacts cache (108B)
Uploaded droplet (76.7M)
Uploading complete
Destroying container
Successfully destroyed container

0 of 1 instances running, 1 starting
0 of 1 instances running, 1 starting
0 of 1 instances running, 1 starting
1 of 1 instances running

App started

OK
...
...
requested state: started
instances: 1/1
usage: 1G x 1 instances
urls: learning-spring-boot.cfapps.io
last uploaded: Tue Sep 20 02:01:13 UTC 2017
stack: cflinuxfs2
buildpack: java-buildpack=v3.9-offline-
https://github.com/cloudfoundry/java-buildpack.git#b050954 java-main
open-jdk-like-jre=1.8.0_101 open-jdk-like-memory-
calculator=2.0.2_RELEASE spring-auto-reconfiguration=1.10.0_RELEASE

    state     since                    cpu      memory        disk
#0  running  2017-09-19 09:01:59 PM   243.7%   503.5M of 1G   158.1M of 1G

    details
We have pushed our JAR file to PWS, let the Java buildpack (automatically selected) register it with a URL, and start it up. Now, we can visit its registered URL at http://learning-spring-boot.cfapps.io:
$ curl http://learning-spring-boot.cfapps.io?name=Greg
  Hey, Greg!
We've taken our application to production.
The next step is to handle what are sometimes referred to as Day 2 situations. This is where we must now monitor and maintain our application, and Spring Boot is ready to provide us just what we need.
Adding production-ready support
We've created a Spring web app with minimal code and released it to production. This is the perfect time to introduce production-grade support features.
There are some questions that often arise in production, and these are as follows:
- What do we do when the system administrator wants to configure his or her monitoring software to ping our app to see if it's up?
- What happens when our manager wants to know the metrics of people hitting our app?
- What are we going to do when the ops center supervisor calls us at 2:00 a.m. and we have to figure out what went wrong?
The last feature we are going to introduce in this chapter is Spring Boot's Actuator module. This module provides some super slick Ops-oriented features that are incredibly valuable in a production environment.
We start by adding this dependency to our build.gradle as follows:
compile('org.springframework.boot:spring-boot-starter-actuator')
When you run this version of our app, the same business functionality is available that we saw earlier, but there are additional HTTP endpoints; these are listed in the following table:
|
Actuator Endpoint |
Description |
|
/application/autoconfig |
This reports what Spring Boot did and didn't autoconfigure, and why |
|
/appplication/beans |
This reports all the beans configured in the application context (including ours as well as the ones autoconfigured by Boot) |
|
/application/configprops |
This exposes all configuration properties |
|
/application/dump |
This creates thread dump report |
|
/application/env |
This reports on the current system environment |
|
/application/health |
This is a simple endpoint to check the life of the app |
|
/application/info |
This serves up custom content from the app |
|
/application/metrics |
This shows counters and gauges on web usage |
|
/application/mappings |
This gives us details about all Spring WebFlux routes |
|
/application/trace |
This shows the details about past requests |
Endpoints, by default, are disabled. We have to opt in. This is accomplished by setting endpoints.{endpoint}.enabled=true inside src/main/resources/application.properties, like this:
endpoints.health.enabled=true
This line added to application.properties mentions the endpoint, health, and enables it. If we restart the application, we can ping for its health, as shown in the next section.
Pinging our app for general health
Each of these endpoints can be visited using our browser or using other tools like curl:
$ curl localhost:9000/application/health
{
  "status": "UP",
  "details": {
    "mongo": {
      "status": "UP",
      "details": {
        "version": "3.2.2"
      }
    },
    "diskSpace": {
      "status": "UP",
      "details": {
        "total": 498937626624,
        "free": 66036432896,
        "threshold": 10485760
      }
    }
  }
}
This preceding health status gives us the following:
- An overall UP status
- The status of MongoDB
- The status of the diskspace
When other components are added, they may, optionally, add their own health checks.
This immediately solves our first need listed previously. We can inform the system administrator that he or she can write a management script to interrogate our app's health.
Be warned that each of these endpoints serve up a compact JSON document. Generally speaking, command-line curl probably isn't the best option. While it's convenient on *nix and Mac systems, the content is dense and hard to read. It's more practical to have the following:
- a JSON plugin installed in our browser (such as JSON Viewer at https://github.com/tulios/json-viewer)
- a script that uses a JSON parsing library if we're writing a management script (such as Groovy's JsonSlurper at http://docs.groovy-lang.org/latest/html/gapi/groovy/json/JsonSlurper.html or JsonPath at https://code.google.com/p/json-path)
Metrics
To really get operational, we need metrics. Most production systems have metrics in one form or another. Thankfully, we don't have to start from scratch. There is a metric endpoint in Spring Boot Actuator. If we add this following setting to application.properties:
endpoints.metrics.enabled=true
With this property setting, if we restart the application, we can get a quick read out on thing.
Assuming we have JSON Viewer installed, it's easy to surf to http://localhost:9000/application/metrics and get a listing on all sorts of metrics. We even have counters for every good/bad web hit, broken down on a per-page basis, as shown here:
    {
      "names": [
        "jvm.buffer.memory.used",
        "jvm.memory.used",
        "jvm.buffer.count",
        "logback.events",
        "process.uptime",
        "jvm.memory.committed",
        "jvm.buffer.total.capacity",
        "jvm.memory.max",
        "process.starttime",
        "http.server.requests"
      ]
    }
We can visit any one of these metrics by appending it's name to the metrics URL. For example, to view the http.server.requests, visit http://localhost:9000/application/metrics/http.server.requests:
    {
      "name": "http.server.requests",
      "measurements": [
        {
          "statistic": "TotalTime",
          "value": 3.53531643E8
        },
        {
          "statistic": "Count",
          "value": 57.0
        }
      ],
      "availableTags": [
        {
          "tag": "exception",
          "values": [
            "none",
            "none",
            "none",
            "none"
          ]
        },
        {
          "tag": "method",
          "values": [
            "GET",
            "GET",
            "GET",
            "GET"
          ]
        },
        {
          "tag": "uri",
          "values": [
            "/application/metrics/{requiredMetricName}",
            "/application/metrics/{requiredMetricName}",
            "/application/metrics",
            "/favicon.ico"
          ]
        },
        {
          "tag": "status",
          "values": [
            "200",
            "404",
            "200",
            "200"
          ]
        }
      ]
    }
This provides a basic framework of metrics to satisfy our manager's needs. It's important to understand that metrics gathered by Spring Boot Actuator aren't persistent across application restarts. To gather long-term data, we have to write them elsewhere (http://docs.spring.io/spring-boot/docs/2.0.0.M5/reference/htmlsingle/#production-ready-metrics).
Summary
In this chapter, we rapidly crafted a Spring Web application using the Spring stack on top of Netty with little configuration from our end. We plugged in Spring Boot's Actuator module, configuring it with metrics, health, and management features so that we can monitor it in production by merely adding two lines of extra code.
In the next chapter, we'll get underway building our social media platform using these scalable APIs built on top of Reactive Streams.