


Getting Started with Visual Workflow
This chapter starts with an overview of Visual Workflow (also called Flow) and its benefits, which take the discussion forward to the various business requirements where we can use Flow. We will discuss various business problems and how we can develop an application without using code to solve them. By the end of this chapter, you will have learned various ways to invoke a Flow and the fundamentals of Visual Workflow.
In the next few chapters, you will be briefed about various concepts related to Visual Workflow and learn numerous ways to create point-and-click solutions without using code. We will also see different ways to streamline our sales process and automate our business process using a Flow. In the last few chapters, we will go through how to automatically launch a Flow using Process Builder, how to create reusable processes using Process Builder, and how to enable Visual Workflows to work with Lightning Experience.
We will cover the following topics in this chapter:
- Business problems
- The benefits of Visual Workflow
- System requirements for using Visual Workflow
- An overview of the Visual Workflow life cycle
- An overview of the Cloud Flow Designer
- An overview of Visual Workflow building blocks
- The various ways to invoke a Flow
- Visual Workflow outcome behavior
Visual Workflow is a drag and drop interface that allows you to automate business processes by creating applications using clicks not code. Using Visual Workflow, we can create, update, edit, and delete records as well as send e-mail, submit records for approval, post to chatter, and take user input in Salesforce and then make those Flows available to the business users or systems. Visual Workflow can execute business processes, interact with the database, invoke Apex classes (an Apex class implements the Process.Plugin interface), and create a series of screens to take user input in order to collect and update data in Salesforce; Flows can also be built with no user interface to allow them to be run from automated processes.
Business problems
As a Salesforce administrator or developer, you may get business requirements from businesses to streamline the processes. Many of them are achievable using out-of-the-box (OOB) concepts, and for others, we have to use Apex or Visualforce pages. Visual Workflow gives us another method that will let us implement many business processes without needing custom coding. A few examples are discussed in the following sections.
Business use case 1
Sara Bareilles is working as a Vice President, Sales, in a company named Universal Containers. She wants to auto-close all the open opportunities with the Closed Lost stage, when an account out of business field (that is, custom field) is checked.
There are several ways to solve the business requirement; these are mentioned in the following sections.
Solution 1 - using an Apex trigger
Because this requirement means that many child records (opportunities) need to be updated when a parent record (Account) is edited, we can't achieve the preceding business requirement using the Workflow rule. The next possibility is to use an Apex trigger. Generally, a developer writes an Apex trigger on the Account object to update all the open opportunities when an account's custom field, out of business, gets updated to True. The following is the sample code:
trigger UpdateRelatedOpportunites on Account (after update) {
  for (Account AccountToUpdate : trigger.new)
    {
        If (AccountToUpdate.Out_Of_Business__c==True)
        {
        // Your logic;
        }
    }
}
In addition, you'll need a test class and then use a change set, Force.com IDE or Force.com Migration Tool, to deploy the trigger and test classes to production. This also means that any change to the business logic will require more development work.
Solution 2 - a combination of Visual Workflow and Process Builder
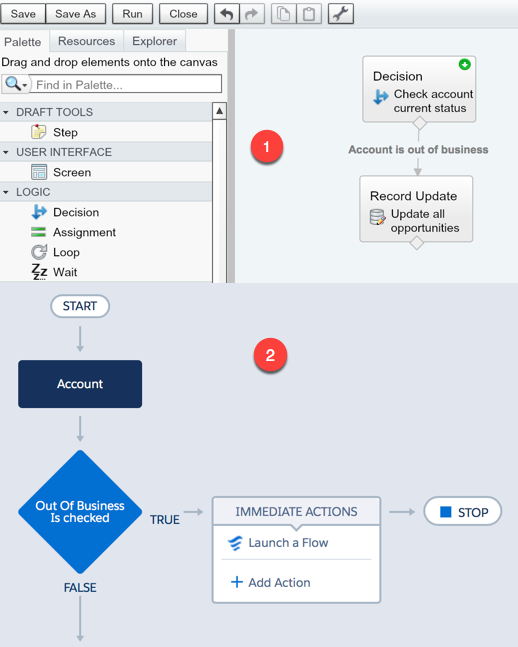
Another way to achieve the same business requirement is to use a combination of Visual Workflow and Process Builder. Here is the description of the next screenshot:
- Section highlighted as 1: In this, a sample Flow updates all the open Opportunity stages to Closed-Lost related to an account that is marked as out of business.
- Section highlighted as 2: This is the process on the Account object; it will always fire whenever an account record gets created or updated.
The following screenshot represents solutions for a similar business scenario by using Visual Workflow and Process Builder:
Process Builder is one of the ways to automate complex business requirements using click not code, similar to the Workflow rule and Visual Workflow. The benefit of using this approach is that you can easily follow the Salesforce best practice to create one process per object and use Visual Workflow to manage logic for multiple business requirements. We will discuss this in Chapter 5, Developing Applications with Process Builder, and Chapter 7, Building Applications without Code.
Solution 3- using Process Builder
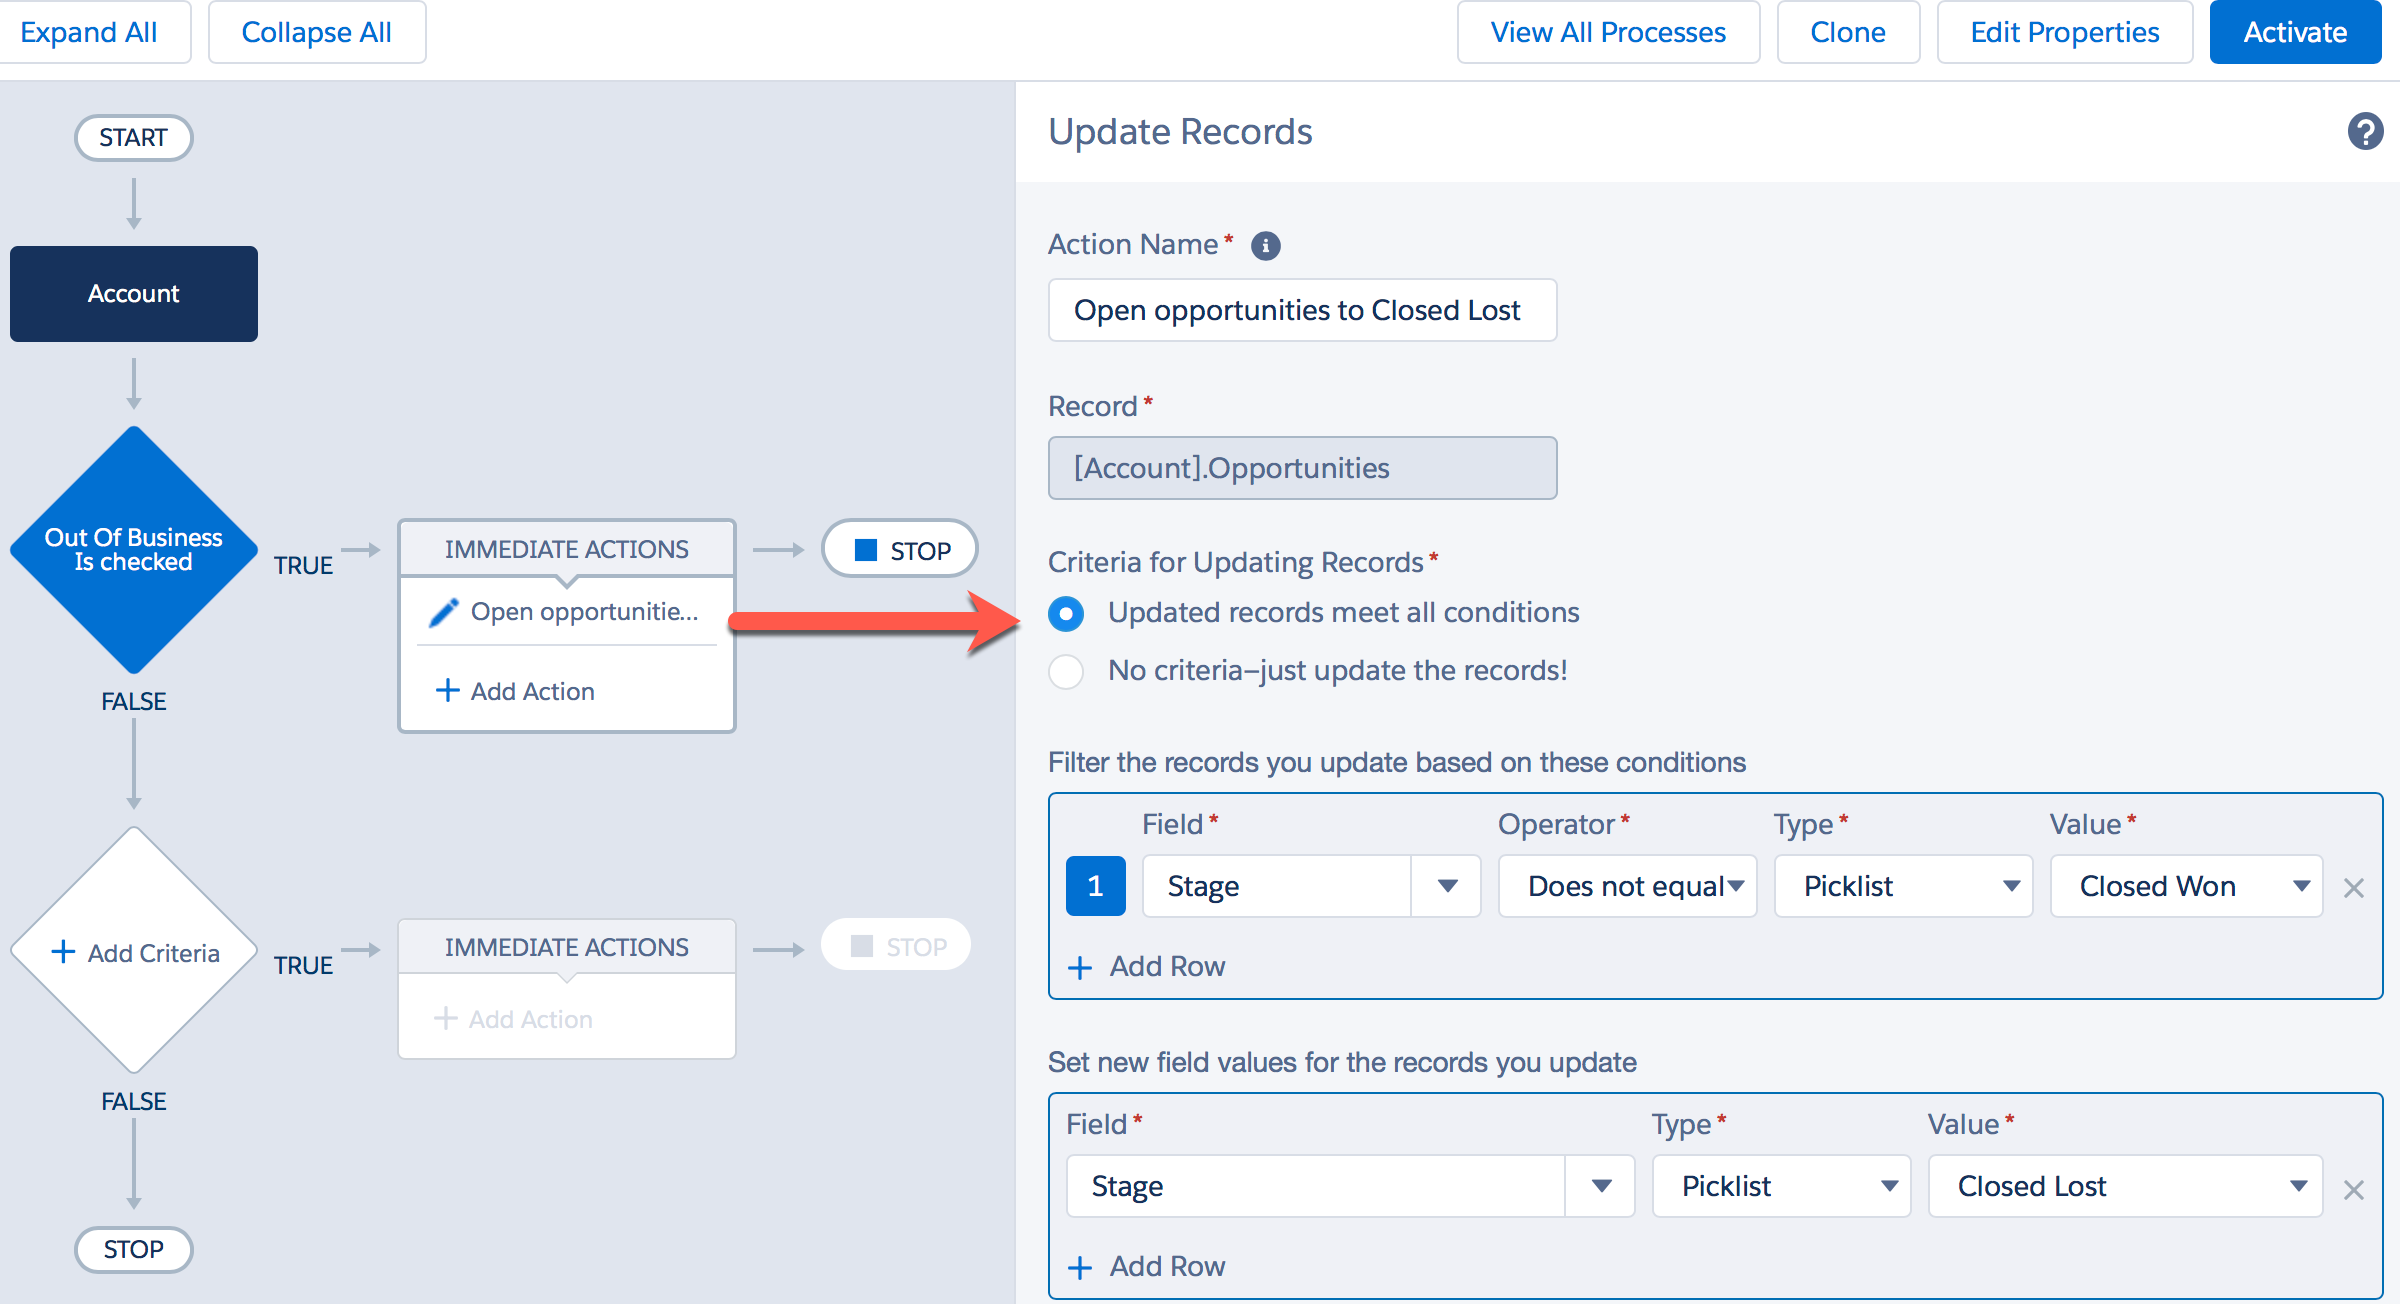
Another way to achieve the same business requirement is to use a process created on Process Builder. Here is the description of the next screenshot:
- A process on the Account object, which will fire when the out of business checkbox is checked
- Then the Update Records action will be fired, and it will update all the open Opportunity stages to the Closed-Lost stage related to an account which is marked as out of business
The following screenshot represents solutions for a similar business scenario using Process Builder:
Process Builder allows you to automate complex business processes using click not code.
Business use case 2
Robby Williams is working as a customer success manager in Universal Containers. He wants to send a reminder e-mail on a weekly basis to all the users who don't have a profile picture on Chatter.
Again, there are plenty of ways to solve this requirement. Some of the ways are as follows.
Solution 1 - using Apex
We can't achieve this goal by the Workflow rule. For this, we have to write an Apex class that implements the Schedulable interface for the class and then use Schedule Apex to run it on a regular basis. The following is the code for this Apex class:
global class SendChatterEmail implements Schedulable
{
    global SendChatterEmail (){
      // Batch Constructor
    }

    // Start Method
    global Database.QueryLocator start(){
      /* Use SOQL query to get the records you want to operate upon
      select Id, fullPhotoUrl from User where isactive = true AND FullPhotoUrl like '%photo/005%'*/
    }

    // Execute Logic
    global void execute(){
      // perform the operation

    }

    global void finish(){
      // Logic which we want to execute at finish
    }
}
Solution 2 - a combination of Visual Workflow and Process Builder
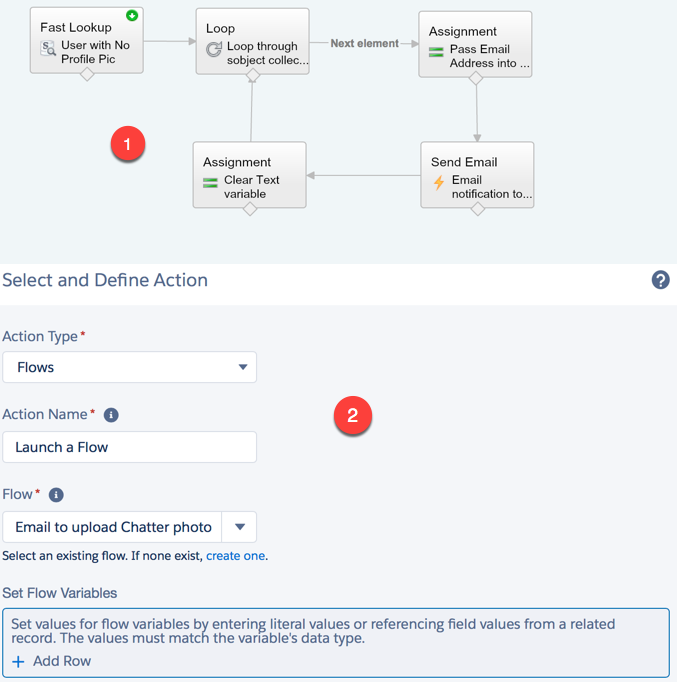
An alternative way to accomplish the same business requirement is to use a combination of Visual Workflow and Process Builder. Here is the description of the next screenshot:
- Section highlighted as 1: This represents a Flow to send e-mail alerts to all users who do not have profile pictures on Chatter
- Section highlighted as 2: This represents the Flows action from Process Builder on a custom object (reminder notification) to trigger our Flow
The following screenshot represents the solution for business scenario 2 using Visual Workflow and Process Builder:
The benefits of Visual Workflow
There are certain benefits of using Visual Workflow. They are as follows:
- It allows you to create an automated business process using clicks not code.
- Visual Workflow does not require coding, and even if you do not know Apex code, you can still develop business processes.
- Using screens, fields, and choices, you can implement complex business processes to make sure that your users are entering data in the right format.
- Through Visual Workflow, you can manipulate data for certain objects that are not available for the Workflow rule or Process Builder. For example, when a "contact role" is created or updated as primary for an opportunity, then create a new task.
- It allows you to auto submit records for approval.
- It allows you to apply assignment rules on leads or cases that are created by API calls.
- You can post messages on Chatter. For example, if the Opportunity status is changed to Closed-Won, post a message on the Chatter group.
- It allows you to embed the Flow into the Visualforce page, and you can expose it for unauthenticated access using the Force.com site.
- Once you embed your Flow into the Visualforce page, it allows you to use HTML, CSS, JavaScript, and other Visualforce components.
- It can be easily maintained by non-developers.
- Since it is not code, you don't need to write test classes.
- You can make changes directly to your production organization, just like other configuration changes.
- Every time unhandled processes fail or an error occurs in the Flow, the author will get an e-mail from Salesforce with the error details.
- Using the debug log, you can debug your Flow. Visual Workflow also has a built-in debugging tool. To open the debug window, press Ctrl + Shift + M (on PC) or command + shift + M (on Mac).
- It allows you to invoke the Apex class that implements the Process.Plugin interface.
System requirements for using Visual Workflow
Visual Workflow is available in Lightning Enterprise, Lightning Unlimited, and Developer Editions. You can access Flow on any platform. The requirements are as follows:
- Windows Internet Explorer versions 8 through 11 (6 and 7 are not supported), Google Chrome, or Mozilla Firefox.
- Adobe Flash Player Version 10.1 and later. The minimum version required to run the Cloud Flow Designer is 10.0.
- A minimum browser resolution of 1024 x 768.
An overview of the Visual Workflow lifecycle
The Cloud Flow Designer is a tool to create Flows, configure screens, and define business logic for your Flows without writing a single line of code. Visual Workflow has three different parts, which are as follows:
- Design: This allows you to create the Flows using the Flow Designer, which has a drag and drop user interface that allows you to draw the Flow structure and configure how it runs, without writing a single line of code.
- Administration: Once you have created a Flow, you can manage it, edit its properties, activate, deactivate, delete, save as a new version or new Flow, or run it as well.
- Runtime: A Flow user can run the active Flow from a custom button, link, Visualforce page, or directly from the Flow URL. If it is Autolaunch Flow, then systems can run active Flows through Process Builder or an Apex class.
An overview of the Cloud Flow Designer
The Cloud Flow Designer is a tool that allows you to implement business requirements by constructing Flows (without any code); this is a way to collect, update, edit, and create data in Salesforce. The Cloud Flow Designer user interface has different functional parts as shown in the following screenshot:

These functional parts are as follows:
- The button bar: You can use Save, Save As, Run, Run with Latest, Close, undo, and redo changes to run or view properties of your Flow buttons available in the button bar. The status indicator marked in the red rectangle on the right-hand side of the bar shows the status (Active or Inactive) of your Flow:
- Save: Use this option to save/quick save your Flow.
- Save As: If you want to clone the Flow you are working on or save as a new version, then use this option.
- Run: This runs the most recent version of the Flow you are working in. If the Flow comprises subflow elements, then each subflow refers to the active version of its referenced Flow. If the referenced Flow has no active version, then the subflow element runs the latest version of its referenced Flow.
- Run with Latest: This button will only appear if you are working in a Flow that contains a subflow element.
- Close: If you are working on a Flow and want to close it, then use this button. If Flow is not saved and you clicked on the Close button, then it will return to the Flow list page or else you will be redirected to the Flow detail page.
- Undo or Redo: Use these to undo or redo recent activities on the canvas.
- Flow Properties: Click on the screw driver
 icon to see information related to your Flow, such as Name, Unique Name, Description, its type (Autolaunched Flow or Flow), Interview Label, Version, and created and modified dates. Salesforce allows you to change Name, Description, and Interview Label of your Flow at any time, as shown in the following screenshot:
 The Interview label helps us differentiate between the interviews of the same Flow when an interview is paused.
- The Flow canvas: You can use this area to design your Flow. To edit any element in the main canvas, double-click on it.
- The zoom control: This is a slider that helps you to zoom in and out of the canvas so that you can focus on particular areas. This feature is also combined with the search options on the Explorer tab, so it will highlight results on the canvas tab:

- Palette: This is the area where you can find all the element types available for your Flow. You have to drag and drop elements from the palette onto the canvas to use it. To see the element description/properties in the Description panel (7), click on an element in the palette. Once you have created new elements, they will appear in the Explorer tab. The Palette tab also has a search field to quickly find what you need.
- Resources: The Resources tab allows you to create new resources for your Flow, for example, variables, formulas, and templates. Once you have created new resources, they will appear in the Explorer tab. To create new resources, double-click on it.
- Explorer: The Explorer tab contains all the elements and resources added to the Flow. Double-click on the items from the list to edit them and click to view their details and usage in the Description panel (7).
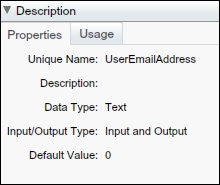
- Description: The Description panel shows the item's description when you view an item in the Palette or Resources tab. It has two subtabs, as follows:
- Properties: This shows the information, such as Unique Name, Description, Data Type, Input/Output Type, and Default Value for the element or resource you have selected:
- Usage: This lists the elements where the selected item is used:

In Chapter 2, Creating Flow through Point and Click, we will start using the elements, variables, and concepts that you learned here.
An overview of the building blocks of Visual Workflow
Flow has three major building blocks known as Element, Connector, and Resource. With the help of these blocks, you can easily develop Flows.

The Element block represents an action that Flow can use to display or collect information from the Flow user, create or update records, delete records, or loop logic. The Element block is used to manipulate the data. The Connector block is used to establish the path between the elements. A Resource block is used to hold the data that you can reference in your Flow.
Flow elements
Flow elements represent actions that Flow can execute such as Record Update, Record Lookup, Fast Lookup, Loop, Screen, and Decision. This is used to read, write, or delete data. Using the element (Screen), you can also display data and capture input from users. Use the Palette tab to drag and drop new elements onto your canvas. Once you add elements, it will be available on the canvas and Explorer tabs.
There are several types of elements available under the Palette tab. They are as follows:
| Flow element | Description |
| Step | You can use this as a placeholder while designing your Flow. Later, you can convert Step elements into Screen elements. |
| Screen | This will display a screen to the user who is running the Flow. The Screen element contains input or output fields. The Screen element is mainly used to take input from users or display guided information. |
| Decision | This is used to evaluate conditions to determine which Flow path to take. |
| Assignment | This is used to set or change values of variables, collection variables, SObject variables, and SObject collection variables. |
| Loop | This iterates through an SObject collection variable and assigns an item's value to an SObject variable. |
| Wait | If you want your Flow to wait for one or more defined events to occur, then use this element. |
| Record Create | This is used to create one record using the field values that you specify separately. You can assign these values from Flow resources such as variables, SObject variable, and the screen fields. |
| Record Update | This is used to update records using the field values that you specify separately. You can assign these values from Flow resources such as variables, SObject Variable, and the screen fields. |
| Record Lookup | This is used to extract one record that meets the filter criteria you specify, and then assign the record's field values to separate, individual Flow variables or individual fields on SObject variables. |
| Record Delete | This is used to delete records from Salesforce that meet the filter criteria you specify in your Flow. |
| Fast Create | This is used to create records using the fields' value from an SObject collection variable or to create one record using the field's value from an SObject variable. |
| Fast Update | This is used to update records using the field's value from an SObject collection variable or to update one record using the field's value from an SObject variable. |
| Fast Lookup | This is used to extract records to assign their field values to an SObject collection variable or query one record to assign its field values to an SObject variable. |
| Fast Delete | This is used to delete records using the ID value from an SObject collection variable or to delete one record by using the ID value from an SObject variable. |
| Apex Plug-in | This is used to call an Apex class that implements the Process.Plugin interface. If you used the tag property in the PluginDescribeResult class, the Apex class appears under a customized section. Otherwise, it appears under the APEX PLUG-INS section. |
| Subflow | This is used to invoke another Flow in the organization. |
| Quick action | This calls an object-specific or global action, such as NewTask and LogACall. |
| E-mail Alerts | This is used to send an e-mail using a Workflow e-mail alert to specify e-mail template and recipients. |
| Post to Chatter | Using this element, you can post a message to the feed for a specific record, user, or Chatter group. |
| Send Email | This is used to send an e-mail using Flow with the specific subject, body, and recipients. |
| Submit for Approval | This is used to auto submit one record for approval. |
From Chapter 2, Creating Flow through Point and Click, we will start using these elements.
Flow resources
Resources are used to hold the data that you can refer in your Flow. The Explorer tab displays the resources that you added to the Flow. To create new resources, double-click on this tab. Global constants and system variables are automatically provided by the system. There are several types of resources available under the Resource tab. They are as follows:
| Flow resource | Description |
| Variable | This is used to store a value that can be updated as the Flow is executed. It can be referenced throughout the Flow and can be used as the value of a field in a record. |
| Global variable | These are system-provided variables that can be referenced as resources, such as an organization ID ({!$Organization.Id}) or running user ID ({!$User.Id}). Visual Workflow global variables are only available in flow formulae. |
| Collection variable | This is used to store values with a single data type. You can use a collection variable as a container in the Flow to store and reference multiple values at once. |
| SObject Variable | This is used to store a record for a specified object. Use an SObject variable as a container in the Flow to store, update, and reference field values for a record. |
| SObject Collection Variable | This is used to store multiple records for a specified object. Use an SObject collection variable as a container in the Flow to store, update, and reference field values for multiple records. |
| Constant | This is used to store a fixed value. |
| Formula | This is used to calculate a value from other resources in the Flow. |
| Text templates | This is used to store formatted text with merge fields that refer to resources. |
| Choice | This represents an individual value that can be used in a variety of screen fields. |
| Dynamic record choice | This looks up data from an object's record and dynamically generates a set of choices for screen fields at runtime. When referenced as a resource, a dynamic choice value is determined by the most recent user selection of a choice within the generated set. For example, display all contacts from an account if a user entered a valid account ID. |
| Element | Any element that you add to the Flow is available as a resource with the visited operator in outcome criteria. An element is considered to be visited if the element has already been executed in the Flow interview. |
| Global constant | This is used to store fixed system-provided values, such as EmptyString, true, and false, that can be assigned as the values of Flow resources. |
| Outcome | For the Decision element you have added to the Flow, its outcomes are available as Boolean resources. If an outcome path has already been executed in the Flow interview, the resource's value is true. |
| Picklist values | These are system-provided values that are available as resources only in Assignment and Decision elements when selecting values for or to compare against picklist fields in SObject variables and SObject collection variables. |
| Picklist Choice | This is used to store picklist or multi-select picklist values, those are generated from standard or custom object picklist or multi-select picklist field. |
| Screen field | This is the field that you add to the Flow is available as a resource. |
| System variable | These are system-provided values that can be referenced as resources, such as {!$Flow.CurrentDate}, {!$Flow.CurrentDateTime}, and {!$Flow.FaultMessage}. |
| Wait element | Wait element events are always available as Boolean resources. If an event's waiting conditions are met, the resource's value is true. If the event has no waiting conditions set, the resource's value is always true. |
From Chapter 2, Creating Flow through Point and Click, we will start using these resources.
Flow connectors
A connector is used to establish the path between the Flow elements. A connector looks like an arrow that points from one element to another. There are several types of connectors available. They are as follows:
| Label | Sample | Description |
| Unlabeled |
 |
This is used to identify which element to execute next. |
| Decision outcome name |  |
This is used to identify which element to execute when the criteria of a decision outcome are met. |
| Wait event name |  |
This is used to identify which element to execute when an event that's defined in a wait element occurs. |
| Fault |  |
This is used to identify which element to execute if the previous element results in an error. |
| Next element |  |
This is used to identify the first element to execute for each iteration of a loop element. |
| End of loop |  |
This is used to identify which element to execute after a loop element finishes iterating through a collection. |
From Chapter 2, Creating Flow through Point and Click, we will start using these connectors.
The various ways to invoke a Flow
As soon as you are done with Flow development, the next task is to configure Flow access for business users, so they can use it. There are various ways through which you can invoke/launch your Flows. They are as follows:
- The Flow URL
- From another Flow (as a Subflow)
- A custom button or URL
- The web or Visualforce tab
- A combination of the Visualforce page and the Force.com site or customer portal and partner portal
- The Login Flow
- The Visualforce page
- Inline Visualforce page
- Salesforce1 navigation menu
- From a Chatter Action
- Embedding a Flow in Lightning Record page
- Embedding a Flow in Lightning App page
- Embedding a Flow in Lightning Home page
- Embedding a Flow in Lightning for Outlook
- Process Builder
- The Apex start() method
- Apex Trigger
- The Invocable Action resource in the Force.com REST API
Visual Workflow outcome behavior
Lightning Experience is a new generation productive user interface designed to help your sales team to close more deals and sell quicker and smarter. With the Spring’16 release, Salesforce announced the Lightning edition of Sales and Service cloud. Lightning editions are a completely reimagined packaging of Sales and Service Cloud to offer additional functionality to their customers and increased productivity with a relatively small increase in cost. It might be possible that you have enabled Lightning Experience in your organization or are planning to enable it in the near future.
We now have two different outcome screen for flow, as mentioned here:
- Salesforce classic outcome for Flows
- Lightning Runtime for Flows
Lightning runtime for Flows allows you to create two column flows and embed a Flow in a third-party application, such as Microsoft Outlook. In chapter 8, Enabling Flows to Work with Lightning Experience, you will be briefed about the differences between these two outcome screens. We will also discuss what modifications you have to do in order to use your existing flows in Lightning Experience.
Creating an Admin playground account
To get started with the topics in this book and practice them on your own, it is recommended you have access to a Salesforce Developer account. Using the Salesforce production instance is not essential for practicing. You can use the Salesforce Sandbox or Admin playground to practice the examples covered in this book.
If you currently do not have your own Admin playground, you can create a new Salesforce Admin playground. The Salesforce Admin playground is completely free and can be used to practice newly learned concepts, but you cannot use this for commercial purposes.
To create a Salesforce Admin playground, perform the following steps:
- Visit https://developer.salesforce.com/promotions/orgs/admin-playground.
- This will open a sign-up page for your free Admin playground account; it will display the following screen:

- Fill in the form and accept the master subscription agreement.
- Click on the Sign me up > button.
Once you register for the admin playground, Salesforce.com will send you the login details on the e-mail ID you provided during registration. By following the instructions in the e-mail, you will be ready to get started with Salesforce.
Logging in to Salesforce.com
Here, we will continue by logging in to Salesforce.com:
- If you are logging into the Salesforce production or admin playground, go to http://login.salesforce.com
- If you are logging into a Salesforce Sandbox instance, then go to http://test.salesforce.com
- Once the login screen loads, provide your username and password
- Salesforce may ask you to enter a verification code depending upon the organization's security and settings
- After verification, you will be allowed to access Salesforce; and the next time you log in, Salesforce will not ask for the verification code
A new admin playground will be launched in Lightning Experience; ensure that you switch back to Salesforce Classic using the switcher, as shown in the following screenshot:

In Salesforce Classic, navigate to the Flow canvas by navigating to Setup | Build | Create | Workflow & Approvals | Flows and clicking on the New Flow button.
Summary
In this chapter, we covered various concepts related to Visual Workflow. We started with the business scenario where you can use Visual Workflow and followed with the benefits of using Flow. We also covered the requirements for Visual Workflow. Then, we moved forward and discussed the life cycle of the Flow development and gave you an overview of Cloud Flow Designer. Finally, we discussed various ways through which you can invoke your Flow and get the idea of Flows Lightning Experience outcome behavior. We have also discussed how to create a free admin playground. In the next chapter, we will go through variables, element creation concepts, and we will also cover how to design your Flow.