


Welcome to the first chapter of this book where you will learn how to install ROS, the new standard software framework in robotics. With ROS, you will start to program and control your robots the easy way using tons of examples and source code that will show you how to use sensors and devices or add new functionalities to your robot, such as autonomous navigation and visual perception. Thanks to the open source motto and the community that is developing the state-of-the-art algorithms and providing new functionalities, ROS is growing every day.
In this book you will learn the following:
Installing the ROS framework on a version of Ubuntu
Learning the basic operation of ROS
Debugging and visualizing the data
Programming your robot using this framework
Creating a 3D model to use it in the simulator
Using the navigation stack to make your robot autonomous
In this chapter we are going to install a full version of ROS in Ubuntu. We will use Ubuntu because it is fully supported by and recommended for ROS. However, you can use a different operating system instead of Ubuntu, but in these operative systems, ROS is still experimental and could have some errors. So, for this reason, we recommend you to use Ubuntu while you follow the samples in this book.
Before starting with the installation, we are going to learn the origin of ROS and its history.
Robot Operating System (ROS) is a framework that is widely used in robotics. The philosophy is to make a piece of software that could work in other robots by making little changes in the code. What we get with this idea is to create functionalities that can be shared and used in other robots without much effort so that we do not reinvent the wheel.
ROS was originally developed in 2007 by the Stanford Artificial Intelligence Laboratory (SAIL) with the support of the Stanford AI Robot project. As of 2008, development continues primarily at Willow Garage, a robotics research institute, with more than 20 institutions collaborating within a federated development model.
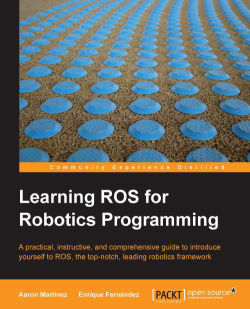
A lot of research institutions have started to develop projects in ROS by adding hardware and sharing their code samples. Also, the companies have started to adapt their products to be used in ROS. In the following image, you can see some fully supported platforms. Normally, these platforms are published with a lot of code, examples, and simulators to permit the developers to start their work easily.

The sensors and actuators used in robotics have also been adapted to be used with ROS. Every day an increasing number of devices are supported by this framework.
ROS provides standard operating system facilities such as hardware abstraction, low-level device control, implementation of commonly used functionalities, message passing between processes, and package management. It is based on graph architecture with a centralized topology where processing takes place in nodes that may receive or post, such as multiplex sensor, control, state, planning, actuator, and so on. The library is geared towards a Unix-like system (Ubuntu Linux is listed as supported while other variants such as Fedora and Mac OS X are considered experimental).
The *-ros-pkg package is a community repository for developing high-level libraries easily. Many of the capabilities frequently associated with ROS, such as the navigation library and the rviz visualizer, are developed in this repository. These libraries give a powerful set of tools to work with ROS easily, knowing what is happening every time. Of these, visualization, simulators, and debugging tools are the most important ones.

ROS is released under the terms of the
BSD (Berkeley Software Distribution) license and is an open source software. It is free for commercial and research use. The *-ros-pkg contributed packages are licensed under a variety of open source licenses.
ROS promotes code reutilization so that the robotics developers and scientists do not have to reinvent the wheel all the time. With ROS, you can do this and more. You can take the code from the repositories, improve it, and share it again.
ROS has released some versions, the latest one being Groovy. In this book, we are going to use Fuerte because it is a stable version, and some tutorials and examples used in this book don't work in the Groovy version.
Now we are going to show you how to install ROS Electric and Fuerte. Although in this book we use Fuerte, you may need to install the Electric version to use some code that works only in this version or you may need Electric because your robot doesn't have the latest version of Ubuntu.
As we said before, the operating system used in the book is Ubuntu and we are going to use it in all tutorials. If you are using another operating system and you want to follow the book, the best option is to install a virtual machine with an Ubuntu copy. Later, we will explain how to install a virtual machine in order to use ROS in it.
Anyway, if you want to try installing it in an operating system other than Ubuntu, you can find the required instructions in the following link: http://wiki.ros.org/fuerte/Installation.
There are a few methods available to install ROS. You can do it directly using repositories, the way we will do now, or you can use the code files and compile it. It is more secure to do it using repositories because you have the certainty that it will work.
In this section, you will see the steps to install ROS Electric on your computer. The installation process has been explained in detail in the official ROS page: http://wiki.ros.org/electric/Installation.
We assume that you know what an Ubuntu repository is and how to manage it. If you have any queries, check the following link to get more information: https://help.ubuntu.com/community/Repositories/Ubuntu.
Before starting with the installation, we need to configure our repositories. To do this, the repositories need to allow restricted, universal, and multiversal repositories. To check whether your version of Ubuntu accepts these repositories, click on Ubuntu Software Center in the menu on the left of your desktop.

Navigate to Edit | Software Sources and you will see the following window on your screen. Make sure that everything is selected as shown in the following screenshot:

Normally, these options are marked, so you will not have problems with this step.
In this step, you have to select your Ubuntu version. It is possible to install ROS Electric in various versions of the operating system. You can use any of them, but we recommend you to always use the most updated version to avoid problems:
A specific way to install the repositories for an Ubuntu-based distro such as Ubuntu Lucid Lynx (10.04) is as follows:
$ sudo sh -c 'echo "deb http://packages.ros.org/ros/ubuntu lucid main" > /etc/apt/sources.list.d/ros-latest.list'A generic way for installing any distro of Ubuntu relies on the
lsb_releasecommand that is supported on all Linux Debian-based distro:$ sudo sh -c 'echo "deb http://packages.ros.org/ros/ubuntu `lsb_release -cs` main" > /etc/apt/sources.list.d/ros-latest.list'
Once you have added the correct repository, your operating system knows where to download the programs that need to be installed on your system.
This step is to confirm that the origin of the code is correct, and nobody has modified the code or programs without the knowledge of the owner. Normally, when you add a new repository, you have to add the keys of that repository so that it is added to your system's trusted list:
$ wget http://packages.ros.org/ros.key -O - | sudo apt-key add –
We can now be sure that the code came from an authorized site.
Now we are ready to start the installation. Before we start, it would be better to update the software to avoid problems with libraries or the wrong software version. We do this with the following command:
$ sudo apt-get update
ROS is huge; sometimes you will install libraries and programs that you will never use. Normally, it has four different installations depending on the final use; for example, if you are an advanced user, you may only need basic installation for a robot without enough space in the hard disk. For this book, we recommend the use of full installation because it will install everything that's necessary to make the examples and tutorials work.
Don't worry if you don't know what you are installing right now, be it rviz, simulators, or navigation. You will learn everything in the upcoming chapters:
The easiest (and recommended if you have enough hard disk space) installation is known as desktop-full. It comes with ROS, the Rx tools, the rviz visualizer (for 3D), many generic robot libraries, the simulator in 2D (such as stage) and 3D (usually Gazebo), the navigation stack (to move, localize, do mapping, and control arms), and also perception libraries using vision, lasers or RGB-D cameras:
$ sudo apt-get install ros-electric-desktop-fullIf you do not have enough disk space, or you prefer to install only a few stacks, first install only the desktop installation file, which comes only with ROS, the Rx tools, rviz, and generic robot libraries. Later, you can install the rest of the stacks when you need them (using aptitude and looking for the
ros-electric-*stacks, for example):$ sudo apt-get install ros-electric-desktopIf you only want the bare bones, install ROS-base, which is usually recommended for the robot itself or computers without a screen or just a TTY. It will install the ROS package with the build and communication libraries and no GUI tools at all:
$ sudo apt-get install ros-electric-ros-baseFinally, along with whatever option you choose from this list, you can install individual/specific ROS stacks (for a given stack name):
$ sudo apt-get install ros-electric-STACK
Congratulations! You are in this step because you have an installed version of ROS on your system. To start using it, the system must know where the executable or binary files as well as other commands are. To do this, you need to execute the next script. If you install another ROS distro in addition to your existing version, you can work with both by calling the script of the one you need every time, since this script simply sets your environment. Here, we will use the one for ROS Electric, but just change electric to fuerte or groovy in the following command if you want to try other distros:
$ source /opt/ros/electric/setup.bash
If you type
roscore in the shell, you will see that something is starting. This is the best test to find out whether you have ROS and whether it is installed correctly.
Note that if you open another shell and type roscore or any other ROS command, it does not work. This is because it is necessary to execute the script again to configure the global variables and path for the location where ROS is installed.
It is very easy to solve this. You only need to add the script at the end of your .bashrc file and when you start a new shell, the script will execute and you will have the environment configured. Use the following command to do this:
$ echo "source /opt/ros/electric/setup.bash" >> ~/.bashrc
$ source ~/.bashrc
If it happens that you have more than a single ROS distribution installed on your system, your ~/.bashrc file must source only setup.bash of the version you are currently using. This is because the last call will override the environment set of the others, as we have mentioned previously, to have several distros living in the same system and switch among them.
In this section, we are going to install ROS Fuerte on our computer. You can have different versions installed on the same computer without problems; you only need to select the version that you want to use in the .bashrc file. You will see how to do this in this section.
If you want to see the official page where this process is explained, you can visit the following URL: http://wiki.ros.org/fuerte/Installation.
You can install ROS using two methods: using repositories and using source code. Normal users will only need to make an installation using repositories to get a functional installation of ROS. You can install ROS using the source code but this process is for advanced users and we don't recommend it.
First, you must check that your Ubuntu accepts restricted, universal, and multiversal repositories. Refer to the Installing ROS Electric – using repositories section if you want to see how to do it.
Normally, Ubuntu is configured to allow these repositories and you won't have problems with this step.
Now we are going to add the URLs from where we can download the code. Note that ROS Fuerte doesn't work for Maverick and Natty, so you must have Ubuntu 10.04, 11.10, or 12.04 on your computer.
For this book we have used Ubuntu 12.04 and it works fine. All the examples have been checked, compiled, and executed in this version of Ubuntu.
Open a new shell and type the following command, as we did before, which should work for any Ubuntu version you have:
$ sudo sh -c 'echo "deb http://packages.ros.org/ros/ubuntu `lsb_release -cs` main" > /etc/apt/sources.list.d/ros-latest.list'
It is important to add the key because with it we can be sure that we are downloading the code from the right place and nobody has modified it.
If you have followed the steps to install ROS Electric, you don't need to do this again as you have already completed this earlier; if not, add the repository using the following command:
$ wget http://packages.ros.org/ros.key -O - | sudo apt-key add –
We are ready to install ROS Fuerte at this point. Before doing something, it is necessary to update all the programs used by ROS. We do it to avoid incompatibility problems.
Type the following command in a shell and wait:
$ sudo apt-get update
Depending on whether you had the system updated or not, the command will take more or less time to finish.
ROS has a lot of parts and installing the full system can be heavy in robots without enough features. For this reason, you can install various versions depending on what you want to install.
For this book, we are going to install the full version. This version will install all the examples, stacks, and programs. This is a good option for us because in some chapters of this book, we will need to use tools, and if we don't install it now, we will have to do it later:
The easiest (and recommended if you have enough hard disk space) installation is known as desktop-full. It comes with ROS, the Rx tools, the rviz visualizer (for 3D), many generic robot libraries, the simulator in 2D (such as stage) and 3D (usually Gazebo), the navigation stack (to move, localize, do mapping, and control arms), and also perception libraries using vision, lasers, or RGB-D cameras:
$ sudo apt-get install ros-fuerte-desktop-fullIf you do not have enough disk space, or you prefer to install only a few stacks, first install only the desktop installation file, which comes only with ROS, the Rx tools, rviz, and generic robot libraries. Later, you can install the rest of the stacks when you need them (using aptitude and looking for the
ros-electric-*stacks, for example):$ sudo apt-get install ros-fuerte-desktopIf you only want the bare bones, install ROS-comm, which is usually recommended for the robot itself or computers without a screen or just a TTY. It will install the ROS package with the build and communication libraries and no GUI tools at all:
$ sudo apt-get install ros-fuerte-ros-commFinally, along with whatever option you choose from the list, you can install individual/specific ROS stacks (for a given stack name):
$ sudo apt-get install ros-fuerte-STACK
Do not worry if you are installing things that you do not know. In the upcoming chapters, you will learn about everything you are installing and how to use it.
When you gain experience with ROS, you can make basic installations in your robots using only the core of ROS, using less resources, and taking only what you need.
Tip
Downloading the example code
You can download the example code files for all Packt books you have purchased from your account at http://www.packtpub.com. If you purchased this book elsewhere, you can visit http://www.packtpub.com/support and register to have the files e-mailed directly to you. You can also download these code files from https://github.com/AaronMR/Learning_ROS_for_Robotics_Programming.
Now that you have installed ROS, to start using it, you must provide Ubuntu with the path where ROS is installed. Open a new shell and type the following command:
$ roscore
roscore: command not found
You will see this message because Ubuntu does not know where to search for the commands. To solve it, type the following command in a shell:
$ source /opt/ros/fuerte/setup.bash
Then, type the roscore command once again, and you will see the following output:
...
started roslaunch server http://localhost:45631/
ros_comm version 1.8.11

SUMMARY
========

PARAMETERS
* /rosdistro
* /rosversion

NODES

auto-starting new master
....
This means that Ubuntu knows where to find the commands to run ROS. Note that if you open another shell and type roscore, it will not work. This is because it is necessary to add this script within the .bashrc file. So, every time you start a new shell, the scripts will run because .bashrc always runs when a shell runs.
Use the following commands to add the script:
$ echo "source /opt/ros/fuerte/setup.bash" >> ~/.bashrc
$ source ~/.bashrc
As mentioned before, only source setup.bash for one ROS distribution. Imagine that you had Electric and Fuerte installed on your computer, and you are using Fuerte as the normal version. If you want to change the version used in a shell, you only have to type the following command:
$ source /opt/ros/electric/setup.bash
If you want to use another version on a permanent basis, you must change the .bashrc file and put the correct script for your version.
ROS has some tools that need to be installed after the principal installation. These tools will help us install dependencies between programs to compile, download, and install packages from ROS. These tools are rosinstall and rosdep. We recommend installing them because we will use them in the upcoming chapters. To install these tools, type the following command in a shell:
$ sudo apt-get install python-rosinstall python-rosdep
Now we have a full installation of ROS on our system. As you can see, only a few steps are necessary to do it.
It is possible to have two or more versions of ROS installed on our computer. Furthermore, you can install ROS on a virtual machine if you don't have Ubuntu installed on your computer.
In the next section, we will explain how to install a virtual machine and use a drive image with ROS. Perhaps this is the best way to get ROS for new users.
VirtualBox is a general-purpose, full virtualizer for x86 hardware, targeted at server, desktop, and embedded use. VirtualBox is free and supports all the major operating systems and pretty much every Linux flavor out there.
As we recommend the use of Ubuntu, you perhaps don't want to change the operating system of your computer. Tools such as VirtualBox exist for this purpose and help us virtualize a new operating system on our computer without making any changes to the original.
In the upcoming sections, we are going to show how to install VirtualBox and a new installation of Ubuntu. Further, with this virtual installation, you could have a clean installation to restart your development machine if you have any problem, or to save the development machine with all the setup files necessary for your robot.
The first step is to download the VirtualBox installation file. At the time of writing, the following links had the latest versions available:
Once installed, you need to download the image of Ubuntu. For this tutorial, we will use an Ubuntu copy with ROS Fuerte installed. You can download it from the following URL: http://nootrix.com/wp-content/uploads/2012/08/ROS.ova.
You can find different virtual machines with preinstalled Ubuntu and ROS, but we are going to use this version because it is referred by the official page of ROS.
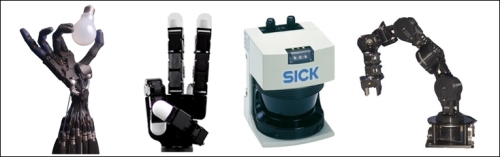
Creating a new virtual machine with the downloaded file is very easy; just follow the steps outlined in this section. Open VirtualBox and navigate to
File | Import Appliance.... Then, click on Open appliance and select the ROS.ova file downloaded before.
In the next window, you can configure the parameters for the new virtual machine. Keep the default configuration and only change the name of the virtual system. This name helps you distinguish this virtual machine from others. Our recommendation is to put a descriptive name; in our case, the book's name.

Click on the Import button and accept the software license agreement in the next window. Then, you will see a progress bar. It means that VirtualBox is copying the file with the virtual image and is creating a new copy with the new name.
Note that this process doesn't modify the original file ROS.ova, and you could create more virtual machines with different copies from the original file.
The process will take a few minutes depending on the speed of your computer. When it finishes, you can start your virtual machine by clicking on the Start button. Remember to select the right machine before starting it. In our case, we have only one machine but you could have more.

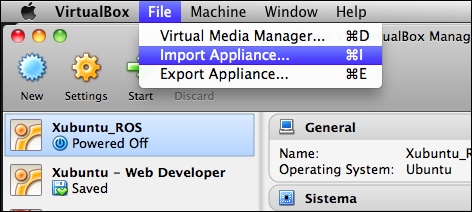
Sometimes you will get the error shown in the following screenshot. It is because your computer doesn't have the correct drivers to use USB 2.0. You can fix it by installing Oracle VM VirtualBox Extension Pack, but you can also disable the USB support to start using the virtual machine.

To disable USB support, right-click on the virtual machine and select Settings. In the toolbar, navigate to Ports | USB and uncheck Enable USB 2.0 (EHCI) Controller. You can now start the virtual machine again, and it should start without problems.
Once the virtual machine starts, you should see the ROS-installed Ubuntu 12.04 window on your screen as shown in the following screenshot:

When you have finished these steps, you will have a full copy of ROS Fuerte that can be used in this book. You can run all the examples and stacks that we are going to work with. Unfortunately, VirtualBox has problems while working with real hardware, and it's possible that you can't use this copy of ROS Fuerte for the steps outlined in Chapter 4, Using Sensors and Actuators with ROS.
In this chapter we have learned to install two different versions of ROS (Electric and Fuerte) in Ubuntu. With these steps, you have all the necessary software installed on your system to start working with ROS and the examples of this book. You can install ROS using the source code as well. This option is for advanced users, and we recommend that you use this repository only for installation; it is more common and normally it should not give errors or problems.
It is a good idea to play with ROS and the installation on a virtual machine. This way, if you have problems with the installation or with something, you can reinstall a new copy of your operating system and start again.
Normally, with virtual machines, you will not have access to real hardware, such as sensors and actuators. Anyway, you can use it for testing algorithms, for example.
In the next chapter, you will learn the architecture of ROS, some important concepts, and some tools to interact directly with ROS.